


Andy Repton
Mission Critical Engineer, Speaker at meetups and conferences, focusing on Cloud Native technologies
Omar Wit,
Mission Critical Engineer @ Schuberg Philis
@SethKarlo
arepton@schubergphilis.com
Andy Repton,
Mission Critical Engineer @ Schuberg Philis
owit@schubergphilis.com
@owit
# If on Linux/Mac:
$ cd docker-and-kubernetes-101/lab01/src

$ vim Dockerfile

# If on Windows:
$ Set-Location docker-and-kubernetes-101\lab01\src
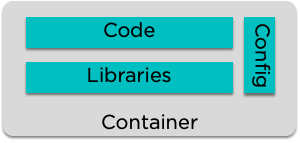
#use notepad to create the file named 'Dockerfile'# Base image from the default nginx image
FROM nginx:1.15-alpineInside the Dockerfile, we start with a FROM keyword. This allows us to pull in a preexisting container image and build on top of it
Here, we're going to start with the official nginx image (when the URL is not set Docker will default to the Docker Hub) and use the alpine tag of that image
# Docker format:

<repository>/<image>:<tag># Base image from the default Node 8 image
FROM nginx:1.15-alpine
# Set /usr/share/nginx/html as the directory where our site resides
WORKDIR /usr/share/nginx/htmlNext, we'll set the WORKDIR for the container. This will be the where docker will run the process from
Every new command in the Dockerfile will create a new layer. Any layers that already exist on the host will be reused rather than recreated. Docker keeps track of these using a hash
# Base image from the default nginx
FROM nginx:1.15-alpine

# Set /usr/share/nginx/html as the directory where our app resides
WORKDIR /usr/share/nginx/html

# Copy the source of the website to the container
COPY site .
And now we can COPY our Website into the container
You cannot COPY from above the directory you're currently in
# Base image from the default nginx
FROM nginx:1.15-alpine

# Set /usr/share/nginx/html as the directory where our app resides
WORKDIR /usr/share/nginx/html

# Copy /etc/passwd
COPY /etc/passwd /usr/share/nginx/html
For example, this won't work:
docker build .
Sending build context to Docker daemon  230.4kB
Step 1/2 : FROM nginx:1.15-alpine
 ---> df48b68da02a
Step 2/2 : COPY /etc/passwd /usr/share/nginx/html
COPY failed: stat /var/lib/docker/tmp/docker-builder918813293/etc/passwd: no such file or directory# Base image from the default nginx
FROM nginx:1.15-alpine
# Set /usr/share/nginx/html as the directory where our app resides
WORKDIR /usr/share/nginx/html
# Copy the source of the website to the container
COPY site .
#Exposing port 80
EXPOSE 80Next, we will EXPOSE the container on port 80, so we can reach the application
$ docker build . -t organisation/<image-name>:<tag>

organisation: sbpdemo
image name  : bkwi-yourname

Or:

$ docker tag <image-id> mysuperwebserver:v1
1. During build
2. Afterwards (re-tagging)
$ docker run --name my-website -d sbpdemo/bkwi-omar:latest...how do we view it?
$ docker run --name my-website -p 8080:80 -d sbpdemo/bkwi-omar:latestAnd now we can view it at http://localhost:8080
$ docker ps
docker ps
CONTAINER ID        IMAGE               COMMAND                  CREATED              STATUS              PORTS               NAMES
a1a144e99570        bkwi-omar:latest             "nginx -g 'daemon of…"   About a minute ago   Up About a minute   80/tcp              my-website
We can view our running containers with:
And stop it, before starting it again:
$ docker rm -f a1a144e99570

$ docker run --name my-website -p 8080:80 bkwi-omar:latest$ docker push sbpdemo/<my-image>:latest
$ docker login
Login with your Docker ID to push and pull images from Docker Hub.
Username: sbpdemo
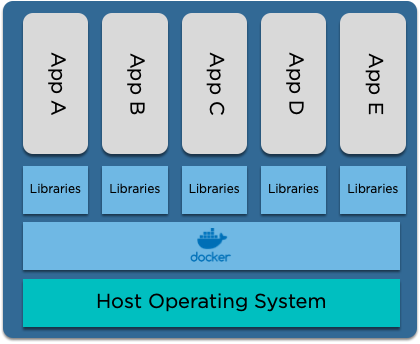
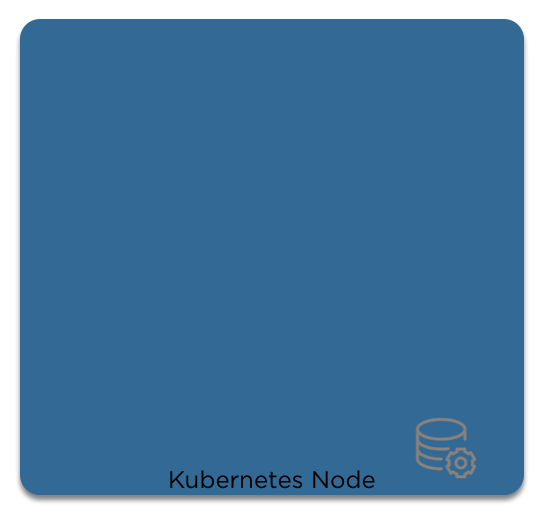
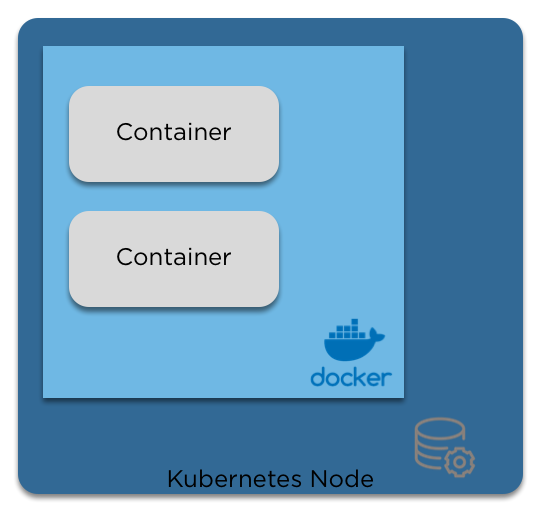
Password: *Pass*When we think of 'Bottom Up', we start with the node:
Then we add the container runtime
And then the containers
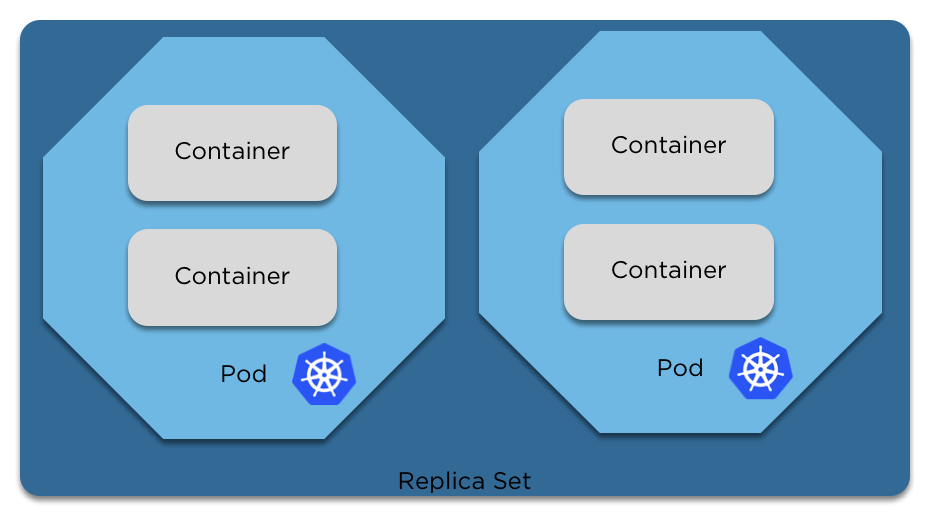
When we move from the 'physical' layer to kubernetes, the logical wrapper around containers is a pod
Pods support Health checks and liveness checks. We’ll go through those later
apiVersion: v1 # The APiVersion of Kubernetes to use
kind: Pod # What it is!
metadata:
  name: pod # The name
  namespace: default # The namespace (covered later)
spec:
  containers:
  - image: centos:7 # The image name, if the url/repo is not specified docker defaults to docker hub
    imagePullPolicy: IfNotPresent # When to pull a fresh copy of the image
    name: pod # The name again
    command: ["ping"] # What to run
args: ["-c", "4", "8.8.8.8"] # Args to pass to the containerEditing a replica set has no impact on running pods, only new ones
apiVersion: apps/v1 # New API here!
kind: ReplicaSet # What it is
metadata:
  name: replica-set # Name of the replica set, *not* the pod
  labels: # Used for a bunch of things, such as the service finding the pods (still to come)
    app: testing
    awesome: true # Because we are
spec:
  replicas: 2 # How many copies of the pod spec below we want
  selector:
    matchLabels: # Needs to be the same as below, this is how the replica set finds its pods
      awesome: true
  template: # This below is just pod spec! Everything valid there is valid here
    metadata:
      labels:
        awesome: true
    spec:
      containers:
      - name: pod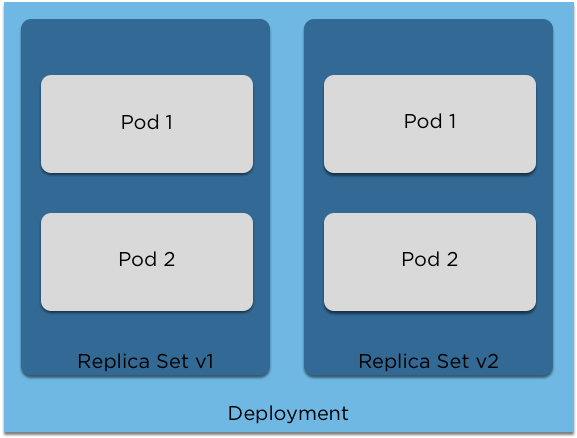
image: centos:7apiVersion: apps/v1 # There's that API again
kind: Deployment # Pretty self explanatory at this point
metadata:
name: pod-deployment
labels:
app: pod
awesome: true
spec: # Anyone recognise this? Yep, it's Replica Set Spec
replicas: 2
selector:
matchLabels:
app: pod
template:
metadata:
labels:
app: pod
spec: # Aaaaand yep, this is pod spec
containers:
- name: nginx
image: nginx:1.7.9
ports:
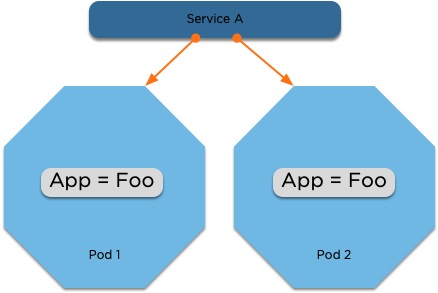
- containerPort: 80kind: Service
apiVersion: v1
metadata:
name: my-service
spec:
selector: # This needs to match the labels of your deployment and pods!
app: MyApp
ports:
- protocol: TCP
port: 80
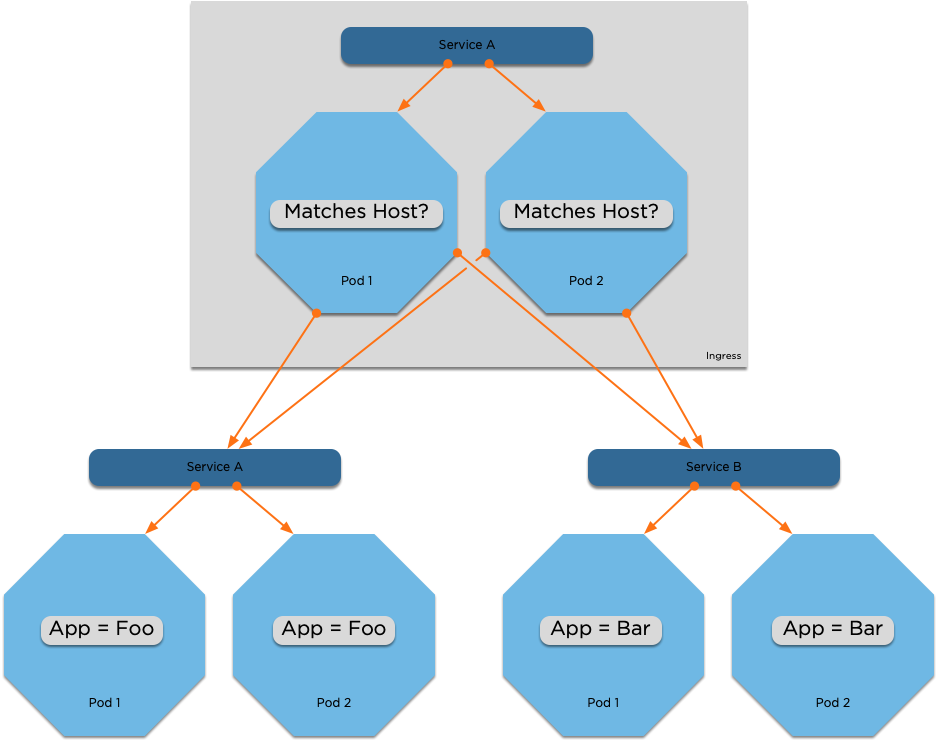
targetPort: 9376apiVersion: extensions/v1beta1
kind: Ingress
metadata:
name: simple-fanout-example
annotations:
nginx.ingress.kubernetes.io/rewrite-target: /
spec:
rules:
- host: foo.bar.com
http:
paths:
- path: /foo
backend:
serviceName: service1
servicePort: 4200
- path: /bar
backend:
serviceName: service2
servicePort: 8080apiVersion: v1
kind: Secret
metadata:
name: mysecret
type: Opaque
data:
username: YWRtaW4=
password: MWYyZDFlMmU2N2RmapiVersion: v1
data:
game.properties: |
enemies=aliens
lives=3
enemies.cheat=true
enemies.cheat.level=noGoodRotten
secret.code.passphrase=UUDDLRLRBABAS
secret.code.allowed=true
secret.code.lives=30
ui.properties: |
color.good=purple
color.bad=yellow
allow.textmode=true
how.nice.to.look=fairlyNice
kind: ConfigMap
metadata:
name: game-config
namespace: defaultapiVersion: apps/v1
kind: DaemonSet
metadata:
name: awesome-app
labels:
awesome: true
spec:
selector:
matchLabels:
name: awesome-app
template:
metadata:
labels:
awesome: true
spec: # Yep, Pod Spec again
containers:
- name: awesome-app
image: gcr.io/awesome-app:latest
volumes:
- name: varlog
hostPath:
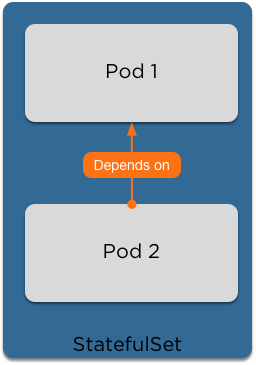
path: /var/logapiVersion: apps/v1
kind: StatefulSet
metadata:
name: web
spec:
selector:
matchLabels:
app: nginx # has to match .spec.template.metadata.labels
serviceName: "nginx"
replicas: 3 # by default is 1
template:
metadata:
labels:
app: nginx # has to match .spec.selector.matchLabels
spec:
terminationGracePeriodSeconds: 10
containers:
- name: nginx
image: k8s.gcr.io/nginx-slim:0.8
ports:
- containerPort: 80
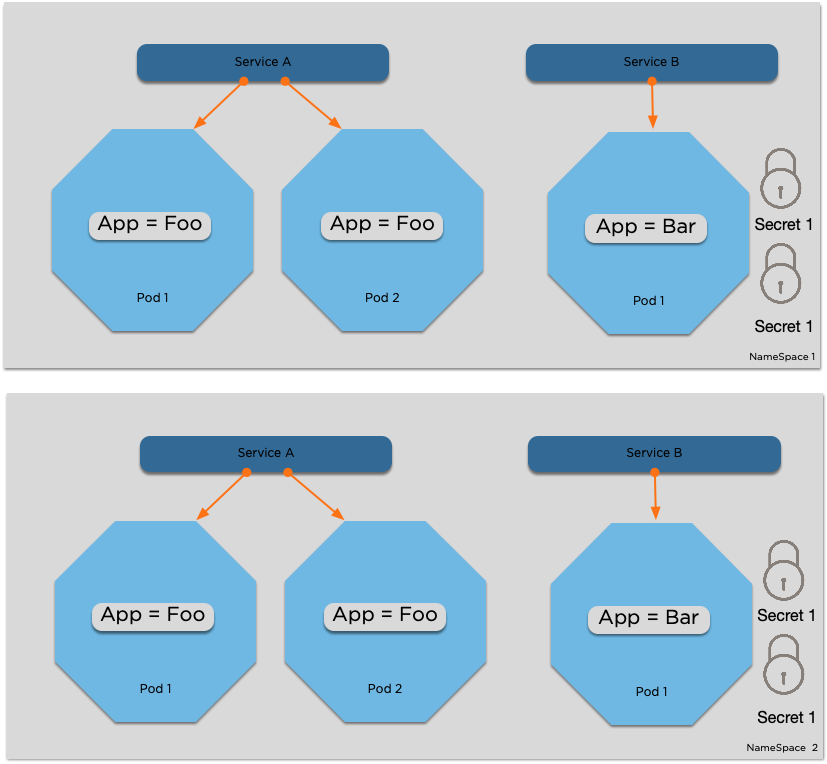
name: webapiVersion: v1
kind: Namespace
metadata:
name: defaultkubectl config set-cluster workshop --insecure-skip-tls-verify=true --server https://<replace>
kubectl config set-credentials bkwi-admin --username <username> --password <password>
kubectl config set-context workshop --cluster workshop --user <username>
kubectl config use-context workshop
kubectl get node$ kubectl run my-website --image eu.gcr.io/pur-owit-playground/bkwi:lab01$ kubectl port-forward my-website-<randomid> 9000:80What is it, why is it helpful and how does it work?
Now we can view it at http://localhost:9000
$ kubectl set image deployment my-website *=eu.gcr.io/pur-owit-playground/bkwi:lab02
$ # Escape the asterisk if you need to
$ kubectl set image deployment my-website \*=eu.gcr.io/pur-owit-playground/bkwi:lab02$ kubectl get pods
$ kubectl describe pod
$ kubectl logs <name-of-the-pod>$ kubectl apply -f https://raw.githubusercontent.com/kubernetes/dashboard/v1.10.1/src/deploy/recommended/kubernetes-dashboard.yaml
$ kubectl proxyThen click here:
http://localhost:8001/api/v1/namespaces/kube-system/services/https:kubernetes-dashboard:/proxy/
$ kubectl create namespace 101-k8sLet's look at 03.2/mysql-deployment.yml together.
Edit the MYSQL_ROOT_PASSWORD variable to be a password of your choice
We can deploy it using:
$ kubectl create -f 03.2/mysql-deployment.yml$ kubectl describe service wordpress-mysqlServices of type ClusterIP can be found inside the cluster by their name as a DNS record!
Let's look at 03.2/wordpress.yml together.
Edit the WORDPRESS_DB_PASSWORD to be what you set above.
We can deploy it using:
$ kubectl create -f 03.2/wordpress.ymlAs containers are usually immutable, a persistent volume allows us to persist that data across a restart
Let's look at 03.3/persistent-volume-yml together.
We can deploy it using:
$ kubectl create -f 03.3/persistent-volume.ymlLet's look at 03.3/wordpress.yml together (note, NOT 03.2!).
Edit the WORDPRESS_DB_PASSWORD to be what you set above.
We can deploy it using:
$ kubectl apply -f 03.3/wordpress.yml

$ kubectl apply -f 03.3/mysql-deployment.ymlWe can use the kubectl port-forward command we learned before to reach our websites
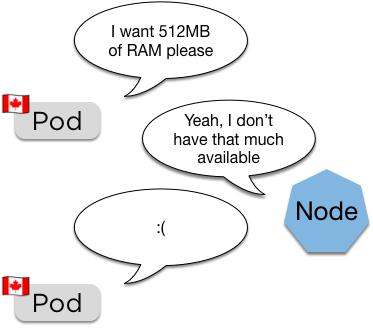
(Canadian pods are very polite)
spec:
  containers:
    resources:
      requests:
        memory: "64Mi"
cpu: "250m"Pod will remain pending until space becomes available (also how the cluster autoscaler works)
Let's look at 04.2/wordpress.yml together.
Edit the MYSQL_ROOT_PASSWORD variable to be a password of your choice
We can deploy it using:
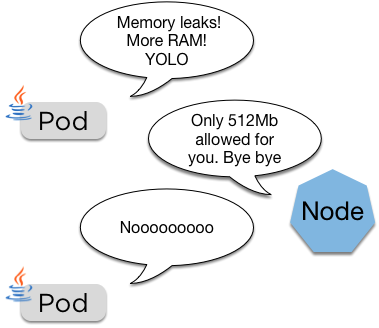
$ kubectl apply -f 04.2/wordpress.ymlspec:
containers:
resources:
limits:
memory: "128Mi"
cpu: "500m"If the pod goes over its limit it'll be restarted
Let's look at 04.3/wordpress.yml together.
Edit the MYSQL_ROOT_PASSWORD variable to be a password of your choice
We can deploy it using:
$ kubectl apply -f 04.3/wordpress.ymlapiVersion: v1
kind: ResourceQuota
metadata:
name: k8s-quota
spec:
hard:
requests.cpu: "2"
requests.memory: 2Gi
limits.cpu: "2"
limits.memory: 2GiDeveloper:
Cluster Admin:
Let's look at 04.4/quota.yml together.
We can deploy it using:
$ kubectl create -f 04.3/quota.yml$ kubectl -n 101-k8s create secret generic mysql-pass --from-literal=password=YOUR_PASSWORD
Let's look at the files in 04.5 together.
We can deploy it using:
$ kubectl apply -f 04.5/$ kubectl get svc wordpress
NAME CLUSTER-IP EXTERNAL-IP PORT(S) AGE
wordpress 100.70.168.153 <none> 80/TCP 3mLet's edit that and make it type 'LoadBalancer'
$ kubectl edit svc wordpress
service "wordpress" edited
$ kubectl get svc wordpress -o wide
NAME        CLUSTER-IP       EXTERNAL-IP                                                               PORT(S)        AGE       SELECTOR
wordpress   100.70.168.153   a252b84715a5a11e788170a75658e305-2028720367.eu-west-1.elb.amazonaws.com   80:30867/TCP   4m        app=wordpress,tier=frontend
At the moment our service is type 'ClusterIP'
Thanks to:
Omar Wit, for helping to build this deck
License:
You may reuse this, but must credit the original!
By Andy Repton
An introduction to containers and Kubernetes


