React
Week 3
Day 2

What is React?
- Developed by Facebook
- React is a view layer library, not a framework like Backbone, Angular etc.
"A JavaScript Library for Building User Interfaces" -- React
Why is it Compelling?
- Declarative & Composable
- Virtual DOM
- One-Way Data Flow
Declarative & Composable
$('form').on('submit', function(e) {
  e.preventDefault();
  $.ajax({
    url: '/customers',
    type: 'POST',
    data: $(this).serialize(),
    success: function(data) {
      $('.status')
        .append('<h3>' + data + '</h3>');
    }
  });
});
var NoteBox = React.createClass({
// ... more code ...
render: function() {
return <div className="NoteBox">
<h1>Notes</h1>
<NoteList data={this.state.data} />
<NoteForm onPost={this.handlePost} />
</div>;
}
});Declarative Code: What
Imperative Code: How
- React is an Abstraction away from the DOM
- It Simplifies the Mental Model
- Re-render the whole app on every update
- Mix and match components to build UIs
Virtual DOM
- Re-rendering the whole app on every update is not efficient
- The Virtual DOM will only update what is necessary
"I tend to think of React as Version Control for the DOM" —AdonisSMU
React Fundamentals
React has no ...
- Controllers
- directive
- templates
- global event listeners
- models
- no view models
Just
Components.

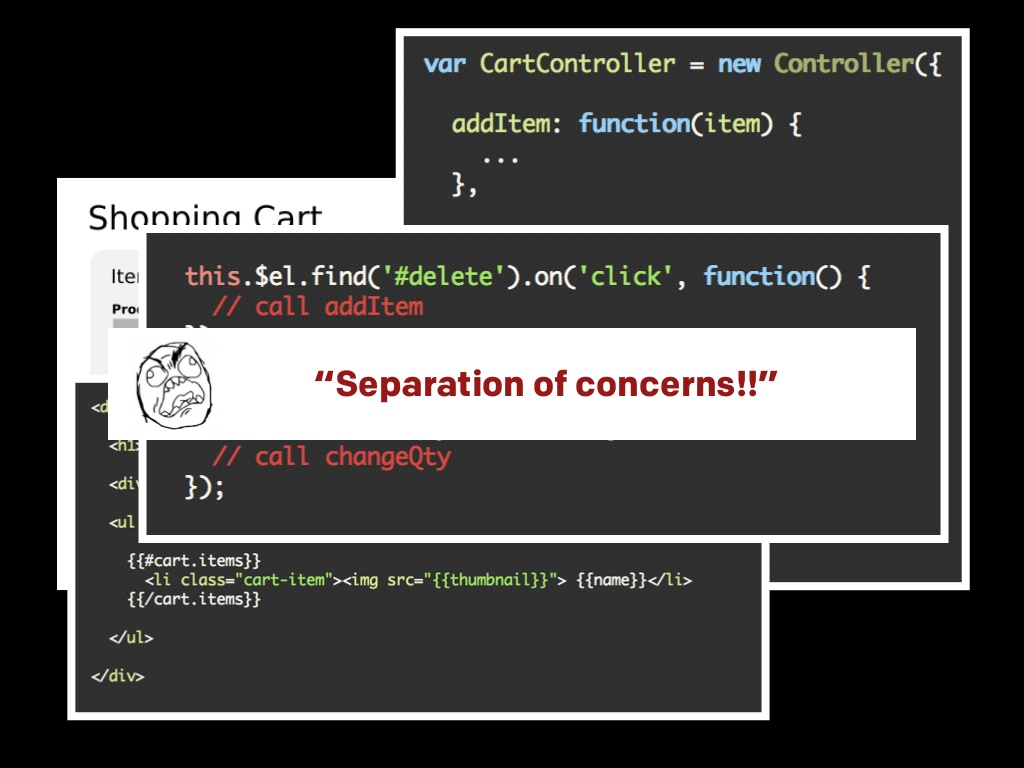

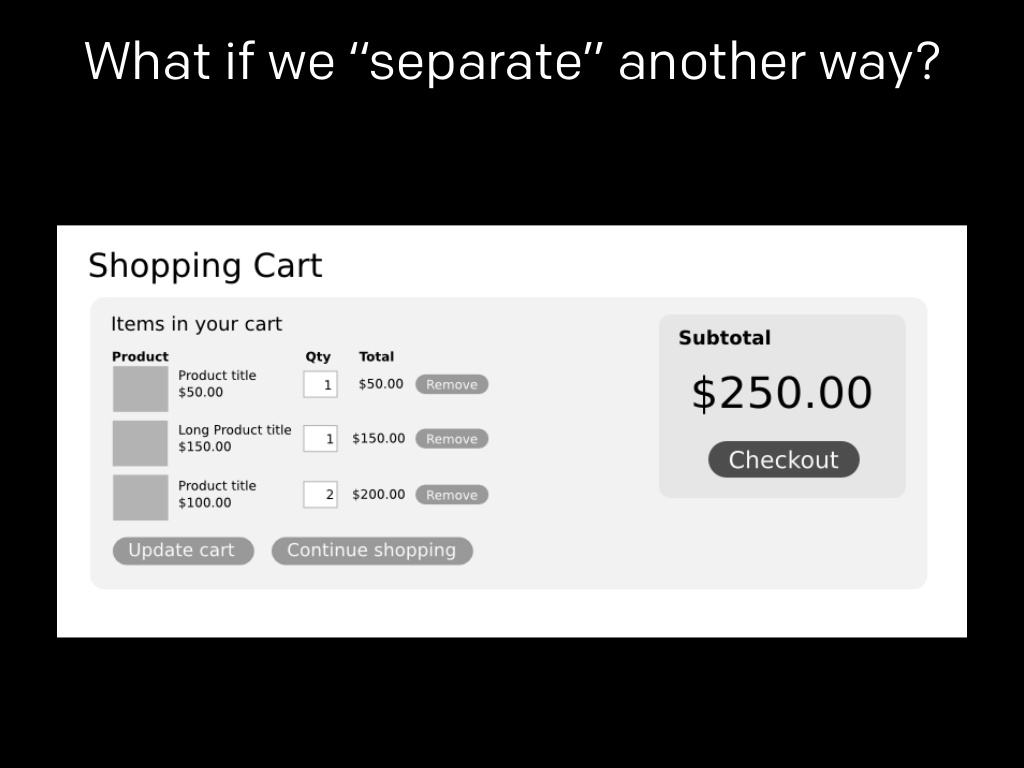
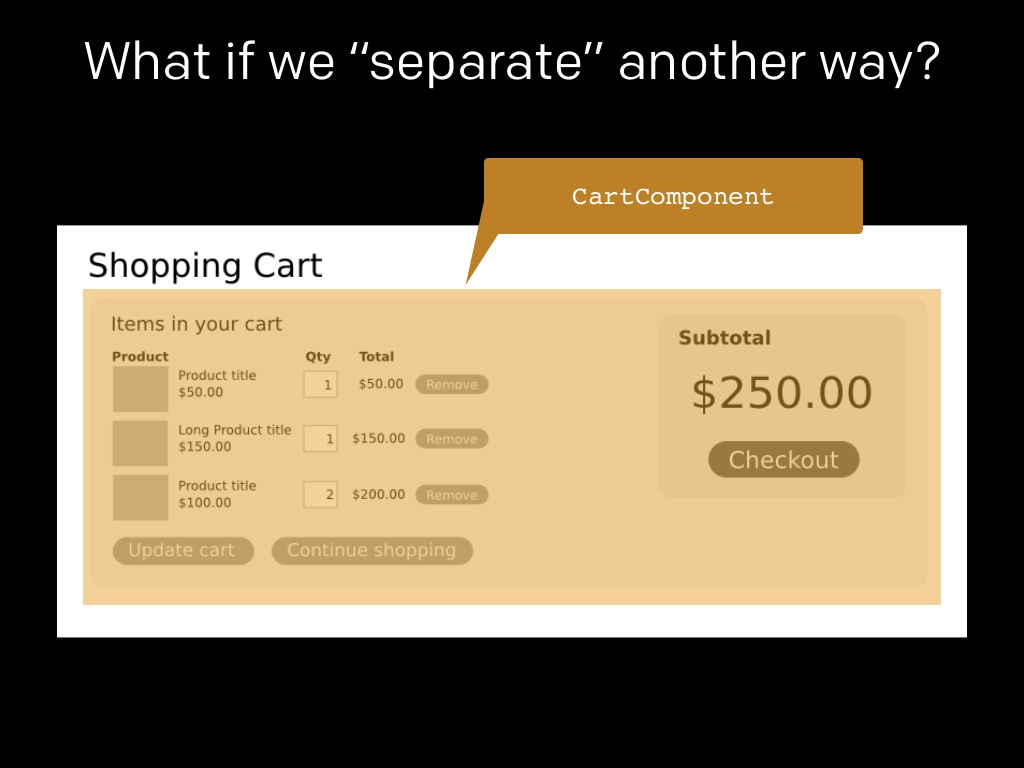
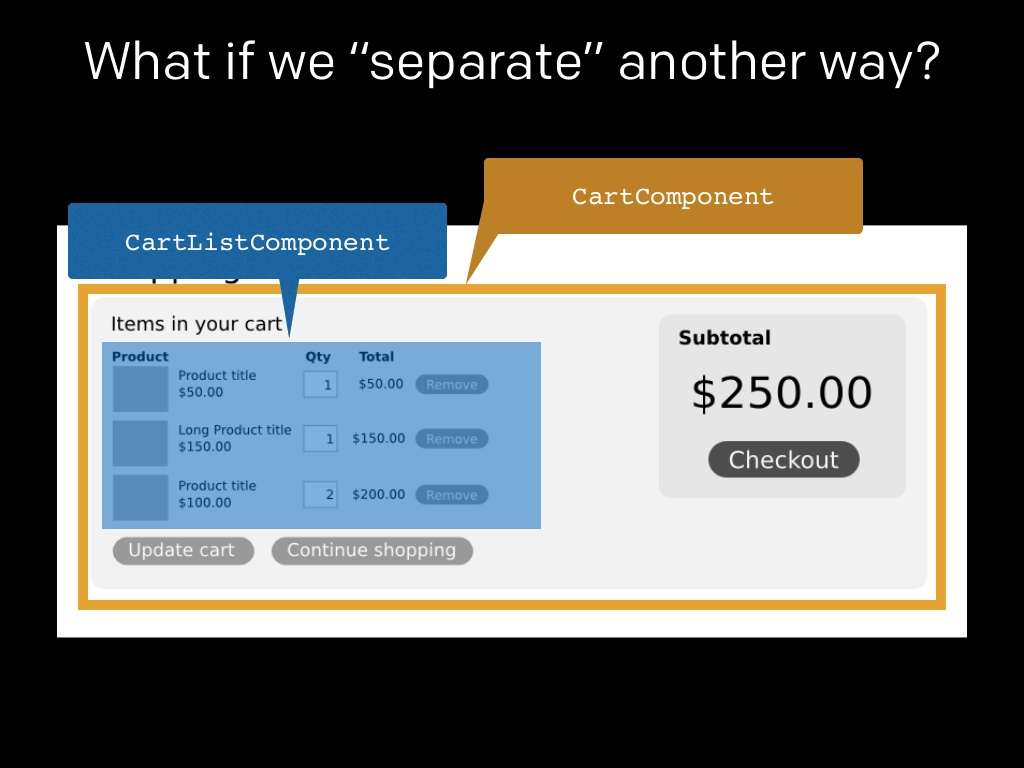
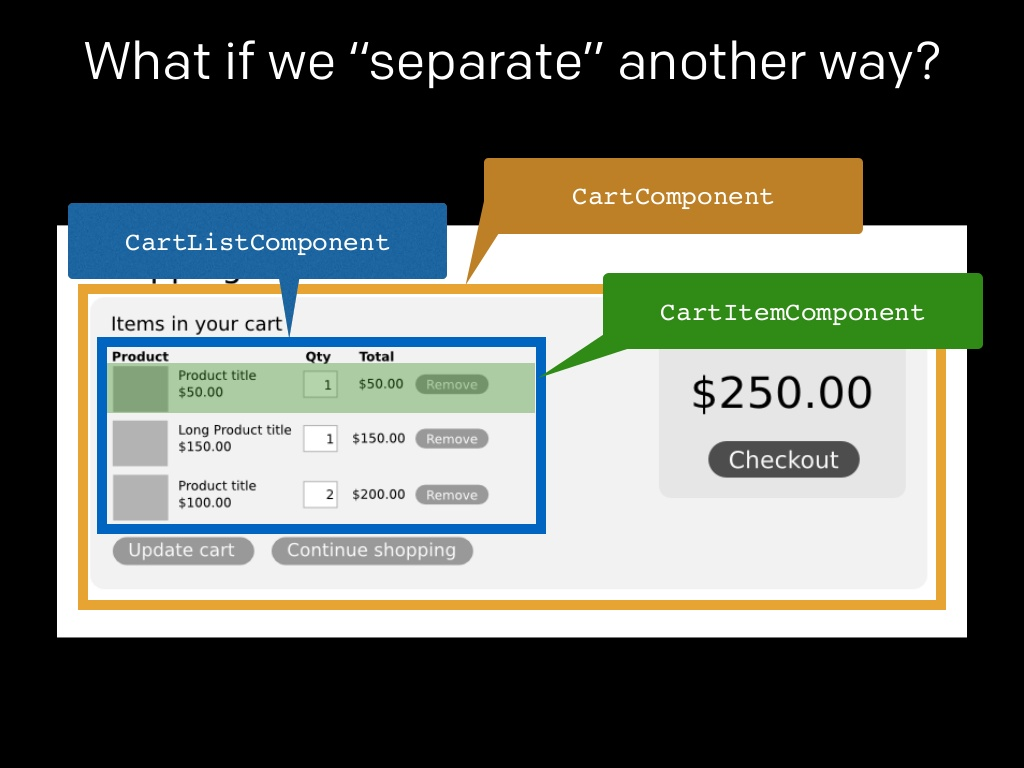
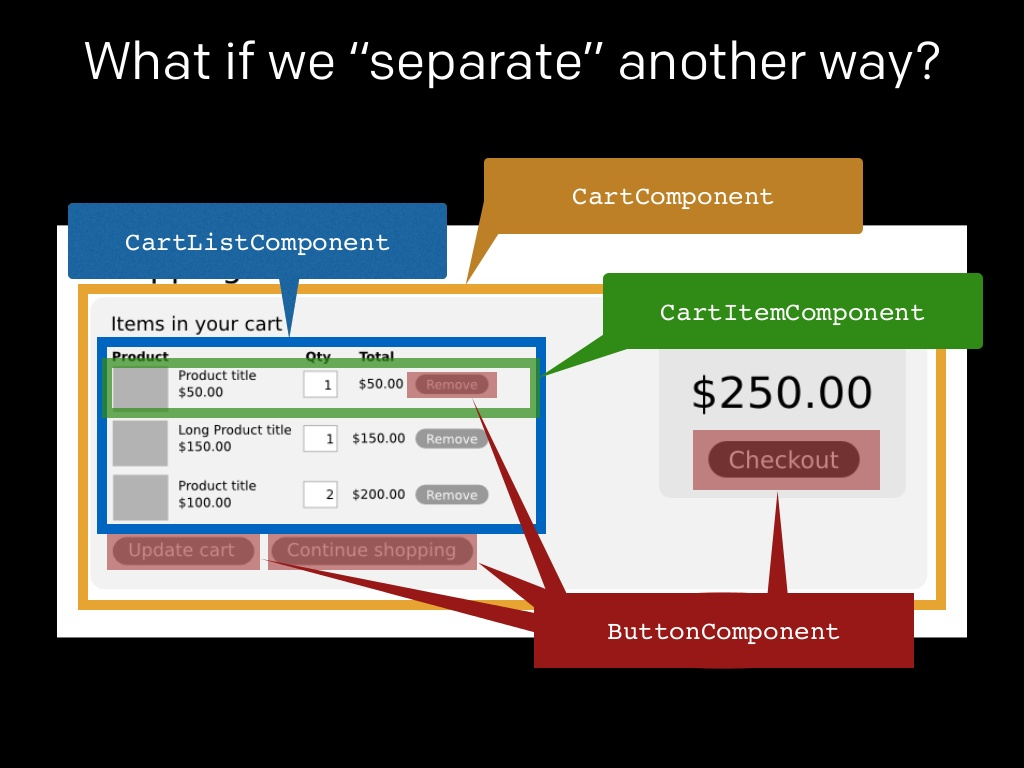
Separation of Components
- composable
- reusable
- maintainable
- testable
If the components are truly self-contained
State Machines
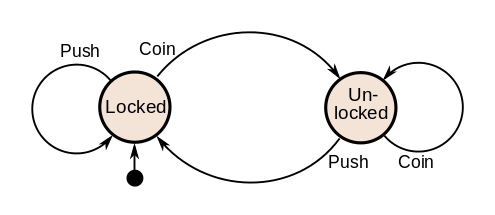
Components are Just State Machines
- React thinks of UIs as simple state machines.
- By thinking of a UI as being in various states and rendering those states, it's easy to keep your UI consistent.
Traditional Data Flows
No framework : Any component can communicate speak to any other component.
Backbone: PubSub
item.on('onchange:name', () => {
...
}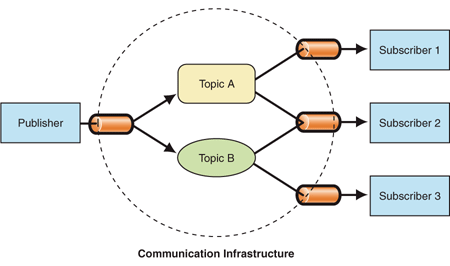
Angular : 2-way data binding and $digest loop
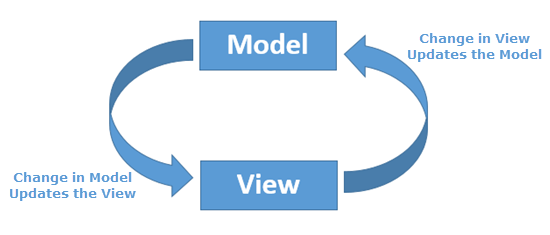
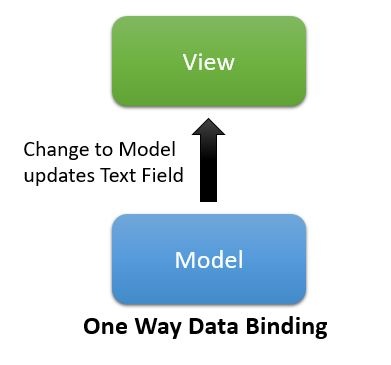
React : 1-way data flow
Dangers of Two-way Data Flow
Image from David Souther
Your First Component
const HelloWorld = <h1>Hello, world!</h1>;

ReactDOM.render(
  HelloWorld,
  document.getElementById('root')
);
JSX (JavaScript XML)
const name = 'Pesto Tech';
const element = <h1>Hello, {name}</h1>;
Consider
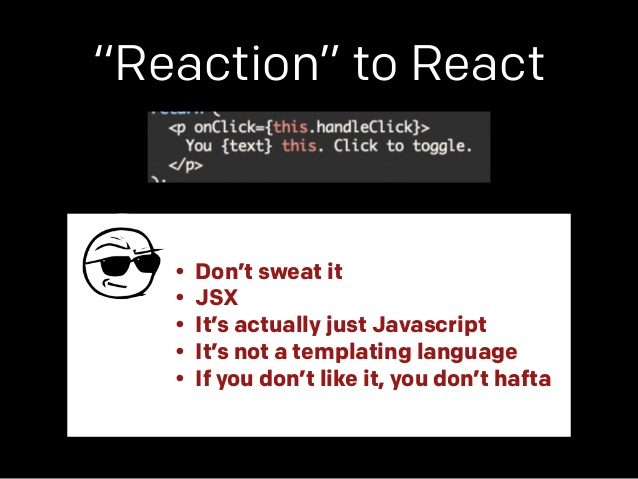
It is called JSX, and it is a syntax extension to JavaScript.
- XML-like syntax for generating component's HTML
- JSX is an expression
- Easier to read and understand large DOM trees
- React doesn’t require using JSX, but most people find it helpful as a visual aid when working with UI inside the JavaScript code.
- It also allows React to show more useful error and warning messages.
JSX Compiles Down to JavaScript
"use strict";

var name = "Pesto Tech";
var element = React.createElement(
    "h1",
    null,
    "Hello, ",
    name
);

ReactDOM.render(
    HelloWorld,
    document.getElementById("root")
);
It's just JavaScript
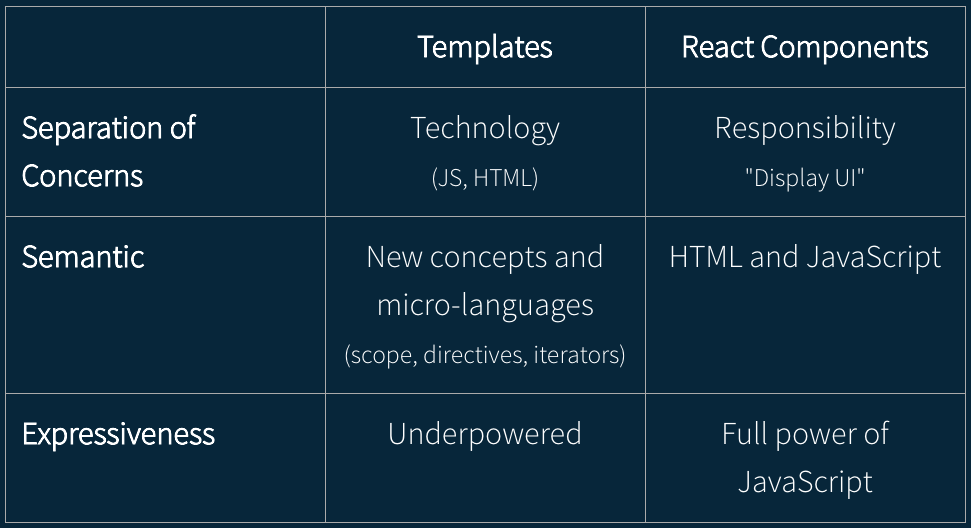
Template vs React Components
Class Components
class HelloWorld extends React.Component {
  render() {
    return (
      <div>Hello {this.props.name}!</div>
    );
  }
};

ReactDOM.render(
  <HelloWorld name="JavaScript" />,
  document.getElementById('root')
);
When using a React class you can access props off the this implicit parameter.
Feel free to use destructuring
const { name } = this.props;Function Components
One of the simplest way to define a component is to write a JavaScript function:
function Welcome(props) {
  return <h1>Hello, {props.name}</h1>;
}
This function is a valid React component because it accepts a single “props” (which stands for properties) object argument with data and returns a React element.
Props and State
const HelloWorld = (props) => {
  return <div>Hello {props.name}!</div>;
};
HelloWorld.propTypes = {
  name: PropTypes.string.isRequired
};

ReactDOM.render(
  <HelloWorld name="JavaScript" />,
  document.getElementById('root')
);- You can pass read-only properties to a React component via its attributes.
- You can access this data as object with the props parameter.
Composing Components
function Welcome(props) {
  return <h1>Hello, {props.name}</h1>;
}

function App() {
  return (
    <div>
      <Welcome name="Sara" />
      <Welcome name="Cahal" />
      <Welcome name="Edite" />
    </div>
  );
}
Events and Methods
Handling events with React elements is very similar to handling events on DOM elements.
Differences
- React events are named using camelCase, rather than lowercase.
- With JSX you pass a function as the event handler, rather than a string.
<button onclick="activateLasers()">
  Activate Lasers
</button>
<button onClick={activateLasers}>
Activate Lasers
</button>- You can't return false to prevent default action
- Passing Arguments to Event Handlers
State in Components
Lifecycle Methods
- We can declare special methods on the component class to run some code when a component mounts and unmounts: These methods are called “lifecycle hooks”.
- Every Component follows a cycle from when it’s created and mounted on the DOM to when it is unmounted and destroyed. This is what we refer to as the Component lifecycle.
- Our lifecycle is broadly categorized into three parts:
- Mounting
- Updating
- Unmounting.
Mounting Methods
- A component mounts when it is created and first inserted into the DOM i.e when it is rendered for the first time. The methods that are available during this period are:
- constructor()
- componentWillMount()
- render()
- componentDidMount()
componentWillMount()
- The componentWillMount method is called right before a component mounts or the render method is called.
Deprecated in React 16
componentDidMount()
- This method is available after the component has mounted. That is, after the HTML from render has finished loading.
- This is the best place to make API calls since, at this point, the component has been mounted and is available to the DOM.
- So here is a bunch of things you can do with this method:
- Connect a React app to external applications, such as web APIs or JavaScript frameworks.
- Set Timers using using setTimeout or setInterval.
- Add event listeners.
- Draw on an element you just rendered.
Updating methods
- Components do not always remain in the same state after mounting. The updating lifecycle methods give you control over when and how this updating should take place.
- There are five updating lifecycle methods and they are called in the order they appear below:
- componentWillReceiveProps
- shouldComponentUpdate
- componentWillUpdate
- render
- componentDidUpdate
componentWillReceiveProps is a method that is called before a component does anything with the new props.
Will Deprecatate in React 16.3
shouldComponentUpdate()
shouldComponentUpdate is used to let React know that a component’s output is not affected by a change of props or state in the component and thus should not re-render.
componentWillUpdate()
componentWillUpdate is the method that can be used to perform preparation before re-rendering occurs. You cannot call this.setState in this method.
Deprecated in React 16.3
componentDidUpdate()
componentDidUpdate is called after any rendered HTML has finished loading. It receives two arguments, the props and state of the component before the current updating period began.
Unmounting method
Components do not always stay in the DOM. Sometimes they have to be removed due to changes in state or something else.
componentWillUnmount()
This is the only unmounting method. componentWillUnmount is called right before a component is removed from the DOM.
This is where you can perform any cleanups that should be done such as invalidating timers, canceling network requests, removing event listeners or canceling any subscriptions made in componentDidMount.
componentDidCatch()
- A component becomes an error boundary if it defines the componentDidCatch method.
- In this method, this.setState can be called and used to catch an unhandled JavaScript error in a child component tree and display a fallback UI instead of the component that crashed.
getDerivedStateFromProps()
getDerivedStateFromProps is called both on initial mounting and on re-rendering of the component
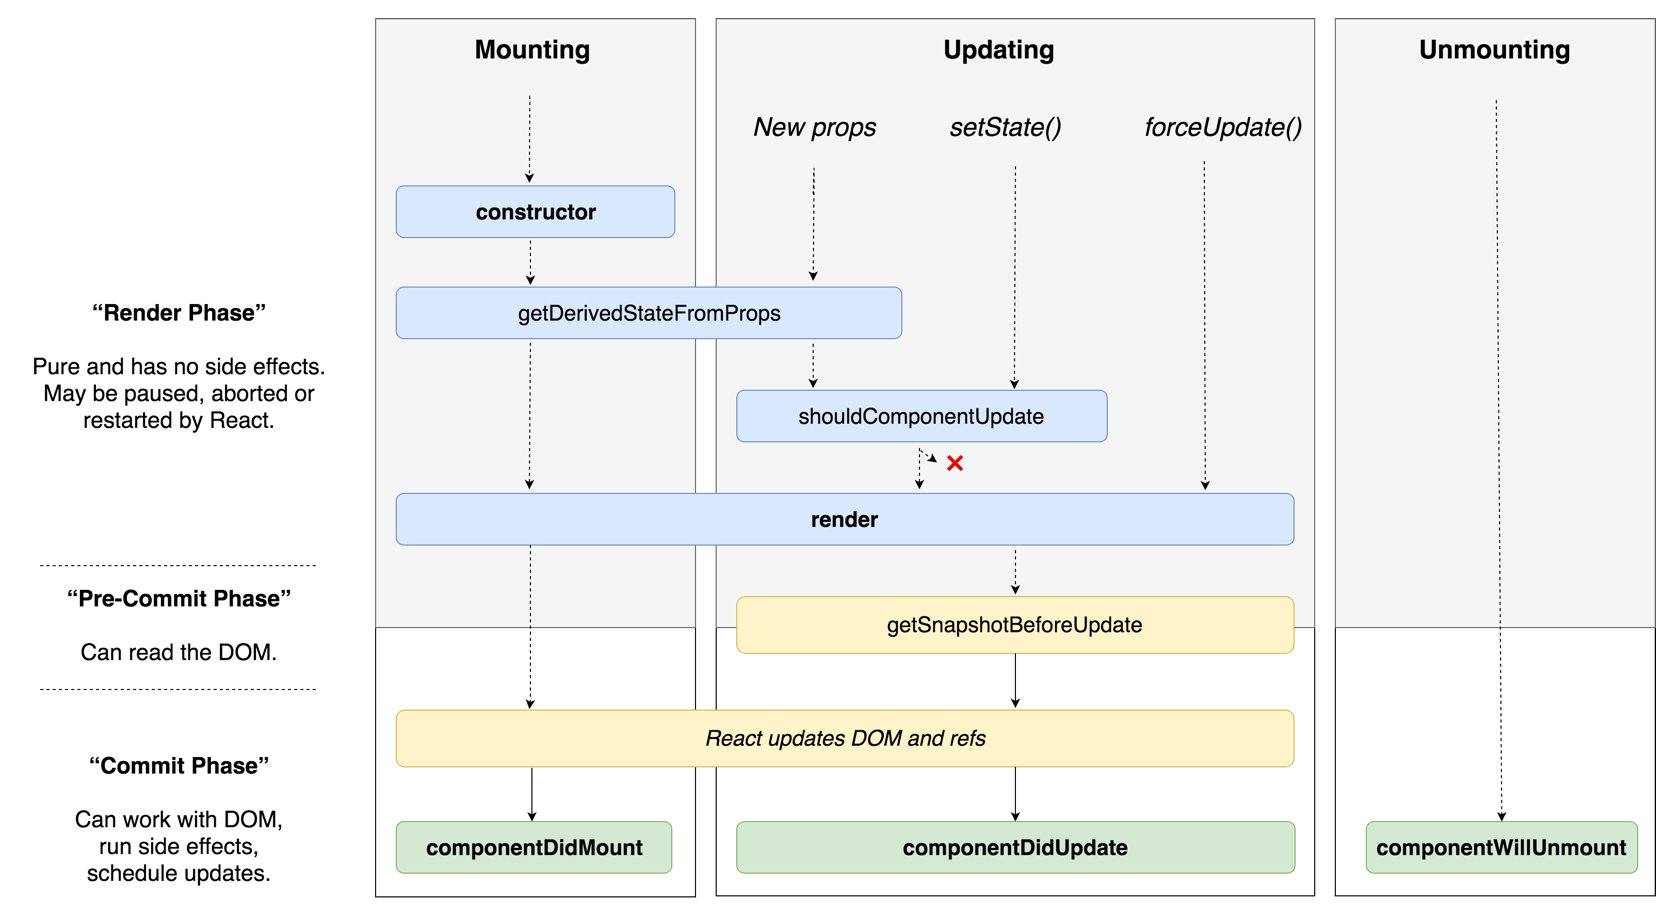
Lifecycle
Reference to Children Nodes
- React supports a special attribute that you can attach to any component.
- When the ref attribute is a callback function, the function receives the underlying DOM element or class instance (depending on the type of element) as its argument.
Functional Component Gotcha
const FunctionalComponent = () => Hello, world!;

class ClassComponent extends React.Component {
  componentDidMount() {
    console.log( "componentDidMount", this.funcComp );
  }
  render() {
    return (
      <FunctionalComponent
        ref={ c => this.funcComp = c } />
    );
  }
}- functional components don't have instances!
- component passed to ref will be null
- therefore, console.log will be null
Styling in React
There are many different options to style React components.
CSS Stylesheet
import React from 'react';
import './DottedBox.css';

const DottedBox = () => (
  <div className="DottedBox">
    <p className="DottedBox_content">Get started with CSS styling</p>
  </div>
);

export default DottedBox;
Inline styling
- In React, inline styles are not specified as a string.
- Instead they are specified with an object whose key is the camelCased version of the style name, and whose value is the style’s value, usually a string.
import React from 'react';

const divStyle = {
  margin: '40px',
  border: '5px solid pink'
};
const pStyle = {
  fontSize: '15px',
  textAlign: 'center'
};

const Box = () => (
  <div style={divStyle}>
    <p style={pStyle}>Get started with inline style</p>
  </div>
);

export default Box;- It is much more popular than the rest of the styling strategies, so there is a ton of helpful resources when you run into a bug.
- Caching & Performance: Standard CSS files are easy for the browser to optimize for, caching the files locally for repeat visits, and ultimately giving performance wins.
- Un-opinionated and Universal
- Quickly Iterate A New Design
- You can very easily rip out the entire stylesheet and create a new one to refresh the look and feel of your app without digging through potentially hundreds of components.
- CSS Frameworks
CSS Modules
A CSS Module is a CSS file in which all class names and animation names are scoped locally by default.
import React from 'react';
import styles from './DashedBox.css';

const DashedBox = () => (
  <div className={styles.container}>
    <p className={styles.content}>Get started with CSS Modules style</p>
  </div>
);

export default DashedBox;
:local(.container) {
margin: 40px;
border: 5px dashed pink;
}
:local(.content) {
font-size: 15px;
text-align: center;
}What is CSS-in-JS?
“CSS-in-JS” refers to a pattern where CSS is composed using JavaScript instead of defined in external files.
- styled-components
- emotion
- Aphrodite
- radium
- react-jss
Styled-components 💅
Styled-components is a library for React and React Native that allows you to use component-level styles in your application that are written with a mixture of JavaScript and CSS
import React from 'react';
import styled from 'styled-components';

const Div = styled.div`
  margin: 40px;
  border: 5px outset pink;
  &:hover {
   background-color: yellow;
 }
`;

const Paragraph = styled.p`
  font-size: 15px;
  text-align: center;
`;

const OutsetBox = () => (
  <Div>
    <Paragraph>Get started with styled-components 💅</Paragraph>
  </Div>
);
React.PureComponent
- React.PureComponent is similar to React.Component.
- The difference between them is that React.Component doesn’t implement shouldComponentUpdate(), but React.PureComponent implements it with a shallow prop and state comparison.
- Furthermore, React.PureComponent’s shouldComponentUpdate() skips prop updates for the whole component subtree. Make sure all the children components are also “pure”.
Design Patterns
Children Of React
<Grid>
  <Row />
  <Row />
  <Row />
</Grid>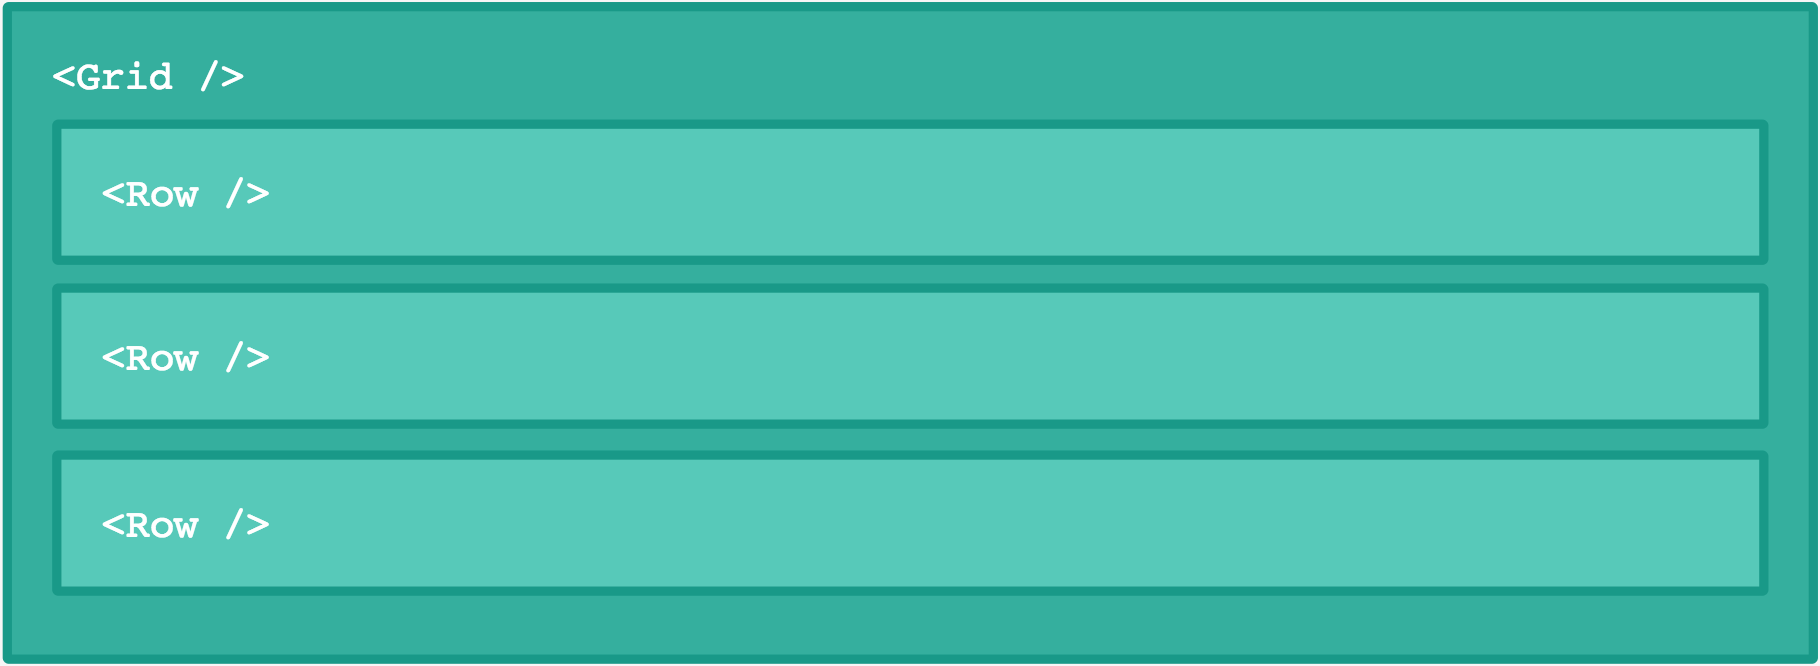
-
These three Row components are passed to the Grid component as props.children.
-
Using an expression container(that’s the technical term for those squiggly brackets in JSX) parents can render their children:
class Grid extends React.Component {
  render() {
    return <div>{this.props.children}</div>
  }
}
class Fullstop extends React.Component {
render() {
return <h1>Hello world!</h1>
}
}Everything can be a child
-
Children in React don’t have to be components, they can be anything.
-
SX will automatically remove whitespace on the beginning and ending of a line as well as blank lines. It also condenses blank lines in the middle of string literals into one space.
-
This means all of these examples will render the same thing:
<Grid>Hello world!</Grid>

<Grid>
  Hello world!
</Grid>
<Grid>
Hello
world!
</Grid>
<Grid>
Hello world!
</Grid>Function as a child
We can pass any JavaScript expression as children. This includes functions.
class Executioner extends React.Component {
  render() {
    // See how we're calling the child as a function?
    //                        ↓
    return this.props.children()
  }
}
<Executioner>
{() => <h1>Hello World!</h1>}
</Executioner>Manipulating children
-
If you take a look at the React docs you will see it says that “children are an opaque data structure”.
-
What they are essentially telling us is that props.children can be any type, such as an array, a function, an object, etc.
-
Since you can pass anything, you can never know for sure.
-
React provides a bunch of helper functions to make manipulating children easy and painless.
-
These are available at React.Children.
Looping over children
-
The two most obvious helpers are React.Children.map and React.Children.forEach.
-
They work exactly like their array counterparts, except they also work when a function, object or anything is passed as children.
class IgnoreFirstChild extends React.Component {
  render() {
    const children = this.props.children
    return (
      <div>
        {React.Children.map(children, (child, i) => {
          // Ignore the first child
          if (i < 1) return
          return child
        })}
      </div>
    )
  }
}-
In this case, we could’ve also used this.props.children.map.
-
But what would’ve happened if somebody passed a function as a child?
-
this.props.children would’ve been a function instead of an array, and we would’ve had an error! 😱
Counting children
-
Since this.props.children can be any type, checking how many children a component has turns out to be rather hard!
-
Naïvely doing this.props.children.length would break when passed a String or a function.
-
We’d have one child, "Hello World!", but the .length would be reported as 12 instead!
-
That’s why we have React.Children.count
class ChildrenCounter extends React.Component {
  render() {
    return <p>React.Children.count(this.props.children)</p>
  }
}
Converting children to an array
-
As a last resort, if none of the above methods fit your need, you can convert your children to an array with React.Children.toArray.
-
This would be useful if you needed to e.g. sort them:
-
Note: The array returned by React.Children.toArray doesn’t contain children from type function, only ReactElement or strings.
class Sort extends React.Component {
  render() {
    const children = React.Children.toArray(this.props.children)
    // Sort and render the children
    return <p>{children.sort().join(' ')}</p>
  }
}
<Sort>
// We use expression containers to make sure our strings
// are passed as three children, not as one string
{'bananas'}{'oranges'}{'apples'}
</Sort>Enforcing a single child
We could try to enforce this with propTypes, which would look something like this:
Executioner.propTypes = {
  children: React.PropTypes.func.isRequired,
}-
That would log a message to the console though, something developers could ignore.
-
Instead, we can use React.Children.only inside our render method!
class Executioner extends React.Component {
  render() {
    return React.Children.only(this.props.children)()
  }
}
Editing children
-
We can render arbitrary components as children, but still control them from the parent instead of the component we render them from.
-
To illustrate this, let’s say we have a RadioGroup component which can contain a number of RadioButton components. (which render an <input type="radio"> inside a <label>)
-
The RadioButtons are not rendered from the RadioGroup itself, they are used as children.
render() {
  return(
    <RadioGroup>
      <RadioButton value="first">First</RadioButton>
      <RadioButton value="second">Second</RadioButton>
      <RadioButton value="third">Third</RadioButton>
    </RadioGroup>
  )
}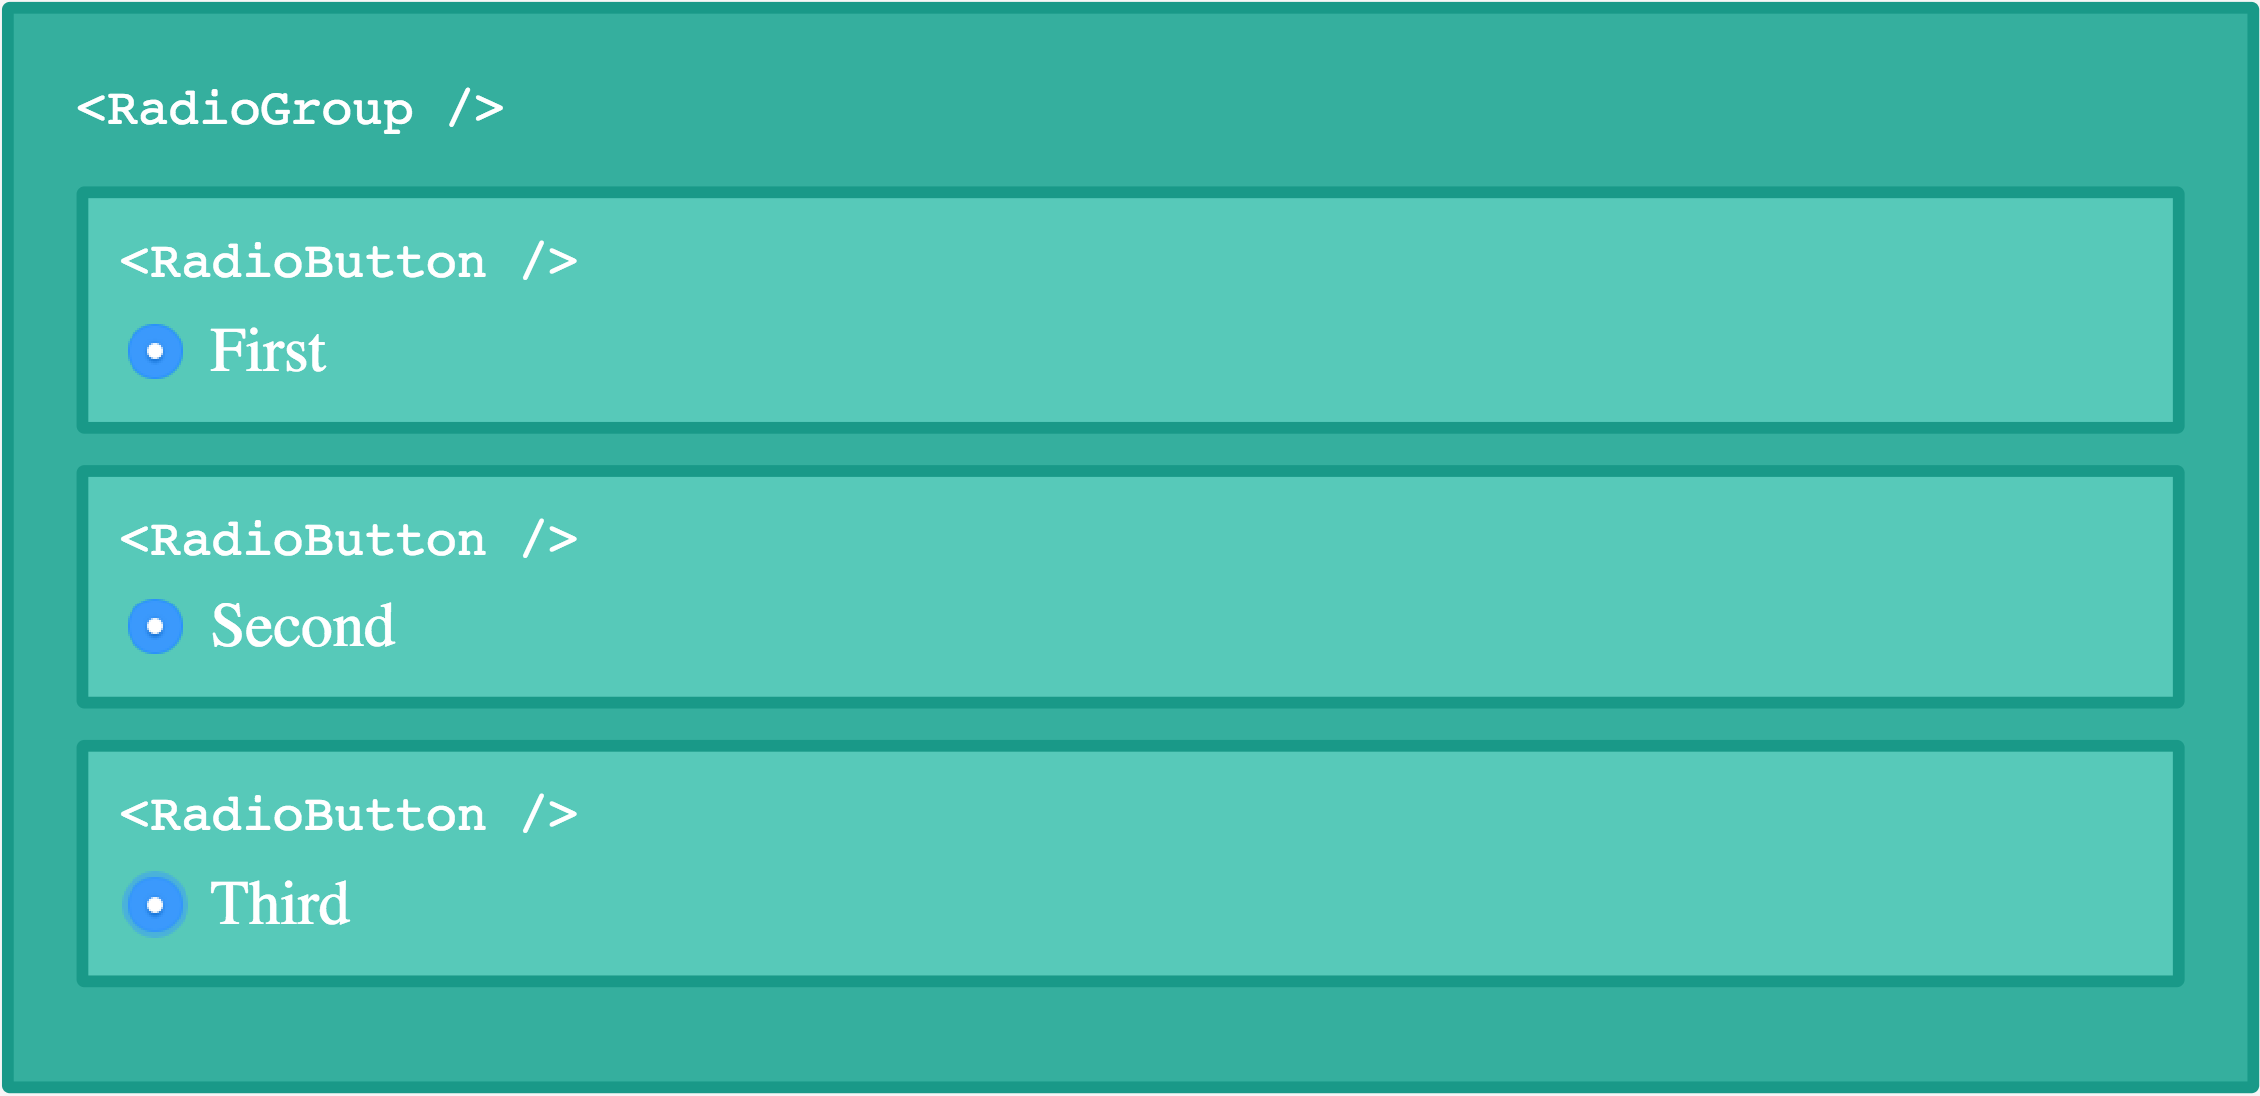
There is an issue with this code though. The inputs aren’t grouped, which leads to this:
To group input tags together they all need to have the same name attribute.
-
This is where the last helper method of today comes into play. As the name suggests, React.cloneElement clones an element.
-
We pass it the element we want to clone as the first argument, and then as a second argument we can pass an object of props we want to be set on the cloned element:
renderChildren() {
  return React.Children.map(this.props.children, child => {
    return React.cloneElement(child, {
      name: this.props.name
    })
  })
}
Functions and Classes
function ProfilePage(props) {
  const showMessage = () => {
    alert('Followed ' + props.user);
  };

  const handleClick = () => {
    setTimeout(showMessage, 3000);
  };

  return (
    <button
      onClick={handleClick}
    >
      Follow
    </button>
  );
}
class ProfilePageClass extends React.Component {
constructor(props) {
super(props);
this.showMessage = this.showMessage.bind(this);
this.handleClick = this.handleClick.bind(this);
}
showMessage() {
alert("Followed " + this.props.user);
};
handleClick() {
setTimeout(this.showMessage, 4000);
};
render() {
return <button onClick={this.handleClick}>Follow</button>;
}
}export default class App extends React.Component {
constructor(props) {
super(props);
this.state = {
value: 0,
}
this.handleChange = this.handleChange.bind(this);
}
handleChange(event) {
this.setState({ value: this.state.value + 1 });
this.setState({ value: this.state.value + 1 });
this.setState({ value: this.state.value + 1 });
}
render() {
return <>
<h1>{this.state.value}</h1>
<button type="button" onClick={this.handleChange}>Click</button>
</>
}
} handleChange(event) {
this.setState(prevState =>
({ value: prevState.value + 1 }));
this.setState(({ value }) => ({
value: value + 1,
}));
this.setState(({ value }) => ({
value: value + 1,
}));
}class App extends React.Component {
constructor(props) {
super(props);
this.state = {
value: '',
}
this.handleChange = this.handleChange.bind(this);
}
handleChange(event) {
this.setState(() => {
return {
value: event.target.value,
}
});
}
render() {
return <>
<h1>Demo: {this.state.value}</h1>
<input type="text"
value={this.state.value} onChange={this.handleChange} />
</>
}
}Principle 1: Don’t Stop the Data Flow
Don’t Stop the Data Flow in Rendering
class Button extends React.Component {
  state = {
    color: this.props.color
  };
  render() {
    const { color } = this.state;
    return (
      <button className={'Button-' + color}>
        {this.props.children}
      </button>
    );
  }
}
A common mistake
- By copying a prop into state you’re ignoring all updates to it.
- In the rare case that this behavior is intentional, make sure to call that prop initialColor or defaultColor to clarify that changes to it are ignored.
function Button({ color, children }) {
  return (
    <button className={'Button-' + color}>
      {children}
    </button>
  );
}

// isOk might be driven by state and can change at any time
<Button color={isOk ? 'blue' : 'red'} />
Computed values are another reason people sometimes attempt to copy props into state.
class Button extends React.Component {
  state = {
    textColor: slowlyCalculateTextColor(this.props.color)
  };
  render() {
    return (
      <button className={
        'Button-' + this.props.color +
        ' Button-text-' + this.state.textColor //
      }>
        {this.props.children}
      </button>
    );
  }
}
This component is buggy because it doesn’t recalculate this.state.textColor on the color prop change.
The easiest fix would be to move the textColor calculation into the render method, and make this a PureComponent
class Button extends React.PureComponent {
  render() {
    const textColor = slowlyCalculateTextColor(
        this.props.color
    );
    return (
      <button className={
        'Button-' + this.props.color +
        ' Button-text-' + textColor // ✅ Always fresh
      }>
        {this.props.children}
      </button>
    );
  }
}- What if it’s the children prop that changed?
- It seems unfortunate to recalculate the textColor in that case.
- Our second attempt might be to invoke the calculation in componentDidUpdate
class Button extends React.Component {
  state = {
    textColor: slowlyCalculateTextColor(this.props.color)
  };
  componentDidUpdate(prevProps) {
    if (prevProps.color !== this.props.color) {
      // 😔 Extra re-render for every update
      this.setState({
        textColor: slowlyCalculateTextColor(this.props.color),
      });
    }
  }
  render() {
    return (
      <button className={
        'Button-' + this.props.color +
        ' Button-text-' + this.state.textColor // ✅ Fresh on final render
      }>
        {this.props.children}
      </button>
    );
  }
}
function Button({ color, children }) {
const textColor = useMemo(
() => slowlyCalculateTextColor(color),
[color] // ✅ Don’t recalculate until `color` changes
);
return (
<button className={'Button-' + color + ' Button-text-' + textColor}>
{children}
</button>
);
}Don’t Stop the Data Flow in Side Effects
It is important that side effects (e.g. data fetching) are also a part of the data flow.
class SearchResults extends React.Component {
  state = {
    data: null
  };
  componentDidMount() {
    this.fetchResults();
  }
  fetchResults() {
    const url = this.getFetchUrl();
    // Do the fetching...
  }
  getFetchUrl() {
    return 'http://myapi/results?query' + this.props.query;
  }
  render() {
    // ...
  }
}- But what if the query prop changes? In our component, nothing will happen. This means our component’s side effects don’t respect changes to its props.
- This is a very common source of bugs in React applications.
In order to fix our component, we need to:
- Look at componentDidMount and every method called from it.
- In our example, that’s fetchResults and getFetchUrl.
- Write down all props and state used by those methods.
- In our example, that’s this.props.query.
- Make sure that whenever those props change, we re-run the side effect.
- We can do this by adding the componentDidUpdate method.
class SearchResults extends React.Component {
  state = {
    data: null
  };
  componentDidMount() {
    this.fetchResults();
  }
  componentDidUpdate(prevProps) {
    if (prevProps.query !== this.props.query) { // ✅ Refetch on change
      this.fetchResults();
    }
  }
  fetchResults() {
    const url = this.getFetchUrl();
    // Do the fetching...
  }
  getFetchUrl() {
    return 'http://myapi/results?query' + this.props.query; // ✅ Updates are handled
  }
  render() {
    // ...
  }
}
function SearchResults({ query }) {
const [data, setData] = useState(null);
const [currentPage, setCurrentPage] = useState(0);
useEffect(() => {
function fetchResults() {
const url = getFetchUrl();
// Do the fetching...
}
function getFetchUrl() {
return (
'http://myapi/results?query' + query +
'&page=' + currentPage
);
}
fetchResults();
}, [currentPage, query]); // ✅ Refetch on change
// ...
}Don’t Stop the Data Flow in Optimizations
If you try to “optimize” a component by writing your own comparison, you may mistakenly forget to compare function props:
class Button extends React.Component {
  shouldComponentUpdate(prevProps) {
    // 🔴 Doesn't compare this.props.onClick
    return this.props.color !== prevProps.color;
  }
  render() {
    const onClick = this.props.onClick; // 🔴 Doesn't reflect updates
    const textColor = slowlyCalculateTextColor(this.props.color);
    return (
      <button
        onClick={onClick}
        className={'Button-' + this.props.color + ' Button-text-' + textColor}>
        {this.props.children}
      </button>
    );
  }
}
class MyForm extends React.Component {
state = {
isEnabled: true
};
handleClick = () => {
this.setState({ isEnabled: false });
// Do something
}
render() {
return (
<>
<h1>Hello!</h1>
<Button color='green' onClick={
// 🔴 Button ignores updates to the onClick prop
this.state.isEnabled ? this.handleClick : null
}>
Press me
</Button>
</>
)
}
}Principle 2: Always Be Ready to Render
- Don’t try to introduce unnecessary timing assumptions into your component behavior.
- Your component should be ready to re-render at any time.
- React components let you write rendering code without worrying too much about time.
- You describe how the UI should look at any given moment, and React makes it happen.
- Take advantage of that model!
class TextInput extends React.Component {
  state = {
    value: ''
  };
  componentWillReceiveProps(nextProps) {
    this.setState({ value: nextProps.value });
  }
  handleChange = (e) => {
    this.setState({ value: e.target.value });
  };
  render() {
    return (
      <input
        value={this.state.value}
        onChange={this.handleChange}
      />
    );
  }
}- We keep value in the local state, but we also receive value from props.
- Whenever we “receive new props”, we reset the value in state.
If its parent re-renders more often, it will keep “blowing away” the child state!
So how can we fix this?
- First of all, we need to fix our mental model.
- We need to stop thinking of “receiving props” as something different from just “rendering”.
- A re-render caused by a parent shouldn’t behave differently from a re-render caused by our own local state change.
- Components should be resilient to rendering less or more often because otherwise they’re too coupled to their particular parents.
// Option 1
function TextInput({ value, onChange }) {
  return (
    <input
      value={value}
      onChange={onChange}
    />
  );
}
// Option 2: Fully uncontrolled component.
function TextInput() {
const [value, setValue] = useState('');
return (
<input
value={value}
onChange={e => setValue(e.target.value)}
/>
);
}
// We can reset its internal state later by changing the key:
<TextInput key={formId} />Render Props
The term “render prop” refers to a technique for sharing code between React components using a prop whose value is a function.
A component with a render prop takes a function that returns a React element and calls it instead of implementing its own render logic.
<DataProvider render={data => (
  <h1>Hello {data.target}</h1>
)}/>
class MouseTracker extends React.Component {
constructor(props) {
super(props);
this.handleMouseMove = this.handleMouseMove.bind(this);
this.state = { x: 0, y: 0 };
}
handleMouseMove(event) {
this.setState({
x: event.clientX,
y: event.clientY
});
}
render() {
return (
<div style={{ height: '100%' }} onMouseMove={this.handleMouseMove}>
<h1>Move the mouse around!</h1>
<p>The current mouse position is ({this.state.x}, {this.state.y})</p>
</div>
);
}
}Use Render Props for Cross-Cutting Concerns
Now the question is: How can we reuse this behavior in another component?
Since components are the basic unit of code reuse in React, let’s try refactoring the code a bit to use a <Mouse> component that encapsulates the behavior we need to reuse elsewhere.
class Mouse extends React.Component {

  handleMouseMove(event) {
    this.setState({
      x: event.clientX,
      y: event.clientY
    });
  }

  render() {
    return (
      <div style={{ height: '100%' }} onMouseMove={this.handleMouseMove}>

        {/* ...but how do we render something other than a <p>? */}
        <p>The current mouse position is ({this.state.x}, {this.state.y})</p>
      </div>
    );
  }
}
Text
class MouseTracker extends React.Component {
  render() {
    return (
      <div>
        <h1>Move the mouse around!</h1>
        <Mouse />
      </div>
    );
  }
}
Now the <Mouse> component encapsulates all behavior associated with listening for mousemove events and storing the (x, y) position of the cursor, but it’s not yet truly reusable.
-
For example, let’s say we have a <Cat> component that renders the image of a cat chasing the mouse around the screen.
-
We might use a <Cat mouse={{ x, y }}> prop to tell the component the coordinates of the mouse so it knows where to position the image on the screen.
class Cat extends React.Component {
  render() {
    const mouse = this.props.mouse;
    return (
      <img src="/cat.jpg" style={{ position: 'absolute', left: mouse.x, top: mouse.y }} />
    );
  }
}
class MouseWithCat extends React.Component {
  constructor(props) {
    super(props);
    this.handleMouseMove = this.handleMouseMove.bind(this);
    this.state = { x: 0, y: 0 };
  }

  handleMouseMove(event) {
    this.setState({
      x: event.clientX,
      y: event.clientY
    });
  }

  render() {
    return (
      <div style={{ height: '100%' }} onMouseMove={this.handleMouseMove}>
        <Cat mouse={this.state} />
      </div>
    );
  }
}
Instead of hard-coding a <Cat> inside a <Mouse> component, and effectively changing its rendered output, we can provide <Mouse> with a function prop that it uses to dynamically determine what to render–a render prop.
class Mouse extends React.Component {
  constructor(props) {
    super(props);
    this.handleMouseMove = this.handleMouseMove.bind(this);
    this.state = { x: 0, y: 0 };
  }

  handleMouseMove(event) {
    this.setState({
      x: event.clientX,
      y: event.clientY
    });
  }

  render() {
    return (
      <div style={{ height: '100%' }} onMouseMove={this.handleMouseMove}>
        {this.props.render(this.state)}
      </div>
    );
  }
}
Compound Component
class Toggle extends React.Component {
  state = {on: false}
  render() {
    return <Switch on={this.state.on} />
  }
}
class Toggle extends React.Component {
state = {on: false}
toggle = () =>
this.setState(currentState => ({on: !currentState.on}))
render() {
return <Switch on={this.state.on} onClick={this.toggle} />
}
}<Toggle onToggle={onToggle} />Version 1
class Toggle extends React.Component {
  static On = ({on, children}) => (on ? children : null)
  state = {on: false}
  toggle = () =>
    this.setState(
      ({on}) => ({on: !on}),
      () => {
        this.props.onToggle(this.state.on)
      }
    ),
  render() {
    return <Switch on={this.state.on} onClick={this.toggle} />
  }
}
Version 2
class Toggle extends React.Component {
  static On = ({on, children}) => (on ? children : null)
  static Off = ({on, children}) => (on ? null : children)
  static Button = ({on, toggle, ...props}) => (
    <Switch on={on} onClick={toggle} {...props} />
  )
  state = {on: false}
  toggle = () =>
    this.setState(
      ({on}) => ({on: !on}),
      () => this.props.onToggle(this.state.on),
    )
  render() {
    return React.Children.map(this.props.children, child =>
      React.cloneElement(child, {
        on: this.state.on,
        toggle: this.toggle,
      }),
    )
  }
}
Version 3
const ToggleContext = React.createContext()

class Toggle extends React.Component {
  static On = ({children}) => (
    <ToggleContext.Consumer>
      {({on}) => (on ? children : null)}
    </ToggleContext.Consumer>
  )
  static Off = ({children}) => (
    <ToggleContext.Consumer>
      {({on}) => (on ? null : children)}
    </ToggleContext.Consumer>
  )
  static Button = props => (
    <ToggleContext.Consumer>
      {({on, toggle}) => (
        <Switch on={on} onClick={toggle} {...props} />
      )}
    </ToggleContext.Consumer>
  )
  state = {on: false}
  toggle = () =>
    this.setState(
      ({on}) => ({on: !on}),
      () => this.props.onToggle(this.state.on),
    )
  render() {
    return (
      <ToggleContext.Provider
        value={{on: this.state.on, toggle: this.toggle}}
      >
        {this.props.children}
      </ToggleContext.Provider>
    )
  }
}
React
By Arfat Salman


