NodeJS
Overview
NodeJS
V8 &
libuv
NPM
NVM
JS
Let's not mix everything
NVM
What is NVM
- NVM stands for Node Version Manager
- NVM is a script which creates functions in your shell
- NVM script is to be sourced in your shell
- NVM manages Node, NPM, and V8 versions
Specific files
-
./.nvmrc
- contains the node version to use locally
- can exist in ~/ as a fallback
FEW NVM functions
echo 6 > ~/.nvmrc     # configure global version to install
echo 6 > ./.nvmrc     # configure local version to install
nvm i                 # install version from .nvmrc file
nvm i 7               # install latest 7.y.z version
nvm use               # use version from .nvmrc file
nvm use 7             # use latest 7.Y.Z version
nvm ls                # list of installed versions
nvm ls-remote         # list existing versions
nvm alias default 6   # configure the active version when opening a shell
. $NVM_DIR/bash_completion # add autocompletion to your shellautocompletion
node version management
NPM
What is npm
- NPM stands for Node Package Manager
- NPM is a binary
- NPM manages packages versions globally and locally
- NPM talks to registries to get packages info and content
Also see awesome NPM resources and tips
Specific files
-
./package.json (mandatory)
- package name, version, description, scripts, dependencies, ...
- ./.npmignore (optional)
- files to ignore when publishing and installing
- ./.npmrc (optional)
- registries to use
Few commands
npm ini               # create/update the package.json file locally
npm i                 # install all the deps in package.json (except peer deps)
npm i --production    # install all the deps in package.json (except peer and dev deps)
npm i -S lodash       # install a dep and save it in package.json
npm i -D lodash       # install a dep and save it in package.json (as dev dep)
npm i -SE lodash      # same as npm i -S but writes exact version
npm ls                # list locally installed packages
npm ls -g             # list globally installed packages
npm ls lodash         # list local packages having lodash as a dependency
npm uninstall lodash  # uninstall lodash locally (use save options to update package.json)
npm prune             # uninstall local packages not existing in package.json
npm run # list lifecycle and custom scripts in package.json
npm run custom # run custom script
npm run custom -- -a # same but passing option -p to the script
npm start # one of the lifecycle scripts ; they do not need "run" word
npm stop # should stop the process the previous script has started
npm test # should run tests
npm build # should run build (also called when installing or linking this modules)packages management
lifecycle and custom scripts
source <(npm completion) # add autocompletion to your shellautocompletion
V8 & libuv
What is V8
- V8 parses JS code to get Abstract Syntax Trees
- V8 builds bytecode from it
- V8 optimizes and compiles it dynamically and speculatively
See http://benediktmeurer.de/ for latest digested news about V8
V8 flags
Find V8 heap flags in heap.cc as FLAG_* variables
What is libuv
- libuv implements the event loop for asynchronous I/O
See how nodejs works additional details
Node
What is Node
- Node is a JS runtime environment
- Node is server-side
- Node is powered by the V8 engine
- Node has a binary which runs JS files
- Node has a set of core modules
- Node has a some modules from the community...
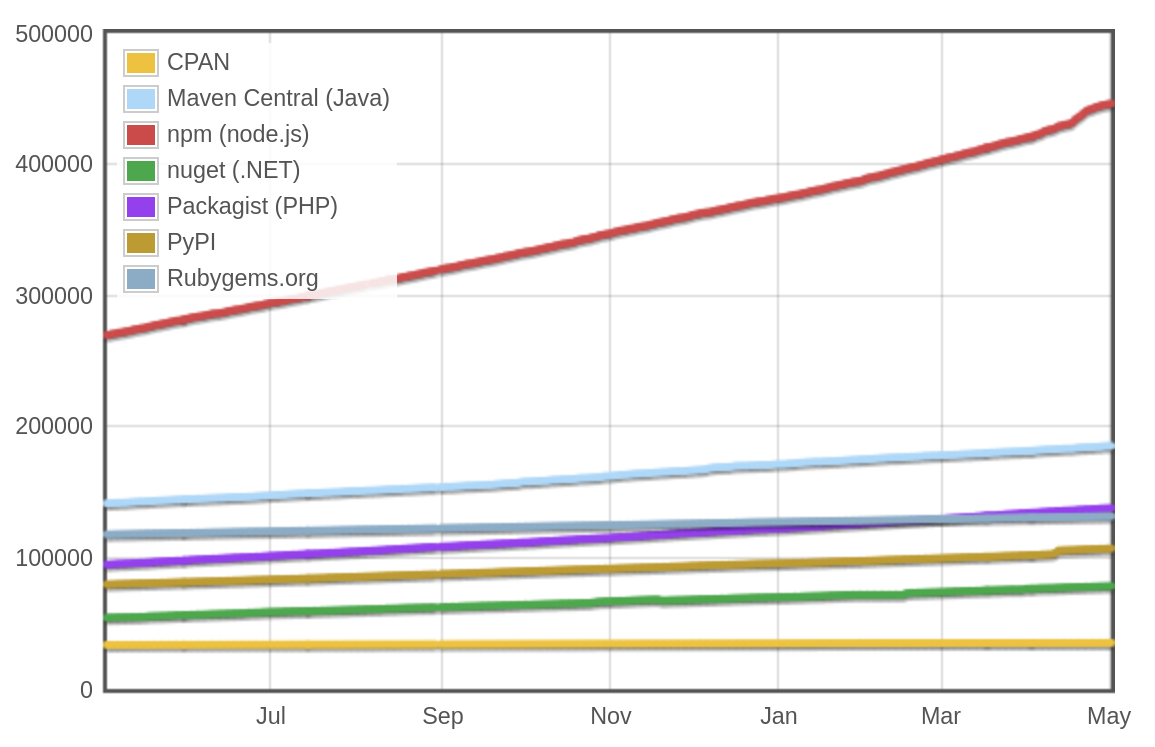
Modules count
Globals
- require function lets you require other modules / files
- module.exports references the exported module
- process.env exposes environment variables
- process.env.NODE_ENV is used by dependencies and must equal "production" in production
- process.cwd() is the current working directory
- __dirname and __filename are to be used when reading package paths
Few commands
node                        # start the repl
node -v                     # echo node version
node index.js               # execute index.js
node --debug index.js       # execute index.js with debug agent
node --debug-brk index.js   # same but the script waits for you to join
node --inspect index.js     # execute index.js and show the link to the live inspector
node --inspect-brk index.js # same but the script waits for you to join
REPL
The Node REPL has few interesting commands you can list with ".help" in a REPL
> .help
.break    Sometimes you get stuck, this gets you out
.clear    Alias for .break
.editor   Enter editor mode
.exit     Exit the repl
.help     Print this help message
.load     Load JS from a file into the REPL session
.save     Save all evaluated commands in this REPL session to a file
You also have access to the repl module
> repl.repl.lines
[ 'repl.repl.lines', level: [] ]
To start the Node REPL, just type (with or witout options)
> nodeCore concepts
Core concepts
- CommonJS module format (aka CJS)
- Asynchronous first
- Event emitters, streams and buffers
- Error-first callbacks pattern
Core modules
Code runner modules
vm
Run code in V8 virtual machine
child_process
Run child processes
cluster
Fork workers in other
Data transport modules
events
Implements basic event emitters
Stream
Specialized event emitters transporting buffers or objects
Buffer
Wrapper for binary data
Contextual modules
Process
Process and env info, emitter of process events, exit
OS
OS info
Domain
(@deprecated) Execution context across async stacks
I/O modules
FS
Discuss with file system
Net
Discuss with sockets
http
HTTP over sockets
Create you first package
using http and fs to expose a file
using commander to implement a command
using config to handle configuration
using bunyan to log things
maybe using rabbitmq
Working with a private registry
Private registry creation with docker
# create the data volume container
docker run -d --name nexus-data sonatype/nexus3 echo "data-only container for Nexus"
# create the nexus container using the latter
docker run -d -p 8081:8081 --name nexus --volumes-from nexus-data sonatype/nexus3
# ping till it works
curl -u admin:admin123 http://localhost:8081/service/metrics/ping- Go to http://localhost:8081/#admin/repository
- Sign in with admin:admin123
- Create 3 blob stores (npm-private, npm-registry, npm-group)
- Create 3 npm repositories
- npm-private: hosted npm using blob store npm-private
- npm-registry: npm proxy using blob store npm-registry
- npm-group: npm group using blob store npm-group, grouping the latters
- Go to http://localhost:8081/#admin/security/realms
- Activate npm Bearer Token Realm
Private registry usage
- Choose a scope for your private packages (e.g. @scope)
- package name becomes "@my-scope/my-package-name"
- In you private package package.json file
- set publishConfig.registry to http://localhost:8081/repository/npm-private/
- set private to false
- Check what you've just done (mandatory)
- Try publishing with npm same credentials admin:admin123
- In any project depending on your private package
- add the .npmrc file containing
@my-scope:registry=http://localhost:8081/repository/npm-group/ - try installing your private package from there
- add the .npmrc file containing
Publishing transpiled private module
Transpile source code
npm install --save-dev babel-cli babel-preset-env
{
  "presets": [
    ["env", { "targets": { "node": 5 } }]
  ]
}
Have this .babelrc file
Install babel
    "babel": "babel src --out-dir dist",
    "dev": "npm run babel -- --source-maps",
Have the following in package.json in "scripts" entry
npm run babelNow you can run the following build
"main": "dist/index.js",Also ensure main script points to dist entry in package.json
Have some code in src/index.js
Publish transpiled code only
"prepublish": "npm run babel",Have the following in package.json in "scripts" entry
"registry": "http://localhost:8081/repository/npm-private/"
Have the following in package.json in "publishConfig" entry
npm publishPublish your module
src
.npmignore
.npmrc
.babelrc
Have this .npmignore file
You may have to login on this private registry !
Using this module
npm i -SE <your module name>Now install
registry=http://localhost:8081/repository/npm-group/Have this .npmrc file
Using the Console
Console logger forever
-
util.inspect is used behind the scene -> you can
- manage depth, colors, hidden props...
- implement object's "inspect" method to customize output
- console.trace adds a stack trace
- console.time/timeEnd measure time durations
You know console.log
NodeJS console has some specificities
Debugging agents
Debugging choices
You can
- log serialized objects
- set breakpoints in code and really navigate
- in objects
- in stacks
NodeJS debugger agent
- debugging utility accessible via a TCP-based protocol
- debugging client
- @deprecated
NodeJS debugging agent
node --debug=5858 index.js # 5858 is
                           # default port
node debug localhost:5858node index.js # pid=1234node debug -p 1234Local debug
Remote debug
node debug index.jsVia process ID (signal to start debugger + TCP)
Via TCP-based protocol
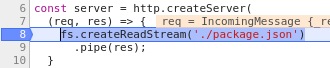
Debug example
break in index.js:7
  6 const server = createServer(
  7   (req, res) => {
> 8     fs.createReadStream('./package.json')
  9       .pipe(res);
  10  }
$ node index.js # pid 1234Starting debugger agent.
Debugger listening on 127.0.0.1:5858$ node debug -p 1234connecting to 127.0.0.1:5858 ... ok$ curl ...debug> setBreakpoint('index.js', 8)Local
Remote
User
debug> repl
Press Ctrl + C to leave debug repl
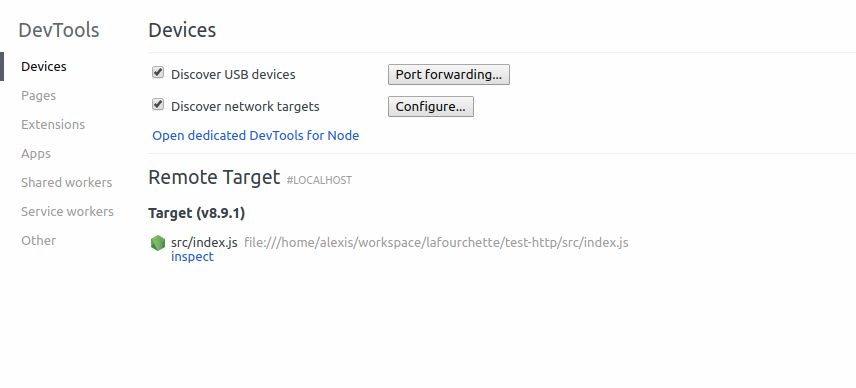
>V8 inspector integration for NodeJS
- V8 inspector
- accessible via the Chrome debugging protocol
- @experimental
V8 INSPECTOR INTEGRATION FOR NODEJS
Inspect
node --inspect=9229 index.js # 9229 is
                             # default port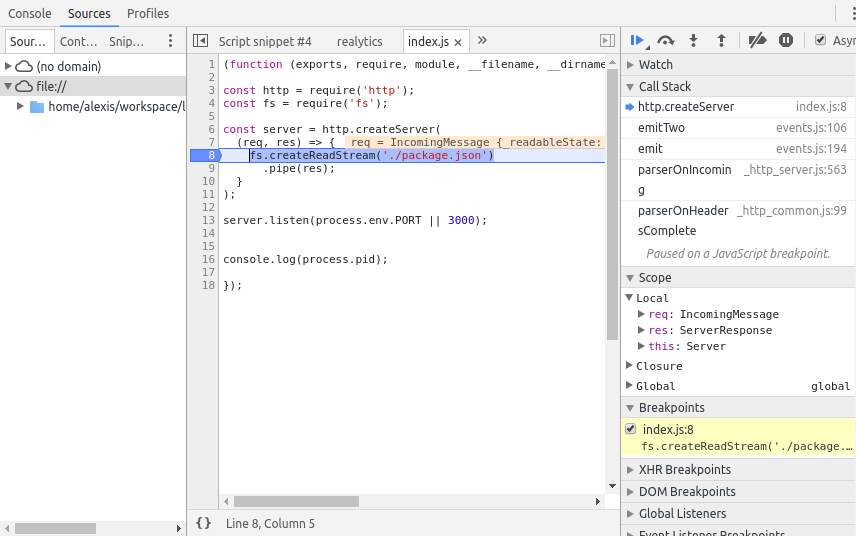
Debugger listening on port 9229.
To start debugging, open the following URL in Chrome:
    chrome-devtools://devtools/b...
Inspect example
$ node --inspect index.jsDebugger listening on port 9229.
To start debugging,
open the following URL in Chrome:
chrome-devtools://devtools/b...$ curl ...Local
Remote
User

Debugging commands
Node commands work because we tell it to interprete it with node
#!/usr/bin/env nodeIt can be run via
myCommandnode myCommandor
node --debug myCommandor even
There you can debug commands the same as other JS files
Profiling
Profile types
- CPU
- Usage
- Garbage collector
- Heap
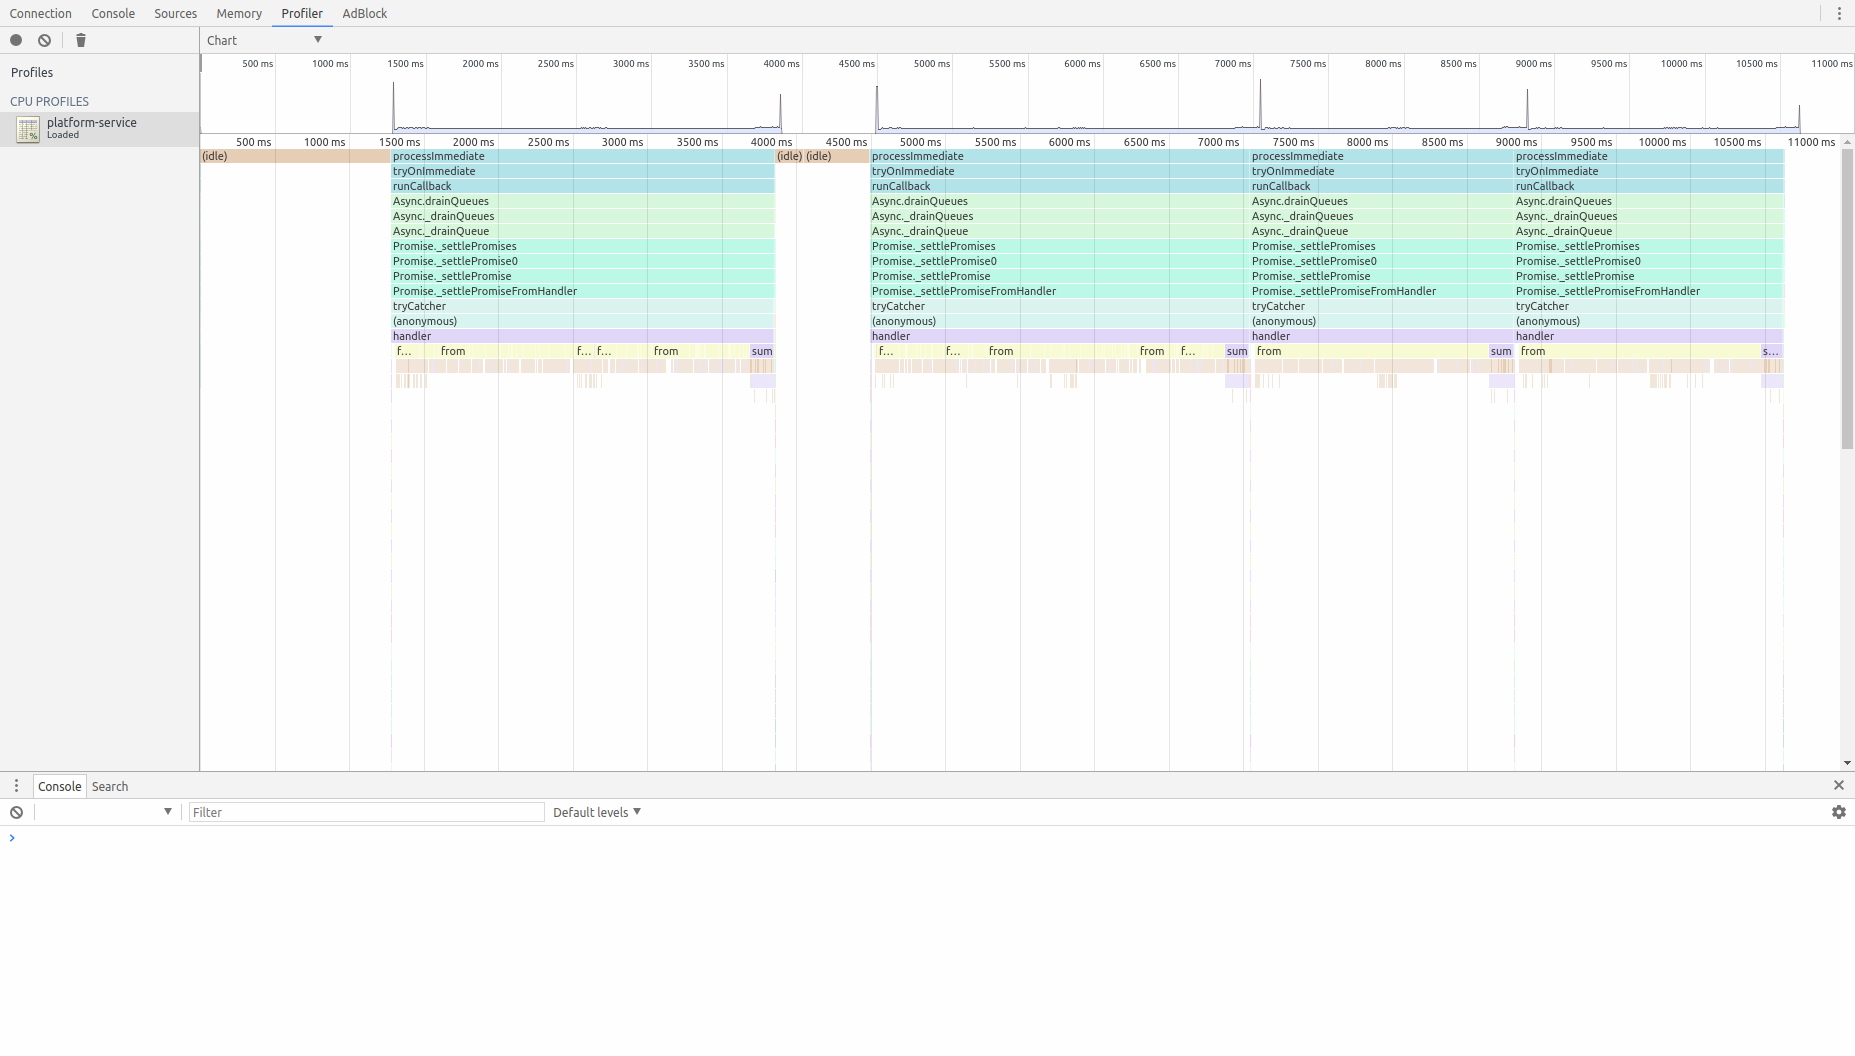
CPU/memory activity overview
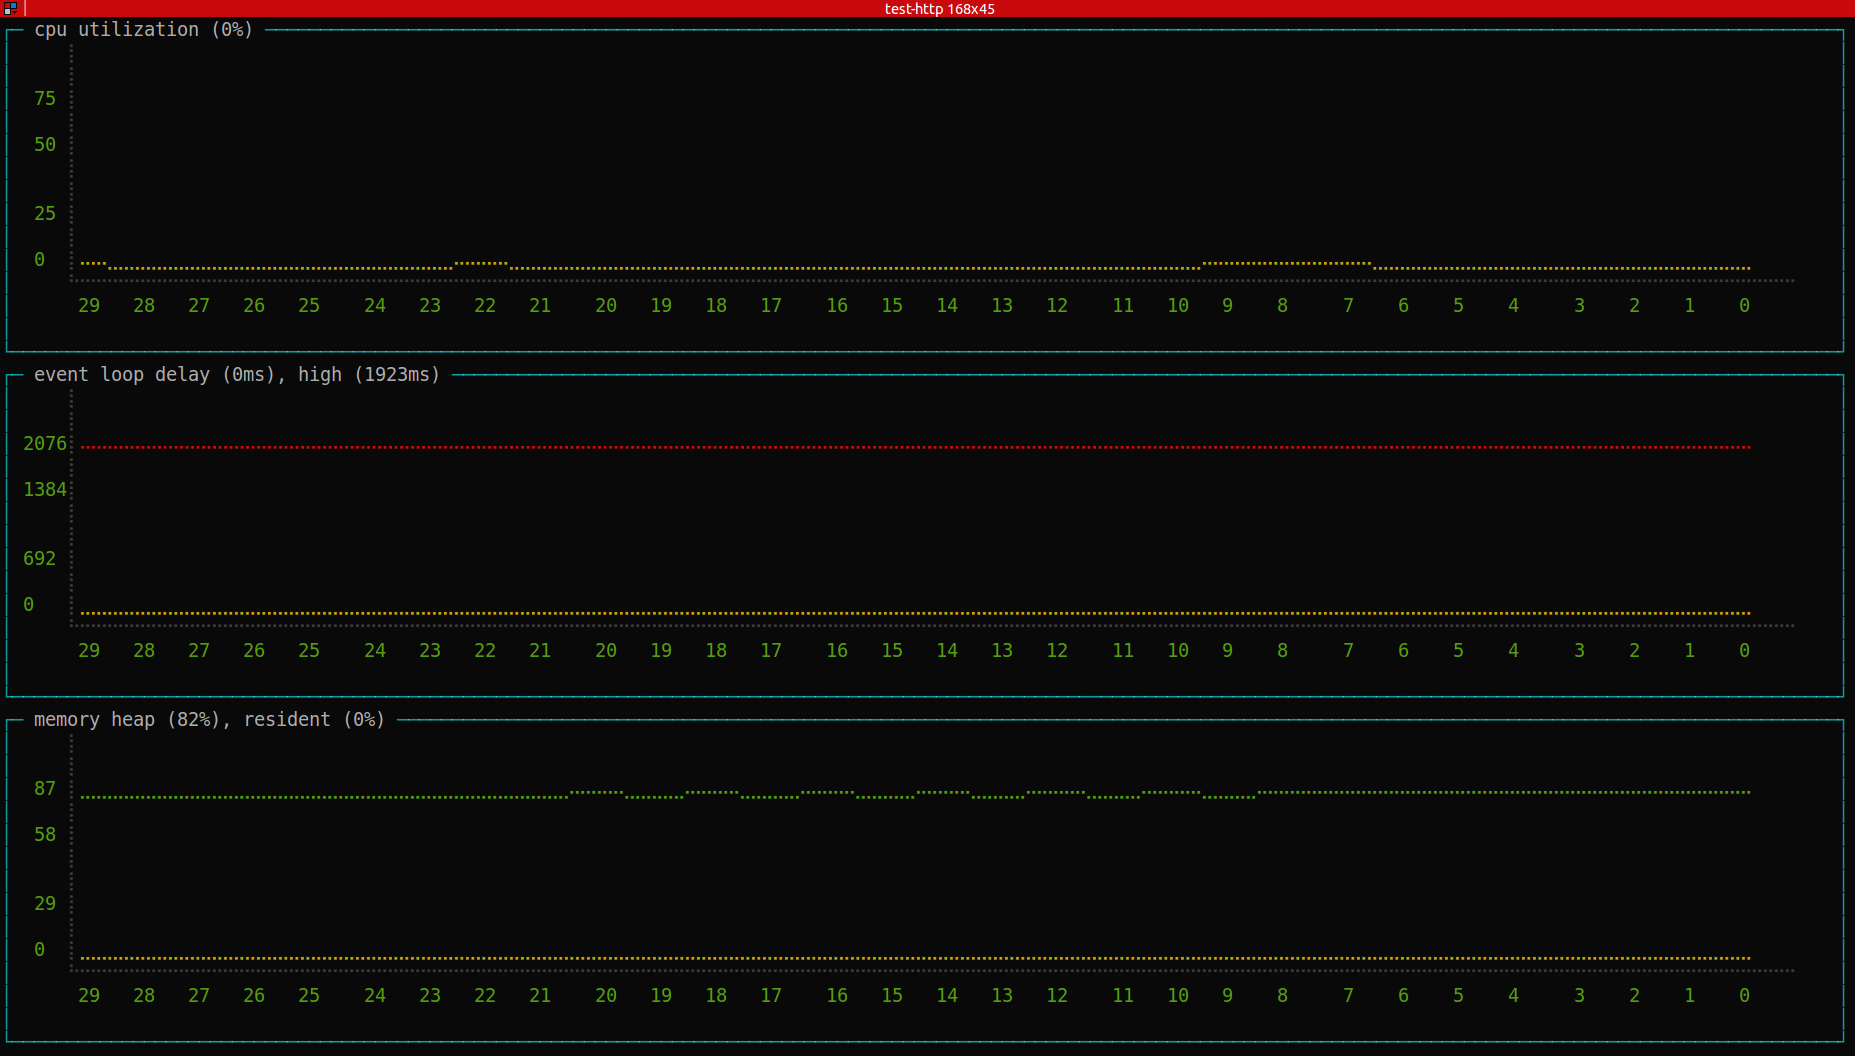
Profiling CPU
- node --inspect
- chrome://inspect
Profiling CPU (v8, node)
- --prof

Profiling CPU (tracing)
- --trace-events-enabled
- --v8-options
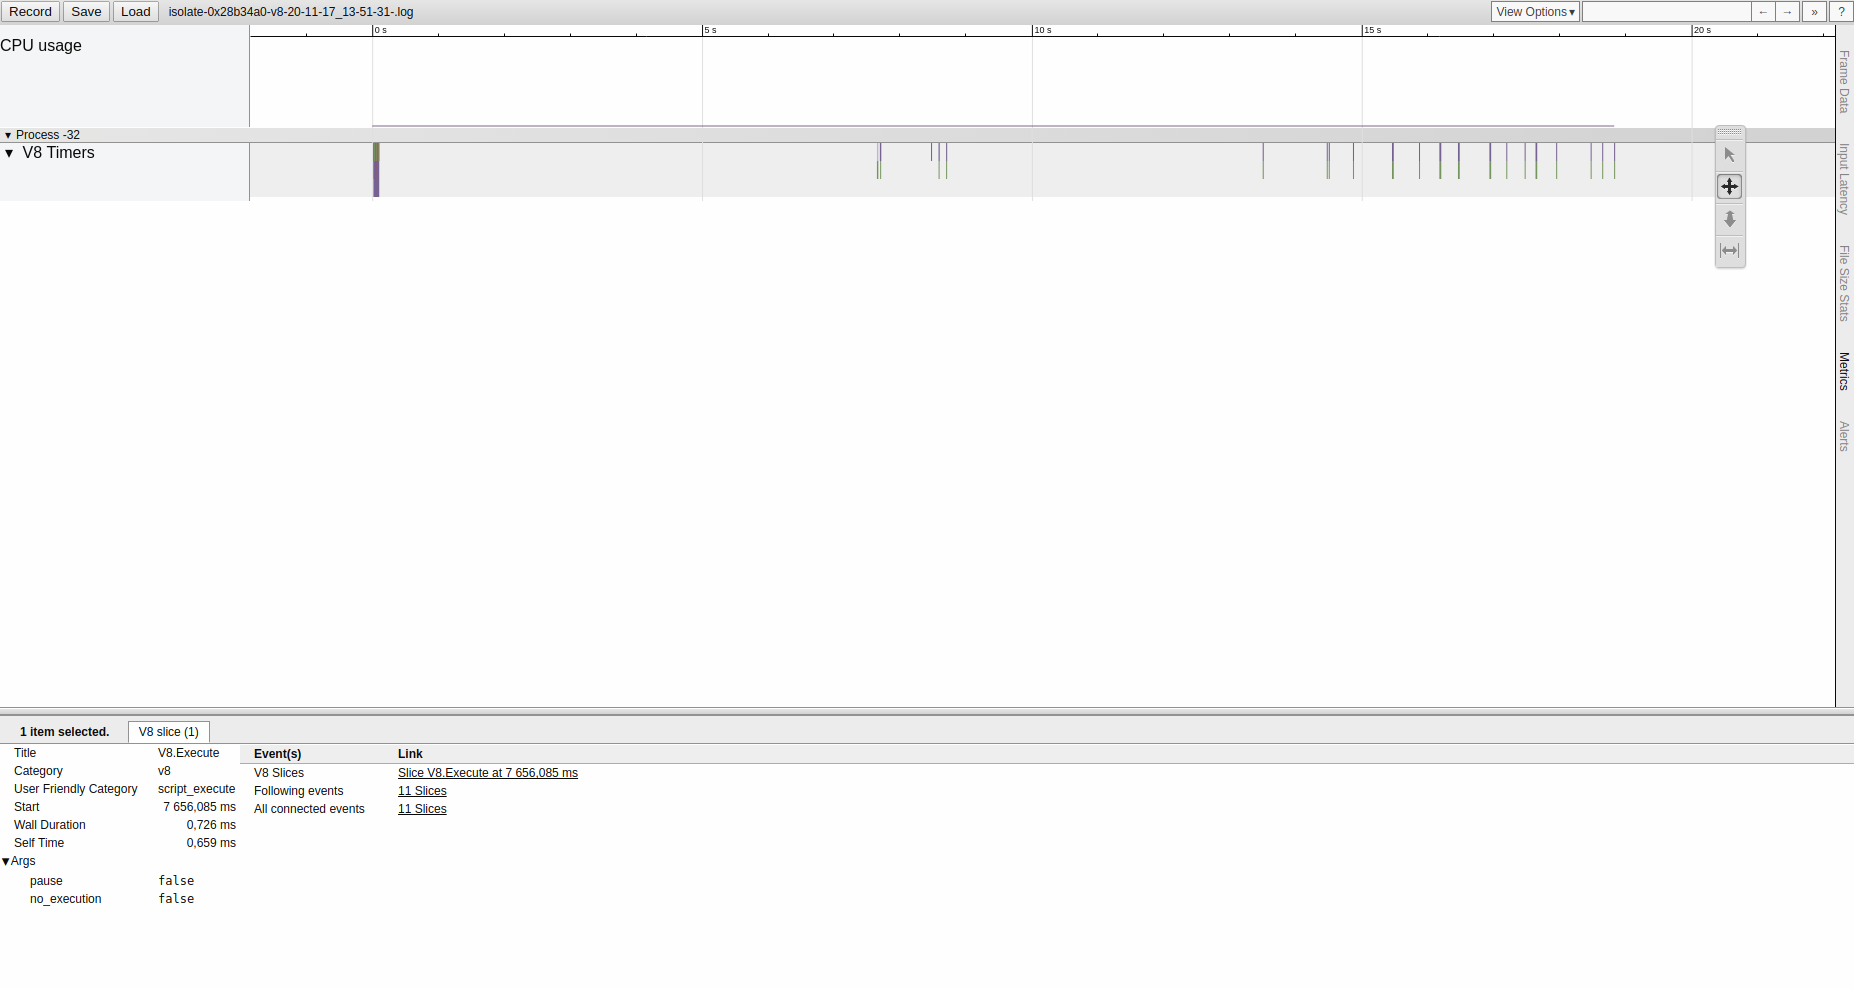
Profiling CPU
Profiling heap
Profiling garbage collector
IDE integration
IDE integration
JetBrains NodeJS plugin
- set run/debug configurations
- add breakpoints in sources
- and play
IDE integration
JetBrains NodeJS plugin configurations


debug with local or remote interpreter
Remote debug
Remote inspect
IDE integration
JetBrains NodeJS plugin advanced features
Working with source maps
Working with test suites
Execute transpiled code and break in sources
Run tests from IDE and
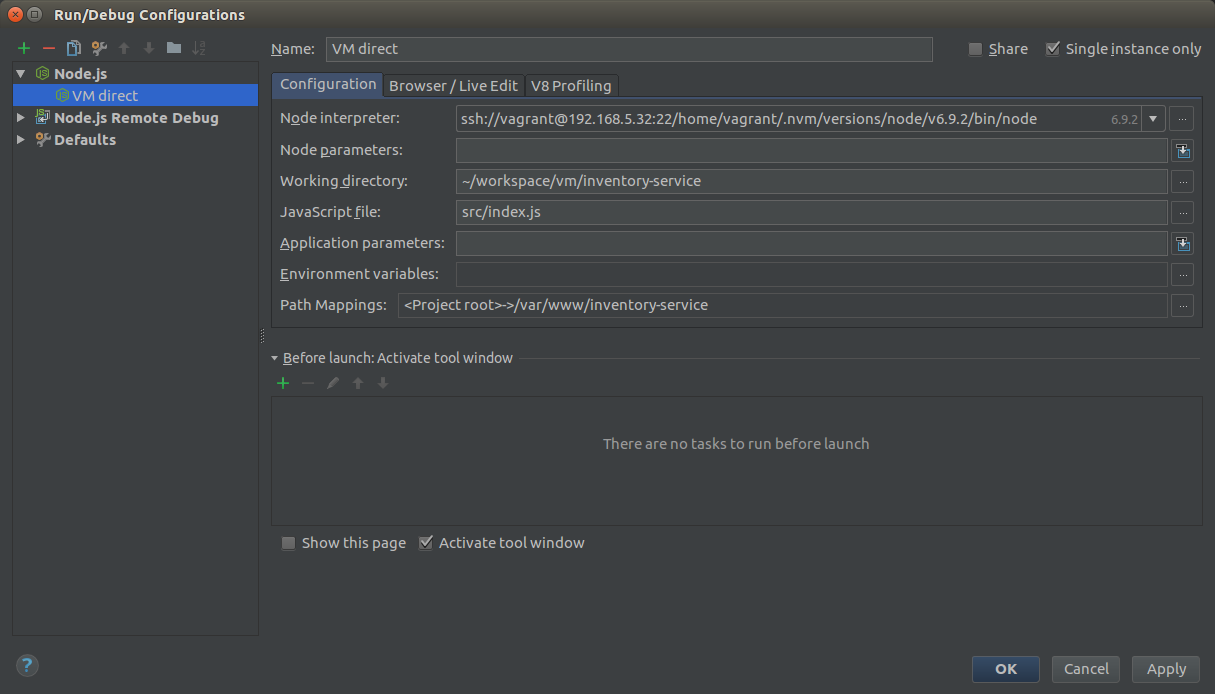
Working With NodeJS remote interpreter through ssh
Run in your VM and debug in your IDE
Working With NodeJS remote interpreter
remote node interpreter URI + path mapping = debug app run in VM
Commands
Write
#!/usr/bin/env node

const os = require("os");
const commander = require("commander");
const omelette = require("omelette");

const completion = omelette`mycommand ${[ 'start', 'stop' ]}`;
completion.init();

commander.command("completion")
  .action(() => process.stdout.write(completion.generateCompletionCode() + os.EOL));

commander.command("start")
  .action(() => console.log("start"));

commander.command("stop")
  .action(() => console.log("stop"));

commander.parse(process.argv);
Write in ./bin/mycommand.js
const completion = omelette`mycommand ${[ 'start', 'stop' ]}`;
completion.init();
commander.command("start")
.action(() => console.log("start"));
commander.command("stop")
.action(() => console.log("stop"));commander.parse(process.argv);commander.command("completion")
.action(() => process.stdout.write(completion.generateCompletionCode() + os.EOL));Publish
  "bin": {
    "mycommand": "bin/mycommand.js"
  },
Ensure package.json contains
Publish your package
npm publishInstall
Install the package previously written
Your command is linked in ./node_modules/.bin
./node_modules/.bin/
└── mycommand -> ../<package name>/bin/mycommand.js
npm i -SE <package name>and accessible in package scripts
  "scripts": {
    "start": "mycommand start"
  },
and accessible in a shell
$(npm bin)/mycommand start # local install
mycommand start # global install
completion
export PATH=$PATH:./node_modules/.binsource <(mycommand completion)Ensure local commands are accessible by name
Source the command completion
?
NodeJS
By Alexis Tondelier
NodeJS
Introduction to nodejs concepts and basic use