OmegaT
installation and setup guide
[version 5.7.2 for macOS]

If you are looking at this presentation offline, the latest version (in case of any updates) is at:
For a better view of this guide, make sure you click on the fullscreen button on the bottom right corner.

Are you running macOS?
You should use this guide if you want to use OmegaT in a computer running mac OS (version 10.12 or higher).
If your computer runs Windows, please use our regular OmegaT installation and customization guide.
OmegaT
OmegaT is the open source computer-assisted translation tool (CAT tool) which we use to translate, reconcile, adapt, review and verify materials.
Also, you will need to customize your OmegaT installation with some additional files, in order to ensure an optimal interface and compatibility with the materials.
OmegaT version
Do's
- Install OmegaT from the link provided in this guide.
- Install OmegaT version 4.3.2
- Ignore prompt to update to latest version
Don'ts
- Do not download OmegaT from another link.
- Do not install any other version of OmegaT
- Do not update OmegaT to a newer version unless you are instructed to do so.
OmegaT version
| Do's | Don'ts |
|---|---|
| Install OmegaT from the link provided in this guide. | Do not download OmegaT from another link. |
| Install OmegaT version 5.7.2. | Do not install any other version of OmegaT. |
| Ignore prompt to update to latest version. | Do not update OmegaT to a newer version if the program prompts you to. |
Install and customize
Notice that there are two steps in the installation process:
-
Installation of OmegaT (the software itself)
-
Installation of the custom files
While the customization might need to be updated often, the OmegaT version you need is unlikely to change during this cycle.
A customization update does not require re-installing OmegaT.
Choose your path
Click on the box that corresponds to your current status:
You will:
- Uninstall (other versions)
- Install OmegaT 5.7.2
- Install customization
You will:
- Install OmegaT 5.7.2
- Install customization
You will:
- Install customization

version --->
Step 0: Uninstall OmegaT
If you have OmegaT installed but its version is
different from 5.7.2, please uninstall it.
To uninstall, just drag and drop the app to the Trash.
After having uninstalled that version, please proceed to step 1 to install version 5.7.2 of OmegaT.
Step 1.0: Download installer
Please click the link below to download the installer.
The link above points to version 5.7.2 of OmegaT. (Do not install any other version.)
☝
Step 1.0: Download installer
Please click the link below to download the installer.
When you click on that link, a download will start.
Step 1.1: Install OmegaT
During the installation:
-
Choose English as the language of the installation and the interface
-
In the License Agreement screen, please select
“I accept the agreement” and click “Next” -
Tick option to create a desktop shortcut
-
In all other dialogs, just press “Next” to use the default options until you reach “Ready to Install” screen.
-
Then click on “Install”.

Step 1.1: Install OmegaT
Steps:
When you click the link, a download will start.
When the download is complete, show the zip file in Finder.
“I accept the agreement” and click “Next”Tick option to create a desktop shortcut
-
In all other dialogs, just press “Next” to use the default options until you reach “Ready to Install” screen.
-
Then click on “Install”.
click on the link
Step 1.1: Install OmegaT
-
When the download ends, Safari will unzip the file.
- If you use another browser, double-click the file to unzip it.
- A folder is created. Open it to see its contents.
- It contains the OmegaT file.
- Drag it to the Applications folder.
Step 1.2: Install OmegaT
- OmegaT is now installed.
- Go to the Applications folder, and open OmegaT there.
- Your Mac will ask for confirmation that you want to open it. Press Open.
- OmegaT will now run.
Step 2: Customization
- The OmegaT installation must be customized.
- The customization consists of adding some additional custom files to your OmegaT installation, which will allow you to work with projects provided to you.
- To do that, you must run the customization script.
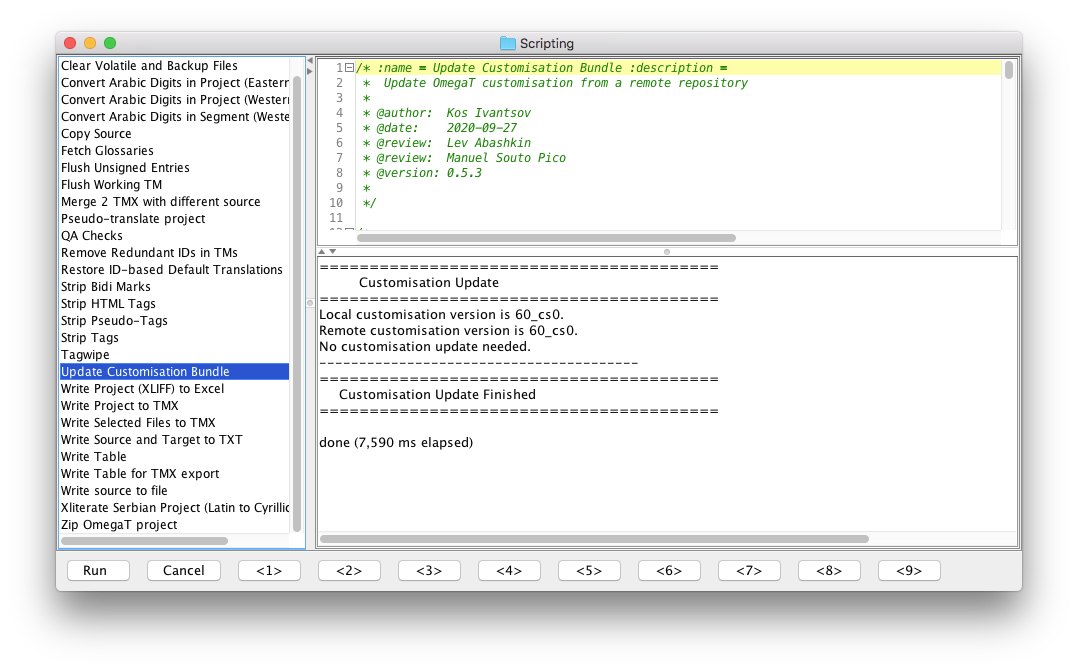
Step 2.0: Have the script yet?
It might be that you already have the customization script.
To check, in OmegaT go to Tools > Scripting. Look for Update Customisation Bundle on the list on left.
If the script is there, see step 2.3 to run it.
If the script is not there, go to step 2.1 to get it.
---
-
-
Step 2.1: Get the script
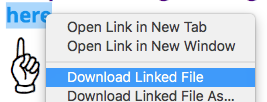
Download the updateConfigBundle.groovy script from here.
Tip: To download the script, right click on the link and select “Download Linked File”, if you use Safari (or “Save Target/Link As”, if you use Firefox or Chrome)
☝
right click
Download Linked File
1
2
Step 2.1b: If using Safari
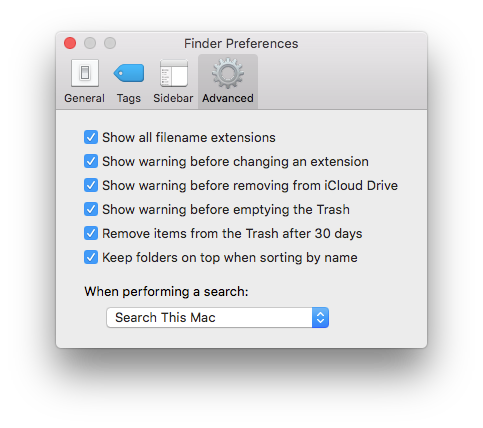
1. Make sure file extensions are not hidden:
- In Finder, go to Preferences, then go to Advanced.
- Make sure option "Show all filename extensions" is checked.
Proceed with the following steps only if your browser is Safari.
Step 2.1b: If using Safari
- Notice how the downloaded file has a .txt extension.
- Open the Downloads folder.
- Remove the .txt extension from the file.
- The file's extension should be .groovy.
Safari adds a .txt extension to the file, you must revert that.
Step 2.2: Open the script
In OmegaT, go to Tools > Scripting > File > Open script, and select the updateConfigBundle.groovy file from wherever you have saved it. Press Open.
Warning: Please do not update OmegaT to a newer version even if OmegaT prompts you to.
Step 2.3: Run the script
Press the Run button at the bottom left of the Scripting dialog.
The script will install all the necessary custom files in your OmegaT's user configuration folder.
Step 2.4: Delete some files??
It could be that the script doesn't have permissions to delete certain files in your C:\Program Files\OmegaT\plugins folder.

Step 2.5: Everything ok?
- You should now see all the script shortcuts under menu Tools > Scripting.
- You should also see menu items Import OMT package and Export OMT package under Project.
Step 2.5: Everything ok?
Under menu Tools > Scripting you should now see:
- All the script shortcuts
Under menu Project you should now see menu items:
- Unpack project from OMT file
- Pack project as OMT file
- Pack and delete project
Auxiliary tools (optional)
If you need to insert non-breaking spaces or other special characters, you might find our AutoHotKey script helpful.
-
Download and install AutoHotKey
-
Press Win+R on your keyboard and type shell:startup to open the Startup folder. Copy the path to that folder (e.g. C:\Users\<your-username>\AppData\Roaming\Microsoft\Windows\Start Menu\Programs\Startup).
-
Right click on this link, choose “Save link as” and paste the path to the Startup folder, to download the script file in that folder.
-
Right click the script file (insert_unicode_char.ahk) in the Startup folder and choose Run script.
This script will be run automatically the next time your machine starts.
Any questions?
If anything is not clear or doesn't seem to work, do not hesitate to get in touch with us through our Helpdesk.

We're here to help :)
OmegaT 5.7.2 setup guide (macOS)
By cApStAn LQC
OmegaT 5.7.2 setup guide (macOS)
OmegaT 5.7.2 for macOS


