REALTIME WEB WITH
By @cramrov
Last update: December 2014
WIP... PLEASE DO NOT READ YET
MARC ROVIRA VALL
37 years old, from Vic (Catalonia, Barcelona, Spain)
Degree in Multimedia Engineering
Degree in Computer Science
Master degree in IT Management
Postgraduate studies on Agile Methods
More info: LinkedIn
Director of the Master in Apps Design and Development
EXPERIMENT
- Open the same folder in two different windows on your computer
- Now click inside one of the two windows and delete a file

Follow these 2 simple steps:
Did the file disappear from the other window as well?

Source: Discover Meteor book
AGENDA
INTRODUCTION
GETTING STARTED
PROJECTS
DATABASES, PART 1
TEMPLATES
EVENTS
SESSIONS
DATABASES, PART 2
Material based on Your First Meteor Application book
AGENDA
FORMS
ACCOUNTS
PUBLISH & SUBSCRIBE
METHODS
STRUCTURE
DEPLOYMENT
CONCLUSION
Material based on Your First Meteor Application book
INTRODUCTION
- Bullet One
- Bullet Two
- Bullet Three
¿¿??
- Bullet One
- Bullet Two
- Bullet Three
Prerequisites
- Prior experience with Meteor
- To have made a web application before
- To consult any other sources along the way
- A basic understanding of JavaScript
- A basic understanding of databases
You won't need:
You will need:
- A computer with any of the major operating systems
- A text editor
- A relatively modern web browser
You will also need:
Summary
In this chapter, we've learned that:
- Meteor is a fascinating framework that is great for beginning developers who have never built a web application before.
- You won’t need a lot of background knowledge to get started with Meteor, but the more you know about JavaScript development and database theory, the better.
- You don’t need much stuff to get started with Meteor. There’s a very short distance between learning about Meteor and actually writing code.
GETTING STARTED
I’ll assume two things in the coming chapter:
- You haven’t operated a computer with the command line.
- You haven’t installed Meteor.
If these assumptions are wrong, feel free to skim this chapter. If these assumptions are not wrong though, then we’ll cover the basics to get you writing code as soon as possible.
Command Line
All major operating systems have one of these applications but the name will vary depending on the system:
- On Mac OS X it is called Terminal
- On MS Windows it is called Command Prompt
- On Linux usually it is called Terminal
Once upon a time, computers didn't have graphical user interfaces with buttons, windows, and menus.
These days, command line interfaces as they’re known — CLI for short — are used by people who forgot to update their operating systems, and computer programmers.
For these reasons, there’s no “Meteor” application with an icon that we double-click to launch and there’s no menu system for us to navigate.
Installing Meteor
- Mac: OS X 10.6 and above
- Linux: x86 and x86_64 systems
At the moment, Meteor is officially supported on:
There is an official Preview of Meteor on MS Windows
Start by typing the following into the command line:
$ curl https://install.meteor.com/ | shThis will download and install Meteor on our local system.
Installing Meteor (Alternative)
Here’s what you need to do:
- Register for an account
- Create a “Box” using the “Meteor” template
- Happy coding! ;)

Then, once you’re done, you’ll be able to:
- Run commands through the web-based command line
- Preview your application from within the web browser
- Manage your files as you normally would
Summary
In this chapter, we've learned that:
- Before computers had graphical interfaces, they were controlled through the use of commands. These days, commands are heavily used by developers.
- Meteor is officially supported on Mac and Linux but it’s just a matter of time before official support arrives for Windows.
- If you’re a Windows user, Nitrous makes it possible to develop Meteor applications from any sort of machine.
To gain a deeper understanding of what we've covered:
- Read through The Command Line Crash Course. This isn't necessary reading but, the more you know about the command line, the more productive you can be.
PROJECTS
The biggest mistake that most beginning developers make is attempting to learn “how to make a web application” without having a precise idea of what they’re trying to make.
With this in mind, we’re going to build Leaderboard.
Why Leaderboard?
Reasons:
- The application already exists
- The application is simple
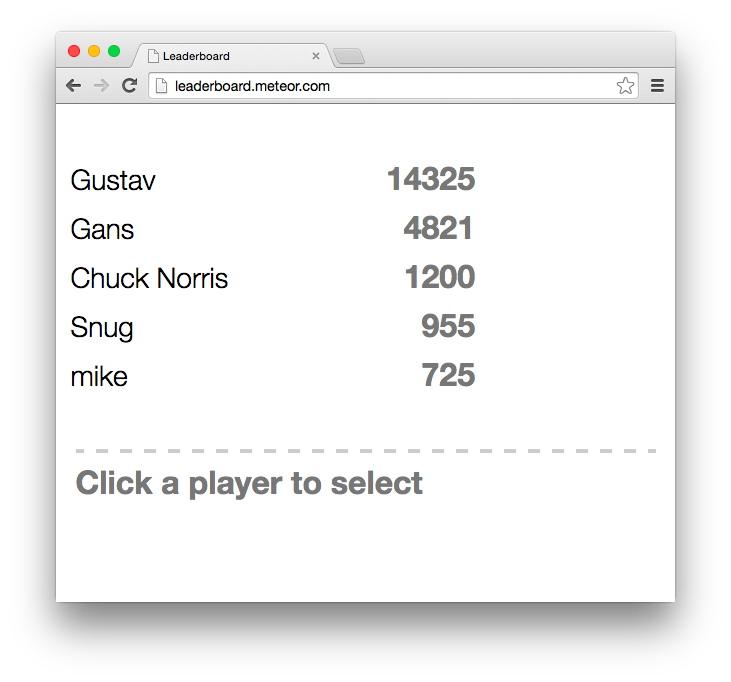
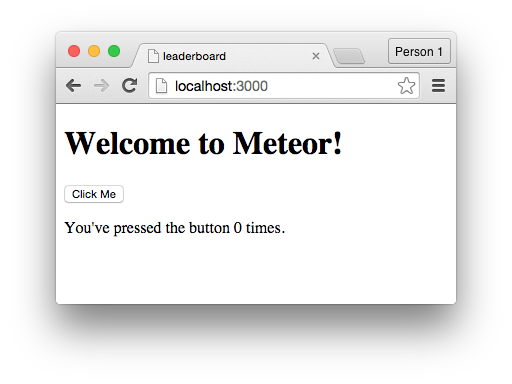
Before we continue, visit leaderboard app and play around with the original application.
While doing this, take note of its core features:
- There’s a list of players
- Each player has a score
- Players are ranked by their score
- You can select a player by clicking on them
- You can increment a selected player’s score
We’ll create additional features in later chapters.
Create a Project
Every project will be different but will generally contain:
- HTML files, to create the interface
- CSS files, to assign styles to the interface
- JavaScript files, to define application logic
- Folders, to keep everything organised
To start creating our first Meteor application, we’ll need to create our first project, and a project is the self-contained set of files that forms the foundation of an application.
A project can contain other types of files, like images and CoffeeScript files, but we’ll keep things as simple as possible and only work with what we need.
Create a Project
First, we’ll create a folder to store our Meteor projects. We don’t have to create this folder but, for the sake of keeping things organised, it’s a good idea.
$ mkdir MeteorWith this directory in place, we can navigate into it by writing:
$ cd MeteorTo then create a Meteor project inside this directory, use the following command:
$ meteor create leaderboardThis command has three parts:
- The meteor part defines this as a command for Meteor itself.
- The create part clarifies that we want to create a Meteor project.
- The leaderboard part is the name we’re assigning to our project.
Create a Project
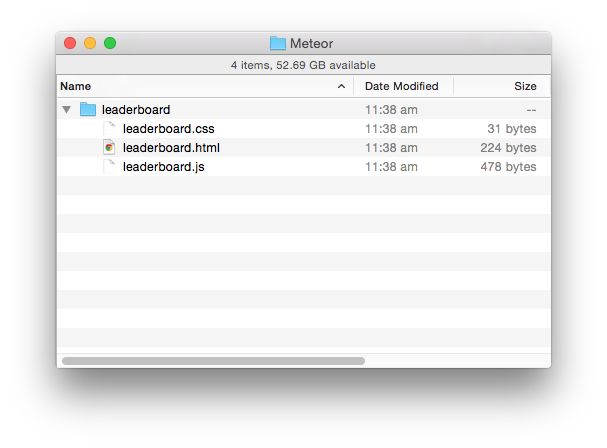
After running this command, a “leaderboard” directory will appear inside the “Meteor” folder and, by default, this folder will contain three files:
- leaderboard.html
- leaderboard.css
- leaderboard.js
Create a Project
It will also contain a hidden folder — .meteor — but if your operating system hides this folder from view, that’s fine. We won’t be touching it for now.
Local Servers
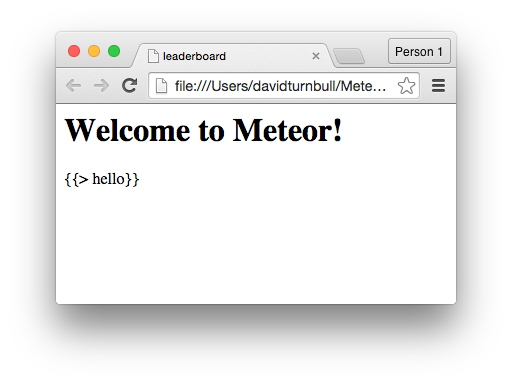
Web applications are not like static websites. We can’t just open the leaderboard.html file and see the dynamic wonders of a Meteor application. In fact, if we open that file in Chrome, all we’ll is see some static text:
- See the processed results of our JavaScript code
- Run a database on our local machine
Local Servers
To get our web application working, we need to launch what’s known as a local server. This is a web server that runs on our local machine, which allows us to:
If you’ve used an application like MAMP for development with PHP and MySQL, this will be familiar, but if all of this sounds new and scary, don’t worry. It’s simple in practice.
Through the command line, let’s first change into the “leaderboard” directory:
$ cd leaderboardThen enter the following command:
$ meteor runLocal Servers
Here, the meteor part defines this as a Meteor command and the run part clarifies the precise action we want to take. In this context, we’re attempting to run the local server.
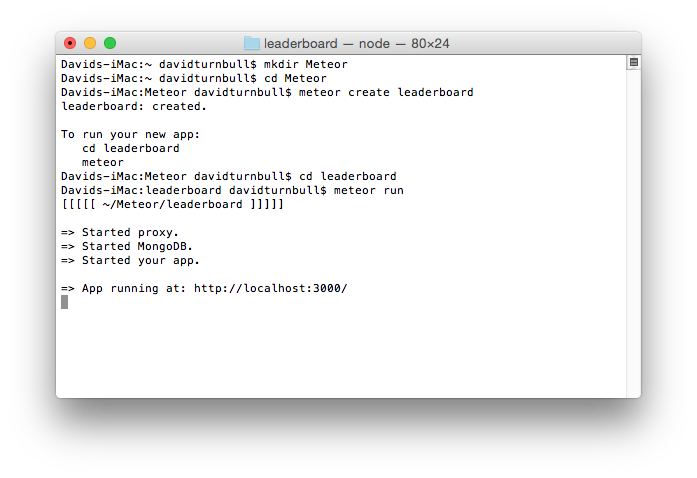
These lines confirm that the local server is starting and that last line provides us with a URL that we can now use to view our Meteor project in a web browser: http://localhost:3000
Local Servers
Navigate to this URL from inside Google Chrome and notice that we’re not seeing some static text like before. Instead, we’re seeing a real, functional web application.
Local Servers
To continually see the results of our code, we’ll need to keep the local server running. This simply means leaving the command line open from this point onward. You will, however, need to open a separate tab or window to write further commands:
To stop the local server, either quit out of the command line or, with the command line in focus, press the CTRL + C combination on your keyboard. To then start the local server again:
$ meteor runDefault Application
The application we see inside the browser at this point is a result of the code that’s included with every Meteor project by default.
For the moment, open the files inside the project’s folder and delete all of the code. Don’t event look at the code. Just get rid of it. We want to start from a completely blank slate.
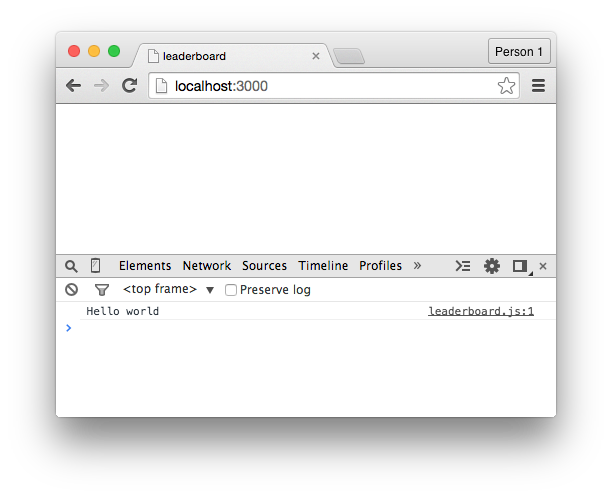
Once that’s done, type the following into the JavaScript file:
console.log("Hello world");Default Application
Save the file, then open the JavaScript Console from inside Google Chrome:
- Click on the View menu
- Hover over the Developer option
- Select the JavaScript Console option
Default Application
If all of this is familiar, great. If it’s not familiar though, then know that console.log statements are used to see the output of code without creating an interface to display that output. This means that, before we invest time into creating an interface, we can:
- Confirm that our code is working as expected
- Fix any bugs that may arise
We can also use the JavaScript Console to:
- Debug our application
- Manipulate our application’s database
As such, leave the Console open from this point onward. You can, however, delete the console.log statement from inside the JavaScript file.
Summary
In this chapter, we've learned that:
- The first step in building a web application — and in learning how to build a web application — is to have a clear idea of what you’re trying to build.
- The command line can be used to achieve familiar tasks, like creating and navigating between folders.
- When developing a Meteor application, we refer to it as a “project”, and we can create a project with the meteor create command.
- To run our applications on our local machines, we can use the meteor run command to start a local web server.
- We can use console.log statements and the JavaScript console as a very handy companion during Meteor development.
Summary
To gain a deeper understanding of Meteor:
- Play around with the original Leaderboard application (if you haven’t already). It doesn't have a lot of features but that just means there’s no reason you can’t have a very clear grasp of its functionality.
- Close the command line application, then open it again and get back to where you were. You should be able to navigate back into your project’s folder with the cd command and start the local server with meteor run.
To see the code in its current state, check out the GitHub commit.
DATABASES, PART 1
So we won’t start by talking about how to create the interface for a Meteor application. Instead, we’ll talk about creating and managing a database for our project.
Talking about creating an interface as soon as possible introduce a couple of problems:
- It’s harder to grasp anything relating to the front-end (the interface) when you’re not yet familiar with what’s happening on the back-end (the database, etc).
- If we talk about the front-end first, we’ll have to back-track in the next chapter anyway, so any sensation of making quick progress is short-lived.
MongoDB vs. SQL
If you’ve been building stuff on the web for a while, you’ve probably come into contact with a database (WordPress blogging platform, phpMyAdmin, PHP...).
In these cases, you would have come into contact with an SQL database.
By default, every Meteor project comes with its own database with the following features:
- There’s no setup or configuration required.
- As soon as you create a project, the database is also created.
- Whenever the local server is running, so is the database.
This database, however, is not an SQL database. Instead, it’s what’s known as a MongoDB database.
For the moment, you only need to know two things:
- There’s no other type of database officially available for Meteor.
- MongoDB uses different words to describe familiar concepts.
MongoDB vs. SQL
SQL
MongoDB
Database
Table
Row
Column
Primary key
Database
Collection
Document
Field
Primary key
Create a Collection
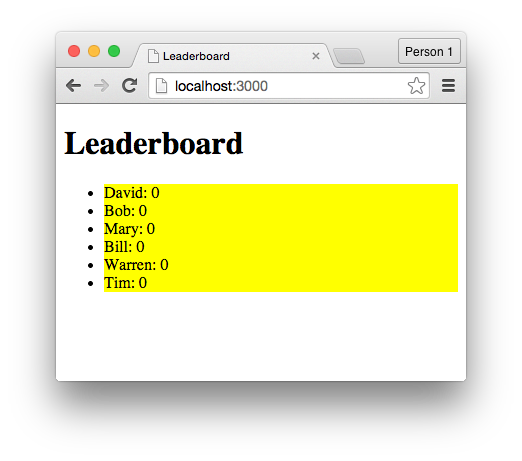
The core feature of the original Leaderboard application is the list of players.
Knowing this, we can ask ourselves two questions:
- Where do we store the data associated with each player?
- How do we display this data from within the interface?
We’ll answer that second question in the next chapter, so let’s focus on the first one: “Where do we store the data associated with each player?”
Create a Collection
The facetious answer would be “in a database”, but the far more useful answer would be “in a collection”, and as shown in the previous section, a collection is equivalent to an SQL table.
Since we’re creating the Leaderboard application, we’ll create a collection for the players.
To do this, open the JavaScript file and write the following statement:
new Mongo.Collection('players');Create a Collection
Here, we’re creating a collection named “players” inside our project’s MongoDB database. You can name the collection whatever you like but it does have to be unique. If the name is not unique, Meteor will return an error.
Despite this line of code though, we still have a problem: there is no way for us to reference this collection, and therefore, we have no way of manipulating it.
To fix this, we’ll place our collection inside a variable:
PlayersList = new Mongo.Collection('players');Create a Collection
But notice that we didn’t use the var keyword, and that’s because we want to create a global variable. This means we’ll be able to reference and manipulate the collection throughout all of our files, rather than within a much more limited scope.
To confirm that the collection exists, save the file and switch back to Google Chrome. Then enter the name of the collection’s variable into the Console:
> PlayersListYou should see something like the following:
Create a Collection
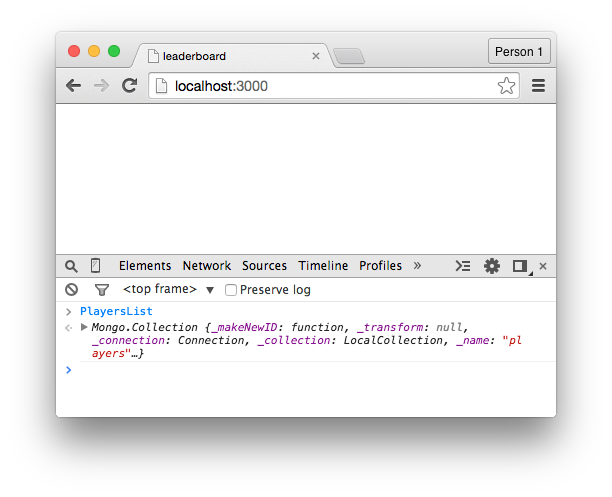
This shows that the collection is working as expected.
Inserting Data
When we want to insert data into a MongoDB collection, we have three options:
- Insert data through the JavaScript Console
- Through the JavaScript file
- Through a form in the interface
We’ll use all three options throughout this course but it’s the first option that is the simplest to get started with, so let’s begin there.
Inside the Console, write the following:
> PlayersList.insert()Inserting Data
This is the syntax we use to manipulate our collection. We start with the “PlayersList” variable associated with our collection, and then attach a function to it. In this case, we’re using the insert function, but there’s other functions available like find, update, and remove (and we’ll cover all of these soon enough).
But while we have a valid function in place, we need to pass some data between the brackets for this statement to do anything.
Inserting Data
What we need to do is pass JSON-formatted data between the brackets. This data will then be inserted into the collection. If you’re not familiar with the JSON format, look at this:
{
  name: "David",
  score: 0
}
Here, there’s a few things going on:
- This data is wrapped in a pair of curly braces
- We’ve defined a pair of keys
- We’ve defined the values associated with our keys
- We’ve separated these key-value pairs with commas
Inserting Data
Knowing this, we can pass this data between the brackets of the insert function:
PlayersList.insert({
  name: "David",
  score: 0
});
This is a complete insert function and, if we type this into the Console and tap the “Return” key, a document will be created inside the “PlayersList” collection.

Inserting Data
Documents are equivalent to SQL rows and, at this point, our intent is to create one document for every player we want in our collection. So if we want our leaderboard to contains six players, we’ll use the insert function six times, thereby creating six documents.
> PlayersList.insert({ name: "Bob", score: 0 })
> PlayersList.insert({ name: "Mary", score: 0 })
> PlayersList.insert({ name: "Bill", score: 0 })
> PlayersList.insert({ name: "Warren", score: 0 })
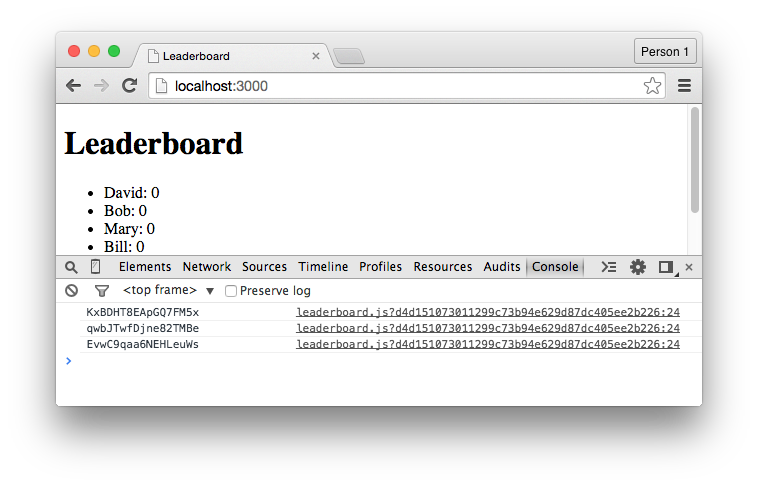
> PlayersList.insert({ name: "Tim", score: 0 })Also notice that, after creating each document, a random jumble of numbers and letters appears in the Console. This jumble is a unique ID that’s automatically created by MongoDB and associated with each document. It’s known as the primary key and it’ll be important later on.
Inserting Data
Before we continue, insert a few more players into the collection. The example application has six players and that should be enough.

Finding Data
Now that we have a collection that contains some data, it makes sense for us to retrieve that data. In the next chapter, we’ll retrieve the data through the interface of our web application, but for now, let’s once again do it through the Console.
> PlayersList.find()Here, we’re using this find function. It’s used to retrieve the data from the collection and, because we’re not passing anything between the brackets, this statement will retrieve all of the data from the collection.
Finding Data
After tapping the “Return” key, the following will appear in the Console:
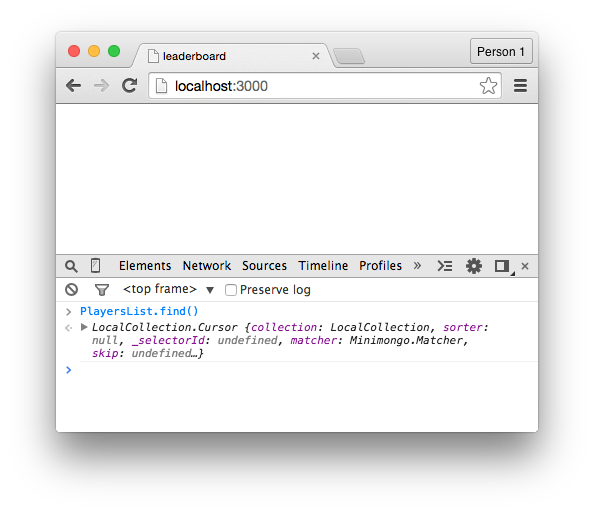
This, obviously, isn’t the most readable response to our statement. Our application can make sense of it but we can’t. We can, however, pair it with a fetch function to convert the retrieved data into an array:
> PlayersList.find().fetch()Finding Data
You’ll then see the following:
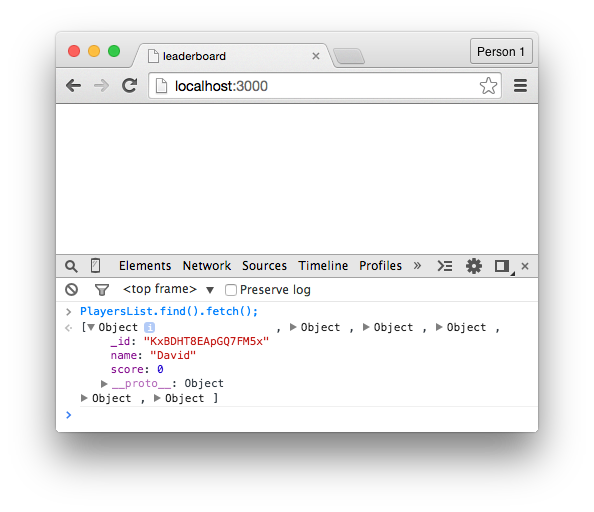
This result is easier to read and, if we click on the downward-facing arrows, we can see the data associated with each document inside the collection, including:
- The _id field, which stores the unique ID of that document (the “primary key”).
- The name field, which stores the name of a player.
- The score field, which stores the score of a player.
Finding Data
But what if we wanted to retrieve a precise selection of data, rather than all of the data from a collection? To achieve this, we can pass JSON-formatted data between the brackets:
> PlayersList.find({ name: "David" }).fetch()Here, we’re passing a field name and a value through the find function and, as a result, we’re able to retrieve only the documents where the the player’s name field is equal to “David”. In our case, this will only retrieve a single document, but if our collection contained multiple players with the same name, they would all be returned based on this query.
Finding Data
What’s also useful is our ability to count the number of documents in a collection by attaching the count function to the find function:
> PlayersList.find().count()If you have six players (documents) inside the collection, these functions will return 6.
Summary
In this chapter, we've learned that:
- After creating a Meteor project, a MongoDB database is automatically created for us and, when the local server is running, so is the database.
- MongoDB is different from SQL, but the differences as a beginner are mostly insignificant. If you have any database experience, you can grasp MongoDB.
- To store data inside our application’s database, we need to first create a collection. This is possible with a single statement.
Summary
In this chapter, we've learned that:
- By using an insert function, we’re able to insert data into a MongoDB collection. This data is structured in the JSON format.
- By using a find function, we’re able to retrieve data from a MongoDB collection. This data can be easily navigated with the JavaScript Console.
- We can attach the fetch and count functions to the find function to change the final output into either an array or a numerical value.
Summary
To gain a deeper understanding of Meteor:
- Notice how we haven’t pre-defined a structure for our database. Instead, the database structure is created on-the-fly as we use the insert function.
- In a separate project, create a MongoDB collection that stores a different type of data. You might, for instance, want to create a collection that stores blog posts. What sort of fields would that collection have?
To see the code in its current state, check out the GitHub commit.
TEMPLATES
In this chapter, we’ll start building the user interface for our application. This is where we’ll create our first templates .
<head>
  <title>Leaderboard</title>
</head>
<body>
  <h1>Leaderboard</h1>
</body>
There’s nothing overtly special about this code, but there does appear to be a few things missing:
- We haven’t included the html tags.
- We haven’t included any JavaScript files.
- We haven’t included any CSS files.
To begin, place the following code inside the leaderboard.html file:
Create a Template
Templates are used to create a connection between our interface and our JavaScript code. When we place interface elements inside a template, we’re then able to reference those elements using our application logic.
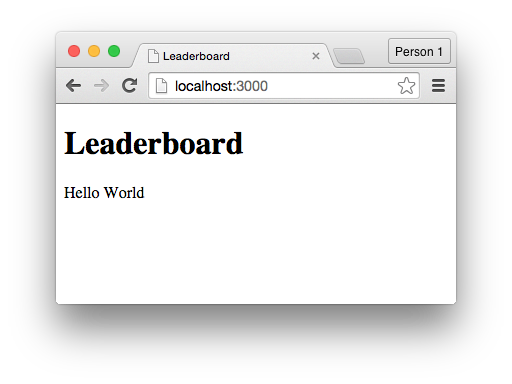
<template name="leaderboard">
  Hello World
</template>
Here, we’re using this template tag, and also attaching a name to this template with the name attribute. In this case, the name of our template is “leaderboard” and we’ll reference this name in a moment from inside the JavaScript file.
To create a template, add the following code at the bottom of the HTML file:
Create a Template
If you save the file in its current state though, the template doesn’t appear inside the web browser. It’s inside the HTML file, but nowhere else. This is because, by default, templates don’t appear inside the interface. This might sound weird, but consider that, in some cases:
- You might want a template to appear at certain times.
- You might want a template to disappear at certain times.
- You might want a template to appear in multiple locations.
As such, we need to manually include our templates inside the interface.
Create a Template
To make the “leaderboard” template appear inside the browser, place this tag between the body tags inside the leaderboard.html file:
{{> leaderboard}}Obviously, this isn’t HTML. Instead, the use of double-curly braces means this is the Spacebars syntax, and Spacebars is the syntax we use in our HTML when we want something dynamic to occur. We’ll use Spacebars throughout this course but, for now, know that:
- All Spacebars tags use double-curly braces to distinguish themselves.
- We only use the greater-than symbol when we want to include a template.
Create a Template
Based on these additions, the HTML file should now resemble:
<head>
<title>Leaderboard</title>
</head>
<body>
<h1>Leaderboard</h1>
{{> leaderboard}}
</body>
<template name="leaderboard">
Hello World
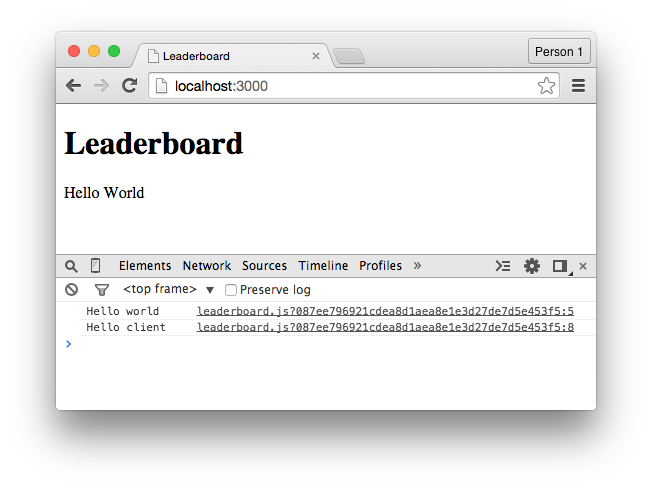
</template>…and after saving the file, the “Hello World” text from the “leaderboard” template should appear inside the browser.
Client vs. Server
Before we continue, I want to demonstrate something. You don’t have to completely grasp what we’re about to cover but do follow along by writing out all of the code yourself.
console.log("Hello world");This is the same log statement we wrote before and, after saving the file and switching to the browser, you should see the “Hello world” message appear inside the Console:
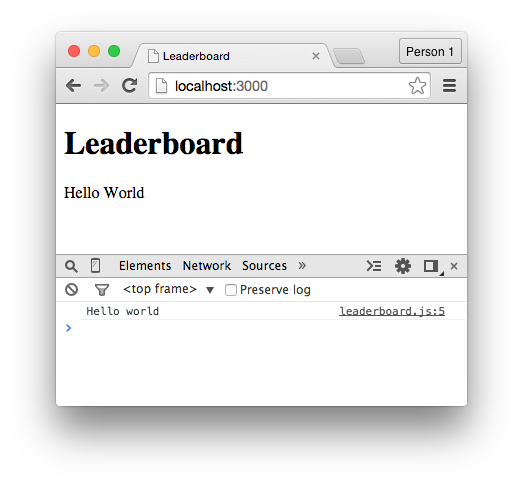
Inside the JavaScript file, write the following console.log statement:
Client vs. Server
What I didn’t mention last time though is that, as a result of this statement, something else is also happening, because if we switch to the command line, we can see that the “Hello world” message also appears here:
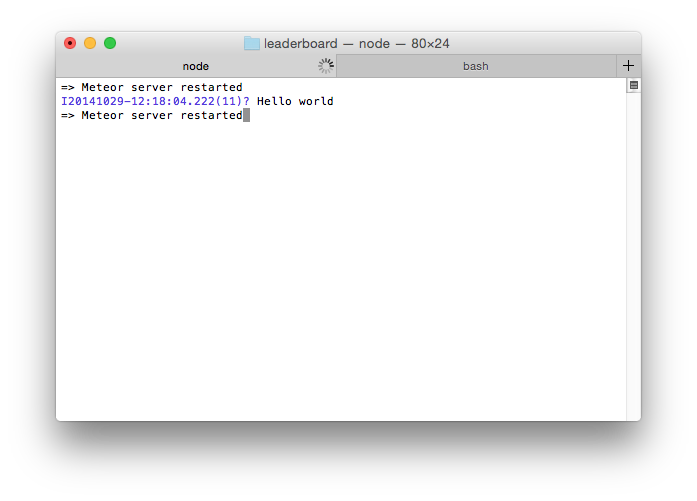
Client vs. Server
This is significant because we’ve written one line of code that’s executed in two places. The code is running on both the client (within the user’s browser) and on the server (where the application is hosted).
console.log("Hello world");But why does that matter?
There’s a few reasons, but here’s one example:
Ever since we created the “PlayersList” collection, the following statement has been running on both the client and the server:
Client vs. Server
But the code doesn't do the same thing in both places:
- When the code is executed on the server, a collection is created inside the MongoDB database. This is where our data is stored.
- When the code is executed from inside the user’s web browser (from the client), then a local copy of that collection is created on that user’s computer. As a result, when the user interacts with our database in any way, they’re interacting with a local copy. This is partly why Meteor applications are real-time by default. Data is manipulated on the user’s local machine and then invisibly synced in the background with the actual, server-side database.
Client vs. Server
If this all sounds a bit too conceptual though, fear not. You don’t have to understand the finer points of Meteor’s “magic”. You just need to grasp that one line of code can:
- Run in two different environments (on the client and on the server).
- Behave differently depending on the environment.
That said, in some cases, we don’t want our code running in two places at once. If, for instance, we write code that only affects the interface of our application, it wouldn’t make sense for that code to run on the server. We’d only want it to run on the client.
Client vs. Server
To accomodate for this, Meteor comes with a pair of conditionals that we’ll be using throughout this course to determine what code runs in which environment. You’ll have a much better idea of when these conditionals are relevant as we progress through the chapters but, once again, follow along by writing out all of the code.
First, we’ll write a Meteor.isClient conditional beneath the console.log statement that we wrote a moment ago:
if (Meteor.isClient) {
  // this code only runs on the client
}
Client vs. Server
This conditional allows us to exclusively execute code on the client — from inside the user’s web browser. To demonstrate this, add a console.log statement to this conditional:
if (Meteor.isClient) {
  console.log("Hello client");
}
Save the file, switch to the browser, and notice that this “Hello client” message appears in the Console. Also notice, however, that the message does not appear inside the command line. This is because the code is not being executed on the server.
Client vs. Server
We can also create the reverse effect by creating a Meteor.isServer conditional:
if (Meteor.isServer) {
  // this code only runs on the server
}
Once again, we’ll place a console.log statement inside this conditional:
if (Meteor.isServer) {
  console.log("Hello server");
}
Client vs. Server
Then, after saving the file, notice that the “Hello server” message does not appear inside the Console, but does appear inside the command line. This is because the code is only being executed on the server (where the application is hosted).

Client vs. Server
But if all of this is too much to grasp, just remember two things:
- A single line of code in our Meteor application can run on both the client and the server.
- Sometimes, we don’t want our code to run in both places.
Like I said, the precise moments where this is relevant will become clearer as we make progress through the course. For now, just delete the console.log statements we’ve created, but leave the conditionals where they are. We’ll be using them soon.
Create a Helper
At this point, our “leaderboard” template only shows the static “Hello World” text. To fix this, we’ll create a helper function, and a helper function is a regular JavaScript function that’s attached to a template, allowing us to execute code from within our interface.
To begin, we’ll take an old approach to creating helper functions. This approach is deprecated, meaning it’s no longer officially supported and, by the time you read these words, it may not work at all. Even so, this older format is easier to teach and understand, and we’ll talk about the proper approach in a moment anyway.
Create a Helper
Inside the JavaScript file, write the following inside the isClient conditional:
Template.leaderboard.playerThis is the deprecated syntax for creating a helper function and, here, there’s three things going on:
- The Template keyword searches through the templates in our Meteor application.
- The leaderboard keyword is a reference to the name of the template we created earlier.
- The player keyword is a name we’re giving to this function.
Create a Helper
To attach code to this helper, we can associate it with a function, like so:
Template.leaderboard.player = function() {
  // code goes here
}
Using the word “helper” might make this sound fancy but we haven’t done anything special here. We’ve created a function, given it a name of player, and by referencing that name, we can execute this function from inside the “leaderboard” template.
Create a Helper
At this point, we’ll add some functionality to the helper function by using a return statement and passing through a static string:
Template.leaderboard.player = function() {
  return "Some other text";
}
Then we’ll remove the “Hello World” text from the “leaderboard” template and replace it with the following tag:
{{player}}Create a Helper
Here, we’re using another Spacebars tag, as evidenced by the use of double-curly braces. Notice, however, that we’re not using the greater-than symbol, and that’s because we’re not including a template. Instead, we’re referencing the name of the player function.
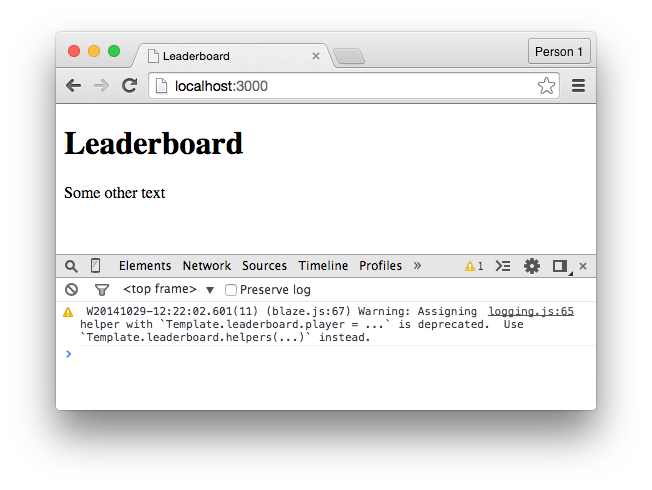
After saving the file, the text from the return statement should appear inside the browser:
Create a Helper
If the text doesn't appear, there’s either something wrong with the code, or this approach to creating helpers has been removed from Meteor. If you’re unsure of which it is, check your code for bugs. If your code is exactly what I've told you to write and it’s still not working, fear not.
Template.leaderboard.helpersNow that you know the old way to create helper functions, we’ll discuss the new way.
Delete all of the code we just wrote and, in its place, write:
Create a Helper
Looks familiar, doesn't it?
We have this Template keyword, which searches through all of the templates in our application, and we have this leaderboard keyword, which is a reference to the “leaderboard” template.
Template.leaderboard.player = function() {
  // code goes here
}
But what about this helpers keyword?
Are we creating a function named “helpers”?
Nope. Instead, this helpers keyword is a special keyword that allows us to define multiple helper functions in a single block of code.
So rather than creating a single helper function, like so:
Create a Helper
We’d create a block for all of a template’s helper functions:
Template.leaderboard.helpers({
  // helper functions go here
});
Then between these curly braces, we use the JSON format to define helper names and the code associated with those helpers.
Template.leaderboard.helpers({
  'player': function() {
    return "Some other text";
  }
});
To create the helper from before, for instance, we could write:
Create a Helper
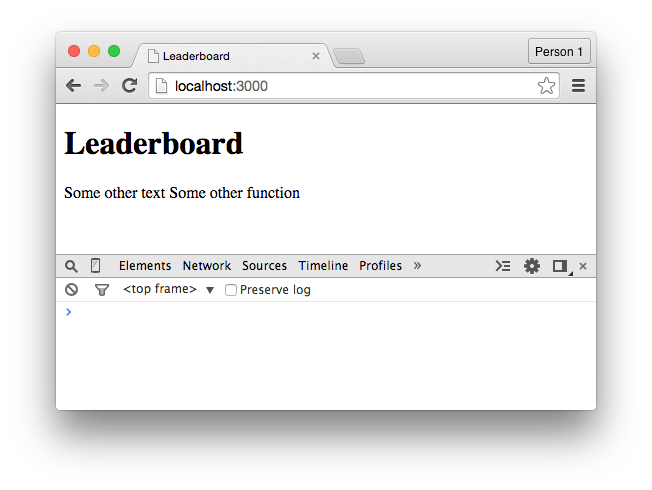
And, by using commas, we could create multiple helper functions inside a single block:
Template.leaderboard.helpers({
  'player': function() {
    return "Some other text";
  },
  'otherHelperFunction': function() {
    return "Some other function";
  }
});
We could then reference these helper functions from inside the “leaderboard” template with the familiar Spacebars syntax:
{{player}}
{{otherHelperFunction}}
Create a Helper
This code might look a little messier than the old, deprecated approach, but that’s only because we’re dealing with a small amount of helpers. With a larger number of helpers, organising them like this is the far cleaner approach.
Each Blocks
The addition of a helper function to our project means it has become relatively dynamic. The player function still just returns static text though, when we what we really want is for it retrieve the documents from the “PlayersList” collection. It’s then that we’ll be able to display a list of players from within the interface.
return PlayersList.find();To achieve this, change the return statement in the helper function to the following:
Each Blocks
Here, we've replaced the static text with the find function that we covered in the previous chapter. This function will retrieve all of the data from the “PlayersList” collection and, because we've placed it inside the helper function, this data is now accessible from inside the “leaderboard” template.
{{player}}To see this in action switch to the HTML file and remove the tag we wrote before:
Each Blocks
This tag does reference the helper function but not in the way we want. Before, our helper function returned a single piece of data — that string of text — but now, because of the find function, the helper is returning an array of all of the documents inside the collection. This means we need to loop through the data that’s returned.
{{#each player}}
  test
{{/each}}
To achieve this, we can use the Spacebars syntax to create an “each” block:
Each Blocks
Here, there’s a few things going on:
-
All of the documents from the “PlayersList” collection are retrieved based on the reference to the player function.
-
We loop through the returned data with this each syntax.
-
We output the word “test” for each document (player) that’s retrieved.
Each Blocks
Conceptually, it’s like we have an array:
var playersList = ['David', 'Bob', 'Mary', 'Bill', 'Warren', 'Tim'];..and it’s like we’re using a forEach loop to loop through the values within this array:
var playersList = ['David', 'Bob', 'Mary', 'Bill', 'Warren', 'Tim'];
playersList.forEach(function() {
  console.log('test');
});
Within the each block we’ve created, we can also retrieve the value of the fields inside our documents. Because we’re pulling data from the “PlayersList” collection, we can display the values from the name and score fields.
Each Blocks
To make our list display the player’s names, for instance, we can write:
{{#each player}}
  {{name}}
{{/each}}
Here, we can see that, to reference a field, we surround the field name with double-curly braces. To also display the player’s scores beside their names, we could write:
{{#each player}}
{{name}}: {{score}}
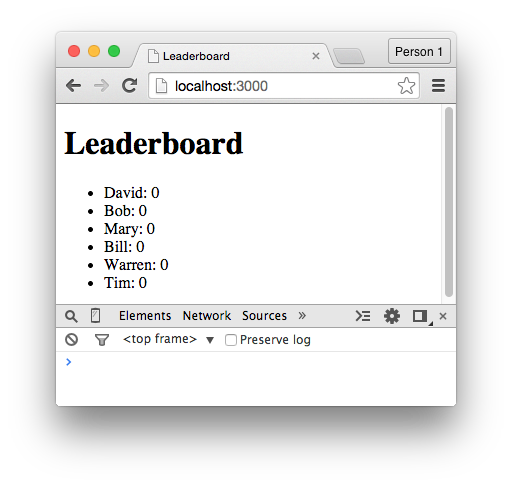
{{/each}}Each Blocks
But while we won’t bother making this application pretty, we will add some slight structure to the interface:
<ul>
  {{#each player}}
    <li>{{name}}: {{score}}</li>
  {{/each}}
</ul>
After saving the file, the names of the players will appear within an unordered list, along with their scores. By default, the players will be sorted by the date they were inserted into the collection in ascending order.
Summary
In this chapter, we've learned that:
- Meteor takes care of some boring details for us, like using the html tags, and manually including JavaScript and CSS files.
- By creating templates, we’re able to connect our interface code to the application logic inside our JavaScript file.
- Code within our application can run on the client and the server, which is an underlying concept for Meteor’s real-time features, but in some cases we don’t want this to happen. We can use the isClient and isServer conditionals to control where code is run.
Summary
In this chapter, we've learned that:
- After creating a template, we need to manually include it within our interface. This gives us control over where and when the template appears.
- By creating helper functions, we can execute code from within a template, thereby creating a dynamic interface.
- If a helper function returns an array of data, we can iterate through that data from within a template using the each syntax.
Summary
To gain a deeper understanding of Meteor:
- Realise that templates can be placed anywhere within our project’s folder. We could, for example, place our “leaderboard” template in another html file and the reference to {{> leaderboard}} would continue to work.
- Break your application on purpose. Move the each block outside of the “leaderboard” template, for instance. Become familiar with errors that you will inevitably encounter as a Meteor developer. Then you’ll know how to deal with them when they’re unexpected.
- Create a helper function that uses the find and count function to return the number of players in the leaderboard. Then display this data inside the interface.
To see the code in its current state, check out the GitHub commit.
EVENTS
We have a list of players that’s appearing inside the interface but there is no way for users to interact with this list. This data is dynamically retrieved from a collection but the user will still probably assume that the web application is static.
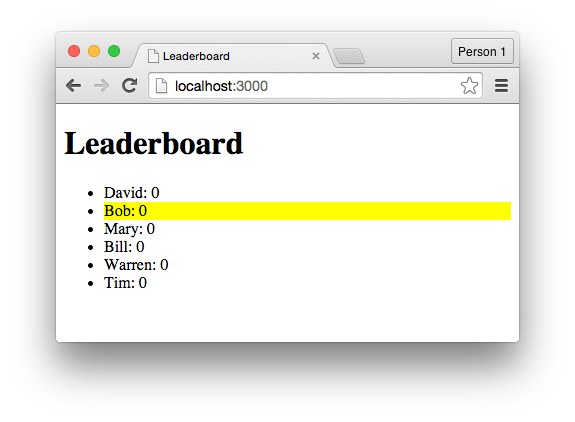
We’ll spend the rest of the course fixing this problem but, over the next couple of chapters in particular, we’ll create the effect of being able to select players inside the list. When a user clicks on one of the players, the background colour of that player’s li element will change.
Create an Event
In this section we’ll create our first event , and events allow us to trigger the execution of code when a user clicks on a button, submits a form, taps a key on their keyboard, or completes a range of other actions.
Template.leaderboard.events({
  // events go here
});
Here, there’s a few things happening:
- The Template part is used to search through the templates in our application.
- The leaderboard part is the name of the template we want to attach our events to.
- The events part is used to specify that we want to define one or more events.
As a demonstration, write the following inside the isClient conditional:
Create an Event
Between the curly braces of this events block, we’ll create our first event using the JSON format:
Template.leaderboard.events({
  'click': function() {
    // code goes here
  }
});
Here, there’s two things going on:
- We've defined the event type. That’s the click part. Because of this, the code inside the associated function will execute when a user clicks anywhere within the bounds of the “leaderboard” template.
- We've attached a function to this event and, inside this function, we write whatever code we want to execute when that click occurs.
Create an Event
To see this in action, add a console.log statement inside the event:
Template.leaderboard.events({
  'click': function() {
    console.log("You clicked something");
  }
});
After saving the file, switch to Google Chrome and click anywhere within the bounds of the “leaderboard” template. With each click, the “You clicked something” message will appear inside the Console.

Event Selectors
The event we've created is too broad. It triggers when the user clicks anywhere within the bounds of the “leaderboard” template. That could be useful but, generally, we’ll want code to trigger when a user does something more precise, like clicking a particular button.
To achieve this, we’ll use event selectors, and selectors allow us to attach our events to specific HTML elements. (If you’ve ever used jQuery before, this process will be familiar, but if not, it’ll still be quite easy to grasp)
Earlier, we placed li tags inside our HTML file:
<li>{{name}}: {{score}}</li>Event Selectors
The plan now is to change our event so it triggers when the user clicks on one of these li elements, rather than triggers when the user clicks anywhere within the template.
To do this, change our event to the following:
'click li': function() {
  console.log("You clicked an li element");
}
Here, we've made two changes:
- We've added the li part after the click keyword. This means our event will now respond when a user clicks an li element inside the “leaderboard” template.
- We've changed the output of the console.log statement.
Event Selectors
To test this, save the file, switch back to Google Chrome, and notice that the “You clicked a list item” message only appears when a user clicks on the list items.
What would happen if we had other li elements inside the “leaderboard” template that aren't a part of the player’s list?
To fix this, we’ll add a player class to our li elements:
<li class="player">{{name}}: {{score}}</li>That’ll be the case later on but, in our code’s current form, it’d cause a problem. The event would trigger when we didn't want it to trigger.
But...
Event Selectors
Then reference this class when creating the event:
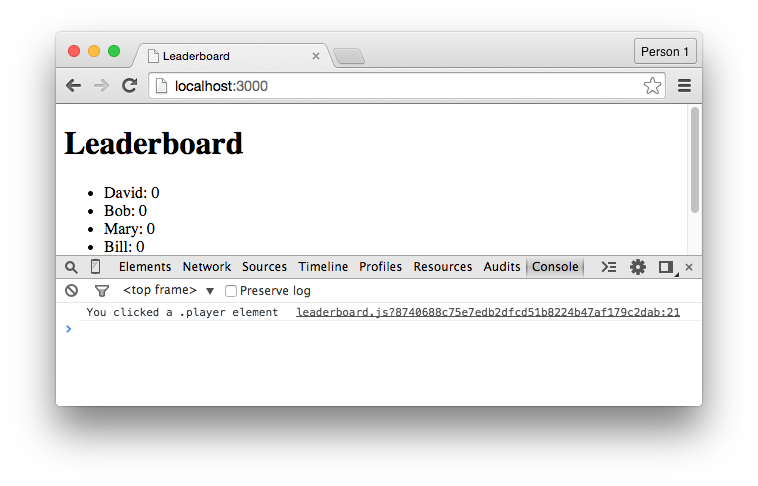
'click .player': function() {
  console.log("You clicked a .player element");
}
Here, we’ve made similar changes to before:
- We've made it so the event will only respond to clicks on elements that have the player class attached to them.
- We've once again changed the output of the console.log statement.
Event Selectors
After saving the file, the final product won’t appear any different, but if we add other li elements to the template, we won’t run into problems. As such, I’d suggest creating events as specifically as possible. The more precise they are, the less likely you’ll run into bugs.
Summary
In this chapter, we’ve learned:
- When a user clicks a button, submits a form, or completes a range of other actions, we’re able to trigger the execution of code by using events.
- The most common event type is click but there’s a range of other options available to make our application interactive in a number of different ways.
- Through the use of event selectors, we’re able to attach events to precise elements with a similar syntax to jQuery and CSS.
Summary
To gain a deeper understanding of Meteor:
- Experiment with different event types, including: dblclick, focus, blur, mouseover, and change. Figure out how these different types behave and try to integrate them with the Leaderboard application.
To see the code in its current state, check out the GitHub commit.
SESSIONS
When a user clicks on one of the .player elements inside the “leaderboard” template, a function executes. Using this function, we want to create the effect of an individual player being selected after we click them. Specifically, this means that, when the click event is triggered, the background colour of that .player element will change.
To achieve this, we’ll use sessions, and sessions are used to store small pieces of data that isn’t saved to the database and won’t be remembered on return visits. This sort of data might not sound immediately useful but, as you’ll soon see, it does come in handy.
Create a Session
To begin, we’ll create our first session, and we can do this inside the click .player event with the following syntax:
Session.set('selectedPlayer', 'session value test');Here, we’re using this Session.set function and passing through two arguments:
- We're passing through a name for the session. This name is used as a reference. In this case, we’re calling our session “selectedPlayer”, but feel free to use whatever name you like.
- We’re passing through a value for the session. This is the data stored inside the session itself. In this case, we’re passing through a static value of “session value test” but, in a moment, we’ll make this session value a lot more interesting.
Create a Session
To prove that our session is doing something, we’ll immediately retrieve the value of the session with the following statement:
Session.get('selectedPlayer');The events block should then resemble:
Template.leaderboard.events({
  'click .player': function() {
    Session.set('selectedPlayer', 'session value test');
    Session.get('selectedPlayer');
  }
});
Here, we’re using this Session.get function and passing through the name of the “selectedPlayer” session that we created a moment ago.
Create a Session
To output the value of this session to the console, we’ll store this result inside a variable:
var selectedPlayer = Session.get('selectedPlayer');Then add a console.log statement beneath this line:
var selectedPlayer = Session.get('selectedPlayer');
console.log(selectedPlayer);
Create a Session
Now, when a user clicks on one of the .player elements, the “session value test” string will be stored inside a session and then be output to the Console. This isn’t very useful code but it’ll be much more useful in a moment.

The Player’s ID
When a user clicks on one of the players inside our list, we want to grab the unique ID of that player and store it inside the “selectedPlayer” session. If you’re unsure of what I mean when I say “the unique ID of the player” though, think back to when we inserted the players into the “PlayersList” collection. Each time we used the insert function, a random jumble would appear. This jumble was the unique ID of that player.
To get started, create a “playerId” variable at the top of our click .player event:
var playerId = "session value test";The Player’s ID
Here, we've made this variable equal to the “session value test” string from before but we can change this to a dynamic value soon enough.
From there, we’ll modify the Session.set function by passing through this playerId variable as the second argument. After making this change, the event should resemble:
'click .player': function() {
  var playerId = "session value test";
  Session.set('selectedPlayer', playerId);
  var selectedPlayer = Session.get('selectedPlayer');
}
The Player’s ID
The trick at this point is to make the playerId equal to the unique ID of the player that’s been clicked. This doesn’t require a lot of code but it does require some explanation.
For now, change the playerId variable statement to the following:
var playerId = this._id;Then, as for the explanation, there’s two things going on:
- We have a reference to this and, as always, the value of this depends on the context. In this context, this refers to the player that has just been clicked.
- This _id part is the name of the field that contains the unique ID of the player. In the same way we created a name and score field, MongoDB creates an _id field for each document. The underscore itself doesn’t have any special significance though.
The Player’s ID
Because of this change, the following is now possible:
- A user clicks on one of the players.
- That player’s unique ID will be stored inside the playerId variable.
- The value of the playerId variable will be stored inside the “selectedPlayer” session.
- The value of the “selectedPlayer” session will be output to the Console.
The Player’s ID
To see this in action: save the file, switch to Google Chrome, and click on any of the players in the list. Their unique ID will appear inside the Console.
The Player’s ID
Since we don’t need to see the unique ID of the clicked player to appear inside the Console though, we can simplify our event to the following:
'click .player': function() {
  var playerId = this._id;
  Session.set('selectedPlayer', playerId);
}
Here, we’re just setting the value of the “selectedPlayer” session.
Selected Effect, Part 1
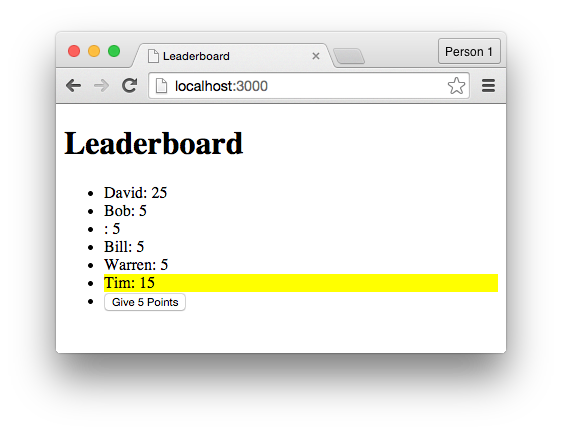
When a user clicks on one of the players inside our list, we want to change the background-color property of the li element that contains that player. This will create the effect of that player being selected.
To achieve this, we’ll open our project’s CSS file for the first time and create a class named “selected”. This class should have a background-color property and we’ll just pass through a value of “yellow”:
.selected {
  background-color: yellow;
}
Selected Effect, Part 1
Next, we’ll switch to the JavaScript file and create a “selectedClass” helper function:
Template.leaderboard.helpers({
  'player': function() {
    return PlayersList.find();
  },
  'selectedClass': function() {
    // code goes here
  }
});
Notice that both of our helpers are inside the same block of code and, as we talked about before, this is possible with the use of commas.
Selected Effect, Part 1
As for the content of this function, we’ll make it return the static text of “selected”:
'selectedClass': function() {
  return "selected"
}
Note that we need the text being returned by this function to be equal to the name of the class in the CSS file. So because we named the class “selected” in the CSS file, we’re returning this “selected” text from within the function.
From there, switch over to the HTML file and place a reference to this “selectedClass” function inside the li element’s class attribute:
<li class="player {{selectedClass}}">{{name}}: {{score}}</li>Selected Effect, Part 1
Because of this, the “selected” class will be applied to each .player element inside the “leaderboard” template. The background colour of each element will then be set to yellow:
This not exactly what we want but it’s an important step.
Selected Effect, Part 2
Before we continue, I want to demonstrate something.
Inside the selectedClass helper function, comment out the return statement:
'selectedClass': function() {
  //return "selected";
}
Then write the following:
'selectedClass': function() {
  //return "selected";
  return this._id;
}
Selected Effect, Part 2
Here, we’re referencing this._id and, as with before, we’re doing this to retrieve the unique ID of the player. Instead of the ID being output to the Console though, it’ll appear inside the class attribute for the li elements. This is not exactly what we want but it’s important to know that, because the selectedClass function is being executed inside the each block, we have access to all of the data that is being iterated through.
For proof of this: save the file, switch to Google Chrome, right click on one of the li elements, and select the “Inspect Element” option. You’ll notice that the unique ID of each player now appears inside the class attribute:
Selected Effect, Part 2
Knowing this, we’ll do a few things:
- We’ll delete the statement we just wrote since it was only for demonstration purposes.
- We’ll uncomment the return statement since we do want the selectedClass function to return the static value of “selected”.
- We’ll create a playerId variable at the top of the function:

Selected Effect, Part 2
- We’ll create a selectedPlayer variable for the “selectedPlayer” session:
'selectedClass': function() {
  var playerId = this._id;
  return "selected";
}
'selectedClass': function() {
var playerId = this._id;
var selectedPlayer = Session.get('selectedPlayer');
return "selected";
}At this point, we can wrap the return statement in the following conditional:
'selectedClass': function() {
  var playerId = this._id;
  var selectedPlayer = Session.get('selectedPlayer');
  if (playerId == selectedPlayer) {
    return "selected";
  }
}
Selected Effect, Part 2
If you’re having trouble following the logic though, here’s what’s going on:
When a user clicks on one of the players in the list, the unique ID of that player is stored inside a session that we’ve named “selectedPlayer”. The ID stored in that session is then matched against all of the IDs of the players in the list. Because the player’s ID will always be unique, there can only ever be a single match, and when there is a match, the static text of “selected” will be returned by the selectedClass function and placed inside the class attribute for that player’s li element. The background colour of that player’s li element is then changed to yellow.
Selected Effect, Part 2
This is the most convoluted example in this course but you only need a basic grasp of sessions to follow the remaining chapters. You don’t have to “get” everything right away.
Summary
In this chapter, we’ve learned that:
- Sessions are used to store small pieces of data that isn’t saved to the database and won’t be remembered on return visits.
- The precise purpose of sessions might not be immediately obvious but you will find many uses for them as a Meteor developer.
- To set create a session we use the Session.set function, while to retrieve the value of a session we use the Session.get function.
- Helper functions and events inside the each block have access to the data that’s being iterated through. As such, we can retrieve the unique ID of a player when they’re clicked.
Summary
To gain a deeper understanding of Meteor:
- Consider how else we might use the “selectedPlayer” session. We have this session that stores the unique ID of the clicked player. What else can we do with it?
To see the code in its current state, check out the GitHub commit.
DATABASES, PART 2
The features we’ll work on during this chapter include:
- The ability to increment the score of a selected player.
- Ranking players by their score (from highest to lowest).
- Displaying the selected player’s name beneath the list.
We’ll also make it possible to decrement the score of a selected player, which isn't a feature of the original application, but it’s a simple addition that will prove quite useful.
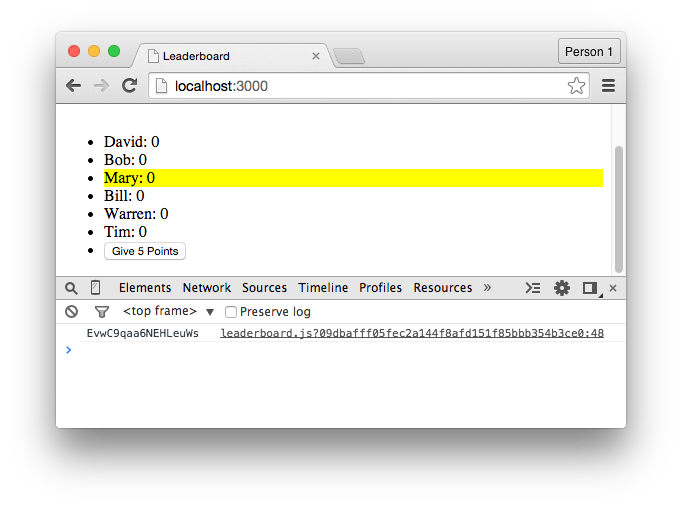
Give 5 Points
Inside our “leaderboard” template, we’ll create a “Give 5 Points” button that, when clicked, will increment the score of the selected player.
To begin, place the following HTML inside the “leaderboard” template:
<input type="button" class="increment" value="Give 5 Points">Make sure this button:
- Is outside of the each block
- Has a class of “increment”
Give 5 Points
The reason we’re not giving an ID to this button is because, if we were to include the “leaderboard” template twice in a single page, having two elements with an ID of “increment” would cause a problem since the ID is supposed to be a unique value. There’s no need to include the “leaderboard” template twice in a single page, so this won’t be an issue, but using a class instead of an ID is still the safer approach in the long run.
To make this button do something, we’ll attach an event to it, and as with before, this can be done inside the JavaScript file. But to be clear, we don’t need to create an entirely new events block. We already have an events block for the “leaderboard” template, and because our new button is inside this same template, we can take the current code:
Give 5 Points
Then create another event with the use of commas:
Template.leaderboard.events({
  'click .player': function() {
    var playerId = this._id;
    Session.set('selectedPlayer', playerId);
  }
});
Template.leaderboard.events({
'click .player': function() {
var playerId = this._id;
Session.set('selectedPlayer', playerId);
},
'click .increment': function() {
// code goes here
}
});This is identical to how we managed multiple helper functions inside a single block of code.
Give 5 Points
Within the click .increment event that we’ve created, we’ll need to access the unique ID of the player that the user has clicked. We’ll then use this ID to find that player inside the “PlayersList” collection and increment the score of that player’s score field by a value of “5”. To access this ID, we can use the Session.get function inside the event:
'click .increment': function() {
  var selectedPlayer = Session.get('selectedPlayer');
}
Give 5 Points
Then to see this in action, feel free to create a console.log statement that outputs the unique ID of the selected player when a user clicks the “Give 5 Points” button:
'click .increment': function() {
  var selectedPlayer = Session.get('selectedPlayer');
  console.log(selectedPlayer);
}
We’ll use this ID in the next section.
Advanced Operators, Part 1
At this point, we want to make it so when a user selects a player from the list and clicks on the “Give 5 Points” button, the document of that selected player is modified. Specifically, we want to modify the score field.
To achieve this, remove the console.log statement from the click .increment event and replace it with the following:
PlayersList.update();This is the MongoDB update function and, between the brackets, we can define:
- What document we want to modify
- How we want to modify it
Advanced Operators, Part 1
First, we’ll make the update function simply select the document we want to modify. We can do this with a similar syntax to the find function:
PlayersList.update(selectedPlayer);Here, we’re retrieving the document where the _id field is equal to the ID of the selected player (the value of which is stored in our session).
The event should now resemble:
'click .increment': function() {
  var selectedPlayer = Session.get('selectedPlayer');
  PlayersList.update(selectedPlayer);
}
Advanced Operators, Part 1
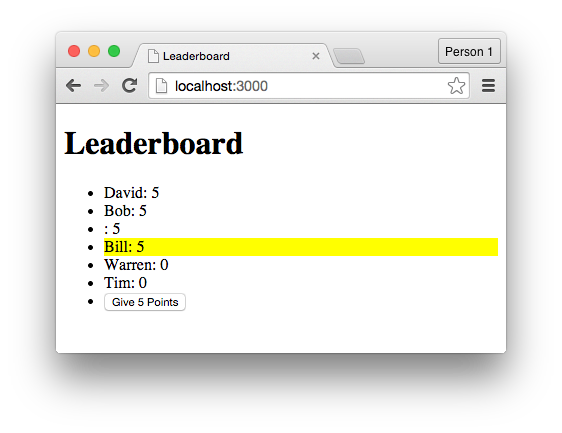
To actually modify the document, we have to pass through a second argument into the update function that determines what part of the document we want to modify. We could, for instance, write the following:
'click .increment': function() {
  var selectedPlayer = Session.get('selectedPlayer');
  PlayersList.update(selectedPlayer, {score: 5});
}
This statement will now:
- Find the document of the selected player, based on that player’s ID.
- Update that document by changing value of the score field to “5”.
Advanced Operators, Part 1
But if you test the feature, you’ll notice that it’s broken. Try selecting a player in the browser and clicking the “Give 5 Points” button. The name of that player will disappear. The value of the score field will change, but the name is still gone. The name is not simply hidden, either.

Advanced Operators, Part 1
Use the find and fetch function inside the Console:
> PlayersList.find().fetch()Then navigate through the returned data to see that the name field no longer exists. There’s only the _id and score field for this particular document:
Advanced Operators, Part 1
This might seem like a bug but this happens because, by default, the MongoDB update function works by deleting the original document and creating a new document with the data that we specify. Through this process, the value of the _id field will remain the same, but because we’ve only specified the score field inside our update statement, that’s the only other field that remains inside the new document.
To account for this, we need to use a MongoDB operator that allows us to set the value of the score field without ever deleting the document.
Advanced Operators, Part 1
To begin, replace the update function’s second argument with the following:
'click .increment': function() {
  var selectedPlayer = Session.get('selectedPlayer');
  PlayersList.update(selectedPlayer, {$set: });
}
Here, we have this $set operator that we can use to modify the value of a field (or multiple fields) without deleting the document. So after the colon, we just pass through the fields we want to modify and their new values:
'click .increment': function() {
  var selectedPlayer = Session.get('selectedPlayer');
  PlayersList.update(selectedPlayer, {$set: {score: 5} });
}
Advanced Operators, Part 1
Because of this change, our update function won’t be completely broken anymore. If we save the file and switch to the browser, we’ll see that selecting a player and clicking the “Give 5 Points” button will modify the score field without affecting the rest of the document.
Advanced Operators, Part 1
Despite this success though, we still haven’t created the feature that we aimed to create. Because while our button can set the selected player’s score field to a value of “5”, that’s all it can do. No matter how many times we click that button, the score won’t go any higher.
To fix this problem, we can use the inc operator:
'click .increment': function() {
  var selectedPlayer = Session.get('selectedPlayer');
  PlayersList.update(selectedPlayer, {$inc: {score: 5} });
}
Here, the structure is the same. We’ve just replaced the set keyword with the inc keyword. As a result, when this update function is executed, the value of the score field will be incremented by whatever value we specify.
Advanced Operators, Part 1
Advanced Operators, Part 2
A feature that’s not present in the original Leaderboard application is the ability to decrement scores. Such a feature would be useful though as it’d mean we could:
- Penalise players for not playing by the rules
- Retract points that are mistakenly awarded
It’s also a very simple feature to create.
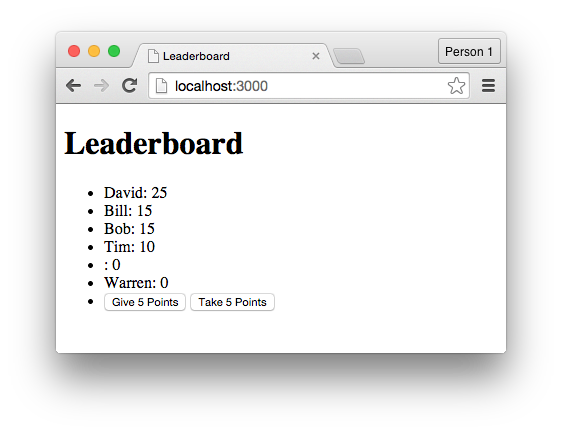
First, let’s create a “Take 5 Points” button inside our “leaderboard” template:
<input type="button" class="decrement" value="Take 5 Points">As with the “Give 5 Points” button, make sure that it’s outside of the each block and that it has a unique class attribute. In this case, we’ll name the class “decrement”.
Advanced Operators, Part 2
Next, we want to switch to the JavaScript file, copy the click .increment event we created earlier, and paste this code into the same events block. This event should now appear twice in the same events block:
Template.leaderboard.events({
  'click .player': function() {
    var playerId = this._id;
    Session.set('selectedPlayer', playerId);
  },
  'click .increment': function() {
    var selectedPlayer = Session.get('selectedPlayer');
    PlayersList.update(selectedPlayer, {$inc: {score: 5} });
  },
  'click .increment': function() {
    var selectedPlayer = Session.get('selectedPlayer');
    PlayersList.update(selectedPlayer, {$inc: {score: 5} });
  }
});
Advanced Operators, Part 2
At this point, we only need to make two changes:
- We’ll attach our event to the button with the class of “decrement”.
- We’ll pass a value of “-5” through the inc operator, rather than a value of “5”. This reverses the functionality of the operator, meaning it will decrement the value of the score field rather than increment it.
The final code for the event should now resemble:
'click .decrement': function() {
  var selectedPlayer = Session.get('selectedPlayer');
  PlayersList.update(selectedPlayer, {$inc: {score: -5} });
}
Our code is somewhat redundant — we have two events that look almost identical — but that’s something we’ll fix in a later chapter. For the moment, it’s good enough to see that the “Take 5 Points” button works as expected.
Sorting Documents
At this stage, our players are ranked by the time they were inserted into the collection, rather than being ranked by their scores. To fix this, we’ll modify the return statement that’s inside the player function:
'player': function() {
  return PlayersList.find();
}
First, we’ll pass a pair of curly braces through the find function:
'player': function() {
  return PlayersList.find({});
}
Sorting Documents
By using these curly braces, we’re explicitly stating that we want to retrieve all of the data from the “PlayersList” collection. This does happen by default, so this statement:
return PlayersList.find({});…is technically the same as this:
return PlayersList.find();But by passing through the curly braces as the first argument, we’re able to pass through a second argument, and it’s within this second argument that we can define options for the find function. One of these options will allow us to sort the data that’s retrieved.
Sorting Documents
To accomplish this, we can use a sort operator:
return PlayersList.find({}, {sort: });Unlike with the set and inc operators, we do not use a dollar sign at the start of the operator’s name.
We can then define the fields that we want to sort by. In this case, we want to sort by the value of the score field:
return PlayersList.find({}, {sort: {score: -1} });By passing through a value of “-1”, we’re able to sort in descending order. This means we’re sorting the players from the highest score to the lowest. If we passed through a value of “1”, the players would be sorted from the lowest score to the highest.
Sorting Documents
Based on this change, our players will now be ranked properly inside the interface, but what happens if two players have the same score?

Sorting Documents
Take “Bob” and “Bill”, for instance. If they have the same score, Bill should be ranked above Bob because, alphabetically, his name comes first. Based on the current code though, this won’t happen. Bob will still be ranked above Bill because he was inserted in the collection first.
What we want to do is also pass the name field through the sort operator and, this time, we’ll pass through a value of “1”:
return PlayersList.find({}, {sort: {score: -1, name: 1} });Sorting Documents
The players will still be primarily ranked by the score field, but once that sorting has occurred, the players will also be ranked by the name field. This secondary sorting of the name field will occur in ascending order (from A to Z).
Based on this change, if Bob and Bill have the same scores, Bill will be ranked above Bob.
Individual Documents
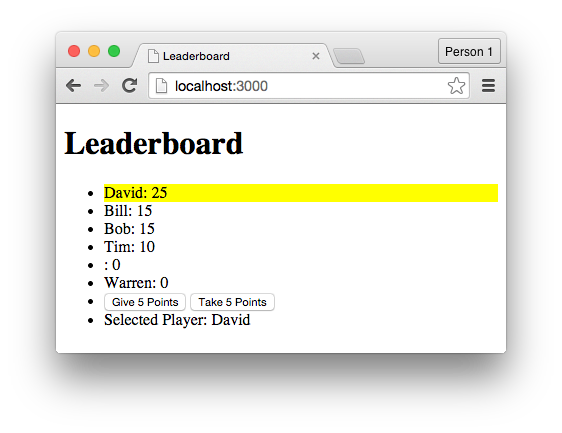
When a user selects one of the players, that player’s name should appear beneath the list of players. This isn’t the most useful feature in the world but:
- It’s part of the original Leaderboard application.
- It means we can talk about a couple of Meteor’s features.
To begin, create a new helper function inside the JS file:
'showSelectedPlayer': function() {
  // code goes here
}
This function is called “showSelectedPlayer” and, as with the rest of our helper functions, it should be attached to the “leaderboard” template.
Individual Documents
Inside this function, we’ll need to retrieve the unique ID of the currently selected player, which can be achieved by referencing the “selectedPlayer” session:
'showSelectedPlayer': function() {
  var selectedPlayer = Session.get('selectedPlayer');
}
Next, we’ll write a return statement that returns the data from a single document inside the “PlayersList” collection. We could use the find function for this but we’ll instead use the findOne function:
'showSelectedPlayer': function() {
  var selectedPlayer = Session.get('selectedPlayer');
  return PlayersList.findOne(selectedPlayer);
}
Individual Documents
By using this findOne function, we can pass the unique ID of a document as the only argument. We’re also able to avoid unnecessary overhead since this function will only ever attempt to retrieve a single document. It won’t look through the entire collection as the find function would.
With this function in place, we can head over to the HTML file and place a reference to the function inside the “leaderboard” template. I’ve placed mine inside a pair of li tags at the bottom of my list:
<li>Selected Player: {{showSelectedPlayer}}</li>Individual Documents
But if we save the file, we’ll see that the output isn’t quite right, and that’s because our findOne function is retrieving the entire document. As such, we need to specify that we only want to show the name field. We can achieve this with the use of dot notation:
<li>Selected Player: {{showSelectedPlayer.name}}</li>The interface will now resemble:
Individual Documents
We also want to make sure that we don’t attempt to display data that doesn’t exist. So if a player isn’t selected, our helper function won’t be executed.
To achieve this, we can create a conditional with the Spacebars syntax:
{{#if showSelectedPlayer}}
  <li>Selected Player: {{showSelectedPlayer.name}}</li>
{{/if}}
Now, if a player hasn't been selected, this code won’t attempt to run.
Summary
In this chapter, we’ve learned that:
- By default, the MongoDB update function deletes the original document that’s being updated and recreates it with the specified fields (while retaining the primary key).
- To change the values of a document without deleting it first, we need to use the $set operator. This operator will change the value of specified fields.
- By using the $inc operator, we can increment a numeric value within a field. MongoDB takes the original value and increases it by a specified value.
- We can reverse the effect of the $inc operator — making it decrement the value of a field — by using the minus symbol in front of the specified value.
Summary
In this chapter, we’ve learned that:
- By using the sort operator, we’re able to sort the results of the find function however we like. We can also sort using multiple fields.
- The findOne function will only ever retrieve a single document from a collection. If you only need to retrieve a single document, this is more efficient than the find function.
Summary
To gain a better understanding of Meteor:
- Make it so the “Give 5 Points” button only appears when a user has been selected. This is how the original application actually works.
- Browse through the “Operators” section of the MongoDB documentation. You’ll see how much can be achieved with pure MongoDB goodness.
To see the code in its current state, check out the GitHub commit.
FORMS
We’ve finished creating a replica of the original Leaderboard application, meaning now’s a good time to start creating some new and original features. These features will:
- Make the application a lot more useful.
- Let us play with some of Meteor’s features.
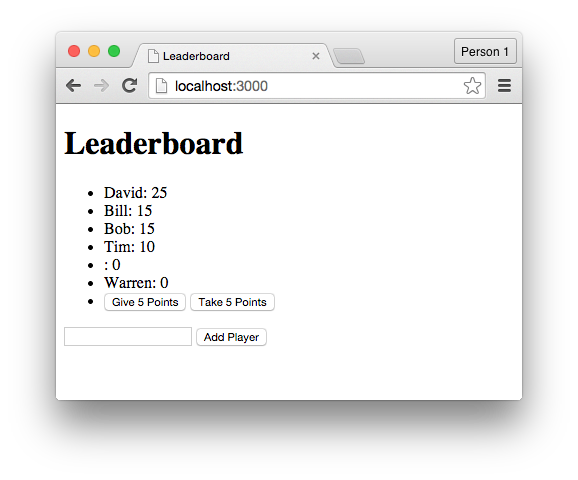
In this chapter specifically, we’ll create a form that allows users to add players to the leaderboard, along with some other user interface controls.
Create a Form
To begin, let’s create a second template known as “addPlayerForm”:
<template name="addPlayerForm">
</template>
Then include this anywhere inside the “leaderboard” template:
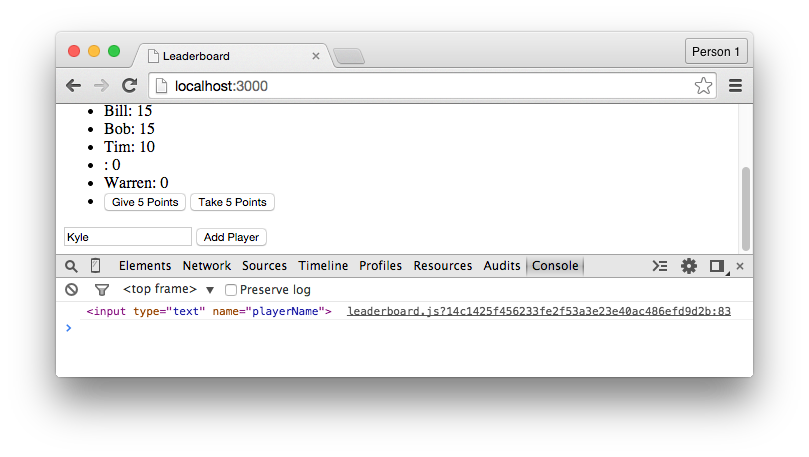
{{> addPlayerForm}}Inside this template, we’ll create a form with two elements:
- A text field with the name attribute set to “playerName”.
- A submit button with the value attribute set to “Add Player”.
Create a Form
The template should then resemble:
<template name="addPlayerForm">
  <form>
    <input type="text" name="playerName">
    <input type="submit" value="Add Player">
  </form>
</template>
The resulting interface won’t look that pretty but it’s all we need.
The “submit” Event
So far, we've seen a couple examples of the click event. This event type allows us to trigger the execution of code when the user clicks on a particular element. In a similar way, we’re able to use a submit event. This allows us to trigger the execution of code when the user submits a form.
To achieve this, we’ll create another events block inside the isClient conditional:
Template.addPlayerForm.events({
  // events go here
});
We need a new events block because this event will be attached to the “addPlayerForm” template, rather than the “leaderboard” template.
The “submit” Event
When creating the event, define the type as “submit” and the selector as “form”. This means the event’s function will trigger when the form inside the “addPlayerForm” template is submitted:
Template.addPlayerForm.events({
  'submit form': function() {
    // code goes here
  }
});
But why don’t we just use the click event for our form? Won’t most users click the submit button anyway? That might be the case but it’s important to remember that forms can be submitted in a range of ways. In some cases, the user will click on the submit button. At other times, they’ll tap the “Return” key on their keyboard. By using the submit event type, we’re able to account for every possible way that the form can be submitted.
The “submit” Event
To make sure the event is working as expected, place a console.log inside the event:
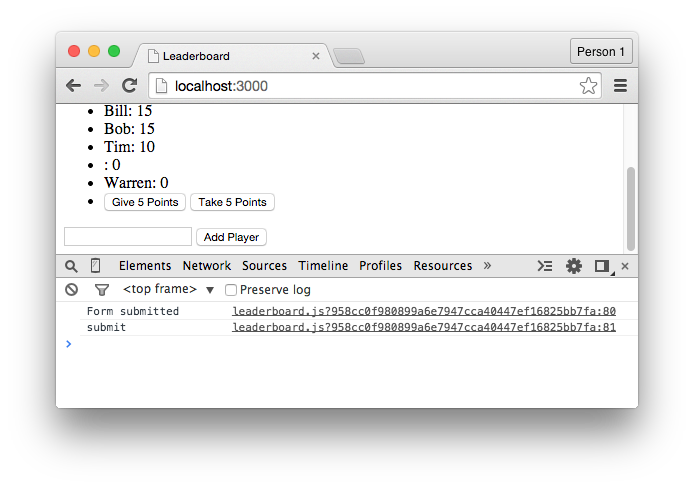
'submit form': function() {
  console.log("Form submitted");
}
You’ll, however, notice that there’s a problem. When we submit the form:
- The web browser refreshes the page.
- The “Form submitted” message doesn’t appear inside the Console.
This is something we’ll fix in the next section.
The Event Object, Part 1
When we place a form inside a web page, the web browser assumes that we want the data from that form to be sent somewhere else. Most of the time, this is convenient. Forms are usually used to send data somewhere else. When working with Meteor though it’s not what we want, but since we’re not defining where the data should go, the web page refreshes.
Knowing this, we must disable the default behaviour that the web browser attaches to forms. First though, there’s something we need to discuss.
The Event Object, Part 1
Whenever an event is triggered from within a Meteor application, we can access information about that event as it occurs. That might sound weird but, to show you what I mean, change the submit form event to the following:
'submit form': function(event) {
  console.log("Form submitted");
  console.log(event.type);
}
Here, we've passed this “event” keyword through the brackets of the event’s function, and then we’re outputting the value of “event.type” to the Console.
The Event Object, Part 1
The result of this is two-fold:
- Whatever keyword is passed through as the first parameter of an event’s function becomes a reference for the event. Because we’ve passed through the keyword “event”, we’re able to reference the event inside the event’s function using that keyword. You can, however, use whatever keyword you want. (Many people use “evt” instead of “event”.)
- The “event.type” part is a reference to the event object and its type property. As a result, this code should output the word “submit” to the Console since that’s the event type for the event that’s being triggered.
The Event Object, Part 1
This doesn't solve our original problem though because our page still refreshes before anything is output to the Console. To fix this, use a preventDefault function:
'submit form': function(event) {
  event.preventDefault();
  console.log("Form submitted");
  console.log(event.type);
}
Here, we’re attaching this preventDefault function to our event to prevent the default functionality of the form from occurring. This gives us complete control over the form:
- By the default, submitting the form won’t do anything.
- We’ll need to manually define all of the form’s functionality.
- The console.log statements will now work.
The Event Object, Part 1
Test the form to see that the page no longer refreshes but feel free to delete the console.log statements since they’re no longer necessary.
The Event Object, Part 2
Now that we have control over our form, we want our submit form event to grab the contents of the “playerName” text field when the form is submitted, and then use that content when adding a player to the database.
To begin, we’ll create a variable known as “playerNameVar”:
'submit form': function(event) {
  event.preventDefault();
  var playerNameVar;
}
We’ll then make this variable equal to “event.target.playerName”:
'submit form': function(event) {
  event.preventDefault();
  var playerNameVar = event.target.playerName;
  console.log(playerNameVar);
}
The Event Object, Part 2
Here, this statement uses the event object to grab the HTML element where the name attribute is set to “playerName”.
This code won’t work exactly as you might expect though. You’ll notice that the console.log statement outputs the HTML for the text field:
The Event Object, Part 2
This is because we need to explicitly retrieve the value property of the text field:
'submit form': function(event) {
  event.preventDefault();
  var playerNameVar = event.target.playerName.value;
  console.log(playerNameVar);
}
Based on this change, whatever the user types into the “playerName” text field will now be output to the Console when they submit the form.
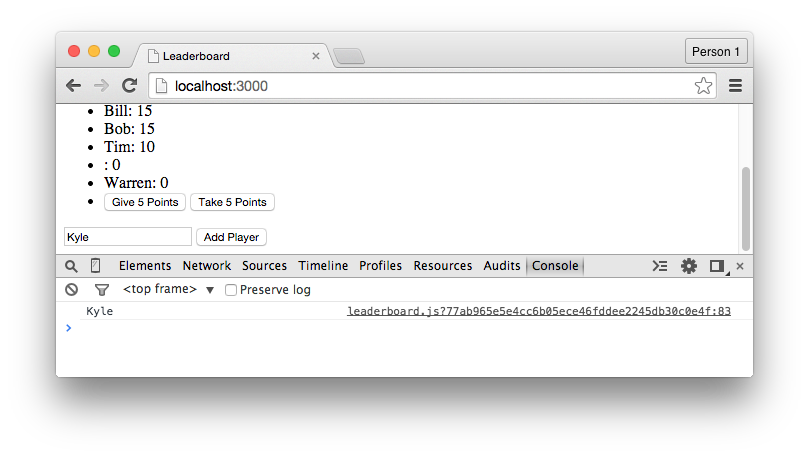
The Event Object, Part 2
As for how to add a player to the leaderboard based on the value of this text field, we’ll once again use the MongoDB insert function:
PlayersList.insert({
  name: playerNameVar,
  score: 0
});
The only difference is, instead of passing through a hard-coded value to the name field, like “David” or “Bob”, we’re passing through a reference to the “playerNameVar” variable.
The Event Object, Part 2
At this point, the code for the event should resemble:
'submit form': function(event) {
  event.preventDefault();
  var playerNameVar = event.target.playerName.value;
  PlayersList.insert({
    name: playerNameVar,
    score: 0
  });
}
…and the form will now work as expected.
The Event Object, Part 2
The user can type a name into the text field, submit the form, and that player will instantly appear inside the leaderboard (with a default score of “0”).
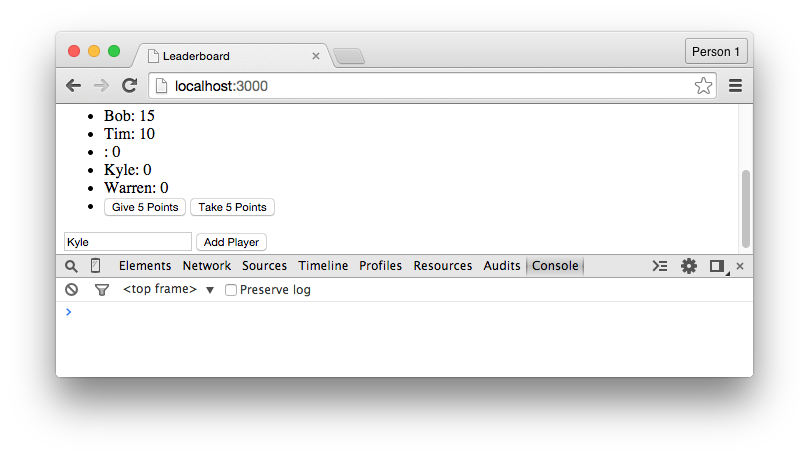
Removing Players
Creating the ability for users to add players to the leaderboard was an important step and now it’s time to create the reverse by making it possible to remove players from the list.
To begin, create a “Remove Player” button inside the “leaderboard” template:
<input type="button" class="remove" value="Remove Player">As with the other buttons we've created, we've attached a class attribute to this one and we’ll use the value of this attribute as a reference in a moment.
Removing Players
Inside the JavaScript file, create an event for this button:
'click .remove': function() {
  // code goes here
}
This event should be placed alongside the other events that are attached to the “leaderboard” template (just don’t forget the commas).
Inside the event, we need to first retrieve the unique ID of the currently selected player, which we can do with the “selectedPlayer” session:
'click .remove': function() {
  var selectedPlayer = Session.get('selectedPlayer');
}
Removing Players
Then, to remove the player from the collection, we can use a remove function on the “PlayersList” collection:
'click .remove': function() {
  var selectedPlayer = Session.get('selectedPlayer');
  PlayersList.remove(selectedPlayer);
}
We haven’t talked about this function before but all we need to do is pass through the unique ID of a document as the only argument. That document will then be removed from the collection.
Users will now be able to select one of the players in the list and delete them entirely by clicking the “Remove Player” button.
Summary
In this chapter, we've learned that:
- By using the submit event type, we can trigger the execution of code when a form is submitted.
- The submit event is used instead of the click event since a form can be submitted in multiple ways (like tapping the “Return” key).
- We’re able to access information about our events from within the event itself. We can also manipulate the event.
- Web browsers attach default behaviour to our forms, interfering with the code that we want to execute.
Summary
In this chapter, we've learned that:
- To disable the default behaviour of web browsers, we need to use the preventDefault function as the first statement inside our events.
- As long as our form fields have a name attribute, there’s an easy way to grab the value of those fields when a form is submitted.
- By using the remove function and passing through the ID of a MongoDB document, we can remove that document from the collection.
Summary
To gain a deeper understanding of Meteor:
- Make it so, after submitting the “Add Player” form, the content inside the text field is wiped.
- Create an alert that asks users to confirm whether or not they really want to remove a player from the list after clicking the “Remove Player” button.
- Add a “Score” field to the “Add Player” form, allowing users to define a score for a player as soon as they’re added.
To see the code in its current state, check out the GitHub commit.
ACCOUNTS
Our leaderboard application has a number of useful features but it still only supports a single leaderboard with a single list of players. This means there can only be one user of the application at any one time, which is just silly for a web application.
To fix this, we’ll create a user accounts system for the application. With other frameworks, this can be a difficult thing to do, but with Meteor, it’s one of the simplest things to setup.
With this system in place, we’ll make it so:
- Users can register for and login to the application.
- Logged out users won’t see the “Add Player” form.
- Every user will have their own, unique leaderboard.
But while this sounds like a lot of functionality, it won’t require a lot of code.
Login Providers (1/4)
To extend the functionality of our Meteor projects, we can install a range of packages, and packages are basically plugins that:
- Quickly add features to our projects.
- Cuts down on the code we need to write.
By default, every Meteor project has local access to a number of official packages. These are packages that many Meteor developers will use. There are also thousands of third-party packages, but since these are beyond the scope of this book, we’ll focus on the official packages.
Login Providers (2/4)
To begin creating the user accounts system for our application, we’ll add a “login provider” package to our project. Login provider packages are included with every installation of Meteor and they make it extremely easy to add the back-end of an accounts system to an application.
Usually, for example, you might expect that the first step in creating an accounts system is to create a collection for the user’s data:
UserAccounts = new Mongo.Collection('users');Login Providers (3/4)
Then you might expect to write the logic for registration and logging in and email verification and all of that other stuff.
But while you could do all of this manually, it’s not necessary. Instead, we can just switch to the command line and enter the following command:
$ meteor add accounts-passwordHere, we’re adding this “accounts-password” package to our project. This package creates the back-end for an accounts system that relies on an email and password for registration and logging in.
Login Providers (4/4)
Specifically, this package:
- Creates a collection to store the data of our users.
- Provides us with a range of functions that we’ll soon cover.
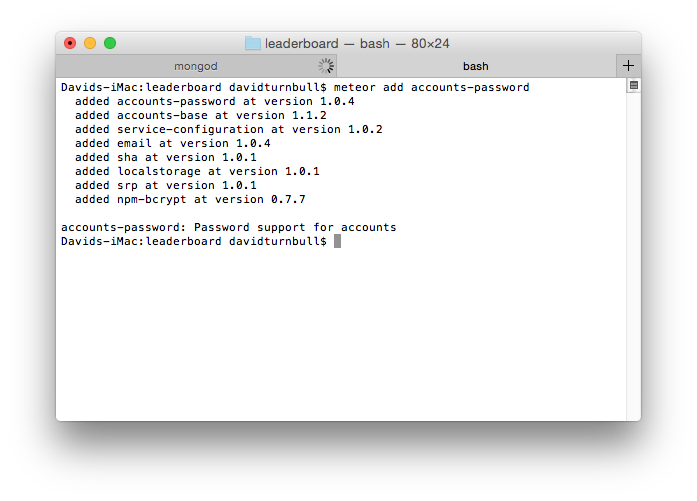
There’s other login provider packages available that allow users to login to our application through services like Google and Facebook.
Meteor.users (1/2)
After adding the accounts-password package to the project, a collection was created to store the data of our users. This collection is known as Meteor.users and it works just like any collection that we might create ourselves.
To demonstrate this, enter the following into the Console:
> Meteor.usersYou’ll notice that the returned information confirms this to be just a regular collection. The name of the collection might look a little different with that dot in the middle but that’s the only difference.
Meteor.users (2/2)
With this in mind we can use the familiar find and fetch functions on this collection:
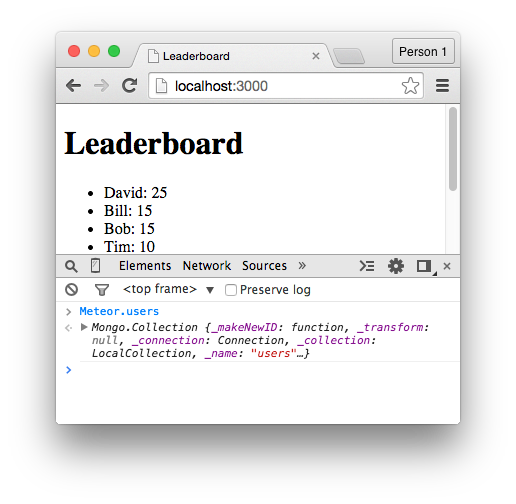
Meteor.users.find().fetch();But because there are no registered users at this point, no data will be returned.
Login Interface (1/5)
It’s not difficult to setup the back-end of an accounts system from within a Meteor application, but what about the front-end? Are we expected to write all of that boring interface code that allows people to register and login?
Nope.
We can easily create a custom interface, but at this stage, not even that is necessary.
Instead, we’ll add another one of Meteor’s default packages to our project. This package is known as the “accounts-ui” package and it takes care of the grunt work for us when creating account-related interface elements.
Login Interface (2/5)
To install it, enter the following command into the command line:
$ meteor add accounts-uiThen place the following tag between the body tags of our interface:
{{> loginButtons}}Here, we’re including this “loginButtons” template. We didn’t create this template but it comes included with the accounts-ui package. So because we added that package to our project, we can now include this template anywhere within the interface.
Login Interface (3/5)
To see what this template contains, save the file and switch to the browser. You’ll notice a “Sign In” button inside the interface, and when we click that button, a login form and a “Create Account” link will appear.

Login Interface (4/5)
This is not just some dummy interface though. It’s not just for show. Already, without any configuration, it’s fully functional. You can:
- Register
- Login
- Logout
There isn't any purpose in logging in and out — users will see the same thing on their screen no matter what they do — but that’s something we’ll fix soon.
Login Interface (5/5)
For now, use the find and fetch function on the Meteor.users collection:
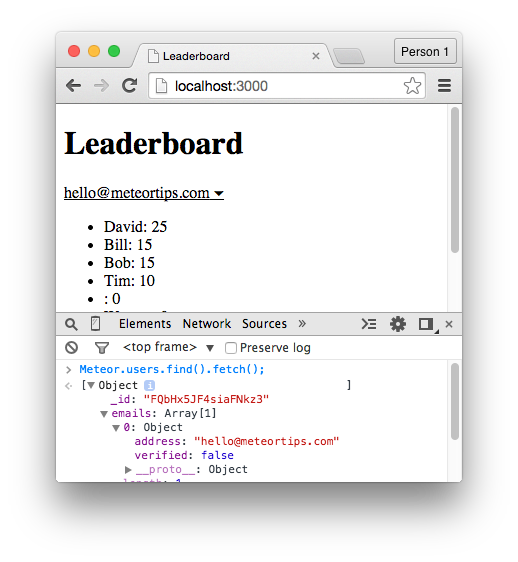
You’ll notice that a document is returned and this document contains the data of the account we just created. Click on the downward facing arrows to see the data associated with the account.
Logged-in Status (1/2)
One of the main reasons we created an user accounts system is to stop unregistered users from seeing content that they’re not supposed to see. In our case, for instance, it doesn’t make sense that unregistered users can see the “Add Player” form.
To fix this problem, change the “addPlayerForm” template to the following:
<template name="addPlayerForm">
  {{#if currentUser}}
    <form>
      <input type="text" name="playerName">
      <input type="submit" value="Add Player">
    </form>
  {{/if}}
</template>
Logged-in Status (2/2)
Here, we’re creating a conditional with the Spacebars syntax using this currentUser object. Where does this object come from? Once again, it’s from the accounts-password package and it works quite simply:
- If the current user is logged in, currentUser will return true.
- If the current user is not logged in, currentUser will return false.
As such, the form will only appear to logged-in users.
One Leaderboard Per User (1/6)
Something our Leaderboard application needs is the ability for each user to have their own, unique leaderboard where they can manage their own list of players without interference from other users. It might not be immediately obvious about how we go about doing this — and the most difficult part of programming is usually figuring out how to approach a problem, rather than the syntax — but the process itself only takes a couple of steps.
One Leaderboard Per User (2/6)
To begin, take a look at the submit form event:
'submit form': function(event) {
  event.preventDefault();
  var playerNameVar = event.target.playerName.value;
  PlayersList.insert({
    name: playerNameVar,
    score: 0
  });
}
Then, beneath the playerNameVar variable, write the following:
var currentUserId = Meteor.userId();Here, we’re creating this currentUserId variable which stores the value returned by this Meteor.userId() function. We haven’t talked about this function before but there’s not much to explain. It simply returns the unique ID of the currently logged in user.
One Leaderboard Per User (3/6)
From there, we’ll create a “createdBy” field inside the insert function and pass through the currentUserId variable:
PlayersList.insert({
  name: playerNameVar,
  score: 0,
  createdBy: currentUserId
});
As a result, when a user adds a player to the leaderboard, the unique ID of that user will be associated with the player that’s being added.
To demonstrate how this works:
- Save the file.
- Switch to the browser.
- Add a player to the leaderboard.
One Leaderboard Per User (4/6)
Then, inside the Console, use the find and fetch function on the “PlayersList” collection. Click on the downward-facing arrow for the latest document and see how the document has this new createdBy field that holds the ID of the user who added this player to the collection.
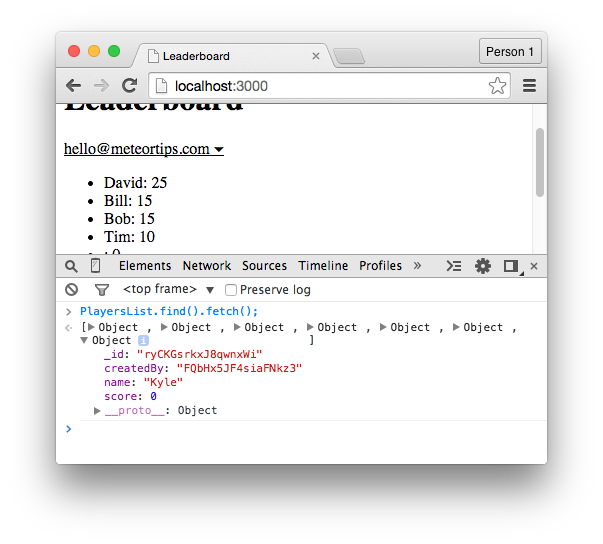
One Leaderboard Per User (5/6)
With this foundation, we’ll modify the player function that’s attached to the “leaderboard” template:
'player': function() {
  return PlayersList.find({}, {sort: {score: -1, name: 1}});
}
First, we’ll setup another currentUserId variable:
'player': function() {
  var currentUserId = Meteor.userId();
  return PlayersList.find({}, {sort: {score: -1, name: 1}});
}
One Leaderboard Per User (6/6)
Then we’ll modify the find function so it only returns players from the collection where their createdBy field is equal to the unique ID of the currently logged in user:
'player': function() {
  var currentUserId = Meteor.userId();
  return PlayersList.find({createdBy: currentUserId},
                          {sort: {score: -1, name: 1}});
}
This ensures that users will only see players they added to the leaderboard, creating the effect that every user has their own, unique leaderboard.
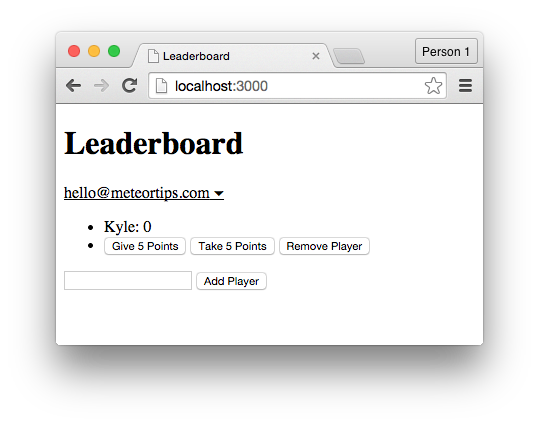
Project Reset
We have some unnecessary data inside our database. There are some players who aren't attached to any particular user, meaning we don’t need them inside our collection.
To wipe the slate clean, switch to the command line, stop the local server by pressing CTRL + C, then enter the following command:
$ meteor resetThis will wipe the database clean, giving us a fresh start and making sure that none of the players in the collection are not attached to a user. It’s also a useful command to know for future reference, since it’s easy for a database to fill up with useless data during the development process.
Summary (1/3)
In this chapter, we’ve learned that:
- Packages allow us to quickly add functionality to an application. There are some official packages, along with many third-party packages.
- “Login Provider” packages are used to create the back-end of an accounts system. We can create a back-end that relies on an email and password, or on Twitter, or on Facebook, or a combination of multiple services.
- After adding a login provider package, a Meteor.users collection is created that contains all of the data of an application’s users.
- The accounts-ui package allows us to quickly add a user interface for our accounts system to an application. You can take a custom approach, but the boilerplate approach is great for beginners.
Summary (2/3)
In this chapter, we've learned that:
- We can check whether or not the current user is logged in by referencing the currentUser object inside our templates.
- To access the user ID of the currently logged in user through our JavaScript file, we use the Meteor.userId() function.
- Associating the currently logged in user’s ID with each player is how we create the effect of each user having their own, unique leaderboard.
Summary (3/3)
To gain a deeper understanding of Meteor:
- See what happens when you add a different login provider package to the project. I’d suggest adding the accounts-twitter package (make sure the accounts-ui package is also added).
- Browse through the atmospherejs.com directory to check out the many third-party packages available for Meteor.
To see the code in its current state, check out the GitHub commit.
PUBLISH & SUBSCRIBE
We've built a feature-rich application but we still haven’t talked about security, which is a big part of developing software for the web. For the most part, I wanted to show you how to build something quickly with Meteor, but there are a couple of security topics we should cover.
First, let’s talk about publications and subscriptions.
Data Security (1/4)
To begin, create two user accounts within your Leaderboard application and, under each account, add three players to the leaderboard. Because of this, six players should exist inside the database and they should “belong” to a total of two users.
Next, logout of the accounts and, inside the Console, use the find and fetch function on the “PlayersList” collection:
PlayersList.find().fetch();Data Security (2/4)
You’ll notice that, as we've seen before, all of the data from the collection is returned. We can see all of the data that belongs to both of the user accounts. This is actually a problem though. Because unless we turn off this feature, every user of the application will have this same, unbridled access to the data in our database. They’ll be able to use the find and fetch functions, and there’ll be nothing stopping them from seeing all of the data inside the “PlayersList” collection.
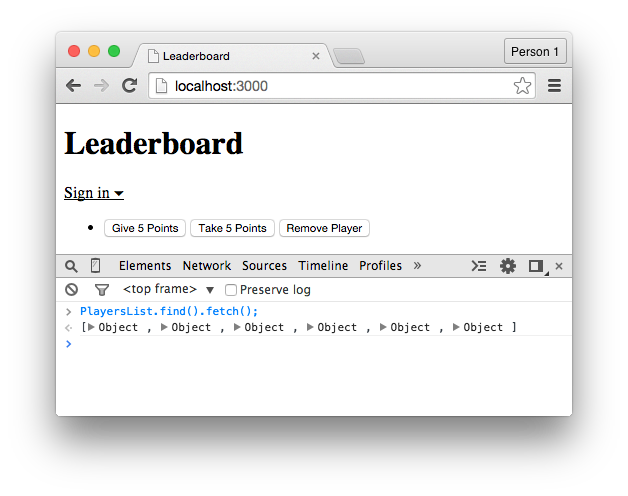
Data Security (3/4)
This data is not particularly sensitive — it’s not like we’re storing credit card numbers or home addresses — but if we were storing sensitive data, it’d be unforgivable if someone could open the Console and navigate through all of the data with complete freedom.
This, however, begs the question:
Why does this feature exist inside of Meteor? If it’s such a huge security risk to access all of the data inside the collection through the Console, why are we allowed to do it?
Data Security (4/4)
The answer is convenience. Throughout this book we’ve used the find and fetch functions and they’ve been great tools for managing and observing our data. It’s just that, before we can share our application with the world, we’ll have to:
- Disable this default behaviour, limiting access to most of the data.
- Precisely define what data should be available to users.
These points are what we’ll discuss for the remainder of this chapter.
autopublish (1/3)
The functionality that allows users to navigate through all of the application’s data is contained within an “autopublish” package that’s included with every Meteor project by default. If we remove this package, users won’t be able to access any data through the Console. Removing the package will also break the application though, so we’ll need to take a couple of steps beyond that point to get it working again.
To remove the autopublish package, enter the following into the command line:
$ meteor remove autopublishautopublish (2/3)
If you’re logged out of both user accounts when the package is removed, nothing will seem different. But use the find and fetch function on the “PlayersList” collection:
PlayersList.find().fetch();You’ll notice that we can no longer navigate through the data inside the collection. The only thing returned is this empty array. It looks like the data has been deleted, although that’s not the case. It’s just been secured.
But there is a problem. If we login to either of our user accounts, we can see that none of the data from the database is appearing from inside the interface:
autopublish (3/3)
This is because we haven’t just made the data inaccessible via the Console. We’ve made the data inaccessible from the client as a whole. When a user visits the web application, none of the data will be accessible in any form.
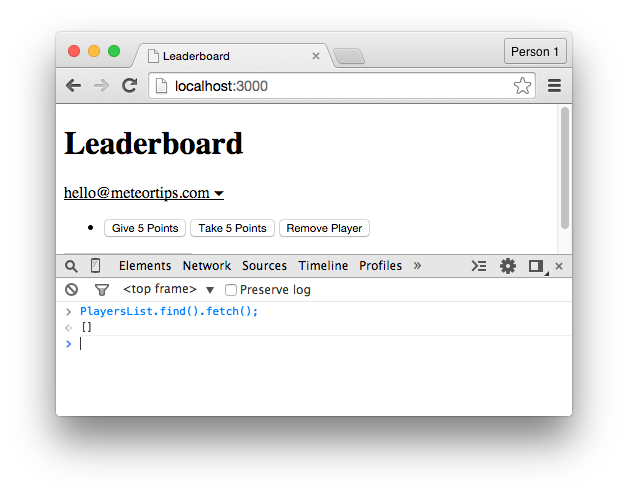
To fix this, we’ll need to find some middle-ground between the two extremes we’ve faced — everything being accessible and nothing being accessible. This means precisely defining what data should be available to our users.
isServer (1/3)
Throughout this course, we've mostly been writing code inside the isClient conditional. This is because we've mostly been writing code that’s meant to run inside the browser. All of the code inside the isClient conditional has, in some way, been linked to one of our templates. There are, however, plenty of situations where we want to run code on the server.
To demonstrate one of these situations, write the following code inside the isServer conditional that’s inside the JavaScript file:
console.log(PlayersList.find().fetch());isServer (2/3)
Here, we've put together a console.log statement that outputs the results of the find and fetch function. But notice what happens when we save the file:
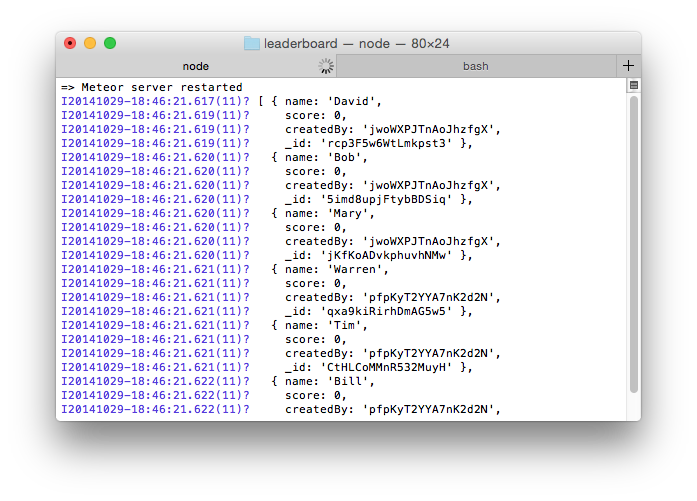
isServer (3/3)
The unsurprising detail is the fact that the output appears inside the command line, since this is something we covered earlier in the book, but notice that we have no trouble retrieving the data from the “PlayersList” collection. Even though the autopublish package was removed, we still have free rein over our data while working directly with the server.
Why?
Well, code that is executed on the server is inherently trusted. So while we’ve stopped users of the application from accessing data, we can continue to retrieve the data on the server — a place that users will never have direct access to and, therefore, will remain secure. The usefulness of this detail will become obvious over the next few sections.
Publications (1/2)
At this point, we want to publish the data that’s inside our “PlayersList” collection, and conceptually, you can think of this process as transmitting some data from the server and into the ether. We’re just looking to specify what data should be available to the users.
To achieve this, delete the console.log statement from inside the isServer conditional and replace it with a Meteor.publish function:
Meteor.publish();Then between brackets, pass through “thePlayers” as the first argument. This argument is an arbitrary name that we’ll reference in a moment:
Meteor.publish('thePlayers');Publications (2/2)
Next, as the second argument, pass through a function:
Meteor.publish('thePlayers', function() {
  // inside the publish function
});
It’s inside this function where we specify what data should be available to the users of our application. In this case, we’ll return all of the data from inside the “PlayersList” collection:
Meteor.publish('thePlayers', function() {
  return PlayersList.find();
});
This code will duplicate the functionality of the autopublish package by returning all of the data, which is not exactly what we want, but it’s a good first step.
Subscriptions (1/3)
Because of the Meteor.publish function that’s executing on the server, we can now subscribe to this data from inside the isClient conditional, once again making the data accessible through the web browser and through the Console. If you imagine that the publish function is transmitting data in the ether, then the subscribe function is what we use to “catch” that data.
Inside the isClient conditional, write the following:
Meteor.subscribe();Subscriptions (2/3)
This is the Meteor.subscribe function and the only argument we need to pass through is the reference we created for the publish function:
Meteor.subscribe('thePlayers');After saving the file, use the find and fetch functions on the “PlayersList” collection:
PlayersList.find().fetch();Subscriptions (3/3)
Here, we’re once again retrieving all of the data, meaning our application is back to its original state. This still isn’t what we want but now we’re in a greater position to precisely control what data is (and is not) accessible.
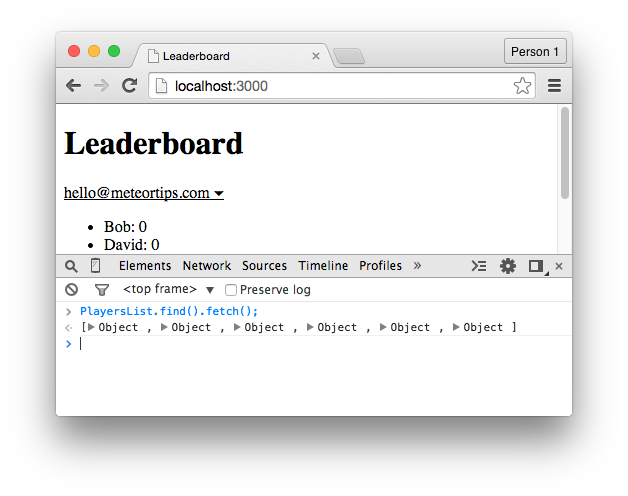
Precise Publications (1/4)
What we want now is for the Meteor.publish function to only publish data from the server that belongs to the currently logged in user. This means:
- Logged in users will only have access to their own data.
- Logged out users won’t have access to any data.
In the end, our application will retain its functionality while being protective of potentially sensitive data.
To achieve this, we’ll need to access the unique ID of the currently logged in user from inside the Meteor.publish function. We can’t, however, use the Meteor.userId() function that we talked about earlier. Instead, When inside a publish function, we have to write:
this.userId;Precise Publications (2/4)
But even though the syntax is different, the end result is the same. This statement returns the unique ID of the currently logged in user.
For the sake of readability, place it inside a currentUserId variable:
Meteor.publish('thePlayers', function() {
  var currentUserId = this.userId;
  return PlayersList.find();
});
Then modify the find function so it only retrieves documents where the createdBy field is equal to the ID of the currently logged in user:
Meteor.publish('thePlayers', function() {
  var currentUserId = this.userId;
  return PlayersList.find({createdBy: currentUserId});
});
Precise Publications (3/4)
Save the file and use the find and fetch functions on the “PlayersList” collection:
PlayersList.find().fetch();If you’re logged in, you’ll only see the data that belongs to the current user’s account, and if you’re not logged in, you won’t see any data. This is because the return statement inside the Meteor.publish function can’t return anything without a unique ID for the current user.
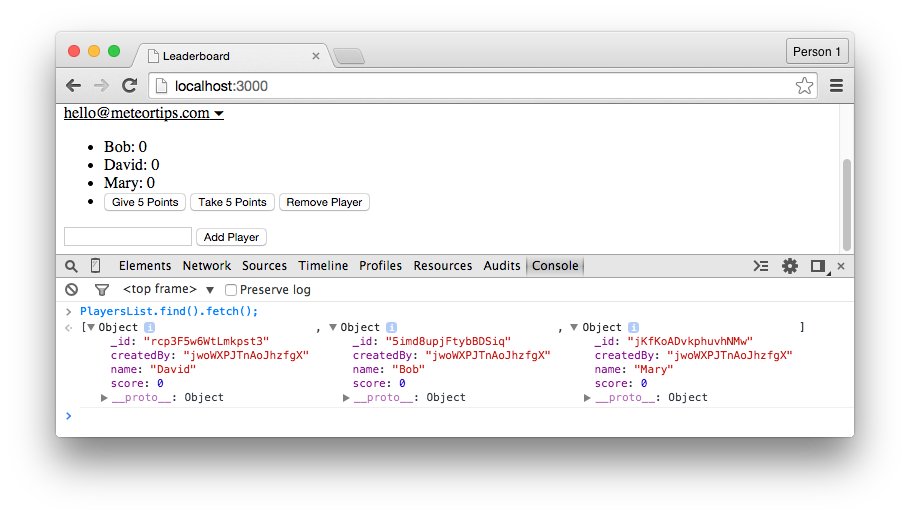
Precise Publications (4/4)
It’s also important to note that we can now simplify the player function, from this:
'player': function() {
  var currentUserId = Meteor.userId();
  return PlayersList.find({createdBy: currentUserId},
                          {sort: {score: -1, name: 1}});
}
…to this:
'player': function() {
  var currentUserId = Meteor.userId();
  return PlayersList.find({}, {sort: {score: -1, name: 1}});
}
Why?
Because the return statement inside the player function can only ever retrieve data that’s being published from the server. Therefore, specifying that we want to retrieve the user’s data in two places is redundant. We only need to that statement inside the publish function.
Summary (1/2)
In this chapter, we’ve learned that:
- By default, Meteor makes all of the data inside our database available to our users. This is convenient during development but a big security hole that needs to be plugged.
- This default functionality is contained within an autopublish package. If we remove this package, our application is more secure, but it also breaks and needs to be fixed.
- The first step in fixing our application is using a Meteor.publish function inside the isServer conditional to decide what data should be available.
- Because our Meteor.publish function executes on the server, it continues to have access to all of our data. This is because code on the server is inherently trusted.
Summary (2/2)
In this chapter, we’ve learned that:
- The second step in fixing our application is using a Meteor.subscribe function from within the isClient conditional to reference the publish function.
- Inside the publish function, we can’t use the Meteor.userId() function. We can, however, achieve the same thing with this.userId.
To gain a deeper understanding of Meteor:
- In a separate project — and without looking at this chapter — remove the autopublish package and make it so users can only access data that is meant for them.
To see the code in its current state, check out the GitHub commit.
METHODS
In the previous chapter, we talked about the first of two major security issues that are included with every Meteor project by default. That issue was the user’s ability to navigate through all of the data inside our database until we removed the autopublish package. Based on the changes we’ve made, users now only have access to their data.
To demonstrate the second major security issue, enter the following into the Console:
PlayersList.insert({name: "Fake Player", score: 1000});METHODS
You’ll notice that we’re still able to insert data into the database through the Console. In some cases, this means a user could:
- Exploit our application to their own advantage.
- Fill our database with useless and unwanted data.
Users also have the ability to modify and remove the data that’s already in the database, so by default, they basically have full administrative permissions.
Once again, this feature is for the sake of convenience. It’s handy to work with the database through the Console and it’s easier to get a prototype working when we’re not concerned about security. It is, however, a feature that we’ll need to turn off.
METHODS
As was the case with the autopublish package, this functionality is contained within a package of its own. It’s known as the “insecure” package and we can remove it from our project using the command line:
$ meteor remove insecureAfter removing the package though, we’ll be able to see that:
- We can no longer give points to the players.
- We can no longer take points from the players.
- We can no longer remove players from the list.
- We can no longer add players to the list.
Almost all of the features have stopped working. The insert, update, and remove functions no longer work from the Console either, so the application is much more secure, but we will have to fix a few things.
Create a Method (1/6)
So far, all of the insert, update, and remove functions have been inside the isClient conditional. This has been the quick and easy approach, but it’s also why our application was insecure to begin with. We’ve been placing these sensitive functions on the client, within the browser.
The alternative is to move these functions to the isServer conditional, which means:
- Database-related code will execute within the trusted environment of the server.
- Users won’t be able to use these functions from inside the Console since users don’t have direct access to the server.
Create a Method (2/6)
The application will once again work as expected but the sensitive code will be completely hidden from users.
To achieve this migration, we’ll need to create our first methods, and methods are blocks of code that are executed on the server after being triggered from the client. That might sound weird though, so this is one of those times where writing out the code will help a lot.
Inside the isServer conditional, write the following:
Meteor.methods({
  // methods go here
});
Create a Method (3/6)
This is the block of code we’ll use to create our methods. The syntax is similar to how we create both helpers and events, and as a quick example, let’s create a “sendLogMessage” method:
Meteor.methods({
  'sendLogMessage'
});
Then associate it with a function:
Meteor.methods({
  'sendLogMessage': function() {
    console.log("Hello world");
  }
});
Create a Method (4/6)
Next, we’ll make it so, when the “Add Player” form is submitted, the code inside this function will execute after being triggered from the client.
To achieve this, we need to call our method from elsewhere in the code, and we can do this from inside the submit form event:
'submit form': function(event) {
  event.preventDefault();
  var playerNameVar = event.playerName.value;
  var currentUserId = Meteor.userId();
  PlayersList.insert({
    name: playerNameVar,
    score: 0,
    createdBy: currentUserId
  });
}
Create a Method (5/6)
At the bottom of this event’s function, write a Meteor.call statement:
Meteor.call('sendLogMessage');Here, we’re passing through “sendLogMessage” as the first and only argument. This is how we choose what method we want to execute once this form is submitted.
At this point, save the file, switch to the browser, and submit the “Add Player” form. The core feature of this form is still broken but, if you switch to the command line, you’ll see the “Hello world” message appear each time the form is submitted. The submission of the form is triggering the method but the actual code inside the method is running on the server.
Create a Method (6/6)
You’ll see further examples of this during the rest of the chapter.
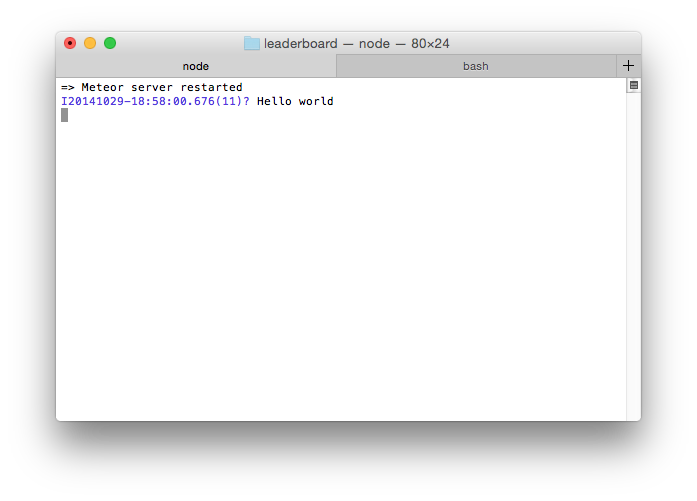
Inserting Data (Again) (1/5)
To get our application working again, we’ll first move the insert function for the “Add Player” form from the client and to the server. This means:
- The insert function will securely execute on the server.
- Users still won’t be able to insert data through the Console.
When the form is submitted, the insert function will execute within the trusted environment of the server, after being triggered from the client.
Inserting Data (Again) (2/5)
First, change the name of the method to “insertPlayerData”, and also get rid of the console.log statement:
Meteor.methods({
  'insertPlayerData': function() {
    // code goes here
  }
});
Next, we’ll need to grab the unique ID of the currently logged in user, and we can set this up as we’ve done before with the Meteor.userId() function:
Meteor.methods({
  'insertPlayerData': function() {
    var currentUserId = Meteor.userId();
  }
});
Inserting Data (Again) (3/5)
Then we’ll add a familiar insert function beneath this statement:
Meteor.methods({
  'insertPlayerData': function() {
    var currentUserId = Meteor.userId();
    PlayersList.insert({
      name: "David",
      score: 0,
      createdBy: currentUserId
    });
  }
});
You’ll notice that we’re passing through a hard-coded value of “David” for the name field, which isn’t exactly what we want, but it’s fine for the moment.
With this method in place, return to the submit form event and remove the statement that sets the value of the currentUserId variable, along with the insert function:
Inserting Data (Again) (4/5)
'submit form': function(event) {
  event.preventDefault();
  var playerNameVar = event.target.playerName.value;
  Meteor.call('sendLogMessage');
}
Then change the name that’s being passed through the Meteor.call function:
'submit form': function(event) {
  event.preventDefault();
  var playerNameVar = event.target.playerName.value;
  Meteor.call('insertPlayerData');
}
Based on these changes, the “Add Player” form will now kind of work. If we submit the form, a player will be added to the “PlayersList” collection. We can only add players named “David”, but that’s something we’ll fix soon.
Inserting Data (Again) (5/5)
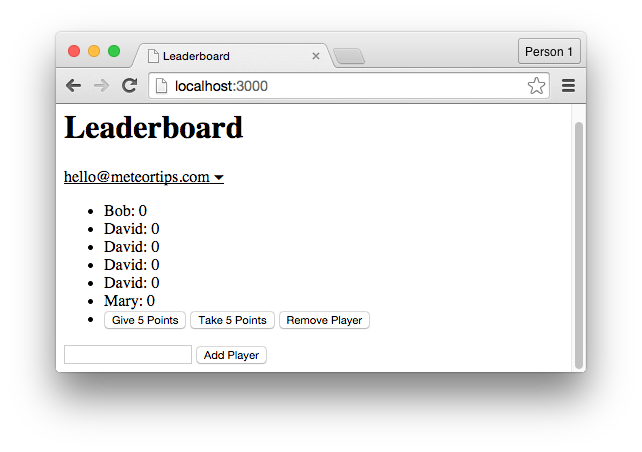
For now, the important part is that, although we can add players to the list again, we still can’t use the insert function via the Console. We’re gaining control over how users can interact with our database.
Passing Arguments (1/4)
A problem with our “Add Player” form is that the value of the text field is not being passed into our method. As such, when we submit the form, the name of the player that’s created will always be set to “David”.
To fix this, modify the Meteor.call statement by passing through the playerNameVar variable as a second argument:
'submit form': function(event) {
  event.preventDefault();
  var playerNameVar = event.target.playerName.value;
  Meteor.call('insertPlayerData', playerNameVar);
}
Because of this, we’re now able to make our method accept this argument by passing playerNameVar between the brackets of the method’s function:
Passing Arguments (2/4)
Then we can reference playerNameVar from within the method as a way of referencing the value that the user enters into the form’s text field:
Meteor.methods({
  'insertPlayerData': function(playerNameVar) {
    var currentUserId = Meteor.userId();
    PlayersList.insert({
      name: "David",
      score: 0,
      createdBy: currentUserId
    });
  }
});
Meteor.methods({
'insertPlayerData': function(playerNameVar) {
var currentUserId = Meteor.userId();
PlayersList.insert({
name: playerNameVar,
score: 0,
createdBy: currentUserId
});
}
});Passing Arguments (3/4)
In the end, here’s what’s happening:
First, when the form is submitted, the insertPlayerData method is called (triggered) and the value of the text field is attached to this call.
Second, the insertPlayerData method is executed, accepting playerNameVar as an argument. We can then reference the value of playerNameVar from inside the method’s function.
Third, the insert function executes inside our method and, because this code is run on the server, it can run without the insecure package. Unlike a moment ago, this function also uses the value from the form’s text field for the name field, rather than the hard-coded value of “David”.
Passing Arguments (4/4)
Ultimately, the form will function as expected, but there’s still no way for users to manipulate the database through the Console. Our application is:
- Regaining its functionality.
- Remaining secure.
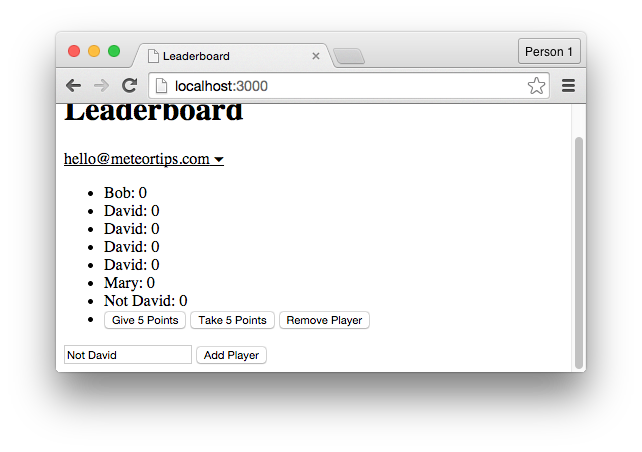
It’s the best of both worlds.
Removing Players (Again) (1/4)
In the same way that we created an “insertPlayerData” method, we’re going to create a “removePlayerData” method that we’ll hook up to the “Remove Player” button inside our interface. As was the case when creating helpers and events, we’ll place our methods in a single block of code, separated with commas:
Meteor.methods({
  'insertPlayerData': function(playerNameVar) {
    var currentUserId = Meteor.userId();
    PlayersList.insert({
      name: playerNameVar,
      score: 0,
      createdBy: currentUserId
    });
  },
  'removePlayerData': function() {
    // code goes here
  }
});
Removing Players (Again) (2/4)
Then we’ll make two changes to the click .remove event that’s attached to the “leaderboard” template.
First, we’ll get rid of the remove function:
'click .remove': function() {
  var selectedPlayer = Session.get('selectedPlayer');
}
Then, in its place, we’ll create another Meteor.call statement:
'click .remove': function() {
  var selectedPlayer = Session.get('selectedPlayer');
  Meteor.call('removePlayerData');
}
We’ll pass through the method name of “removePlayerData” as the first argument and the selectedPlayer variable as the second argument:
Removing Players (Again) (3/4)
We’ll then allow our method to accept this argument:
'click .remove': function() {
  var selectedPlayer = Session.get('selectedPlayer');
  Meteor.call('removePlayerData', selectedPlayer);
}
'removePlayerData': function(selectedPlayer) {
// code goes here
}…and recreate the remove function inside the method:
'removePlayerData': function(selectedPlayer) {
  PlayersList.remove(selectedPlayer);
}
Removing Players (Again) (4/4)
The “Remove Player” button will now work as expected, but users still don’t have access to any database-related functions from inside the Console.
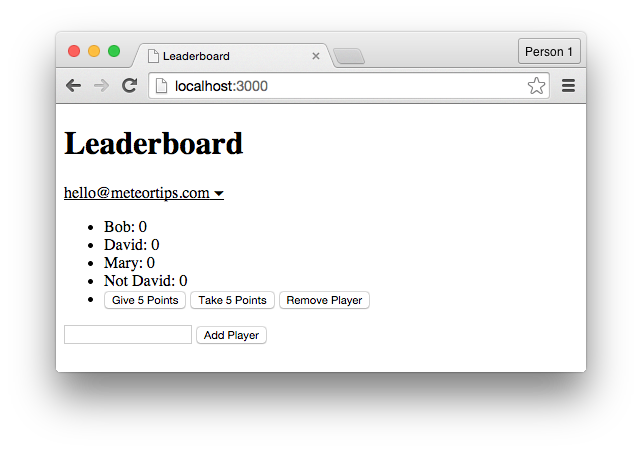
Modifying Scores (1/7)
Throughout this chapter, we’ve used methods for the sake of security. We can, however, also use methods to reduce the amount of code in our application.
To demonstrate this, we’ll take the click .increment and click .decrement events and combine them into a single method. We can do this because the code between these events is quite similar:
'click .increment': function() {
  var selectedPlayer = Session.get('selectedPlayer');
  PlayersList.update(selectedPlayer, {$inc: {score: 5} });
},
'click .decrement': function() {
  var selectedPlayer = Session.get('selectedPlayer');
  PlayersList.update(selectedPlayer, {$inc: {score: -5} });
}
Modifying Scores (2/7)
The only difference is that, in the click .increment event, we’re passing a value of “5” through the inc operator, and in the click .decrement event, we’re passing a value of “-5” through the inc operator.
To improve upon this code, we’ll focus on the click .increment event, and the first step is to delete the update function from the event and replace it with a Meteor.call function:
'click .increment': function() {
  var selectedPlayer = Session.get('selectedPlayer');
  Meteor.call('modifyPlayerScore', selectedPlayer);
}
Modifying Scores (3/7)
Here, we’re passing through this value of “modifyPlayerScore”, which is a method we’ll create in a moment, along with the value of selectedPlayer.
Next, we’ll create this “modifyPlayerScore” method inside the methods block, making sure to separate the methods with commas:
'modifyPlayerScore': function() {
  // code goes here
}
Also make sure the method can accept the selectedPlayer variable:
'modifyPlayerScore': function(selectedPlayer) {
  // code goes here
}
Modifying Scores (4/7)
Then inside the method’s function, we’ll recreate the update function that we deleted a moment ago:
'modifyPlayerScore': function(selectedPlayer) {
  PlayersList.update(selectedPlayer, {$inc: {score: 5} });
}
Based on this code, the “Give 5 Points” button will work as expected. To make the method a lot more flexible though, return to the click .increment event and pass a third argument of “5” through the Meteor.call statement:
'click .increment': function() {
  var selectedPlayer = Session.get('selectedPlayer');
  Meteor.call('modifyPlayerScore', selectedPlayer, 5);
}
Modifying Scores (5/7)
We’ll make sure the method can accept this third argument:
'modifyPlayerScore': function(selectedPlayer, scoreValue) {
  PlayersList.update(selectedPlayer, {$inc: {score: 5} });
}
Then replace the value of “5” that’s inside this method with a reference to the value of the third argument:
'modifyPlayerScore': function(selectedPlayer, scoreValue) {
  PlayersList.update(selectedPlayer, {$inc: {score: scoreValue} });
}
Here, we've replaced “5” with a reference to scoreValue.
Because of this change, this method is now flexible enough that we can use it for both the “Give 5 Points” button and the “Take 5 Points” button.
Modifying Scores (6/7)
Here’s how…
First, delete the update function from inside the click .decrement event:
'click .decrement': function() {
  var selectedPlayer = Session.get('selectedPlayer');
}
Second, place a Meteor.call statement inside this event:
'click .decrement': function() {
  var selectedPlayer = Session.get('selectedPlayer');
  Meteor.call('modifyPlayerScore');
}
Third, pass through the value of the selectedPlayer variable:
'click .decrement': function() {
  var selectedPlayer = Session.get('selectedPlayer');
  Meteor.call('modifyPlayerScore', selectedPlayer);
}
Modifying Scores (7/7)
Fourth, pass through a value of “-5” instead of just “5”:
'click .decrement': function() {
  var selectedPlayer = Session.get('selectedPlayer');
  Meteor.call('modifyPlayerScore', selectedPlayer, -5);
}
See what we've done?
We’ve made it so the utility of the update function depends on what value we pass through as the third argument for the method:
- If we pass through “5”, the update function will increment the value of the score field.
- If we pass through “-5”, the update function will decrement the value of the score field.
We have one method that can work in multiple ways, all the while remaining secure since our database-related functions are being executed on the server.
Summary (1/3)
In this chapter, we’ve learned that:
- By default, it’s possible for users to insert, update, and remove data from a collection using the JavaScript Console. This is convenient for development but a big security risk for a live application.
- The solution is to move our database-related code to the trusted environment of the server. Here, users don’t have any direct control.
- To first remove the security risk, we remove the insecure package from the project. The application will become much more secure but our application will break. None of the database-related features will work.
Summary (2/3)
In this chapter, we've learned that:
- By using methods, we’re able to write code that runs on the server after it’s triggered from the client. This is how we fix our application.
- To create methods, we use a methods block on the server, and can then trigger methods with the Meteor.call function.
- We can pass data from the Meteor.call function and into the method, allowing us to still use data from our submitted form on the server.
- Methods are not just for security. They’re also useful for combining similar pieces of functionality into a smaller fragment of code.
Summary (3/3)
To gain a deeper understanding of Meteor:
- In a separate project, remove the insecure package and, from the beginning, place all database-related code into methods.
To see the code in its current state, check out the GitHub commit.
STRUCTURE
Throughout this course, we've placed all of the code for our Leaderboard application into just three files:
- leaderboard.html
- leaderboard.js
- leaderboard.css
Once you start working on projects that are even slightly bigger in scope:
- You’ll want to spread your code across multiple files.
- You’ll love Meteor’s conventions for structuring a project.
Keep in mind:
- Meteor doesn't have hard and fast rules about how to structure your project.
- People are still figuring out the best practices of Meteor.
Your Project, Your Choice
Meteor doesn't have any hard and fast rules about how to structure your project.
How should you structure your project? The answer depends on your experience as a developer:
- If you’re a beginner, keep the structure of your projects as simple as possible for as long as you can.
- If you’re not a beginner, then you’ll find the conventions that we’re about to discuss easy enough to implement right away.
If you want to create a much larger project with just three files, you can. The code would be a pain to manage but Meteor wouldn't care.
It doesn't care how your files and folders are organised.
Your Project, Your Choice
Best practices are also much easier to learn compared to the fundamentals of developing software, so don’t let purists convince you that, when making something, you have to make it perfectly.
When you are ready to add structure to your projects, do it slowly.
Structure is meant to make your life easier and splitting a tiny prototype of a project across dozens of files for no particular reason is the opposite of easy.
Thin Files, Fat Files
When creating a Meteor application, our project’s files can be as “thin” or as “fat” as we want them to be. This means:
- We can spread our code across many files.
- We can pack a little or a lot of code into each file.
For example, let’s consider the leaderboard.html file. It’s not exactly fat, but it does contain three components that, while connected, don’t need to be contained within a single file:
- The basic HTML structure of the page ( head tags, body tags, etc.)
- The “leaderboard” template
- The “addPlayerForm” template
Thin Files, Fat Files
To account for this project growing larger and more complex, it would therefore make sense to split these three components into three separate files. You might, for instance, want to:
- Leave the basic HTML structure in the “leaderboard.html” file
- Move the “leaderboard” template into a “leaderboardList.html” file
- Move the “addPlayerForm” template into an “addPlayerForm.html” file
Thin Files, Fat Files
By doing so, you’d have an easier time navigating through the project since each file name tells us what’s within that file. To be clear though:
- There’s no further step required on your part. You place your code wherever you want in your project and Meteor “knows” how to put the pieces together.
- The file names are arbitrary. There are some “special” file names to be aware of, but we’ll talk about those in a moment.
You’re also free to place files within folders and sub-folders (and deeper structures, too), but there are certain conventions that encourage certain ways of naming these folders.
Folder Conventions
Inside the leaderboard.js file, a lot of our code is inside the isClient conditional. If we spread this code across multiple files though, it’d be inelegant to reuse the conditional over and over again.
To avoid such a fate, Meteor has a convention where any code that’s placed within a folder named “ client” will only run on the client .
As a demonstration:
- Create a folder named “client” inside your project’s folder.
- Create a JavaScript file inside this new folder. You can name it whatever you like.
- Cut and paste all of the client-side code from the leaderboard.js into the new file, but without the isClient conditional.
After saving the file, the application continues to work as expected.
Folder Conventions
It’s best to place templates, events, helper functions, and the Meteor.subscribe statement inside a “client” directory within your project’s directory.
There’s the convention where any code placed within a folder named “ server” will only run on the server . This is where we’d place our methods, and the Meteor.publish statement.
We’ll leave the statement that creates the “PlayersList” collection outside of the “client” and “server” folders since we need the code to execute in both environments for it to function correctly. You could, however, move the code to a file named “collections.js” (or something similar). This would only be for the sake of navigating your project though. That name has no inherent meaning.
Other Special Folders
There are some other folder names that can be used for different purposes:
- Files stored in a " private" folder will only be accessible to code that’s executed on the server. The files will never be accessible by users.
- Files stored in a " public" folder are served to visitors. These are files like images, favicons, and the robots.txt file (static assets).
- Everything else runs on both the client and server.
And it's also useful to know how Meteor decides in which order to load your files:
- Files in any " lib" are loaded before anything else.
- Any " main.*" file is loaded after everything else.
- Everything else loads in alphabetical order based on the file name.
Boilerplate Structures
When you’re ready to actively think about how to structure your Meteor application, research how other people are structuring their applications.
Here, for instance, are three boilerplate structures for Meteor projects:
These structures do contradict each other but there’s a lot to learn from both their similarities and differences. Then it’s just a matter of filling in the gaps with your own experiences and preferences (along with the details of the project that you’re working on).
Summary
In this chapter, we've learned that:
- Meteor doesn't enforce a precise file structure for our projects. There are simply conventions that we’re encouraged to follow.
- By naming certain folders in certain ways, we’re able to cut down on some application logic based on how Meteor handles those folders.
To gain a deeper understanding of Meteor:
- Search through other people’s Meteor projects on GitHub and see how real-world applications are being organised.
- Imagine you’re creating a blogging application (like WordPress). How would you structure that application? Write it out on a piece of paper.
To see the code in its current state, check out the GitHub commit.
DEPLOYMENT
At this point, we’re ready to deploy our application to the web. This is the part where we can share our creations with the world and have hordes of strangers marvel at our genius.
Deployment isn't simply a matter of uploading some files to a web server though. In some ways, it exceeds the scope of this book.
As such, here’s what we’ll do:
- We’ll deploy our web application to the Meteor.com servers. This is an imperfect approach, but it’s quick, easy, and free.
- We’ll discuss alternative methods of deployment.
Deploy to Meteor.com
Meteor provides free hosting to web applications built with the framework. This hosting isn't suitable for large-scale applications but, if you’re just looking to share what you've made with a handful of people, it’s very useful.
To begin, shut down the local server with CTRL + C, and then enter the following into the command line:
$ meteor deploy APPLICATIONNAME.meteor.comHere, we’re using a deploy command and passing through a sub-domain that we’ll use to access our application from a web browser.
Tap the “Return” key to begin the deployment process. Your application will soon be available via the specified URL.
Deploy to Meteor.com
To host your Meteor application with a custom domain name, use the following command instead of the one we just covered:
$ meteor deploy YOURDOMAINNAME.comOnce the application is live, you’ll be able to deploy updates by using the same command and sub-domain as the first time around.
Alternative Solutions
If you’re looking for a more serious, future-proof option for deploying a Meteor application to the web, here’s a few options to choose between:
- Meteor Up
- ...
- “Galaxy”
CONCLUSION
Text
REALTIME WEB WITH METEOR
By Marc Rovira Vall


