PHP Autoloading
+
Dependency Manager for PHP
FOLLOW ALLONG: http://slides.com/donsheridn/composer/live#/
Created by Don Sheridan / @DonSheridn
Don Sheridan

Irish Party Animal!
@donsheridn
IT Administrator, PL/SQL Programmer, PHP Developer
Liverpool FC fan
Born and raised in Navan, Co Meath, Ireland
Quick Survey
-
Who is familiar with PHP Autoload() and Spl_Autoload() functionality?
-
Who uses Composer?
-
Who is familiar with Packagist.org?
So What Are We Going to Cover:
-
We will be looking at how Composer uses the PHP autoload functionality to load libraries and all their dependencies for use in your application without the need for require statements in the files where you use them!
-
For this reason I will first give a quick summary of PHP autoload() and Spl_autoload().
-
Before moving on to installing, configuring, and using Composer and the many packages / libraries available for use with it on Packagist.org and Gemfury.com.
__AUTOLOAD() and SPL_AUTOLOAD()
-
PHP 5 introduced the somewhat magical __autoload() function.
-
The __autoload() function if defined allows the loading of classes on-demand (aka lazy loading).
-
This means you no longer need to write a long list of include / require statements in each of your scripts to load classes.
-
And you no longer have to use fully qualified class names.
-
However it is limited to one naming scheme so things get complicated when you try to use more than one library, for this reason it has been deprecated in favor of Spl_Autoload()!
__Autoload() Example
<?php
function __autoload($class_name) {
include $class_name . '.php';
}
$obj = new MyClass1();
$obj2 = new MyClass2();
Spl_Autoload() Functionality
-
Enables you to load classes from different libraries by allowing you to stack autoloaders on top of each other. If one fails to load a class, the next is called.
-
If all the custom autoloaders fail to load the class a fatal error occurs which can be caught in a try / catch block.
-
Using spl_autoload functionality is a two step process: 1. You define your custom_autoload() function. 2. Use spl_autoload_register(custom_autoload); to register an autoloader on the autoload stack.
- spl_autoload_register() is boolean in that it prepends the autoloader on the autoload stack when true; appends when false.
So what about Spl_autoload()?
-
Spl_autoload() - is the default autoloader used when you don't want to define and register your own custom autoloaders.
-
The first time you call spl_autoload_register() with / without a parameter you replace the regular __autoload() call with the custom_autoloader() or spl_autoload().
-
Once default spl_autoload() has been activated to handle all your autoload requests, it receives the classname, and searches the include_path for the classname with a file extension appended (you register the file extensions to use using the spl_autoload_extensions() function).
Auto-loading Namespaced Classes:
- Auto-loading Namespaced Classes is slightly different than auto-loading from global scope.
- When PHP needs to call the Spl_autoload() or __autoload() function from a namespaced class the fully-qualified namespace and class name are passed to your autoload function.
- So you need to code the autoload function to resolve the namespace names to their actual file path equivalents for use in the require / include statements
Spl_Autoload Example
use App\Classlib1\MyClass1 as MC; //namespace with alias spl_autoload_extensions('.inc,.php,.class.php'); //the order matters
function my_autoload($class) {
$class = str_replace("\\", "/", $class) . '.php';
require_once($class);
}
spl_autoload_register(my_autoload);
$obj = new MC();
//$obj = new myclass();
//$obj = new App\Classlib1\MyClass1();
echo $obj->WhoAmI1().PHP_EOL;
The Benefit of using Autoloading
- Assume you've got an application with 150 classes that are called dynamically through a controller file at the root of your application filesystem.
- All 150 classes follow the naming convention class.classname.inc.php and reside in the inc folder of your application.
-
Prior to auto-loading you would have to require all 150 files in the controller file just in case you needed them.
-
Now with autoloading the controller can implement PHP's __autoload() function to dynamically pull in only the classes it needs as they are called.
Another Example
<?php
function __autoload($class_name)
{
include_once 'inc/class.' . $class_name . '.inc.php';
}
Composer and Spl_Autoloading
- Composer uses spl_autoload_register() to register autoloaders for the various different components / libraries you configure it to download, manage, and update. We can see this in \vendor\composer\autoload_real.php and ClassLoader.php.
- However with Composer the require statements are configured by you in the Composer.json file (the main configuration file where you tell it what you want it to manage)
- So once you have installed Composer, configured your Composer.json file, have Composer run it, and add require_once __DIR__.'/vendor/autoload.php'; to your root app file any component / library you requested is now available on-demand anywhere in your application! Endless Possibilities!!
What is Composer?
- Composer is a tool for dependency management in PHP. It allows you to declare the dependent libraries your project needs and it will install them in your project for you.
- Composer is not a package manager. Yes, it deals with "packages" or libraries, but it manages them on a per-project basis, installing them in a directory (e.g. vendor) inside your project. By default it will never install anything globally. Thus, it is a dependency manager.
- This idea is not new and Composer is strongly inspired by node's npm and ruby's bundler.
What does Composer do?
The problem that Composer solves:
- You have a project that depends on a number of libraries.
- Some of those libraries depend on other libraries.
- You declare the things you depend on.
- Composer automatically finds out which versions of which packages need to be installed, even what dependencies your dependencies rely on, and installs them (meaning it downloads them into your project).
System Requirements
- Composer requires PHP 5.3.2+ to run.
- A few sensitive php settings and compile flags are also required, but when using the installer you will be warned about any incompatibilities.
- To install packages from sources instead of simple zip archives, you will need git or svn depending on how the package is version-controlled.
- Composer is multi-platform and they try to make it run equally well on Windows, Linux and OSX.
Installing Composer
There are two ways to install Composer:
- Locally as part of your project,
- or globally as a system wide executable.
You can install Composer in a local directory using the command:
curl -s https://getcomposer.org/installer | php
Or if you don't have curl, you can download the composer.phar installer with php instead:
php -r "readfile('https://getcomposer.org/installer');"| php
Installing Composer Globally
A more common practice is to install composer globally:
curl -s https://getcomposer.org/composer.phar \ - o $HOME/local/bin/composer
You then need to make the folder executable.
chmod +x $HOME/local/bin/composer
This command downloads the composer.phar file. You can place it anywhere you wish and then add it to your enviroment variables. If you put it in your PATH, you can access it globally. On unixy systems you can even make it executable and invoke it without php.
This gives you access to the:
composer install command
Composer and Vagrant Boxes
If your using a Vagrant test environment (such as Vaprobash) Composer will already be installed and configured for you.
You can check this using:
echo "$PATH" to display what has been registered as an enviroment variable.
vagrant@localhost:~/.composer$ echo "$PATH"
/usr/local/sbin:/usr/local/bin:/usr/sbin:/usr/bin:/sbin:/bin:/usr/games:/usr/local/games:/home/vagrant/.composer/vendor/bin
Should you ever need to register a path variable you can do so using:
export PATH=$PATH:/home/vagrant/.composer/vendor/bin
Composer.json + Declaring Dependencies
Let's say you are creating a project, and you need a library that does logging.
You decide to use monolog.
In order to add it to your project, all you need to do is create a composer.json file which describes the project's dependencies.
{
    "require": {
        "monolog/monolog": "1.2.*"
    }
}
We are simply stating that our project requires some monolog/monolog package, any version beginning with 1.2.
Using Composer
Creating a Symfony Application with Composer:
-
Once Composer is installed on your computer, execute the create-project command to create a new Symfony application based on its latest stable version:
composer create-project symfony/framework-standard-edition my_project_name
composer create-project symfony/framework-standard- edition my_project_name "2.3.*"
The above command downloads and installs the core libraries for a Symfony Project, along with all the dependencies / components.
-
If you need to base your application on a specific Symfony version, provide that version as the second argument of the create-project command:
Using Composer
So lets see what the previous commands actually installed:
vagrant@localhost:/vagrant/acme$ ls
app bin composer.json composer.lock src vendor web
As we can see above several things got installed, of primary concern here is our composer.json file, as this is where a lot of the magic happens.
“require” is the key to the strength of Composer. This tells composer what core libraries, and their versions, you would like to install.
Composer then figures out the dependencies and their versions and installs them.
Add your own code to the Composer Autoloader
You can even add your own code to the autoloader by adding an autoload field to composer.json.
"autoload": {
"psr-4": {
"SDPHP\\EventDispatcherTest\\": "src"
}
},
Composer will register a PSR-4 autoloader for the Acme namespace. You define a mapping from namespaces to directories. The src directory would be in your project root, on the same level as vendor directory is. An example filename would be src/Foo.php containing an Acme\Foo class. After adding the autoload field, you have to re-run dump-autoload to re-generate the vendor/autoload.php file.
Composer.json
{
"name": "sdphp/event-dispatcher-test",
"homepage": "http://sdphp.org",
"keywords":["console", "CLI", "event-dispatcher"],
"license":"MIT",
"authors": [
{ "name": "Juan Manuel Torres.",
"email": "kinojman@gmail.com" }
],
"require": {
"php": ">=5.4",
"symfony/console": "~2.6",
"symfony/event-dispatcher": "~2.6"
},
Composer.json Cont.
"autoload": {
"psr-4": {
"SDPHP\\EventDispatcherTest\\": "src"
}
},
"extra": {
"branch-alias": {
"dev-master": "1.0.x-dev"
}
}
}
The require Key
The require Key#
The first (and often only) thing you specify in composer.json is the require key. You're simply telling Composer which packages your project depends on.
{
"require": {
"monolog/monolog": "1.0.*",
}
}
As you can see, require takes an object that maps package names (e.g. monolog/monolog) to package versions (e.g. 1.0.*).
Package Names
The package name consists of a vendor name and the project's name. Often these will be identical - the vendor name just exists to prevent naming clashes. It allows two different people to create a library named json, which would then just be named igorw/json and seldaek/json.
Here we are requiring monolog/monolog, so the vendor name is the same as the project's name. For projects with a unique name this is recommended. It also allows adding more related projects under the same namespace later on. If you are maintaining a library, this would make it really easy to split it up into smaller decoupled parts.
Package Versions
In the previous example we were requiring version 1.0.* of monolog. This means any version in the 1.0 development branch. It would match 1.0.0, 1.0.2 or 1.0.20.
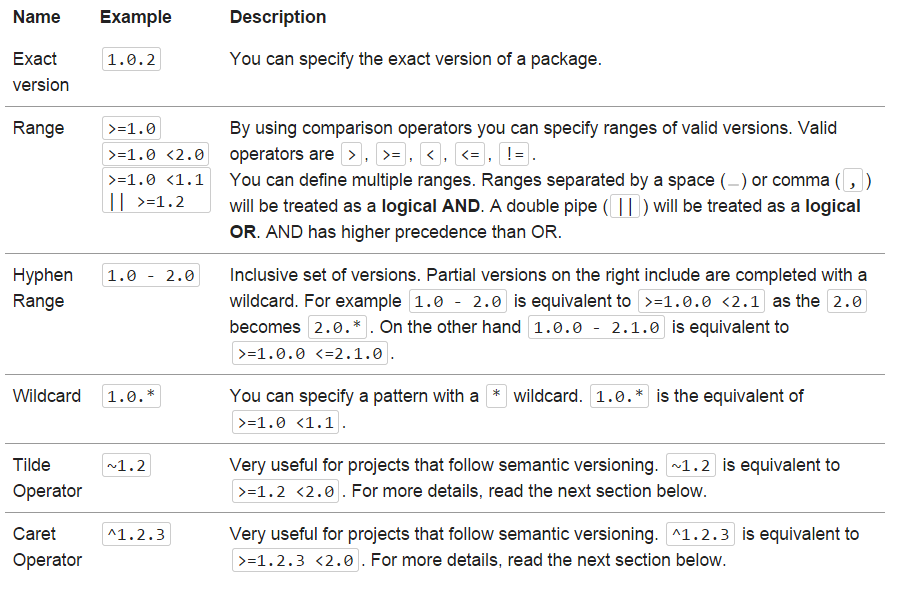
Version constraints can be specified in a few different ways:
Package Versions
Semantic Versioning
Is a simple set of rules and requirements that dictate how version numbers are assigned and incremented.
- PATCH you increment the patch version when you implement Bug fixes not affecting the API, that is they are backwards-compatible.
- MINOR you increment the minor version when you add new API functionality that is backwards compatible.
- MAJOR you increment the major version when you make API changes that are not backwards compatible.
Once you identify your public API, you communicate changes to it with specific increments to your version number. Consider a version format of X.Y.Z (Major.Minor.Patch).
Next Significant Release (~)
The ~ operator is best explained by example:
~1.2 is equivalent to >=1.2 <2.0.0,
while ~1.2.3 is equivalent to >=1.2.3 <1.3.0.
As you can see it is mostly useful for projects respecting semantic versioning. A common usage would be to mark the minimum minor version you depend on, like ~1.2 (which allows anything up to, but not including, 2.0). Since in theory there should be no backwards compatibility breaks until 2.0, that works well. Another way of looking at it is that using ~ specifies a minimum version, but allows the last digit specified to go up.
Note: Though 2.0-beta.1 is strictly before 2.0, a version constraint like ~1.2 would not install it. As said above ~1.2 only means the .2 can change but the 1. part is fixed.
Next Significant Release (^)
The ^ operator behaves very similarly but it sticks closer to semantic versioning, and will always allow non-breaking updates.
For example:
^1.2.3 is equivalent to >=1.2.3 <2.0.0
as none of the releases until 2.0 should break backwards compatibility. For pre-1.0 versions it also acts with safety in mind and treats ^0.3 as >=0.3.0 <0.4.0
Stability Flags
By default only stable releases are taken into consideration.
If you would like to also get RC, beta, alpha, dev, or unstable (dev-master) versions of your dependencies you can do so using stability flags. These allow you to further restrict or expand the stability of a package beyond the scope of the minimum-stability setting.
{
"require": {
"monolog/monolog": "1.0.*@beta",
"acme/foo": "@dev"
"doctrine/doctrine-fixtures-bundle": "dev-master",
"doctrine/data-fixtures": "@dev"
}
}
Minimum-Stability
To change stability settings for all packages instead of doing so on a per dependency basis you use the minimum-stability settings.
To do so add:
"minimum-stability": "dev"
your composer.json file
All versions of each package are checked for stability, and those that are less stable than the minimum-stability setting will be ignored when resolving your project dependencies.
Available options (in order of stability) are dev, alpha, beta, RC, and stable.
composer.lock - The Lock File
After installing the dependencies, Composer writes the list of the exact versions it installed into a composer.lock file. This locks the project to those specific versions.
Commit your application's composer.lock (along with composer.json) into version control.
This is important because the install command checks if a lock file is present, and if it is, it downloads the versions specified there (regardless of what composer.json says).
This means that anyone who sets up the project will download the exact same version of the dependencies.
When to Leave out Composer.lock
- If you are releasing an open source library do not commit the composer.lock file.
- Composer.lock is intended for use by projects that consist of one or more libraries and code to integrate those.
- When running composer from a project it doesn't use individual library's composer.lock files it uses it's own, so it installs the individual libraries dependencies at the latest version even though the version of the library is set.
Composer Update v Install
Always use Composer Install over Composer Update as it locks the dependencies that will be used in the project in the Composer.lock file, and these can only ever be updated by explicitly modifying the Composer.json file and running Composer Update.
Using Composer Install instead of Composer Update means that if any of the dependencies get a new version, you won't get the updates automatically, and so won't break your application.
Ony use Composer Update command to update to the new versions when you really want to. This will fetch the latest matching versions (according to your composer.json file) and also update the lock file with the new versions.
Composer Install runs faster than Composer Update because all of the dependencies the project needs are already there.
Advanced Topics:
- Publishing your own packages / libraries to Packagist or Version Control / GitHub
- Using Classmap to define autoloading for all libraries that do not follow PSR-0/4
- Using Composer to load packages from PEAR.
- Using Composer with your own private repositories (Toran Proxy / Satis / Artifact/Gemfury)
- Composer and Virtual Packages
Composer
By donsheridn
