React
Formation de 3 jours
Programme
Programme
Écosystème JavaScript et découverte de React
1.
2.
React
Les composants en long et en large
3.
Technique avancé
Routing, les effets de bords, ...
# Programme
# Programme
Jeu de Pokémons !
- Fil rouge
- Correction à la fin de la formation
Travaux Pratique

Demandez-moi de l'aide !
Dispo sur https://berthelot.io
Slides
Je navigue de formation en formation
Florent Berthelot
7 ans d'expériences très diverses...
2 SSII, puis indépendant (WeFacto).
JavaScript
Rappels
JavaScript ?
Exercice 1
Créez une page Web, pour l'instant Vide.
Cette page charge un fichier JS et aussi ceci :
<!-- Votre page HTML -->

<script src="https://unpkg.com/react@18/umd/react.development.js" crossorigin></script>
<script src="https://unpkg.com/react-dom@18/umd/react-dom.development.js" crossorigin></script>

<!-- Votre page HTML -->
Qu'est ce que React ?


# React
Pourquoi un Framework JS ?

# React
Comment React est apparu ?
Facebook !
# React
Popularité ?
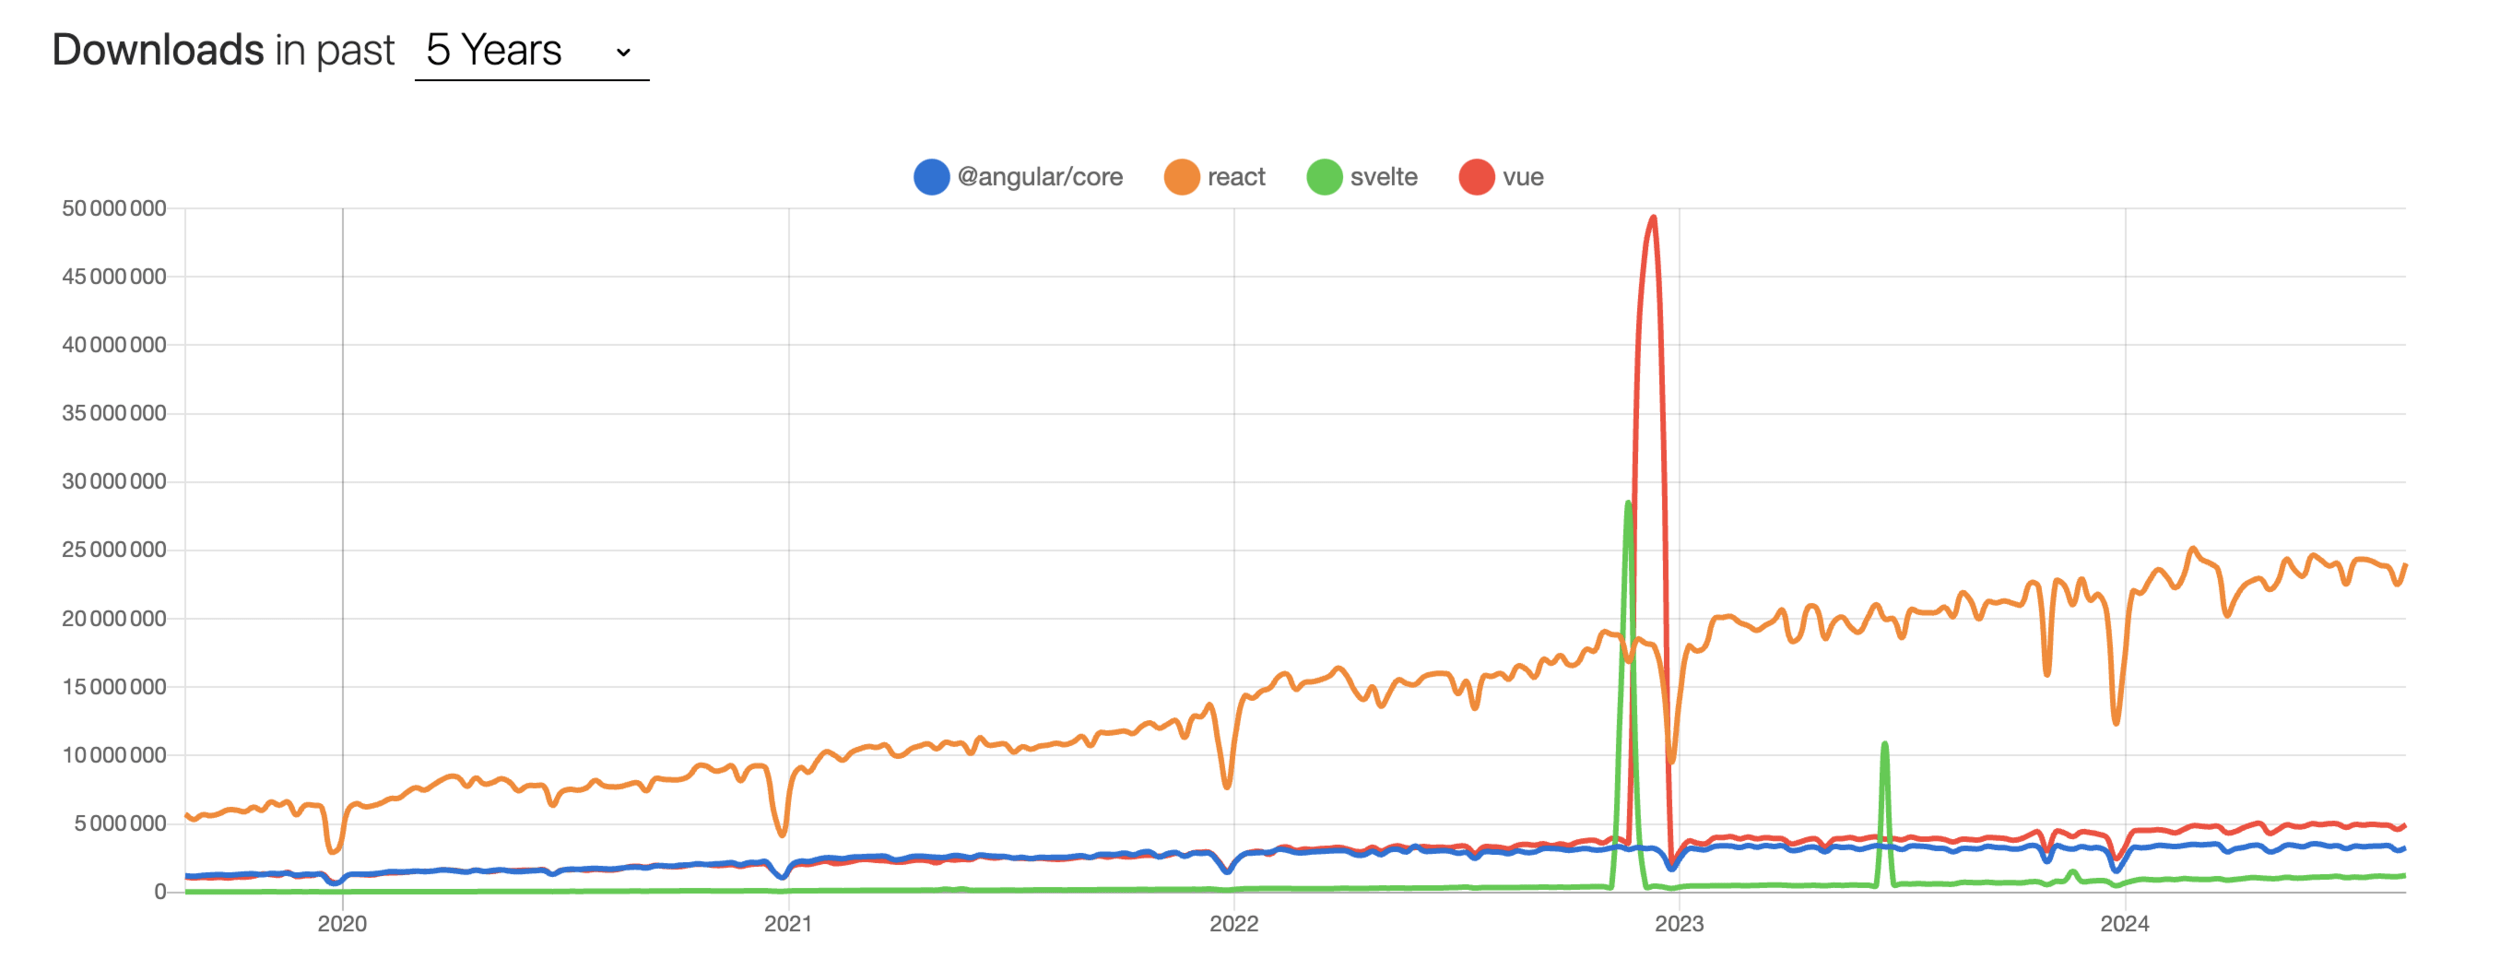
# React
Les avantages
- Stable
- Stable
- JSX
- Assez performant
- Simple !
- Progressive Framework ou Lib
# React
Où se positionne React ?
- Angular
- Vue.JS
- Là
Le "Hello World"
<div id="my-react-application"></div># React
const domContainer = document.querySelector('#my-react-application');


const root = ReactDOM.createRoot(domContainer);
root.render(React.createElement('h1', {}, 'Hello world'));
Exercice 2
Démarrer React pour afficher votre nom sur la page Web
JSX
Le "Hello World"
<div id="my-react-application"></div># React
const domContainer = document.querySelector('#my-react-application');


const root = ReactDOM.createRoot(domContainer);
root.render(React.createElement('h1', {}, 'Hello world'));
Un peu plus ?
# React
const domContainer = document.querySelector('#my-react-application');

const root = ReactDOM.createRoot(domContainer);
root.render(
  React.createElement('main', {},
  [
    React.createElement('header', {},
       React.createElement('h1', {}, 'Hello world')
    ),
    React.createElement('section', {}, 'lorem ipsum')
  ])
, domContainer);
Encore peu plus ?
# React
const domContainer = document.querySelector('#my-react-application');

const root = ReactDOM.createRoot(domContainer);
root.render(
  React.createElement('main', {},
  [
    React.createElement('header', {},
       React.createElement('h1', {}, 'Hello world')
    ),
    /** ... **/
    React.createElement('section', {},
       React.createElement('article', {}, [
        React.createElement('p', {}, 'lorem ipsum'),
        React.createElement('p', {}, 'lorem ipsum')
       ]),
       React.createElement('article', {}, [
        React.createElement('p', {}, 'lorem ipsum'),
        React.createElement('p', {}, 'lorem ipsum')
       ])
    )
    /** ... **/
  ])
, domContainer);
JSX à la rescousse
# React
const domContainer = document.querySelector('#my-react-application');

const root = ReactDOM.createRoot(domContainer);
root.render(
  <main>
    <header>
      <h1>Hello world</h1>
    </header>
    {/** ... **/}
    <section>
      <article>
        <p>lorem ipsum</p>
        <p>lorem ipsum</p>
      </article>
      <article>
        <p>lorem ipsum</p>
        <p>lorem ipsum</p>
      </article>
    </section>
    {/** ... **/}
  </main>
, domContainer);
Rappels
Outillage JavaScript ?
Exercice 3 ?
- NVM
- NPM
- GIT
- JEST
- Babel / SWC
- ESLINT
- PRETTIER
- Installer React
- ... ?
CRA
Create React App
CRA
Exercice 3
Initialisez le projet avec Create React App
Observez le code et les outils qui ont été généré.
Changez le contenu de la Page pour afficher votre nom.
Template
Qu'est ce qu'un composant ?
<LikeButton></LikeButton>

ou

<LikeButton />
# Template
Qu'est ce qu'un composant ?
<!-- Composant Parent -->
<LikeButton></LikeButton>
# Template
Composant
Qu'est ce qu'un composant ?
<!-- Composant Parent -->
<LikeButton></LikeButton>
# Template
Composant
Vue
// like.component.jsx
const LikeButton = () => {
  return <button>O j'aime</button>;
}
Améliorons notre code !
# Template
Composant
Vue
// like.component.jsx
const LikeButton = () => {
  const nbOfLike = 0;

  return <button>{nbOfLike} j'aime</button>;
}
Améliorons notre code !
# Template
Composant
Vue
// like.component.jsx
const LikeButton = () => {
  const nbOfLike = 0;

  return <button>{nbOfLike} j'aime{nbOfLike > 1 ? 's' : ''}</button>;
}
Et la sémantique HTML ?
# Template
Composant
Vue
// like.component.jsx
const LikeButton = () => {
  const nbOfLike = 0;

  return (
    <button type="button">
    	{nbOfLike} j'aime{nbOfLike > 1 ? 's' : ''}
    </button>;
  );
}
Et le style ?
# Template
Composant
Vue
// like.component.jsx
const LikeButton = () => {
  const nbOfLike = 0;

  return (
    <button type="button" className="btn-primary">
    	{nbOfLike} j'aime{nbOfLike > 1 ? 's' : ''}
    </button>;
  );
}
Mieux ?
# Template
Composant
Vue
// like.component.jsx
const LikeButton = () => {
  const nbOfLike = 0;
  const liked = true;

  return (
    <button type="button" className="btn-primary" style={{color: liked ? 'red' : 'grey'}}>
    	{nbOfLike} j'aime{nbOfLike > 1 ? 's' : ''}
    </button>;
  );
}
Encore mieux ?
# Template
Composant
Vue
// like.component.jsx
const LikeButton = () => {
  const nbOfLike = 0;
  const liked = true;

  return (
    <button type="button" className={`btn-primary ${liked ? 'btn-liked' : ''}`}>
    	{nbOfLike} j'aime{nbOfLike > 1 ? 's' : ''}
    </button>;
  );
}
Exercice 4
Créez la structure HTML de votre arène de Pokémon.
Une arène se compose de deux Pokémons qui s'affrontent.
Pour l'instant, l'écran est figé.
Il n'y a qu'un seul composant Arène.
Tester !
React Testing Library
# Tests
React Testing Library
# Tests
React Testing Library
# Tests
Live-Coding
import { render, screen } from "@testing-library/react"
import { LikeButton } from "./likeButton"


describe('LikeButton', () => {
    it("should display 0 like", () => {
        render(<LikeButton />)

        expect(screen.getByText('0 like')).toBeVisible()
    })
})
Exercice 5
Réparez vos tests !
Props
Comment passer des données ?
# Props
Composant
Vue
// like.component.jsx
const LikeButton = () => {
  const nbOfLike = 0;
  const liked = true;

  return (
    <button type="button" className={`btn-primary ${liked ? 'btn-liked' : ''}`}>
    	{nbOfLike} j'aime{nbOfLike > 1 ? 's' : ''}
    </button>;
  );
}
<!-- Composant Parent -->
<LikeButton></LikeButton>Comment passer des données ?
# Props
Composant
Vue
// like.component.jsx
const LikeButton = (props) => {
  const nbOfLike = props.nbOfLike;
  const liked = props.liked;

  return (
    <button type="button" className={`btn-primary ${liked ? 'btn-liked' : ''}`}>
    	{nbOfLike} j'aime{nbOfLike > 1 ? 's' : ''}
    </button>;
  );
}
<!-- Composant Parent -->
<LikeButton liked={true} nbOfLike={1} />Propriétés
Mieux ?
# Props
Composant
Vue
// like.component.jsx
const LikeButton = (props) => {
  const nbOfLike = props.nbOfLike;
  const liked = props.liked;

  return (
    <button type="button" className={`btn-primary ${liked ? 'btn-liked' : ''}`}>
    	{nbOfLike} j'aime{nbOfLike > 1 ? 's' : ''}
    </button>;
  );
}
<!-- Composant Parent -->
<LikeButton liked nbOfLike={1} />Propriétés
Destructuring ?!
# Props
Composant
Vue
// like.component.jsx
const LikeButton = ({
  nbOfLike,
  liked
}) => {
  return (
    <button type="button" className={`btn-primary ${liked ? 'btn-liked' : ''}`}>
    	{nbOfLike} j'aime{nbOfLike > 1 ? 's' : ''}
    </button>;
  );
}
<!-- Composant Parent -->
<LikeButton liked nbOfLike={1} />Propriétés
Exercice 6
Séparez en plusieurs composants l'arène.
Passez des données entre les composants.
State
Et effets de bords
Le state
# State & effects
Composant
Vue
// like.component.jsx
const LikeButton = () => {
  const nbOfLike = 0;

  return (
    <button type="button">
    	{nbOfLike} j'aime{nbOfLike > 1 ? 's' : ''}
    </button>;
  );
}
<!-- Composant Parent -->
<LikeButton />Propriétés
Le state
# State & effects
Composant
Vue
// like.component.jsx
const LikeButton = () => {
  const NbLikeState = React.useState(0);

  return (
    <button type="button">
    	{NbLikeState[0]} j'aime{nbOfLike > 1 ? 's' : ''}
    </button>;
  );
}
Propriétés
State
Le state : Destructuring !
# State & effects
Composant
Vue
// like.component.jsx
const LikeButton = () => {
  const [nbOfLike, setNbOfLike] = React.useState(0);

  return (
    <button type="button">
    	{nbOfLike} j'aime{nbOfLike > 1 ? 's' : ''}
    </button>;
  );
}
Propriétés
State
Le state
# State & effects
Composant
Vue
// like.component.jsx
const LikeButton = () => {
  const [nbOfLike, setNbOfLike] = React.useState(0);

  return (
    <button type="button">
    	{nbOfLike} j'aime{nbOfLike > 1 ? 's' : ''}
    </button>;
  );
}
Propriétés
State
# State
Instant bonne pratique.
Tout ce qui est dans un React.useState doit être totalement indépendant des autres useState.
Qu'est ce qu'un effet de bords ?
# State & effects
Composant
Vue
const Timer = () => {
  const [ellapsedTime, setEllapsedTime] = React.useState(0);


  return <span>Il s'est passé {ellapsedTime} secondes.</span>;
}
Propriétés
State
UseEffect
# State & effects
Composant
Vue
const Timer = () => {
  const [ellapsedTime, setEllapsedTime] = React.useState(0);

  React.useEffect(() => {
    setInterval(() => {
      setEllapsedTime((ellapsedTime) => ellapsedTime + 1);
    }, 1000)
  }, [])


  return <span>Il s'est passé {ellapsedTime} secondes.</span>;
}
Propriétés
State
Fuite mémoire ?
# State & effects
Composant
Vue
const Timer = () => {
  const [ellapsedTime, setEllapsedTime] = React.useState(0);

  React.useEffect(() => {
    const interval = setInterval(() => {
      setEllapsedTime((ellapsedTime) => ellapsedTime + 1);
    }, 1000)

    return () => {
      clearInterval(interval);
    }
  }, [])


  return <span>Il s'est passé {ellapsedTime} secondes.</span>;
}
Propriétés
State
Exercice 7
Les Pokémons s'attaquent maintenant à raison d'une attaque (ou tour) par seconde.
(Pour l'instant seul les points de vies changent)
Les évènements
Comment écouter le click ?
# Évenement
Composant
Vue
// like.component.jsx
const LikeButton = () => {
  const [nbOfLike, setNbOfLike] = React.useState(0);

  return (
    <button type="button">
    	{nbOfLike} j'aime{nbOfLike > 1 ? 's' : ''}
    </button>;
  );
}
Propriétés
State
onClick ! (camelCase)
# Évenement
Composant
Vue
// like.component.jsx
const LikeButton = () => {
  const [nbOfLike, setNbOfLike] = React.useState(0);

  return (
    <button type="button" onClick={() => setNbOfLike(nbOfLike++)}>
    	{nbOfLike} j'aime{nbOfLike > 1 ? 's' : ''}
    </button>;
  );
}
Propriétés
State
Ses propres évènements ?
# Évenement
Composant
Vue
// like.component.jsx
const LikeButton = ({onLike, nbOfLike}) => {

  return (
    <button type="button" onClick={() => onLike()}>
    	{nbOfLike} j'aime{nbOfLike > 1 ? 's' : ''}
    </button>;
  );
}
Propriétés
State
const Tweet = () => {
  const [nbOfLikes, setNbOfLikes] = useState(0);
  return <LikeButton nbOfLikes={nbOfLikes} onLike={() => setNbOfLikes(nbOfLikes++)} />
}
Comment tester des évènements ?
# Évenement
L'empathie !
Comment tester des évènements ?
# Évenement
import { fireEvent, render, screen } from '@testing-library/react';

it('should display 1 like when cliking on the button', () => {
  render(<LikeButton />);

  screen.fireEvent(screen.getByRole('button'))

  expect(screen.getByText('1 like')).toBeVisible()
})
Mieux ?
# Évenement
import { render, screen } from '@testing-library/react';
import userEvent from '@testing-library/user-event'

it('should display 1 like when cliking on the button', async () => {
  render(<LikeButton />);

  await userEvent.click(screen.getByRole('button'));

  screen.getByText('1 like');
})
Exercice 8
Ajoutez un boutton Play/Pause.
Par défaut, le combat est en pause.
Props #2
Validation et valeurs par défault
Valeurs par défaut
const LikeButton = ({
  onLike = () => {},
  nbOfLike = 0
}) => {
  return (
    <button type="button" onClick={() => onLike()}>
    	{nbOfLike} j'aime{nbOfLike > 1 ? 's' : ''}
    </button>;
  );
}
# Props 2
Valeurs par défaut
const LikeButton = ({onLike, nbOfLike}) => {
  return (
    <button type="button" onClick={() => onLike()}>
    	{nbOfLike} j'aime{nbOfLike > 1 ? 's' : ''}
    </button>;
  );
}

LikeButton.defaultProps = {
	onLike: () => {},
	nbOfLike: 0
}
# Props 2
Validation de props
import PropTypes from 'prop-types';


const LikeButton = ({onLike, nbOfLike}) => {
  return (
    <button type="button" onClick={() => onLike()}>
    	{nbOfLike} j'aime{nbOfLike > 1 ? 's' : ''}
    </button>;
  );
}

LikeButton.defaultProps = {
	nbOfLike: 0
}

LikeButton.proptypes = {
  onLike: PropTypes.func.isRequired,
  nbOfLike: PropTypes.number
}
# Props 2
Truc et astuces
Boucles, affichage conditionnel, ...
Les fragments
const Tweets = () => {
    const datas = [/* ... */]
    return (
      <React.Fragment>
        <Tweet data={datas[0]}/>
        <Tweet data={datas[1]}/>
      </React.Fragment>
    )
}
# Tips
Les fragments - version courte
const Tweets = () => {
    const datas = [/* ... */]
    return (
      <>
        <Tweet data={datas[0]}/>
        <Tweet data={datas[1]}/>
      </>
    )
}
# Tips
Boucles
const Tweets = () => {
  const items = [
    {id: 1, price: 10_00},
    {id: 2, price: 150_00}
  ]
  return (
    <ul>
      {items.map((item) => {
        return <li>{item.price}</li>;
      })}
    </ul>
  )
}
# Tips
Boucles
const Tweets = () => {
  const items = [
    {id: 1, price: 10_00},
    {id: 2, price: 150_00}
  ]
  return (
    <ul>
      {items.map((item) => {
        return <li key={item.id}>{item.price}</li>;
      })}
    </ul>
  )
}
# Tips
Important !
Fait l'objet d'une règle ESLint
Boucles, autre exemple
const Tweets = () => {
  const tweets = [
    {id: 1, message: 'coucou' /* ...*/ },
    {id: 2, message: 'un thread !' /* ...*/ }
  ]
  return (
    <section>
      {tweets.map(tweet => {
        return <Tweet key={tweet.id} tweet={tweet}/>;
      })}
    </section>
  )
}
# Tips
Affichage conditionnel
const Tweets = ({
  isUserTweet
}) => {
  return (
    <article>
      {/* ... */}
      {
        isUserTweet ?
           <EditButton /> :
           null
      }
    </article>
  )
}
# Tips
Affichage conditionnel ?
const Tweets = ({
  isUserTweet
}) => {
  return (
    <article>
      {/* ... */}
      {isUserTweet && <EditButton />}
    </article>
  )
}
# Tips
Affichage conditionnel ?
const Tweets = ({
  isUserTweet
}) => {
  return (
    <article>
      {/* ... */}
      {isUserTweet ?? <EditButton />}
    </article>
  )
}
# Tips
Transclusion, children, ...
const Parent = () => {
  return (
    <Modal>
    	<h2>lorem ipsum</h2>
    	<button>close</button>
    </Modal>
}


const Modal = ({children}} => {
  return (
    <div className="modal">
	  {children}
    </div>
  )
}
# Tips
Destructring ?
# Tips
const TweetPage = () => {
	const tweets = [{
		id: 1,
		message: "destructuring ?",
		isLiked: false,
		nbOfLike: 0,
		image: "http://placeholder.com/random.jpg"
	}]

	return (
	<section>
		{tweets.map(tweet => {
		return <Tweet
			key={tweet.id}
			message={tweet.message}
			isLiked={tweet.isLiked}
			nbOfLike={tweet.nbOfLike}
			image={tweet.image}
			/>
		})}
	</section>
	)
}
Destructring !
# Tips
const TweetPage = () => {
	const tweets = [{
		id: 1,
		message: "destructuring ?",
		isLiked: false,
		nbOfLike: 0,
		image: "http://placeholder.com/random.jpg"
	}]

	return (
		<section>
			{tweets.map(tweet => {
				return <Tweet key={tweet.id} {...tweet} />
			})}
		</section>
	)
}
Exercice 9
Améliorez votre code.
Afficher les logs de la bataille sur la page.
Maintenant le Pokemon vaincu se voit graphiquement.
The other way
Old fashion
Les class component
class LikeComponent extends React.Component {
  render() {
    return (
       <button type="button">
       	0 j'aime
       </button>
    );
  }
}
# Class component
Props ?
class LikeComponent extends React.Component {
  render() {
    const {nbOfLike} = this.props
    return (
       <button type="button">
       	{nbOfLike} j'aime
       </button>
    );
  }
}
# Class component
State ?
class LikeComponent extends React.Component {
  state = {
    nbOfLike: 0
  }

  constructor() {
    super();
    this.handleLike = this.handleLike.bind(this);
  }

  handleLike() {
    this.setState({
      nbOfLike: this.state.nbOfLike + 1
    })
  }

  render() {
    return (
       <button type="button" onClick={this.handleLike}>
       	{this.state.nbOfLike} j'aime
       </button>
    );
  }
}
# Class component
La gestion d'erreur
Gestion des erreurs
const Tweet = () => {
  return (
    <ErrorBoundary>
      <LikeButton />
    </ErrorBoundary>
  )
}


const LikeButton = () => {
  throw new Error('Not Implemented');
}
# Error boundary
Gestion des erreurs
class ErrorBoundary extends React.Component {
  constructor(props) {
    super(props);
    this.state = { hasError: false };
  }

  static getDerivedStateFromError(error) {
    return { hasError: true };
  }

  componentDidCatch(error, errorInfo) {
    sendErrorToSentry(error, errorInfo);
  }

  render() {
    if (this.state.hasError) {
      return <h1>Page d'erreur.</h1>;
    }

    return this.props.children;
  }
}
# Error boundary
# Error Boundary
Attention
Cela ne gère pas les erreurs dans les évènements ! C'est uniquement pour les erreurs critiques.
Exercice 10
Créer un composant ErrorBoundary qui affiche un message d'erreur à l'utilisateur et qui dans le même temps afficher l'erreur dans la console du navigateur.
Pour tester, modifiez un composant pour qu'il renvoi une erreur.
Qu'observez-vous ?
Cycle de vie
D'un composant
Les grandes étapes
# Lifecycle
- Mount
- Updates
- (Errors)
- Unmount
Mount - Le constructor
# Lifecycle
class LikeComponent extends React.Component {
  state = {
    nbOfLike: 0
  }

  constructor() {
    super();
    this.handleLike = this.handleLike.bind(this);
  }

  handleLike() {
    this.setState({
      nbOfLike: this.state.nbOfLike + 1
    })
  }

  render() {
    return (
       <button type="button" onClick={this.handleLike}>
       	{this.state.nbOfLike} j'aime
       </button>
    );
  }
}
Mount - Component Did Mount
# Lifecycle
class LikeComponent extends React.Component {
  state = {
    nbOfLike: 0
  }

  constructor() {
    super();
    this.handleLike = this.handleLike.bind(this);
  }

  handleLike() {
    this.setState({
      nbOfLike: this.state.nbOfLike + 1
    })
  }

  componentDidMount() {
    sendDataToAnalytics();
  }

  render() {
    return (
       <button type="button" onClick={this.handleLike}>
       	{this.state.nbOfLike} j'aime
       </button>
    );
  }
}
Le mount
# Lifecycle
- constructor
- getDerivedStateFromProps
- render
- componentDidMount
L'update
# Lifecycle
- getDerivedStateFromProps
- shouldComponentUpdate
- getSnapshotBeforeUpdate
- render
- componentDidUpdate
L'unmount
# Lifecycle
- ComponentWillUnmount
Les hooks
Enfin l'explication !
# Les hooks
Règle #1 :
Toujours appeler les hooks depuis un composant React.
# Les hooks
Règle #2 :
Toujours appeler les hooks au plus haut niveau de la fonction de rendu.
(Pas dans une boucle, pas dans un if, etc.)
# Les hooks
Quel est l'interêt ?
- Réutiliser de la logique !
- Donner du sens au lifecycle
UseState
const LikeButton = () => {
  const [nbOfLike, setNbOfLike] = React.useState(0);

  return (
    <button type="button">
    	{nbOfLike} j'aime{nbOfLike > 1 ? 's' : ''}
    </button>;
  );
}
# Les hooks
UseMemo
const Einstein = () => {
  const result = React.useMemo(() => whatIsTheLifeGoal(), []);

  return result;
}
# Les hooks
UseMemo
const Einstein = ({
  humanName
}) => {
  const result = React.useMemo(
    () => whatIsTheLifeGoal(humanName),
    [humanName]
  );

  return result;
}
# Les hooks
UseMemo
const Einstein = ({
  humanName
}) => {
  const result = React.useMemo(() => whatIsTheLifeGoal(humanName));

  return result;
}
# Les hooks
UseEffect
const Tweet = ({id}) => {
  useEffect(() => {
   	console.log('A new render occured');
  })

  return result;
}
# Les hooks
UseEffect
const Tweet = ({id}) => {
  useEffect(() => {
   	console.log('Id changed', id);
  }, [id])

  return result;
}
# Les hooks
UseEffect
const Tweet = ({id}) => {
  useEffect(() => {
   	console.log('Initial id', id);
  }, [])

  return result;
}
# Les hooks
UseDebugValue
const Tweet = ({id}) => {
  // Affiche l'ID dans les Devtools React
  useDebugValue(id);

  return result;
}
# Les hooks
UseCallback
const TweetEdit = ({id}) => {
  const handleSubmit = useCallback(() => {
    fetch(`addTweet?userId=${id}`)
  }, [id])

  return <TweetForm onSubmit={handleSubmit} />;
}
# Les hooks
Un hook custom ?
const TweetEdit = ({id}) => {
  const [inputValue, setInputValue] = useState(initialValue);

  const onInput = (e) => {
    setInputValue(e.target.value);
  }

  return <input type="text" onInput={onInput} value={inputValue} />;
}
# Les hooks
Un hook custom !
const useInput = (initialValue) => {
  const [inputValue, setInputValue] = useState(initialValue);

  const onInput = (e) => {
    setInputValue(e.target.value);
  }

  return [inputValue, onInput];
}


const TweetEdit = ({id}) => {
  const [value, onInput] = useInput()

  return <input type="text" onInput={onInput} value={value} />;
}
# Les hooks
D'autre hooks ?
# Les hooks
Exercice 11
Déplacez la logique de bataille dans un hook custom.
Les appels HTTP
Le Rest
# HTTP
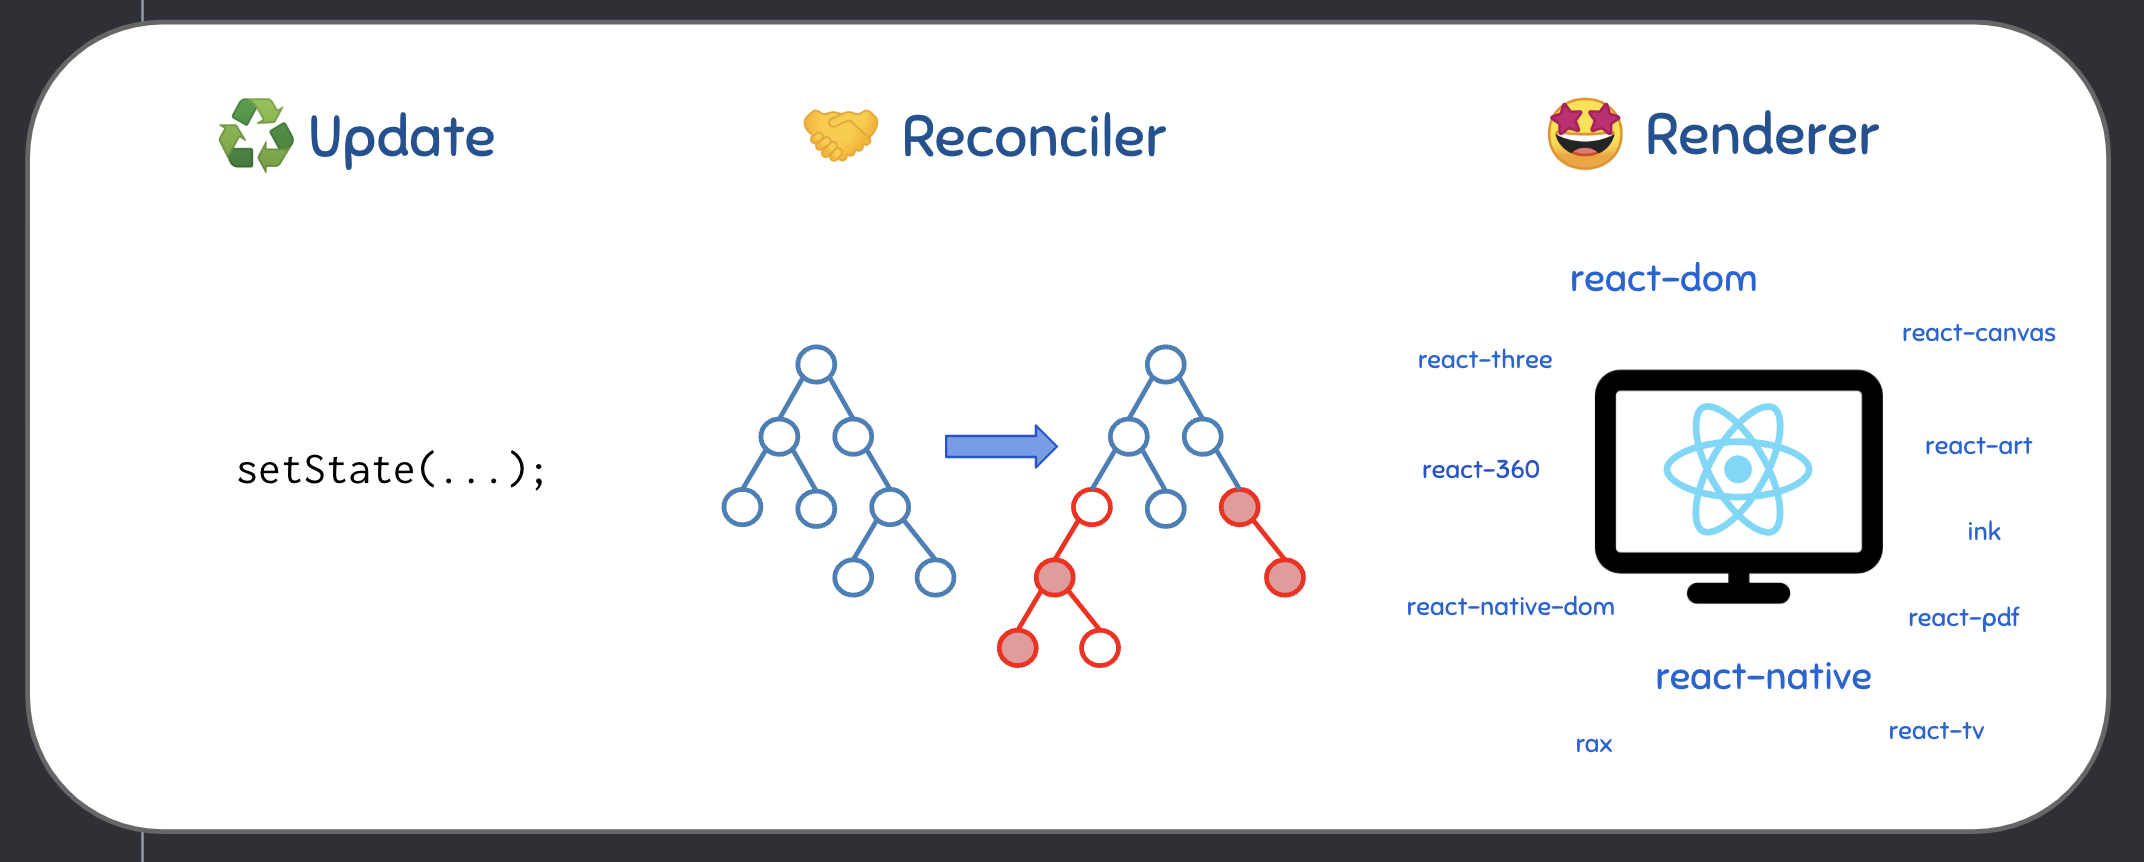
React = Library
Donc pas de manière officiel pour récupérer des données :/
Fetch
const Tweet = () => {
  const [fetchState, setFetchState] = useState({
    error: null,
    data: null,
  	isLoading: true
  });

  useEffect(() => {
    fetch('/people.json')
    	.then(res => res.json())
    	.then(data => {
      		setFetchState({
              data,
              isLoading: false
            })
		});
    	})
        .catch(err => {
        	setFetchState({
            	error: err,
              	isLoading: false
            })
		});
  }, [])


  if(fetchState.isLoading) {
    return 'loading...':
  }

  if(fetchState.error) {
    return <>Refresh page</>
  }

  return <>{fetchState.data}</>
}
# HTTP
Fetch - Générique
const useQuery = (url) => {
  const [fetchState, setFetchState] = useState({
    error: null,
    data: null,
    isLoading: true
  });

  useEffect(() => {
    fetch(url)
      .then(res => {
        if(!res.ok) {
          throw new Error('bouu')
        }
        return res
      })
    	.then(res => res.json())
    	.then(data => {
          setFetchState({
            data,
            isLoading: false
          })
    	})
        .catch(err => {
          setFetchState({
            error: err,
            isLoading: false
          })
    	});
  }, [])

  return fetchState;
}

const Tweet = () => {
  const {
    data,
    isLoading,
    error
  } = useQuery('people.json')


  if(isLoading) {
    return 'loading...':
  }

  if(error) {
    return <>Refresh page</>
  }

  return <>{data}</>
}
# HTTP
React Query !
import { QueryClient, QueryClientProvider, useQuery } from '@tanstack/react-query'

const queryClient = new QueryClient()
const App = () =>  {
   return (
     <QueryClientProvider client={queryClient}>
       <Tweet />
     </QueryClientProvider>
   )
 }

const Tweet = () => {
   const { isLoading, error, data } = useQuery({
	queryKey: ['peoples'],
	queryFn: () => fetch('/peoples.json').then(res => res.json())
   });

   if (isLoading) {
     return 'Loading...';
   }

   if (error) {
     return 'Please refresh the page.';
   }

   return <>{data}</>
 }
# HTTP
React Query !
# HTTP
React Query !
npm i @tanstack/react-query# HTTP
// Des concurents existent comme SWR de vercel

/** npm i swr **/
const { data, error, isLoading } = useSWR('/api/user', fetcher)
Et les tests ?
npm i -D nock# HTTP
const scope = nock('https://api.github.com')
  .get('/repos/atom/atom/license')
  .reply(200, {
    license: {
      key: 'mit',
      name: 'MIT License',
      spdx_id: 'MIT',
      url: 'https://api.github.com/licenses/mit',
      node_id: 'MDc6TGljZW5zZTEz',
    },
  })
Exercice 12
Faites appel à une API Pokémon pour récupérer les stats des Pokémons
Le router
# router
Qu'est ce qu'une SPA ?
# Router
Pourquoi faire une SPA ?
# router
Quel sont les limites d'une SPA ?
# Router
Avant propos
Client
Page web
Serveur
html + css + js + Data
# Router
Avant propos
Client
SPA
Serveur
Statique
Ngnix, GH-page, surge.sh, ...
html + css + js
API
Java, Node, ...
data (Json)
React Router - Init
// Index.js
import { BrowserRouter, RouterProvider } from "react-router-dom";
import { createRoot } from "react-dom/client";

const router = createBrowserRouter([
  {
    path: "/",
    element: <HomePage />,
  },
  {
    path: "/tweet",
    element: <MyTweetPage />,
  },
]);


createRoot(document.getElementById("#my-app")).render(
  <React.StrictMode>
    <RouterProvider router={router} />
  </React.StrictMode>
);
# Router
React Router - Les liens ?
import { Link, useParams } from "react-router-dom";

const router = createBrowserRouter([
  {
    path: "/",
    element: <HomePage />,
  },
  {
    path: "/tweet",
    element: <MyTweetPage />,
  }
]);

/* ... */

function HomePage() {
  return (
    <div className="Home">
      <h1>Tweeeeeet heure</h1>
      <nav>
        <Link to="/tweet">Mes Tweets</Link>
      </nav>
    </div>
  );
}
# Router
React Router - Les params ?
import { Link, useParams } from "react-router-dom";

const router = createBrowserRouter([
  {
    path: "/",
    element: <HomePage />,
  },
  {
    path: "/tweet/:id",
    element: <TweetDetails />,
  },
]);

function HomePage() {
  return (
    <div className="Home">
      <h1>Tweeeeeet heure</h1>
      <nav>
		<Link to="/tweet/lastTweet">Mon dernier tweet</Link>
      </nav>
    </div>
  );
}

function TweetDetails() {
  const {id} = useParams()

  return <article>id du tweet: {id}</article>
}
# Router
React Router - Les search params ?
import { Link, useParams } from "react-router-dom";

const router = createBrowserRouter([
  {
    path: "/",
    element: <HomePage />,
  },
  {
    path: "/tweet/:id",
    element: <TweetDetails />,
  },
]);

function HomePage() {
  return (
    <div className="Home">
      <h1>Tweeeeeet heure</h1>
      <nav>
		<Link to="/tweet/lastTweet">Mon dernier tweet</Link>
		<Link to="/tweet/lastTweet?display=edit">Editer mon dernier tweet</Link>
      </nav>
    </div>
  );
}

function TweetDetails() {
  const {id} = useParams()
  let [searchParams, setSearchParams] = useSearchParams();

  if(searchParams.display === 'edit') {
    return /* ... */;
  }

  return <article>id du tweet: {id}</article>
}
# Router
React Router - Redirection ?
import { Routes, Route, Link } from "react-router-dom";


const EditTweet = () => {
  const user = useUser();
  if(!user) {
    return <Navigate to="/" />
  }
  /** ... **/
}

/** OU **/

const EditTweet = () => {
  const navigate = useNavigate();

  useEffect(() => {
    fetch('user')
      .catch(() => {
        navigate('/')
      })
  }, [])
  /** ... **/
}
# Router
React Router - Installation
npm i react-router-dom# Router
React Router - V6
# Router
La version 6 est une mise à jour majeur de la librairie.
Pour aller plus loin :
- Nesting
- Gestion de loader
- Busy Indicator
- Error Handling
- ...
En somme, c'est la Philosophie Remix.
Exercice 13
- Ajoutez un écran qui permet de sélectionner deux Pokemons
- Les deux Pokemons sélectionné sont envoyé en paramètre d'url à l'écran de combat
Les formulaires
# Forms
React = Library
Donc c'est très manuel, ou alors faut une autre library.
Un hook custom !
const useInput = (initialValue) => {
  const [inputValue, setInputValue] = useState(initialValue);

  const onChange = (e) => {
    setInputValue(e.target.value);
  }

  return [inputValue, onChange];
}


const TweetEdit = ({id}) => {
  const [value, onChange] = useInput()

  return <input type="text" onChange={onChange} value={value} />;
}
# Les hooks
Exemple complet
const TweetEdit = ({id}) => {
  const [valueInput, onChangeInput] = useInput('')
  const [valueSelect, onChangeSelect] = useInput('false')
  const [valueTextArea, onChangeTextArea] = useInput('')

  const handleSubmit = (e) => {
    e.preventDefault();
    // ...
  }

  return (
    <form onSubmit={handleSubmit}>
    	<label>
    		Titre :
    		<input type="text" name="title" onChange={onChangeInput} value={valueInput} />
        </label>
		<label>
    		Message :
            <textarea name="message" value={valueTextArea} onChange={onChangeTextArea} />
        </label>
		<label>
    		NSFW :
            <select value={valueSelect} onChange={onChangeSelect}>
              <option value="true">Oui</option>
              <option value="false">Non</option>
          	</select>
        </label>
    	<button type="submit">Envoyer</submit>
    </form>
  );
}
# Les hooks
# Form
Composants Contrôlé
# Form
Composant Non Controlé
On définit la valeur par défaut de l'input, après c'est le DOM qui gère.
Un lib ?
React-Hook-Form !
React-Hook-Form
import { useState } from "react";
import { useForm } from "react-hook-form";
import Header from "./Header";

export function App() {
  const { register, handleSubmit } = useForm();

  const onSubmit = handleSubmit((data) => {
    // ...
    console.log(data)
  })

  return (
    <form onSubmit={onSubmit}>
      <input {...register("firstName")} placeholder="Titre" />
      <select {...register("NSFW")}>
        <option value="true">Oui</option>
        <option value="false">Non</option>
      </select>
      <textarea {...register("message")} placeholder="Un T-8 !" />
      <button type="submit" >Envoyer</button>
    </form>
  );
}
# Form
React-Hook-Form - Gestion d'erreur
import { useState } from "react";
import { useForm } from "react-hook-form";
import Header from "./Header";

export function App() {
  const { register, handleSubmit } = useForm();

  const onSubmit = handleSubmit((data) => {
    // ...
    console.log(data)
  })

  return (
    <form onSubmit={onSubmit}>
      <input {...register("firstName", {required: true})} placeholder="Titre" />

      {/* ... */}
      <button type="submit" >Envoyer</button>
    </form>
  );
}
# Form
React-Hook-Form - Gestion d'erreur
import { useState } from "react";
import { useForm } from "react-hook-form";
import Header from "./Header";

export function App() {
  const { register, handleSubmit, formState } = useForm();

  const onSubmit = handleSubmit((data) => {
    // ...
    console.log(data)
  })

  return (
    <form onSubmit={onSubmit}>
      <input {...register("firstName", {required: true})} placeholder="Titre" />
      <span>{formState.errors?.firstName.message}</span>

      {/* ... */}
      <button type="submit" >Envoyer</button>
    </form>
  );
}
# Form
React-Hook-Form - Gestion d'erreur
import { useState } from "react";
import { useForm } from "react-hook-form";
import Header from "./Header";

export function App() {
  const { register, handleSubmit, formState } = useForm();

  const onSubmit = handleSubmit((data) => {
    // ...
    console.log(data)
  })

  return (
    <form onSubmit={onSubmit}>
      <input
		{...register("firstName", {
			required: {
				value: true,
				message: 'Ce champ est requis.'
			}
		})}
		placeholder="Titre"
		/>
      <span>{formState.errors?.firstName.message}</span>

      {/* ... */}
      <button type="submit" >Envoyer</button>
    </form>
  );
}
# Form
React-Hook-Form
# Form
Exercice 14
Transformez (ou ajouter) la page de selection de Pokémon en formulaire
Pour aller plus loin
CSS
Dans le JS ?!
Vous avez remarqué ?
import 'app.css';

export const App = () => {
	/*
 		...
	*/
}
# CSS
Vous avez remarqué ?
import 'app.css';

export const App = () => {
	/*
 		...
	*/
}
# CSS
Tout se passe au moment du build (Webpack, Vite, ...)
Tout est global ?
import classes from 'app.module.css';

export const App = () => {

  	return <h1 className={classes.title}>hello world</h1>
}
# CSS
Les CSS module, le premier CSS in JS :)
Une autre solution du marché
import styled from 'styled-component';

const Title = styled.h1`
  font-size: 1.5em;
  text-align: center;
  color: #BF4F74;
`;


const Wrapper = styled.section`
  padding: 4em;
  background: papayawhip;
`;


render(
  <Wrapper>
    <Title>
      Hello World!
    </Title>
  </Wrapper>
);
# CSS
Dev Tools
Demo !
Redux ?
Les contextes
Passer des props, ça peut être fastidieux !
// app.tsx
const App = () => {
	return (
      		<MyApp giveIt={'toMe'} />
	)
}

// MyApp.tsx
const MyApp = (props) => {
   return (
		<OtherCmp {...props} />
	)
}

// OtherCmp.tsx
const OtherCmp = () => {
   return (
		<div>{giveIt} gnon</div>
	)
}
# Context
// Fichier A
const CookieContext = React.createContext(null);
export const CookieProvider = SessionState.Provider;
export const useCookie = () => React.useContext(CookieContext);


// // app.tsx
const App = () => {
	return (
		<CookieProvider value={{giveIt: "toMe"}}>
			<MyApp />
		</CookieProvider>
	)
}

// MyApp.tsx
const MyApp = (props) => {
   return (
		<OtherCmp />
	)
}

// OtherCmp.tsx
const OtherCmp = () => {
  const {giveIt} = useCookie()
   return (
		<div>{giveIt} gnon</div>
	)
}
# Context
Les références
Intéragir avec le DOM
UseRef
function TextInputWithFocusButton() {
  const inputEl = useRef(null);
  const onButtonClick = () => {
    // `current` fait référence au champ textuel monté dans le DOM
    inputEl.current.focus();
  };
  return (
    <>
      <input ref={inputEl} type="text" />
      <button onClick={onButtonClick}>Donner le focus au champ</button>
    </>
  );
}
# Les refs
Les autres Hooks
UseReducer
const initialState = {count: 0};

function reducer(state, action) {
  switch (action.type) {
    case 'increment':
      return {count: state.count + 1};
    case 'decrement':
      return {count: state.count - 1};
    default:
      throw new Error();
  }
}

function Counter() {
  const [state, dispatch] = useReducer(reducer, initialState);
  return (
    <>
      Total : {state.count}
      <button onClick={() => dispatch({type: 'decrement'})}>-</button>
      <button onClick={() => dispatch({type: 'increment'})}>+</button>
    </>
  );
}
# Les autres hooks
UseImperativeHandle
function FancyInput(props, ref) {
  const inputRef = useRef();
  useImperativeHandle(ref, () => ({
    focus: () => {
      inputRef.current.focus();
    }
  }));
  return <input ref={inputRef} ... />;
}

FancyInput = forwardRef(FancyInput);
# Les autres hooks
UseLayoutEffect
const Tweet = () => {
  useLayoutEffect(() => {
   	// Interact with another framework, ...
  }, [])

  return result;
}
# Les autres hooks
UseTransition
function TabContainer() {
  const [isPending, startTransition] = useTransition();
  const [tab, setTab] = useState('about');

  function selectTab(nextTab) {
    startTransition(() => {
      setTab(nextTab);
    });
  }
  // ...
}
# Les autres hooks
Un recueil de hooks
# Les autres hooks
Next.js
PHP ? C'est inspirant !
Le problème des SPA
# Next.js
Framework JS et le syndrome de la page blanche
<!doctype html>
<html lang="en">
<head>
  <meta charset="utf-8">
  <title>AngularBdd</title>
  <base href="/">

  <meta
    name="viewport"
    content="width=device-width, initial-scale=1"
  >
  <link rel="icon" type="image/x-icon" href="favicon.ico">
</head>
<body>
  <div id="root">loading...</div>
</body>
</html>
Next.js
Démo !
SPA classique
# Next.js
Next.JS
React
1 fichier / APP
SPA classique (CSR)
# Next.js
Client
SPA
Serveur
Statique
Ngnix, GH-page, surge.sh, ...
html + css + js
API
Java, Node, ...
data (JSON)
Server Side Rendering (SSR)
# Next.js
Client
APP Angular
Serveur
html + css + js
API
Java, Node, ...
more data (JSON)
+ initial data
data (JSON)
Next.js
Static Side Generation (SSG)
# Next.js
Next.JS
React
1 fichier HTML / page
API
Static Site Generation (SSG)
# Next.js
Client
APP React
Serveur
html + css + js
+ data
Statique
API
Java, Node, ...
more data (JSON)
Incremental Static Regeneration (ISR)
# Next.js
Client
APP React
Serveur
html + css + js
API
Java, Node, ...
more data (JSON)
+ initial data
data (JSON)
Next.js
Serveur
Static
Merci
florent@berthelot.io
github : FBerthelot
@berthel350
Corrections
- L'exemple : http://pokemon.lux.frachet.berthelot.io/
- Le code de l'application de démo (le code date un peu) : https://github.com/Swiip/pokemon-arena
- La correction des TPs : https://github.com/FBerthelot/training-react-pokemon
React
By Florent Berthelot
React
Formation React de 3 jours.


