管伟
Web developer
Pooky
npm install -g idtidt --help Usage: idt [options] [command]
Commands:
ws [options] <action> run webserver: `idt ws start`. <action> now only has `start` option
build [options] [dirs...] build your project, dir is optional
ceconfig <type> create config for your project. <type> : `main` / `more`
install install `grunt-cli` and `edp` globally
Options:
-h, --help output usage information
-V, --version output the version number
-c, --config [config] specify your `idt-config.js`, `idt-config.js` by defaultidt ws startIDT -> cmd: running idt ws(webserver) start, use idt-config.js
IDT -> cmd: running grunt --gruntfile "/usr/local/lib/node_modules/idt/webserver.js" --configpath "/Users/mrguan/work/codes/lagou/Trunk-Webcontent/idt-config.js" --wsweinredebug off --weinredebugport 8080 --weinredebughost localhost
Running "connect:baseServer" (connect) task
IDT -> nor: WebServer Pid: 1288
IDT -> nor: Running on port: 8003
Waiting forever...
Started connect web server on http://0.0.0.0:8003 // webserver的端口号
webPort: '8003',
// webserver的项目根目录【一般不需修改】,即为当前`pwd`的目录
webContent: webContent,
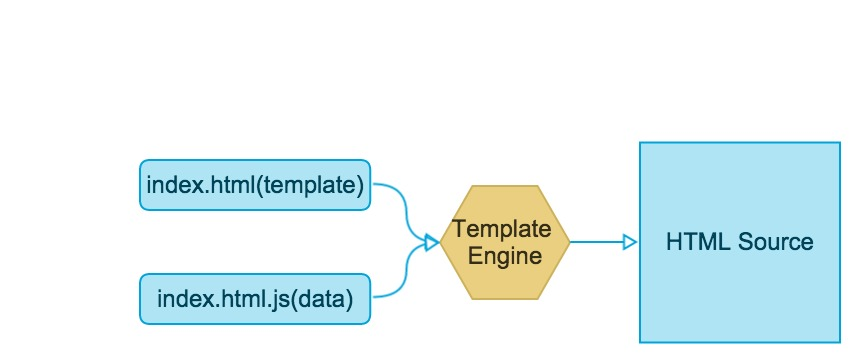
// 模板引擎的模板根目录【只需要修改最后一个参数即可】
templates: path.join( webContent, secondary, 'template' ),// 模板引擎切换: smarty / django / velocity / freemarker [ 默认velocity ]
/**
* velocity模板引擎采用:
* https://www.npmjs.com/package/velocity
*
* django模板引擎采用'A wrapper of Django's template engine'方式(桥接原理)
* 详见:https://www.npmjs.com/package/django
* 在启用之前请确保python环境已经ready,然后安装django:
* # pip install -v Django==1.7
* //or
* # easy_install "Django==1.7"
*
* smarty模板引擎采用:
* https://www.npmjs.com/package/nsmarty
*
* freemarker模板引擎采用:(桥接原理)
* 在启用之前,请确保java环境,并且需要安装:http://fmpp.sourceforge.net/
* https://www.npmjs.com/package/freemarker.js#readme
*/
tplEngine: 'velocity',// 反向代理配置【按需配置】,键名可以随意,只要是每一个的匹配规则
reverseProxyMap: {
tpl: {
pattern: /^\/custom\//,
replace: '/tpl/custom/'
},
center: {
pattern: /^\/center\//,
replace: '/tpl/center/'
},
mobile: {
pattern: /^\/mobile\//,
replace: '\/'
},
template2mobile: {
pattern: /^\/template\/mobile\//,
replace: '\/'
}
}, // mock 相关配置【一般不需修改】
mockCommon: 'commonmock/common.js',
mockTemplate: path.join( webContent, secondary, 'mock/html' ),
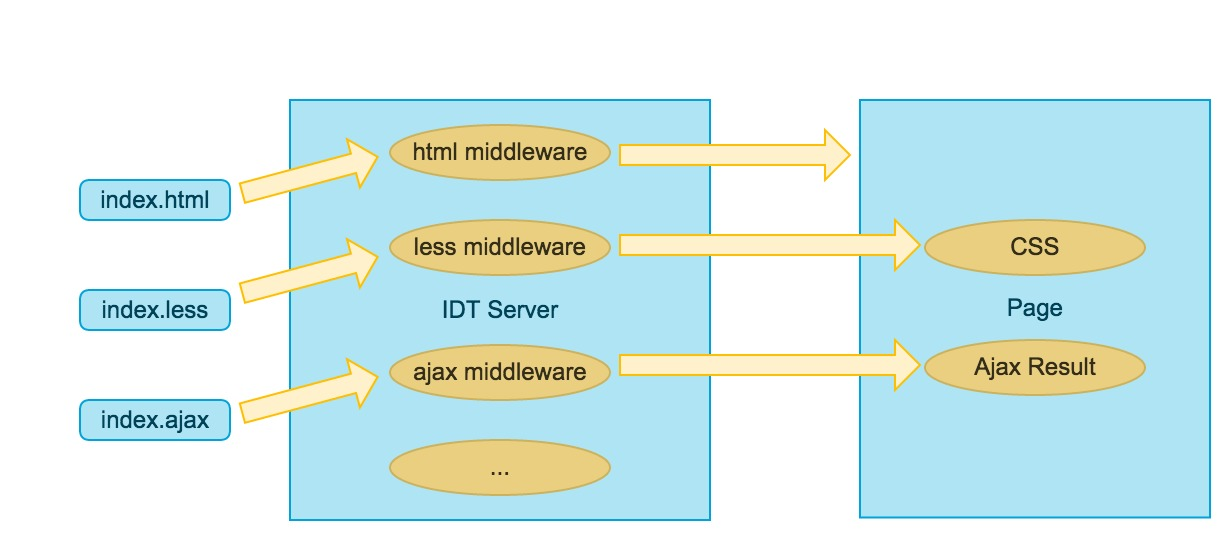
mockAjax: path.join( webContent, secondary, 'mock/ajax' ), /**
* web server 中间层
* requester 是一个请求器,可以用来做反向代理等等
*
* @param {Object} connect
* @param {Object} options
* @param {Array} middlewares 系统中间层
* @param {Object} rtool
* {
* requester: 请求器,
* defaulthostp: '默认的本地域名'
* }
* @return {Array} 中间层数组
*/
middlewares: function( connect, options, middlewares, rtool ) {
// how to inject a custom middleware into the array of default
// middlewares
//
// html middlewares example:
//
// middlewares.unshift( function( req, res, next ) {
// if ( utils.isHtml( req ) )
// return handlerHtml.run( req, res, next, config );
// return next();
// } );
middlewares.unshift( function( req, res, next ) {
// 这是一个可以自定义的中间层
console.log( 'user middleware, request url: ' + req.url );
return next();
} );
// 如果需要请求对应的线上数据或者其他域的数据,可以使用 requester 来请求
// requester的使用参见:
// https://www.npmjs.org/package/request
// console.log( rtool.requester, rtool.defaulthostp );
return middlewares;
},idt ceconfig main/moremrguan@wumolaidianjing a$ idt ceconfig main
IDT -> nor: create idt-config.js for your project, in dir: /private/tmp/a
IDT -> cmd: running cp -f "/usr/local/lib/node_modules/idt/store/idt-config.js" "/private/tmp/a"
IDT -> nor: Exit code: ok
IDT -> nor: create copyright for your project, in dir: /private/tmp/a
IDT -> cmd: running cp -f "/usr/local/lib/node_modules/idt/store/copyright.txt" "/private/tmp/a"
IDT -> nor: create moduleConfig for your project, in dir: /private/tmp/a
IDT -> cmd: running cp -f "/usr/local/lib/node_modules/idt/store/module.conf" "/private/tmp/a"
IDT -> nor: Exit code: ok
IDT -> nor: Exit code: ok
mrguan@wumolaidianjing a$ ls
copyright.txt idt-config.js module.confidt build (-r).....
只要不出现`error`提示就好
注意大致浏览一下整体的输出即可 // 单路径整体build【String】
// buildPath: '../outs/outall',
// 多路径整体build【Array】
// buildPath: [ '../outs/o1', '../outs/o2' ],
// 多路径整体build,但是需要资源分离【Object】
buildPath: {
// 键名是需要存留的文件,键值是对应的build路径
'.js': '../outs/outjs/mobile',
'.css': '../outs/outcss/mobile',
'.jpg|.jpeg|.gif|.png': '../outs/outimg/mobile',
'.html|.htm': '../outs/outtemplate/mobile',
// template的buildpath直接诶通过templates路径指定
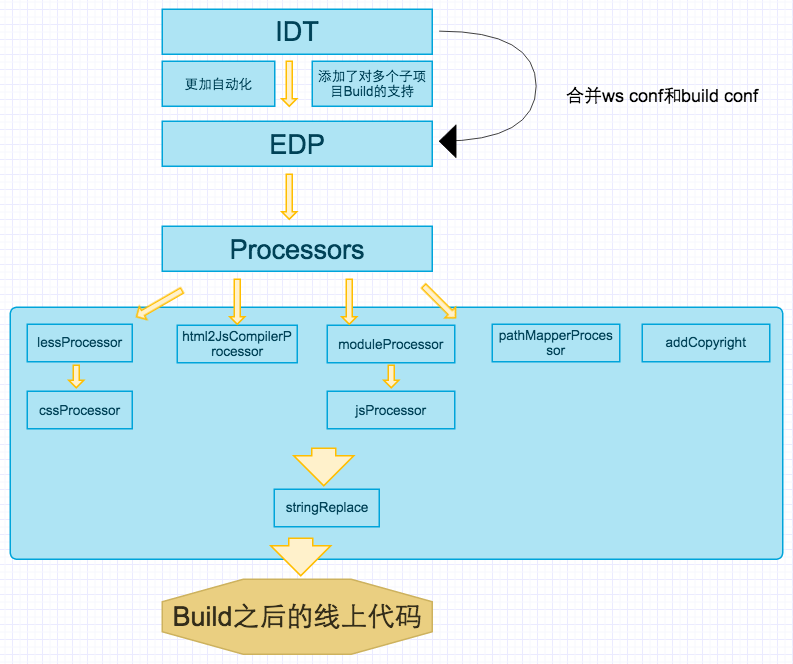
}, return {
// 默认的build不需要压缩,以便开发(联调)的时候,利于调试
'default': [ lessProcessor, html2JsCompilerProcessor,
moduleProcessor, pathMapperProcessor,
stringReplace ],
// 在最后联调成功以后,要进行release,会进行代码压缩等处理
'release': [
lessProcessor, cssProcessor, html2JsCompilerProcessor,
moduleProcessor,jsProcessor, pathMapperProcessor,
addCopyright, stringReplace
]
}; // build 中需要排除的文件(夹)
exclude: [
'demo',
'Gruntfile.js',
'tests',
'test',
'examples',
'vendor',
'demo',
'tool',
'doc',
'test',
'make',
'module.conf',
'dep/packages.manifest',
'dep/*/*/test',
'dep/*/*/doc',
'dep/*/*/demo',
'dep/*/*/tool',
'dep/*/*/*.md',
'dep/*/*/package.json',
'edp-*',
'.edpproj',
'.svn',
'.git',
'.gitignore',
'.idea',
'.project',
'Desktop.ini',
'Thumbs.db',
'.DS_Store',
'*.tmp',
'*.bak',
'*.swp',
'*.psd',
'copyright.txt',
'package.json',
'README.md',
'mobile',
'idt-config.js',
'idt-config.js.bak',
// pagefooter.html为建立下载模板,build会出错,故排除,但是需要单独处理
'pagefooter.html',
'WEB-INF',
'mock'
], var html2JsCompilerProcessor = new Html2JsCompiler( {
mode: 'compress',
extnames: [ 'atpl' ],
combine: true,
exclude: [ '*' ],
include: [ '*.atpl' ]
} ); (sudo) npm install -g idt
(sudo) npm update -g idt
# 查看版本号
idt -V// web inspector remote 的配置及其使用参看:
// http://people.apache.org/~pmuellr/weinre-docs/latest/Running.html
// debug username, 关闭调试: `off`,如果设置此项,则开启调试,不设置即为`off`关闭
var wsWeinreDebug = '' || 'off';
// default 8080
var weinreDebugPort = '' || '8080';
// default localhost
var weinreDebugHost = '' || 'localhost'; 开启远程调试
看几个例子
By 管伟
Integration Develop Tool [ 集成开发工具 ]