


Jakub Gutkowski PRO
Dad, husband, blogger, developer, geek. Loves to play with novelties, learn new languages and libraries, avid conference attender, passionate about meeting new people, always willing to help.
Allegro 2022
Organizational stuff
# docker pull
docker pull gutek/dumpster:v1folder: exercises/XX-
~time
"name"
description
ask, if you do not understand
If you can’t feed a team with two pizzas, it’s too large. That limits a task force to five to seven people, depending on their appetites
Jeff Bezos
?
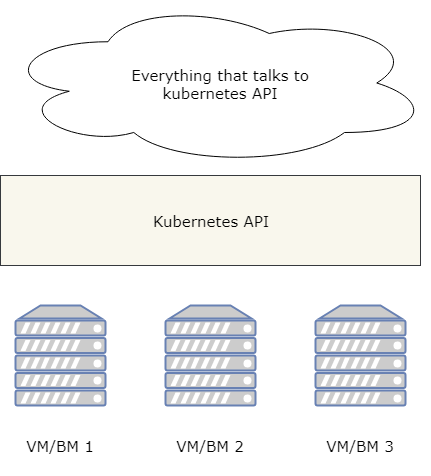
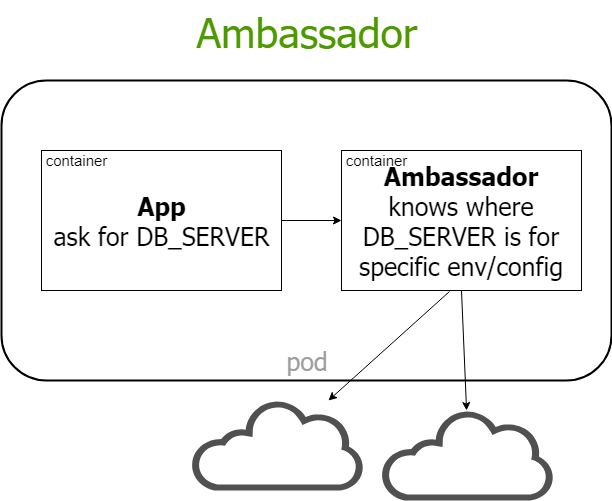
Docker is popular container platform allowing to run linux* containers on variety of platforms including Windows and Mac.
Docker Inc. provides kubernetes cluster for local development - this cluster is hosted in... containers ;)
It's a good tool to be used on daily basis if we are working with docker too. If not, why bother.
* to serve the greater good of humanity and the World, let's not talk about windows containers...
Docker is popular container platform allowing to run linux* containers on variety of platforms including Windows and Mac.
Docker Inc. Rancher provides kubernetes cluster for local development - this cluster is hosted in... containers ;)
It's a good tool to be used on daily basis if we are working with docker too. If not, why bother.
* to serve the greater good of humanity and the World, let's not talk about windows containers...
Minikube is a tool that makes it easy to run Kubernetes locally.
Minikube runs a single-node Kubernetes cluster inside a VM on your laptop for users looking to try out Kubernetes or develop on day-to-day basis.
# linux
sudo apt minikube

# mac
brew install minikube

# win chocolaty
choco install minikube

# other options
https://github.com/kubernetes/minikube/
installation
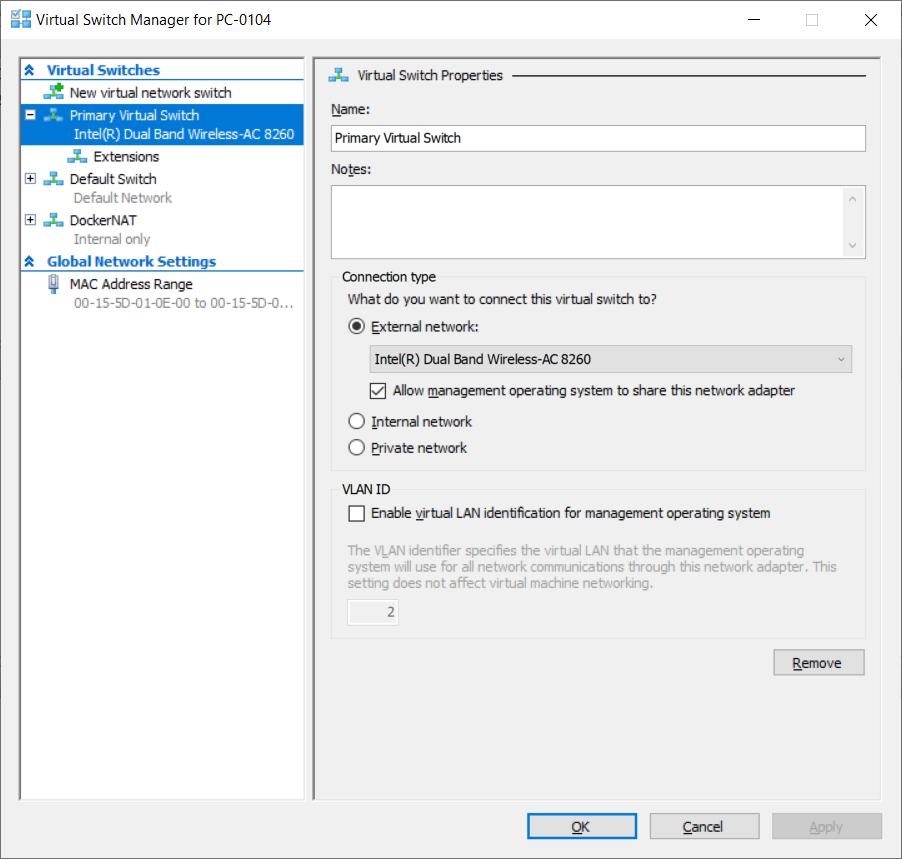
Windows - Hyper-V virtual switch
# start
minikube start

# start full
minikube start --memory 8192 --vm-provider virtualbox
minikube start --vm-driver hyperv --hyperv-virtual-switch "Primary Virtual Switch" --memory 8192
minikube start --memory 8192 --vm-provider none


# destroy
minikube deletebasic commands
Instructions:
Time Cap:
5 min
01
* plane
Things we should understand to understand basics :)
installation
# linux
sudo snap install kubectl --classic

# mac
brew install kubernetes-cli

# win chocolaty
choco install kubernetes-cli

# win powershell
Install-Script -Name install-kubectl -Scope CurrentUser -Force
install-kubectl.ps1 [-DownloadLocation <path>]

# docker desktop (mac, win)
# already contains it

# other options
# with info how to add autocomplete to shell
https://kubernetes.io/docs/tasks/tools/install-kubectl/verification
$ kubectl version -o json
{
  "clientVersion": {
    "major": "1",
    "minor": "10",
    "gitVersion": "v1.10.3",
    "gitCommit": "2bba0127d85d5a46ab4b778548be28623b32d0b0",
    "gitTreeState": "clean",
    "buildDate": "2018-05-21T09:17:39Z",
    "goVersion": "go1.9.3",
    "compiler": "gc",
    "platform": "windows/amd64"
  },
  "serverVersion": {
    "major": "1",
    "minor": "11",
    "gitVersion": "v1.11.3",
    "gitCommit": "a4529464e4629c21224b3d52edfe0ea91b072862",
    "gitTreeState": "clean",
    "buildDate": "2018-09-09T17:53:03Z",
    "goVersion": "go1.10.3",
    "compiler": "gc",
    "platform": "linux/amd64"
  }
}
We need kubectl working so make sure that version check did worked for you
tools
01
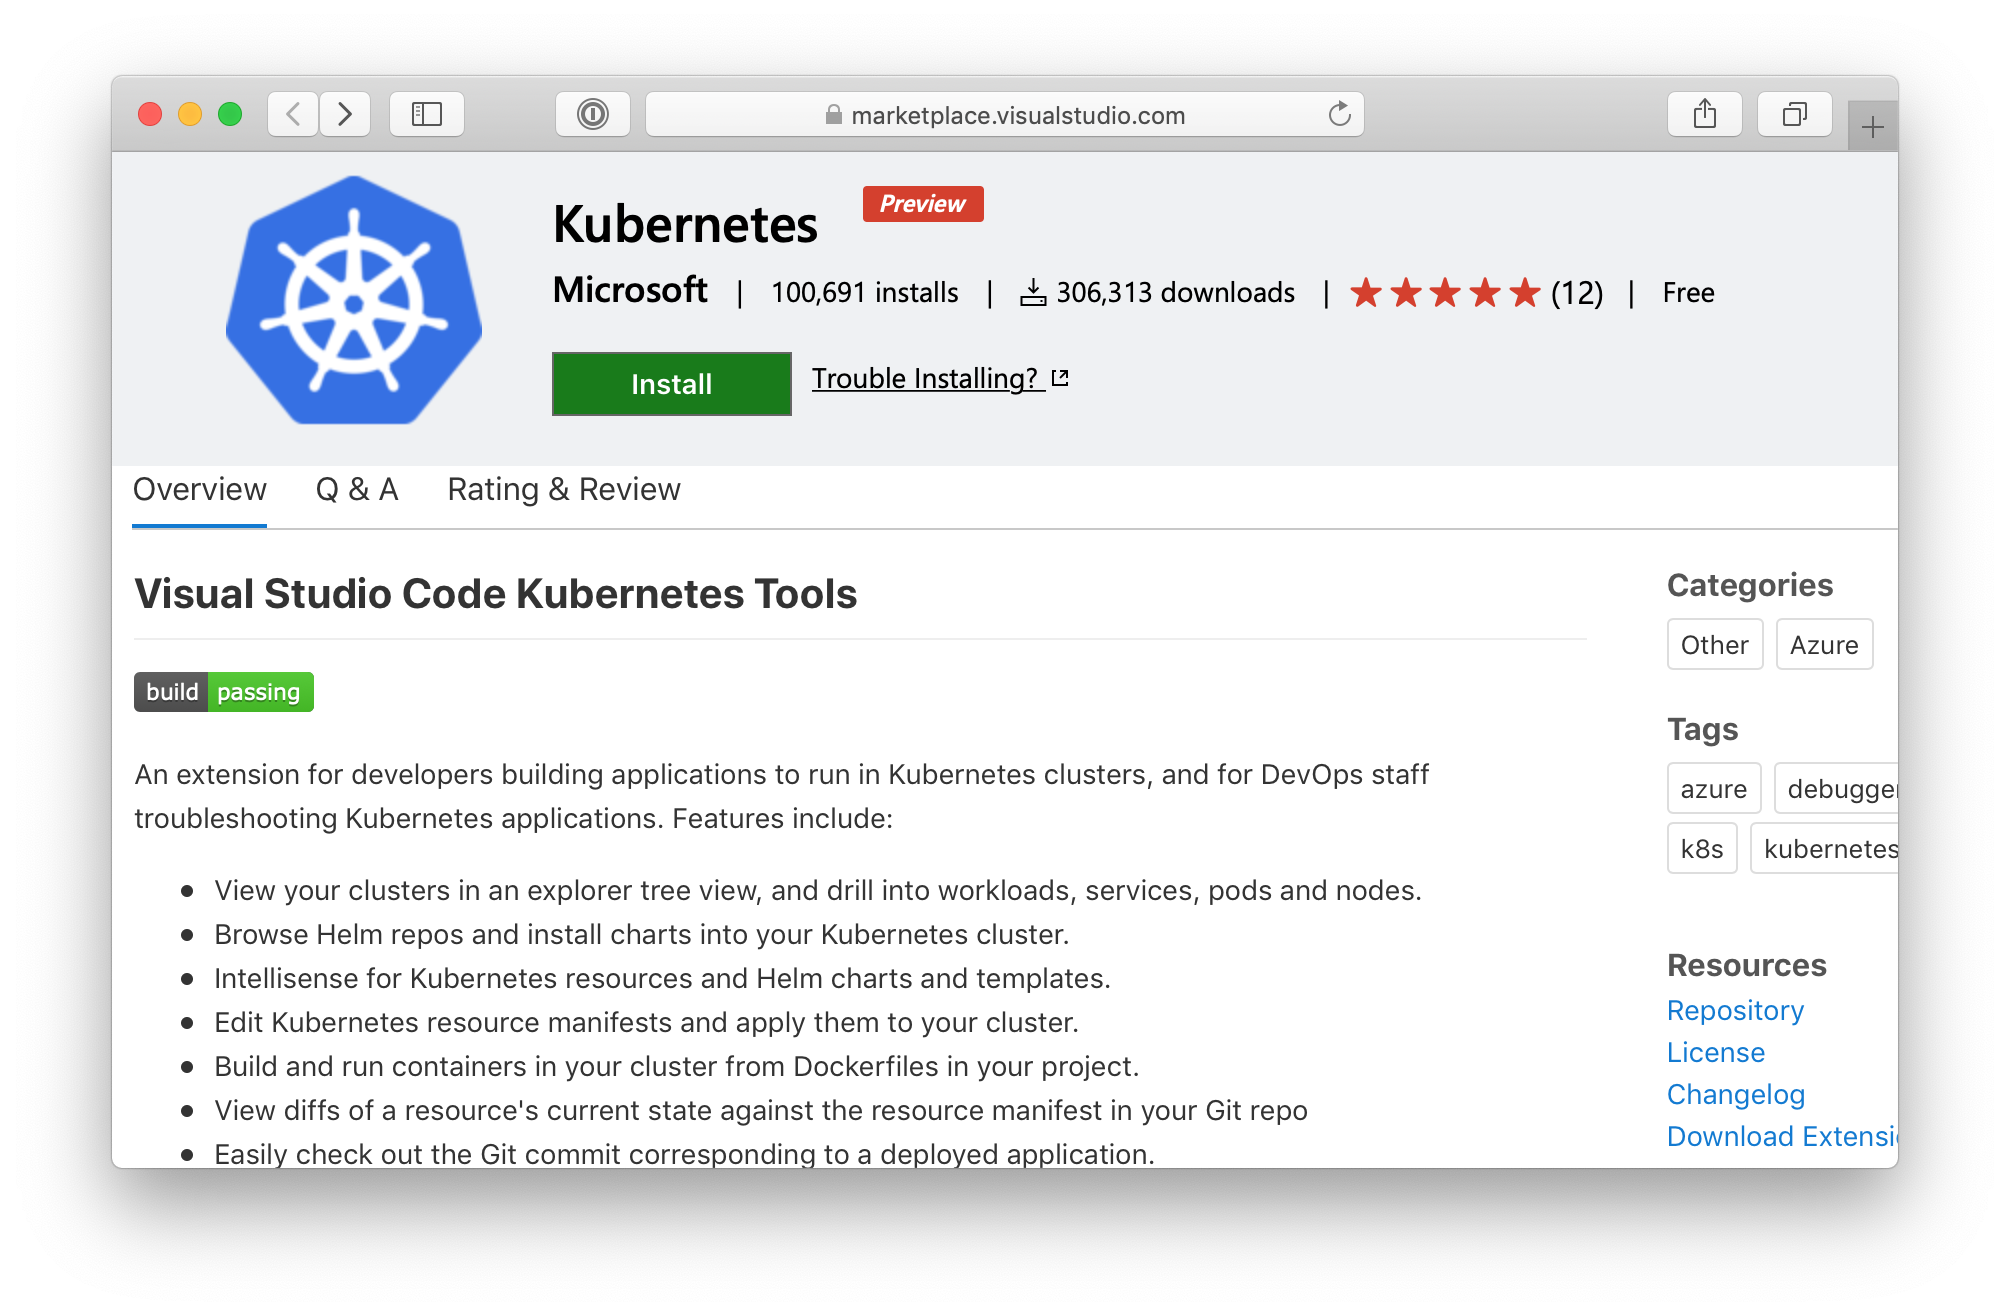
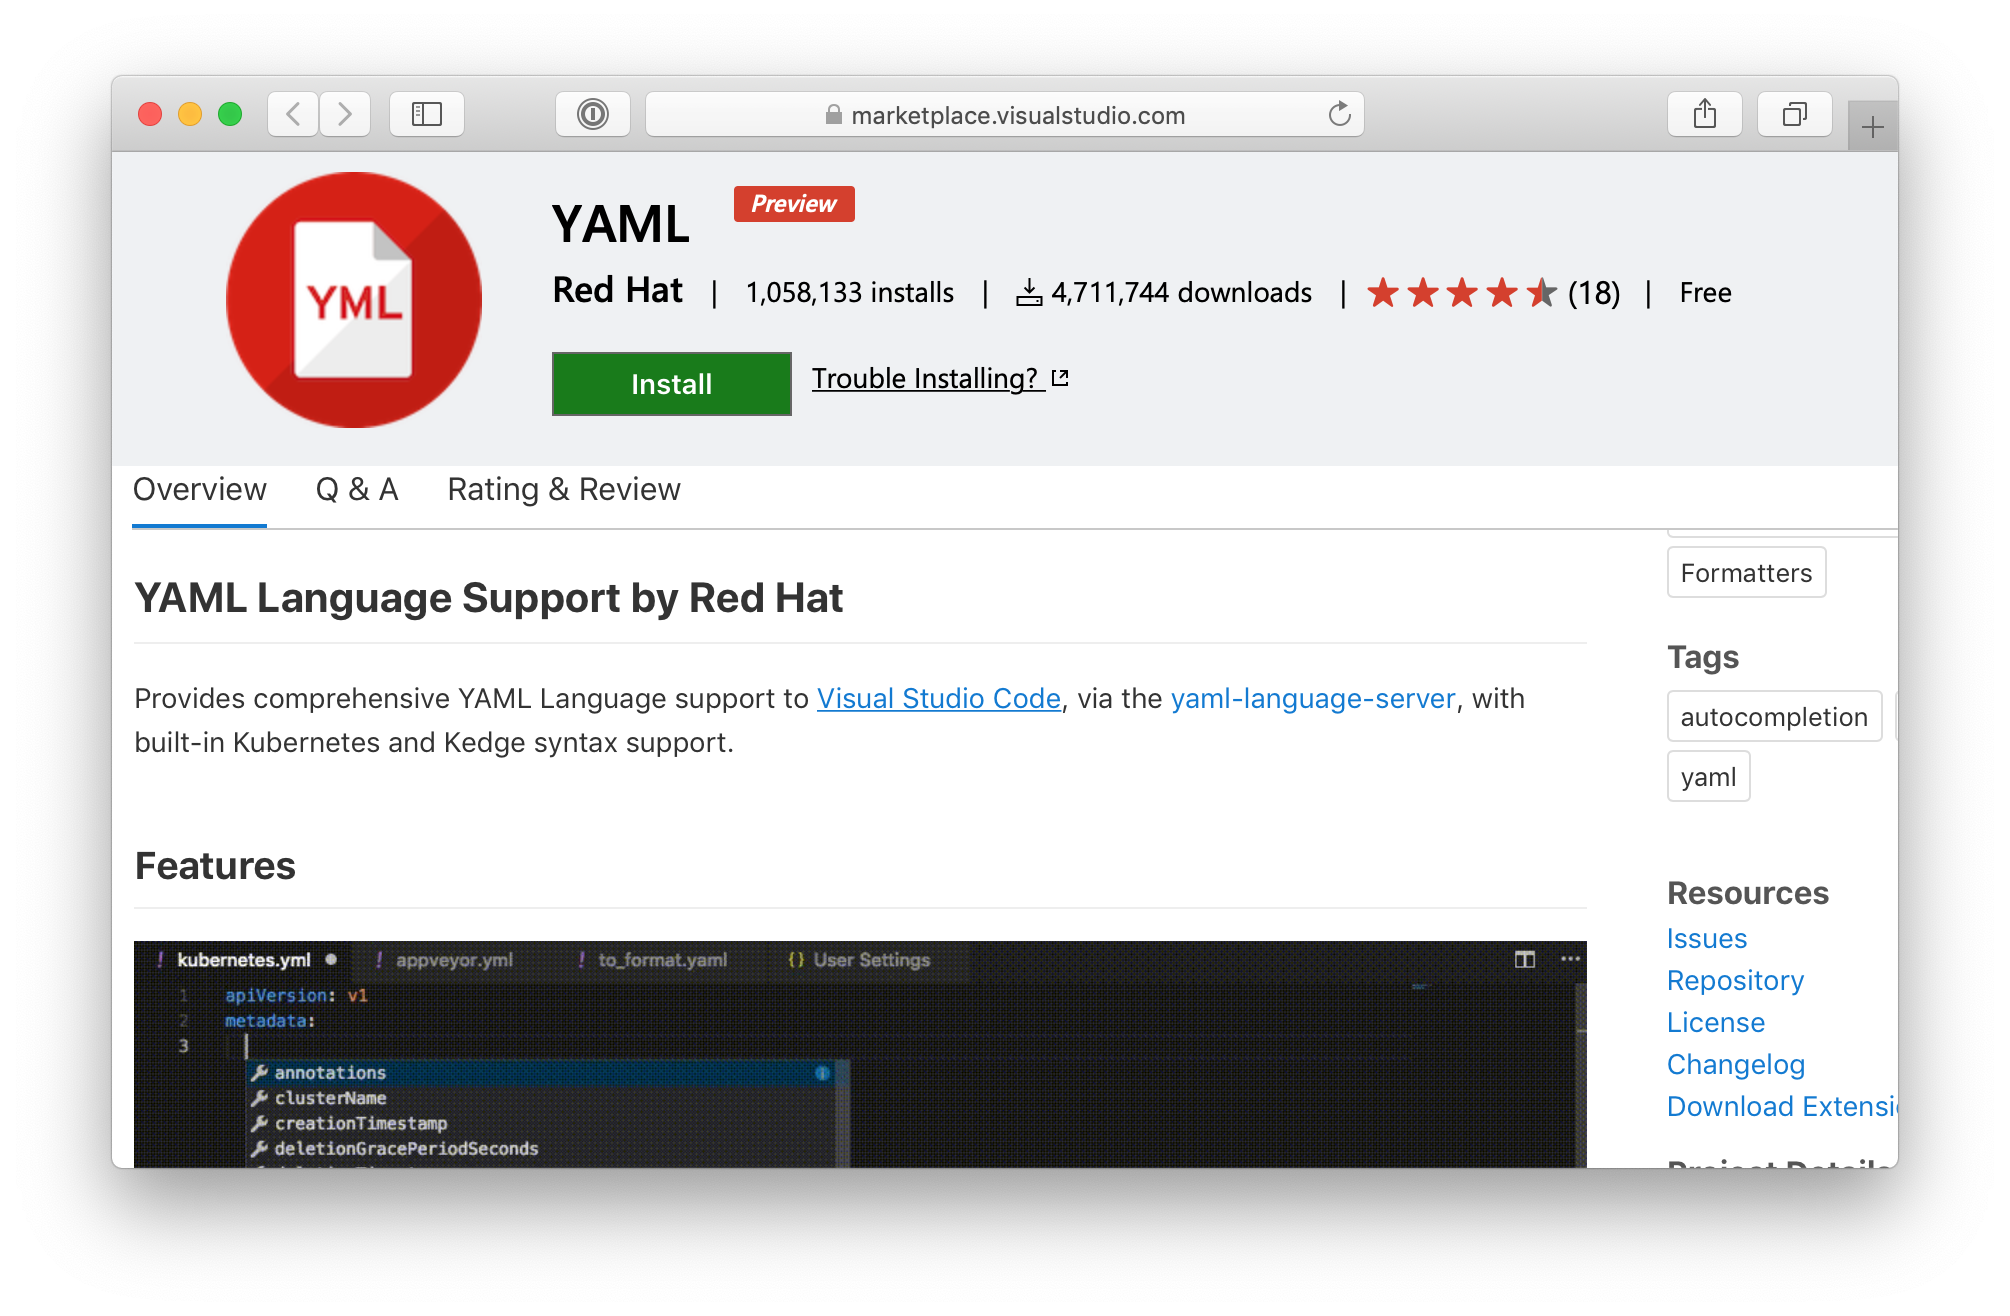
Make sure you have a way to write YAML files - w/ or w/o intellisense
our amazing application
endpoints
code
const http = require('http');
const os = require('os');
const fs = require('fs');

const port = 8080;
const path = '/var/data'

console.log('dumpster server starting...');

const dataHandler = (request, response) => {}
const envHandler = (request, response) => {}
const generalHandler = (request, response) => {}

const requestHandler = (request, response) => {
    console.log(`received request from ...`);

    response.writeHead(200);
    if(request.url === '/data') {}

    if(request.url === '/env') { }

    console.log('handling general request');
    generalHandler(request, response);
};

const server = http.createServer(requestHandler);
server.listen(port, err => {});docker
FROM node:11
ADD app.js /app.js

ENTRYPOINT ["node", "app.js"]alternativly
API walkthrough with definitions
minikube
# we can open dashboard by
minikube dashboard
🔌  Enabling dashboard ...
🤔  Verifying dashboard health ...
🚀  Launching proxy ...
🤔  Verifying proxy health ...
🎉  Opening http://127.0.0.1:51160/api/v1/namespaces/
        kube-system/services/http:kubernetes-dashboard:/
        proxy/ in your default browser...


# or
kubectl proxy

# and then opening url manually:
http://127.0.0.1:8001/api/v1/namespaces/
   kube-system/services/http:kubernetes-dashboard:/
proxy/docker
# execute
kubectl create -f https://gist.githubusercontent.com/Gutek/748b5b489532b243e31ce9c069b2a3b6/raw/2c122dd208fcd605c203ce898b6491c53099dd99/dashboard.yaml

# then
kubectl proxy

# wait a moment :)

# and finally open browser (beware of spaces):
http://localhost:8001/api/v1/namespaces/
	kubernetes-dashboard/services/
	https:kubernetes-dashboard:/proxy/


# whole steps:
https://gist.github.com/Gutek/748b5b489532b243e31ce9c069b2a3b6Instructions:
02
A Pod:
Instructions:
03
Instructions:
Time Cap:
5 min
02
02
let's do it together
04
A ReplicaSet:
Instructions:
Time Cap:
5 min
03
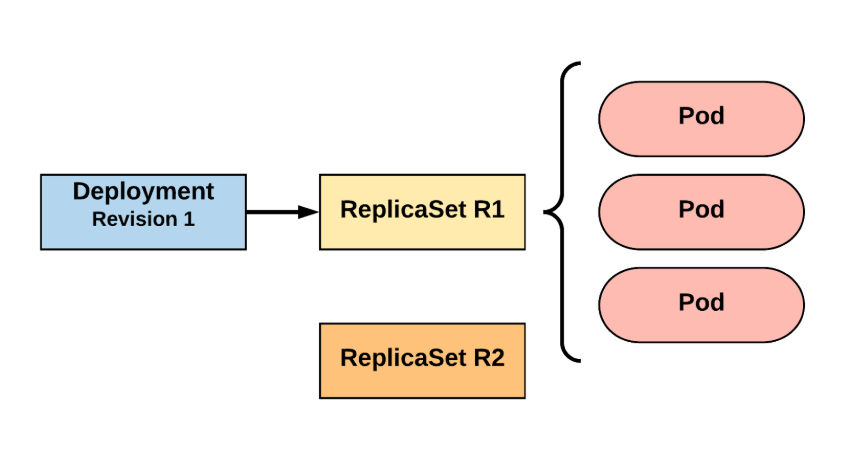
A Deployment:
You describe a desired state in a Deployment object, and the Deployment controller changes the actual state to the desired state at a controlled rate.
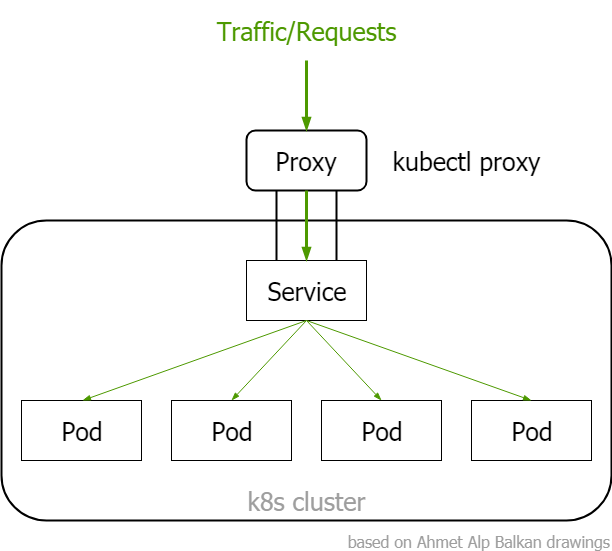
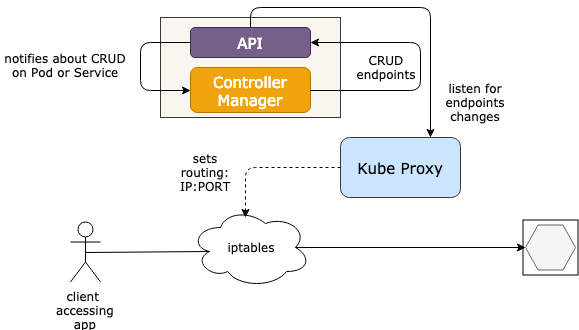
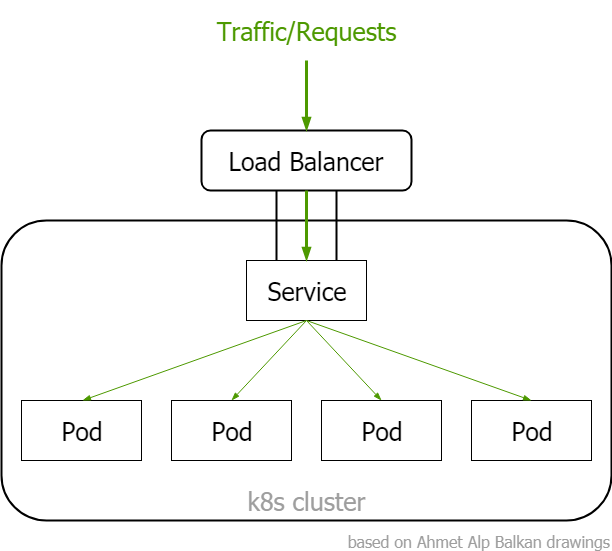
A Service:
the set of Pods targeted by a Service is (usually) determined by a Label Selector
makes pod available externally (adds external access)
Instructions:
Time Cap:
5 min
04
while true; do curl http://...; done
#powershell
while ($true) {curl http://... -UseBasicParsing}
#powershell 6+
while ($true) {curl http://... }04
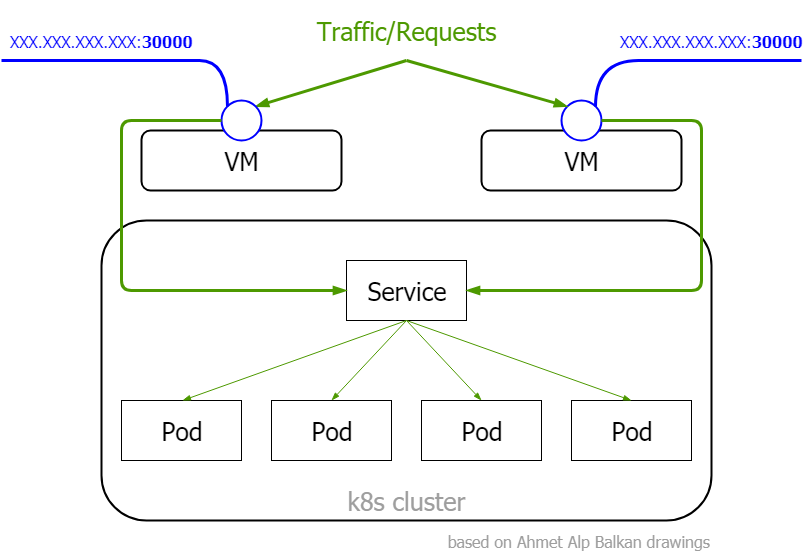
A Service Type can be:
A Service Type can be:
A ConfigMap:
A Secret:
is safer and more flexible than putting it verbatim in a pod definition or in a docker image
is stored as base64
Instructions:
Time Cap:
-
05
A Label:
Bare metal underhood :
# execute in shell
kubectl edit svc kubernetes-dashboard -n kubernetes-dashboard

# !!"type: " is important in below replace!!
# replace -> type: ClusterIP
# with -> type: NodePort

# execute
kubectl get svc kubernetes-dashboard -n kubernetes-dashboard
NAME                   TYPE       ... PORT(S)
kubernetes-dashboard   NodePort   ... 80:31611/TCP

# remember port 31611 (your's might be different)
# if you have docker, open http://127.0.0.1:31611
# if you have minikube
minikube ip

# then open http://IP_FROM_ABOVE:31611 kubectl
Open shell/cmd and play along :)
# get list of clusters
$ kubectl config get-contexts
CURRENT   NAME                  CLUSTER               AUTHINFO
          lab                   lab                   kube-admin-local
*         aaa-aks               aaav-aks              clusterUser_aaa-aks-rg_aaa-aks
          u4k8scluster          u4k8scluster          clusterUser_unity4_u4k8scluster

# set cluster as current
$ kubectl config use-context lab
Switched to context "lab".

# get ~/.kube/config file with some "redacted" values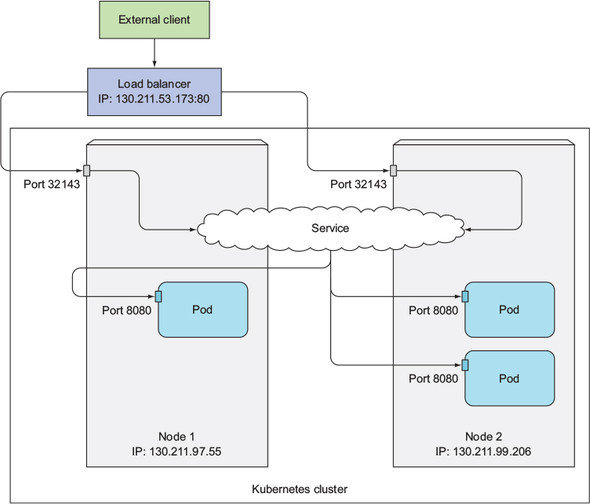
$ kubectl config view$ kubectl cluster-info
Kubernetes master is running at https://wwww
Heapster is running at https://www/api/v1/namespaces/kube-system/services/heapster/proxy
KubeDNS is running at https://www/api/v1/namespaces/kube-system/services/kube-dns:dns/proxy
kubernetes-dashboard is running at https://www/api/v1/namespaces/kube-system/services/kubernetes-dashboard/proxy
Metrics-server is running at https://www/api/v1/namespaces/kube-system/services/https:metrics-server:/proxy
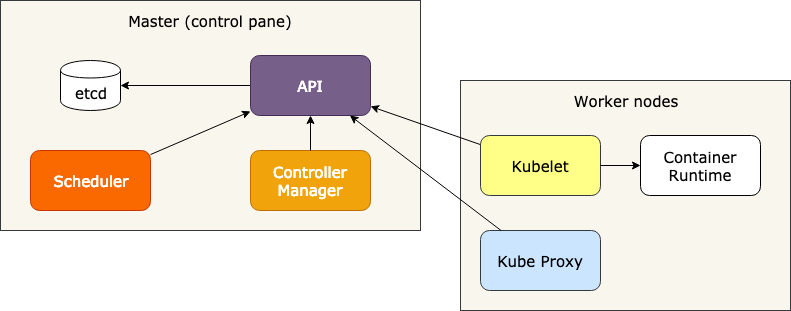
To further debug and diagnose cluster problems, use 'kubectl cluster-info dump'.# what is node
kubectl explain node
# what is pod
kubectl explain pod
kubectl explain pod.spec
kubectl explain pod.spec.containers
kubectl explain pod.spec.containers.command
# what is service
kubectl explain service
# what is RESOURCE_NAME
kubectl explain RESOURCE_NAME
# get status information about all nodes
$ kubectl get node
NAME STATUS ROLES AGE VERSION
NODE_NAME-0 Ready agent 25d v1.11.3
NODE_NAME-1 Ready agent 25d v1.11.3
NODE_NAME-3 Ready agent 25d v1.11.3
# get status information about single node
$ kubectl get node NODE_NAME
NAME STATUS ROLES AGE VERSION
NODE_NAME Ready agent 25d v1.11.3
# get status information about single RESOURCE (pod, service...)
$ kubectl get RESOURCE RESOURCE_NAME
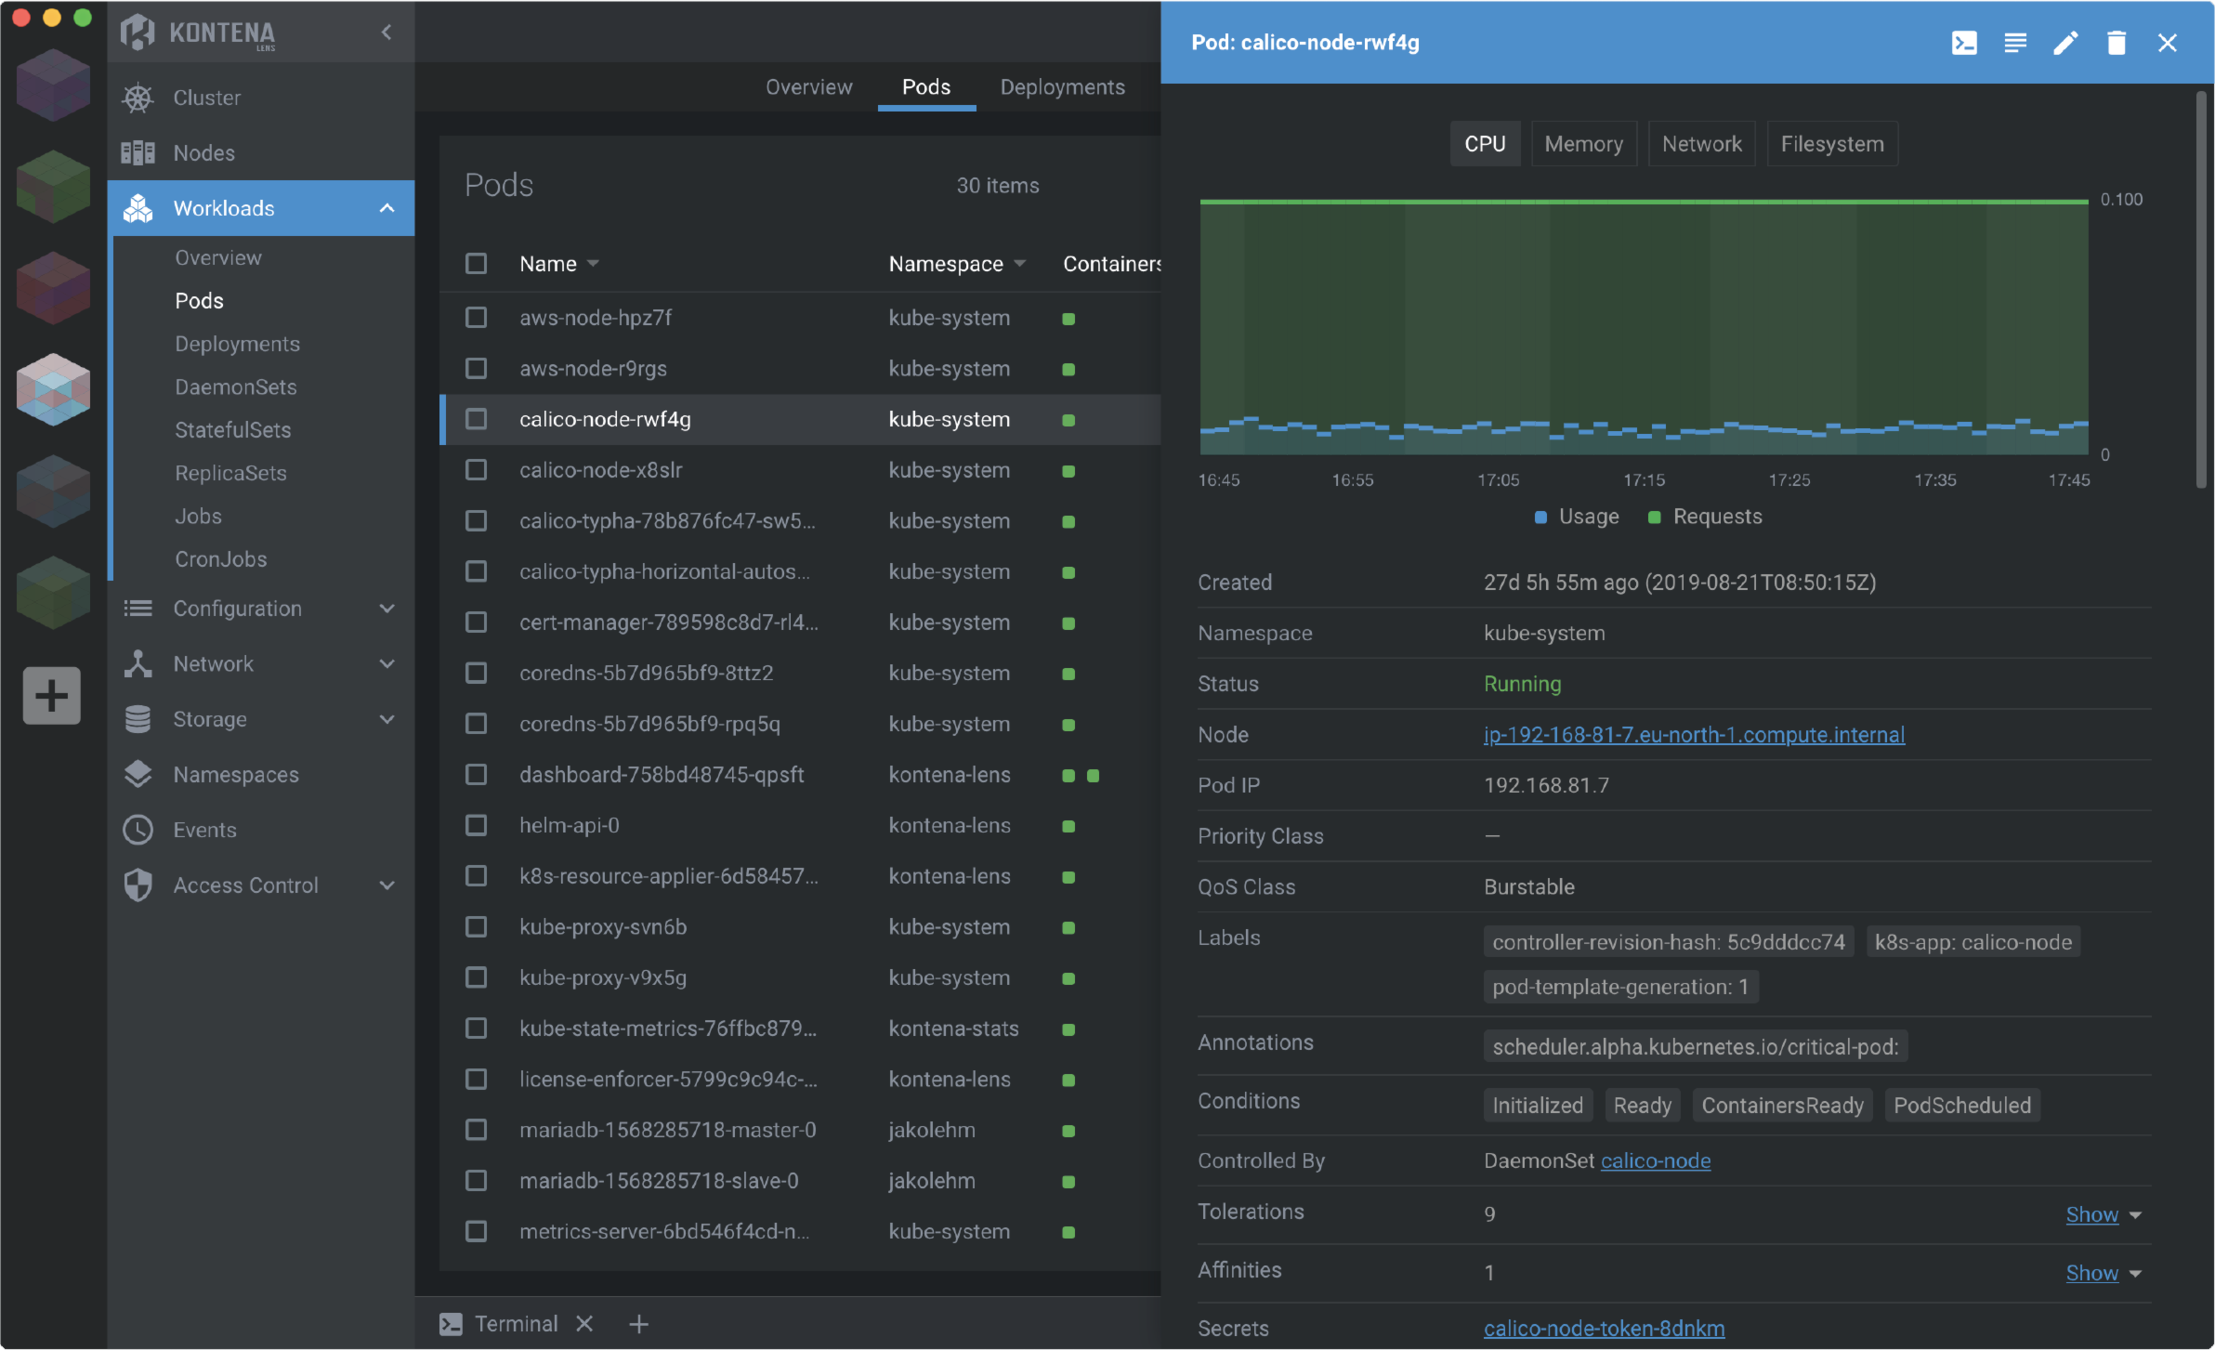
# get details about node
$ kubectl describe node NAME
# get node yaml representation
$ kubectl get node NAME -o yamlInstructions:
??
Things we should know
how to clean up our mess
# list all resources in cluster
kubectl get all

# remove everything that deployment had created including:
# replica set and pods
kubectl delete deployments NAME

# remove pod of specific name
kubectl delete pod NAME

# remove service
kubectl delete service NAME

# remove all pods
kubectl delete pod --all

# remove all deployments
kubectl delete deployments --all

# hint: aliases
alias kdel='kubectl delete po,svc,deploy,pvc,pv,cm,secret,rs --all'
kdel

# powershell
function kube-delete-all {kubectl delete pod,service,cm,deployments --all}
Instructions:
Time Cap:
5 min
06
06
# /seed/dumpster-pod-extract.yaml

kind: Pod
apiVersion: v1
metadata:
  name: dumpster-6d6f7864d9-tzr8j
  generateName: dumpster-6d6f7864d9-
  namespace: default
  selfLink: /api/v1/namespaces/default/pods/dumpster-6d6f7864d9-tzr8j
  uid: 028fee83-140b-4c95-80ca-9e04990d6d52
  resourceVersion: '86671'
  creationTimestamp: '2021-02-23T20:25:10Z'
  labels:
    k8s-app: dumpster
    pod-template-hash: 6d6f7864d9
  ownerReferences:
    - apiVersion: apps/v1
      kind: ReplicaSet
      name: dumpster-6d6f7864d9
      uid: 8e0a3762-e4f8-477d-865a-121d6fac6cde
      controller: true
      blockOwnerDeletion: true
  managedFields:
    - manager: kube-controller-manager
      operation: Update
      apiVersion: v1
      time: '2021-02-23T20:25:10Z'
      fieldsType: FieldsV1
      fieldsV1:
        'f:metadata':
          'f:generateName': {}
          'f:labels':
            .: {}
            'f:k8s-app': {}
            'f:pod-template-hash': {}
          'f:ownerReferences':
            .: {}
            'k:{"uid":"8e0a3762-e4f8-477d-865a-121d6fac6cde"}':
              .: {}
              'f:apiVersion': {}
              'f:blockOwnerDeletion': {}
              'f:controller': {}
              'f:kind': {}
              'f:name': {}
              'f:uid': {}
        'f:spec':
          'f:containers':
            'k:{"name":"dumpster"}':
              .: {}
              'f:image': {}
              'f:imagePullPolicy': {}
              'f:name': {}
              'f:resources': {}
              'f:securityContext':
                .: {}
                'f:privileged': {}
              'f:terminationMessagePath': {}
              'f:terminationMessagePolicy': {}
          'f:dnsPolicy': {}
          'f:enableServiceLinks': {}
          'f:restartPolicy': {}
          'f:schedulerName': {}
          'f:securityContext': {}
          'f:terminationGracePeriodSeconds': {}
    - manager: kubelet
      operation: Update
      apiVersion: v1
      time: '2021-02-23T20:25:12Z'
      fieldsType: FieldsV1
      fieldsV1:
        'f:status':
          'f:conditions':
            'k:{"type":"ContainersReady"}':
              .: {}
              'f:lastProbeTime': {}
              'f:lastTransitionTime': {}
              'f:status': {}
              'f:type': {}
            'k:{"type":"Initialized"}':
              .: {}
              'f:lastProbeTime': {}
              'f:lastTransitionTime': {}
              'f:status': {}
              'f:type': {}
            'k:{"type":"Ready"}':
              .: {}
              'f:lastProbeTime': {}
              'f:lastTransitionTime': {}
              'f:status': {}
              'f:type': {}
          'f:containerStatuses': {}
          'f:hostIP': {}
          'f:phase': {}
          'f:podIP': {}
          'f:podIPs':
            .: {}
            'k:{"ip":"10.1.0.101"}':
              .: {}
              'f:ip': {}
          'f:startTime': {}
spec:
  volumes:
    - name: default-token-v2pqp
      secret:
        secretName: default-token-v2pqp
        defaultMode: 420
  containers:
    - name: dumpster
      image: 'gutek/dumpster:v1'
      resources: {}
      volumeMounts:
        - name: default-token-v2pqp
          readOnly: true
          mountPath: /var/run/secrets/kubernetes.io/serviceaccount
      terminationMessagePath: /dev/termination-log
      terminationMessagePolicy: File
      imagePullPolicy: IfNotPresent
      securityContext:
        privileged: false
  restartPolicy: Always
  terminationGracePeriodSeconds: 30
  dnsPolicy: ClusterFirst
  serviceAccountName: default
  serviceAccount: default
  nodeName: docker-desktop
  securityContext: {}
  schedulerName: default-scheduler
  tolerations:
    - key: node.kubernetes.io/not-ready
      operator: Exists
      effect: NoExecute
      tolerationSeconds: 300
    - key: node.kubernetes.io/unreachable
      operator: Exists
      effect: NoExecute
      tolerationSeconds: 300
  priority: 0
  enableServiceLinks: true
  preemptionPolicy: PreemptLowerPriority
status:
  phase: Running
  conditions:
    - type: Initialized
      status: 'True'
      lastProbeTime: null
      lastTransitionTime: '2021-02-23T20:25:10Z'
    - type: Ready
      status: 'True'
      lastProbeTime: null
      lastTransitionTime: '2021-02-23T20:25:12Z'
    - type: ContainersReady
      status: 'True'
      lastProbeTime: null
      lastTransitionTime: '2021-02-23T20:25:12Z'
    - type: PodScheduled
      status: 'True'
      lastProbeTime: null
      lastTransitionTime: '2021-02-23T20:25:10Z'
  hostIP: 192.168.65.3
  podIP: 10.1.0.101
  podIPs:
    - ip: 10.1.0.101
  startTime: '2021-02-23T20:25:10Z'
  containerStatuses:
    - name: dumpster
      state:
        running:
          startedAt: '2021-02-23T20:25:11Z'
      lastState: {}
      ready: true
      restartCount: 0
      image: 'gutek/dumpster:v1'
      imageID: >-
        docker-pullable://gutek/dumpster@sha256:76ddbed27cf8395b88dcf1027e0a8507d6638724f9b2827098e85489c4c4d050
      containerID: >-
        docker://efa7f5c0da92fd07a732d9cfad4fb3f891b72cc062644a73e9656b77699857c5
      started: true
  qosClass: BestEffort
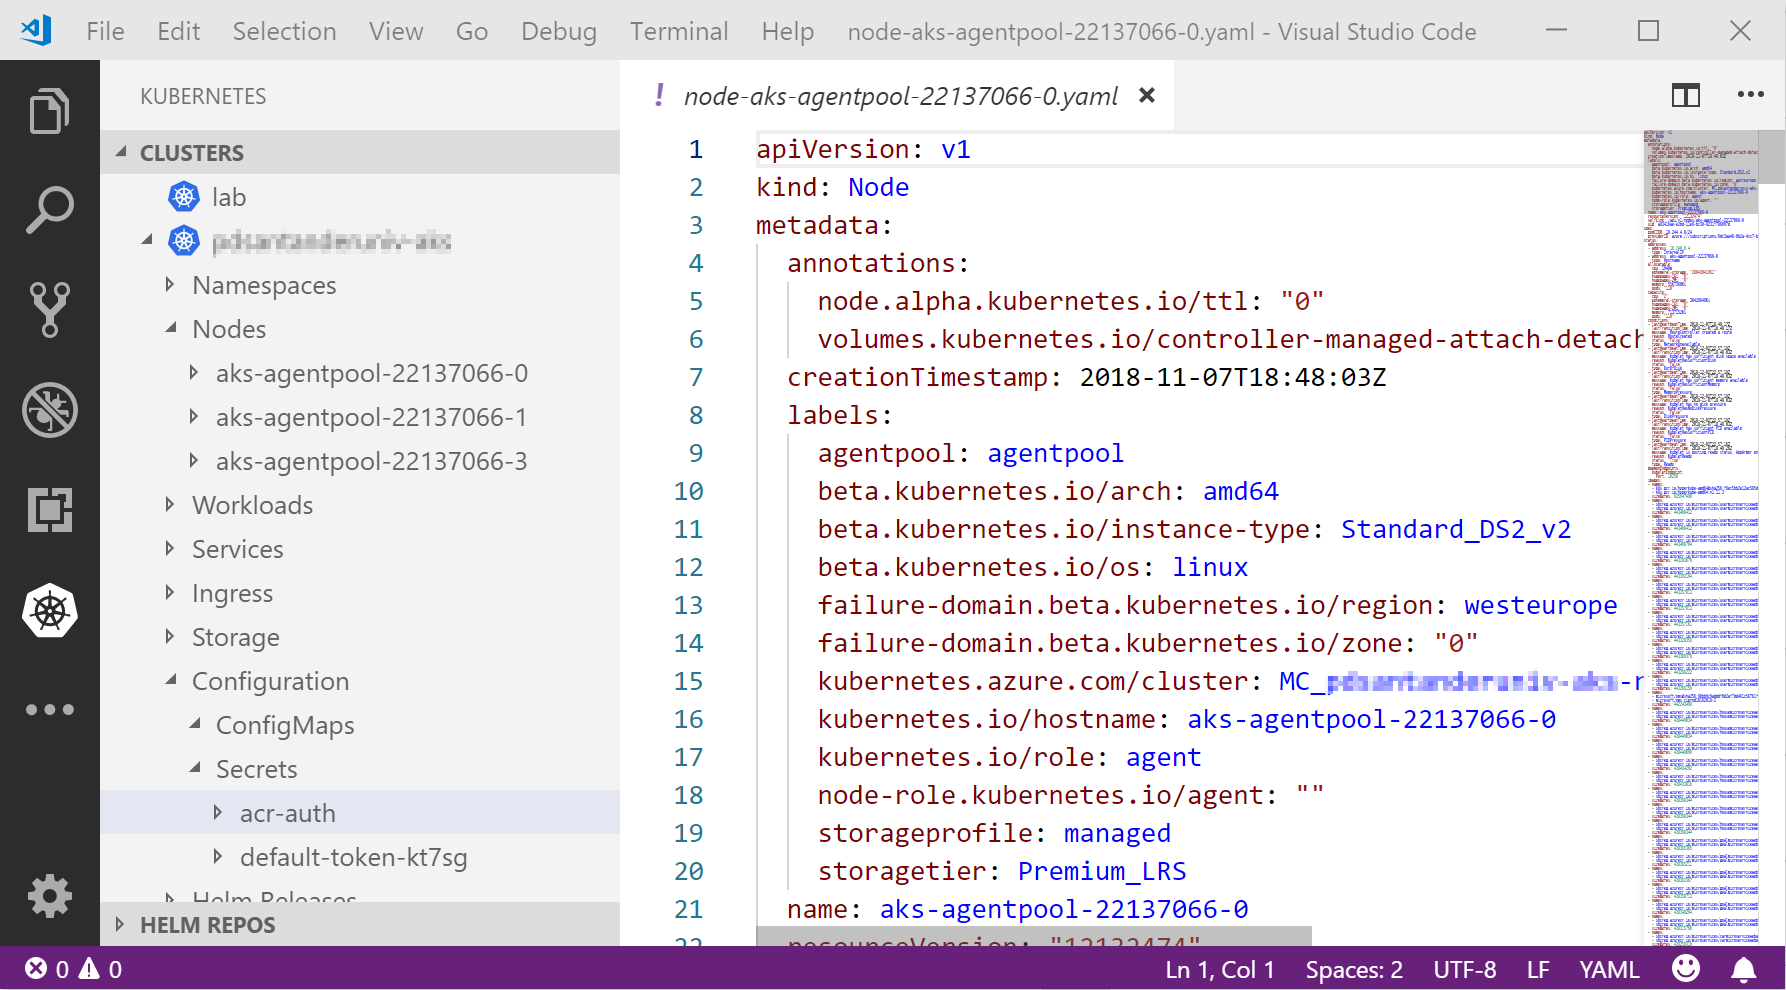
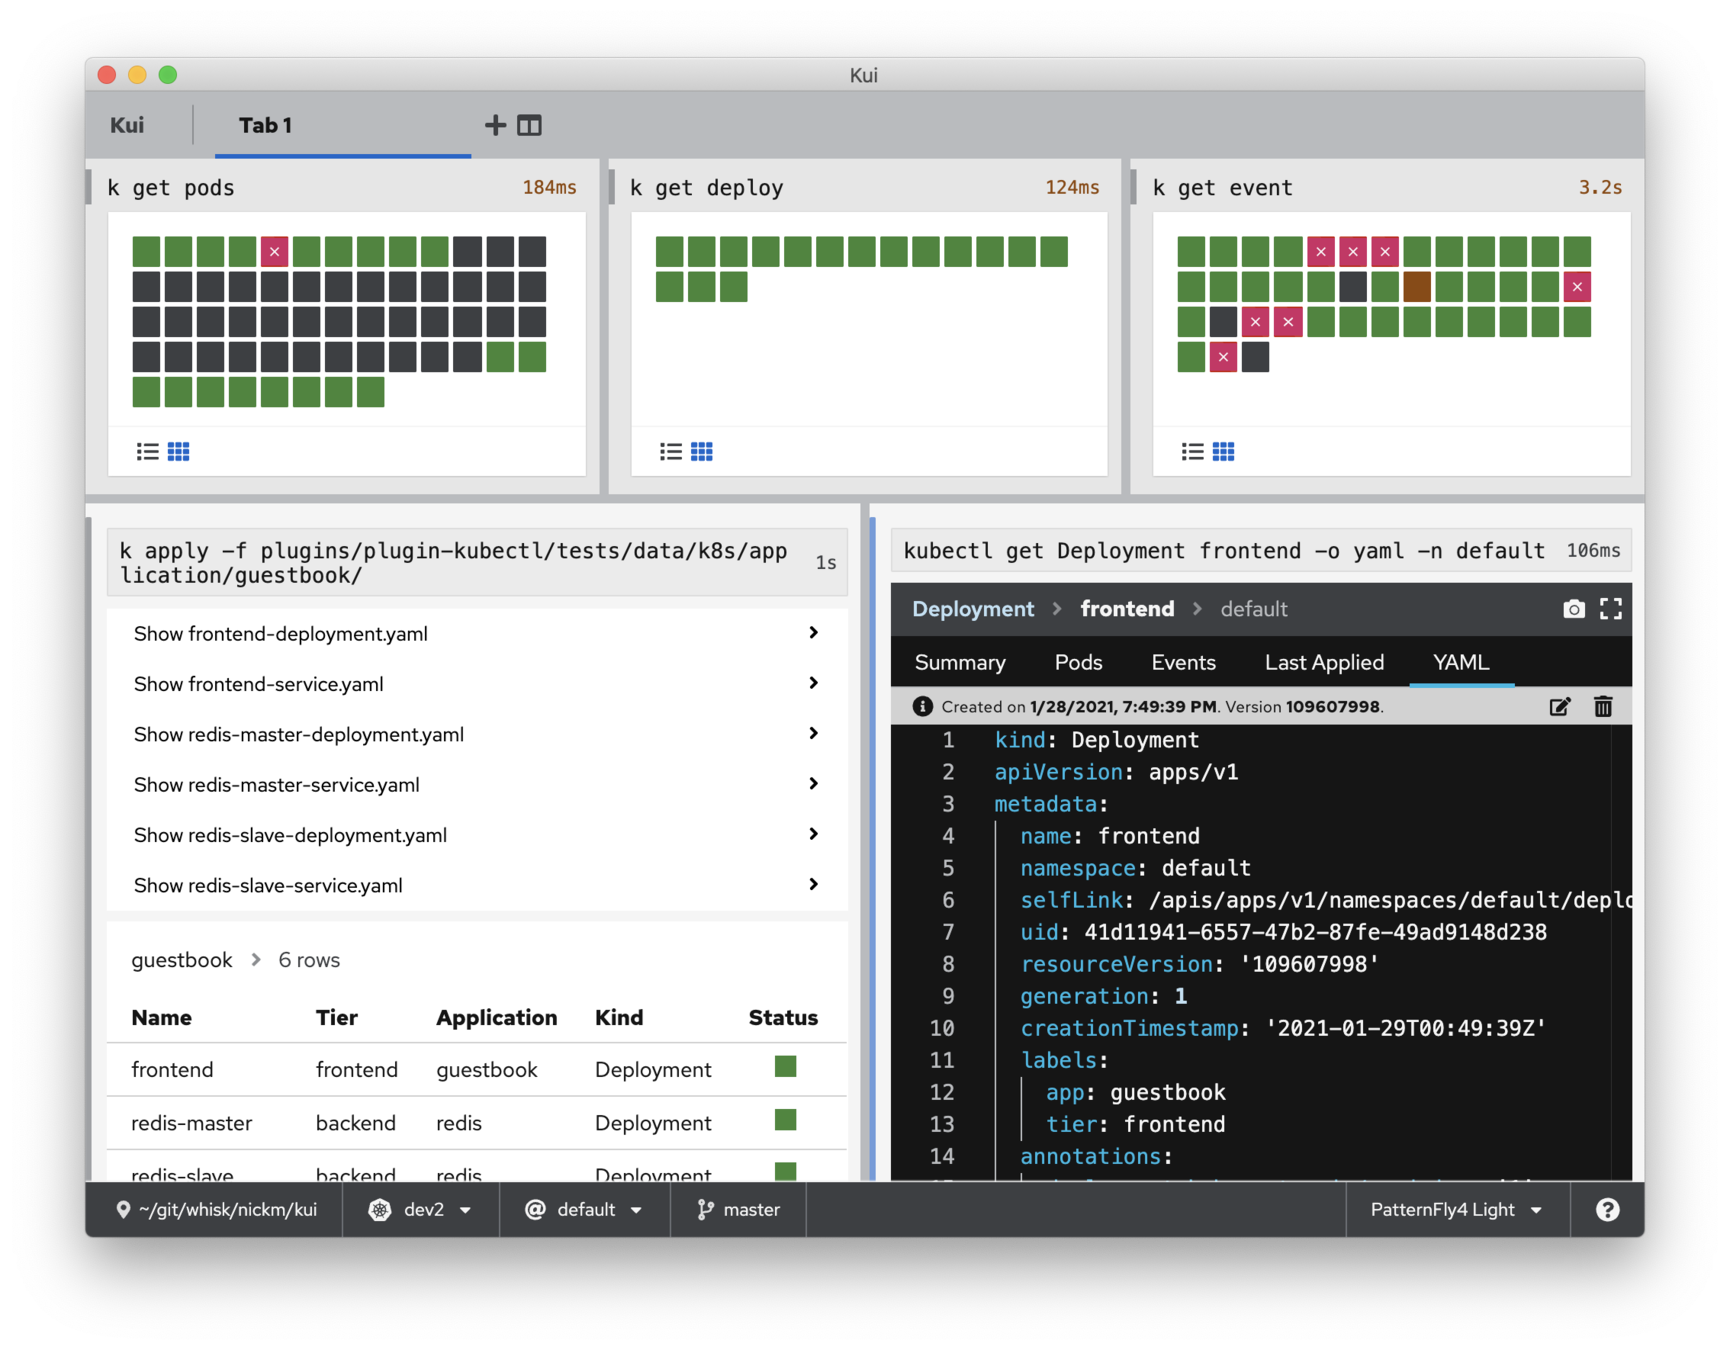
let's look at a structure from the dashboard
apiVersion: v1
kind: Pod
metadata:
  name: POD_NAME
  labels:
    key: value
spec:
  containers:
  - name: CONTAINER_NAME
    image: CONTAINER_IMAGE
    ports:
- containerPort: 80yaml structure
deployment
# create pod from file
kubectl create -f pod.yaml

# create pod and save base configuration so it can be used later by apply
kubectl create -f pod.yaml --save-config=true

# create pod or update if exists
kubectl apply -f pod.yaml

# replace pod
kubectl replace -f pod.yaml

# get the current pod definition
kubectl get pod NAME -o yaml|json
Instructions:
Time Cap:
10 min
07
07
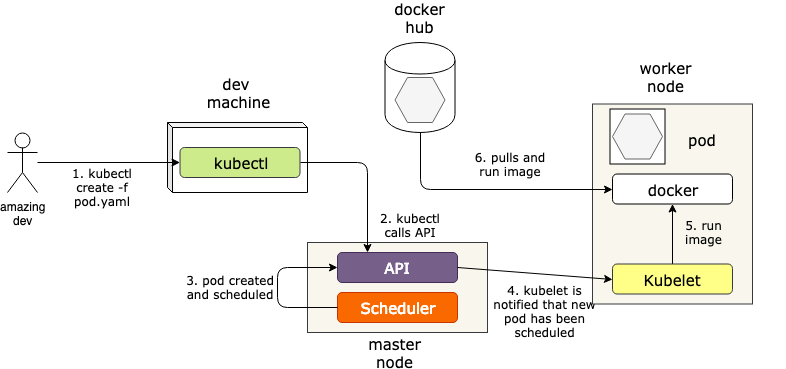
what exactly happens when create is executed?
Instructions:
Time Cap:
5 min
08
08
delete
# deletes pod described in file
$ kubectl delete -f pod.yaml

# delete pod of name
$ kubectl delete pod POD_NAMEInstructions:
clear environment using delete cmd
Time Cap:
10 min
09
09
how to access pod from the command line
# allowing access to the pod by url http://127.0.0.1:8888
kubectl port-forward pod/NAME 8888:pod_container_port

# accessing container in pod/running app in container
kubectl exec -it POD_NAME bash
kubectl exec -it POD_NAME -c container_name bash
kubectl exec POD_NAME -- cmd -p1 -p2
kubectl exec POD_NAME cmd

# and
kubectl proxyInstructions:
Time Cap:
5 min
10
10
best practices
a way to describe resource
example
apiVersion: v1
kind: RESOURCE_TYPE
metadata:
  name: MY_RESOURCE_NAME
  labels:
    version: 1.0.0.0
    app: new-facebook
    tier: backend

---

apiVersion: v1
kind: RESOURCE_TYPE
metadata:
  name: MY_RESOURCE_NAME
  labels:
    version: 1.0.0.0
    app: new-facebook
tier: frontendkubectl
# get all pods with label tier of value backend
kubectl get pods -l tier=backend

# get all resources with label tier of value frontend
kubectl get all -l tier=frontend

# delete all pods with label app of value api
kubectl delete pods -l app=api

# delete all pods and services with label app of value api
kubectl delete pods,services -l app=api

# get all pods and services with label app
kubectl get pods,services -l app

# get all pods and services with label app and display its value in column
kubectl get pods,services -L app

# display labels while listing resources
kubectl get pods --show-labelsInstructions:
Time Cap:
10 min
11
11
# adding
kubectl label pod NAME key1=value1 key2=value2

# changing
kubectl label pod NAME key1=newValue --overwrite
from now on you can clean your k8s by deleting everything under
workshop=true
label
exposing pods
template
apiVersion: v1
kind: Service
metadata:
  name:  name-svc
  labels:
    tier: backend
    app: api
spec:
  type: TYPE
  selector:
    pod-label-key: pod-label-value
  ports:
  - name: http
    port: 8080
    targetPort: 80
ports
ports:
- name: http
  protocol: TCP
  port: 8080
  targetPort: 80|api
kubectl
# get services
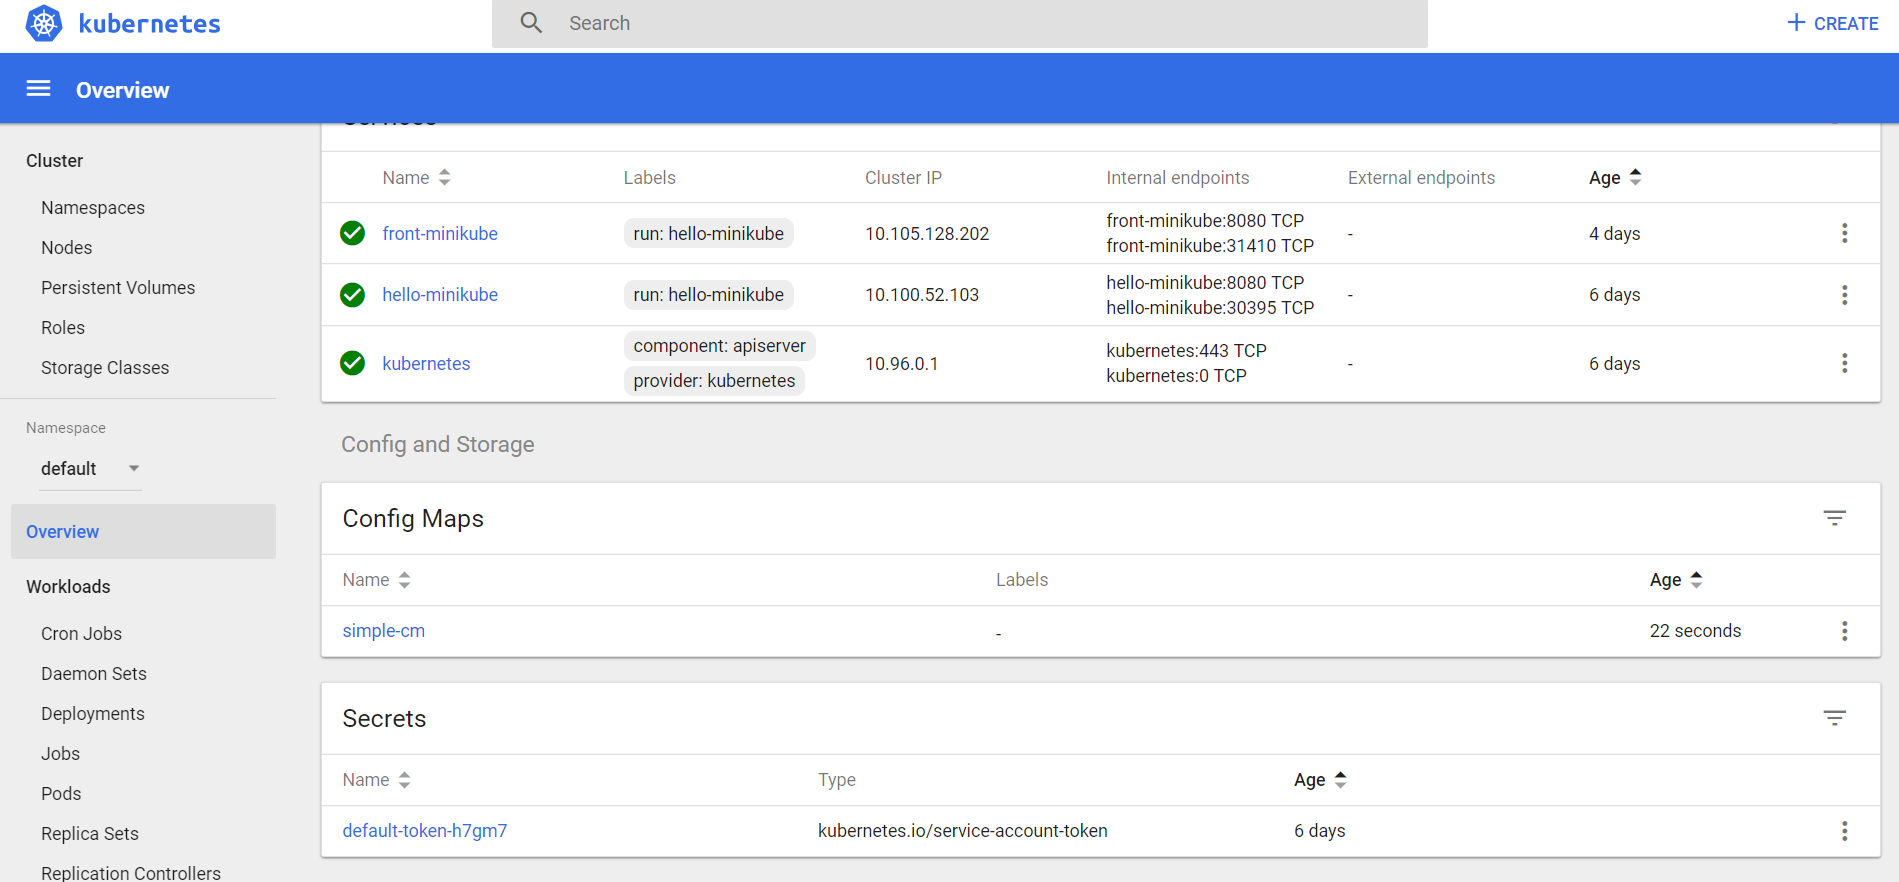
kubectl get service
kubectl get services
kubectl get svc
NAMESPACE NAME TYPE CLUSTER-IP EXTERNAL-IP PORT(S) AGE
default kubernetes ClusterIP 10.0.0.1 <none> 443/TCP 97d
default my-svc NodePort 10.0.18.147 <none> 8080:31238/TCP 97d
default my-second-svc NodePort 10.0.45.201 <none> 8080:32245/TCP 97d
# removes service
kubectl delete svc NAME
# create/update service
kubectl apply -f service.yamlInstructions:
Time Cap:
10 min
12
12
We have three options to access ClusterIP service
??
ClusterIP
Instructions:
Time Cap:
5 min
13
13
Instructions:
Time Cap:
10 min
14
14
Instructions:
Time Cap:
10 min
15
15
Pros
Cons
ClusterIP
When to use it:
ClusterIP
Instructions:
Time Cap:
10 min
16
16
??
# get services
kubectl get services
NAME         TYPE        CLUSTER-IP      EXTERNAL-IP   PORT(S)        AGE
dumpster     NodePort    10.101.205.44   <none>        80:30111/TCP   5h51m
kubernetes   ClusterIP   10.96.0.1       <none>        443/TCP        4d20h

# on minikube
minikube ip
192.168.99.101

# open http://192.168.99.101:30111
# on docker open http://localhost:30111NodePort
Pros
Cons
NodePort
When to use it:
NodePort
LoadBalancer
Instructions:
17
Time Cap:
10 min
17
Most important: LoadBalancer -> NodePort -> ClusterIP, so NodePort is ClusterIP, and LoadBalancer is NodePort and ClusterIP
??
# get servcies
kubectl get services
NAME       TYPE           CLUSTER-IP    EXTERNAL-IP   PORT(S)        AGE
dumpster   LoadBalancer   10.98.49.32   <pending>     80:30803/TCP   4s

# 30803 its NodePort so we have access service same
# was as we did with NodePort

# to make it work in minikube, in new shell tab execute:
minikube tunnel

kubectl get services dumpster
NAME       TYPE           CLUSTER-IP    EXTERNAL-IP   PORT(S)        AGE
dumpster   LoadBalancer   10.98.49.32   10.98.49.32   80:30803/TCP   108s

# now you can access your's service: http://10.98.49.32LoadBalancer
LoadBalancer
k8s in action, manning
Load Balancer
Pros
Cons
Load Balancer
when to use it:
Load Balancer
how it's normally done?
when in doubt, remember you can always clean everything:
workshop=true
a way to create MANY pods ;)
template
apiVersion: apps/v1
kind: Deployment
metadata:
  name: DEP_NAME
spec:
  replicas: 3
  selector:
    matchLabels:
      app:  app_name
  template:
    metadata:
      labels:
        app: app_name
    spec:
      containers:
      - name: pod_name
        image: gutek/dumpster:v1
        ports:
        - containerPort: 8080
...kubectl
# create/update deployment
kubectl apply -f deployment.yaml

# create/update deployment and keep track of operations
kubectl apply -f deployment.yaml --record=true

# get all deployments
kubectl get deployments
kubectl get deployment
kubectl get deploy

# get replica sets
kubectl get rsapiVersion: apps/v1
kind: Deployment
metadata:
spec:
strategy:
type: RollingUpdate
rollingUpdate:
maxSurge : 1
maxUnavailable: 1 replicas: 3
selector:
matchLabels:
app: app_name
template:
metadata:
labels:
app: app_name
spec:
containers:
- name: pod_name
image: gutek/dumpster:0.1
ports:
- containerPort: 80
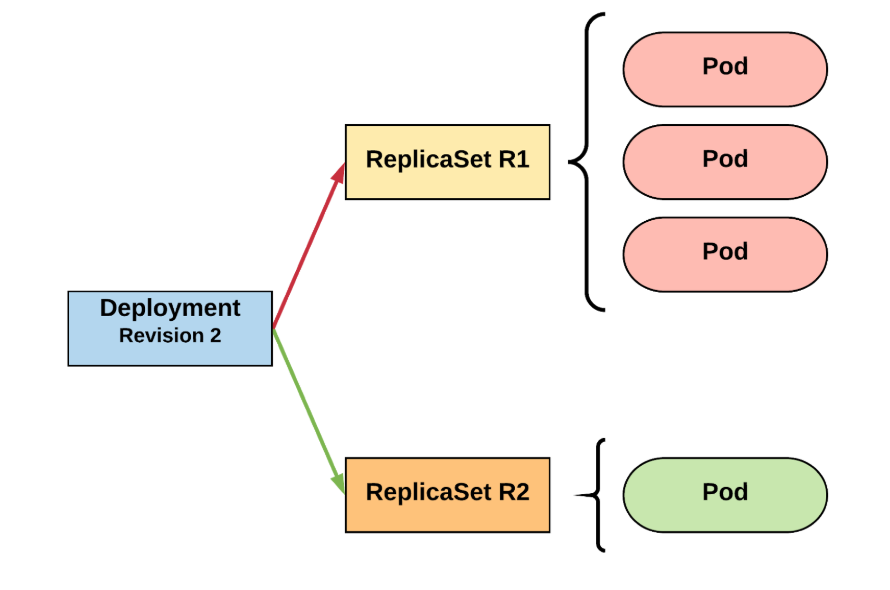
...Deployment
ReplicaSet
naming
apiVersion: apps/v1
kind: Deployment
metadata:
  name: dumpster-deploy
spec:
  replicas: 3
  selector:
    matchLabels:
      app: dumpster-naming-01
  template:
    metadata:
      labels:
        app: dumpster-naming-01
    spec:
      containers:
      - name: dumpster-naming-container
image: gutek/dumpster:v1kubectl get all
NAME
pod/dumpster-deploy-585cdbd6cf-7zm27
pod/dumpster-deploy-585cdbd6cf-nkbhv
pod/dumpster-deploy-585cdbd6cf-w6cg8
NAME
deployment.apps/dumpster-deploy
NAME
replicaset.apps/dumpster-deploy-585cdbd6cfInstructions:
Time Cap:
10 min
18
18
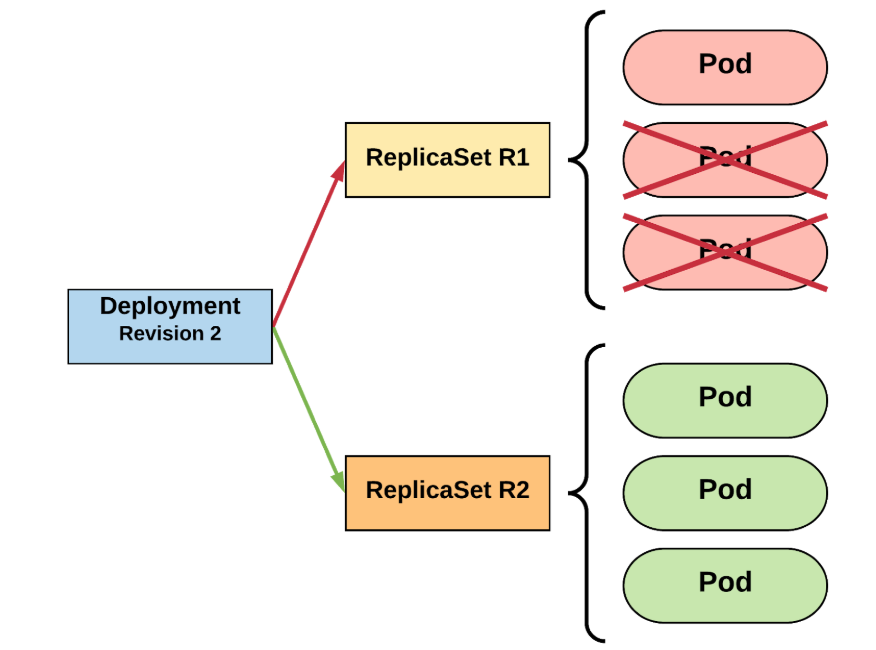
available strategies - RollingUpdate (default)
apiVersion: apps/v1
kind: Deployment
...
spec:
  replicas: 3

  strategy:
    type: RollingUpdate
    rollingUpdate:
      maxSurge : 1
      maxUnavailable: 1

  selector:
    matchLabels:
      app:  app_name
  template: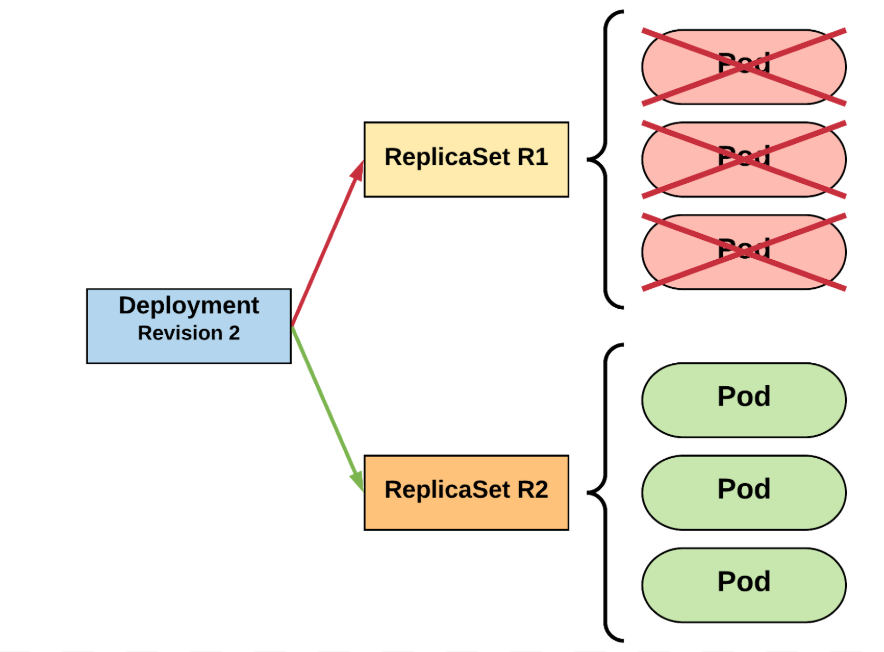
...available strategies - Recreate
apiVersion: apps/v1
kind: Deployment
...
spec:
  replicas: 3

  strategy:
    type: Recreate

  selector:
    matchLabels:
      app:  app_name
  template:
...Instructions:
Time Cap:
20 min
19
19
while true; do curl http://...; done
#powershell
while ($true) {curl http://... -UseBasicParsing}
#powershell 6+
while ($true) {sleep 1; curl http://... }19
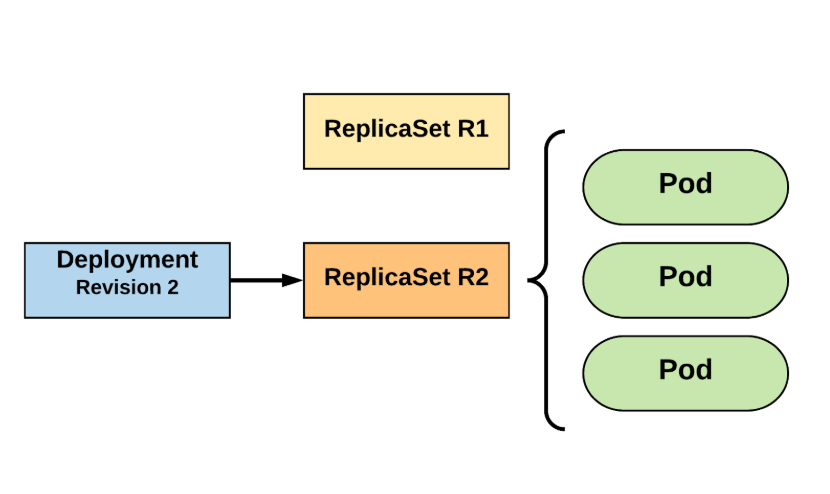
managing deployments from kubectl
# return status of current deployment
# this waits if the status is not finished
$ kubectl rollout status deployment/NAME

# get a history of rollout's
$ kubectl rollout history deployment/NAME

# get history details of rollout N
$ kubectl rollout history deployment/NAME --revision=N

# undo rollout
$ kubectl rollout undo deployment/NAME

# restart
$ kubectl rollout restart deployment/NAMEInstructions (use kubectl only):
Time Cap:
10 min
20
20
when do we know that our pod is alive?
...
spec:
  containers:
  - name: NAME
    image: gutek/dumpster:0.1
    livenessProbe:
      httpGet:
        path: /path
        port: 80
      initialDelaySeconds: 5
      periodSeconds: 5
      timeoutSeconds: 1
failureThreshold: 3 Instructions:
Time Cap:
10 min
ATTENTION: 29
29
when do we know that our pod is ready/deployed?
...
spec:
  containers:
  - name: NAME
    image: gutek/dumpster:0.1
    readinessProbe:
      httpGet:
        path: /healthz
        port: 80
      initialDelaySeconds: 5
      periodSeconds: 5
      timeoutSeconds: 1
      failureThreshold: 3
clean up reminder :)
workshop=true
label
Instructions:
Time Cap:
10 min
30
30
liveliness & readiness best practies
help with zero-downtime
...
spec:
  containers:
  - name: NAME
    image: gutek/dumpster:0.1
    ...
    lifecycle:
        preStop:
            exec:
                command:
                - sh
                - -c
                - "sleep 10"
our app might need extra time to shutdown gracefully
best practices
fire and forget
template
apiVersion: batch/v1
kind: Job
metadata:
    name: some-name
spec:
  template:
...kubectl
# get cron jobs
$ kubectl get cronjob

# on cron schedule new job is created
$ kubectl get jobs --watch

# get pods created by jobs
$ kubectl get pods

# get job result
$ kubectl logs pod-name00-jobs
template
apiVersion: batch/v1beta1
kind: CronJob
metadata:
  name: hello
spec:
  schedule: "*/1 * * * *"
  jobTemplate:
    spec:
      template:
        metadata:
          labels:
            app: hello-cronpod
        spec:
          containers:
          - name: hello
            image: busybox
            args:
            - /bin/sh
            - -c
            - date; echo Hello World!
restartPolicy: OnFailuregroup application
kubectl
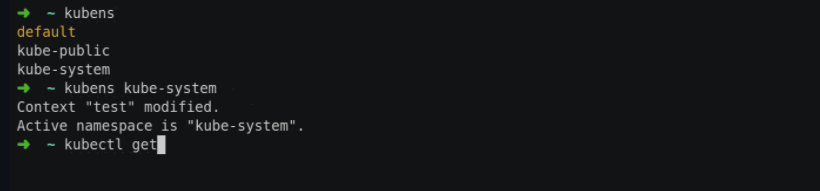
# get all namespaces
$ kubectl get namespace

# get pods from namespace A
$ kubectl get pods --namespace=A
$ kubectl get pods -n=A

$ get all pods from all namespaces
$ kubectl get pods --all-namespaces

$ get all from all namespaces
$ kubectl get all --all-namespacestemplate
apiVersion: v1
kind: Namespace
metadata:
  name: our-name

---

apiVersion: v1
kind: Pod
metadata:
    name: my-pod
    namespace: our-name
...Instructions:
Time Cap:
10 min
21
21
common configuration
kubectl
# get all config maps
$ kubectl get cm
$ kubectl get configmap

# create/update config map from file
$ kubectl apply -f cm.yaml

# create config map from arguments
$ kubectl create cm CM_NAME --from-literal=key_01=val_01 --from-literal=key_02=val_02

# get config map info
$ kubectl describe configmaps CM_NAMEtemplate
apiVersion: v1
kind: ConfigMap
metadata:
  name: my-name
data:
  KEY_01: VAL1
KEY_02: VAL2passing parameters
...
spec:
  containers:
  - name: NAME
    image: gutek/dumpster:v1
    env:
    - name: app_version
      value: v1
    - name: app_hostname
value: NAME Instructions:
Time Cap:
5 min
22
22
passing parameters from config map
...
spec:
  containers:
  - name: NAME
    image: gutek/dumpster:0.1
    envFrom:
    - configMapRef:
        name: CM_NAME
    env:
    - name: app_version
      valueFrom:
        configMapKeyRef:
          name: CM_NAME
key: key01Instructions:
Time Cap:
10 min
23
23
best practices
common configuration in base64
kubectl
# get all secrets
$ kubectl get secrets

# create/update sercret from file
$ kubectl apply -f secret.yaml

# create secret from arguments
$ kubectl create secret generic SECRET_NAME --from-literal=key_01=val_01 --from-literal=key_02=val_02

# get config map info
$ kubectl describe sercret SECRET_NAME
Name:         SECRET_NAME
Namespace:    default
Labels:       <none>
Annotations:  <none>

Type:  Opaque

Data
====
key_02:  6 bytes
key_01: 6 bytestemplate
apiVersion: v1
kind: Secret
metadata:
  name: env-secrets
data:
  DB_PASSWORD: cDZbUGVXeU5e0ZW
REDIS_PASSWORD: AAZbUGVXeU5e0ZBin pods
...
spec:
  containers:
  - name: dumpster-container
    image: gutek/dumpster:0.5
    ports:
    - containerPort: 80
    envFrom:
    - secretRef:
        name: local-secret
    env:
    - name: app_version
      valueFrom:
        secretKeyRef:
          name: local-secret
          key: key01
    volumeMounts:
    - name: config-volume
mountPath: /etc/configbest practices
types
...
spec:
  containers:
  - name: dumpster-container
    image: gutek/dumpster:v1
    ports:
    - containerPort: 8080
    volumeMounts:
    - name: empty-volume
      mountPath: /var/data
  volumes:
  - name: empty-volume
emptyDir: {}...
spec:
initContainers:
- name: git-container
image: ...
args:
- /bin/sh
- -c
- git clone https://github.com/kubernetes/kubernets /local/path
volumeMounts:
- name: empty-volume
mountPath: /local/path
containers:
- name: dumpster-container
image: gutek/dumpster:v1
ports:
- containerPort: 8080
volumeMounts:
- name: empty-volume
mountPath: /var/data
volumes:
- name: empty-volume
emptyDir: {}...
spec:
containers:
- name: dumpster-container
image: gutek/dumpster:0.5
ports:
- containerPort: 80
volumeMounts:
- name: config-volume
mountPath: /etc/config
volumes:
- name: config-volume
configMap:
name: local-cm00-volume-cm
...
spec:
  containers:
  - name: dumpster-container
    image: gutek/dumpster:0.5
    ports:
    - containerPort: 80
    volumeMounts:
    - name: config-volume
      mountPath: /etc/config
  - name: config-volume
    secret:
secretName: local-secret00-volume-secret
emptyDir, configMap, secret, hostPath contains data as long as Pod/Node works. They do not sync data back!
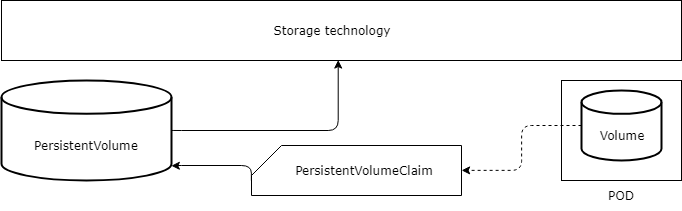
decoupling storage technology
template
apiVersion: v1
kind: PersistentVolume
metadata:
  name: my-pv
spec:
  capacity:
    storage: 1Gi
  accessModes:
    - ReadWriteOnce
    - ReadOnlyMany
  persistentVolumeReclaimPolicy: Retain
  hostPath:
path: /tmp/mypathtemplate
apiVersion: v1
kind: PersistentVolumeClaim
metadata:
  name: my-pvc
spec:
  volumeMode: Filesystem|raw
  resource:
    requests:
        storage: 1Gi
  accessModes:
    - ReadWriteOnce
    - ReadOnlyMany
  storageClassName: slow
  selector:
...in Pod
apiVersion: v1
kind: Pod
metadata:
  name: pod-with-volume
spec:
  containers:
  - name: fc-container
    image: gutek/dumpster:v1
    volumeMounts:
    - name: data
      mountPath: /var/data
  volumes:
    - name: data
      persistentVolumeClaim:
claimName: my-pvc00-volume-azure
The action or fact of going in or entering; the capacity or right of
installation
# for minikube
minikube addons enable ingress

# for docker for desktop
kubectl apply -f https://raw.githubusercontent.com/kubernetes/ingress-nginx/controller-v1.0.4/deploy/static/provider/cloud/deploy.yaml

# verify
kubectl get po -n ingress-nginx -w

# popular - the rest of the world :)

# add repo chart
helm repo add nginx-stable https://helm.nginx.com/stable
helm repo update

# install simple but ....
helm install my-release nginx-stable/nginx-ingress

# install complicated
kubectl create ns ingress-nginx
helm install my-release nginx-stable/nginx-ingress --namespace ingress-nginx --set rbac.create=false
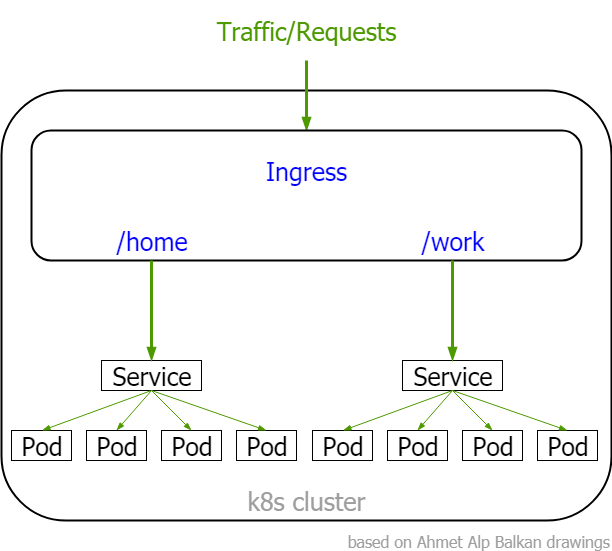
apiVersion: networking.k8s.io/v1apiVersion: extensions/v1beta1Changed into:
default configuration
apiVersion: networking.k8s.io/v1
kind: Ingress
metadata:
  name: dumpster-ing
  annotations:
    kubernetes.io/ingress.class: nginx
    nginx.ingress.kubernetes.io/rewrite-target: /
    nginx.ingress.kubernetes.io/enable-cors: "true"
    nginx.ingress.kubernetes.io/ssl-redirect: "false"
spec:
  rules:
    - http:
        paths:
        - path: /01
          backend:
            serviceName: dumpster-01-svc
            servicePort: 8080

        - path: /02
          backend:
            serviceName: dumpster-02-svc
            servicePort: 8080

        - path: /
          backend:
            serviceName: dumpster-03-svc
servicePort: 8080using external load balancer
$ helm install stable/nginx-ingress --set controller.service.loadBalancerIP="8.8.2.2"
,controller.service.externalTrafficPolicy="Local"Default backend
default backend
apiVersion: networking.k8s.io/v1
kind: Ingress
metadata:
  name: all-paths
  annotations:
    kubernetes.io/ingress.class: "nginx"
spec:
  rules:
  - http:
      paths:
      - pathType: Prefix
        path: "/"
        backend:
          service:
            name: servicename
            port:
number: 8080Fanout routing
Fanout routing
apiVersion: networking.k8s.io/v1
kind: Ingress
metadata:
  name: fanout
  annotations:
    kubernetes.io/ingress.class: "nginx"
spec:
  rules:
  - http:
      paths:
      - pathType: Prefix
        path: "/api/v1"
        backend:
          service:
            name: svc-v1
            port:
              number: 8080
      - pathType: Prefix
        path: "/api/v2"
        backend:
          service:
            name: svc-v2
            port:
number: 8080Name based virtual hosting
Name based virtual hosting
apiVersion: networking.k8s.io/v1
kind: Ingress
metadata:
  name: virtual-hosting
  annotations:
    kubernetes.io/ingress.class: "nginx"
spec:
  rules:
  - host: v1.k8s.buzz
    http:
      paths:
      - pathType: Prefix
        path: "/"
        backend:
          service:
            name: echo-v2
            port:
              number: 8080
  - host: v2.k8s.buzz
    http:
      paths:
      - pathType: Prefix
        path: "/"
        backend:
          service:
            name: echo-v2
            port:
number: 8080Rewrite target
apiVersion: networking.k8s.io/v1
kind: Ingress
metadata:
  name: rewrite-target
  annotations:
    nginx.ingress.kubernetes.io/rewrite-target: /
    kubernetes.io/ingress.class: "nginx"
spec:
  rules:
  - host: v1.k8s.buzz
    http:
      paths:
      - pathType: Prefix
        path: "/app"
        backend:
          service:
            name: app
            port:
number: 8080Instructions:
Time Cap:
10 min
31
31
few operations that might be useful
# create deployment with pod and one replicaset
kubectl run NAME --image gutek/dumpster:v1

# create 5 replicas
kubectl run NAME --image gutek/dumpster:v2 --replicas=5

# run pod that will be removed once done
kubectl run -it NAME --image=some/img --rm --restart=Never -- curl http://onet

# we can use different generators
# only pod
kubectl run NAME --image=some/img --generator=run-pod/v1
# deployment
kubectl run NAME --image=some/img --generator=extensions/v1beta1# List the environment variables defined on all pods
kubectl set env pods --all --list
# Update all containers in all replication controllers in the project to have ENV=prod
kubectl set env deploy --all ENV_VAR=VALUE_1
# Set a deployment's container image to 'nginx:1.9.1'
kubectl set image deployment/DEPLOYMENT_NAME CONTAINER_NAME=nginx:1.9.1Instructions:
Time Cap:
15 min
24
24
# scale to 3 replicas deployment of name DEPLOYMENT_NAME
$ kubectl scale --replicas=3 deployment/DEPLOYMENT_NAME

# scale to 3 replicas ReplicaSet of name RS_NAME
$ kubectl scale --replicas=3 rs/RS_NAME# create service of type NodePort
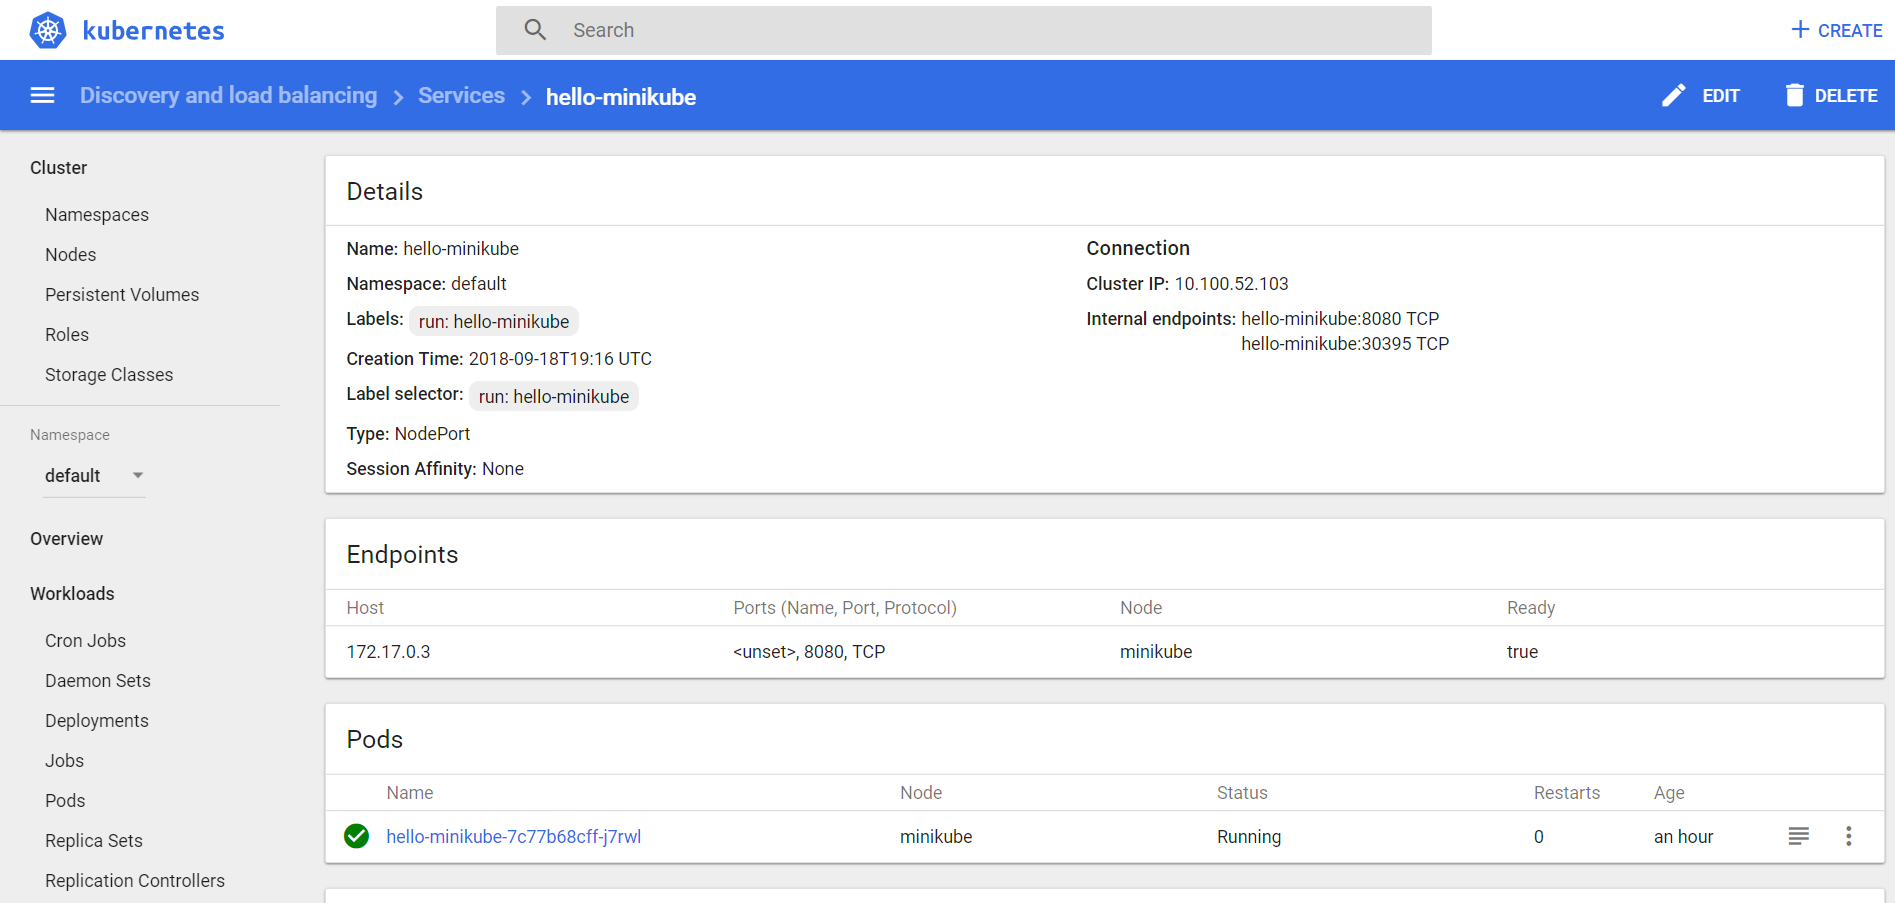
# for deployment hello-minikube
# and name it front-minikube
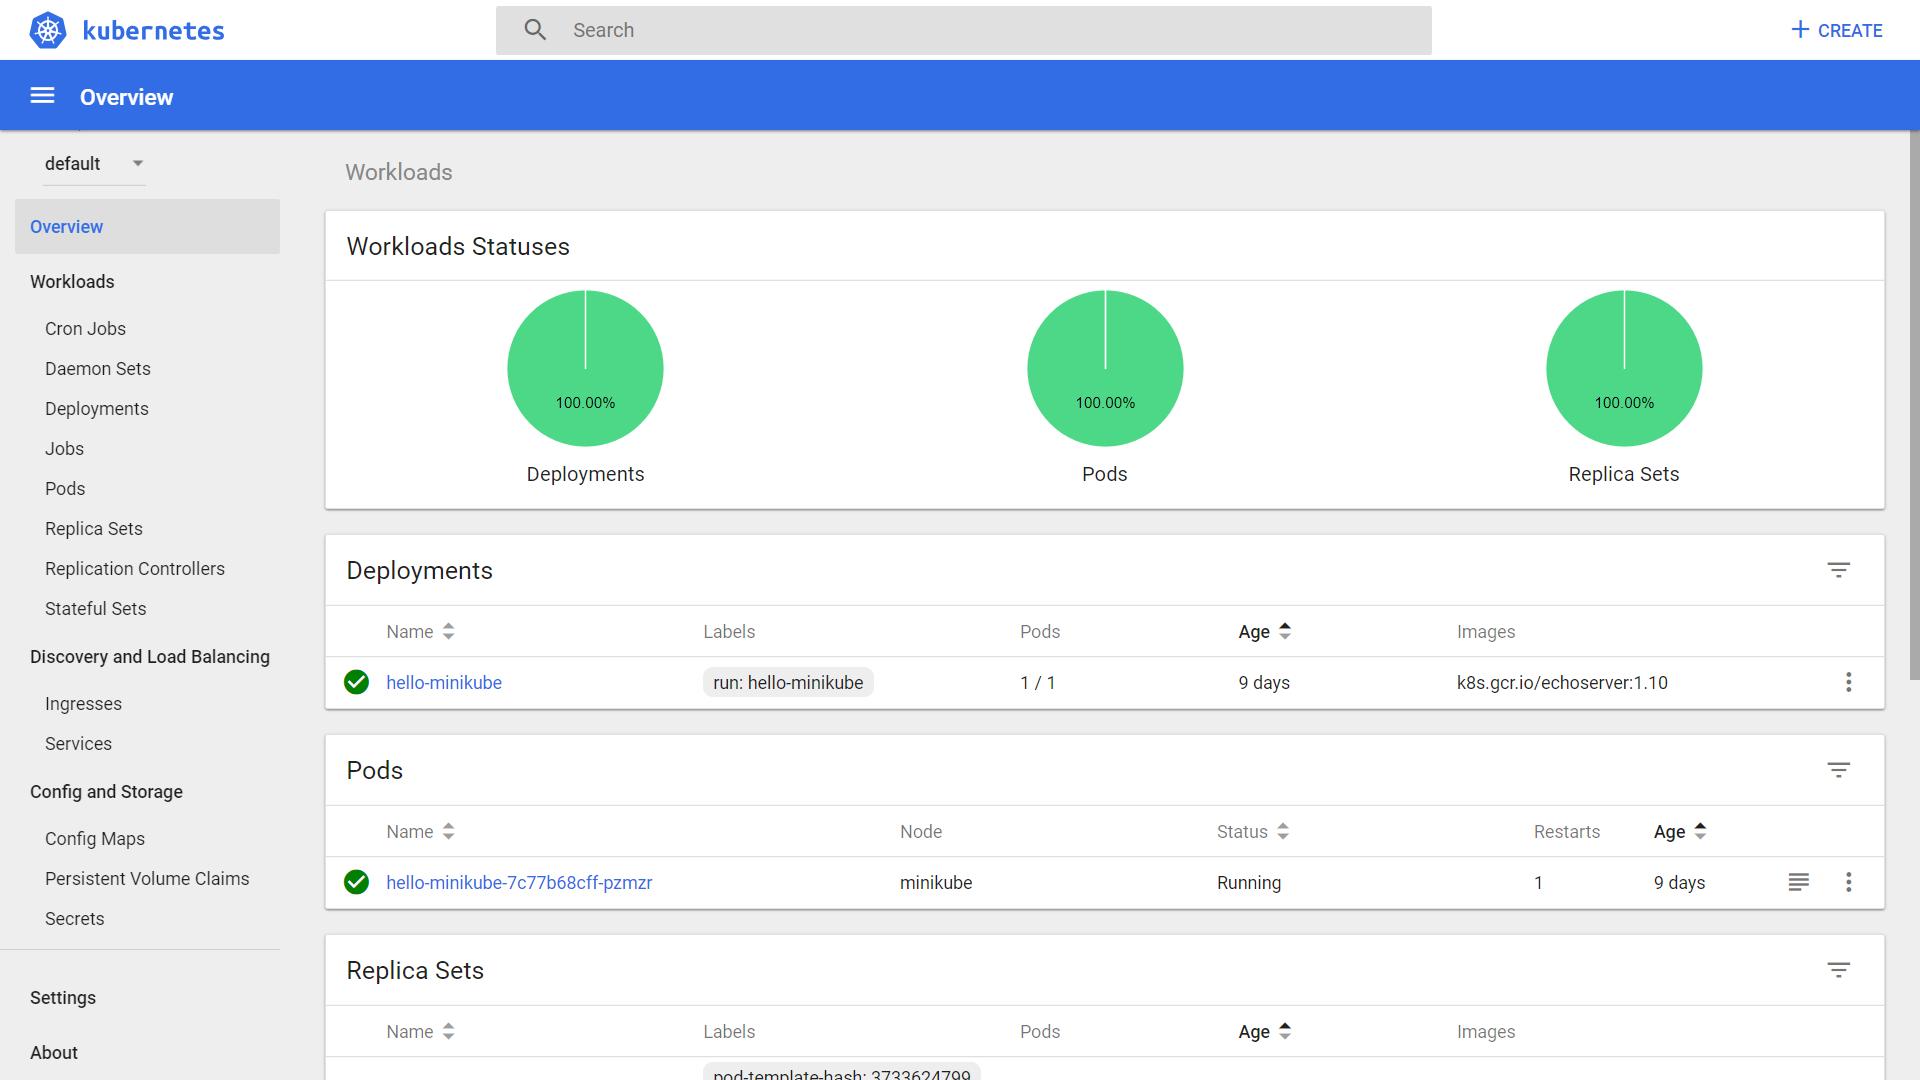
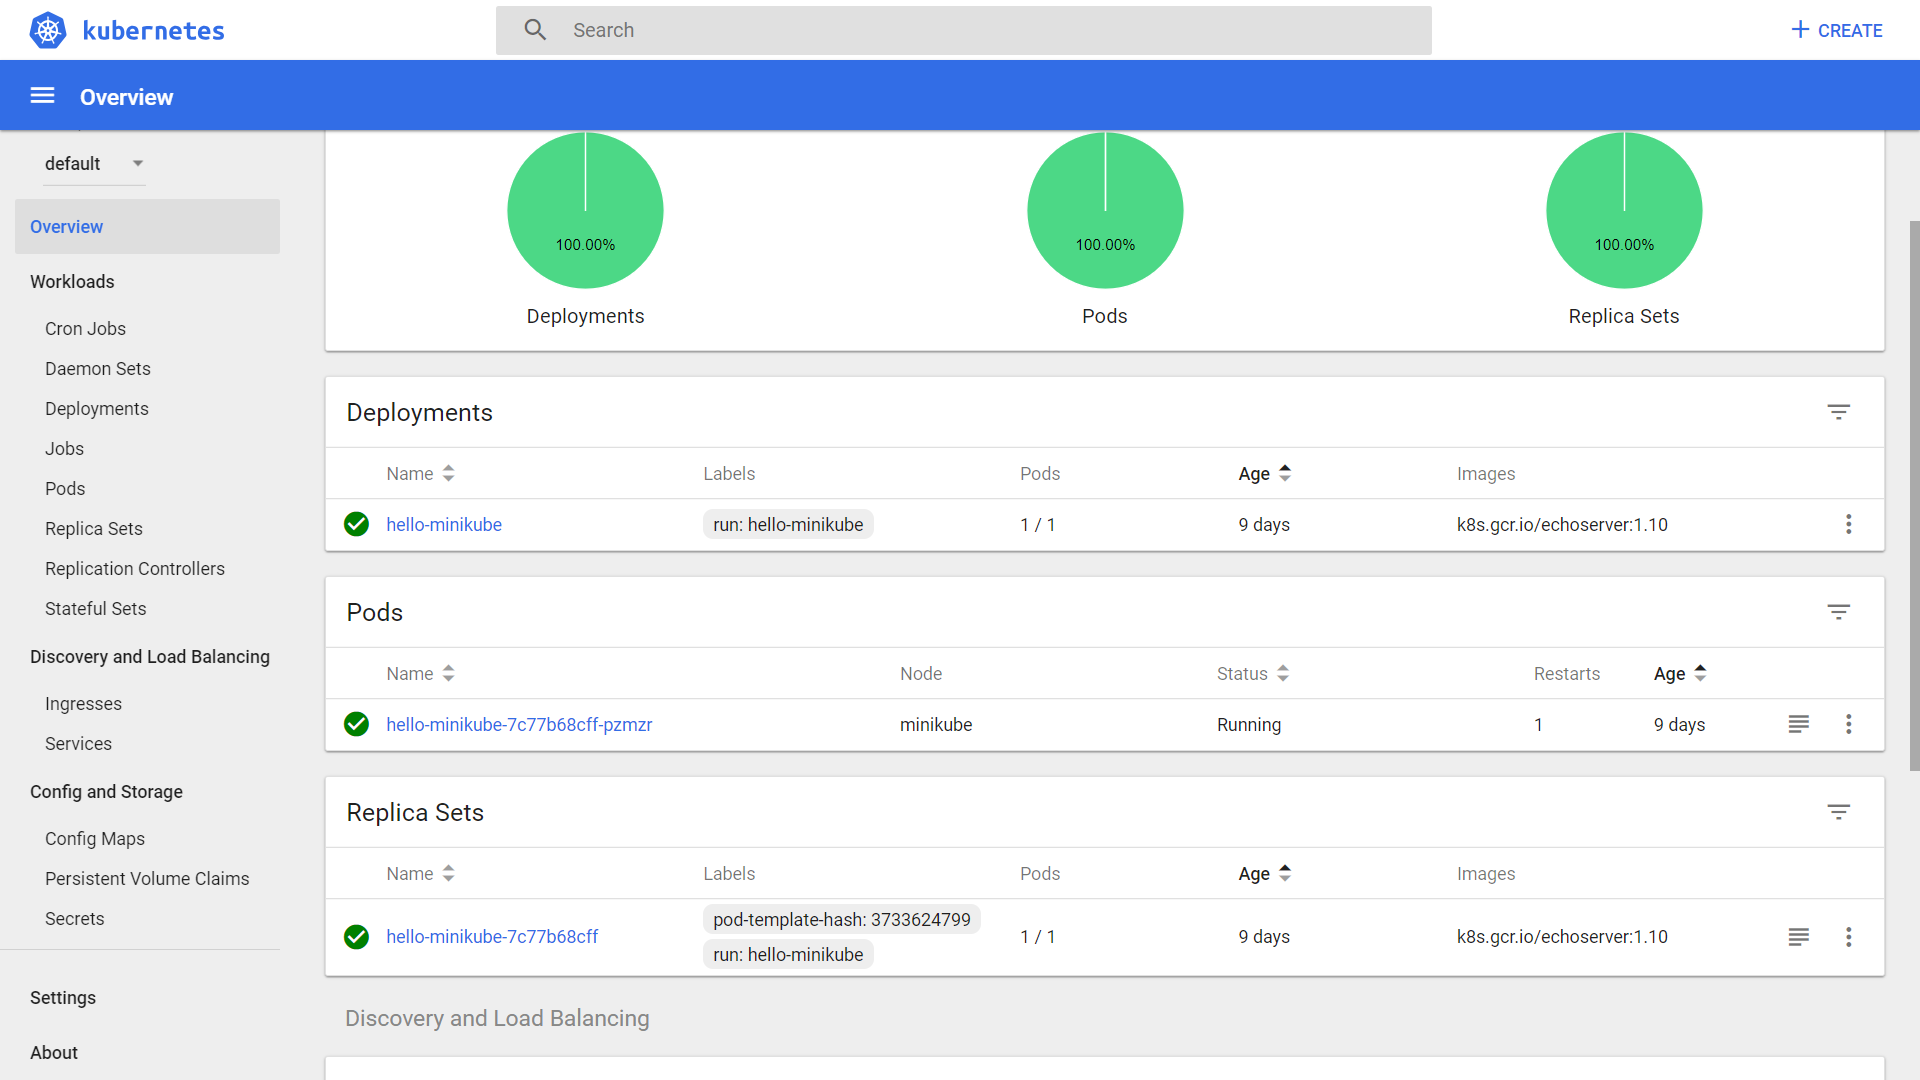
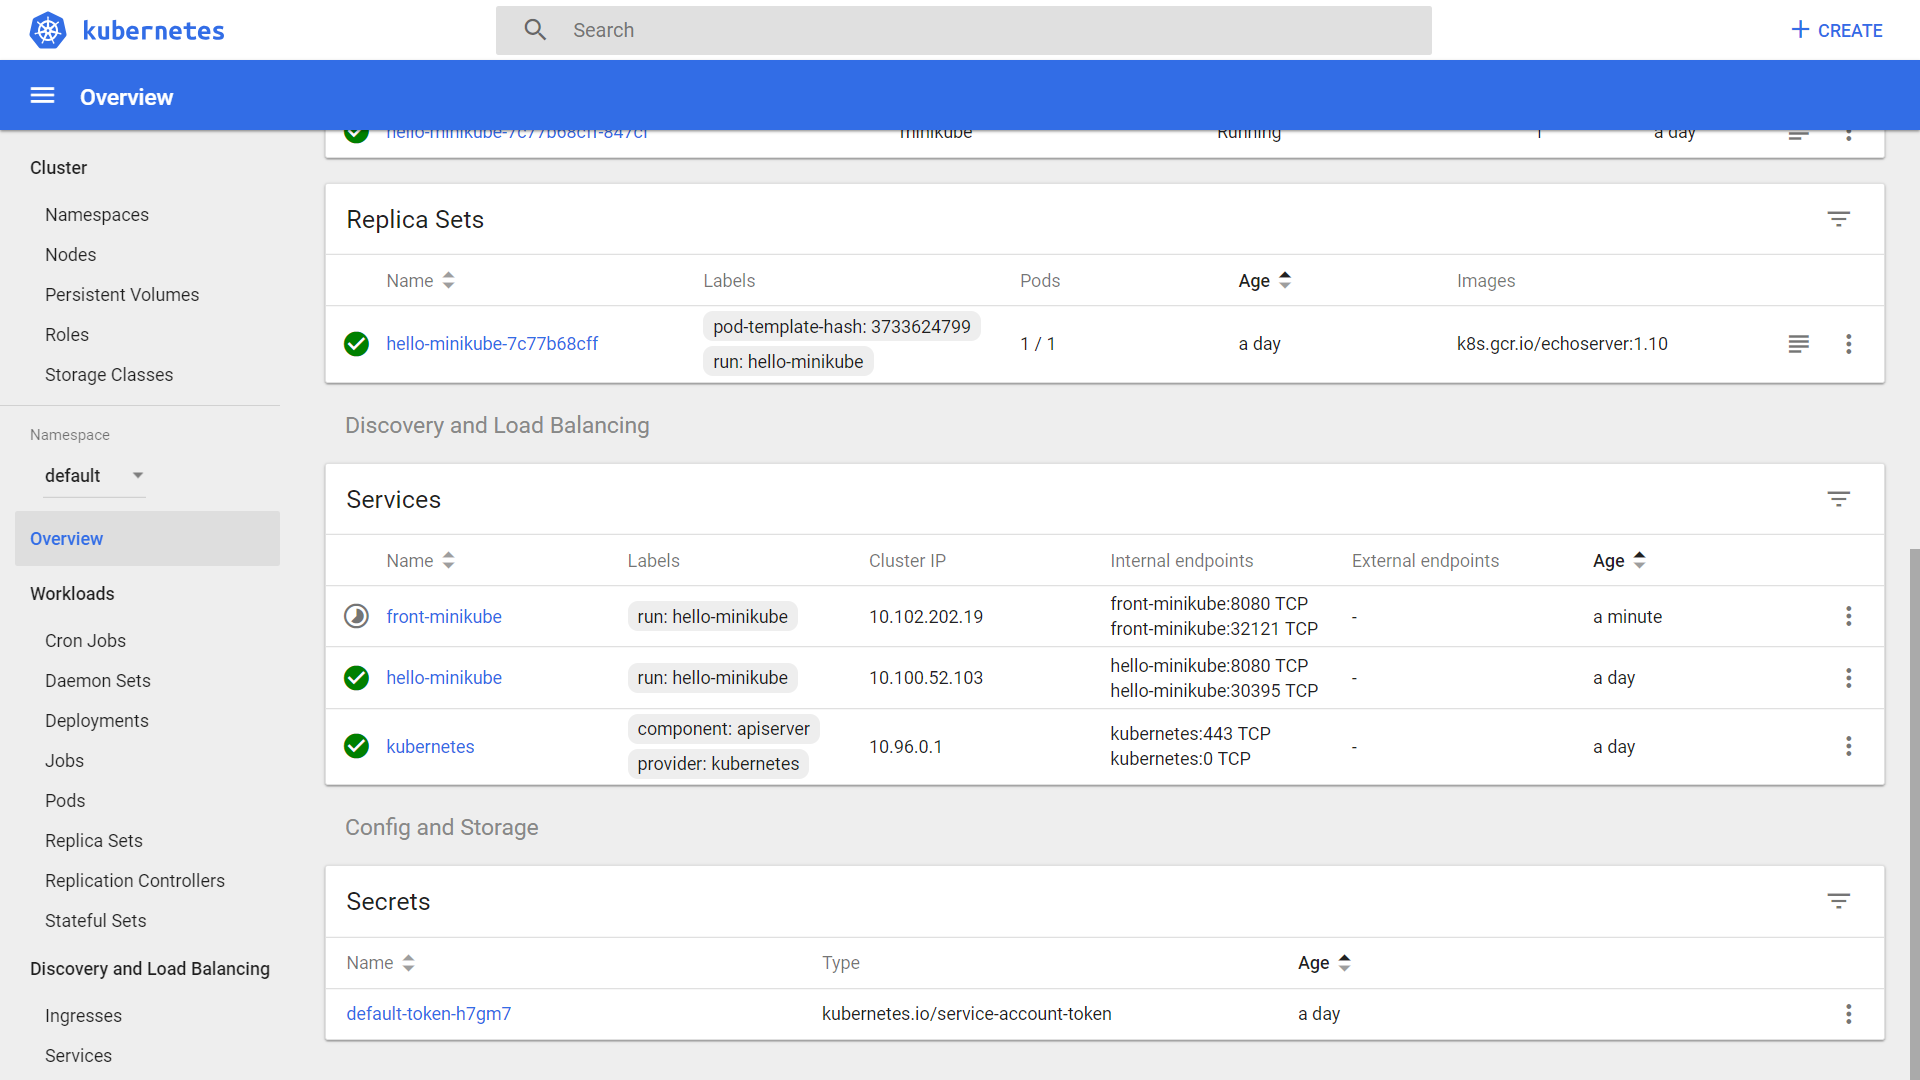
kubectl expose deployment hello-minikube --type=NodePort --name=front-minikube
# create service of type NodePort
# for pod POD_NAME
# and name it POD_NAME_svc
kubectl expose pod POD_NAME --type=NodePort --name=POD_NAME_svc
Instructions:
Time Cap:
15 min
25
25
Good to know things
few things...
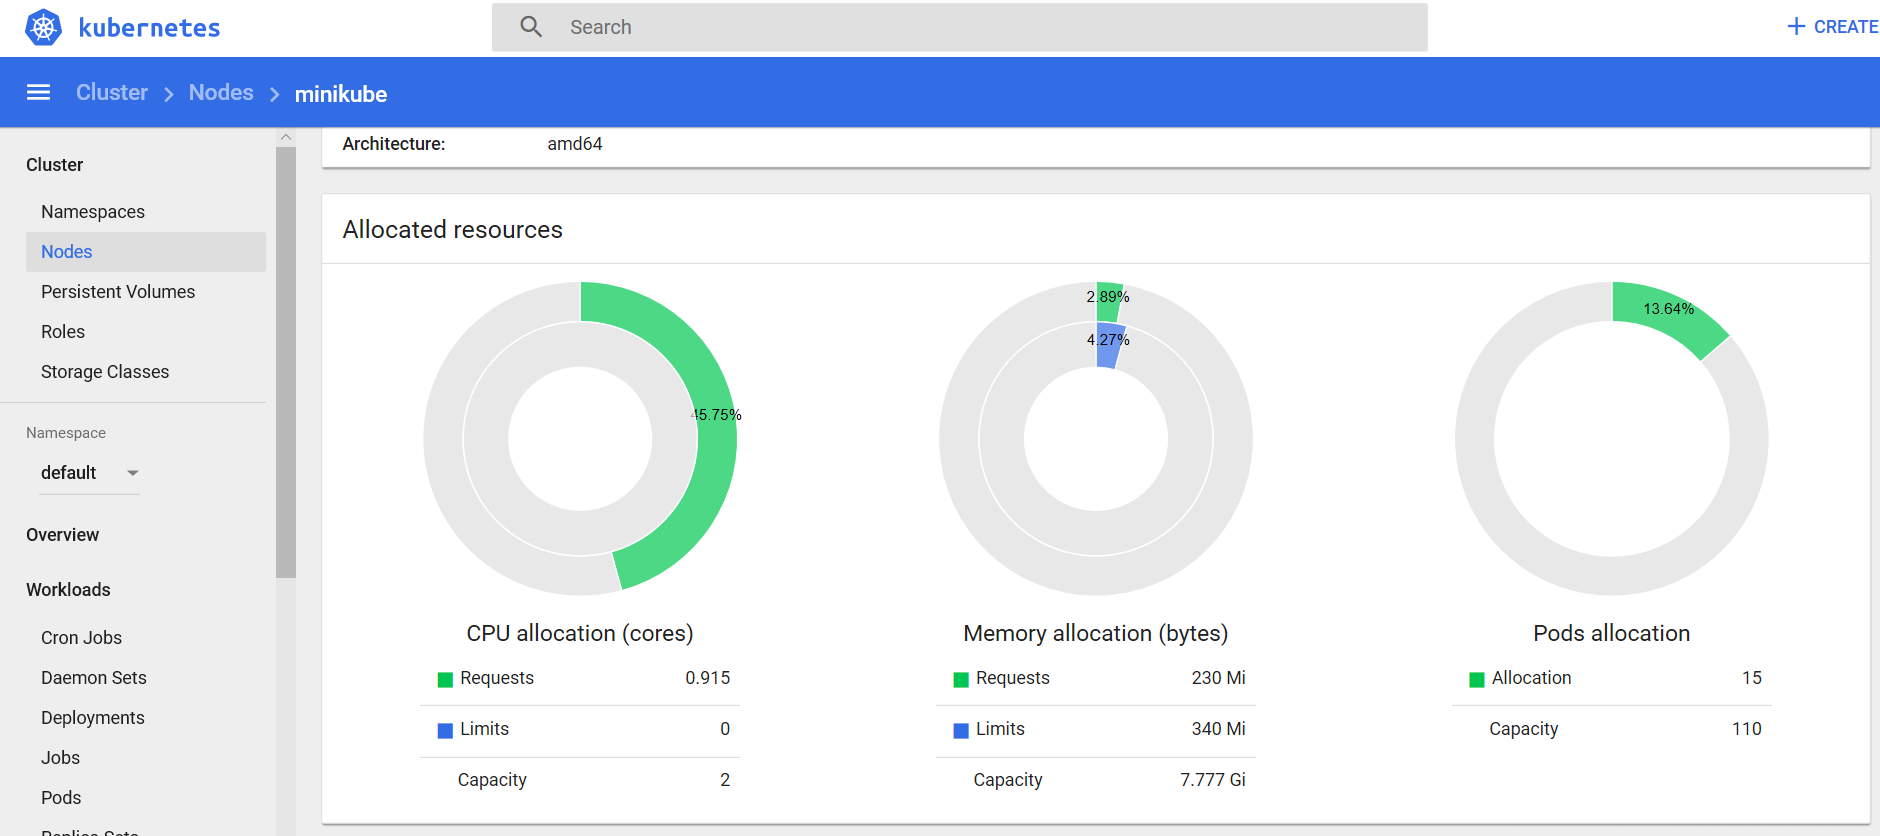
# install metric server on Docker for Desktop
cd demos\00-hpa
k apply -f .\components.yaml

# verify it with:
kubectl get po -n kube-system -l k8s-app=metrics-server

# and open dashboard
# check avaliable addons
$ minikube addons list
# adding heapster addon on to minikube so we have matrics
# old one -> $ minikube addons eneble heapster
minikube addons enable metrics-server
resource limit
resources.requests - we
resources.limits - we maximum will take this memory and
apiVersion: v1
kind: Pod
...
spec:
  containers:
  - name: dumpster-containers
    image: gutek/dumpster:0.1
    resources:
      requests:
        memory: "64Mi"
        cpu: "250m"
      limits:
        memory: "128Mi"
        cpu: "500m"
Instructions:
Time Cap:
15 min
27
27
Allows specify desire limits
It can be applied globally or locally
It needs to be turned on --enable-admission-plugins
spec.hard defines list of quotas for current namespace
apiVersion: v1
kind: ResourceQuota
metadata:
  name: sample
spec:
  hard:
    requests.cpu: "1"
    requests.memory: 1Gi
    limits.cpu: "2"
    limits.memory: 2Gi
    configmaps: "10"
    persistentvolumeclaims: "4"
    pods: "4"
    replicationcontrollers: "20"
    secrets: "10"
    services: "10"
    services.loadbalancers: "2"
Allows specify desire limits of possible resources usage per pod
Also allows specify ratio aspect of the resources used in Pod
It needs to be turned on --enable-admission-plugins
limits defines limits of resources for pod or container
apiVersion: v1
kind: LimitRange
metadata:
  name: test-limit
spec:
  limits:
  - maxLimitRequestRatio:
      memory: 10
    type: Pod
  - max:
      cpu: "800m"
      memory: "1Gi"
    min:
      cpu: "100m"
      memory: "99Mi"
    default:
      cpu: "700m"
      memory: "900Mi"
    defaultRequest:
      cpu: "110m"
      memory: "111Mi"
    type: Container
  - type: PersistentVolumeClaim
    max:
      storage: 2Gi
    min:
storage: 1Gihow to scale based on resources?
kubectl - imperatively
# auto scal to max 10 replicas when cpu utilization is at around 10%
# this is autoscaling/v1
$ kubectl autoscale deploy deployment-name --min=3 --max=10 --cpu-percent=10

# get all autoscalers
$ kubectl get hpa

# describe autoscaler
$ kubectl describe hpa hpa-nametemplate
apiVersion - autoscaling/v1 allows only scale on
targetCPUUtilizationPercentage, beta allows scaling on multiple metrics
to make it WORK pods needs to define resources
apiVersion: autoscaling/v1
kind: HorizontalPodAutoscaler
metadata:
  name: php-apache
  namespace: default
spec:
  scaleTargetRef:
    apiVersion: apps/v1
    kind: Deployment
    name: php-apache
  minReplicas: 1
  maxReplicas: 10
targetCPUUtilizationPercentage: 50template
MAIN THING TO TAKE FROM THIS TEMPLATE
autoscaling/v1 allows only scale on cpu utilization %
autoscaling/v2beta1 allows to scale on multiple metrics
to make it WORK pods needs to define resources
apiVersion: autoscaling/v2beta1
kind: HorizontalPodAutoscaler
metadata:
  name: dumpster-hpa
spec:
  scaleTargetRef:
    apiVersion: apps/v1
    kind: Deployment
    name: dumpster-dep
  minReplicas: 1
  maxReplicas: 10
  metrics:
  - type: Resource
    resource:
      name: memory
      targetAverageUtilization: 10
  - type: Resource
    resource:
      name: cpu
      targetAverageUtilization: 10
  - type: Pods
    pods:
      metricName: packects-per-second
targetAverageValue: 1kInstructions:
$ kubectl run -it load-generator --image=busybox /bin/sh

Hit enter for command prompt
$ while true; do wget -q -O- http://dumpster-svc.default.svc.cluster.local; done00-hpa
28
az feature register \
	--namespace Microsoft.ContainerService \
    --name AKS-VPAPreview

az aks update  \
    --resource-group poznajkubernetes \
    --name szkolenie-aks \
    --enable-vpa
Instructions:
# create namespace and switch to it
k create ns vpa-demo
kubens vpa-demo

# deploy hamster app with VPA
k apply -f \
https://raw.githubusercontent.com/kubernetes\
/autoscaler/master/vertical-pod-autoscaler/examples/hamster.yaml

# run describe
k describe pod hamster-<TAB><TAB>

# check pods with
k get --watch pods -l app=hamster

# wait a few minutes and run describe again on different pod
k describe pod hamster-<TAB><TAB>
00-vpa
how things are resolved
my-svc.my-namespace.svc.cluster.local
dumpster-svc.default.svc.cluster.local
pod-ip.my-namespace.pod.cluster.local
10-10-10-10.default.pod.cluster.local
template
apiVersion: apps/v1
kind: DaemonSet
metadata:
  name: dumpster-ds
  namespace: kube-system
  labels:
    workshop: "true"
    app: dumpser
spec:
  selector:
    matchLabels:
      app: dumpster-ds-pos
  template:
    metadata:
      labels:
        app: dumpster-ds-pos
        workshop: "true"
    spec:
      tolerations:
      - key: node-role.kubernetes.io/master
        effect: NoSchedule
      containers:
      - name: dumpster-ds-pod-container
        image: gutek/dumpster:0.1
terminationGracePeriodSeconds: 30kubectl
# get deamon sets
kubectl get ds

# delete deamon set
kubectl delete ds ds-name
Instructions:
00-ds-create
headless service
apiVersion: v1
kind: Service
metadata:
  name: dumpster-ss-svc
  labels:
    app: dumpster
    workshop: "true"
spec:
  ports:
  - port: 80
    name: web
  clusterIP: None
  selector:
app: dumpster-ss-podtemplate
apiVersion: apps/v1
kind: StatefulSet
metadata:
  name: dumpster-ss
  # no lables!!!!!!
spec:
  selector:
    matchLabels:
      app: dumpster-ss-pod
  serviceName: "dumpster-ss-svc"
  replicas: 3
  template:
    metadata:
      labels:
        app: dumpster-ss-pod
    spec:
      terminationGracePeriodSeconds: 10
      containers:
      - name: dumpster-ss-pod-container
        image: gutek/dumpster:0.1
        ports:
- containerPort: 80kubectl
# get stateful sets
$ kubectl get statefulset

# delete stateful set
$ kubectl delete statefulset ss-name
Instructions:
00-ss-create
dns
pod-NUMBER.service-name.namespace.svc.cluster.local

dumpster-ss-2.dumpster-ss-svc.default.svc.cluster.local
apiVersion: v1
kind: Pod
metadata:
  name: testpod
  labels:
    env: test
spec:
  containers:
  - name: pkad
    image: poznajkubernetes/pkad
    imagePullPolicy: IfNotPresent
  nodeSelector:
    disktype: ssd
apiVersion: v1
kind: Pod
metadata:
  name: testpod
  labels:
    env: test
spec:
  containers:
  - name: pkad
    image: poznajkubernetes/pkad
    imagePullPolicy: IfNotPresent
  nodeName: node-01
apiVersion: v1
kind: Pod
metadata:
  name: pkad-node-affinity
spec:
  affinity:
    nodeAffinity:
      requiredDuringSchedulingIgnoredDuringExecution:
        nodeSelectorTerms:
        - matchExpressions:
          - key: storage
            operator: In
            values:
            - ssd
      preferredDuringSchedulingIgnoredDuringExecution:
      - weight: 10
        preference:
          matchExpressions:
          - key: env
            operator: In
            values:
            - test
  containers:
  - name: pkad
image: poznajkubernetes/pkadapiVersion: apps/v1
kind: Pod
metadata:
name: app
labels:
app: web-store
spec:
affinity:
podAntiAffinity:
requiredDuringSchedulingIgnoredDuringExecution:
- labelSelector:
matchExpressions:
- key: app
operator: In
values:
- web-store
topologyKey: "kubernetes.io/hostname"
podAffinity:
requiredDuringSchedulingIgnoredDuringExecution:
- labelSelector:
matchExpressions:
- key: app
operator: In
values:
- store
topologyKey: "kubernetes.io/hostname"
containers:
- name: web-app
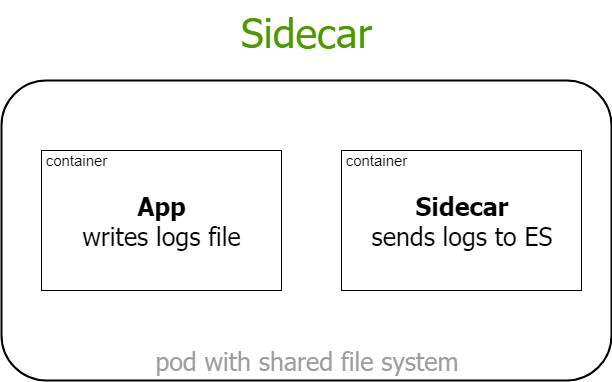
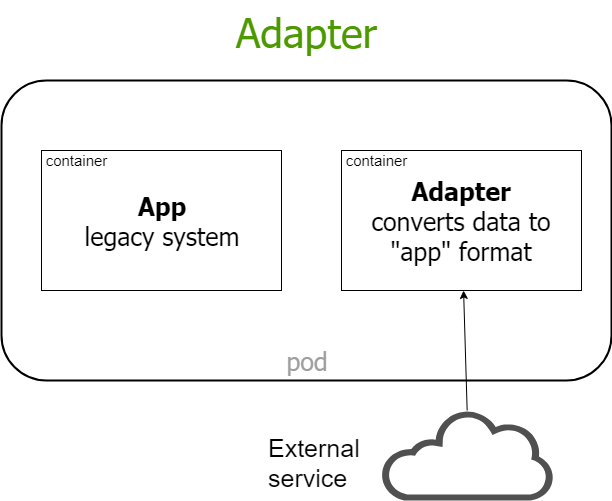
image: poznajkubernetes/pkadmulti container systems
# check
$ helm version

# linux
$ sudo snap install helm --classic

# mac
brew install kubernetes-helm

# win
choco install kubernetes-helm

# or by visual studio code kubernetes plugin./Chart.yaml
./values.yaml
./templates/NOTES.txt
./templates/_helpers.tpl
./templates/deployment.yaml
./templates/hpa.yaml
./templates/ingress.yaml
./templates/service.yaml
./templates/serviceaccount.yaml
./templates/tests
./templates/tests/test-connection.yamlapiVersion: v1
kind: Service
metadata:
name: {{ include "poznajkubernetes-helm-example.fullname" . }}
labels:
{{- include "poznajkubernetes-helm-example.labels" . | nindent 4 }}
spec:
type: {{ .Values.service.type }}
ports:
- port: {{ .Values.service.port }}
targetPort: http
protocol: TCP
name: http
selector:
{{- include "poznajkubernetes-helm-example.selectorLabels" . | nindent 4 }}basic commands
# initialize helm usage
helm repo add stable https://kubernetes-charts.storage.googleapis.com/

# refresh repo
helm repo update

# search for a package ingress
helm search repo ingress

# list all installed packages
$ helm list

# list all even deleted pacakges
$ helm list --all

# uninstall package but keep it locally
$ help uninstall NAME

# install package
$ help install channel/package-namePros
Cons
00-kustomization
Pros
Cons
kubectl
# return information about current state of object
# including latest events
$ kubectl describe resource name

# wide return all resources - status of resources
$ kubectl get all -o wide

# get latest logs from pod
$ kubectl logs pod-name

# get all logs from all pods in deployment
$ kubectl logs deployment/deployment-name

# events happening in the system
$ kubectl get events --sort-by=.metadata.creationTimestamp

# checking pods/modes most used
$ kubectl top nod
$ kubectl top pod

# rollout deployment
$ kubectl rollout ...

# exec command on pod
$ kubectl exec pod-name -i -t /bin/sh

# attach to running container
$ kubectl attach pod-namedashboard
Instructions:
Time Cap:
10 min
32
32
# used to be so simple...
minikube addons open heapster

# now:
kubectl apply -f https://raw.githubusercontent.com/giantswarm/kubernetes-prometheus/master/manifests-all.yaml

kubectl get pods -n monitoring -l app=grafana,component=core

kubectl port-forward -n monitoring POD_FROM_PREV 3000:3000

# localhost:3000/login admin:admin
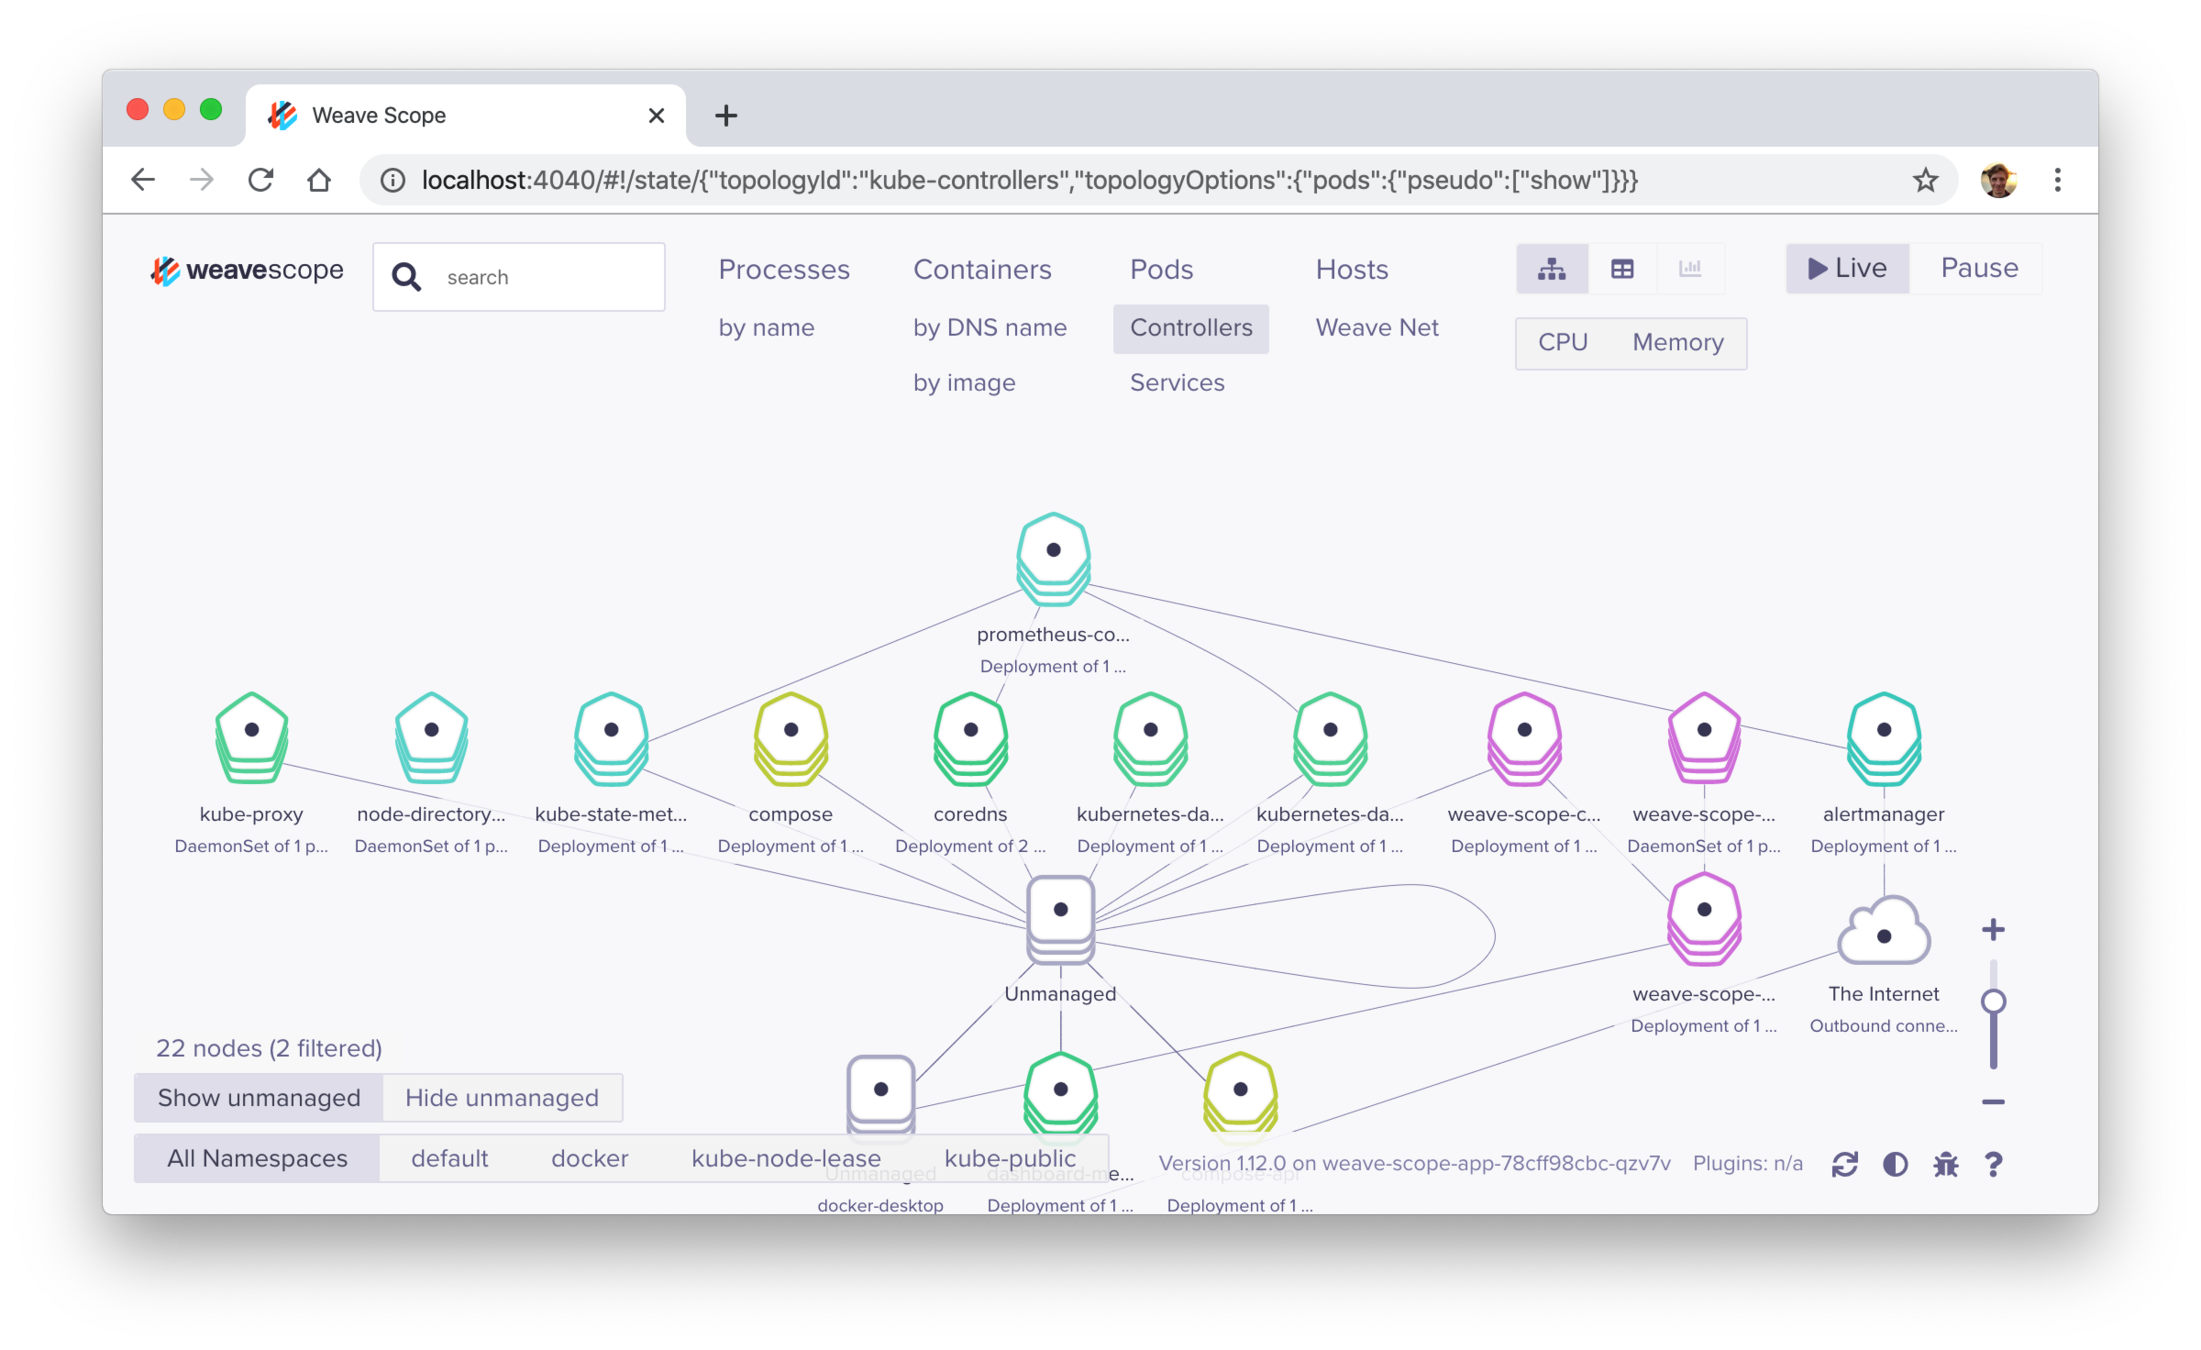
wave
kubectl apply \
   -f "https://cloud.weave.works/k8s/scope.yaml?k8s-version=$(kubectl version | base64 | tr -d '\n')"

kubectl port-forward -n weave \
   "$(kubectl get -n weave pod --selector=weave-scope-component=app -o jsonpath='{.items..metadata.name}')" 4040

# localhost:4040
wave
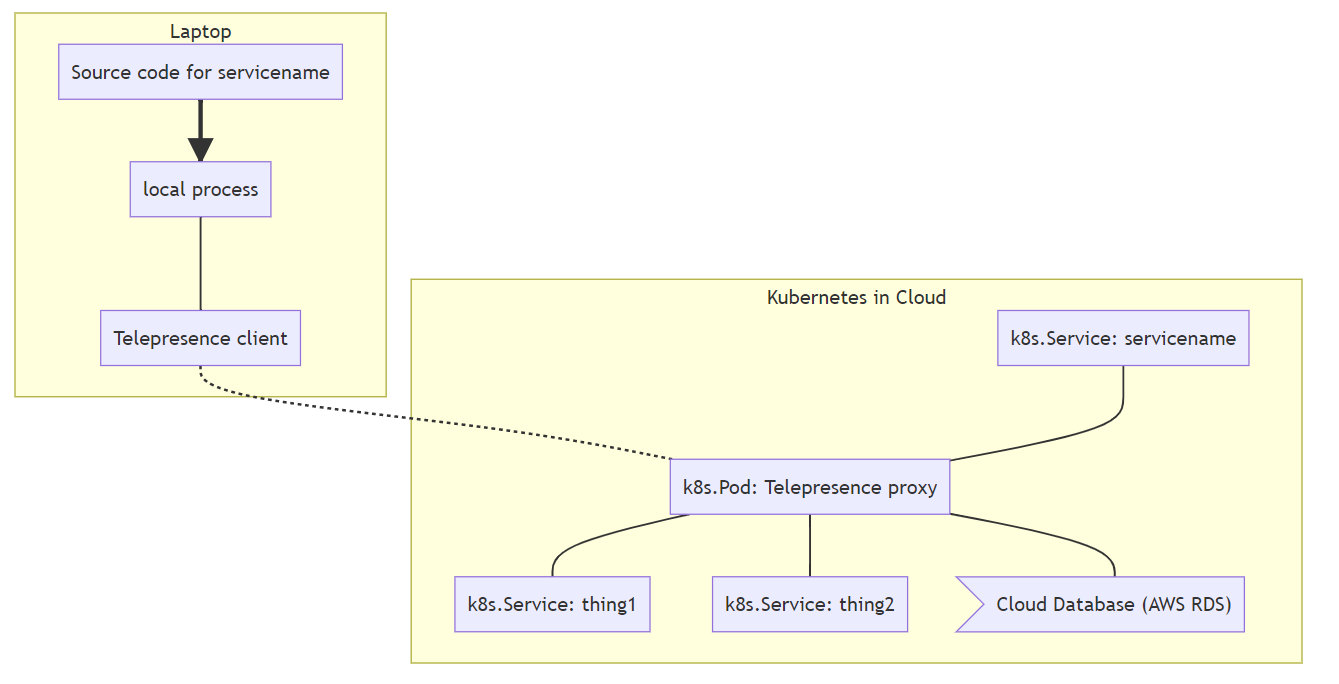
debugging
Popular tools:
- Telepresence
- Bridge to Kubernetes
debugging
# Poweshell
Import-Module PSKubectlCompletion
Set-Alias k -Value kubectl
Register-KubectlCompletion

# Bash
source <(kubectl completion bash)
upload image to private registry
docker login devszkolak8s.azurecr.io -u USER -p PASS
docker tag gutek/dumpster:v1 devszkolak8s.azurecr.io/YOUR_NAME/dumpster:v1
docker push devszkolak8s.azurecr.io/YOUR_NAME/dumpster:v1
00-private-registry
register private registry in K8S
Command
kubectl create secret docker-registry regcred
--docker-server=devszkolak8s.azurecr.io
--docker-username=USER
--docker-password=PASS
--docker-email=email@email.com
00-private-registry
deploy pod
containers:
- name: private-reg-container
image: <your-private-image>
imagePullSecrets:
- name: regcred
00-private-registry
making a pipeline
kubectl apply -f deployment.yml
kubectl rollout status deployment NAME_FROM_YML
kubectl rollout undo deployment NAME_FROM_YML
To run or not to run
what is needed
By Jakub Gutkowski
Kubernetes dla Developerów


