Client Side
Web Applications
Single Page Applications, Routing, and Auth in React
HTML
Product Content
CSS
JavaScript
/product/8ce7
HTML
Checkout Form
HTML
CSS
JavaScript
/checkout/8ce7
HTML
Success Message
HTML
CSS
JavaScript
/checkout/success
link
link
form submission
With server-side applications, every time a user navigates to a new page:
- all HTML, CSS, JavaScript and any other content is loaded (or reloaded from the cache)
- state is forgotten and must be retrieved
link
Product Content
JavaScript
HTML
CSS
Checkout Form
Success Message
link
form submission
Single Page Application
A single page, with all the HTML, is loaded once and only once.
Instead of navigating to a new "page", the application swaps different React components on the screen.
Single Page Application (SPA)
Most of your view is generated by JavaScript!
<!DOCTYPE html>
<html lang="en">
  <head>
    <meta charset="utf-8" />
    <meta name="viewport" content="width=device-width, initial-scale=1, shrink-to-fit=no" />
    <link rel="manifest" href="%PUBLIC_URL%/manifest.json" />
    <link rel="shortcut icon" href="%PUBLIC_URL%/favicon.ico" />
    <title>React App</title>
  </head>
  <body>
    <noscript>You need to enable JavaScript to run this app.</noscript>
    <div id="root"></div>
</html>
Pros
- Faster, because most resources are loaded only once
- Smoother user experience
- State is not lost when the user navigates to a new screen
- Easier to debug
- Easier to extend to mobile applications
Cons
- SEO is harder
- The first download of the website can take longer
- Less secure
- JavaScript must be enabled to see any content
Routing
navigation through URLs
Event occurs
e.g. user clicks on a link, submits a forms, or types a URL in the address bar
URL changes
Application displays different content on the screen
React Router
library that maps a URL to a React component
|
/product/8ce7 |
Product.jsx |
|
/checkout/8ce7 |
Checkout.jsx |
|
/checkout/success |
CheckoutSuccess.jsx |
Product Content
Checkout Form
Success Message
link
form submission
https://mysite.com
Routing
with React Router
Routing
navigation through URLs
Event occurs
e.g. user clicks on a link, submits a forms, or types a URL in the address bar
URL changes
Application displays different content on the screen
Anatomy of a URL
https://mysite.com/checkout/success| https:// | protocol |
| mysite.com | user friendly name for your entire website |
| /checkout/success | the path to the page or what you see on the screen |
Step 1: Install React Router
npm install react-router-domStep 2: Import and use BrowserRouter in your router in main.jsx / main.tsx file
import React from 'react';
import ReactDOM from 'react-dom/client';
import App from './App.tsx';
import './index.css';
// Add line below
import { BrowserRouter } from 'react-router-dom';

ReactDOM.createRoot(document.getElementById('root')!).render(
  <React.StrictMode>
    {/* Put App inside BrowserRouter */}
    <BrowserRouter>
      <App />
    </BrowserRouter>
  </React.StrictMode>
);
Step 3: Setup your router in App.jsx / App.tsx (or a high level component)
import { Routes, Route } from "react-router-dom";
// Import components used as "element" below ...

function App() {
  return <>
    <Menu >{/* Or any content that stays on every page */}
      <Routes>
        <Route path="/checkout/success" element={<CheckoutSuccess />} />
        <Route path="/product/:productId" element={<Product />} />
      </Routes>
    </Menu>
  <>
}
See more on path matching: https://github.com/pillarjs/path-to-regexp
Exact match
https://mysite.com/checkout/success
<Route path="/checkout/success" element={<CheckoutSuccess />} />Relative match using a placeholder for an id, key or data https://mysite.com/product/8ce7
<Route path="/product/:productId" element={<Product />} />Step 2: Setup your router in App.jsx (or a high level component)
import { BrowserRouter as Router, Switch, Route } from "react-router-dom";

function App() {
  return <>
    <Menu >{/* Or any content that stays on every page */}
      <Router>
        <Switch>
          <Route exact path="/checkout/success" component={CheckoutSuccess} />
          <Route path="/product/:productId" component={Product} />
          <Route exact path="/" render={() => <Home username="Peter Piper" />} />
        </Switch>
      </Router>
    </Menu>
}
See more on path matching: https://github.com/pillarjs/path-to-regexp
Exact match
https://mysite.com/checkout/success
<Route exact path="/checkout/success" component={CheckoutSuccess} />Relative match using a placeholder for an id, key or data https://mysite.com/checkout/8ce7
<Route path="/product/:productId" component={Product} /> <Route exact path="/" render={() => <Home username="Peter Piper" />} />Passing props to a route
https://mysite.com/
Retrieving parameters
import { useParams } from "react-router-dom";

function Product(props) {
  const { productId } = useParams();
  // Make AJAX request or do whatever you need with the productId
  // ...
}
<Route path="/product/:productId" component={Product} />In App.jsx (or other high level component):
In the React Component:
const { placeholder } = useParams();
File Not Found Page
import { Routes, Route } from "react-router-dom";
// Import components used as "element" below ...

function App() {
  return <>
    <Menu >
      <Routes>
        <Route path="/checkout/success" element={<CheckoutSuccess />} />
        <Route path="/product/:productId" element={<Product />} />
        {/* For any other path, this shows a 404 "File Not Found" error */}
        <Route path="*" element={<NotFound />} />
      </Routes>
    </Menu>
  <>
}
        {/* For any other path, this shows a 404 "File Not Found" error */}
        <Route path="*" element={<NotFound />} />
Redirect
import { BrowserRouter as Router, Switch, Route } from "react-router-dom";

function App() {
  return <>
      <Menu >{/* Or any content that stays on every page */}
        <Router>
          <Switch>
            <Route path="/product/:productId" component={Product} />
            {/* If the url does not match anything, redirecting to home page  */}
            <Redirect to="/home" />
          </Switch>
        </Router>
    </>
}
            {/* If the url does not match anything, redirecting to home page  */}
            <Redirect to="/home" />
Navigate to a new URL with a router redirect
React Router's Navigate
import { Routes, Route, Navigate } from "react-router-dom";
import Home from "./Components/Home";

function App() {
  return (
    <Routes>
      <Route path="/home" element={<Home />} />
      {/* If the url does not match anything, change the URL to /home  */}
      <Route path="*" element={<Navigate replace to="/home" />} />
    </Routes>
  );
}
{/* If the url does not match anything, change the URL to /home */}
<Route path="*" element={<Navigate replace to="/home" />} />Navigation and History
with React Router
Navigate to a new URL with links
React Router's Link
import { Link } from "react-router-dom";
// Or you can use <NavLink> to add the CSS "active" class to your navigation
function Nav() {
return (
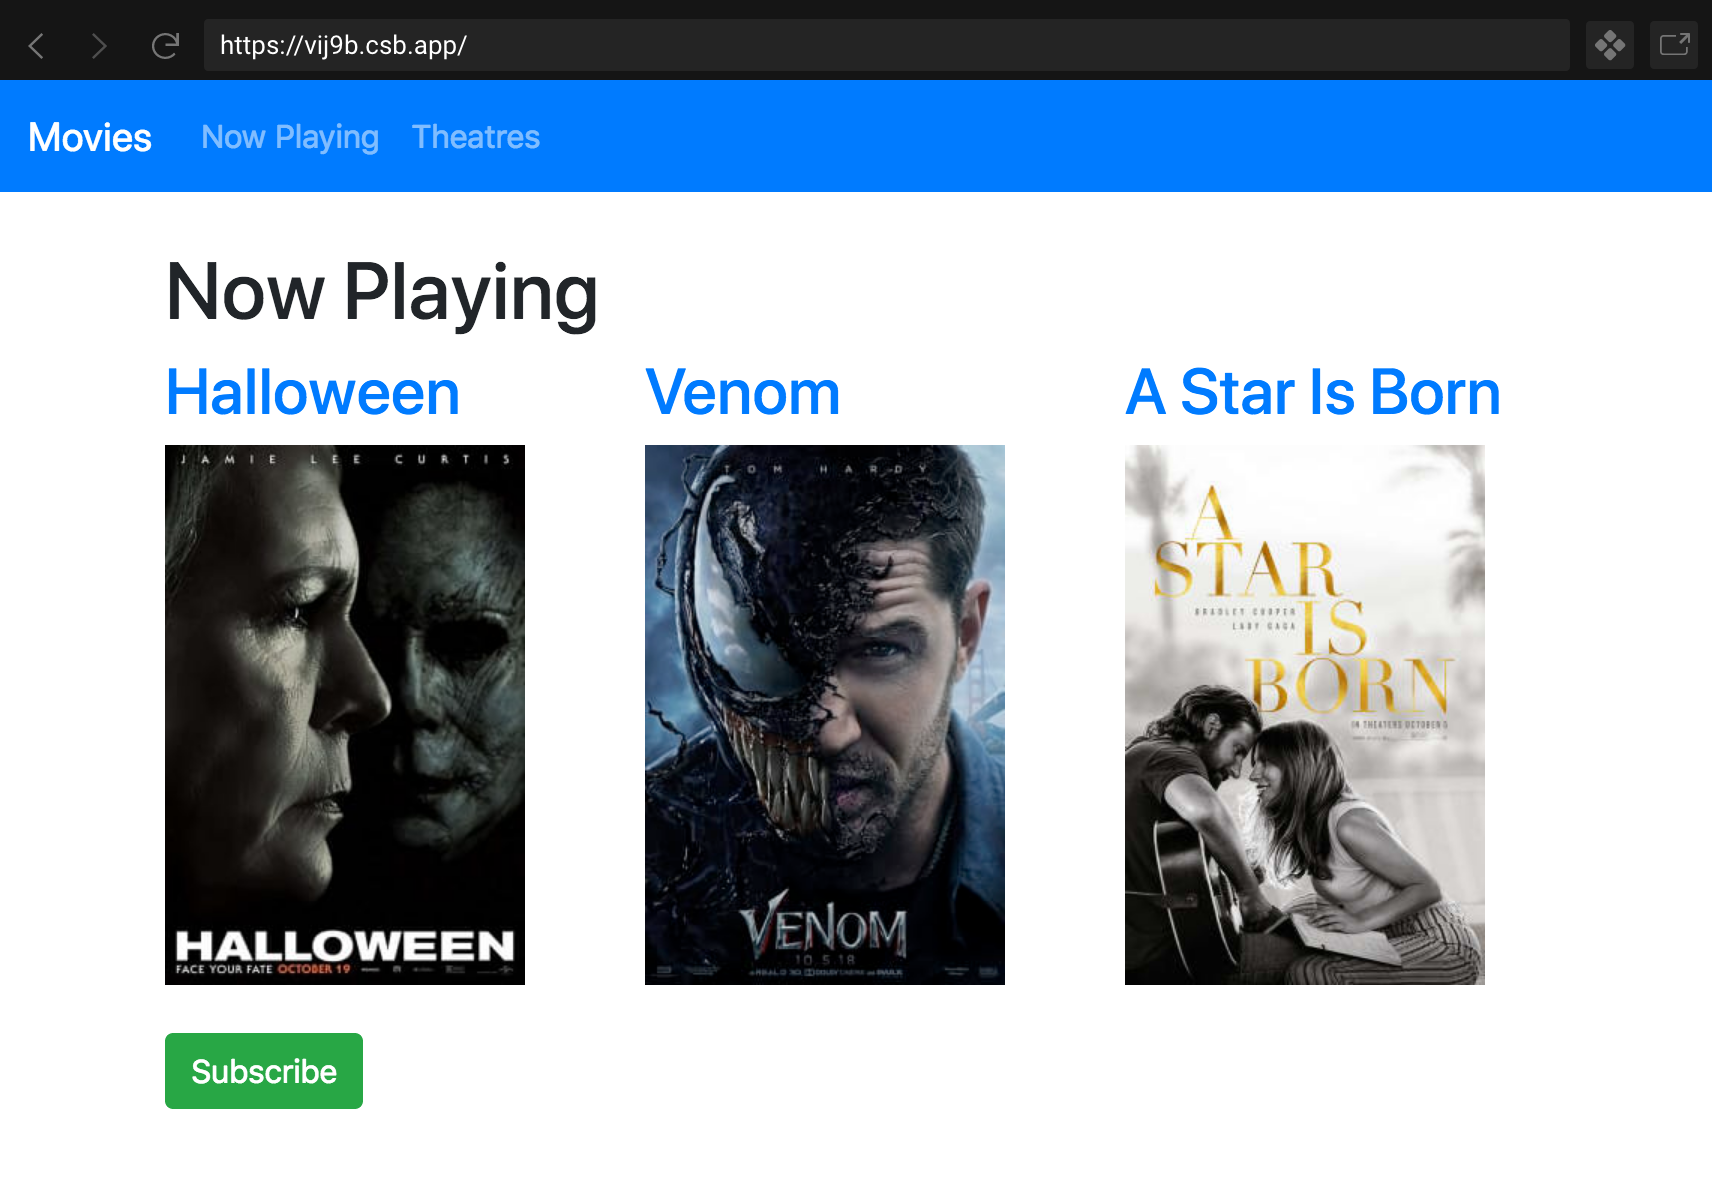
<Link to="/new/url">Now Playing</Link>
);
}
export default Nav;
This will navigate a new URL without refreshing the page and loosing all of your state.
Navigate to a new URL without links
React Router's useNavigate hook
// Or useNavigate with React Router v6
import { useNavigate } from "react-router-dom";

function MyComponent() {
  const navigate = useNavigate();

  // e.g. go to new URL after submitting a form
  const handleForm = (e) => {
    e.preventDefault();
    // ... code ...
    navigate("/to/some/new/url");
  };
}
import { useState, FormEvent, ChangeEvent } from "react";
import { useNavigate } from "react-router-dom";
type LoginProps = {
setIsLoggedIn: Function
};
function Login({ setIsLoggedIn }: LoginProps) {
const [username, setUsername] = useState("");
const [password, setPassword] = useState("");
const navigate = useNavigate();
const handleSubmit = (e: FormEvent) => {
e.preventDefault();
// You would want to make an AJAX request to check if the username and password is valid here.
// If it is valid:
setIsLoggedIn(true);
// If the credentials are valid, redirect to the LoggedIn screen
navigate("/logged-in");
};
return (
<>
<h1>Login</h1>
<form method="POST" onSubmit={handleSubmit}>
<label htmlFor="username">
Username
</label>
<input
onChange={(e: ChangeEvent<HTMLInputElement>) => setUsername(e.target.value)}
value={username}
/>
<label htmlFor="password">
Password
</label>
<input
onChange={(e: ChangeEvent<HTMLInputElement>) => setPassword(e.target.value)}
value={password}
/>
<button type="submit">Login</button>
</form>
</>
);
}
export default Login;
↓ Scroll down
How to redirect to a new route in
React Router v6
// Or useNavigate with React Router v6
import { useNavigate } from "react-router-dom";

function MyComponent() {
  const navigate = useNavigate();
  if (/* some condition */) {
    // Redirects to new url
    navigate("/some/new/url");
  }
  // ...
}
Browser History
A list of web sites that you have visited recently. You can navigate through history with your browser's back and forward buttons.
Example of loosing state when navigating through history and refreshing the page:
https://stackblitz.com/edit/vitejs-vite-sxixnc?file=src%2Fcomponents%2FFaq%2FFaq.tsx
// If the URL is an empty string, it will stay on the same page
navigate("/new/page", {
  /**
   * If replace is true, your history will look like:
   * 1. /previous/page
   * 2. /new/page
   *
   * If false (the default), your history will look like:
   * 1. /previous/page
   * 2. /current/page
   * 3. /new/page
   */
  replace: true
  state: { activeItem: 3 } // Stores state in your browser history
});
Preserve state
import { useLocation } from "react-router-dom";

function MyComponent() {
  const location = useLocation();

  // Accessing state from history
  console.log(location.state?.activeItem) // 3
  // ...
Access state in history
by putting state in history
Search or Query Parameters
State that you can put in a URL as key-value pairs.
Anatomy of a URL
https://mysite.com/search?page=1&query=react%20router| https:// | protocol |
| mysite.com | user friendly name for your website |
| /search | the path to page / screen |
| ? | separates rest of URL from search or query parameters |
| page=1 query=react |
key-value pair in search parameters (escape spaces with %20) |
| & | separates key-value pairs |
WARNING!
Do not put any credentials, session tokens, user information, personal information, or anything else that is sensitive in URLs and history.
Preserve state
by putting state in search params
import { useSearchParams } from "react-router-dom";

function MyComponent() {
  const [searchParams, setSearchParams] = useSearchParams();
Get state
const page = searchParams.get("page");Type check state
const page = searchParams.has("page"); // true or falseSet state
searchParams.set("page", page);

// This let's React know there was a change,
// so that everything will re-render:
setSearchParams(searchParams);
References & Resources
Auth
logging in and accessing private content
Authentication
Proving who you are. For example, signing in with a username / email and password.
Authorization
Granting access. For example, pocessing a token, key or secret to prove that you can access a protected resource like an API.
This is like checking in at a hotel.
This is like using a key card to enter your hotel room.
Access Token
When a user has a valid access token, they are "signed in" and can access a site's content.
Tokens are used so that a user doesn't have to login with their credentails (like username and password) for every API request.
Think of this like a hotel key card that opens your APIs and other protected web content.
token
Application
Server
(Your API)
Authorization
Server
(e.g. Okta)
1
2
3
User signs in (using username + password, Facebook, Google, etc.)
token
User authenticates.
Token created and returned.
User passes token when making AJAX calls
4
Applications validates token
and returns API content
User
IMPORTANT!
You must use HTTPS, where your AJAX calls are encrypted. Otherwise, attackers can easily hijack your users' token and impersonate them.
Signining In
The web server (what hosts the API) has a secret key that only the web server knows. When a user logins with valid credentials, the server generates a JWT token by first encodes data like the user's ID. Then it signs the token using the secret.
Getting Protected Content
The server checks to make sure the token is valid and hasn't been tampered with by unlocking the token's signature with the secret key.
A simple example of authentication with a JWT token
Signing In

Client
(You)
Server
(Website / App)
e.g. username and password
JWT token
HTTP status code 401
axios.request({
  method: "POST",
  url: "http://localhost:7000/api/login",
  headers: {
    "Content-Type": "application/json",
  },
  data: { username: "fluffypanda37", password: "1234" },
})
.then((response) => {
  // The token will be somewhere within the response
  console.log(response.data.token); // e.g.
})
.catch((error) => {
  console.error(error);
  if (error.response && error.response.status === 401) {
    // Incorrect username or password
  }
});
(e.g. invalid username or password)
Signing In
↓ Scroll down
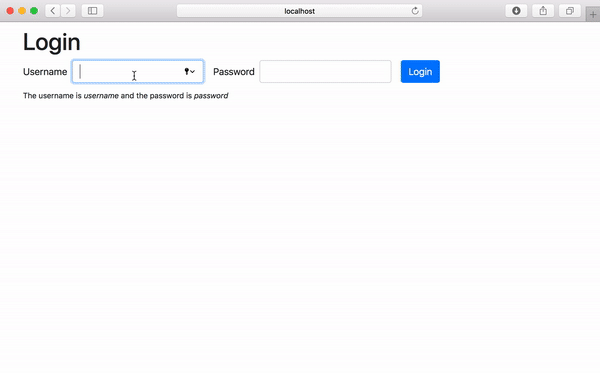
function Login(props) {
  const [username, setUsername] = useState("");
  const [password, setPassword] = useState("");
  const [errorMessage, setErrorMessage] = useState("");

  // When a user is logged in, a token is stored in state here.
  const [token, setToken] = useState("");

  const login = async (e) => {
    e.preventDefault();
    try {
      const response = await axios("http://localhost:7000/api/login", {
        method: "POST",
        headers: {
          "Content-Type": "application/json",
        },
        data: {
          username: username,
          password: password,
        },
      });
      // I'm telling React the user is logged in by store the token in state.
      setToken(response.data.token);
    } catch (error) {
      console.error(error);
      // If the response returns an HTTP status of 401 when loggin in,
      // this means that username or password is incorrect.
      if (error.response && error.response.status === 401) {
        setErrorMessage("Invalid username or password");
      } else setErrorMessage("We are sorry, unexpected error occurred.");
    }
  };

  return <form onSubmit={login}>
    {/* Username and password <input> ... */}
  </form>
}
Getting Protected Content
content that the user must be logged in order to see
Client
(You)
Server
(Website / App)
JWT token
HTTP status code 401
Data
axios.request({
  method: "GET",
  url: "http://localhost:7000/api/movies",
  headers: {
    Authorization: `Bearer eyJhbGciOiJI...`,
  })
  .then((response) => console.log(response))
  .catch((error) => {
    console.error(error);
    if (error.response && error.response.status === 401) {
      // There is some problem with your authentication.
    }
  });
});
(e.g. expired or invalid JWT token)
Getting Protected Content
content that the user must be logged in order to see
↓ Scroll down
function ProtectedContent({ token }) {
  const [users, setUsers] = useState([]);

  const getUsers = async () => {
    try {
      // The API should not give you back any users unless you are logged in.
      // To prove that you are logged in, you must pass the token in the API.
      const response = await axios("http://localhost:7000/api/users", {
        method: "GET",
        headers: {
          // Passing to the token to the API here, where it is a header.
          // The name of the header is "Authorization" and the value is "Bear mytoken".
          Authorization: `Bearer ${token}`,
        },
      });
      setUsers(response.data.data);
    } catch (error) {
      console.error(error);
      // Handle error
    }
  };

  useEffect(() => {
    getUsers();
  }, []);

  return // Display content
}function ProtectedContent({ setToken }) {
// We a logout a user by clearing the token in memory.
const logout = () => {
setToken("");
};
return (
<div>
<h1=>You are logged in!</h1>
<button type="button" onClick={logout}>
Logout
</button>
{/* ... */}
</div>
);
}
Signing Out
clear the JWT token from memory
Protected or Secure Routes
routes that the user should not be able to navigate to unless they are signed in
import { useState } from "react";
import { Switch, Route, Redirect } from "react-router-dom";
import ProtectedRoute from "./ProtectedRoute";
import Login from "./views/Login";
import LoggedIn from "./views/LoggedIn";

function App() {
  const [isLoggedIn, setIsLoggedIn] = useState();
  return (
    <Switch>
      <Route exact path="/login" component={Login} />
      <ProtectedRoute exact path="/logged-in" isLoggedIn={isLoggedIn}>
        <LoggedIn setIsLoggedIn={setIsLoggedIn} />
      </ProtectedRoute>
    </Switch>
  );
}

export default App;
import { Route, Redirect } from "react-router-dom";

// This will redirect the user to the login form if they haven't logged in.
function ProtectedRoute({ children, isLoggedIn, ...restOfProps }) {
  return isLoggedIn ? (
    // If the user is logged in, return the child component
    <Route {...restOfProps}>{children}</Route>
  ) : (
    // If the user isn't logged in, redirect to the login form
    <Redirect to="/login" />
  );
}

export default ProtectedRoute;
Click to Toggle
Note that protected routes by themselves does not prevent a user from accessing content that they must be logged in to see. Attackers can use their browser's Dev Tools to get around protected routes. This is why your application should access or modify protected content through APIs that are secured with an access token or some other kind of authorization.
In the use cases where:
-
the user refreshes the page
-
the user opens a new tab
-
the user types a new URL into the address bar
React's state is forgotten. This means that the JWT token is erased and the user will have to login again.
Local Storage
key and value pairs that are stored as in the browser and persists after the user leaves or refreshes a webpage
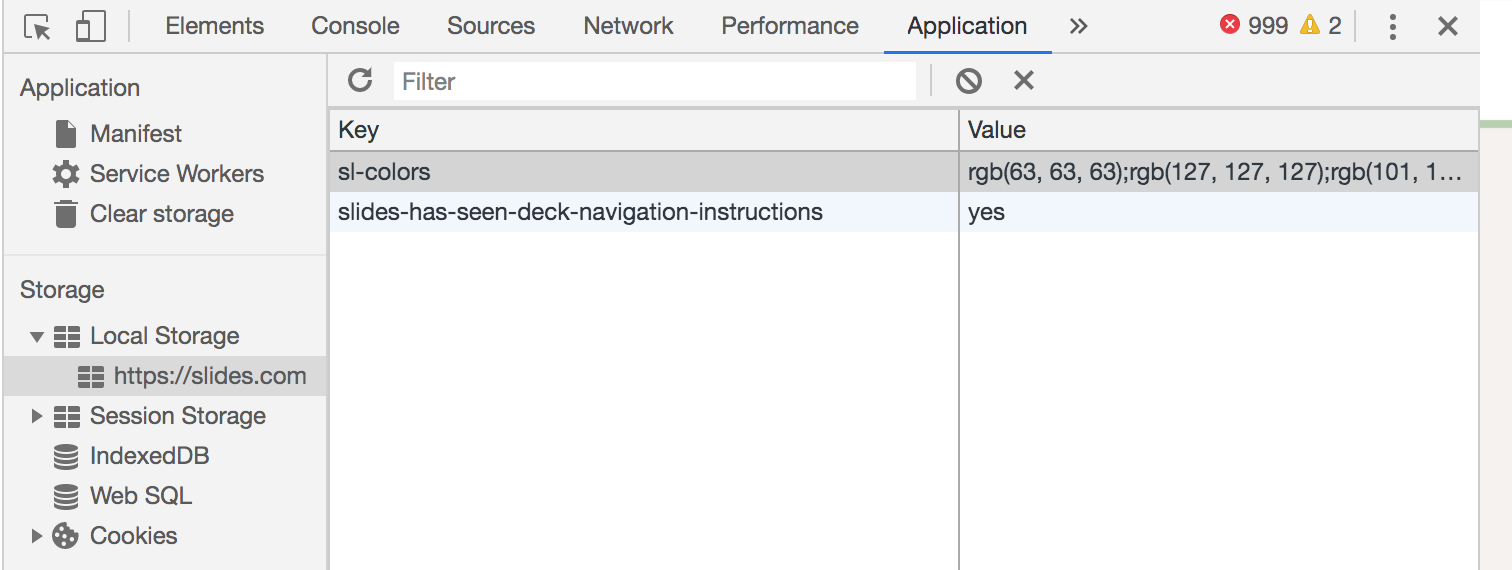
To view, edit or delete local storage, open your Dev Tools

command+option+i

ctrl+shift+i
Store a value in localStorage
localStorage.setItem("myCat", "Patches");Get a value in localStorage
const myCat = localStorage.getItem("myCat");
// Patches
Remove a value from localStorage
localStorage.removeItem("myCat");Security and other problems with our authentication approach so far:
- Tokens stored in localStorage are prone to Cross Site Scripting (XSS) attacks
- Access tokens should expire after a short period of (no more than 24 hours) and we should handle the UX seamlessly when they expire
- We need to handle additional use cases like when users forget their passwords
- We may need to introduce security measures like Multi-Factor Authentication (MFA) and email confirmation to our application
- If our application gets hacked, we are 100% liable
Building a secure and complete authentication process takes a lot of security knowledge and resources.
Authentication and authorization is always on the
OWASP Top 10
An Identity Platform


Brings user accounts
from several different
sources together
in one place
Benefits of an Identity Plaform like Okta
-
Single Sign On (SSO) - customers or employees can login with a single account
- Social Login - customers can login with their social media accounts
- Enterprise Directory - employees can login with the enterprise user accounts like Active Directory or LDAP
-
Security
- Authorization and Authentication - quickly follow and stay up-to-date security best practices
- Multi-Factor Authentication (MFA) - easily add MFA to to your application
How the Okta Signin Widget works inside of your React application
/login
/login/callback
LoginCallback component from Okta
Embeded Signin Form from Okta
Your Login Component
Your site's main content
Checks to see if the username and password is valid and generates an access token
Stores token in local storage
Charting Your Future
Post-Class Roadmap

Technical Skill Roadmaps
Practice
Websites like
Aim for at least one problem a day.
-
What It Offers: A broad spectrum of challenges from basic to advanced levels, emphasizing algorithms and data structures.
-
Community & Forums: Active discussion forums for sharing solutions and learning from peers.
-
Progress Tracking: Track your daily progress and improvement over time.
LeetCode,
Daily Javascript Coding Challenges
HackerRank,
- What It Offers: Diverse challenges that cater to various aspects of programming, including domain-specific problems.
- Real-World Relevance: Challenges that simulate real-world scenarios, helping to prepare for technical job interviews.
- What It Offers: Unique, timed coding challenges that test both your problem-solving skills and coding speed.
- Languages & Technologies: Supports multiple programming languages, allowing you to practice in your preferred language.
CodeSignal.

Websites like CSSBattle, 100 Days CSS Challenge, or Daily CSS Images offer daily or regular challenges that focus specifically on CSS.
Daily CSS Challenges

Recreate Design Mocks


Focus on creating responsive layouts. Use media queries and flexible grids to ensure your designs work on various screen sizes.
Recreate Design Practice

Contribute to
Open Source
Enhances Technical Skills: Develops and showcases your coding and problem-solving abilities in real-world scenarios.
Builds a Strong Portfolio: Contributions to open source projects serve as practical evidence of your coding and project management skills.
Expands Professional Network: Connects you with a community of developers and industry professionals, opening doors to job opportunities and collaborations.
Improves Collaboration Skills: Offers experience in working with teams, understanding diverse perspectives, and using tools like Git.
Demonstrates Initiative and Passion: Shows potential employers your proactive nature and genuine interest in technology and software development.
Gives Real-World Experience: Provides a practical understanding of software development processes, including coding standards and project lifecycles.
A curated list of awesome beginner-friendly open source projects across various languages.
For beginners looking for a wide range of options to start their open source journey.

A dependency-free JavaScript ES6 slider and carousel.
For front-end developers interested in creating interactive, responsive web elements.
A JSON Schema based editor that generates HTML forms.
Full support for JSON Schema versions 3 and 4, integration with popular CSS frameworks like Bootstrap, Spectre, Tailwind.
For developers looking to work with JSON and form interfaces.
Networking
Expand Professional Connections: Networking introduces you to professionals in your field, widening your circle of contacts and potential opportunities.
Gain Industry Insights: Regular interaction with peers and experts provides valuable insights into industry trends and best practices.
Enhance Visibility: Being active in professional circles increases your visibility and presence in the industry.
Attend Meetups and Tech Conferences
Use platforms like Meetup.com to find local events. Volunteer or attend to learn and meet people in the industry.
Join Online Communities
Participate in forums like Stack Overflow, Reddit’s r/JavaScript. Engage in discussions and offer help to others.
Social Media Presence
Find a Mentor
Reach out to experienced professionals for guidance. Engage with mentors through platforms like Codementor or LinkedIn.
Pros of Not Working in Isolation:
Creating a YouTube Channel

Enhanced Understanding and Retention: Teaching or explaining concepts to others can deepen your understanding of the subject. When you create content to explain what you've learned, it reinforces your knowledge.
Building an Online Presence: Regularly posting educational content can establish you as a thought leader in your field. This online presence can open up networking opportunities and potential collaborations.
Community Building: YouTube allows you to connect with viewers who are interested in similar topics. This community can provide support, feedback, and motivation, creating a learning environment that extends beyond individual study.
Monetization and Career Opportunities: As your channel grows, it can open avenues for monetization through ads, sponsorships, and partnerships. It can also catch the attention of employers or clients who value your expertise and teaching ability.

Pros of Not Working in Isolation:
Creating a Blog
Enhanced Clarity and Retention: Writing about what you've learned helps solidify your understanding. Articulating complex concepts in your own words can deepen your comprehension.
Building a Personal Brand: Regular blogging establishes you as a knowledgeable individual in your area of interest. This can be valuable for professional recognition and building an online presence.
Portfolio for Job Opportunities: A well-maintained blog can serve as a dynamic portfolio showcasing your skills, thought process, and expertise to potential employers or clients.
Networking Opportunities: Blogging can connect you with like-minded individuals, industry experts, and potential mentors, expanding your professional network.
Improving Writing and Communication Skills: Regular writing enhances your ability to communicate ideas clearly and effectively, a valuable skill in any profession.
Volunteering
Skill Development: Enhances both soft and technical skills through practical experiences.
Networking Opportunities: Connects you with people from various backgrounds, expanding your professional and personal network.
Career Exploration: Offers a chance to explore different fields and roles, which can be valuable for career decision-making.
Enhance Your Resume: Volunteering experiences can strengthen your resume, showing commitment and diverse skills to potential employers.
Personal Fulfillment: Provides a sense of achievement and personal satisfaction from contributing to the community or a cause.
This platform is a great place to find a variety of volunteer opportunities that match your interests and skills. It connects people with causes and organizations that need help.

United Way offers a range of volunteer opportunities globally, focusing on various issues and causes. It's a good platform for those looking to make a real change in their communities.
Idealist is a comprehensive resource for finding volunteer positions in numerous fields and issues, ranging from education to environmental conservation. It's a good site for those looking to find a cause that resonates with them.
Client SideWeb Applications
By Jamal Taylor


