Let's play with hardware
Julio César Rodríguez
(@_Jurasec)
¿A cuántos de ustedes les gusta los robots?
¿Cuántos de ustedes han programado un robot?
Programar robots con Javascript.
(Atwood's Law)
“any application that can be written in JavaScript, will eventually be written in JavaScript.”
NodeBots = Node + Hardware
Stack
Chris Williams(@voodootikigod)
Hello World!

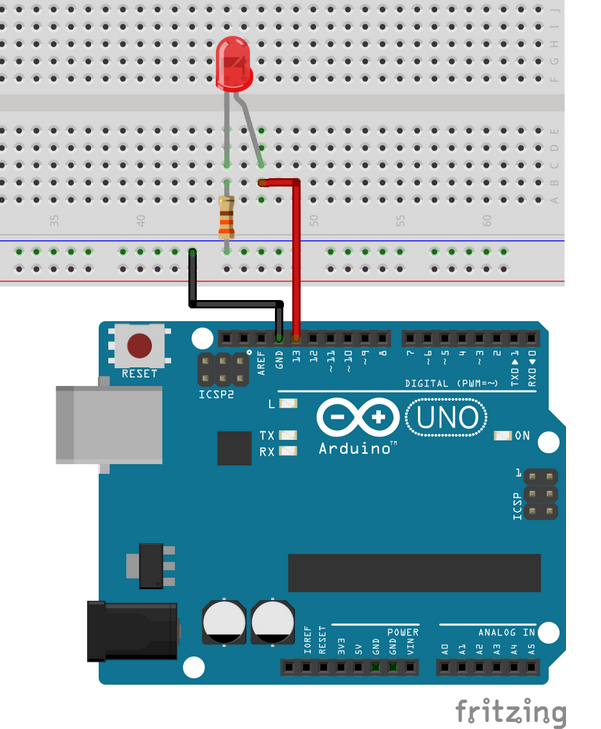
Led
Blinking led (Programado en C)
 /*
  Blink
  Turns on an LED on for one second, then off for one second, repeatedly.

  This example code is in the public domain. http://arduino.cc/en/tutorial/blink
 */

// Pin 13 has an LED connected on most Arduino boards.
// give it a name:
int led = 13;

// the setup routine runs once when you press reset:
void setup() {
  pinMode(led, OUTPUT);      // initialize the digital pin as an output.
}

// the loop routine runs over and over again forever:
void loop() {
  digitalWrite(led, HIGH);   // turn the LED on (HIGH is the voltage level)
  delay(1000);               // wait for a second
  digitalWrite(led, LOW);    // turn the LED off by making the voltage LOW
  delay(1000);               // wait for a sec
Estilo Johnny-Five
var five = require("johnny-five"),
    board = new five.Board();

board.on("ready", function() {
  (new five.Led(13)).strobe();   // Create an Led on pin 13 and strobe it on/off

});
Comparación jQuery <=> Node
jQuery
$( document ).ready(function() {
    console.log( "ready!" );
});
Node
var five = require("johnny-five"),
    board = new five.Board();

board.on("ready", function() {
  console.log( "ready!" );
});
Laser.

Laser código
var five = require("johnny-five"),
    board = new five.Board(),
    laserDiode;

board.on("ready", function() {
  laserDiode = new five.Led({
    pin: 9
  });

  // Hacemos que este disponible el objeto "laserDiodo" dentro del REPL
  this.repl.inject({
      laser: laserDiode
  });

  laser.on()
  // Dentro del REPL, puedes probar el PWM con: laser.pulse()
});
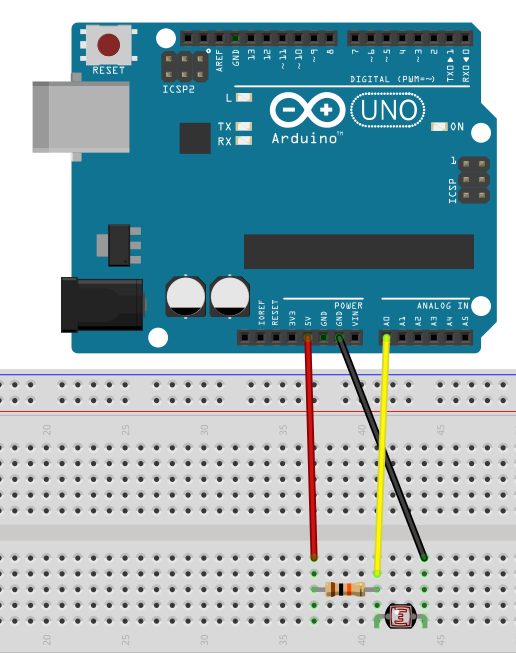
Photoresistor

Photoresistor código
var five = require("johnny-five"), board = new five.Board(),photoresistor;board.on("ready", function() { // Creamos una instancia de Sensor, indicándole que lea con una frecuencia de 100 milisegundos. photoresistor = new five.Sensor({ pin: "A2", freq: 100 }); photoresistor.on("data", function() { console.log(this.value); }); });
Laser - Photoresistor (Detector de intrusos)
var five = require("johnny-five"),
    board = new five.Board(),
    laserDiode;

board.on("ready", function() {

  laserDiode = new five.Led({
    pin: 9
  });

  // Hacemos que este disponible el objeto "laserDiode" dentro del REPL
  this.repl.inject({
      laser: laserDiode
  });

  // Creamos una instancia de Sensor, indicándole que lea con una frecuencia de 100 milisegundos.
  photoresistor = new five.Sensor({
    pin: "A2",
    freq: 100
  });
  laserDiode.on()

  photoresistor.on("data", function() {
    console.log(this.value);
    if( this.value > 100){
      console.log('_________uu$$$$$$$$$$$$$$$$$uu__________');
      console.log('_________u$$$$$$$$$$$$$$$$$$$$$u_________');
      console.log('________u$$$$$$$$$$$$$$$$$$$$$$$u________');
      console.log('_______u$$$$$$$$$$$$$$$$$$$$$$$$$u_______');
      console.log('_______u$$$$$$$$$$$$$$$$$$$$$$$$$u_______');
      console.log('_______u$$$$$$”___”$$$”___”$$$$$$u________');
      console.log('_______”$$$$”______u$u_______$$$$”________');
      console.log('________$$$———u$u_______u$$$________');
      console.log('________$$$u______u$$$u______u$$$________');
      console.log('_________”$$$$uu$$$___$$$uu$$$$”_________');
      console.log('__________”$$$$$$$”___”$$$$$$$”__________');
      console.log('____________u$$$$$$$u$$$$$$$u____________');
      console.log('_____________u$”$”$”$”$”$”$u______________');
      console.log('__uuu________$$u$_$_$_$_$u$$_______uuu__');
      console.log('_u$$$$________$$$$$u$u$u$$$_______u$$$$_');
      console.log('__$$$$$uu______”$$$$$$$$$”_____uu$$$$$$__');
      console.log('u$$$$$$$$$$$uu____”””””____uuuu$$$$$$$$$$');
      console.log('$$$$”””$$$$$$$$$$uuu___uu$$$$$$$$$”””$$$”');
      console.log('_”””______””$$$$$$$$$$$uu_””$”””___________');
      console.log('___________uuuu_””$$$$$$$$$$uuu___________');
      console.log('__u$$$uuu$$$$$$$$$uu_””$$$$$$$$$$$uuu$$$__');
      console.log('__$$$$$$$$$$””””___________””$$$$$$$$$$$”__');
      console.log('___”$$$$$”______________________””$$$$””__');
    }
  });

  console.log( 'LD ready!' );

});
Ok me interesa, pero ¿Cómo inicio?
- Download Arduino IDE (http://arduino.cc/en/main/software)
- Plug in your Arduino or Arduino compatible microcontroller via USB
- Open the Arduino IDE, select: File > Examples > Firmata > StandardFirmata
- Click the "Upload" button.
npm install johnny-fivehttps://github.com/rwaldron/johnny-five
http://www.geekytime.net/arduino/como-iniciar-con-arduino-y-johnny-five/
Recursos
https://github.com/rwaldron/johnny-five
https://github.com/voodootikigod/node-serialport
http://voodootikigod.com/nodebots-the-rise-of-js-robotics/
http://nodebots.io/
http://www.geekytime.net/arduino/
Otras librerías/frameworks
http://artoo.io/ => Ruby
http://cylonjs.com/ => Javascript
http://gobot.io/ => Go
Happy Hacking!

@_Jurasec
NodeBots
By Julio César
NodeBots
- 1,766


