Firefox Nightly Foxfooding

#KelasMozilla
- #MozCampaign
Intro + Rules

| Sections |
| Requirements |
| Text recognition in images | Desktop - macOS 10.15+ |
| First Run Onboarding - New Users | Desktop |
| First-Run-Onboarding - Existing Users | Desktop |
| Desktop Onboarding Callout | Desktop |
TEST SECTIONS
|
|
BEFORE YOU TESTING
Bug Report Demo
Feedback
Bug Tracking System
Section 01
Text recognition in images
what is Text recognition in images?
The user can extract text from an image on a website and copy that text for usual text-based functions.
Step 1 of 7
-
Navigate to the about:config page and verify the following preference is set: dom.text-recognition.enabled set to true
-
Restart the browser and search for an image that contains text.
-
Right-click on the image and click the Copy Text From Image button.
-
Verify that the following modal is displayed on the page. After the text from the image is recognized, the text is displayed and automatically copied on the clipboard.
Step 2 of 7
-
Verify that the text is copied by pasting your clipboard in the search bar or other text field.
Step 3 of 7
-
Verify that images with many lines of text are successfully copied.
Step 4 of 7
-
Verify that the text can be copied from different image types. (.jpeg, .png, .webp)
Step 5 of 7
-
Verify that images containing different fonts and sizes are recognized and copied.
Step 6 of 7
-
Verify that you can highlight a selection of the presented text and copy and paste that excerpt (Ctrl + C or V).
Step 7 of 7
Section 02
First Run Onboarding - New User
Step 1 of 11
[Prerequisites: Make Firefox Release (or another browser) your default browser and unpin Firefox Nightly from taskbar on Windows/uncheck Keep in Dock option on macOS.]
1. Update to the latest Nightly version.
2. Navigate to the about:welcome page and verify that the new onboarding is displayed.
Click the Pin Nightly to taskbar/Keep in Dock button and verify that the icon is pinned to the taskbar/dock.
- NOTE: Linux users do not have the “Pin to taskbar/dock” option.
The “Unpin from taskbar/Options – Keep in Dock” option is displayed when right-clicking the Firefox Icon from the taskbar/Dock.
Step 2 of 11
-
Click the Set Nightly as default browser button and verify that the Settings Default apps window is opened on Windows. Clicking the Web browser option opens the list of available browsers and Firefox Nightly can be selected.
- On macOS the following pop-up window appears. Clicking the Use “Firefox Nightly” button sets the browser as the new default.
Step 3 of 11
- Verify that the next slide is displayed.
Step 4 of 11

- Click the Import from previous browser button and verify that the import wizard is displayed.
Step 5 of 11

- Follow the on-screen instructions to import your bookmarks, history, passwords and other data from a secondary browser. The next slide is displayed.
Step 6 of 11

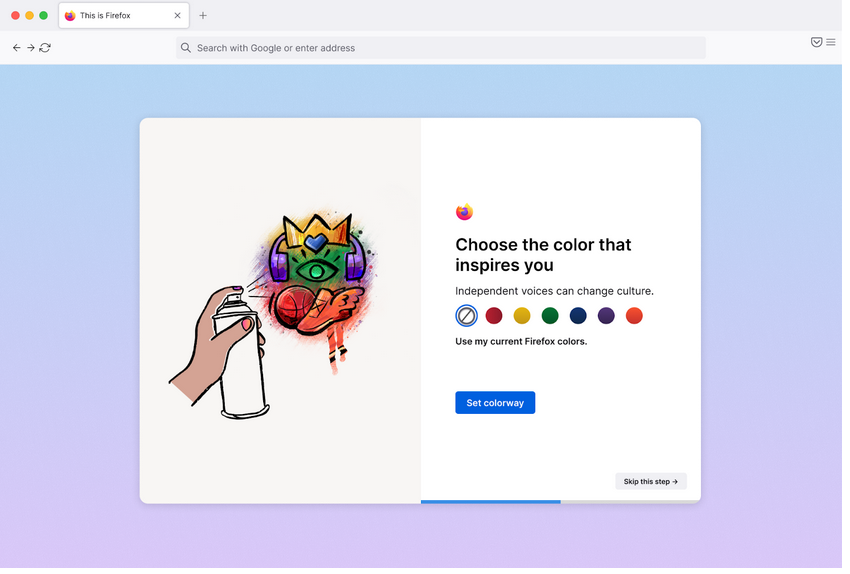
- Verify that the preview for each theme is correctly applied and click the Set colorway button. Verify that the chosen theme remains set and that the next slide is displayed.
Step 7 of 11

-
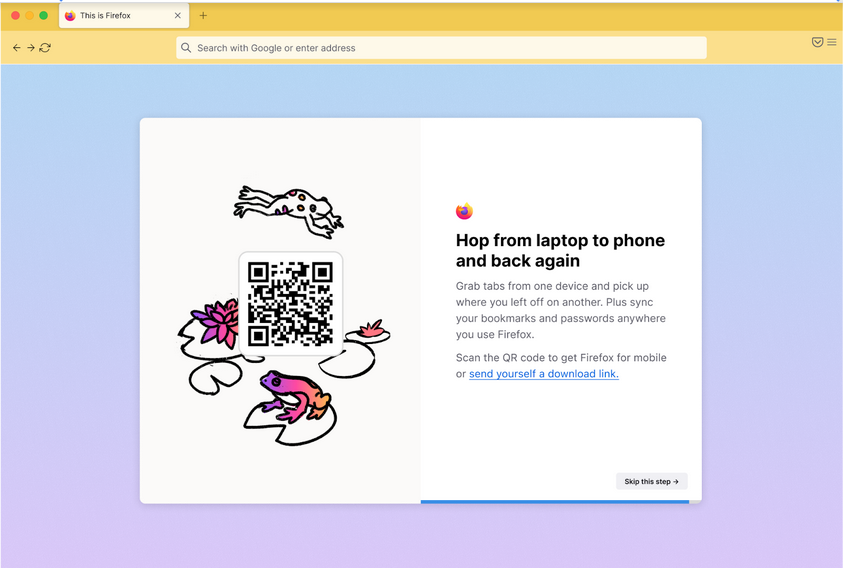
Verify that the QR code can be scanned and that it redirects to the Play Store/App Store depending on your device.
-
Click the send yourself a download link button and verify that a Mozilla page is opened in a new background tab with the option to send yourself a link to the Play/App Store.
- Click the Skip this step button and observe the final slide.
Step 8 of 11
- Click the See what’s new button and verify that the Firefox View page is opened in its pinned place before all other tabs and focused.
NOTE: You can navigate to the about:welcome page again to go through the onboarding process again.
Step 9 of 11
Verify that the Intro – Pin Nightly to taskbar/Keep Nightly in Dock slide is not displayed if Firefox Nightly is already pinned, but not set to default. Instead, you should see an Intro – Set to default slide.
Step 10 of 11
-
Verify that the Intro – Set Nightly as default browser slide is not displayed if Firefox Nightly is already set as your default web browser. Instead, you should see Intro – Set up in seconds slide.
- Verify that the Skip this step buttons work as expected and that the next slides are displayed.
Step 11 of 11
Section 03
First Run Onboarding - Existing User
Note: The following steps require the use of a code snippet in the browser console to trigger the Existing users onboarding cards.
Step 1 of 12
- Prerequisites: Make Firefox Release (or another browser) your default browser and unpin Firefox Nightly from taskbar on Windows/uncheck Keep in Dock option on macOS.
- Navigate to the about:config page and set the following preference:
-
devtools.chrome.enabled set to true
-
devtools.chrome.enabled set to true
- Copy the following code snippet to the clipboard:
Cc[“@mozilla.org/browser/browserglue;1”].getService().wrappedJSObject._showUpgradeDialog();
- Open the browser console (Ctrl/Cmd+Shift+J), paste the string and press the “Enter” key. The Onboarding will be displayed over your active tab.
Step 2 of 12
-
Click the Pin Nightly to taskbar/Keep in Dock button and verify that the icon is pinned to the taskbar/dock.
-
NOTE: Linux users do not have the “Pin to taskbar/dock” option.
-
NOTE: Linux users do not have the “Pin to taskbar/dock” option.
-
[Windows 7+ only] Click Pin Nightly to taskbar and check Also pin Nightly private browsing checkbox and verify that both regular Nightly ad Private Browsing Window shortcuts are pinned to the taskbar.
- Click the Skip this step button and observe the next slide.
- The “Unpin from taskbar/Options – Keep in Dock” option is displayed when right-clicking the Firefox Icon from the taskbar/Dock.
Step 3 of 12
-
Click the Set Nightly as default browser button and verify that the Settings Default apps window is opened on Windows. Clicking the Web browser option opens the list of available browsers and Firefox Nightly can be selected.
- On macOS the following pop-up window appears. Clicking the Use “Firefox Nightly” button sets the browser as the new default.
- Verify that the next slide is displayed.
Step 4 of 12

- Click the Import from previous browser button and verify that the import wizard is displayed.
Step 5 of 12

- Follow the on-screen instructions to import your bookmarks, history, passwords and other data from a secondary browser. The next slide is displayed.
Step 6 of 12

-
If before you started the onboarding you had an active theme from an already expired Colorways collection (Turning red colorways, Cheese Puff, etc), verify that it’s preserved if you click Skip this step button.
- Verify that the preview for each theme is correctly applied and click the Set colorway button. Verify that the chosen theme remains set and that the next slide is displayed.
Step 7 of 12
-
Verify that the QR code can be scanned and that it redirects to the Play Store/App Store depending on your device.
-
Click the send yourself a download link button and verify that a Mozilla page is opened in a new background tab with the option to send yourself a link to the Play/App Store.
- Click the Skip this step button and observe the final slide.
Step 8 of 12
- Click the Pin Firefox private browsing to taskbar and verify that the Private Browsing Window shortcut is pinned to the taskbar.
- Click the Skip this step button and observe the next slide.
NOTE: This spotlight is displayed only on Windows 7+ OS if the browser has already been pinned to the taskbar prior to the beginning of onboarding.
Step 9 of 12
- Click the See what’s new button and verify that the Firefox View page is opened and focused.
Note: You can focus the browser console and paste the:
Cc[“@mozilla.org/browser/browserglue;1”].getService().wrappedJSObject._showUpgradeDialog();
string to go through the onboarding process again. If you do:
Step 10 of 12
- Verify that the Intro – Pin Nightly to taskbar/Keep Nightly in Dock slide is not displayed if Firefox Nightly is already pinned, but not set to default. Instead, you should see an Intro – Set to default slide.
Step 11 of 12
-
Verify that either Intro – Set Nightly as default browser or Keep Nightly in Dock slides are not displayed if Firefox Nightly is already set as your default web browser and kept in Dock.
-
Instead, you should see Intro – Set up in seconds slide.
- Verify that the Skip this step buttons work as expected and that the next slides are displayed.
Step 12 of 12
Section 04
Desktop Onboarding Callout
Step 1 of 4
- Navigate to the “about:config” page, search for the browser.firefox-view.feature-tour preference and set it to the following value:
{“message”:”FIREFOX_VIEW_FEATURE_TOUR”,”screen”:”FEATURE_CALLOUT_1″,”complete”:false}
- Navigate to the about:firefoxview page or click the Firefox view icon from the top left-hand side part of the tab area.
- The first callout message should appear on the “Firefox view” page: Hop between devices with tab pickup anchored to the “Tab pickup” section.
Step 2 of 4
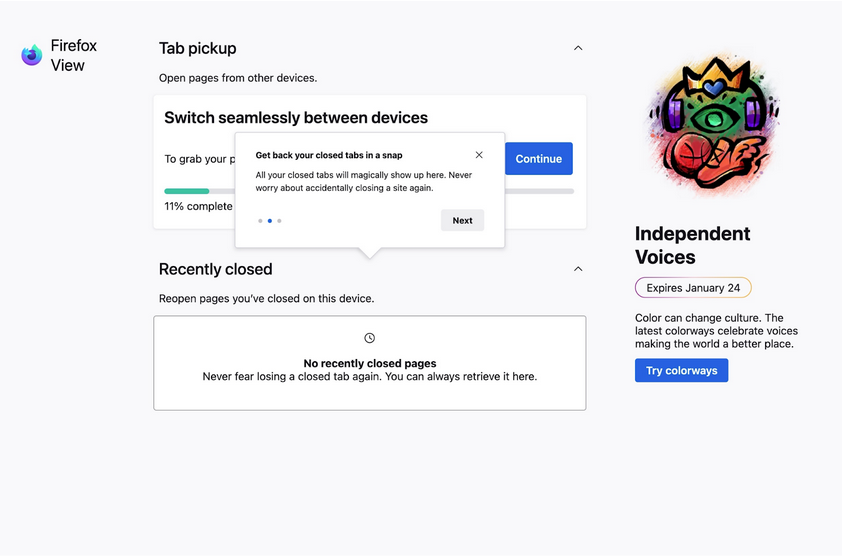
- Click the Next button in order to trigger the next callout message: Get back your closed tabs in a snap anchored to the “Recently Closed” section.

Step 3 of 4
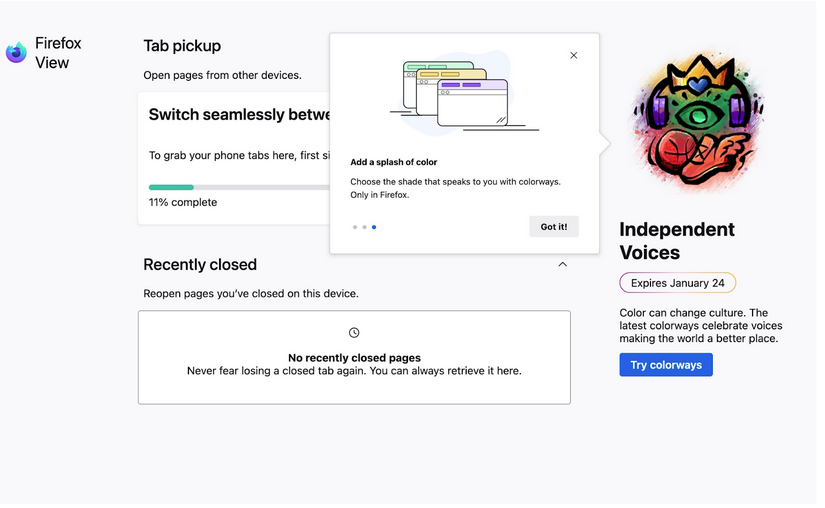
- Click the Next button to trigger the third callout message: Add a splash of color anchored to the “Colorways” section.

Step 4 of 4
- Click the Got it button to end the Firefox view feature tour.
Note:
-
You can navigate again to the “about:config” page, reset the browser.firefox-view.feature-tour pref to the {“message”:”FIREFOX_VIEW_FEATURE_TOUR”,”screen”:”FEATURE_CALLOUT_1″,”complete”:false} value to go through the “Firefox view feature tour” again.
-
By clicking the “X” button from each of the callout messages, the “Firefox view feature tour” will close and the next callout message won’t be displayed.
-
The callout messages cannot be dismissed using the “ESC” key.
-
The callout messages persist if the user is switching tabs or navigating away
Thank You!
Firefox-Nightly-Foxfooding-Sep22
By lidyaa
Firefox-Nightly-Foxfooding-Sep22
- 407


