


lucasw
大佬教麻
Discord 機器人
Full Stack
Discord Bot
Machine Learning
Unity
Competitive Programming
Web Crawler
Server Deployment
Minecraft Datapack
Scratch
PyPI
Discord Application
Hello World!
Slash Command
Option
User
Channel
Guild
Example
Python 軟體儲存庫
一個python官方認可的第三方軟體儲存庫
在安裝python時如果你有加入環境變數
那麼你在終端機可以輸入以下指令來管理你的python套件
pip install <package> 從pypi安裝package
pip uninstall <package> 解除安裝package
pip list 查看已安裝的package
本次教學會使用到discord.py函式庫
請先在終端中輸入以下指令
pip install discordDiscord 應用程式
接著呢點擊右上角的 New Application
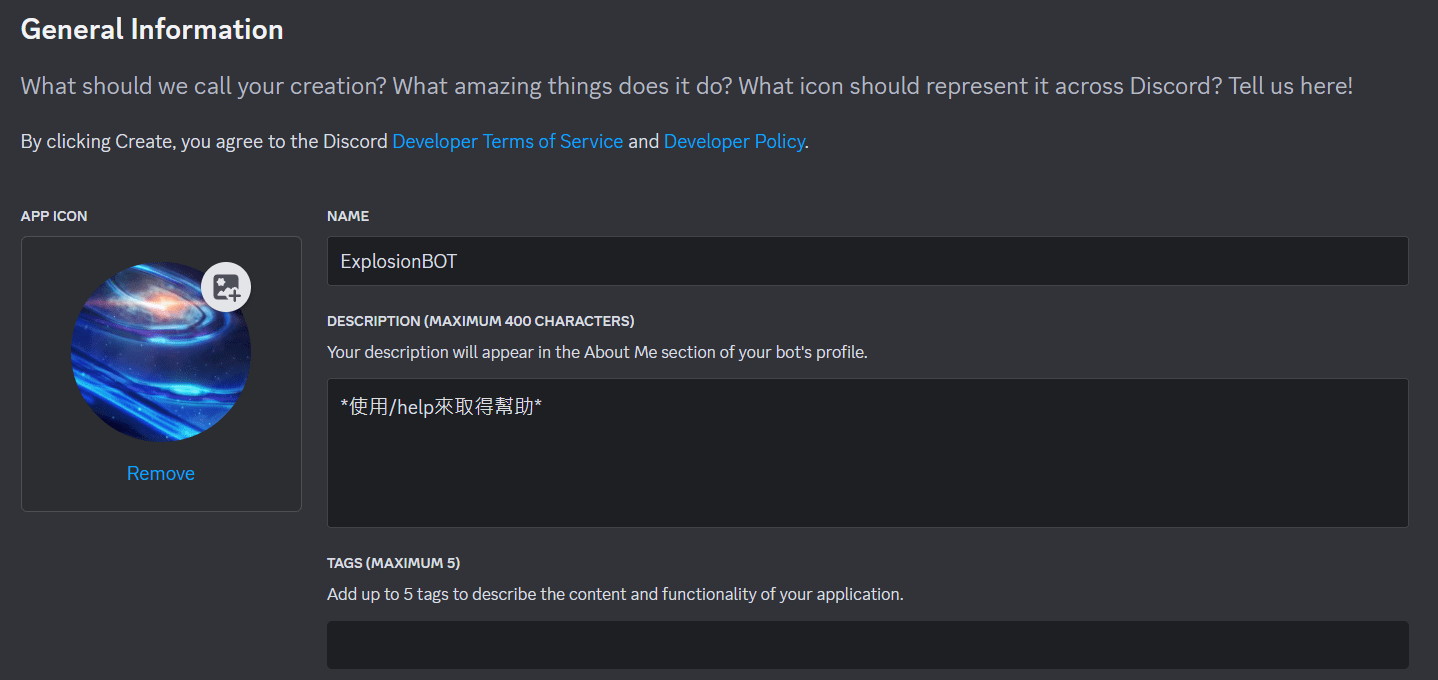
創建成功後可以看到左邊的
General Information
這裡可以設定你的機器人名稱、說明、Tag
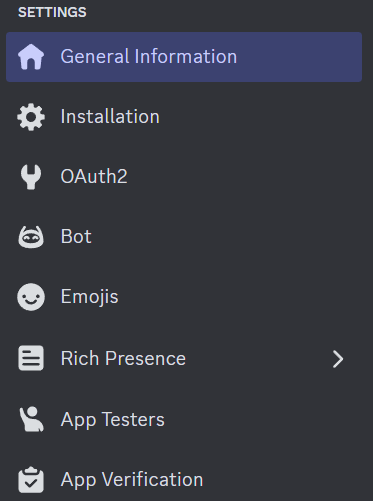
接著我們要啟動他的Bot功能
進入到Bot頁面
選擇Reset Token來獲取Token
這個Token是DC用來判斷是哪台機器人的依據
如果讓別人拿到你的機器人可能會被拿去做壞壞的事情
所以千萬要保管好
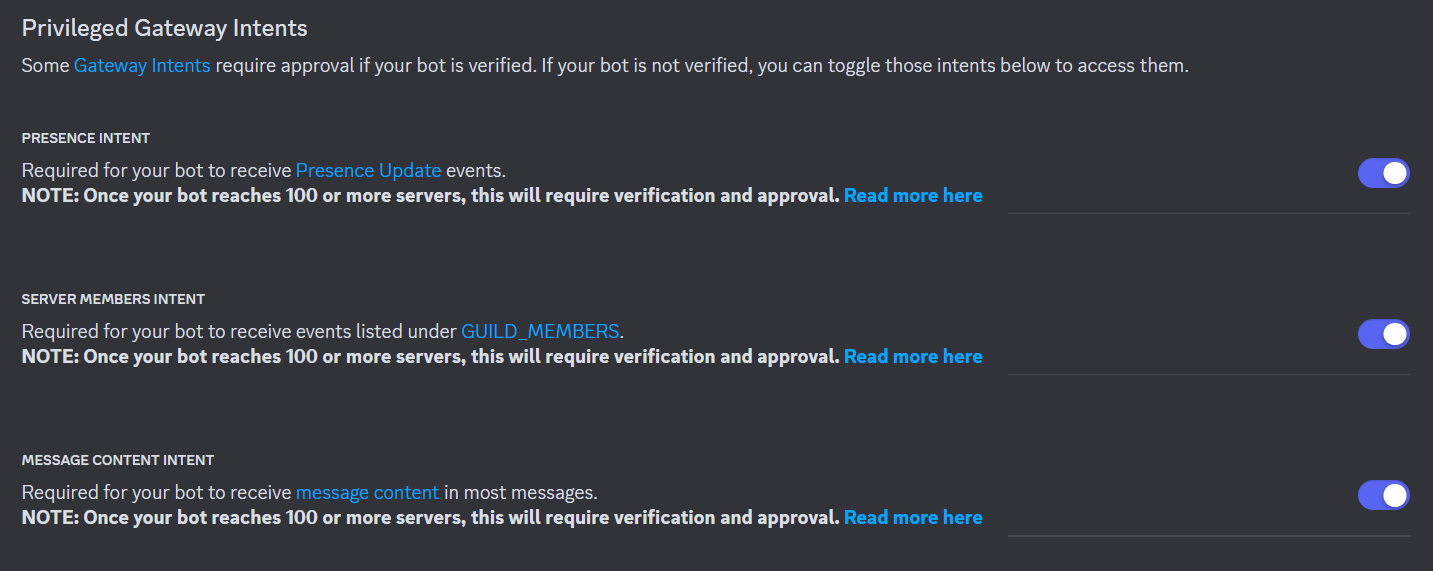
留在Bot頁面
翻到這個地方
把三個選項都打開
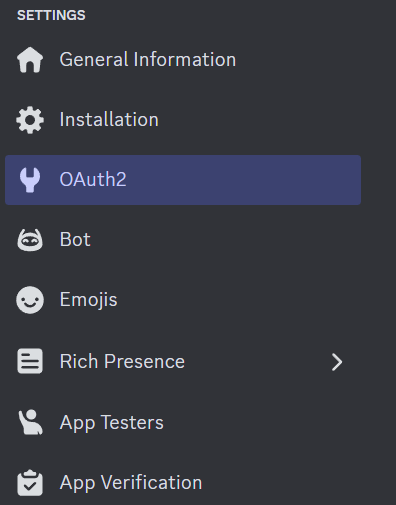
前往OAuth2頁面
在OAuth2 URL Generator選擇
Bot -> Administrator
複製底下連結
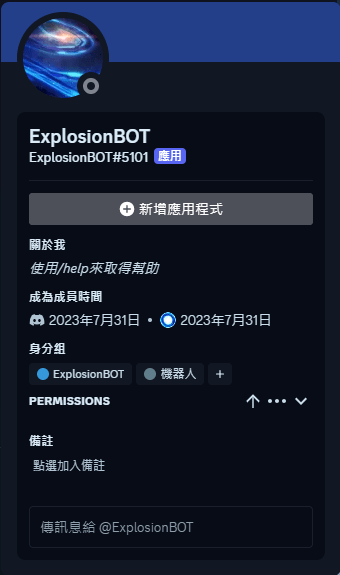
進入連結後你會看到這個頁面
選擇伺服器後打開DC進入伺服器
就可以看到你的機器人了🎉
進入連結後你會看到這個頁面
選擇伺服器後打開DC進入伺服器
就可以看到你的機器人了🎉
你好 世界!
import discord
from discord.ext import commands

bot = commands.Bot(command_prefix="!", intents=discord.Intents.all())

bot.run("TOKEN")
建立一個Python檔案
並且在裡面加入以上內容
※TOKEN要換成自己的Token
import discord
from discord.ext import commands

bot = commands.Bot(command_prefix="!", intents=discord.Intents.all())

bot.run("TOKEN")
簡單來講就是建立一個Bot
指令前綴 = "!"
權限 = 全開
執行檔案
如果成功的話就可以看到你的機器人上線啦
但是現在他什麼也不會做
所以我們要在程式中加上這一段
@bot.event
async def on_ready():
    print(f"{bot.user} logged in!")
如果成功的話會在啟動程式時看到以下內容
我們來解析一下剛剛做了什麼
@bot.event
async def on_ready():
    print(f"{bot.user} logged in!")
我們來解析一下剛剛做了什麼
@bot.event
async def on_ready():
    print(f"{bot.user} logged in!")
先幫程式碼區塊換個顏色
我們來解析一下剛剛做了什麼
@bot.event
async def on_ready():
    print(f"{bot.user} logged in!")
先幫程式碼區塊換個顏色
我們來解析一下剛剛做了什麼
@bot.event
async def on_ready():
    print(f"{bot.user} logged in!")
第一行的@被稱為裝飾器
他相當於往bot.event這個函式放入on_ready()這個函式
discord.py會聰明的偵測函式名稱如果是特殊函式
如 on_ready()、on_message()
就會在特定時間呼叫他
我們來解析一下剛剛做了什麼
@bot.event
async def on_ready():
    print(f"{bot.user} logged in!")
on_ready()函式會在Bot啟動時被呼叫
我們來解析一下剛剛做了什麼
@bot.event
async def on_ready():
    print(f"{bot.user} logged in!")
on_ready()函式會在Bot啟動時被呼叫
而可能有人注意到前面多了個async
這是什麼?
在檔案讀取或是連線時
是不是都會有一段等待讀取的時間
這段時間會導致程式只能進行等待的動作
在檔案讀取或是連線時
是不是都會有一段等待讀取的時間
這段時間會導致程式只能進行等待的動作
而協程會在程式運行的空檔先讓程式去執行別的事情
在async開頭的函式可以使用await
被await呼叫的函式就會是以協程運行
其他與協程相關的內容都在內建函式庫的asyncio之中
簡單做個示範
import asyncio

async def hi(name: str) -> None:
    for _ in range(5):
        print(name, "says hi!")
        await asyncio.sleep(1)

async def main() -> None:
    await asyncio.gather(hi("Alice"), hi("Bob"))

asyncio.run(main())簡單做個示範
import asyncio

async def hi(name: str) -> None:
    for _ in range(5):
        print(name, "says hi!")
        await asyncio.sleep(1)

async def main() -> None:
    await asyncio.gather(hi("Alice"), hi("Bob"))

asyncio.run(main())
可以看到兩個函式互相在對方的空檔執行了
那為什麼Discord.py會用到協程呢?
那為什麼Discord.py會用到協程呢?
Discord.py會與Discord API建立一個Websocket
他能夠讓兩者之間保持連線狀態
以便及時傳送訊息
那為什麼Discord.py會用到協程呢?
Discord.py會與Discord API建立一個Websocket
他能夠讓兩者之間保持連線狀態
以便及時傳送訊息
也就是說他會有大量的連線相關或是需要非阻斷函式的操作
使用協程對整體效能會有偌大的提升
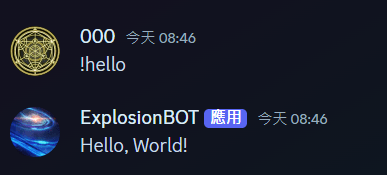
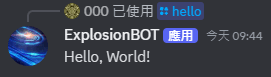
@bot.command(name="hello")
async def hello(ctx: commands.context.Context):
    await ctx.send("Hello, World!")
接著讓我們往檔案裡再加入一串
@bot.command(name="hello")
async def hello(ctx: commands.context.Context):
    await ctx.send("Hello, World!")
接著讓我們往檔案裡再加入一串
經過剛剛的介紹相信大家都看得懂這個大概在幹嘛了
不過還是出現了個新東西
commands.context.ContextContext: 上下文
為所有Discord Command的第一個參數
(DC會給你)
他可以獲取這個對話(使用者打的指令)的資訊
也可以對它的指令做出回應
@bot.command(name="hello")
async def hello(ctx: commands.context.Context):
    await ctx.send("Hello, World!")
而ctx.send()可以傳送訊息到指令輸入的頻道
你只需要在機器人看的到的頻道(或是私訊他)
傳送 前綴 + 指令名稱 (!hello)
你就可以看到機器人傳送Hello World了
而ctx.send()可以傳送訊息到指令輸入的頻道
你只需要在機器人看的到的頻道(或是私訊他)
傳送 前綴 + 指令名稱 (!hello)
你就可以看到機器人傳送Hello World了
import discord
from discord.ext import commands

bot = commands.Bot(command_prefix="!", intents=discord.Intents.all())

@bot.event
async def on_ready():
    print(f"{bot.user} logged in!")

@bot.command(name="hello")
async def hello(ctx: commands.context.Context):
    await ctx.send("Hello, World!")

bot.run("TOKEN")
on_message(msg)可以在偵測到訊息的時候調用
import discord
from discord.ext import commands
bot = commands.Bot(command_prefix="!", intents=discord.Intents.all())
@bot.event
async def on_ready():
print(f"{bot.user} logged in!")
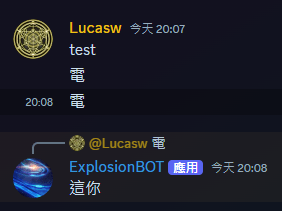
@bot.event
async def on_message(message: discord.Message):
if message.author == bot.user:
return
print(f"{message.author}: {message.content}")
if "電" in message.content:
await message.reply("這你")
bot.run("TOKEN")import discord
from discord.ext import commands
bot = commands.Bot(command_prefix="!", intents=discord.Intents.all())
@bot.event
async def on_ready():
print(f"{bot.user} logged in!")
@bot.event
async def on_message(message: discord.Message):
if message.author == bot.user:
return
print(f"{message.author}: {message.content}")
if "電" in message.content:
await message.reply("這你")
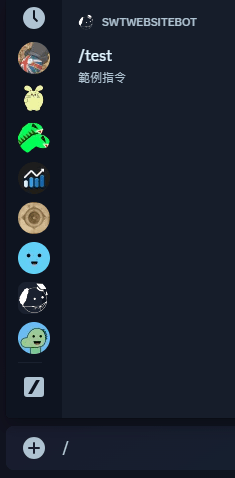
bot.run("TOKEN")斜線指令 / 應用程式指令
你在使用DC時是否曾看過這種指令
能有輸入選項,有說明
而且不用擔心不知道有什麼指令能用
這種俗稱為Slash Command(斜線指令)
在Bot中可以使用@bot.tree.command()來達成
@bot.event
async def on_ready():
    slash_commands = await bot.tree.sync()
    print("\n".join([f"已註冊: {sc.name}"for sc in slash_commands]))
    print(f"{bot.user} logged in!")


@bot.tree.command(name="hello", description="hello world")
async def hello(interaction: discord.Interaction):
    await interaction.response.send_message("Hello, World!")
記得在on_ready的地方加入sync
這樣DC才會知道你打算註冊那些指令進去
@bot.event
async def on_ready():
    slash_commands = await bot.tree.sync()
    print("\n".join([f"已註冊: {sc.name}"for sc in slash_commands]))
    print(f"{bot.user} logged in!")


@bot.tree.command(name="hello", description="hello world")
async def hello(interaction: discord.Interaction):
    await interaction.response.send_message("Hello, World!")
要注意這次不是ctx
而是使用interaction
一個類似的東西,不過語法不太一樣
成功後前往機器人看的到的頻道or私訊
按下斜線便會看到以下畫面
點下去
然後就成功啦
如果沒出現可以嘗試看看換網頁版DC
或是其他瀏覽器
也可以檢查看看機器人打印的訊息有沒有註冊指令
如果沒有可能是網路問題或是code有問題
選項
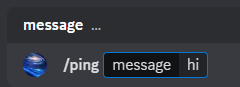
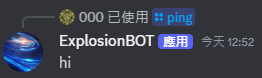
@bot.tree.command(name="ping", description="ping pong")
async def ping(interaction: discord.Interaction, message: str):
    await interaction.response.send_message(message)
來試著幫指令加入選項
在指令的函式後面再加入更多參數
並且用型別註釋標記型別讓discord.py知道
可以看到機器人成功接收輸入的東西
並且從DC打印出來
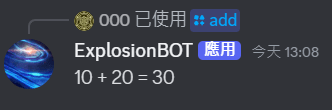
@bot.tree.command(name="add", description="add two numbers")
async def add(interaction: discord.Interaction, number1: int, number2: int):
    await interaction.response.send_message(f"{number1} + {number2} = {number1 + number2}")
當然你也可以接收多個參數或是其他型別的參數
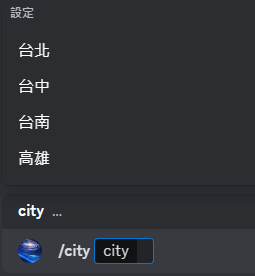
@bot.tree.command(name="city")
async def city(interaction: discord.Interaction, city: Literal["台北", "台中", "台南", "高雄"]):
    await interaction.response.send_message(f"你選擇的城市是: {city}")
也能使用typing函式庫的其他type
像是Literal能夠限縮選項範圍
async def str_autocomplete(interaction: discord.Interaction, cur: str):
string: str = interaction.data["options"][0]["value"]
return [discord.app_commands.Choice(name=word, value=index+1)
for index, word in enumerate(string)]
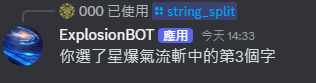
@bot.tree.command(name="string_split")
@discord.app_commands.autocomplete(word=str_autocomplete)
async def string_split(interaction: discord.Interaction, string: str, word: int):
await interaction.response.send_message(f"你選了{string}中的第{word}個字")甚至可以使用autocomplete去達到更多功能
範例中調用了string中使用者輸入的值
並且讓他成為word的選項
而word參數的接收值為該字元的位置
async def str_autocomplete(interaction: discord.Interaction, cur: str):
    string: str = interaction.data["options"][0]["value"]
    return [discord.app_commands.Choice(name=word, value=index+1)
            for index, word in enumerate(string)]

@bot.tree.command(name="string_split")
@discord.app_commands.autocomplete(word=str_autocomplete)
async def string_split(interaction: discord.Interaction, string: str, word: int):
    await interaction.response.send_message(f"你選了{string}中的第{word}個字")
autocomplete函式會有2個DC給予的參數
第一個是大家熟悉的interaction
第二個是使用者目前選到的選項名稱
成果如下
使用者
User,顧名思義,就是我們每個使用DC的人
而使用機器人可以幫助我們控制使用者 (?
我們可以指定User物件為輸入
之後對User的不同屬性作抓取
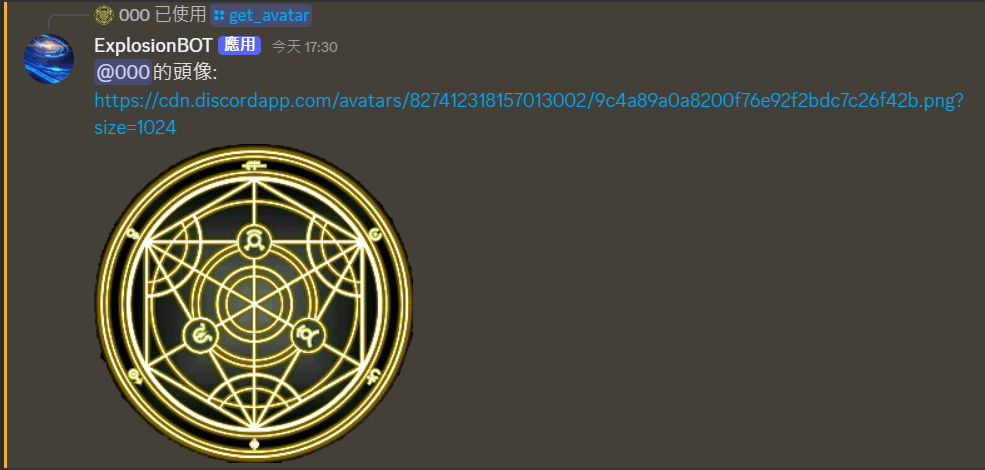
@bot.tree.command(name="get_avatar", description="get someone's avatar")
async def get_avatar(interaction: discord.Interaction, user: discord.User):
    await interaction.response.send_message(f"{user.mention}的頭像: {user.avatar.url}")
你也可以抓更多資料
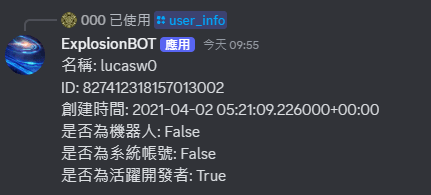
@bot.tree.command(name="user_info", description="get someone's info")
async def user_info(interaction: discord.Interaction, user: discord.User):
await interaction.response.send_message(f"\n".join([
f"名稱: {user.name}",
f"ID: {user.id}",
f"創建時間: {user.created_at}",
f"是否為機器人: {user.bot}",
f"是否為系統帳號: {user.system}",
f"是否為活躍開發者: {user.public_flags.active_developer}",
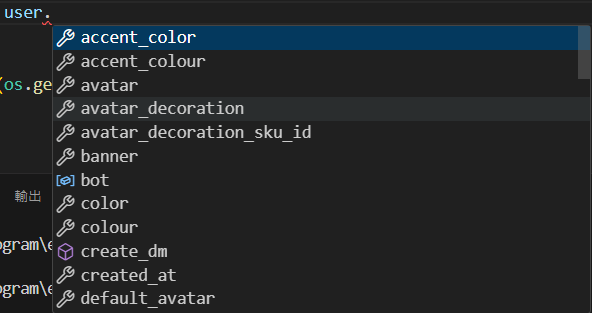
]))當然你還可以抓取更多更多的資料
如果IDE支援的話通常在user後面打個點
他就會跑出各種你可以調用的屬性
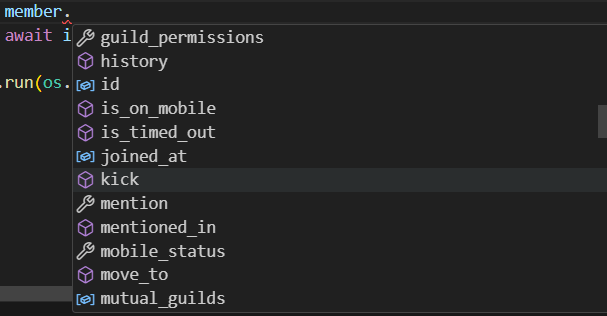
除了獲取資訊以外
也可以對user做出其他操作
只不過通常對使用者的操作是屬於伺服器內操作
所以我們要把對象從User換成Member
※在私訊內獲取的是User 在伺服器內獲取的是Member
所以型別註釋使用Member就不能在私訊使用
獲取身分組
@bot.tree.command(name="role")
async def role(interaction: discord.Interaction, member: discord.Member, role: discord.Role):
    await member.add_roles(role)
    await interaction.response.send_message(f"{member.mention}已獲得{role.mention}身分組")
from datetime import datetime
@bot.tree.command(name="ban")
async def ban(interaction: discord.Interaction, member: discord.Member):
await member.ban()
await interaction.response.send_message(f"我們摯愛的 {member.name},於西元{datetime.now().strftime("%Y年%m月#d號")},轟轟烈烈的死了。我們痛徹心扉,就僅僅一眨眼的時間,天人永隔。 {member.name}掙扎著走完了一段顛簸旅程,它彷彿在沉睡中做了一個美夢,夢醒了,留下陪伴我們成長過程中的點點滴滴,留下我們永恆的追思與感恩。")把你ban不見
一樣更多操作可透過IDE或是閱讀
(User有的屬性Member也都有)
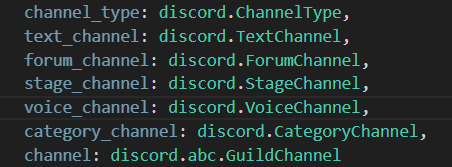
頻道
DC有許多關於頻道的類別
這些都可以使用在指令參數中
讓我們來一一介紹
DC有許多關於頻道的類別
這些都可以使用在指令參數中
讓我們來一一介紹
| TextChannel | 文字頻道,可以傳訊息上去 |
|---|---|
| ForumChannel | 論壇頻道,可以建立不同的貼文 |
| StageChannel | 舞台頻道,可以區別主講者與聽眾的語音頻道 |
| VoiceChannel | 語音頻道,可以進入裡面通話 |
※論壇頻道與舞台頻道為社群伺服器專屬
DC有許多關於頻道的類別
這些都可以使用在指令參數中
讓我們來一一介紹
| ChannelType | 包含各種頻道種類名稱 |
|---|---|
| CategoryChannel | 頻道資料夾 |
| GuildChannel | 包含所有頻道類別,一般使用這個為參數 |
特殊類別
可以設定一個指令都放入參數來試看看選項內容
@bot.tree.command(name="a_lot_of_channel", description="check channel")
async def a_lot_of_channel(interaction: discord.Interaction, text_channel: discord.TextChannel=None, forum_channel: discord.ForumChannel=None, stage_channel: discord.StageChannel=None, voice_channel: discord.VoiceChannel=None, category_channel: discord.CategoryChannel=None, channel: discord.abc.GuildChannel=None):
    await interaction.response.send_message("\n".join([f'頻道{bot.get_channel(int(ch["value"])).name}的id為: {ch["value"]}'for ch in interaction.data["options"]])if "options" in interaction.data else "沒有選項")
然後不要問我為啥這個指令要壓行
@bot.tree.command(name="a_lot_of_channel", description="check channel")
async def a_lot_of_channel(interaction: discord.Interaction,
                text_channel: discord.TextChannel=None,
                forum_channel: discord.ForumChannel=None,
                stage_channel: discord.StageChannel=None,
                voice_channel: discord.VoiceChannel=None,
                category_channel: discord.CategoryChannel=None,
                channel: discord.abc.GuildChannel=None
                ):

    await interaction.response.send_message(
        "\n".join([
            f'頻道{bot.get_channel(int(ch["value"])).name}的id為: {ch["value"]}'
            for ch in interaction.data["options"]
        ])
        if "options" in interaction.data else "沒有選項"
    )
這樣有好讀一點嗎
@bot.tree.command(name="haha")
async def haha(interaction: discord.Interaction):
    data = []
    channels = interaction.guild.channels

    for channel in channels:
        data.append(channel.name)
        await channel.edit(name="???")

    await interaction.response.send_message(data)

    for index, channel in enumerate(channels):
        await channel.edit(name=data[index])

    await interaction.response.send_message("什麼事也沒發生")
當然你也可以玩玩別種操作
你可以從interaction取得頻道、伺服器等等資訊
範例中從回應取得該伺服器所有頻道
全部改名為"???" 再改回去
要注意這個指令可能會吃DC API速率限制
且若是程式中斷可能導致頻道名稱需手動恢復
大概會變這樣
(DC頻道文字名稱不允許特殊字元("?"))
伺服器
DC的伺服器相信大家都知道
想當然我們也可以對他進行操作
伺服器物件的取得可以透過interaction
一樣包含各種屬性可以使用
詳細請見範例
經過那麼多教學現在大家應該已經很熟悉這樣的操作了
@bot.tree.command(name="get_guild_info", description="取得伺服器資訊")
@commands.guild_only()
async def get_guild_info(interaction: discord.Interaction):
    await interaction.response.send_message("\n".join([
        f"伺服器名稱: {interaction.guild.name}",
        f"伺服器擁有者: {interaction.guild.owner.name}",
        f"伺服器人數: {interaction.guild.member_count}",
        f"頻道數: {len(interaction.guild.channels)}",
        f"身分組數: {len(interaction.guild.roles)}"
        ]))
而這裡有點不一樣的是
由於在私訊使用指令沒有伺服器可以抓
因此我們要使用guild_only()來限制只能在伺服器中使用
@bot.tree.command(name="get_guild_info", description="取得伺服器資訊")
@commands.guild_only()
async def get_guild_info(interaction: discord.Interaction):
    await interaction.response.send_message("\n".join([
        f"伺服器名稱: {interaction.guild.name}",
        f"伺服器擁有者: {interaction.guild.owner.name}",
        f"伺服器人數: {interaction.guild.member_count}",
        f"頻道數: {len(interaction.guild.channels)}",
        f"身分組數: {len(interaction.guild.roles)}"
        ]))
@bot.tree.command(name="create_channel", description="創建頻道")
@commands.guild_only()
async def create_channel(interaction: discord.Interaction, name: str, type: Literal["text", "voice", "forum", "stage"]):
if name in [channel.name for channel in interaction.guild.channels]:
await interaction.response.send_message("頻道已存在")
return
await interaction.guild._create_channel(name=name, channel_type=discord.ChannelType[type])
await interaction.response.send_message(f"已創建頻道: {name}")透過伺服器物件可以進行各種有關伺服器的操作
理論上使用者能做到的機器人都能做到
各位可以自己從物件來做出各種操作
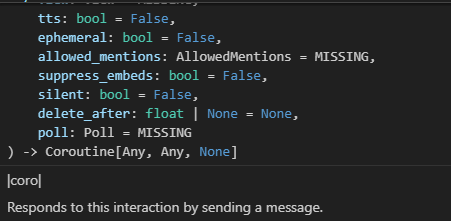
注意大多數的操作都是協程(要加上await)
可以透過查看指令訊息辨別
非協程
協程
回傳值為Coroutine(協程)
且底下會有|coro標記|
學了這麼多東西
我們可以來試著用機器人做點實用功能
我們來做個可以下載指定emoji的指令
有人可能會問autocomplete那串是什麼功能
由於DC選項最高只能給25個
所以我們採用翻頁的方式 每次以當前選取的值為開頭
顯示在那個表符之後的表符
async def emoji_autocomplete(interaction: discord.Interaction, cur: str):
emojis = interaction.guild.emojis
output = [discord.app_commands.Choice(name=e.name, value=str(e.id)) for e in emojis]
if cur not in [e.name for e in emojis]:
return output[:25]
index = [e.name for e in emojis].index(cur)
return output[index:index+25]
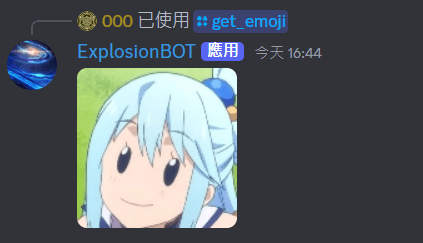
@bot.tree.command(name="get_emoji", description="get emoji image")
@commands.guild_only()
@discord.app_commands.autocomplete(emoji=emoji_autocomplete)
async def get_emoji(interaction: discord.Interaction, emoji: str):
for e in interaction.guild.emojis:
if str(e.id) == emoji:
await interaction.response.send_message(file=await e.to_file())解釋起來有些複雜
slides.com沒付費不能貼影片
大家可以自己執行看看來了解效果
async def emoji_autocomplete(interaction: discord.Interaction, cur: str):
    emojis = interaction.guild.emojis
    output = [discord.app_commands.Choice(name=e.name, value=str(e.id)) for e in emojis]
    if cur not in [e.name for e in emojis]:
        return output[:25]
    index = [e.name for e in emojis].index(cur)

    return output[index:index+25]

@bot.tree.command(name="get_emoji", description="get emoji image")
@commands.guild_only()
@discord.app_commands.autocomplete(emoji=emoji_autocomplete)
async def get_emoji(interaction: discord.Interaction, emoji: str):

    for e in interaction.guild.emojis:
        if str(e.id) == emoji:
            await interaction.response.send_message(file=await e.to_file())
成果如上
範例
本次課程的所有範例檔案都在裡面
請自行取用
另外如果好奇更多Discord Bot的應用可以參考
希望大家在成果發表時能發揮創意
做出一些實用或是有趣的小功能
範例的程式若有不懂的地方
或是有想了解的功能都可以來問我
// config.py

import os
from dotenv import load_dotenv


load_dotenv()

TOKEN = os.getenv("TOKEN")
GEMINI_API_KEY = os.getenv("GEMINI_API_KEY")

GENERATION_CONFIG = {
  "temperature": 0.9,
  "top_p": 1,
  "top_k": 1,
  "max_output_tokens": 2048,
}

SAFETY_SETTINGS = [
  {
    "category": "HARM_CATEGORY_HARASSMENT",
    "threshold": "block_none"
  },
  {
    "category": "HARM_CATEGORY_HATE_SPEECH",
    "threshold": "block_none"
  },
  {
    "category": "HARM_CATEGORY_SEXUALLY_EXPLICIT",
    "threshold": "block_none"
  },
  {
    "category": "HARM_CATEGORY_DANGEROUS_CONTENT",
    "threshold": "block_none"
  },
]

PROMPT = "你是一隻魚,沒有名字也不會被賦予名字,會以一隻魚的口吻進行對話,並且講話喜歡加上「啵」,喜歡在大海游來游去,知識量很少,遇到太難的問題會無法回答,自己不是機器不是AI,沒有開發者,請以這些設定進行以下對話:"
放個ai bot的範例
// main.py

import discord
from discord.ext import commands
import google.generativeai as genai

from config import GEMINI_API_KEY, GENERATION_CONFIG, SAFETY_SETTINGS, PROMPT, TOKEN


genai.configure(api_key=GEMINI_API_KEY)

bot = commands.Bot(command_prefix="114514", intents=discord.Intents.all())
model = genai.GenerativeModel(model_name="gemini-pro", generation_config=GENERATION_CONFIG, safety_settings=SAFETY_SETTINGS)

@bot.event
async def on_message(message: discord.Message):
    if message.author.bot: return
    if message.content.startswith("魚,"):
        print("Generating content...")
        prompt = message.content[2:]
        response = await model.generate_content_async(PROMPT + prompt)

        await message.reply(response.text, allowed_mentions=discord.AllowedMentions.none())

bot.run(TOKEN)
放個ai bot的範例
By lucasw
使用discord.py函式庫實作自己的Discord Bot


