Google AIY Voice Kit 在
Raspberry Pi 2B
上實作經驗
2017/12/16
about me
EE degree back in 1982
Z80 was the most popular CPU
Pascal/Fortran/COBOL were popular languages
Apple ][ + BASIC and CP/M
intel 80386SX PC mother board designer
......
Interested in Linux since 2016

Z80 CPU

intel 80386SX CPU
photo source: wikipedia.org

Apple ][
marconi.jiang@gmail.com
參考資料
- 一開始吸引我的 Google Do-it-yourself artificial intelligence 介紹 https://aiyprojects.withgoogle.com
- 因為買不到 AIY Voice Kit, 看看是否可以利用手頭上的零件來真正的 DIY, 找到了Instuctables 這篇文章 “ Raspberry Pi Google Assistant With Sleek Wood Box”, 後續以 Instructables-rpi-google-AIY 稱此文章,也有 Youtube 影片說明
- Google Assistant SDK guide, 後續以 Google-SDK 稱此文章, 內容大多參考此篇文章
- Github - Google Assistant SDK Python API
緣起
- AI 及 ML (Machine Learning) 成為最近科技業的 buzz word
- Google 和 Raspberry Pi 合作打造的 AI 語音助理套件 AIY Voice Kit
- Micro Center Raspberry Pi 3 + Voice Kit bundled 賣 35 鎂, 但只在實體店面取貨
- 乾脆用手上有的 Raspberry Pi 2B 自己來,發現 Google 對於硬體部份的說明
。。。。。。付諸闕如。。。。。。
其實, 後來才發現 Google SDK 內文有硬體相關說明, 只是, 用 Google search 時, 並不容易發現
手上有的零組件
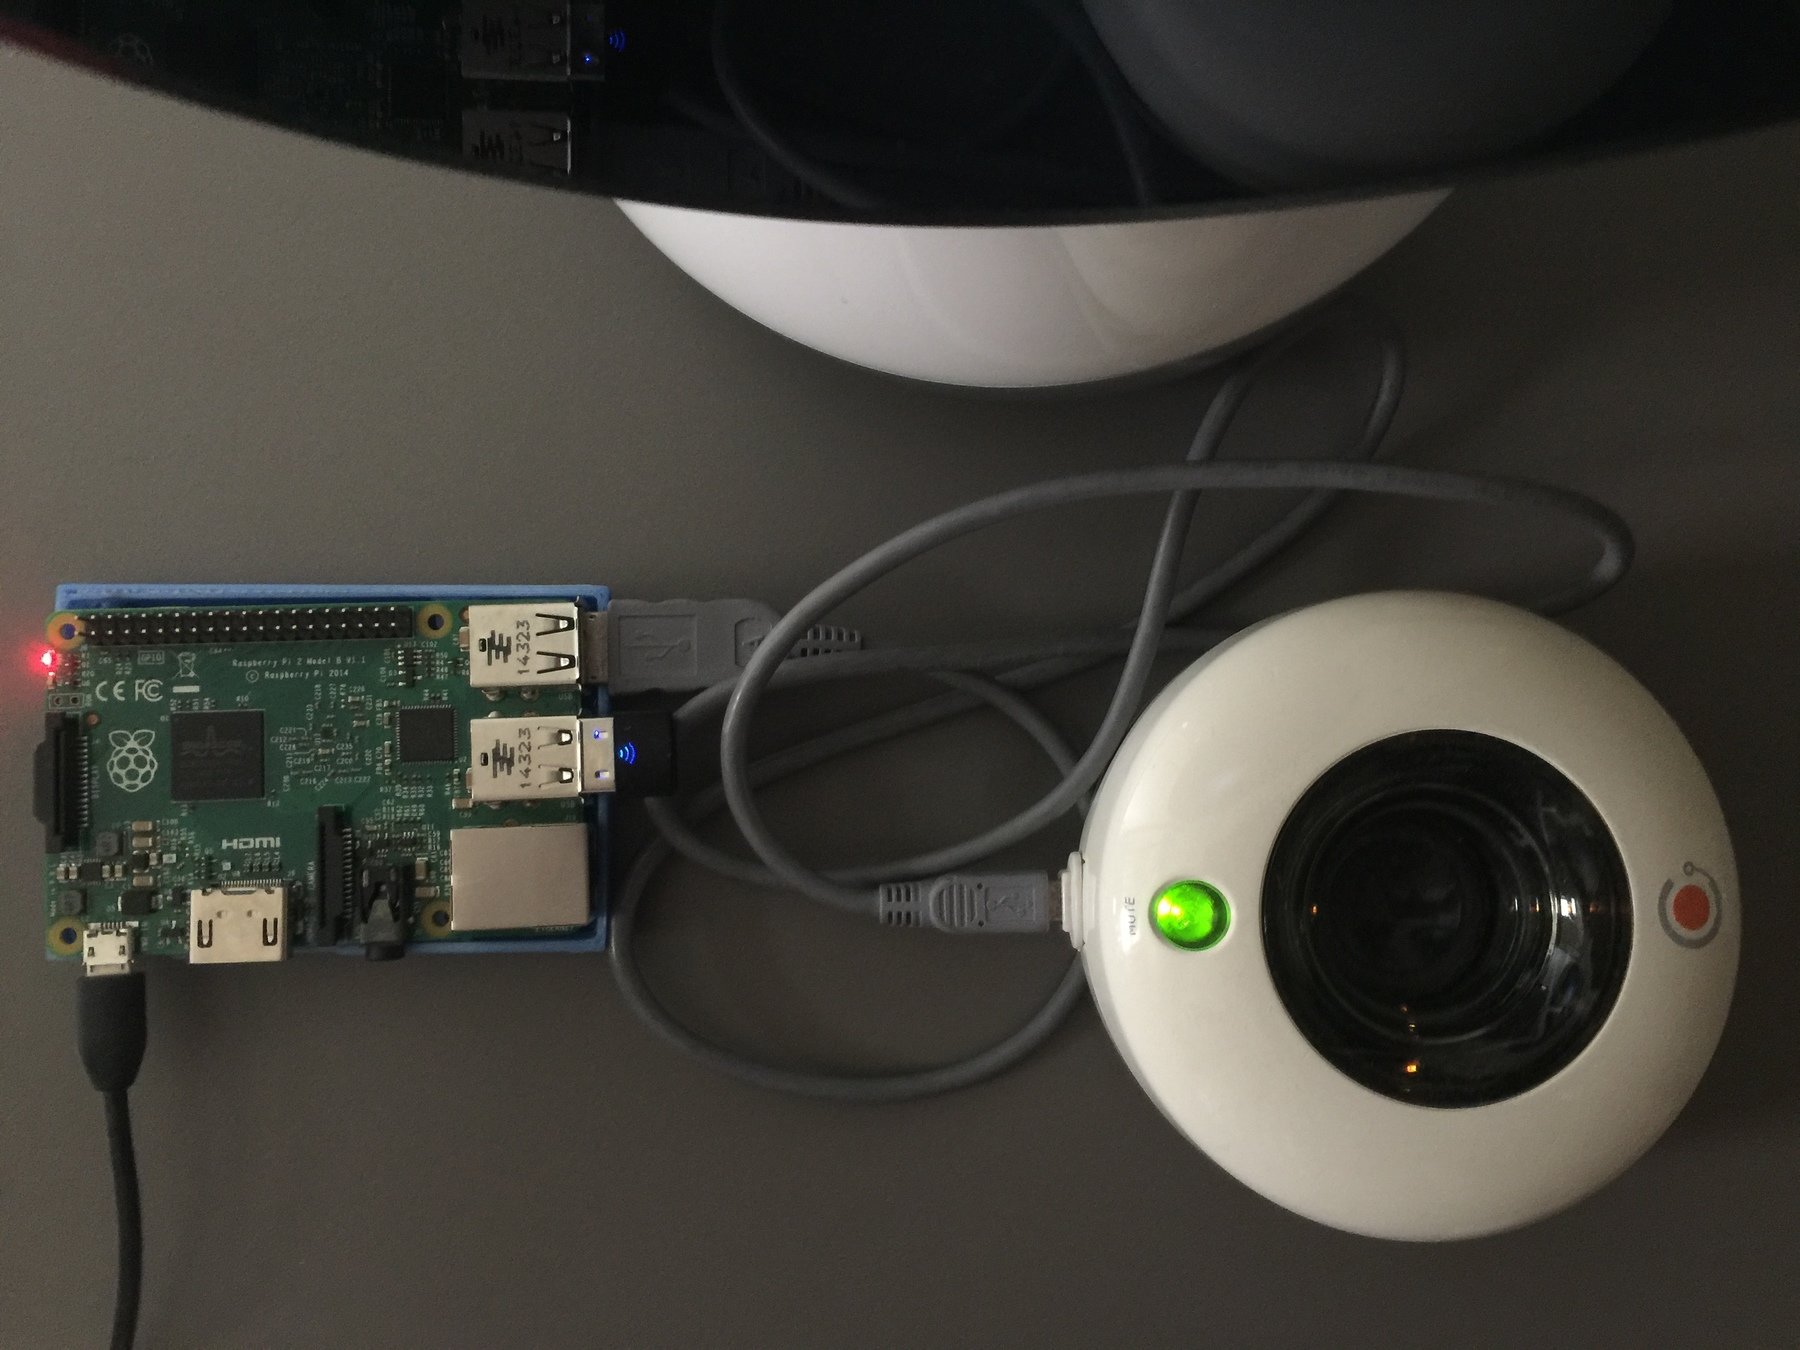
- Raspberry Pi 2B (含 MicroSD card)
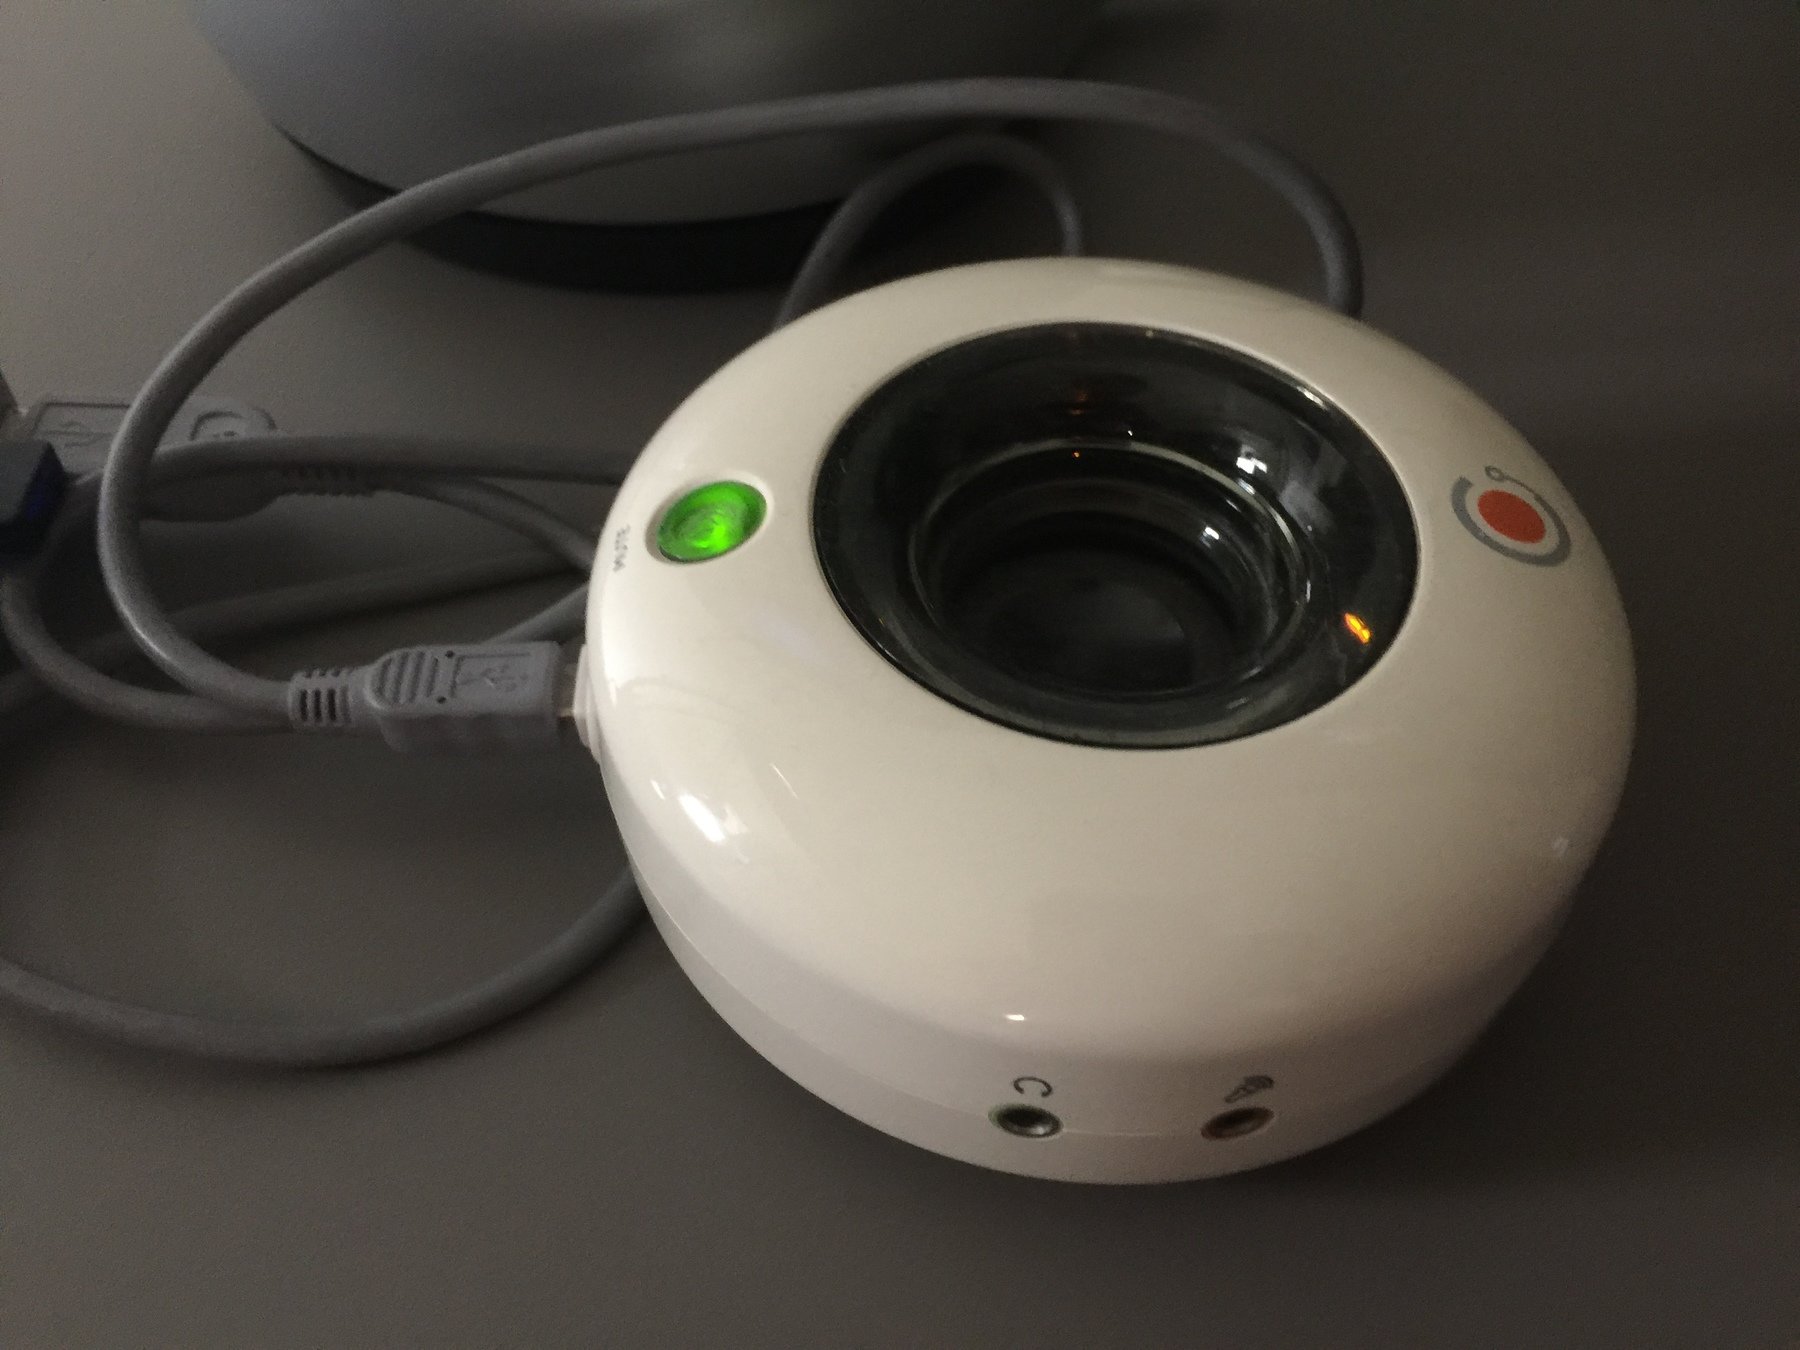
- 好久以前 PC 用的 USB microphone+speaker (現在有個說法叫 speakerphone)
- 麵包板
- 一些零件
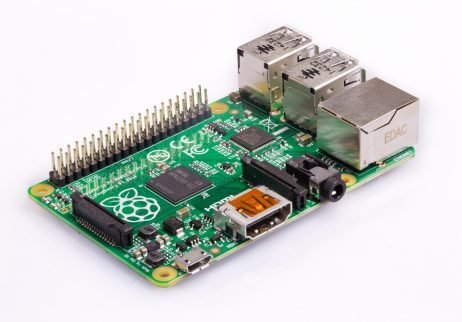
Photo: www.raspberrypi.org
如果有虛線以上的零件即可開始
虛線以下額外的零件, 可以提供硬體控制/狀態顯示功能
* Google 提供的 SDK 是由 OK Google 或 Hey Google 來叫醒服務 (wake word), 可以不需要硬體的按鈕設置, 也沒有 LED 顯示目前狀態, 這需要個人修改硬體及 SDK 來達成, 我會分段來說明
硬體準備及測試
本段介紹安裝 RPi 及 audio (USB speaker 跟 Microphone)的設定
假設大家對 RPi 已經有經驗, RPi 安裝部份就附上連結而已, 不再重複
硬體準備及測試 - 準備
所需零件及設備
-
Raspberry Pi 2B(*1)
- MicroSD card
- A 2A microB USB power supply
- Internet connection(我用 WiFi USB dongle)
- USB speakerphone (也可以單獨的 USB microphone 跟 USB speaker)
- Linux CLI 基礎
* 往後內容主要是根據以下 Instuctables 網頁操作, 後續以 Instructables-rpi-google-AIY 稱此文章
Raspberry Pi Google Assistant With Sleek Wood Box
* 以及 Google Assistant SDK guide, 後續以 Google-SDK 稱此文章
*1 如果你用的是 3B, 一定可以, 雖然我沒用試過。至於更早的 1B, 應該也可以, 同樣沒試過。至於 Pi Zero/Zero W, 還需要外接轉接頭到 USB, 就不在這裡討論
硬體準備及測試 - 組裝
組裝步驟
- 根據 RPi 官方網頁來來安裝及設定 Raspberry Pi (*1)
- RPi 2B 沒用內建 WiFi, 需要額外安裝 USB WiFi dongle (*2)
- 安裝 USB Microphone 跟 Speaker:RPi 的 OS Debian 已經事先安裝 ALSA 相關 audio 應用, 而且是 plug & play, 所以只需接上 USB 即可, 無須特別安裝, 但是需要將輸出設定從 default 的 HDMI 轉成 USB audio, 會後續再討論
Remark
1. 玩過 RPi 的都應該很熟悉這過程, 參考以下文章 https://www.raspberrypi.org/help/
2. 參考以下文章 How-To: Add WiFi to the Raspberry Pi
硬體準備及測試 - 測試
測試步驟
- 在完成之前的步驟後, RPi 可以正常運作。接下來的操作就需要用到 Command Line 的方式進行(大家應該都很熟悉了才對). 而且, 專業的你, 大多是透過 ssh 方式進行, 但是 RPi 的 default 設定是關閉 ssh, 所以, 需要 enable ssh (*1)
- Google-SDK 有介紹 ALSA (*2) 標準測試 USB Speaker 跟 Microphone的方法. “Configure and Test the Audio”
但是, 沒有聲音耶。。。 即使 USB audio 是 Plug&Play, 還是需要改個設定, 將語音輸出設定成 USB audio
$ speaker-test -t wavRemark
1. 玩過 RPi 的都應該很熟悉這過程, 參考以下 RPi 關於 ssh 的文章 https://www.raspberrypi.org/documentation/remote-access/ssh/
2. ALSA 以開源的方式, 提供 Linux 核心的 audio 相關驅動程式, 在此次的安裝上, 只要設定完成即可, 無須花額外花時間了解, 對語音有興趣的, 可以參考 wiki ALSA 的介紹
硬體準備及測試 - USB speakerphone 設定
1. 一般 RPi default 設定 audio 輸出是 HDMI 的音頻輸出, 也可以 config 成 3.5mm audio jack (*1)
2. 我用的是 USB audio, 先確定是否有偵測到硬體.
3. 列表上的第一個 C-Media 就是了, 再來看 USB audio 是在 ALSA 的那一張 card (*2)
Remark
1. 關於 HDMI及 3.5mm audio 接頭的說明 Raspberry Pi Model B+ 3.5mm Audio/Video Jack
2. ALSA 文章, 如何設定標準輸出裝置 Set the default device
$ sudo raspi-config$ lsusb
Bus 001 Device 005: ID 0d8c:000c C-Media Electronics, Inc. Audio Adapter
Bus 001 Device 004: ID 148f:5370 Ralink Technology, Corp. RT5370 Wireless Adapter
Bus 001 Device 003: ID 0424:ec00 Standard Microsystems Corp. SMSC9512/9514 Fast Ethernet Adapter
Bus 001 Device 002: ID 0424:9514 Standard Microsystems Corp. SMC9514 Hub
Bus 001 Device 001: ID 1d6b:0002 Linux Foundation 2.0 root hub
$ $ cat /proc/asound/cards
0 [ALSA ]: bcm2835 - bcm2835 ALSA
bcm2835 ALSA
1 [Set ]: USB-Audio - C-Media USB Headphone Set
C-Media USB Headphone Set at usb-3f980000.usb-1.5, full speed
$硬體準備及測試 - USB speakerphone 設定
4. 新建一個含有以下內容的檔案 /etc/asound.conf(0 或 1 是上一個指令支援的裝置編號, 我用的 C-Media 的 USB audio, 所以選 1)
5. 設定好了, 再來測試一次
6. 聲音輸出沒問題了, 看一下 Microphone. 因為 RPi 並沒有標準的 Microphone 輸入裝置, 所以, 一般接了 USB microphone 後, 就成為 default 的 device 了. 用 arecord -L 指令來確認
$ speaker-test -t wavdefaults.pcm.card 1
defaults.ctl.card 1$ arecord -L
null
Discard all samples (playback) or generate zero samples (capture)
default:CARD=Set
C-Media USB Headphone Set, USB Audio
Default Audio Device
sysdefault:CARD=Set
C-Media USB Headphone Set, USB Audio
Default Audio Device
front:CARD=Set,DEV=0
C-Media USB Headphone Set, USB Audio
Front speakers
surround21:CARD=Set,DEV=0
C-Media USB Headphone Set, USB Audio
2.1 Surround output to Front and Subwoofer speakers
surround40:CARD=Set,DEV=0
C-Media USB Headphone Set, USB Audio
4.0 Surround output to Front and Rear speakers
surround41:CARD=Set,DEV=0
C-Media USB Headphone Set, USB Audio
4.1 Surround output to Front, Rear and Subwoofer speakers
surround50:CARD=Set,DEV=0
C-Media USB Headphone Set, USB Audio
5.0 Surround output to Front, Center and Rear speakers
surround51:CARD=Set,DEV=0
C-Media USB Headphone Set, USB Audio
5.1 Surround output to Front, Center, Rear and Subwoofer speakers
surround71:CARD=Set,DEV=0
C-Media USB Headphone Set, USB Audio
7.1 Surround output to Front, Center, Side, Rear and Woofer speakers
iec958:CARD=Set,DEV=0
C-Media USB Headphone Set, USB Audio
IEC958 (S/PDIF) Digital Audio Output
dmix:CARD=Set,DEV=0
C-Media USB Headphone Set, USB Audio
Direct sample mixing device
dsnoop:CARD=Set,DEV=0
C-Media USB Headphone Set, USB Audio
Direct sample snooping device
hw:CARD=Set,DEV=0
C-Media USB Headphone Set, USB Audio
Direct hardware device without any conversions
plughw:CARD=Set,DEV=0
C-Media USB Headphone Set, USB Audio
Hardware device with all software conversions
$ 硬體準備及測試 - USB speakerphone 設定
7. 確定 microphone device 沒問題後, 根據 Google-SDK Configure and Test the Audio 測試一下
$ arecord --format=S16_LE --duration=5 --rate=16000 --file-type=raw out.raw
$ aplay --format=S16_LE --rate=16000 out.raw
硬體準備及測試 okay, 進行下一階段 Google SDK 的安裝
軟體安裝及測試
本段介紹安裝 Google Assistant SDK 的安裝及設定
Get started
Once you have your hardware, read on to learn how to get the Google Assistant running on it!
Embed the Google Assistant
This section gets the Google Assistant Library working on your device:
1. Set Up Hardware and Network Access
2. Configure and Test the Audio
3. Configure a Developer Project and Account Settings
4. Install the SDK and Sample Code
7. Next Steps
Extend the Google Assistant
This section extends the Google Assistant Library to include Device actions:
2. Register Traits for the Device
1. 跟 2. 已經在前面章節硬體安裝時完成, 接下來就進行 3. 以後的軟體安裝
3. 在 PC/Mac 上設定 Google Developer Project
4. 執行這段程式後就可以 demo 了
Configure a Google Developer Project
A Google Developer Project gives your device access to the Google Assistant API. The project tracks quota usage and gives you valuable metrics for the requests made from your device.
To enable access to the Google Assistant API, do the following:
-
In the Cloud Platform Console, go to the Projects page. Select an existing project or create a new project.
-
Enable the Google Assistant API on the project you selected (see the Terms of Service).
Click Enable.
-
Create an OAuth Client ID with the following steps:
-
Create the client ID.
CREATE AN OAUTH CLIENT ID -
You may need to set a product name for the product consent screen. On the OAuth consent screen tab, give the product a name and click Save.
-
Click Other and give the client ID a name.
-
Click Create. A dialog box appears that shows you a client ID and secret. (No need to remember or save this, just close the dialog.)
-
Click ⬇ (at the far right of screen) for the client ID to download the client secret JSON file (client_secret_<client-id>.json).
-
需要 Google 帳號建立(免費的)開發項目以連接上 Google Assistant API, 這可以在 PC/Mac 上執行 ,...
1. Log in 到 Google 網頁新建/Create project
2. 點選 Google Assistant API 右邊的 Enable
3. 到網頁取得“認證終端 ID" 碼, 此 ID 碼以 json 格式碼、 client_secret_xxxx.json 的檔案名(檔案名中的 xxxx 非常長)下載到你的電腦, 記得 - 不要修改這檔案名稱, 待會兒需要把這檔案傳到 RPi
Configure a Google Developer Project
-
The client_secret_<client-id>.json file must be located on the device to to authorize the Google Assistant SDK sample to make Google Assistant queries. Do not rename this file.
For the Raspberry Pi only:
Make sure this file is located in /home/pi. If you want to upload the file to the device, do the following:
-
Open a new terminal window. Run the following command in this new terminal:
Note: Do not run the following command in an SSH session connected to the device. This command transfers the JSON file from a directory on your development machine to the device. An SSH session cannot access your local directories.
-
Close this terminal window.
$ scp ~/Downloads/client_secret_client-id.json pi@raspberry-pi-ip-address:/home/pi/

password: password-for-your-RPi
4. 將 client_secret_xxxx.json 檔案從你的電腦上傳到 RPi 的目錄 /home/pi (也就是你 log in 後的 ~ 目錄) 下
從 PC /Mac 上傳到 RPi 的 Linux CLI 指令, 記得要新開一個 terminal, (不是從 RPi 下的指令)
需要修改
- client_secret_xxxx.json 檔案
- raspberry-pi-ip-address 改成你 RPi 的 IP 位址
- password-for-your-RPi 改成你 RPi 的密碼
Set activity controls for your account
In order to use the Google Assistant, you must share certain activity data with Google. The Google Assistant needs this data to function properly; this is not specific to the SDK.
Open the Activity Controls page for the Google account that you want to use with the Assistant. You can use any Google account, it does not need to be your developer account.
Ensure the following toggle switches are enabled (blue):
-
Web & App Activity
- In addition, be sure to select the Include Chrome browsing history and activity from websites and apps that use Google services checkbox.
- Device Information
- Voice & Audio Activity
需要 log in 到 Google 的 Activity Controls page 去 enable 三個功能
這次, 我們直接到 github 上的 Google Assistant SDK for Python
Content
-
google-assistant-library: Python bindings for the Google Assistant Library
-
google-assistant-grpc: autogenerated Python bindings to communicate with the Google Assistant gRPC API
-
google-assistant-sdk: tools and python samples to help developers get started with the Google Assistant SDK
-
googlesamples/assistant/grpc: reference sample for the Google Assistant gRPC API
-
googlesamples/assistant/library: reference sample for the Google Assistant library
-
既然是 demo, 還沒有要自行開發, 不需要用到 google-assistant-sdk, 就參考第一個 google-assistant-library 的 Reference sample 來測試,
Reference
-
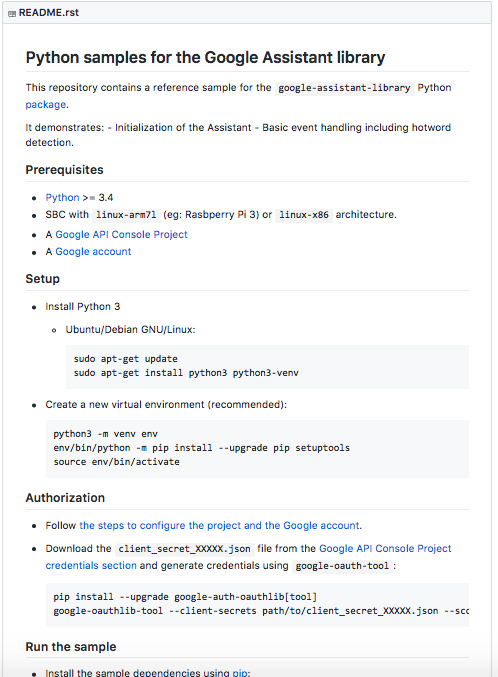
Reference sample for the Google Assistant Library for Python .
Python samples for the Google Assistant library
This repository contains a reference sample for the google-assistant-library Python package. It demonstrates: - Initialization of the Assistant - Basic event handling including hotword detection.
Prerequisites
-
Python >= 3.4
-
SBC with linux-arm7l (eg: Rasbperry Pi 3) or linux-x86 architecture.
我們都已經準備好了
回到 SDK 主頁
Follow these instructions to install the SDK and sample code on your device. Run all of the commands on this page in a terminal on the device (either directly or via an SSH connection).
Configure a new Python virtual environment
Use a Python virtual environment to isolate the SDK and its dependencies from the system Python packages.
(Recommended) For Python 3:
$ sudo apt-get update
$ sudo apt-get install python3-dev python3-venv # Use python3.4-venv if the package cannot be found.
$ python3 -m venv env
$ env/bin/python -m pip install --upgrade pip setuptools
$ source env/bin/activateGet the package
The Google Assistant SDK package contains all the code required to get the Google Assistant running on the device, including the sample code.
Use pip to install the latest version of the Python package in the virtual environment:
(env) $ python -m pip install --upgrade google-assistant-library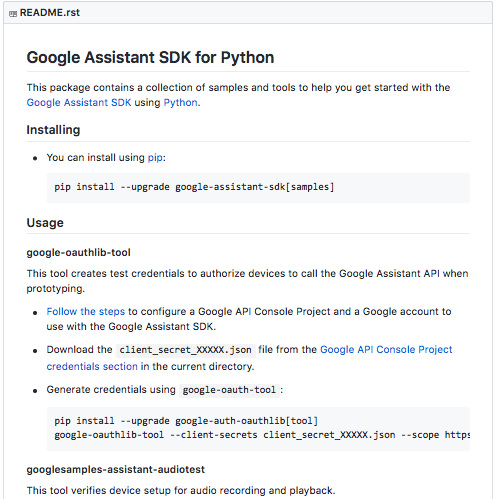
(env) $ python -m pip install --upgrade google-assistant-sdk[samples]Generate credentials
-
Install or update the authorization tool:
(env) $ python -m pip install --upgrade google-auth-oauthlib[tool] -
Generate credentials to be able to run the sample code and tools. Reference the JSON file you downloaded in a previous step; you may need to copy it the device. Do not rename this file.
(env) $ google-oauthlib-tool --scope https://www.googleapis.com/auth/assistant-sdk-prototype \ --save --headless --client-secrets /path/to/client_secret_client-id.json
You should see a URL displayed in the terminal:
Please visit this URL to authorize this application: https://...
-
Copy the URL and paste it into a browser (this can be done on any machine). The page will ask you to sign in to your Google account. Sign into the Google account that created the developer project in the previous step.
-
After you approve the permission request from the API, a code will appear in your browser, such as "4/XXXX". Copy and paste this code into the terminal:
-
Enter the authorization code:If authorization was successful, you will see a response similar to the following:
credentials saved: /path/to/.config/google-oauthlib-tool/credentials.json
If instead you see
InvalidGrantError, then an invalid code was entered. Try again, taking care to copy and paste the entire code.
(env) $ python -m pip install --upgrade google-assistant-library
(env) $ python -m pip install --upgrade google-assistant-sdk[samples]
我就在 RPi 的 ~ 目錄下執行, 所以, /path/to/ 就省略了, 保險起見, 可以用 ~/client_secret_xxxx.json
記得 --headless 這選項, 因為我是用 ssh 遠端連線
這檔案也自然儲存在 RPi 的 ~/.config/ 目錄下
Ready for Demo
完成以上步驟, 就可以開始 demo 了
也可以背景執行, 這樣我的 Mac 就可以關機, 而 RPi 繼續執行
如果 RPi 關機了, 再執行前, 需要多下個指令到 Python 的虛擬環境, 再執行 demo 程式
(env) $ google-assistant-demo(env) $ nohup google-assistant-demo &$ source env/bin/activate
(env) $ nohup google-assistant-demo &試試 Google Assistant SDK 有什麼功能
-
似乎還是只能用英文對話
- "Talk to me in German" or "Speak Hindi" 都失敗*
-
可以翻譯
- “Good morning in Mandarin"
- "Happy birthday in Dutch"
- "Thank you in German"
-
唱歌 / 播歌
- “Sing a song"
- "Play music"*
* Google Home 有此功能
心得
Google 的內容算是完整, 但, 部份內容有重複, 卻各自不完整. 例 1:
左邊的 Google Assistant Library Samples 跟 右邊的 Google Assistant SDK 類似內容卻不盡相同
心得
例2: 也許我不夠細心, 不知道這兩個頁面有什麼差別
https://developers.google.com/assistant/sdk/guides/library/python/
https://developers.google.com/assistant/sdk/guides/service/python/
還需要去了解 grpc 跟 sdk 的差異
Content
-
google-assistant-library: Python bindings for the Google Assistant Library
-
google-assistant-grpc: autogenerated Python bindings to communicate with the Google Assistant gRPC API
-
google-assistant-sdk: tools and python samples to help developers get started with the Google Assistant SDK
-
googlesamples/assistant/grpc: reference sample for the Google Assistant gRPC API
-
googlesamples/assistant/library: reference sample for the Google Assistant library
-
心得
我沒有 register the device 也可以運作, 所以咧?
先擱置這些問題吧
想先加上簡單的硬體 (LED / button) 來試試
且聽下回分解
Get started
Once you have your hardware, read on to learn how to get the Google Assistant running on it!
Embed the Google Assistant
This section gets the Google Assistant Library working on your device:
1. Set Up Hardware and Network Access
2. Configure and Test the Audio
3. Configure a Developer Project and Account Settings
4. Install the SDK and Sample Code
7. Next Steps
新增 RPi 硬體來控制 Google Assistant
Get started
Once you have your hardware, read on to learn how to get the Google Assistant running on it!
Embed the Google Assistant
This section gets the Google Assistant Library working on your device:
1. Set Up Hardware and Network Access
2. Configure and Test the Audio
3. Configure a Developer Project and Account Settings
4. Install the SDK and Sample Code
7. Next Steps
Extend the Google Assistant
This section extends the Google Assistant Library to include Device actions:
2. Register Traits for the Device
Extend 講的是增加額外的控制功能,
後續說明的是
- 增加 LED 的 Google Assistant 狀態顯示,
- 用 button 來取代 hotword 來 trigger Google Assistant
參考資料
找到 2 個跟 button trigger Google Assistant SDK 有關的網站
Google AIY Voice Kit 實作經驗
By Marconi Jiang
Google AIY Voice Kit 實作經驗
DIY of Google Assistant on Raspberry Pi 2B, similar to AIY Voice Kit


