JavaScript Four
JavaScript in the DOM


JS
You
HTML, CSS, JS Recap

Adding JavaScript to HTML
When adding JavaScript to our HTML, we use the <script> tag. The script tag is placed at the bottom of the body tag. JavaScript can either be typed directly into the script tag, or an external .js file can be connected to the tag using the src attribute.
<!-- Typing directly into the script tag -->
<body>
  <script>
    const name = 'Matt';

    console.log(name)
  </script>
</body>

<!-- Connecting to an external file -->
<body>
  <script src='index.js'>
  </script>
</body>
Document Object Model (DOM)
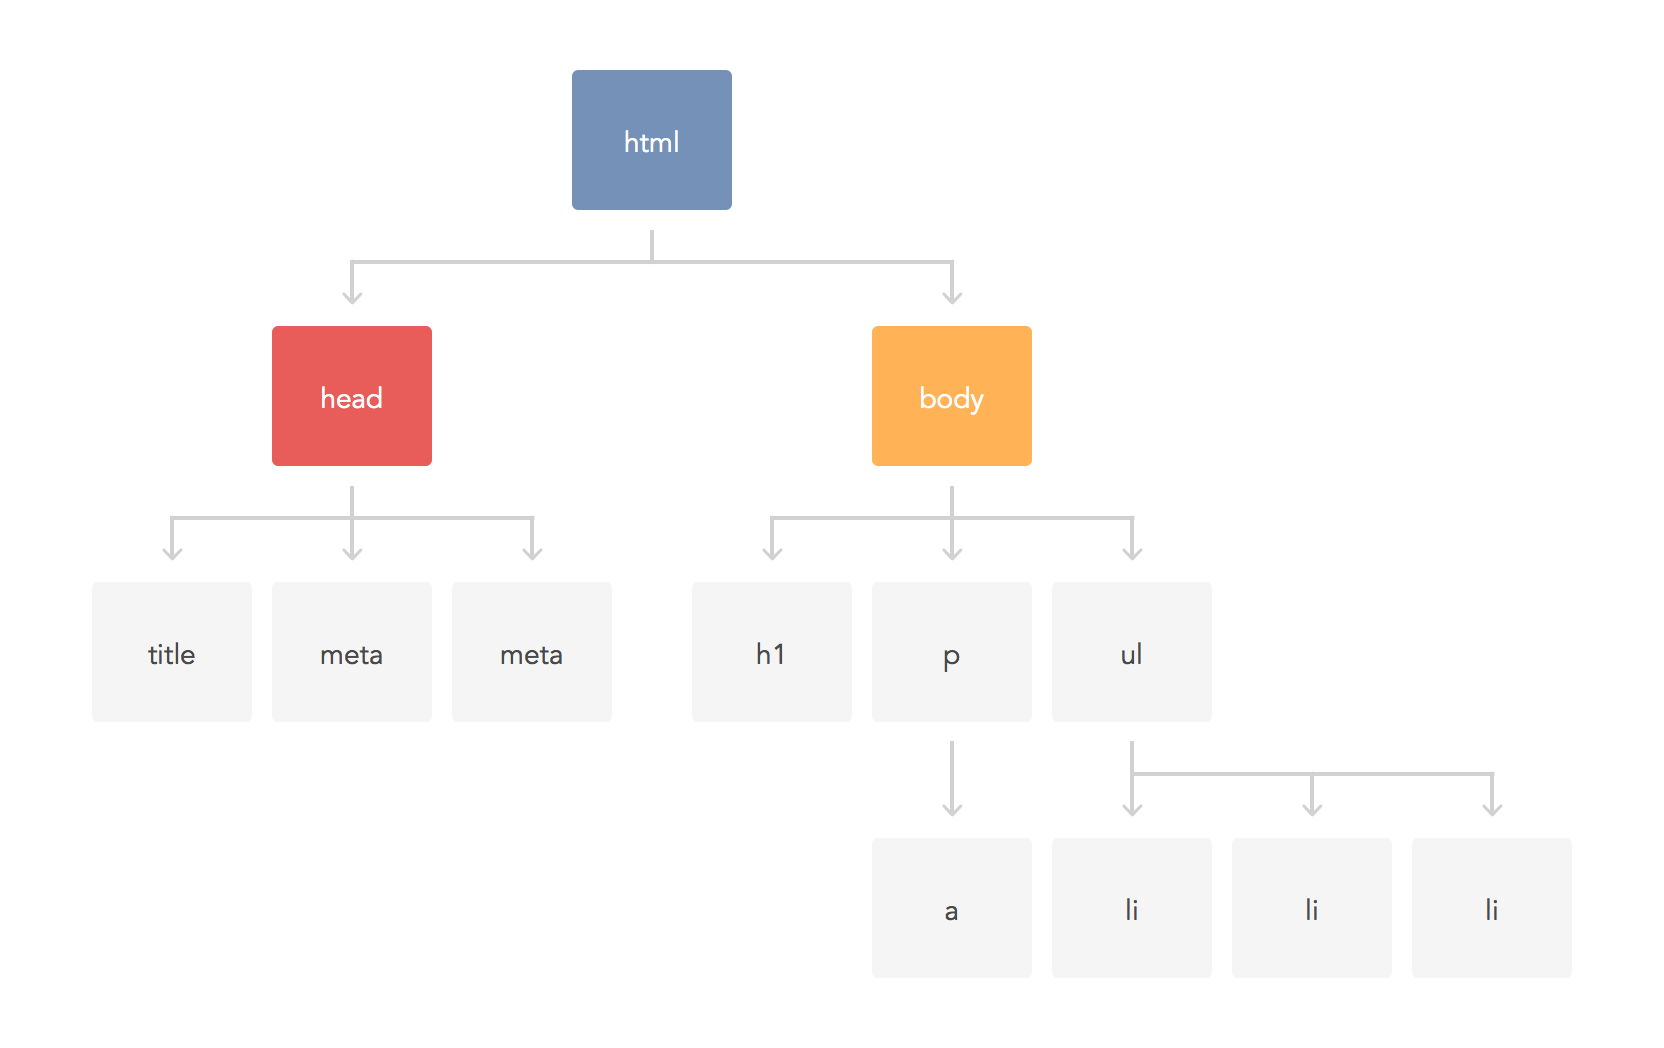
The Document Object Model, or DOM, is an object representation or blueprint for our web page.
The DOM is created by the browser so we can target our HTML.
The DOM can be manipulated with JavaScript to create interactive web pages.
Document Object Model (DOM)

Accessing DOM Elements
JavaScript is able to access DOM Nodes (elements) using the built-in document object. The document represents the DOM tree, and is our entry point for interacting with the DOM. The document object also gives access to methods that let us select specified elements in our HTML file. Some you may use frequently are:
.getElementById( )
.getElementByTagNames( )
.querySelector( )
.querySelectorAll( )
Accessing Elements
.getElementById( ) selects an element by its given id. It can be saved to a variable to use in multiple places of the JS file.
.getElementsByTagNames( ) will select every element of the type passed in to the method.
<!-- HTML element -->
<section id='awesome-section'>
</section>

<!-- JS -->
const section = document.getElementById('awesome-section')
const items = document.getElementsByTagNames('li')These are collected as a NodeList, and can be accessed similarly to an array, with a zero-based index, as well as length property.
Accessing Elements
.querySelector( ) will return the FIRST node(element) that matches what is passed in.
Note: Id's and classes can be found this way, but must include the '#' or '.' selectors.
.querySelectorAll( ) will return a NodeList of ALL elements that match what is passed in to the method.
<button id='submit-btn'>Submit</button>

const btn = document.querySelector('#submit-btn')
const names = document.querySelectorAll('.name-list')Node Properties
Once a node (element) is selected, we can use its node properties to manipulate the node. Some you may use frequently are:
innerText
innerHTML
className
classList
style
value
Node Properties
innerText will return all of the text content inside of the selected node.
innerHTML will return the HTML inside of the selected node.
<ul id="myList">
    <li>One</li>
    <li>Two</li>
    <li>Three</li>
</ul>
'One, Two, Three'
<ul id="myList">
    <li>One</li>
    <li>Two</li>
    <li>Three</li>
</ul>

const myList = document.getElementById('myList');
console.log(myList.innerHTML);'<li>One</li> <li>Two</li> <li>Three</li>'
const myList = document.getElementById('myList');
console.log(myList.innerText);
const myList = document.getElementById('myList');
console.log(myList.innerHTML);Node Properties
className will get or set the value of the selected nodes class.
<div class="divOne" id="divOne">
</div>
'divOne'
<div id="divOne">
</div>
Getting a class:
Setting a class:
const divOne = document.getElementById('divOne');
console.log(divOne.className);
const divOne = document.getElementById('divOne');
divOne.className = 'divOne';Node Properties
classList is an object that allows us to add or remove classes from an element. To do this, use its 'add', 'remove', and 'toggle' methods.
const myList = document.getElementById('myList');

// Add A Class
myList.classList.add('show');

// Remove A Class
myList.classList.remove('show');

// Toggle A Class
myList.classList.toggle('show');
Each method checks if the passed in string matches the class of the selected node. Add will attach the passed in class if the element doesn't contain, remove will remove the passed in class if the element does contain it, and toggle will toggle the class.
Node Properties
style allows for attaching inline styles to an element.
<ul class="list" id="myList">
    <li>One</li>
    <li>Two</li>
    <li>Three</li>
</ul>
const myList = document.getElementById('myList');

myList.style.background = 'red';
Node Properties
value is used with input boxes to access what has been typed into the selected input box.
<input type="text" id="myInput">

const myInput = document.getElementById('myInput');
console.log(myInput.value)
Events and Event Handlers
Events are actions triggered by interaction with DOM nodes. These interactions can be clicks, keypresses, and more. Events can be attached to the opening tag of an HTML file.
<tagname eventName='functionHere'></tagname>Buttons are common examples of events, specifically the 'onclick' event:
<button onclick="submit()">Submit</button>

function submit(){
    alert('Post has been submitted!');
}
Events and Event Handlers
There are many events you can use. Some you may use frequently are:
onclick - click interaction with element
ondblclick - double click interaction with element
onmouseover - cursor moves over element
onmouseout - cursor moves away from element
onkeypress - listens for a key to be pressed
onkeydown - listens for a key to be pressed down
onkeyup - listens for a key to be unpressed.
onchange - listens for a change in an input
Events and Event Handlers
Event listeners can also be attached to elements. Event listeners take two parameters: the event to listen for, and a callback function to provide the action that happens when the event fires.
<input type="text" id="myInput">

// Create variable to store the input value
let inputValue = '';
// Add the event and function to handle the event
document.getElementById('myInput')
.addEventListener('change', function(event){
    inputValue = event.target.value
    console.log(inputValue);
});
Event Bubbling
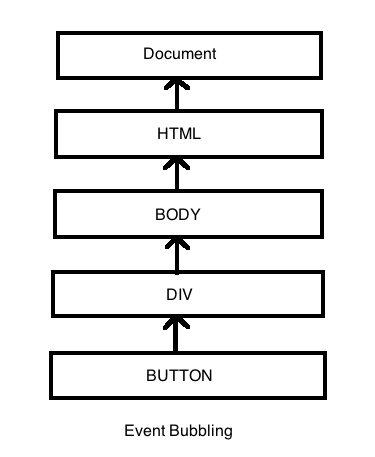
Event bubbling refers to how events can 'bubble' up the DOM tree.
Event bubbling occurs when a parent element has the same event as its child element, the parents event will fire when the child's does.
To prevent this, we can use the .stopPropagation( ) method.

Preventing Default Events
Some elements have default events attached to them. A common example of this is the form element. To prevent these default events we use the .preventDefault( ) method.
const formBtn = document.getElementById('form-btn');

formBtn.addEventListener('click', function(event){
    // prevent default event
    event.preventDefault();

    // stop event bubbling
    event.stopPropagation();
});
Node Methods
Node's also have methods attached to them that we can use. More common methods are:
.createElement( )
creates an element
.appendChild( )
appends, or attaches, the element to another element
.getAttribute( )
returns the value of a specified attribute
.setAttribute( )
sets the value of a specified attribute
.parentNode (property, not method)
returns the parent node of a specified element.
.remove( )
removes an element from the DOM
Node Methods
.createElement( ) and .appendChild( ) work together to create an element and attach it to an element in the DOM.
Note: the element is appended to the end of the selected node.
// create the button element
const btn = document.createElement('BUTTON');

// add inner text
btn.innerText = 'Click me';

// Add the new button into the body element
document.body.appendChild(btn);

//remove an element
btn.remove()
Node Methods
.getAttribute( ) and .setAttribute( ) allow you to get or set the value of a given attribute on the selected element.
<button class="btn">Click Me!</button>

const btnClass = document.querySelector('btn')
.getAttribute('class');

console.log(btnClass) // result: 'btn'


const btn = document.querySelector('btn');
btn.setAttribute('id', 'myBtn');
Node Property
.parentNode will return the parent node of a selected element
<div class="parent">
    <button class="child">Click Me</button>
</div>

const btn = document.querySelector('.child');
const btnParent = btn.parentNode;
JavaScript 4
By matias_perez
JavaScript 4
JavaScript in the DOM
- 452


