Getting Started with
Arduino & Johnny-Five
What will be covered?
- What is an Arduino?
- What hardware basics should you learn?
- What is Johnny-Five.js?
- Setting Johnny Five up with Arduino
- Demos with code overviews (pray they work)
- Cool story bro, now what?
- Who's your dealer?
What Is An Ardunio?
- Open-source microcontroller board
- Has an IDE for writing software for the board
- Uses a simplified version of C++
- Theres about 22+ flavors
- Recommend starting with the Arduino Uno or Sparkfun Red Board(Simplified Uno)
What Hardware Basics Should I learn?
What Hardware Basics Should I learn?
- Electronics Primer - learn basic hardware components and their purpose like resistors, motors, relay, etc...
- How to use a breadboard - best friend for prototyping without soldering
- Soldering(is fun) and De-soldering(sucks)
- Multimeter - nifty tool for debugging
What is Johnny-Five?
- Open source JS robotics programming framework
- Uses the Firmata protocol for communicating with microcontrollers from your computer
- Created by Rick Waldron in 2012
- Maintained by a community of passionate software developers and hardware engineers
- Community is super duper nice and noob friendly
Why Johnny-Five?
- You don't have to learn C
- No Compiling - just run `node blahfile.js` in terminal and/or REPL for debugging/experimenting
- Asynchronous = handy
- Nice to give signals to your hardware while receiving feedback from the hardware
- Atwood’s Law - any application that can be written in JavaScript will eventually be written in JavaScript.
- Ummm JavaScript, F#CK YEAH!
Johnny-Five community = Awesomesauce
Setting Up Johnny-Five - Part 1
- Download Arduino IDE
- Connect your Arduino-compatible microcontroller via USB
- Launch Arduino IDE and open the Firmata sketch via the menu: File > Examples > Firmata > StandardFirmata
- Select your Arduino board type (e.g. Arduino Uno) via Tools > Board
- Select the port for your board via Tools > Serial Port > (the comm port of your Arduino)
- Upload the program by selecting File > Upload
- Close the Arduino IDE and kill it with fire
Setting Up Johnny-Five - Part 2
- Install Node JS
- Make a new project folder
- Make a new package.json
- npm install --save-dev johnny-five
DEMOs!!!!
Hello World - Code
var five = require('johnny-five');
var board = new five.Board();

board.on('ready', function() {
    // LED is on pin 11
    // Create a standard `led` component instance
    var led = new five.Led(11);

    // "blink" the led in 500ms on-off phase periods
    led.blink(500);

    board.repl.inject({
        led: led
    });
});
Hello World - layout

Hello World - In Action
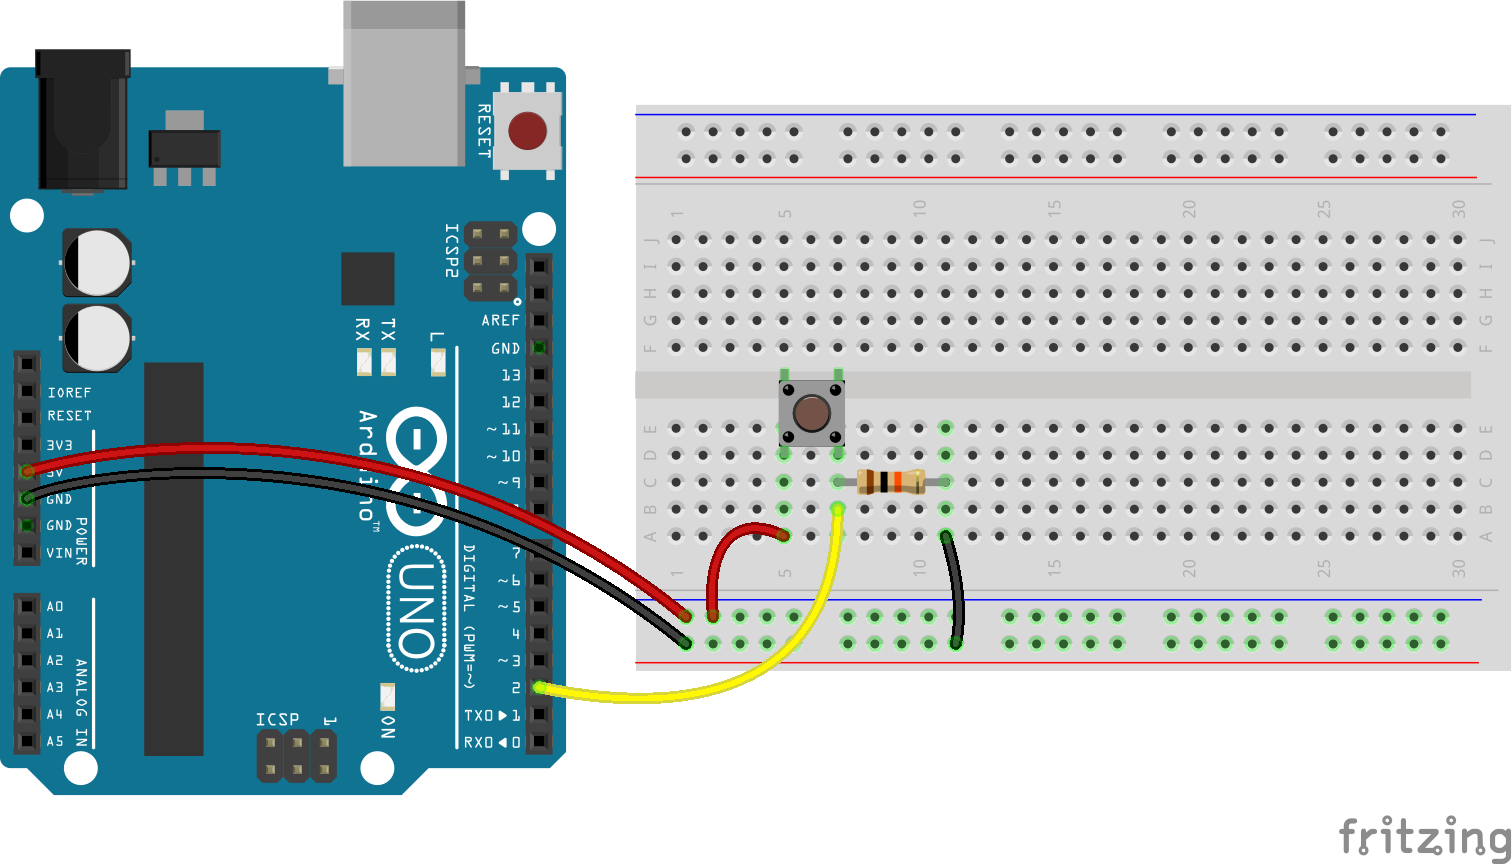
Button - Code
var five = require('johnny-five');
var board = new five.Board();
var button;
var led;

board.on('ready', function() {
    led = new five.Led(11);

    // Create a new `button` hardware instance.
    // This example allows the button module to
    // create a completely default instance
    button = new five.Button(2);

    // Inject the `button` hardware into
    // the Repl instance's context;
    // allows direct command line access
    board.repl.inject({
        button: button,
        led: led
    });

    // Button Event API

    // "down" the button is pressed
    button.on('down', function() {
        console.log('down');
        led.brightness(255);
    });

    button.on('hold', function() {
        console.log('hold');
        led.blink(500);
    });

    // "up" the button is released
    button.on('up', function() {
        console.log('up');
        led.stop(); // Stops the blinking
        led.brightness(0);
    });
});
Button - Layout
Button - In Action
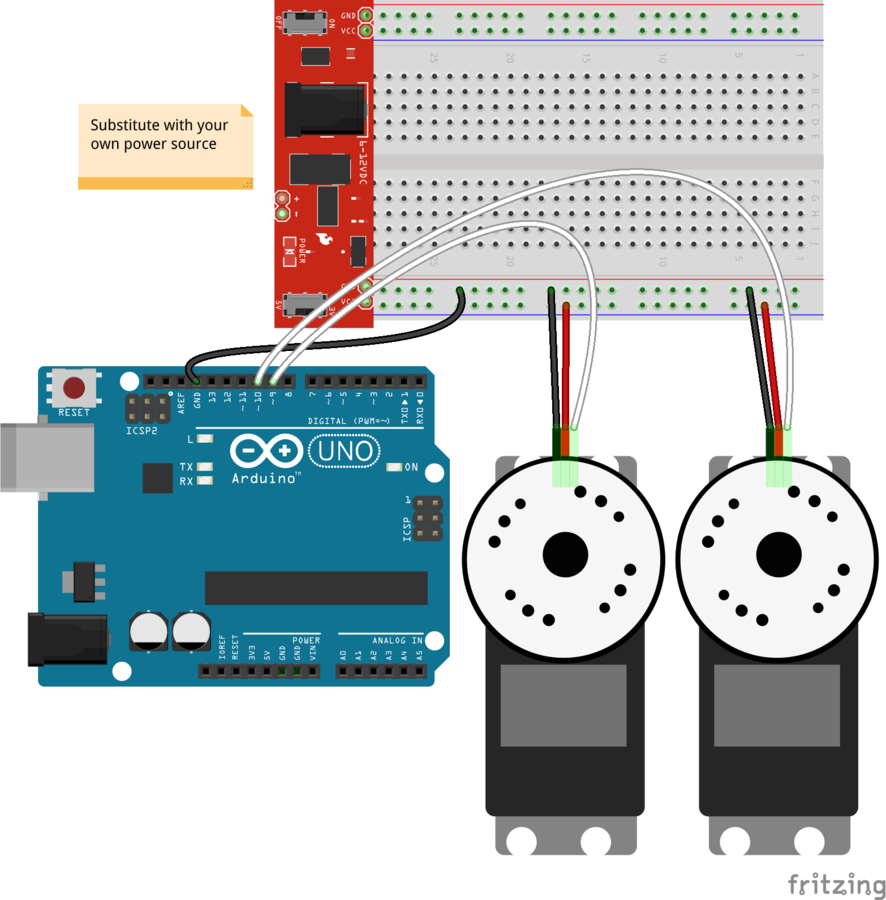
Joystick Pan Tilt Servo - Code
var five = require('johnny-five');
var board = new five.Board();

board.on('ready', function() {
    var range = [
        0,
        170
    ];

    // Servo to control panning
    var pan = new five.Servo({
        pin: 9,
        range: range
    });

    // Servo to control tilt
    var tilt = new five.Servo({
        pin: 10,
        range: range
    });

    // Joystick to control pan/tilt
    // Read Analog 0, 1
    // Limit events to every 50ms
    var joystick = new five.Joystick({
        pins: [
            'A0',
            'A1'
        ],
        freq: 100
    });

    tilt.center();
    pan.center();

    joystick.on('change', function() {
        console.log('y: ', this.y);
        console.log('x: ', this.x);

        tilt.to(five.Fn.scale(this.y, -1, 1, 0, 170));
        pan.to(five.Fn.scale(this.x, -1, 1, 0, 170));
    });
});
Joystick Pan Tilt Servo - Layout
Joystick Pan Tilt Servo - In Action
Express Server - Web Meets Real World
- Run `node app.js`
- Open up `localhost:3000`
- Source Files
Cool Story Bro, Now What?
- House Automation
- Nerf Turret
- NodeBot
- Home Arcade
- Home Brewing
- Halloween Costumes
- Art Installations
- 3d Printers
- Just Use Your....
Build It and The ideas Will Come
PSsT, Who's Your Dealer?
PSsT, Who's Your Dealer?
- SparkFun - Good prices, close by just past Boulder
- Adafruit - great products and prices
- MicroCenter - convenient but more expensive
- RadioShack - believe it or not they still have stuff even bot kits
Questions?
Still Comic Sans TRolling
Getting Started with Arduino & Johnny-Five
By Matt Webb


