Welcome!

Creating a Simple Spotify App Using ExtReact

What is ExtReact?
It's not a framework 🎉
Instead, it's a set of over 100 robust, pre-built, professionally tested UI components, used to create stunning applications
Instead, it's a set of over 100 robust, pre-built, professionally tested UI components, used to create stunning applications
Instead, it's a set of over 100 robust, pre-built, professionally tested UI components, used to create stunning applications
Instead, it's a set of over 100 robust, pre-built, professionally tested UI components, used to create stunning applications
Instead, it's a set of over 100 robust, pre-built, professionally tested UI components, used to create stunning applications
Instead, it's a set of over 100 robust, pre-built, professionally tested UI components, used to create stunning applications
Instead, it's a set of over 100 robust, pre-built, professionally tested UI components, used to create stunning applications
There's also tooling to help with styling, debugging and testing
The components range from basics — like buttons, labels, panels and input fields...
through amazing and sophisticated components, like trees, grids, calendars, and charts
Let's take a look:
Licensing
Sencha offers flexible affordable licensing
And...
Your license includes experienced technical support — so there's someone to help if you need guidance
Mechanics
Before we start coding, let's cover a few mechanics
This is a series of videos that show how to create a simple Spotify app using ExtReact
What you'll be coding

You'll find links to resources below, including links to the code
The presentation is done via these techniques
-
The two of us talking, and pair programming
-
Looking at API docs and other resources
-
These slides (which are the presentation outline)
Get starter app
Spotify
Use ExtReact
Set up Spotify
Get recent releases
Album as a class
Layout
Show tracks
Audio preview
Track features
DataView
Get ExtReact trial
Album details
Get starter app
Spotify
Use ExtReact
Set up Spotify
Get recent releases
Album as a class
Layout
Show tracks
Audio preview
Track features
DataView
Get ExtReact trial
Album details
Get access to the ExtReact npm repository.
Goals
-
Sign up for ExtReact trial
-
Receive confirmation email
-
Login and confirm
Steps
Steps
Go to Getting Started with ExtReact and perform steps 1 and 2.
Once you get your trial confirmation email, log in using the username and password found in the email.
Get starter app
Spotify
Use ExtReact
Set up Spotify
Get recent releases
Album as a class
Layout
Show tracks
Audio preview
Track features
DataView
Get ExtReact trial
Album details
Get and run a React starter app.
Goals
-
Get a copy of the starter app
-
Run the app
Steps
Overview
ExtReact Spotify is in a git repo, and uses tags to indicate which commits correspond to the code at the end of each lecture topic.
Steps
1. Clone the starter app
Use a terminal window and navigate to the folder where you want to do your work. Then enter this command:
git clone --branch getting-started https://github.com/sencha/ext-react-spotify.git
As a result, the directory should look like this:
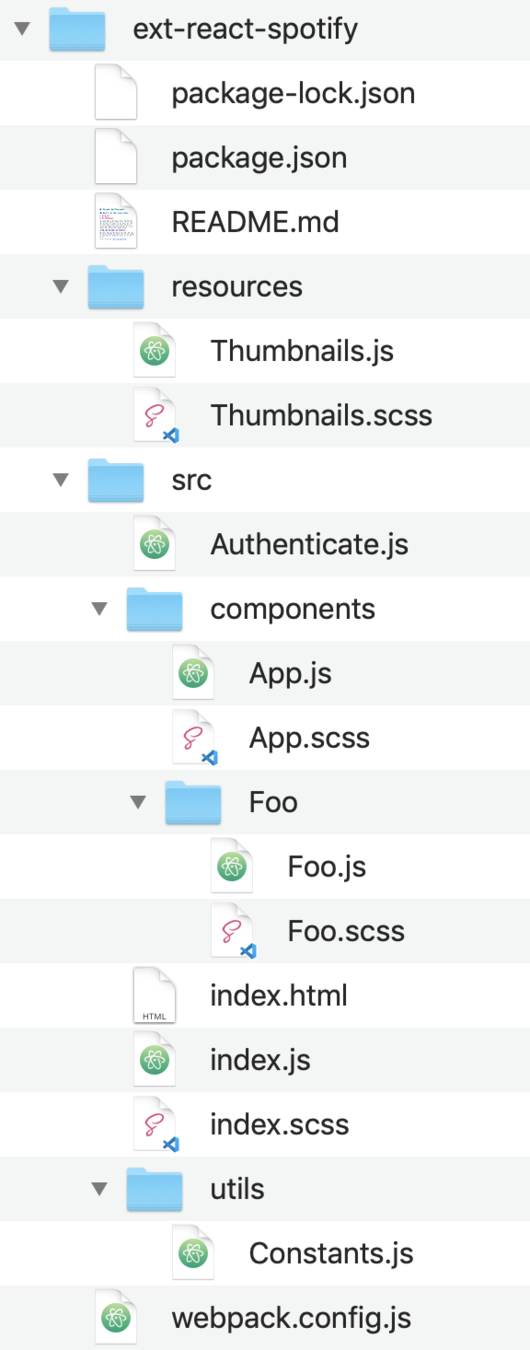
2. Install dependent packages
Use a terminal window and navigate to your project folder, and run this command:
git install
3. Run the app
Use a terminal window and navigate to your project folder, and run this command:
git start
This builds and runs the app in a new browser window.
4. Inspect the source code
Using a source code editor, open index.html and note the <div id="root"></div>.
Open index.js and note the render(<App />, document.getElementById('root')); — this tells React to render the App component to the element specified
in index.html.
Open src/components/App.js. It renders a single component <Foo>.
Open src/components/Foo/Foo.js. It renders a div whose contents reference
a constant defined in src/utils/Constants.js.
Get starter app
Spotify
Use ExtReact
Set up Spotify
Get recent releases
Album as a class
Layout
Show tracks
Audio preview
Track features
DataView
Get ExtReact trial
Album details
Modify the starter app so it can use ExtReact.
Goals
-
Use launch()
-
Remove the root element
-
Add the <ExtReact> element
-
Use an ExtReact <Panel>
Steps
Steps
1. Remove the root element from index.html
Use a code editor and remove the contents of the <body> element. Save
your changes and the app should fail, because index.js is still referencing
root, and it no longer exists.
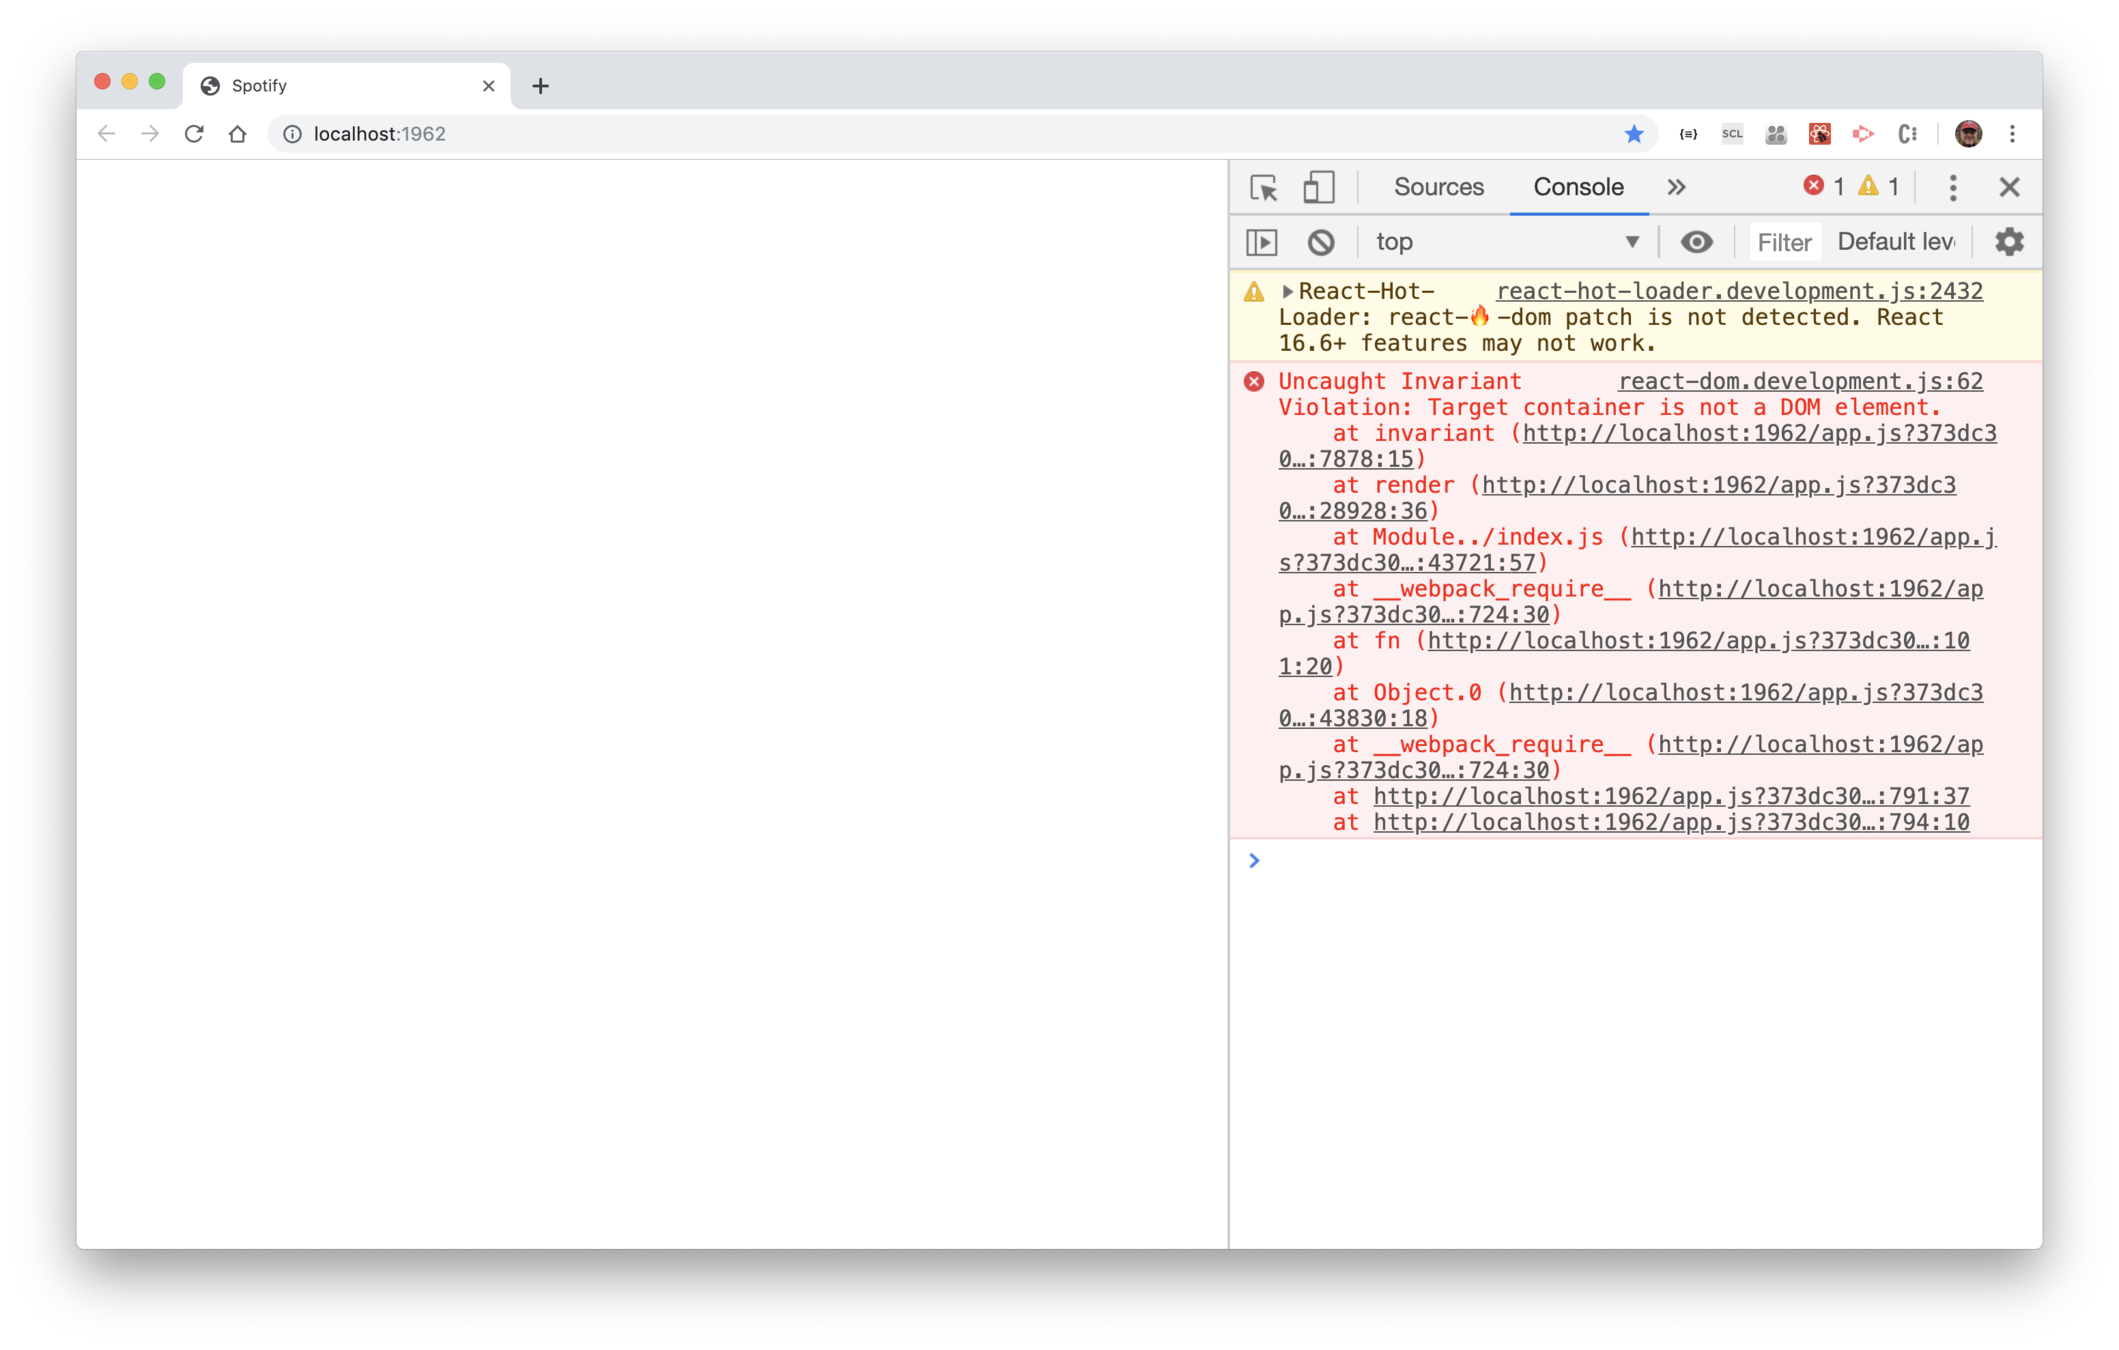
2. Use the ExtReact render() function
Use a code editor and edit index.js. Remove the
import for render. Then add these imports:
Then replace the render() call with this statement:
Save your changes, and the app should run.
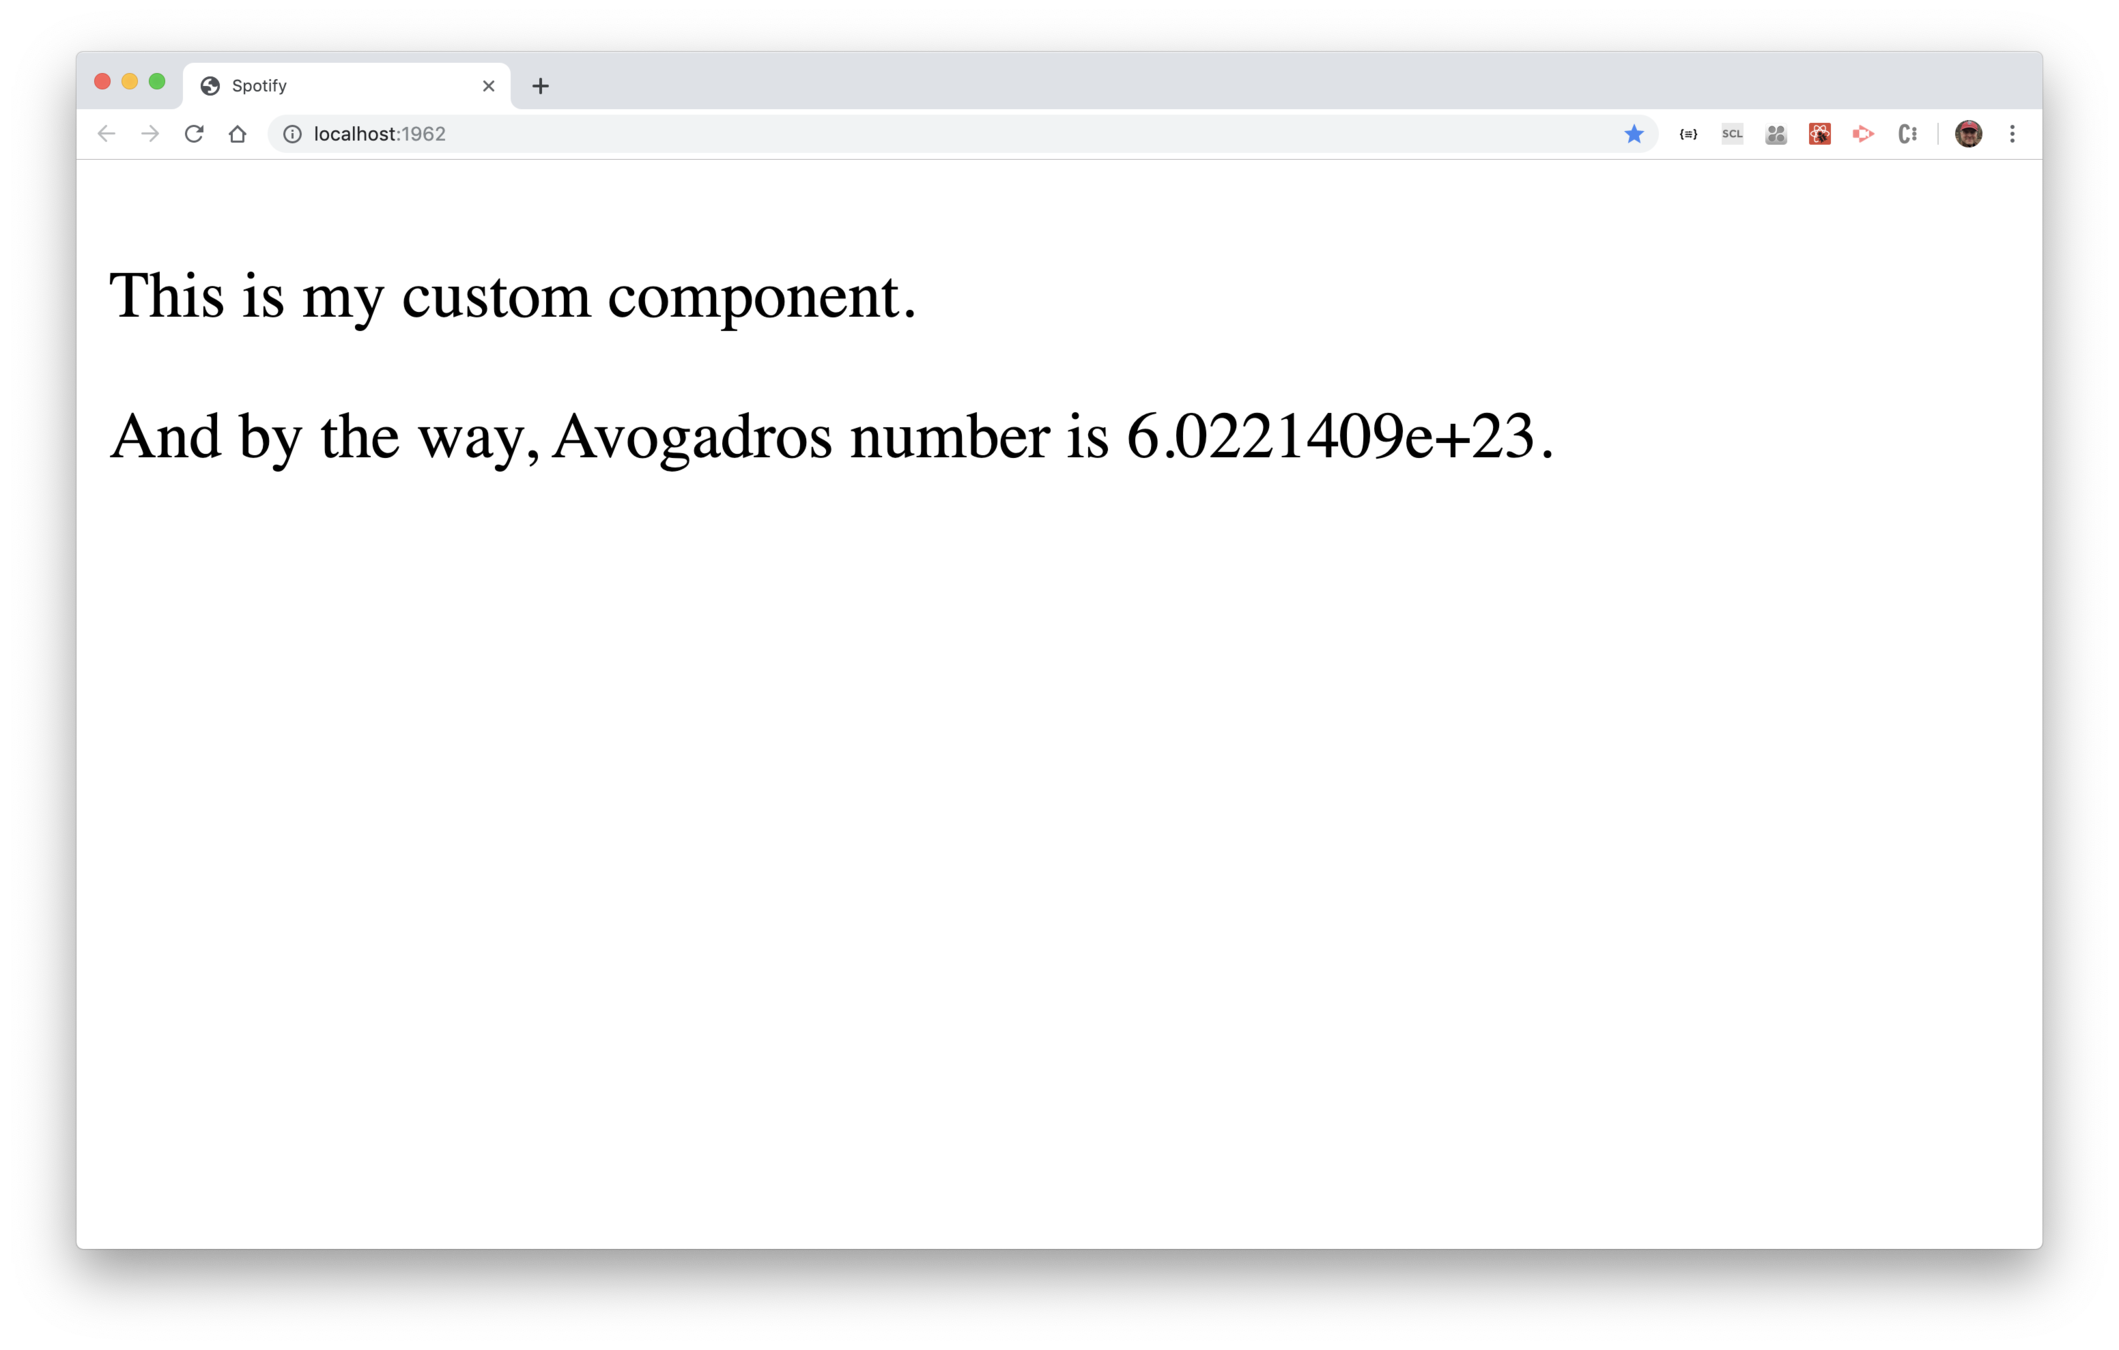
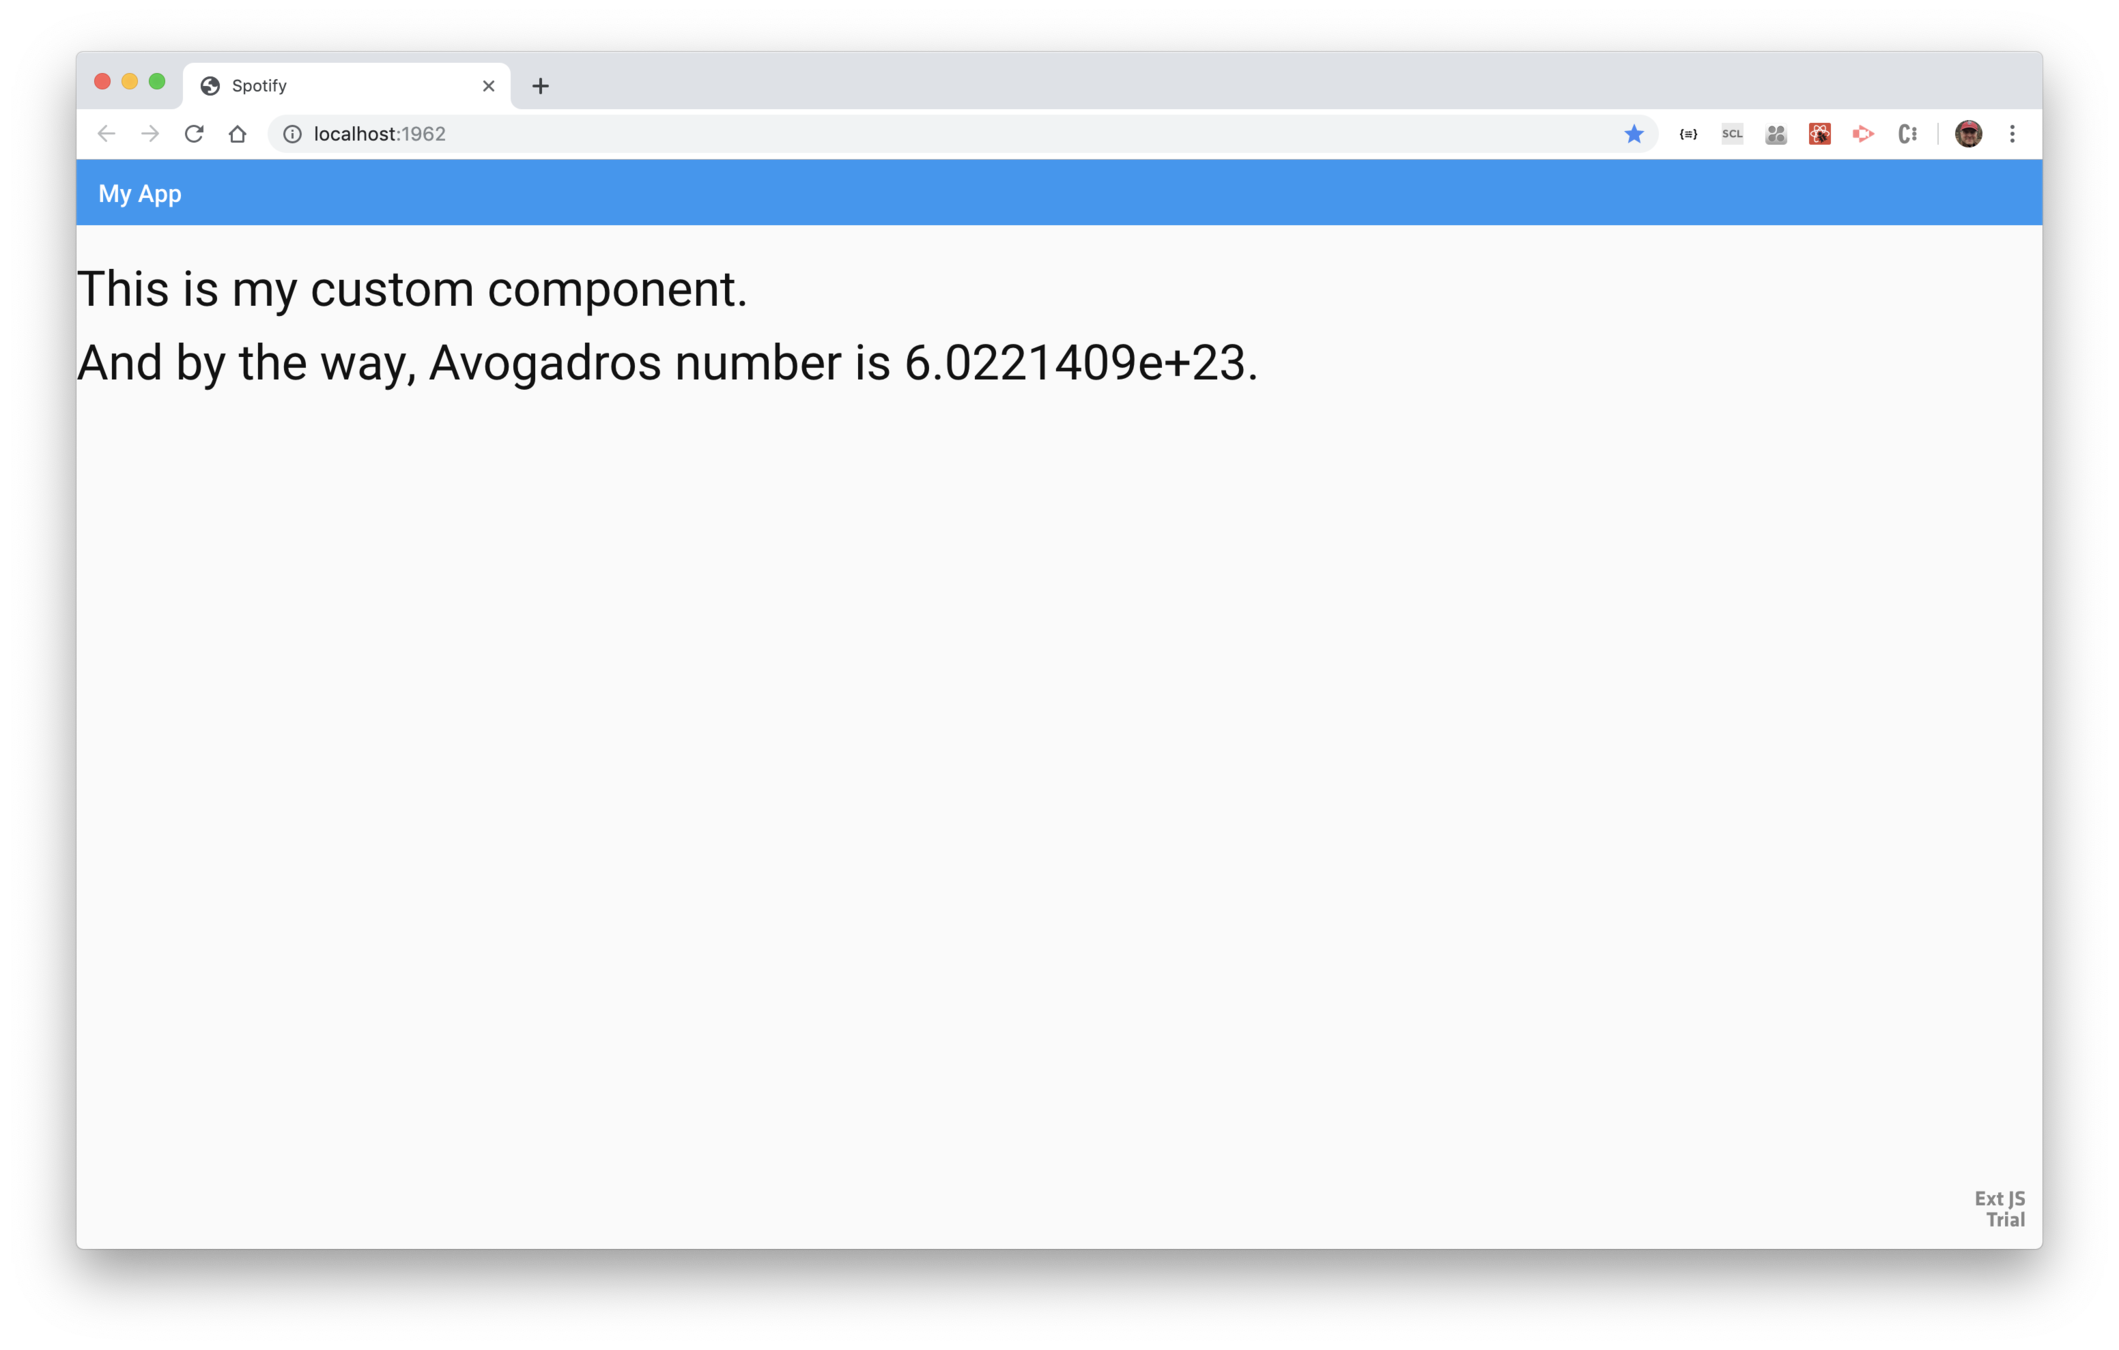
3. Use an ExtReact component
Use a code editor and edit src/components/App.js.
Import the ExtReact <Panel> component.
Then modify the render() method so <Foo>
is contained within an ExtReact <Panel>.
Set the panel's title attribute to My App.
Save your changes and the app should run, but now you'll see the the panel's titlebar, showing the title.
Source
To check out the ending code, use a terminl window and navigate to your project folder, then enter this command:
To browse the code, visit https://github.com/sencha/ext-react-spotify/tree/use-extreact
Get starter app
Spotify
Use ExtReact
Set up Spotify
Get recent releases
Album as a class
Layout
Show tracks
Audio preview
Track features
DataView
Get ExtReact trial
Album details
Set up Spotify user account, set up developer app, and modify starter app to authenticate.
Goals
-
Get a user account
-
Register an app
-
Authentication overview
-
Add authentication
Steps
Steps
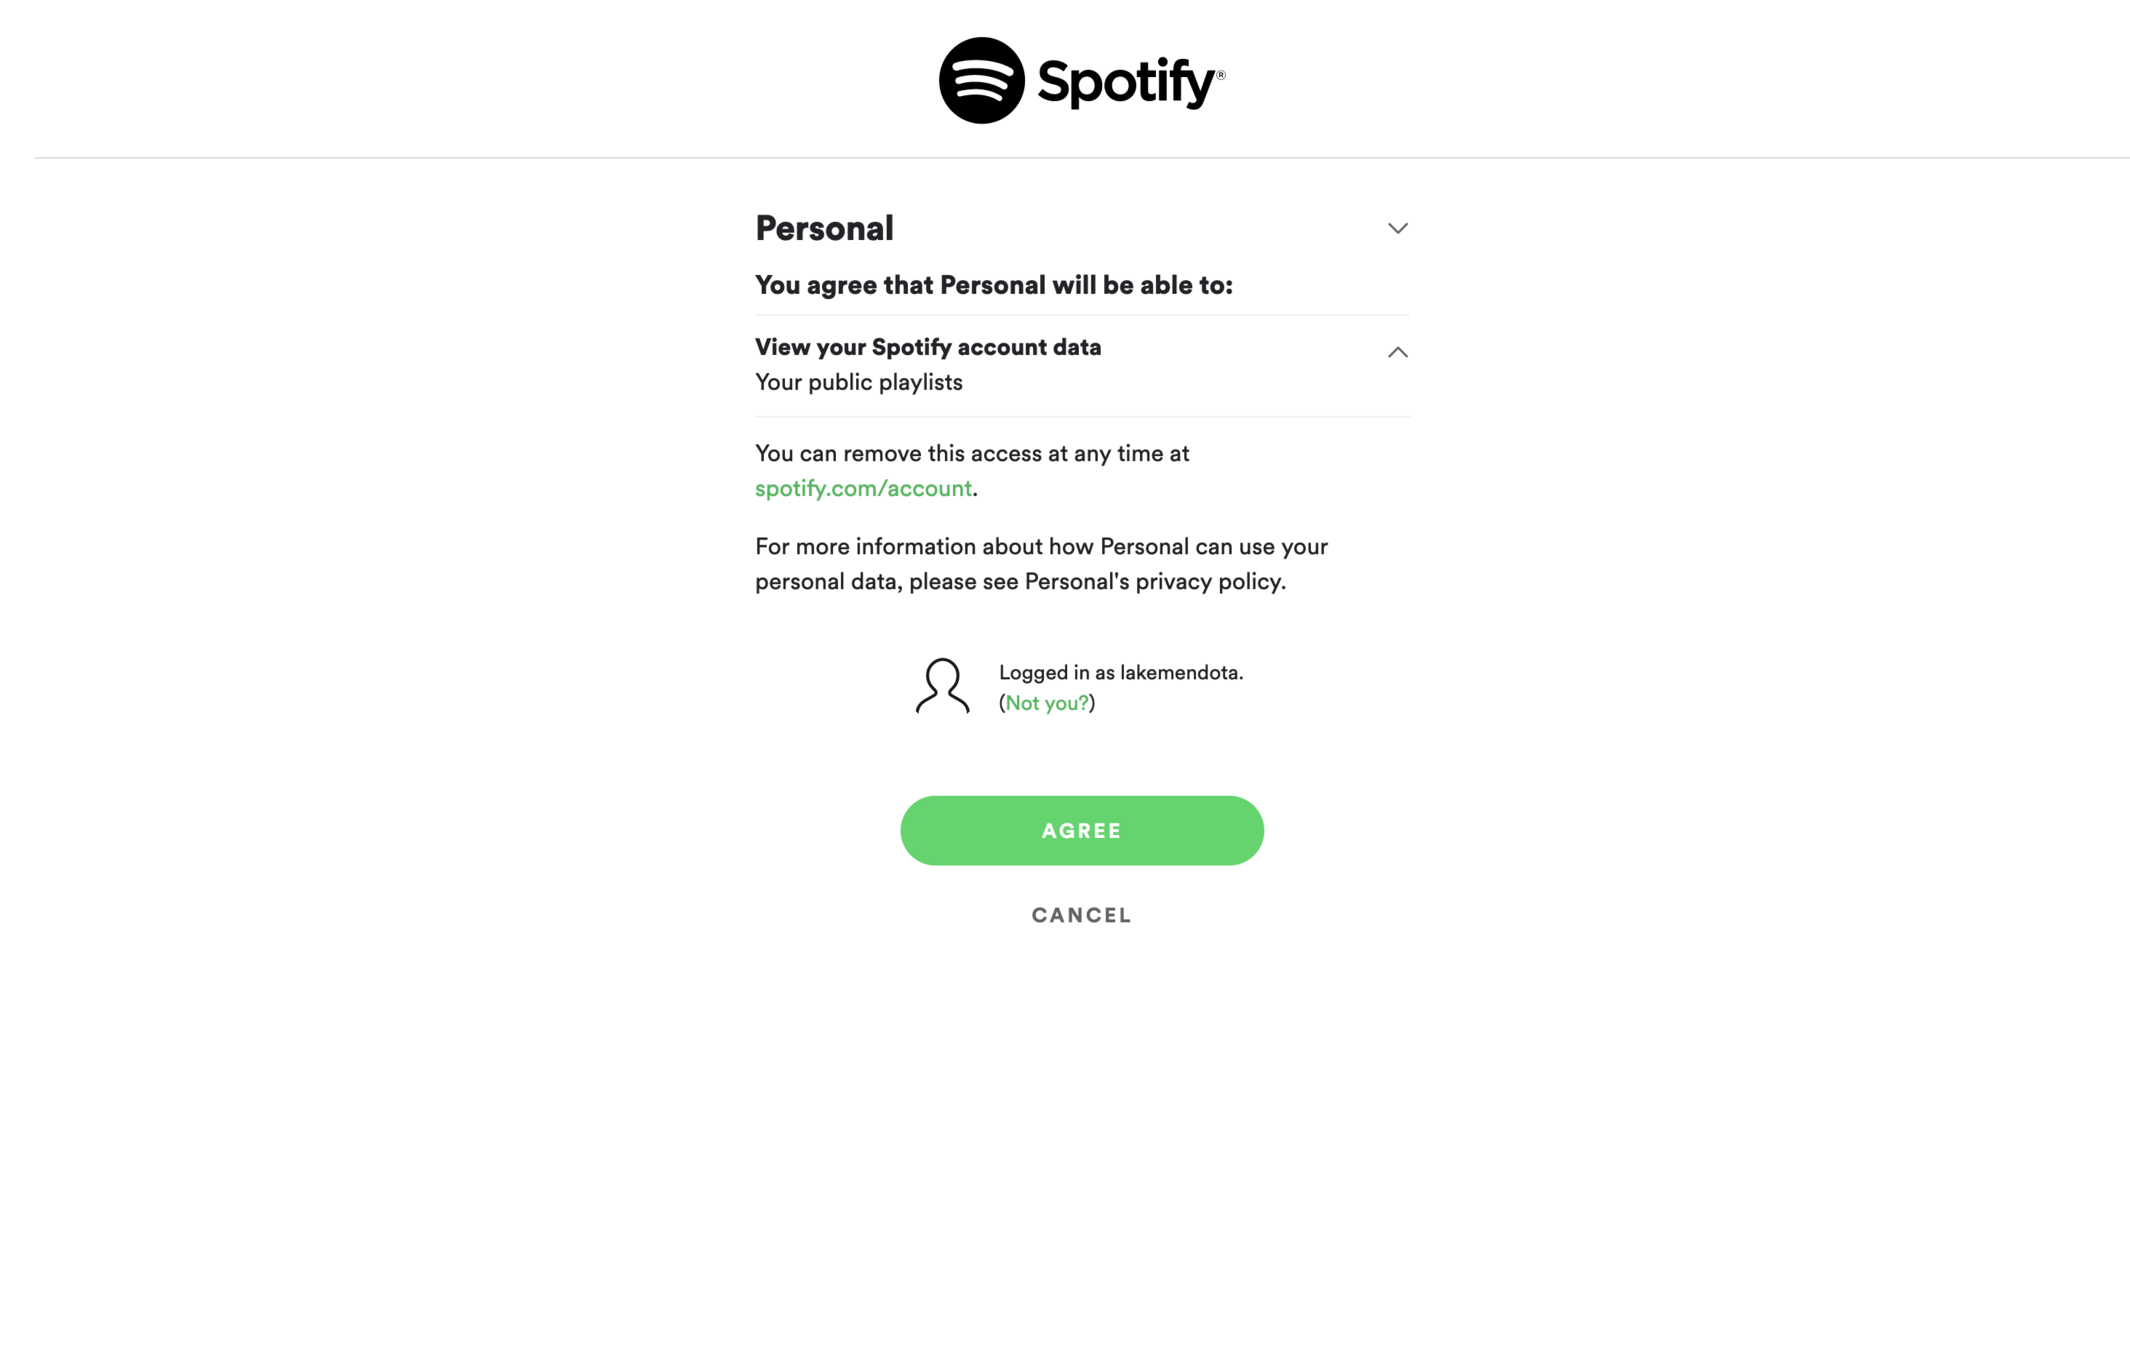
1. Get a Spotify user account
Sign up for Spotify at https://www.spotify.com/us/signup/.
2. Create an app in Spotify
Once you've completed the signup process, visit the Spotify developer dashboard, and click on My New App / Create an App, and follow the steps. When you're done, copy the client ID.
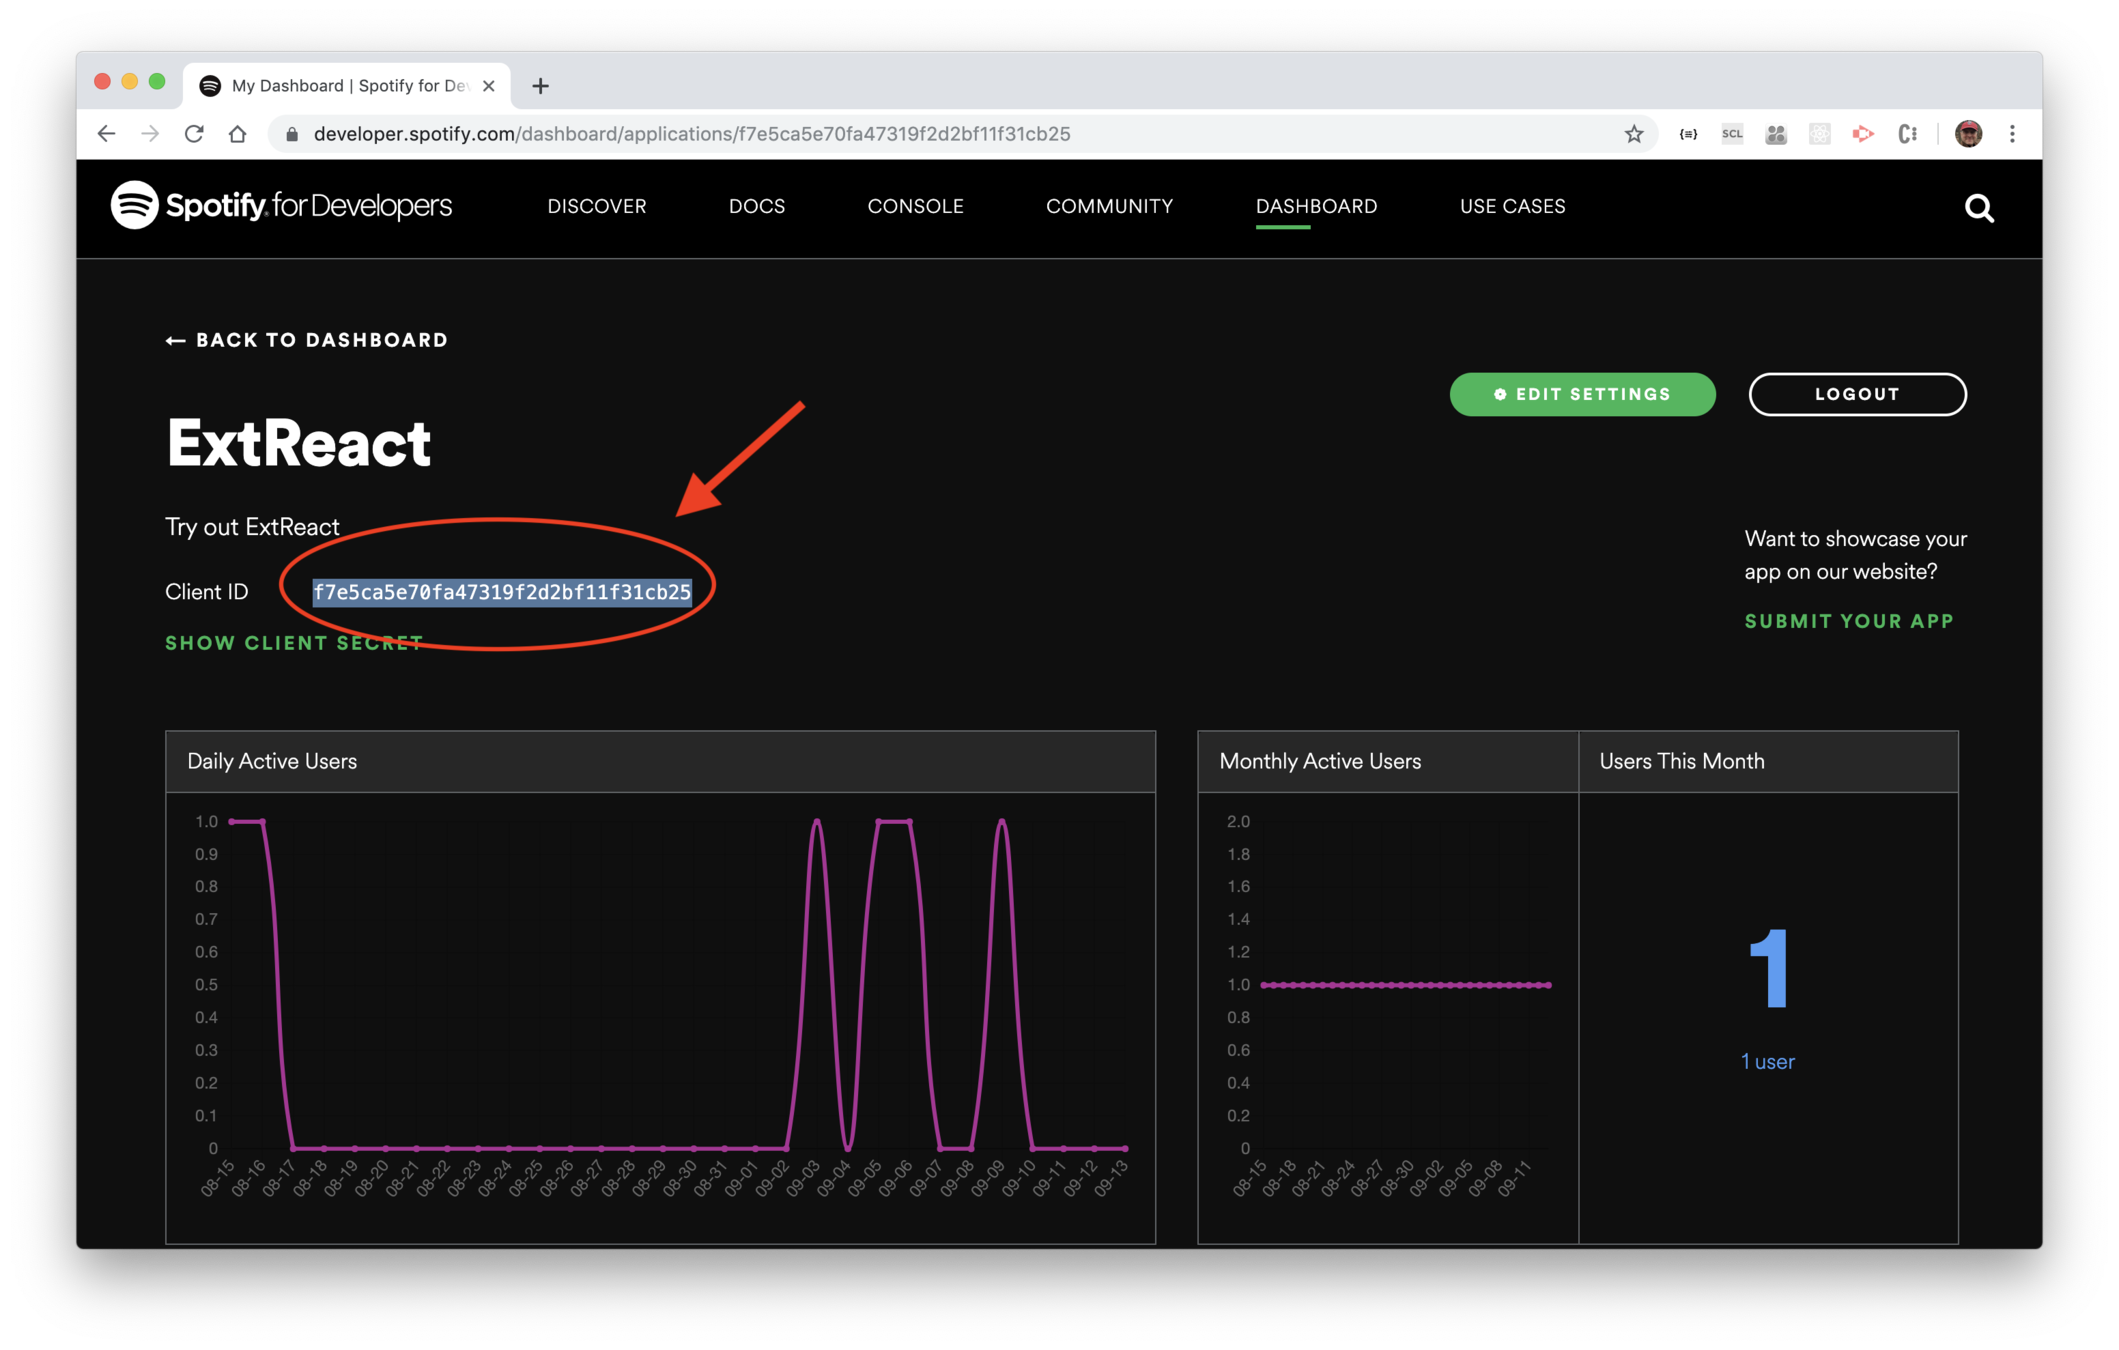
3. Use the clent ID in your app
Use a code editor and edit src/Authenciate.js and
replace your-client-id with the client ID from Spotify.
4. Run the authenticate() function
Use a code editor to edit app/index.js and
import the authenticate() function.
import authenticate from './Authenticate';
Then run it immediately before the call to launch().
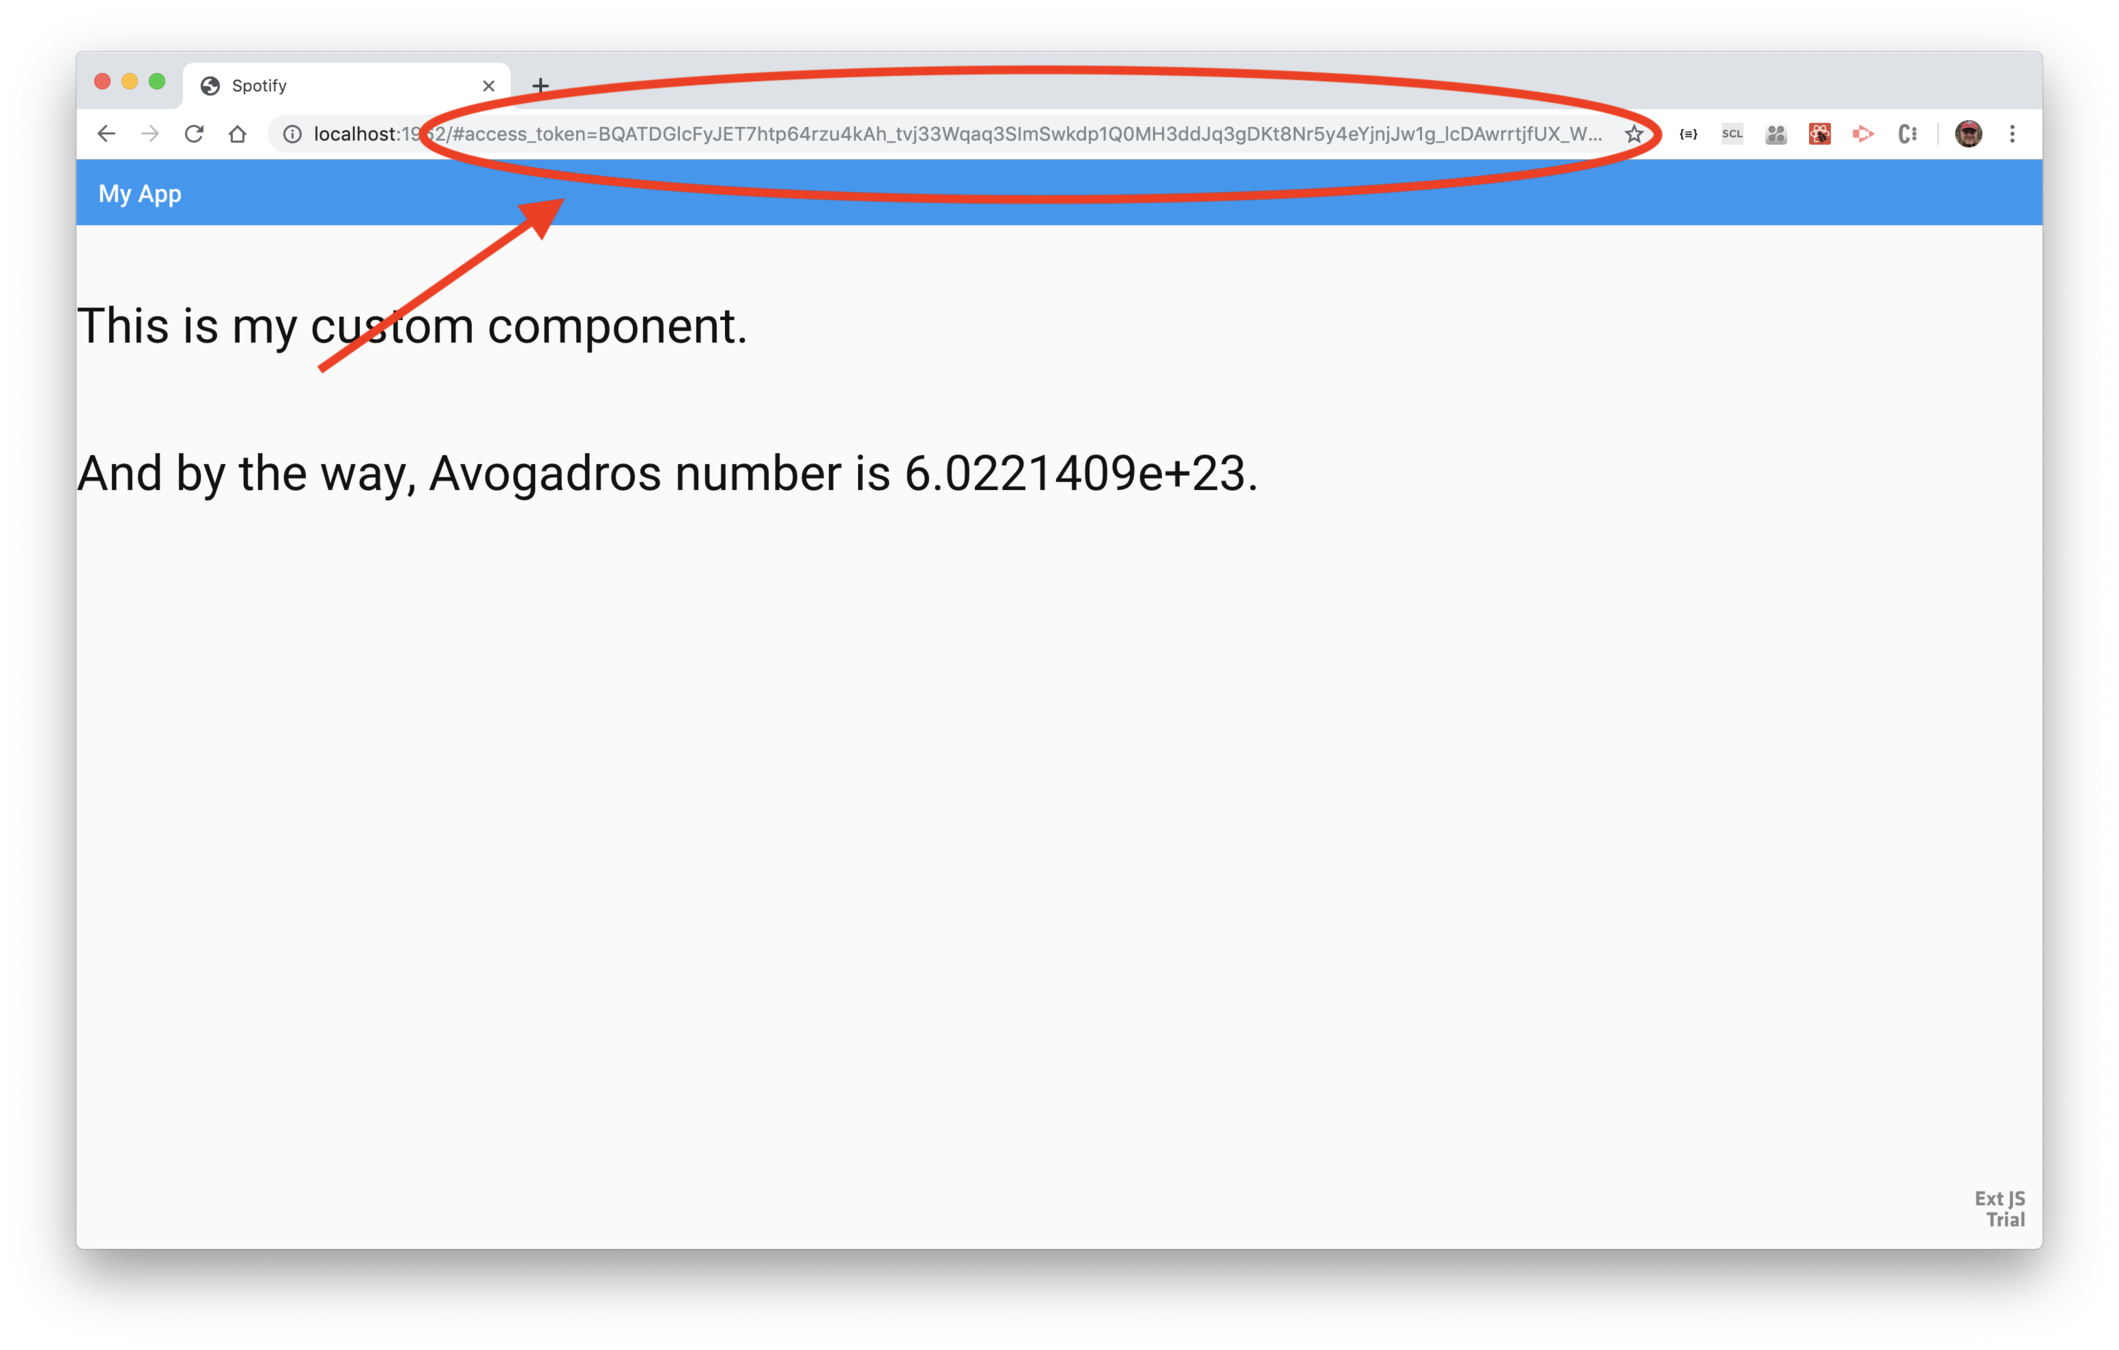
Save your changes and the app should refresh, and immediately redirect to Spotify.
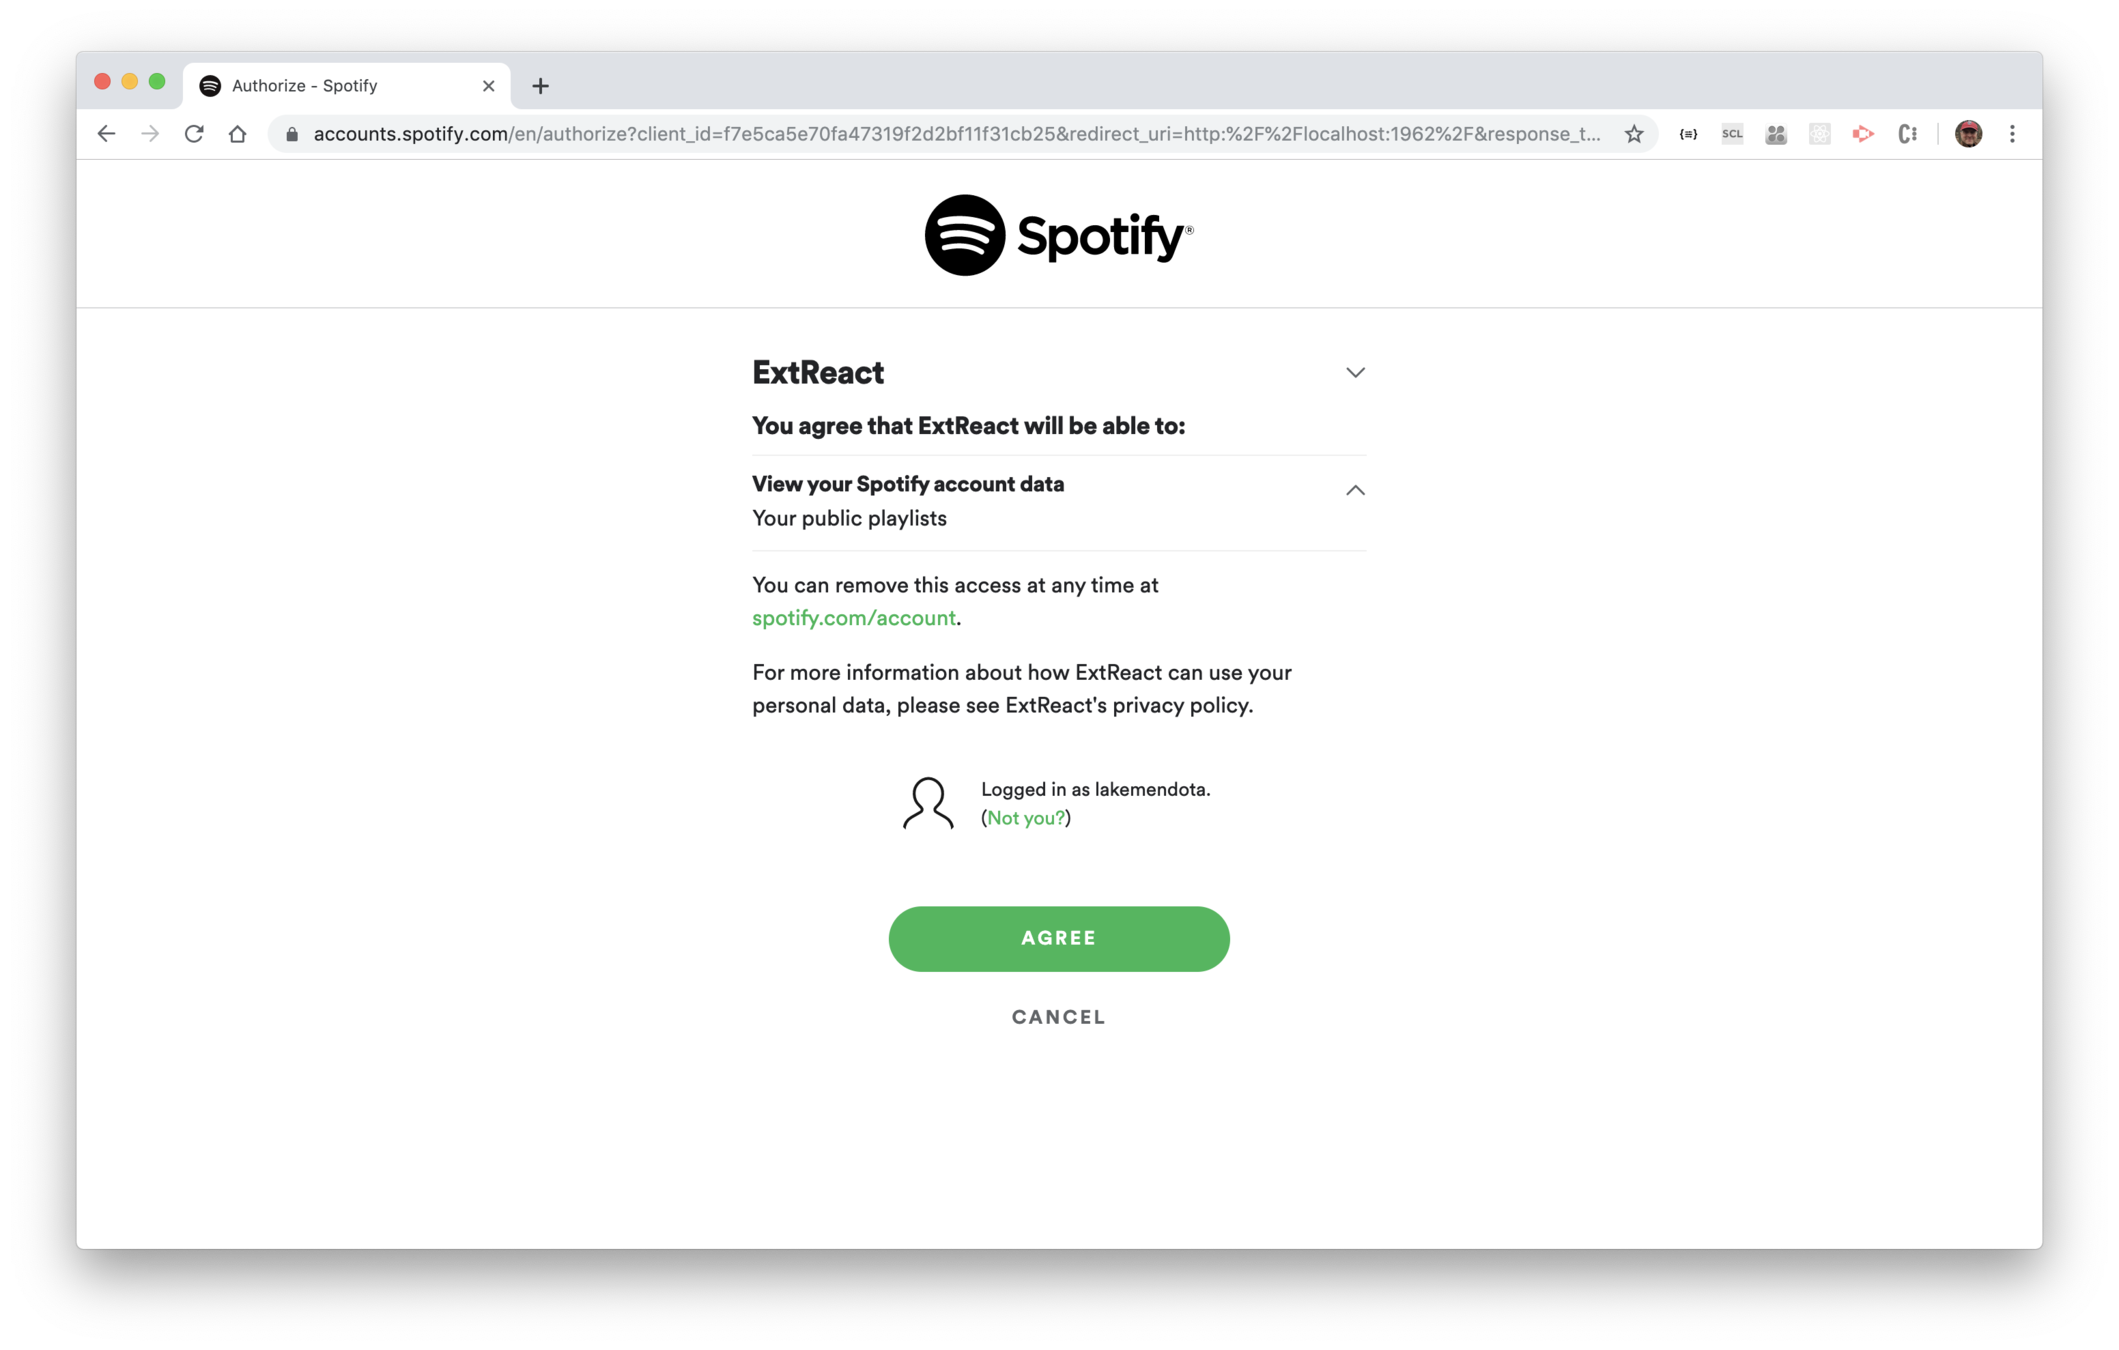
5. Authenticate in Spotify
Login and agree in Spotify, and the app should redirect back to your app. Note that the Spotify token and other Spotify information is in the app URL.
Get starter app
Spotify
Use ExtReact
Set up Spotify
Get recent releases
Album as a class
Layout
Show tracks
Audio preview
Track features
DataView
Get ExtReact trial
Album details
Fetch new releases from Spotify.
Goal
-
Review the Spotify API
-
Use an Ext.data.Store
Steps
Steps
1. Create a Ext.data.Store
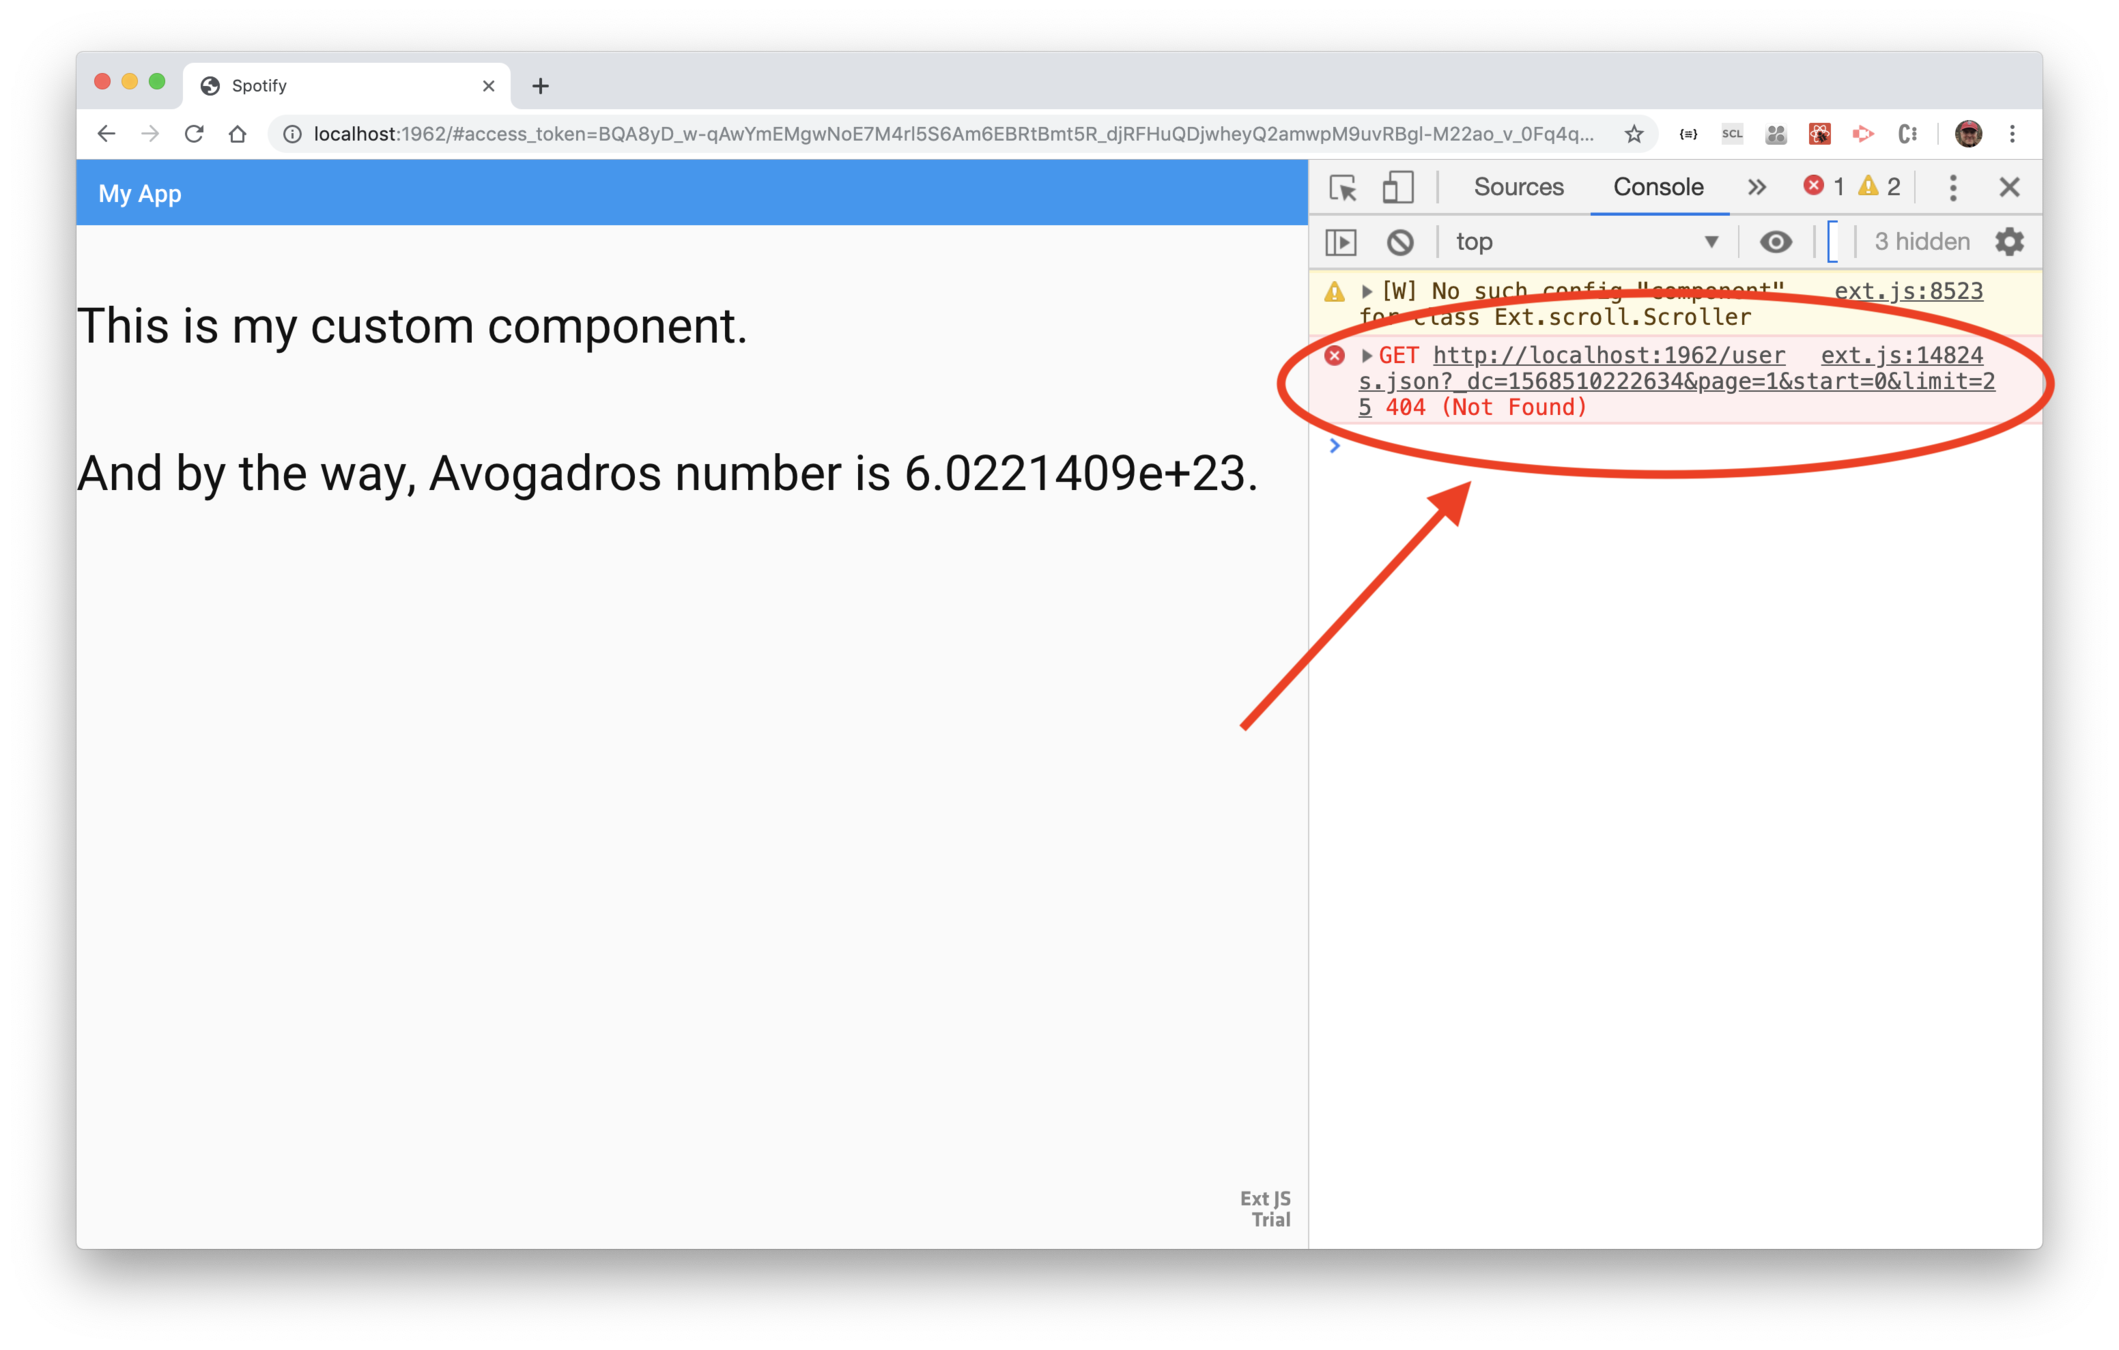
Use a code editor and open src/components/App.js. Then
open
the API docs for Ext.data.Store and copy the example to the App
constructor. Then delete the model specification.
Save your changes. The app will run, but you'll have a run-time error because the proxy URL uses what was in the API example — you need to use the URL for the Spotify feed instead.
2. Clean up the store definition
First, change the variable you're assigning the
store to from var myStore to this.newReleases.
By making it an instance property, we can reference
the store anywhere within the class.
Then go to the Spotify API docs for new
releases and copy the endpoint URL. Paste it into the proxy configuation
in src/components/App.js.
Save your changes, and the app still runs, but now you get a different error, telling you that CORS is blocking the request because it contains the wrong header.
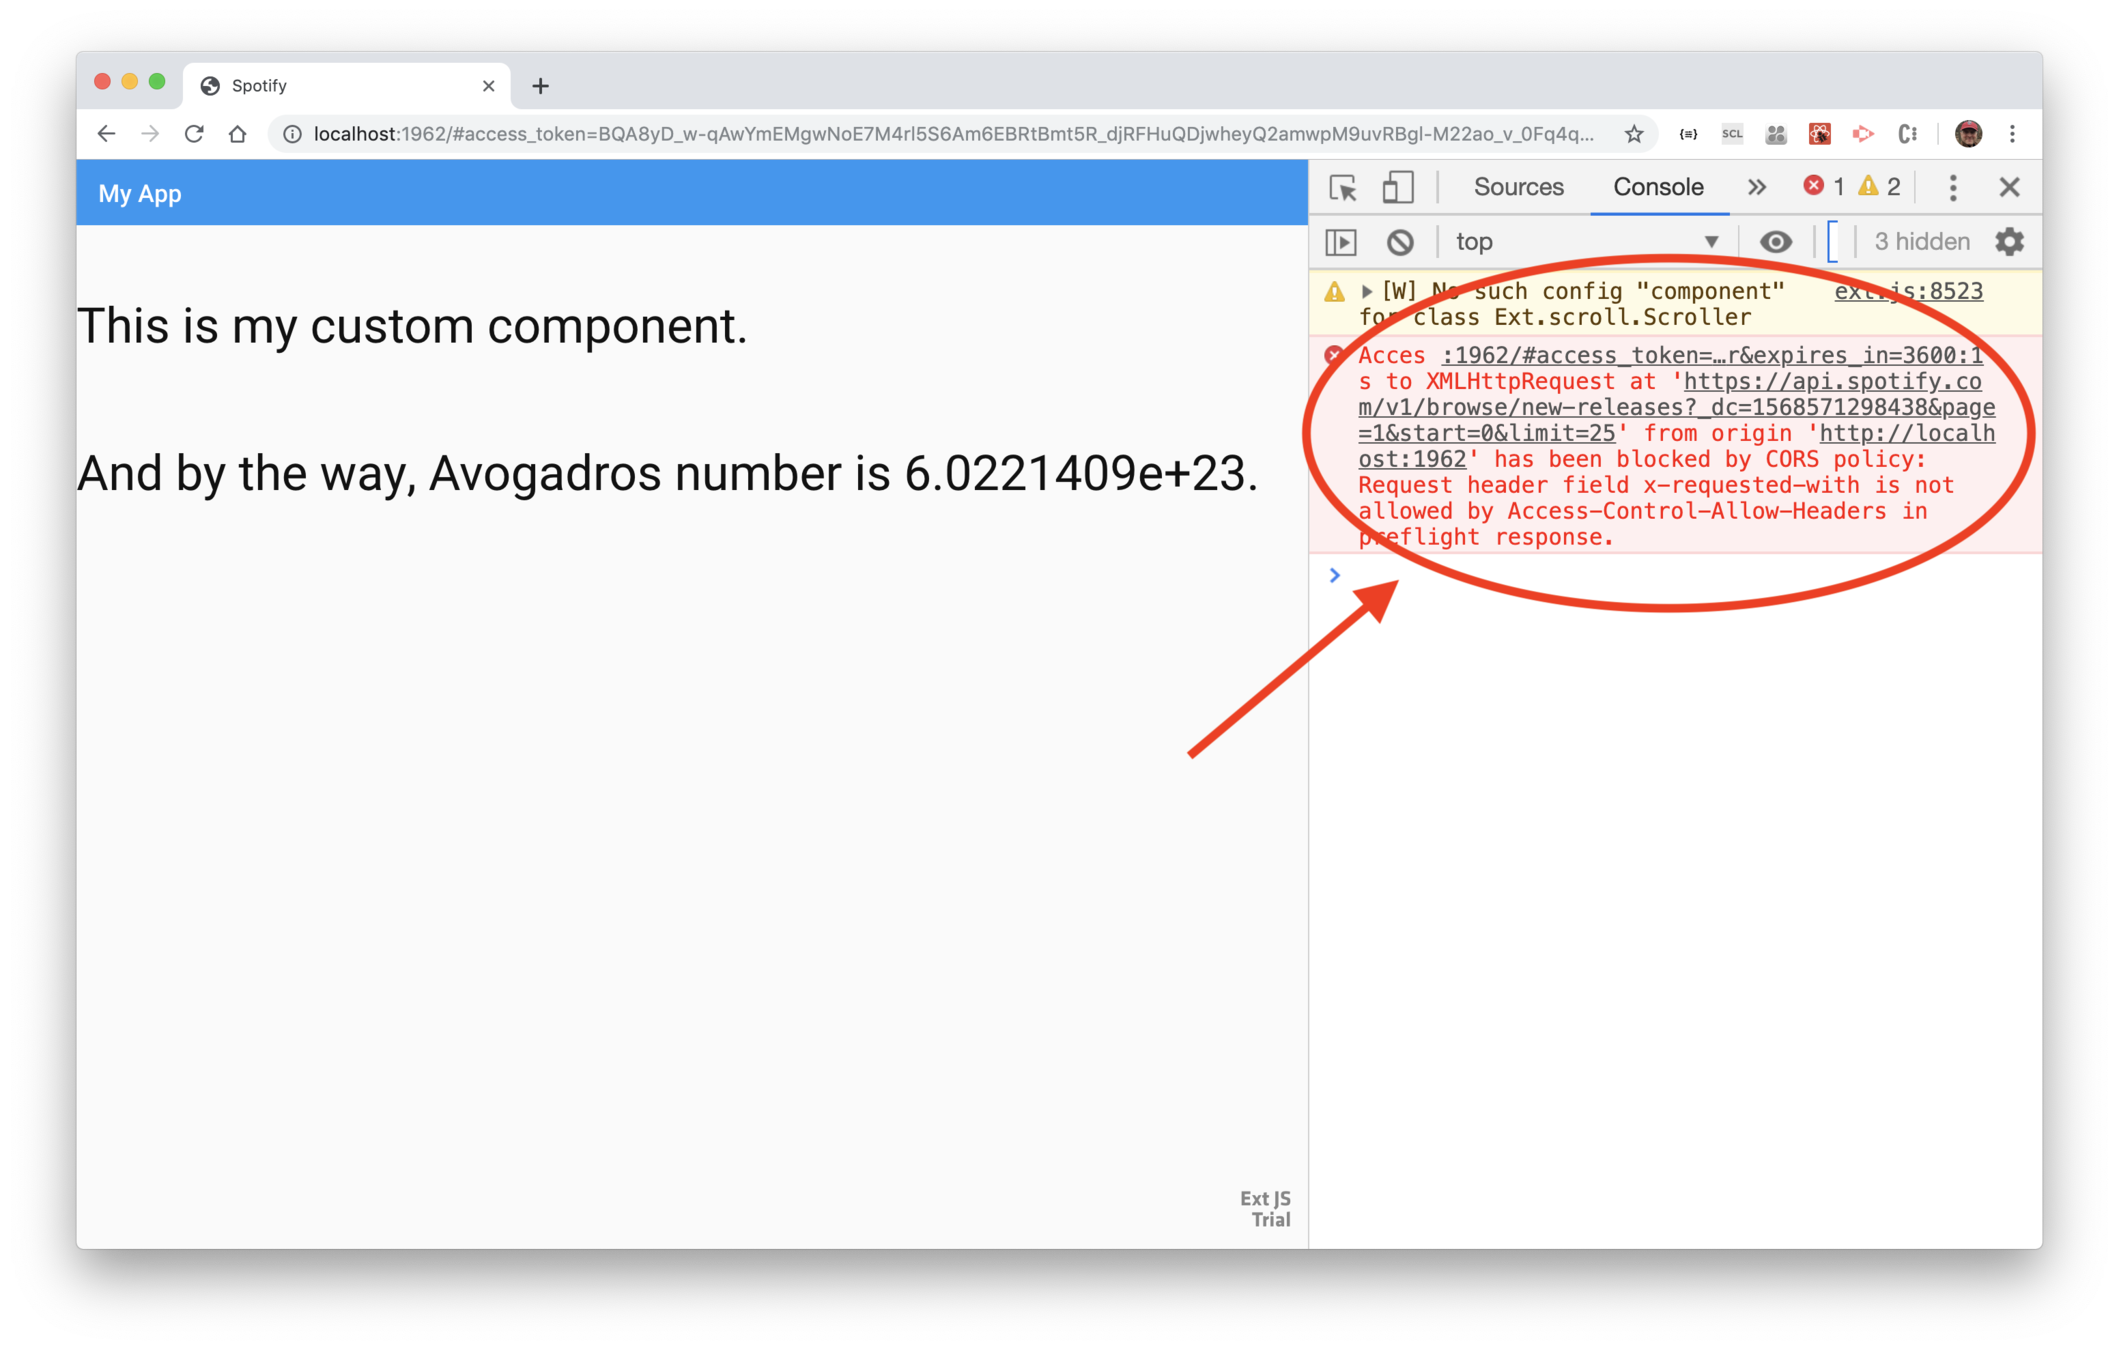
3. Remove the x-requested-with header from the request
Now edit the proxy configuration and add a configuation
useDefaultXhrHeader:false.
Save your changes, and the app runs, but now (finally!) you are getting an error telling you you need the Spotify access token.
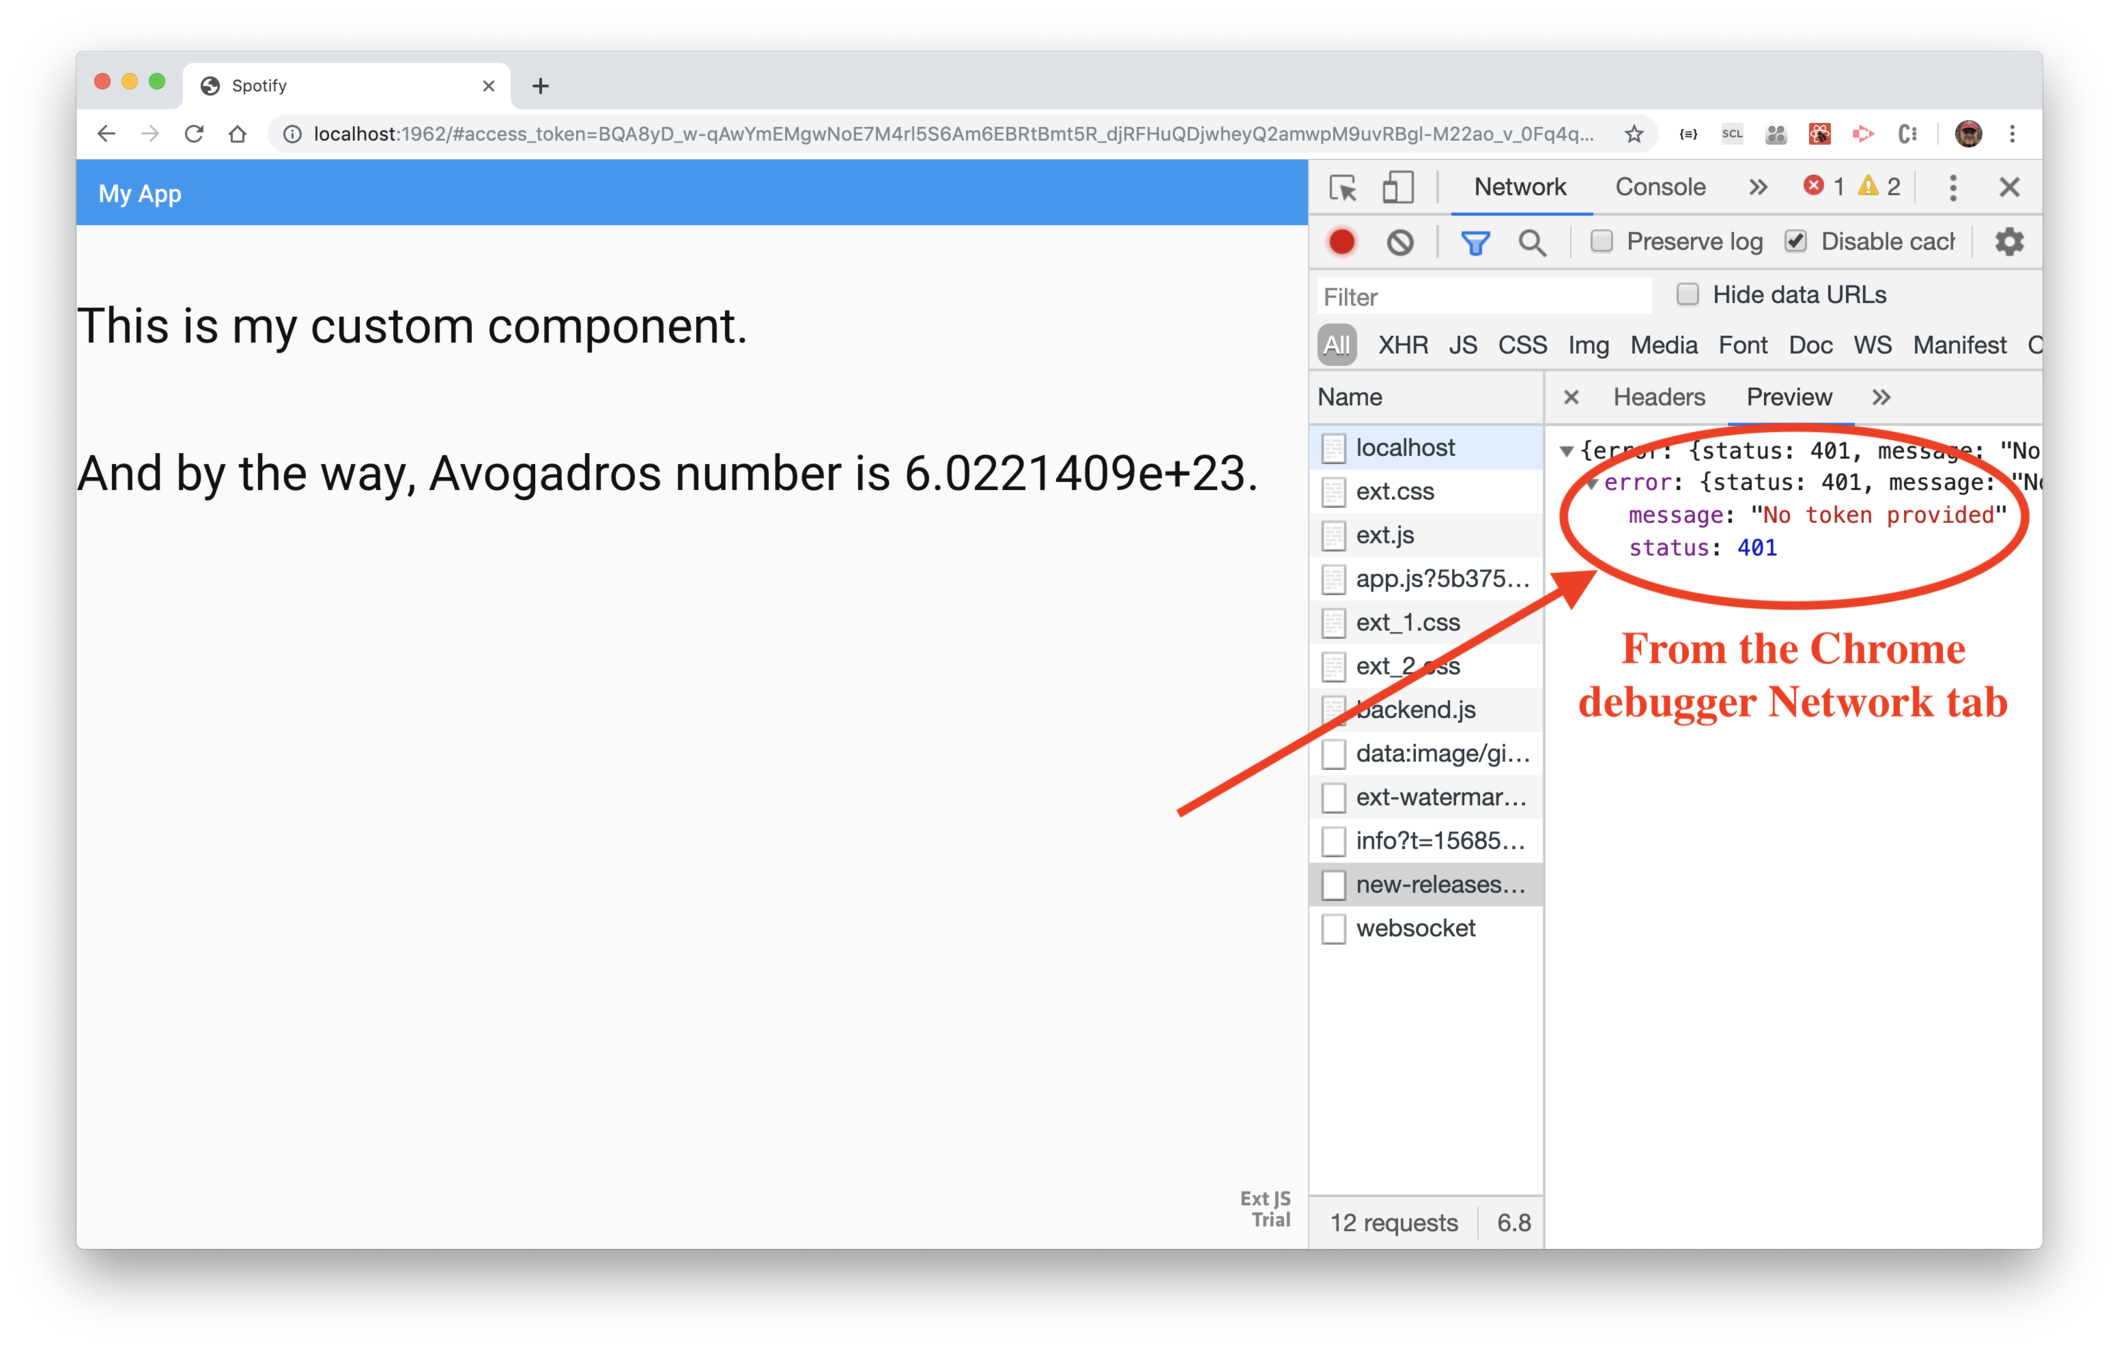
4. Add the access token
The access token is returned from the authenticate()
function, which is being called from src/index.js.
Use a code editor and edit src/index.js and save the
token to a local variable, then pass it to <App>.
Now edit src/components/App.js and modify the
store definition to include the header
and token.
Save your changes and the app runs without error. If you look at network traffic, you'll see the data in the response.
5. Add debug code
Use a code editor and add a global property to
src/index.js.
Then edit src/components/App.js and add
a reference to the <App> instance to the
global property.
The code adds an entry to
window.Spotify corresponding to the class
name, and assigns the instance to it. In other
words, there will be property named window.Spotify.App,
set to the instance of the App component.
6. Try out the new property
In your running app, use the Chrome debugger console and enter.
In that statement, Spotify.App is instance, newReleases
is the instance field that holds the store, and getCount()
is a method of Ext.data.Store.
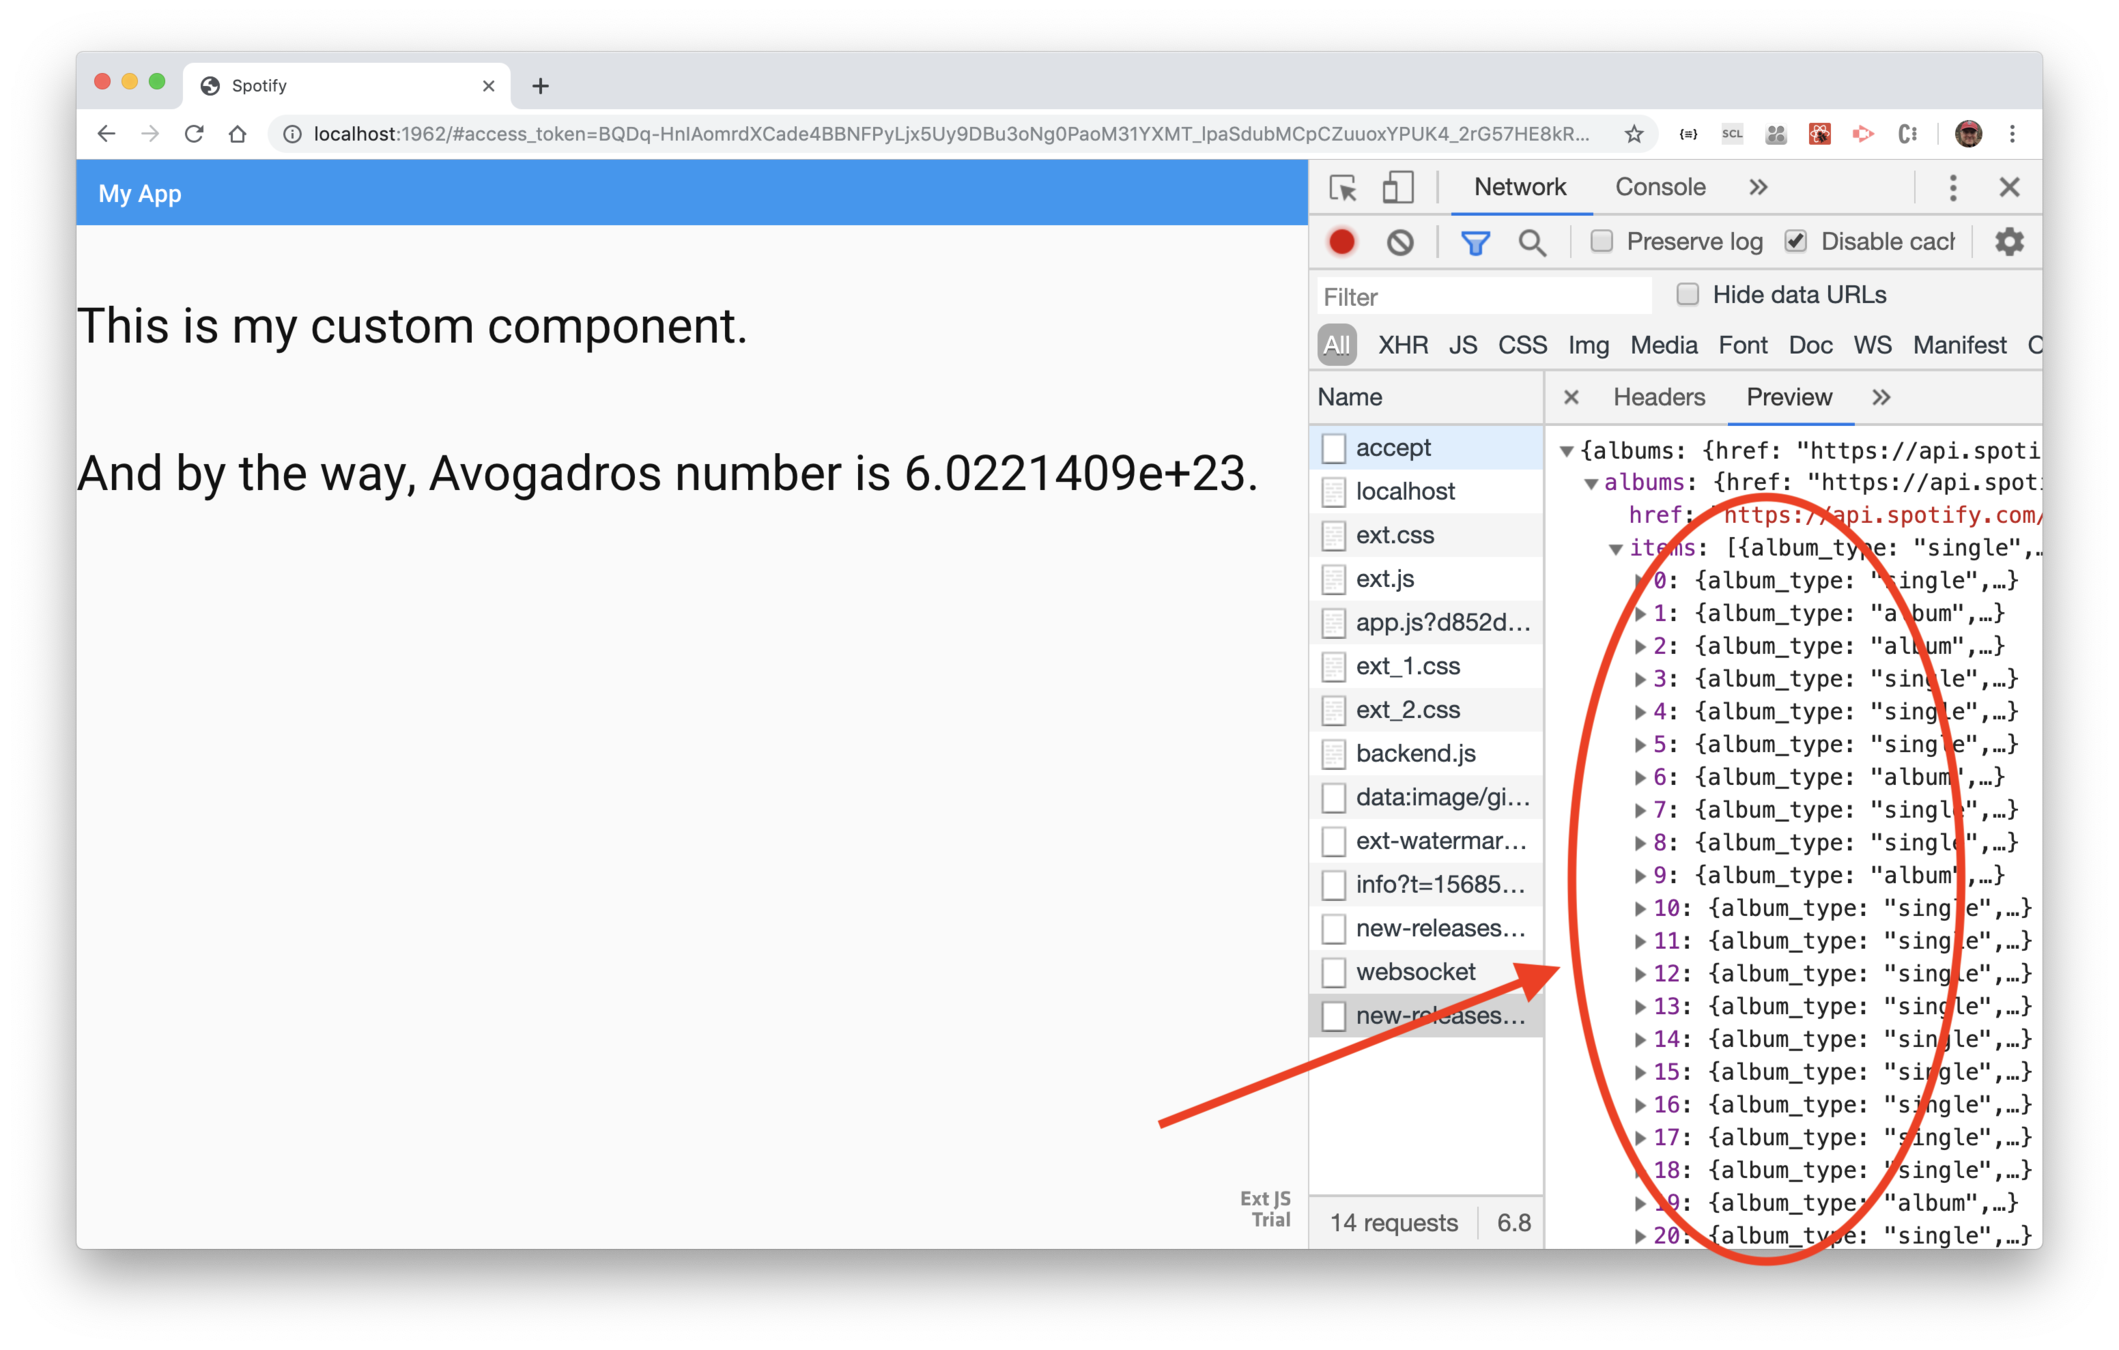
7. Fix the root property
If you look at the response in the debugger's Network
traffic, you'll see that the array of values is actually
in a property named albums.items. Edit src/components/App
and add that property to the store's rootProperty config.
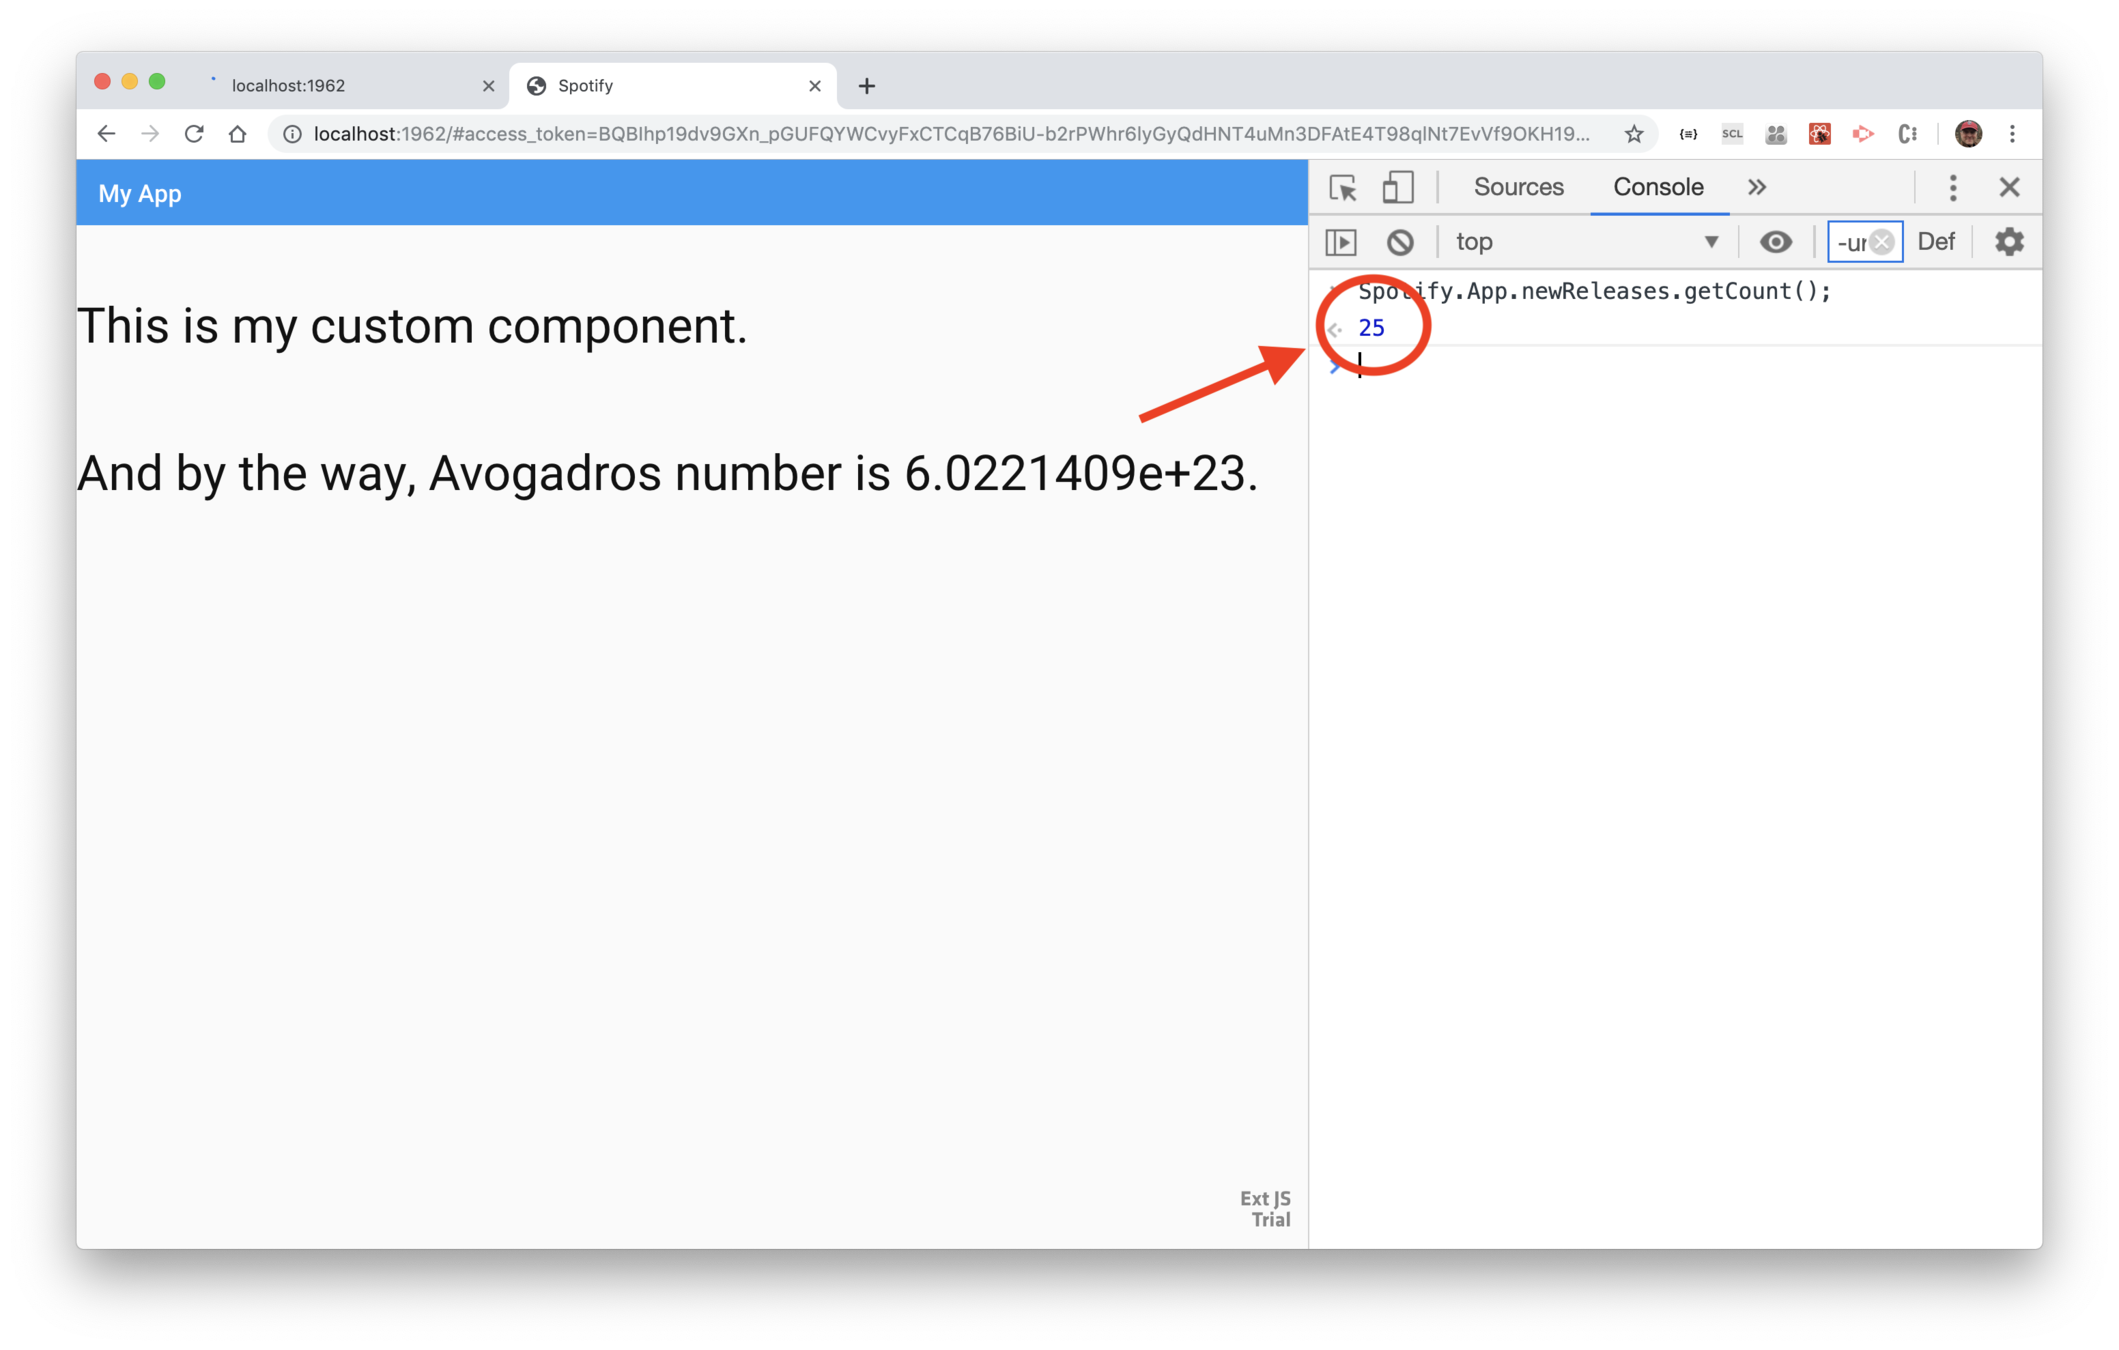
Save your work, then in the browser debugger, enter
Spotify.App.newReleases.getCount(); and you'll see
25, which is the correct value. This shows that the store
now has 25 records corresponding to the 25 recent releases
returned from Spotify.
Get starter app
Spotify
Use ExtReact
Set up Spotify
Get recent releases
Album as a class
Layout
Show tracks
Audio preview
Track features
DataView
Get ExtReact trial
Album details
Goal
Show album art thumbnails of new releases.
-
Use a <DataView to show the store's records
-
Explain the usefulness of the spread operator
-
Code the <DataView> as its own class
Steps
Get starter app
Spotify
Use ExtReact
Set up Spotify
Get recent releases
Album as a class
Layout
Show tracks
Audio preview
Track features
DataView
Get ExtReact trial
Album details
Goal
Show a dialog as the user taps on an album
-
Listen to a <DataView> event
-
Use a <Dialog>
-
Dynamically show or hide the dialog
Steps
Get starter app
Spotify
Use ExtReact
Set up Spotify
Get recent releases
Album as a class
Layout
Show tracks
Audio preview
Track features
DataView
Get ExtReact trial
Album details
Goal
Put the Dialog into its own class.
-
Move the <Dialog>
-
Create Album.js and .scss
-
Put state in Album
Steps
-
Use componentDidUpdate()
Steps
1. Create the source files
Create the directory src/components/album, and within it
create Album.js and Album.scss.
Album.scss is empty. Here's the starter code for Album.js.
2. Cut and paste the dialog
Edit src/components/App.js and cut-and-paste the entire <Dialog ...></Dialog>
to the render() method of Album.js and replace it with <Album/>.
Here's the result in Album.js.
Then edit App.js and import Album.
Then code the <Album></Album> where the dialog used to be.
4. Pass in album
Edit src/components/App.js and modify the
<Album> to pass in the current album.
5. Set up state in Album
Edit src/components/album/Album.js and modify
the constructor to use state.
6. Have Album detect when the App state changes
Edit src/components/album/Album.js and add a
componentDidUpdate to detect when App passes in different props. In other words, when the user taps on a release, the App state will change and
therefore, the album attribute passed to Album will change.
Code the method to detect when the album changes, and to update its state accordingly.
Save your changes and the app should work as before.
Get starter app
Spotify
Use ExtReact
Set up Spotify
Get recent releases
Album as a class
Layout
Show tracks
Audio preview
Track features
DataView
Get ExtReact trial
Album details
Goals
Learn about layout managers and use hbox and vbox.
-
Discuss layout managers
Steps
-
Use hbox and vbox layouts (with placeholders)
Get starter app
Spotify
Use ExtReact
Set up Spotify
Get recent releases
Album as a class
Layout
Show tracks
Audio preview
Track features
DataView
Get ExtReact trial
Album details
Goals
Learn about grids and grid columns, and use them to show tracks.
-
Use <Grid> and <Column>
-
Fetch album tracks
Steps
-
Use a column renderer
-
Add a package to webpack.config.js
Getting started
Spotify
Use ExtReact
Set up Spotify
Recent releases
DataView
Show album details
Layout
Show tracks
Audio preview
Track analysis
Goals
Learn about the <Audio> component, and use it to play the selected track.
-
Listen to grid event
-
Set up ref
-
Run <Audio> methods
Steps
Get starter app
Spotify
Use ExtReact
Set up Spotify
Get recent releases
Album as a class
Layout
Show tracks
Audio preview
Track features
DataView
Get ExtReact trial
Album details
Goals
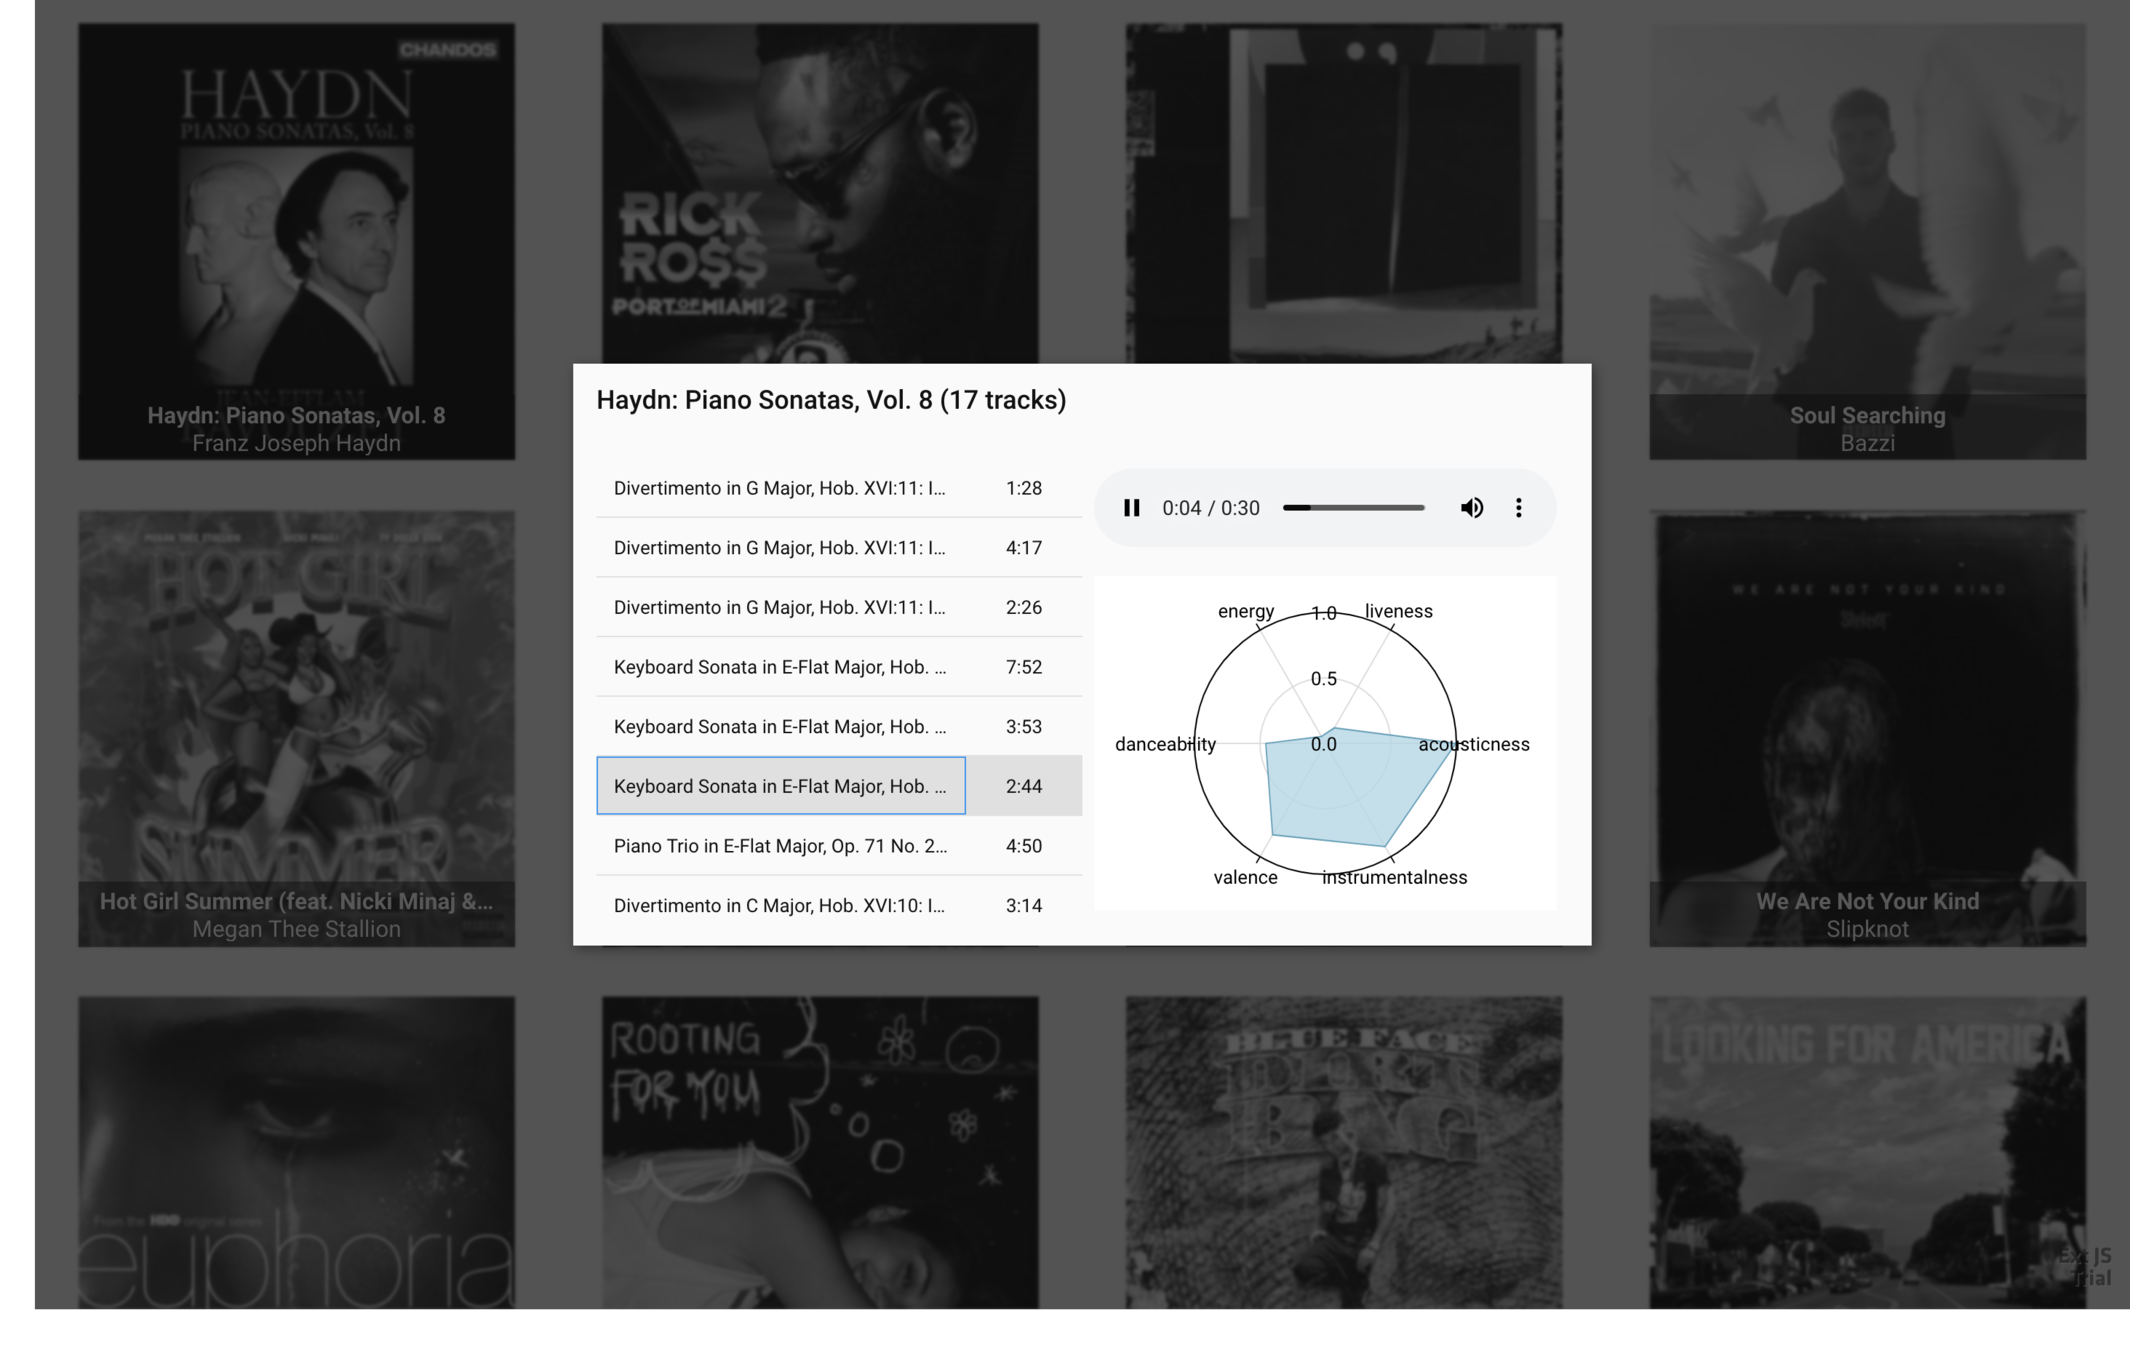
Learn about charts and use a polar radar chart to show track features.
-
Fetch audio analysis as tracks are selected
-
Use a <Polar> chart
Steps
-
Add the charts package
🎉 Yay! 🎉
Access
ExtReact is kept in a private repo, available to licensed users.
<ExtReact>
The root element is <ExtReact>, which automatically renders to the document body.
launch()
Rather than use ReactDom render(), use ExtReact launch()
Ext.data.Store
An Ext.data.Store uses its proxy to fetch data.
Ext.data.Store
An Ext.data.Store uses its proxy to fetch data.
You have full control over headers and methods
Ext.data.Store
An Ext.data.Store uses its proxy to fetch data.
You have full control over headers and methods
You can easily sort, filter and group the data.
<DataView>
A dataview renders an HTML snippet for every record in a store.
{...this.props}
If your component wraps an ExtReact component, use the JavaScript spread operator to apply props.
Events
All ExtReact components, and many other types, are observable, and fire events.
Events
All ExtReact components, and many other types, are observable, and fire events.
In the Spotify app, we used events to detect item tap on the dataview, and row selection on the grid.
Layouts
ExtReact layout managers make it easy to arrange items.
Layouts
You get the power of flex and other layouts, without having to be an expert in CSS.
ExtReact layout managers make it easy to arrange items.
<Grid>
Grids show tabular data.
<Grid>
Grids render smoothly and quickly, even when the data feed has millions of records.
<Grid>
Grid cells can render simple text, formatted numbers or dates, charts or any ExtReact component.
<Grid>
You can also provide your own renderer and do any calculation you need.
Grid cells can render simple text, formatted numbers or dates, charts or any ExtReact component.
Charts
ExtReact has many types of chart, such as bar charts, line charts, and financial charts.
Charts
ExtReact has many types of chart, such as bar charts, line charts, and financial charts.
We used a radar chart in the Spotify app.
Charts
ExtReact has many types of chart, such as bar charts, line charts, and financial charts.
We used a radar chart in the Spotify app.
ExtReact also makes it easy to use D3.
ExtReact Spotify
By Max Rahder


