NODE + Socket.io + three.js

Nota
Lista:
- Item 1
- Item 2
- Item 3
Párrafo normal
Subtítulo
Título
class Hola
  def self.hi
    puts "Hello world!"
  end
end
Heading text
Label
Monoespaciado
0. Context
1. A NODE.JS SERVER
2. IMPLEMENTING SOCKET.IO
3. THREE.JS
ContenTS
¿WHat is node.JS?
Context
Is a powerful runtime environment for JS, executed in the server
¿WHat is SOCKET.io?
Is a Javascript library for writing real time applications
¿WHat is Three.js?
Is a Javascript webGL-based 3D library for making easy do some 3D
SOCKET.io: Real time
Context
CLIENT
SERVER
WebSocket
API
node.js
browser
eventHandler
socket.io server library
socket.io client library
emitter
event & data
eventHandler
emitter
fires
fires
event & data
- Node allows us to run JS on server side.
- We'll cover the basics to setup a basic server that handles a few routes.
- Create a folder to put inside all the files
1. A NODE SERVER
First we need to load some modules:
NODE BASICS
1. A NODE SERVER
// server.js

var http = require('http');   // will create a http interface (our webserver)
var url = require('url');     // we'll need this for handling paths (our views)
var fs = require('fs');       // we use fs, a simple POSIX wrapper, to load static files (our html files)
All of them are native.
Now, we'll need to use our server instance to create a server
NODE BASICS
1. A NODE SERVER
// server.js

var server = http.createServer(function(request, response){
    var path = url.parse(request.url).pathname;
});

server.listen(8000);
And parse the url. The main goal is get the parts to load the proper html corresponding to the view name.
NODE BASICS
1. A NODE SERVER
$ node server.jsPoint to your current path and start the magic
This is the interesting part... we are serving content!
NODE BASICS
1. A NODE SERVER
switch (path) {
        case '/':
            response.writeHead(200, {'Content-Type': 'text/json'});
            response.write('{"greet": "Hello World"}');
            response.end();
            break;
        ...
}
Reload the server (stop & start) and point in your browser to localhost:8000 again

NODE BASICS
1. A NODE SERVER
switch (path) {
        case '/':
            response.writeHead(200, {'Content-Type': 'text/json'});
            response.write('{"greet": "Hello World"}');
            response.end();
            break;
        case '/socket.html':
            fs.readFile(__dirname + path, function(error, data){
                if (error){
                    response.writeHead(404, {'Content-Type': 'text/html'});
                    response.write('resource not found');
                    response.end();
                } else {
                    response.writeHead(200, {'Content-Type': 'text/html'});
                    response.write(data, 'utf8');
                    response.end();
                }
            });
            break;
        default:
            response.writeHead(404, {'Content-Type': 'text/html'});
            response.write('resource not found');
            response.end();
            break;

}
- Socket.io is a JS library that enables realtime and bidirectional communication between devices
- We'll reuse the code of the last exercise to explore how socket.io works
2. ImplementiNG socket.io
SOCKET.io: Real time
2. IMPLEMENTING SOCKET.IO
CLIENT
SERVER
WebSocket
API
node.js
browser
eventHandler
socket.io server library
socket.io client library
emitter
event & data
eventHandler
emitter
fires
fires
event & data
This time we'll need to install the module on our machine (if is not installed)
$ npm install socket.io2. ImplementiNG socket.io
The general example on server side looks like this:
    var server = require('http').createServer();
    var io = require('socket.io')(server);

    io.on('connection', function(socket){
      socket.on('event', function(data){});
      socket.on('disconnect', function(){});
    });
    server.listen(8000);
2. ImplementiNG socket.io
Let's refactor our prev exercise!
Socket.IO allows you to emit and receive custom events.
2. ImplementiNG socket.io
Besides connect, message and disconnect, you can emit custom events:
    io.on('connection', function(socket){
        socket.emit('fooBarEvent', {
            "message" : "These aren't the droids you're looking for.😇"
        });
    });
2. ImplementiNG socket.io
We attach our listener to connection event to fire when loading the server.
<!DOCTYPE html>
<html>
    <head>
        <meta charset="utf-8">
        <title>Socket.io</title>
        <script src="socket.io/socket.io.js"></script>
    </head>
    <body>
        <h1>Hello World</h1>
        <script>
            var socket = io.connect();
            socket.on('fooBarEvent', function(data){
                console.log(data);
            });
        </script>
    </body>
</html>
2. ImplementiNG socket.io
Now create our client side. It will catch the event and the data sent by the server

    var socket = io.connect();
    document.querySelector('button').onclick = function(e){
        socket.emit('sendClientDate',
            {
                "date": new Date(),
                "source" : "Client"
            }
        );
    }
2. ImplementiNG socket.io
We can send the data from client to server as well
2. ImplementiNG socket.io
- Wait! You said bidirectional, isn't it?
- Yes, bidirectional.
- What if we create an emitter on client that sends an envent that fires an emiter on server that send an event that fires an emitter on client...?
2. ImplementiNG socket.io
Ok, let's try:
    socket.on('sendClientDate', function(data){
        socket.emit('sendServerDate',
            {
                "date": new Date(),
                "source": "Server"
            }
        );
    });
3. Three.js
- Three.js allow us to create a 3D scene in a few lines of code.
- So we got now a basic knowledge of how pass data between devices on realtime, but are we understanding the real power of this?


    user 1: Hello fellas!
    user 2: Hey mates!
    user 3: Whats up bro!
node + socket.io
data: {
  msg: "Hello fellas!"
}
data: {
  msg: "Hey mates!"
}
data: {
  msg: "Whats up bro!"
}
OK, too much tutorials out there about how to make a chat. Let's explore our devices.
PLEASE NO MORE CHATS
Did you know? Your phone has more than 5 sensors by average on some models.

3. Three.js
An iPhone has:
- Proximity sensor
- Accelerometer
- Ambient light sensor *
- Gyroscope
- Compass (+ GPS)
3. Three.js
*: also available in a Macbook Pro
Let's combine the data we obtain from sensors into some kind of cool visuals thanks to three.js
3. Three.js
But first... we need to learn the basics of three.js. Let's dive in!
3. Three.js
3. Three.js
TV series and movies need 3 basic things to work:
1. A scene
2. A camera
3. A renderer
3. Three.js
    var scene = new THREE.Scene();
    var camera = new THREE.PerspectiveCamera(50, window.innerWidth / window.innerHeight, 0.1, 100);

    var renderer = new THREE.WebGLRenderer({alpha:true});
    renderer.setSize( window.innerWidth, window.innerHeight );
    document.body.appendChild(renderer.domElement);
Things are no different when coding :-)
3. Three.js
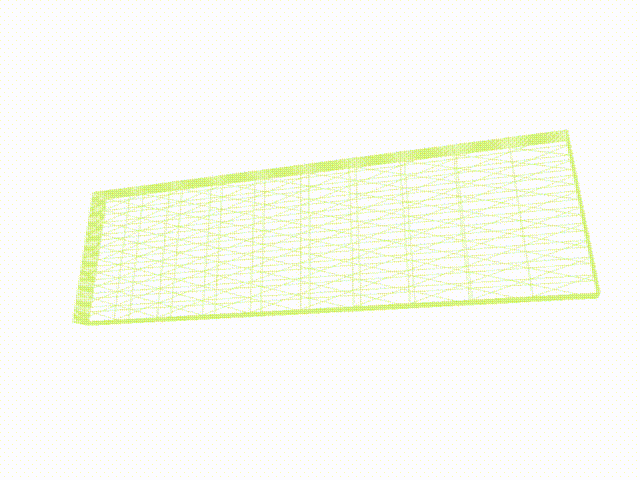
    var geometry = new THREE.CubeGeometry(4,1.5,.2,10,10,10);
    var material = new THREE.MeshBasicMaterial({color:0xD9F57E, wireframe:true});
    var cube = new THREE.Mesh(geometry, material);
    scene.add(cube);

    camera.position.z = 5;
Now, we are gonna add to the scene some actors.
3. Three.js
    function render() {
    	requestAnimationFrame(render);
    	renderer.render(scene, camera);
    }
    render();
And the last, but not the least: render the scene!
requestAnimationFrame is the responsible for refreshing the canvas and animating things.
3. Three.js
Ok, nice cube, but where's my animation?
    function render() {
    	requestAnimationFrame(render);
    	renderer.render(scene, camera);
        cube.rotation.x += .01;
        cube.rotation.y += .01;
    }
    render();
3. Three.js
Voilà
3. Three.js
What if we pass data from the device's gyroscope and position the cube according to the given coordinates?
3. Three.js
var socket = io.connect();
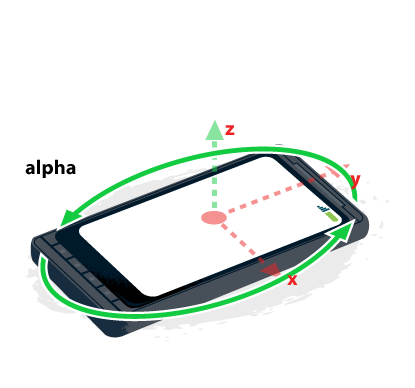
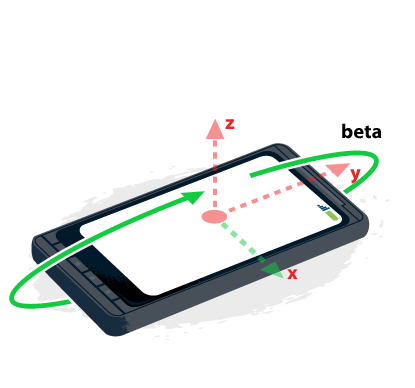
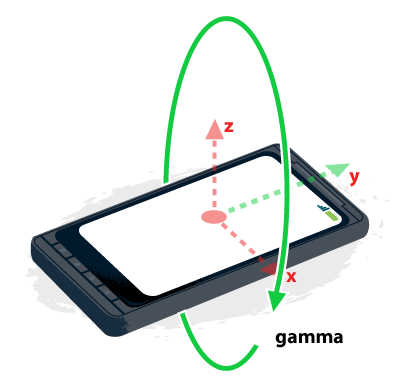
function handleOrientation(event) {
var orientation = {
alpha: Math.round(event.alpha),
beta: Math.round(event.beta),
gamma: Math.round(event.gamma)
};
socket.emit('deviceOrientation', orientation);
}
window.addEventListener("deviceorientation", handleOrientation);Web API to the rescue: using the ondeviceorientation event we can listen the 3 spatial coordinates and send to the server via socket.io
3. Three.js
    socket.on('deviceOrientation', function(data){
        socket.emit('sendCoords', data)
    });
Then, in our server, we catch the event we've just sent from the client and emit the coordinates.
3. Three.js
    function render() {
        requestAnimationFrame(render);
        renderer.render(scene, camera);
        //cube.rotation.x += .01;
        //cube.rotation.y += .01;
        socket.on('sendCoords', function(data){
            console.log(data.alpha);
            cube.rotation.z = (data.alpha * Math.PI)/180;
            cube.rotation.y = (data.beta * Math.PI)/180;
            cube.rotation.x = (data.gamma * Math.PI)/180;
        });
    }
Finally, we need to update our render function in our index.html. We need to parametrize the data and update the cube's position according to the info gathered by the sensor.
Remember that the motion data is sent in degrees and we should convert them into radians before operating.
Workshop: Node + socket.io + three.js
By mgmerino