Unity Game Development
第3~4話 基礎物理系統&簡易平台遊戲實作
Lecturer:水獺
目錄(可點)
本堂課內容
本堂課內容
Collider(碰撞器)

1
這是什麼?
Collider,翻譯成中文就是碰撞器
在場景中會以綠色線條顯示
顧名思義
這個Component可以偵測兩個GameObject之間的碰撞
並透過某些函數回傳碰撞資訊
當兩個有Collider的物件碰在一起時會有「撞到」的效果
會被擋下而無法前進
因此可以拿來製作平台遊戲中的站立平台
2
有什麼類型?
大致上可以用2D、3D以及形狀來做區分
2D形狀包含:
矩形、膠囊形、圓形、多邊形、邊、組合
3D形狀包含:
矩形、膠囊形、球形、網格狀、地形、車輪
3
有什麼類型?
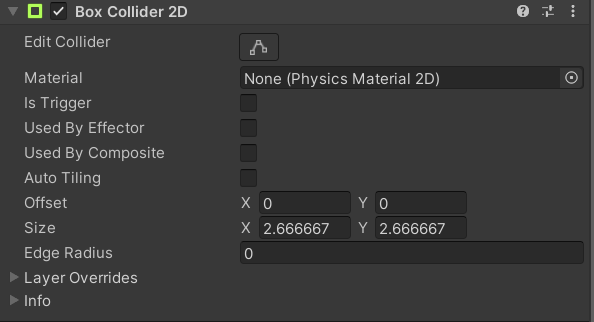
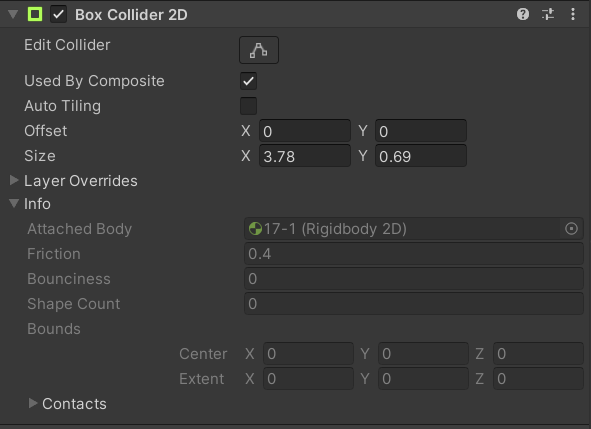
- 矩形Box
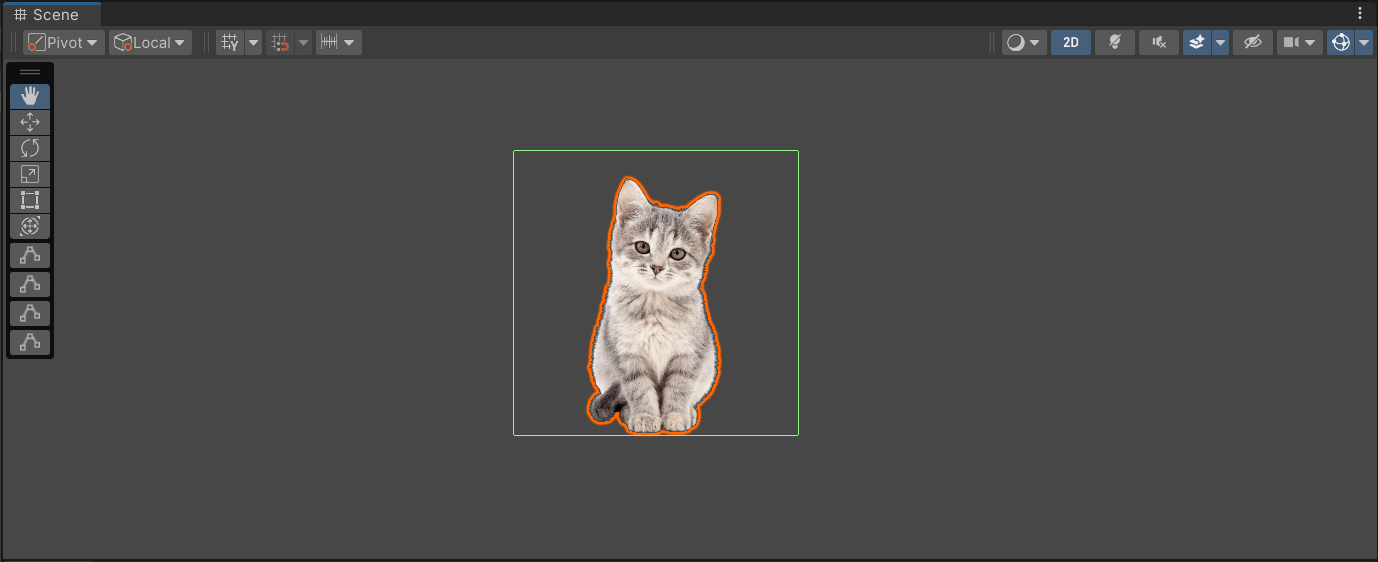
生成一個包住GameObject邊界的Collider
最不吃效能
可直接在Heirarchy裡用
拖曳的方式編輯形狀
是否為觸發器(之後會講)
是否被組合使用(之後會講)
相對中心偏移量
長寬
圓角半徑(可以自己試試看)
覆蓋層(之後會講)
4
物理材質
有什麼類型?
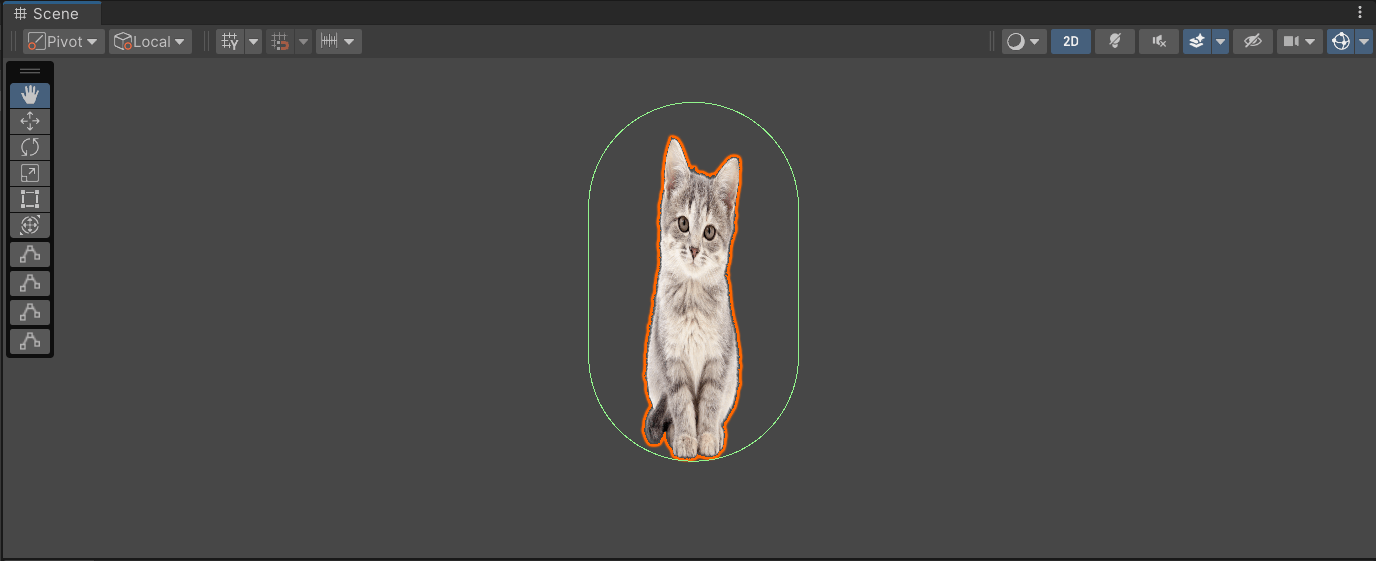
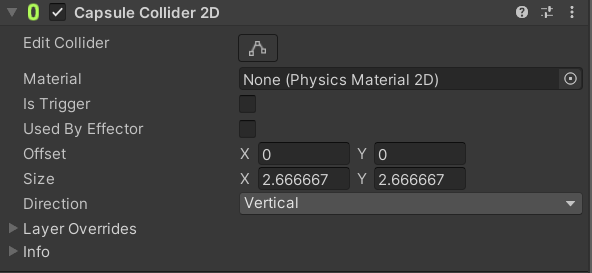
- 膠囊形Capsule
圓滑版的矩形
(為了示範所以我把他拉長了(。_。))
因為如果太大會變圓形
可直接在Heirarchy裡用
拖曳的方式編輯形狀
是否為觸發器(之後會講)
相對中心偏移量
長寬
橫向或直向
覆蓋層(之後會講)
5
物理材質
有什麼類型?
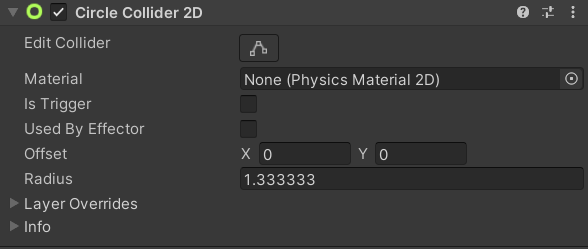
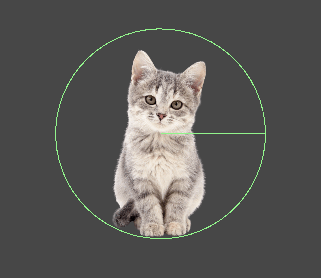
- 圓形Circle
生成一個圓形包住GameObject
可直接在Heirarchy裡用
拖曳的方式編輯形狀
是否為觸發器(之後會講)
相對中心偏移量
半徑
覆蓋層(之後會講)
6
物理材質
有什麼類型?
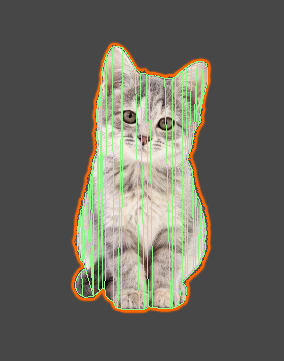
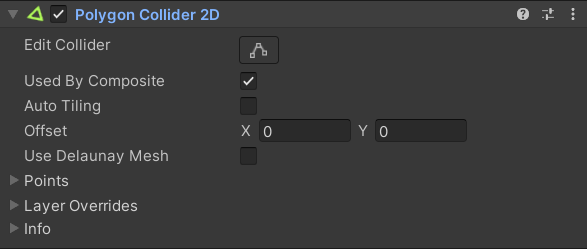
- 多邊形Polygon
生成一個貼合GameObject邊緣的多邊形
蠻吃效能的
需要很精細的碰撞範圍可以用
可直接在Heirarchy裡用拖曳的方式編輯形狀
是否為觸發器(之後會講)
相對中心偏移量
組合成這個碰撞器的所有點座標
覆蓋層(之後會講)
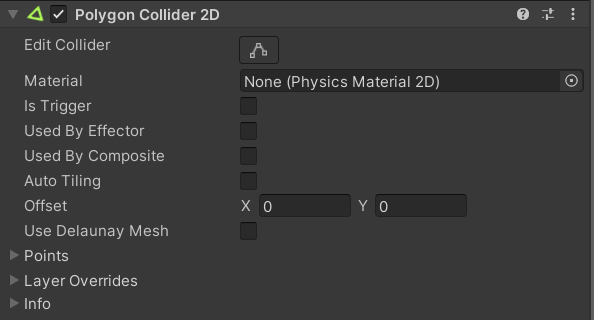
是否被組合使用(之後會講)
Draw Mode為Tiled時讓所有複製的Sprite都有碰撞器
7
物理材質
有什麼類型?
- 邊Edge
生成一個或多個邊
不常用
可以想想他能用在什麼地方
可直接在Heirarchy裡用拖曳的方式編輯形狀
是否為觸發器(之後會講)
相對中心偏移量
組合成這個碰撞器的所有點座標
覆蓋層(之後會講)
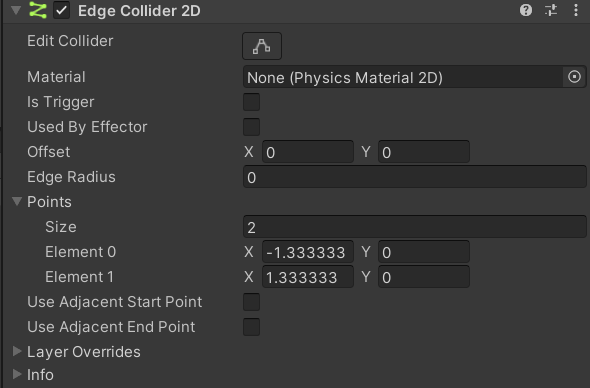
邊圓角半徑(可以自己試試看,會有膠囊的效果)
點數量,可以調整
8
物理材質
有什麼類型?
- 組合Composite
9
=
+
將有勾選Used By Composite屬性的Collider形狀
結合在一起
Trigger
Collider是碰撞器
那如果我只想要偵測兩個東西相碰的效果
而不要碰撞的效果呢?
10
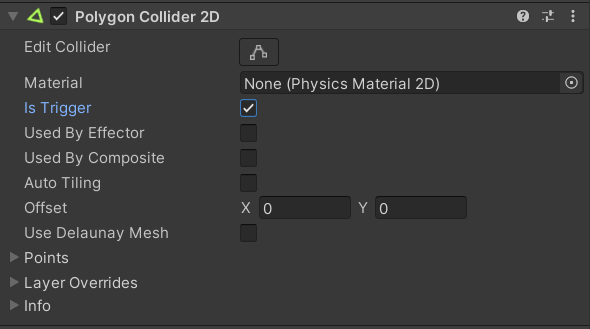
Trigger!也就是觸發器
只要把Is Trigger屬性勾起來
Collider就會變成一個Trigger
不會有碰撞讓東西不能動的效果
但一樣可以回傳資訊
平台製作
11
平台製作
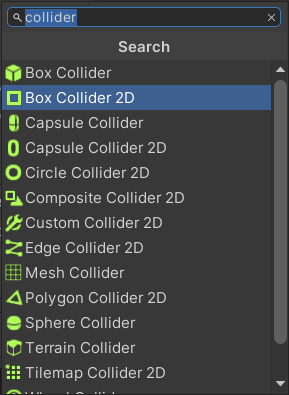
- 加入Collider
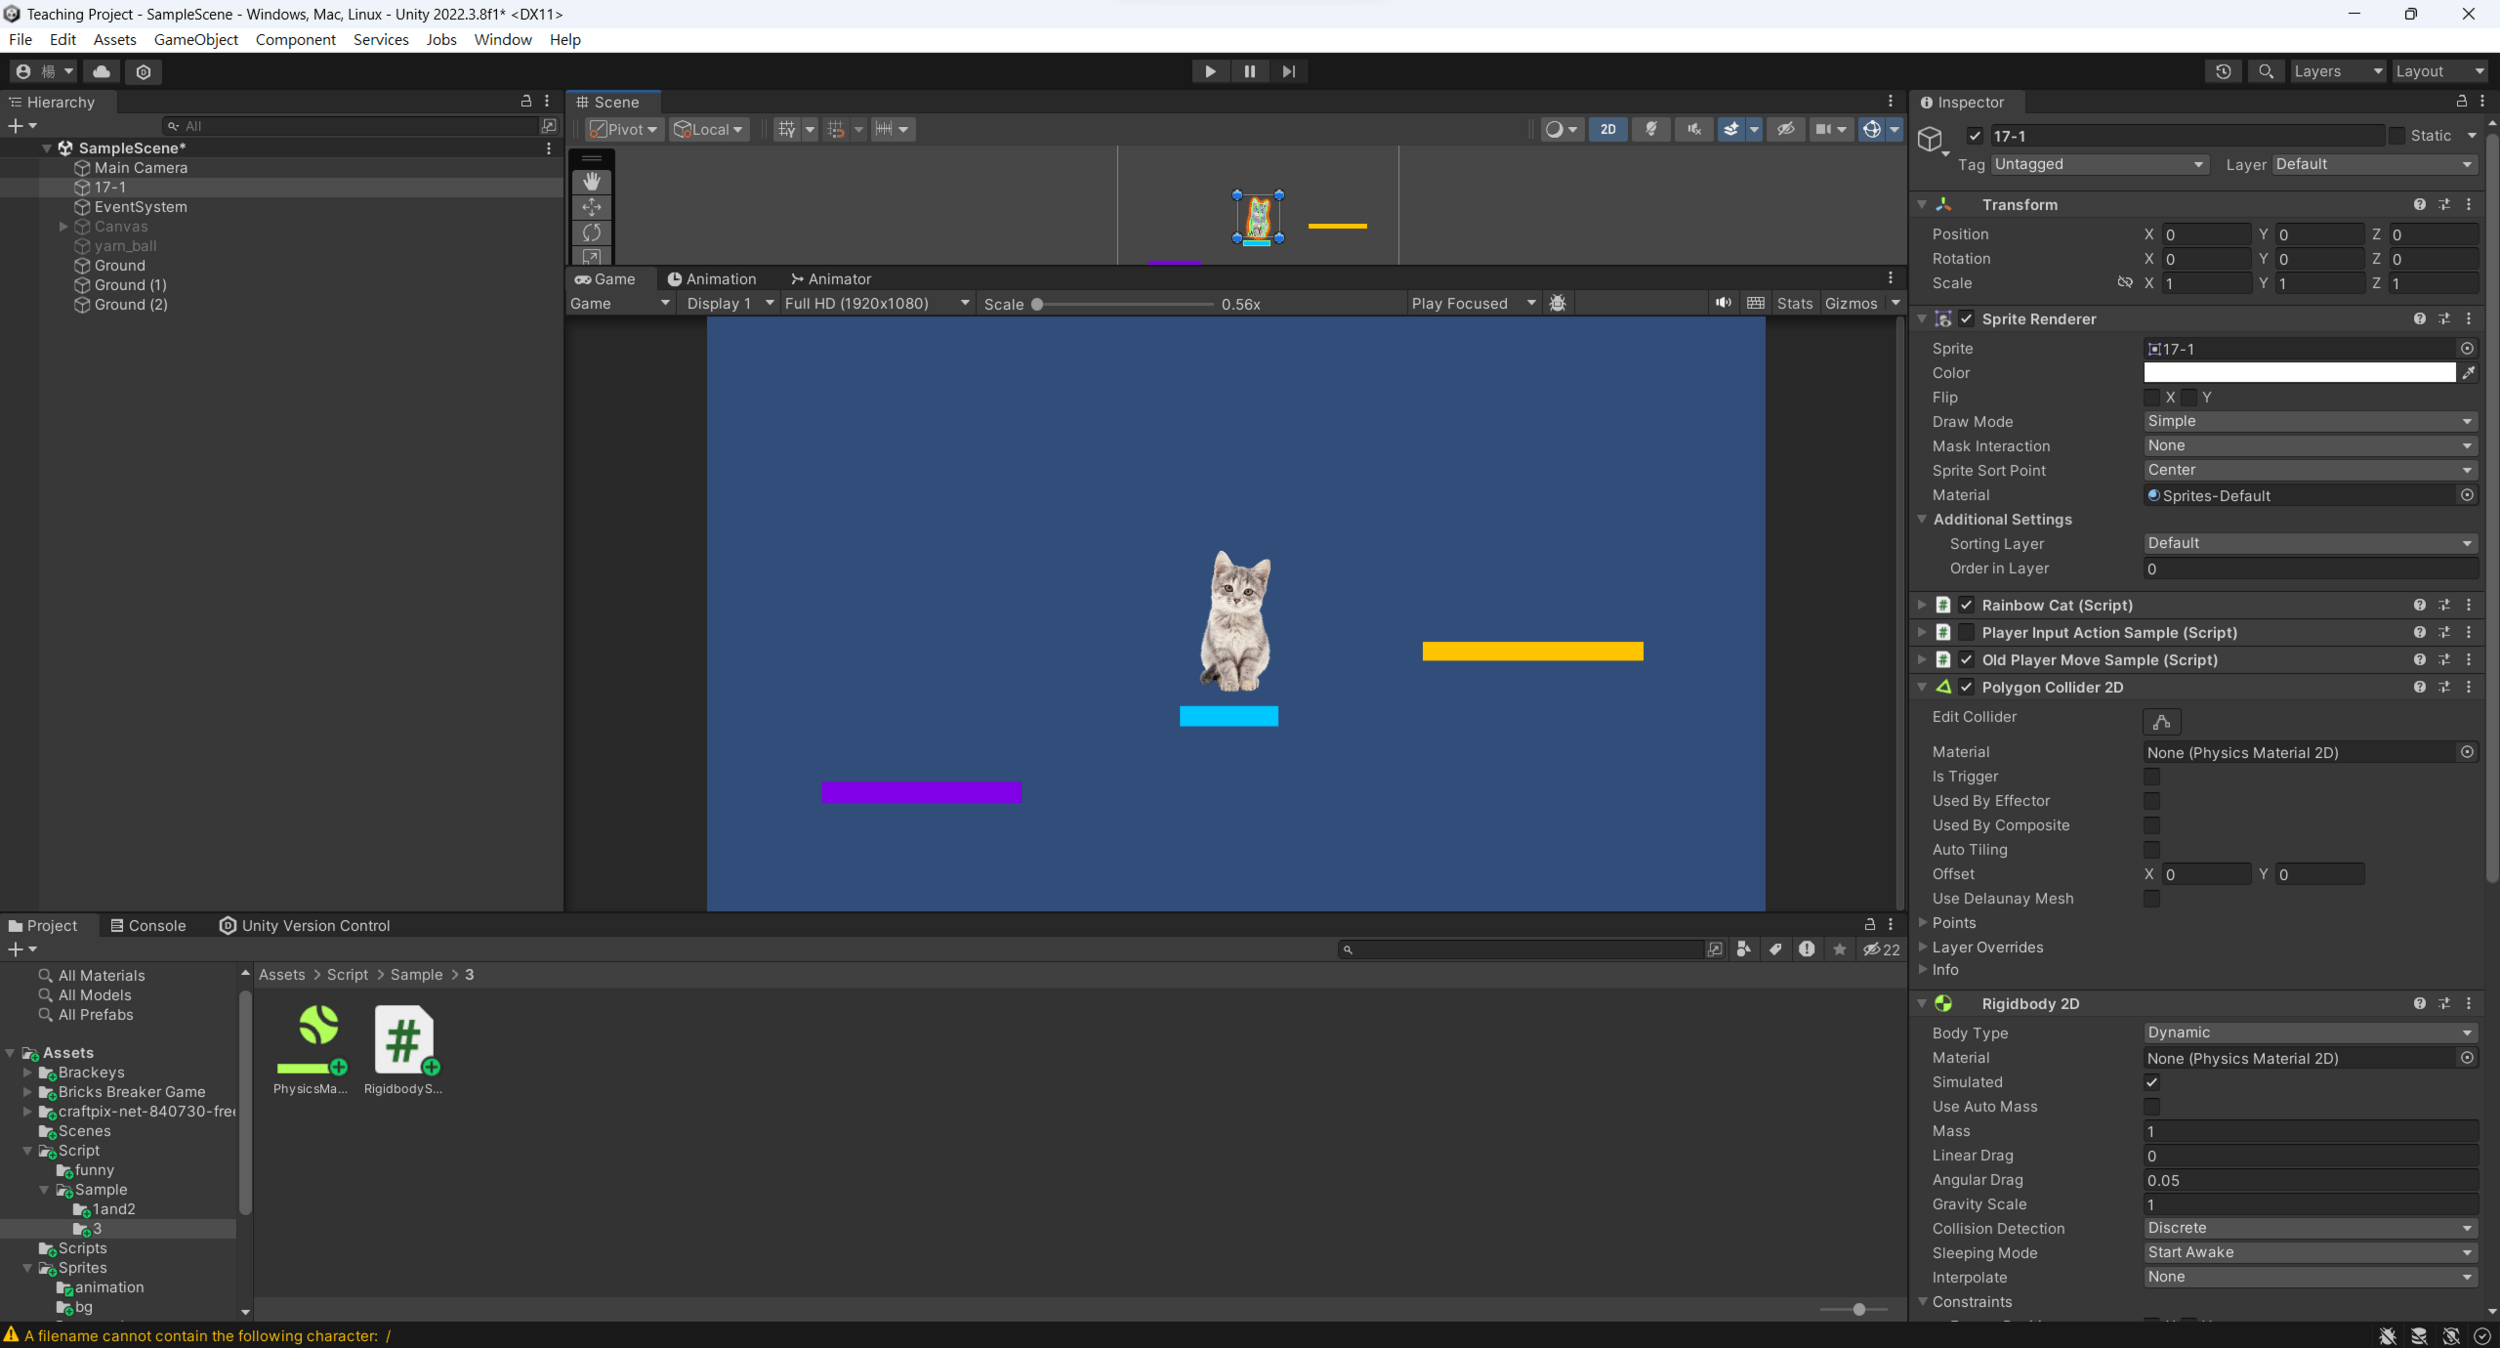
開啟之前的專案
在遊戲角色上加一個Collider 2D
(善用搜尋會快很多)
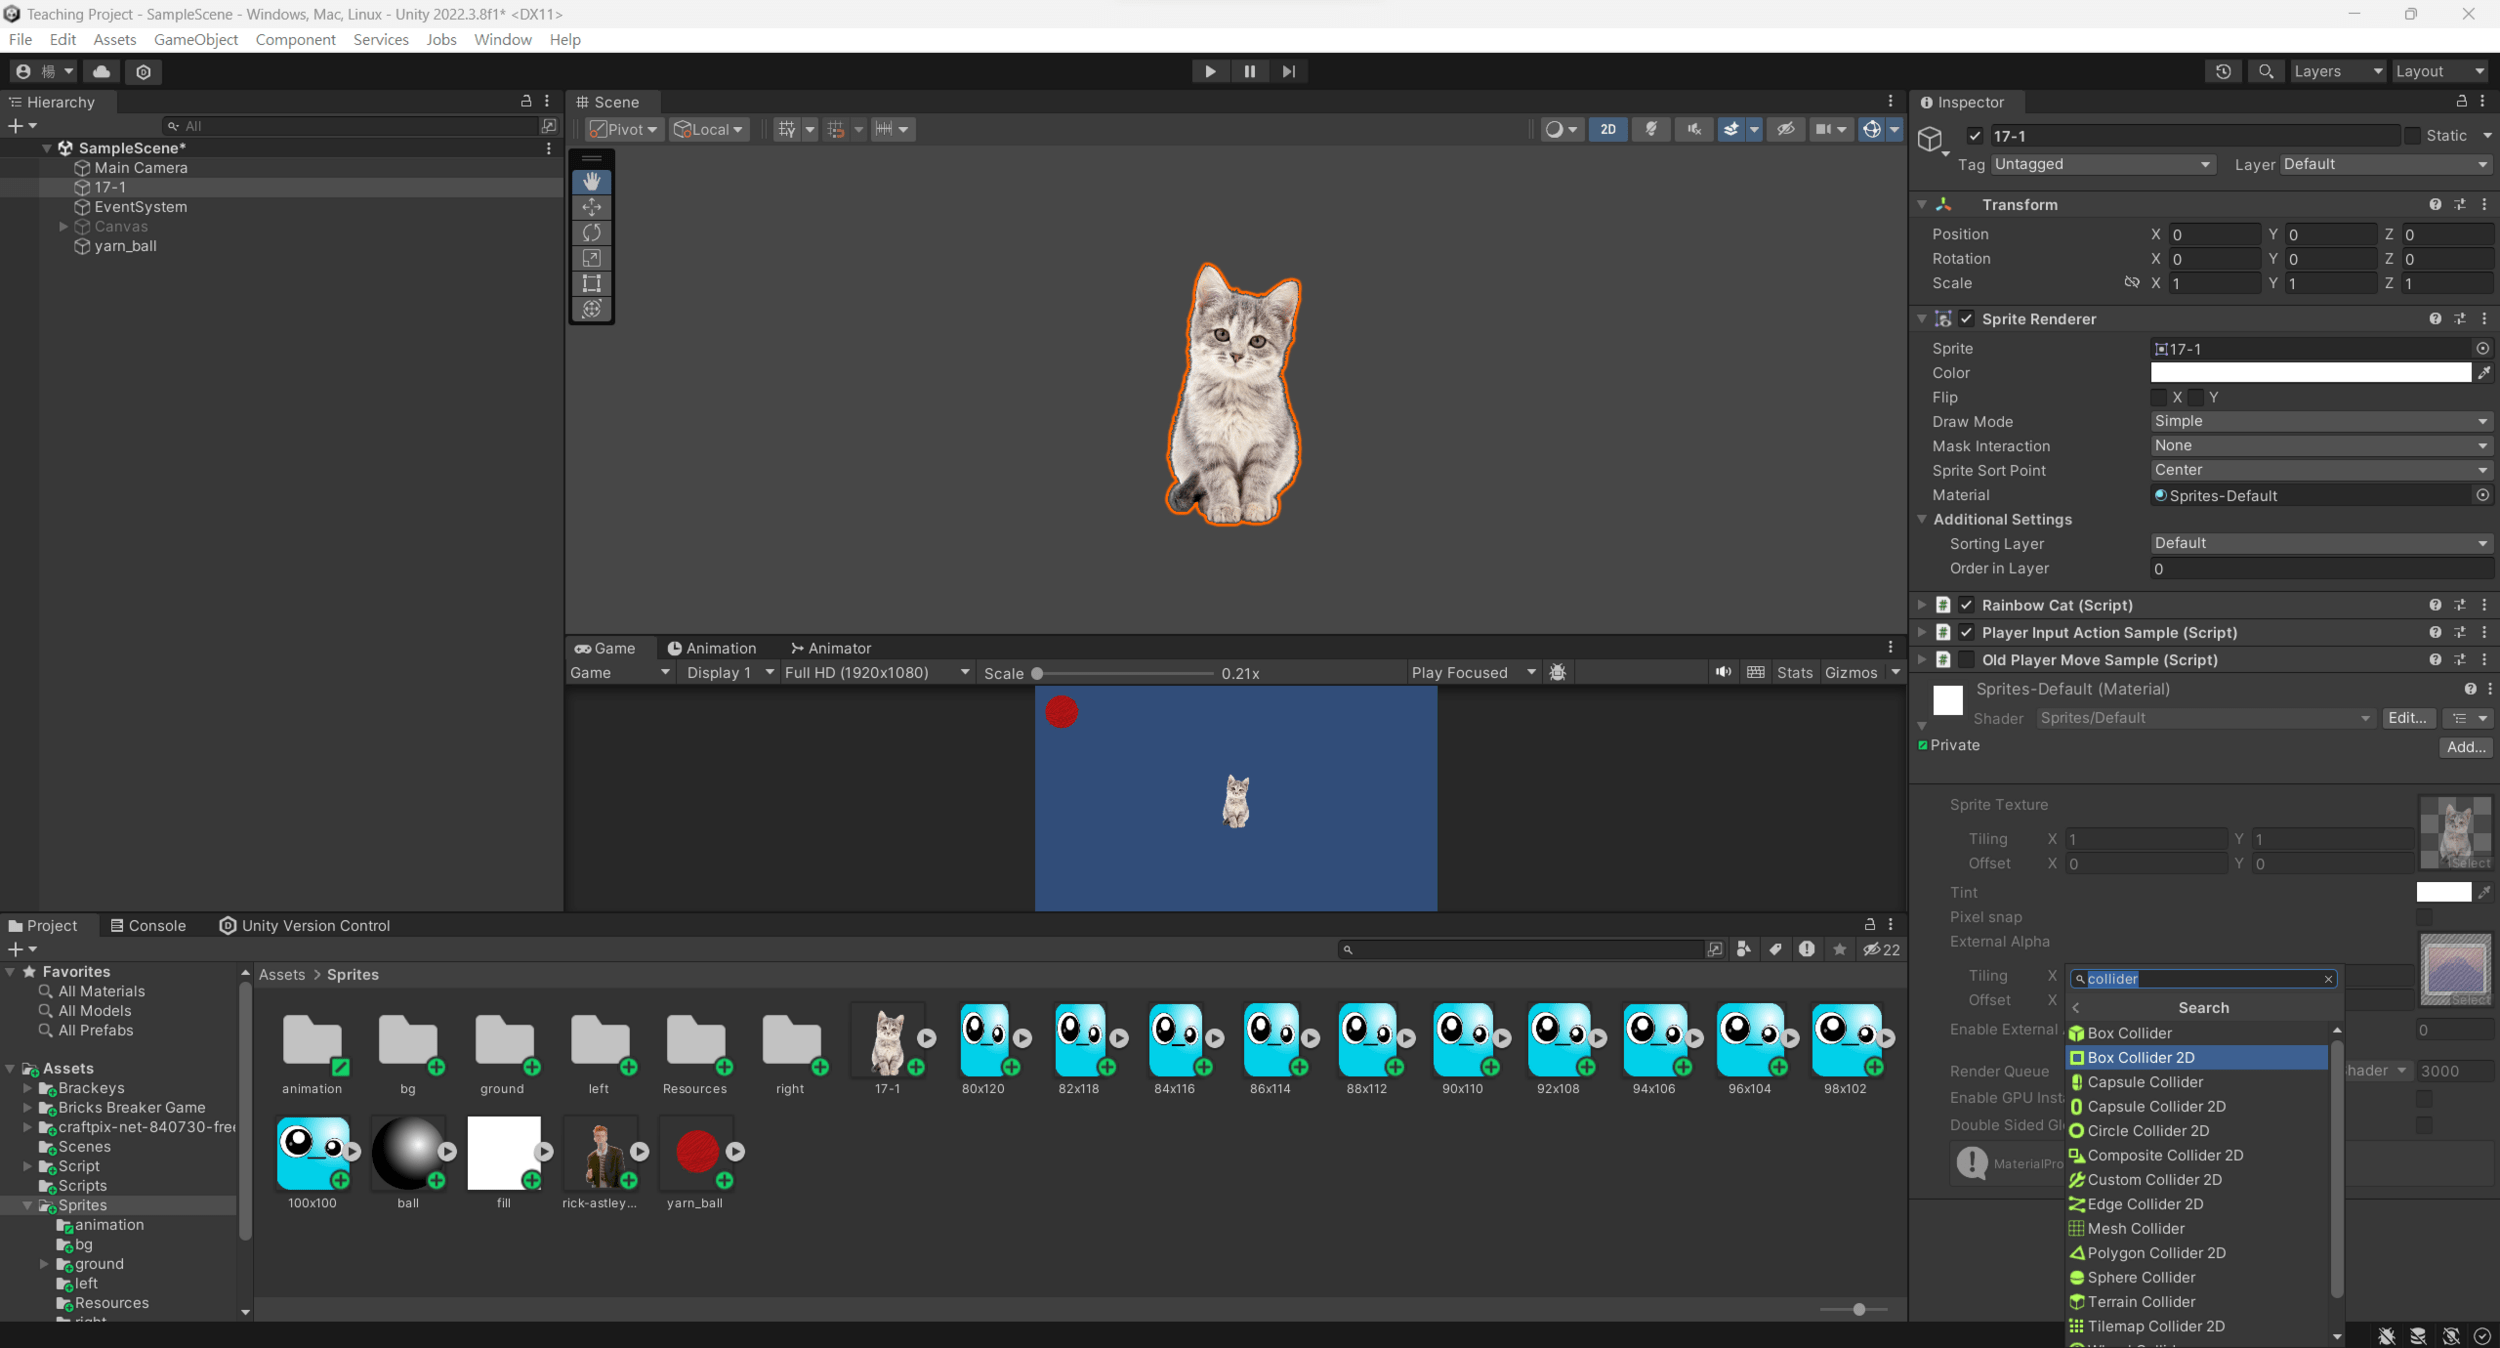
12
平台製作
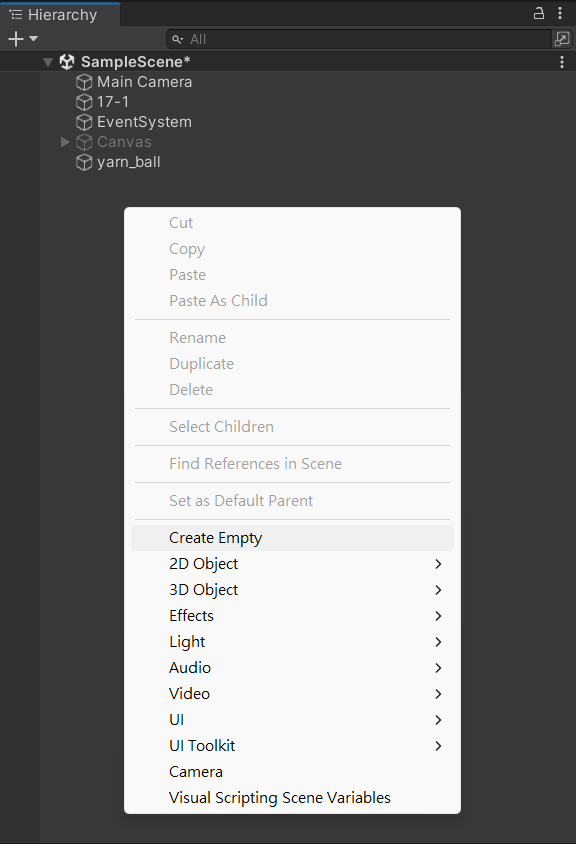
- 新增平台GameObject
在Hierarchy點右鍵 --> Create Empty(綠框)
新增一個空的GameObject 然後取個名(我取Ground)
13
平台製作
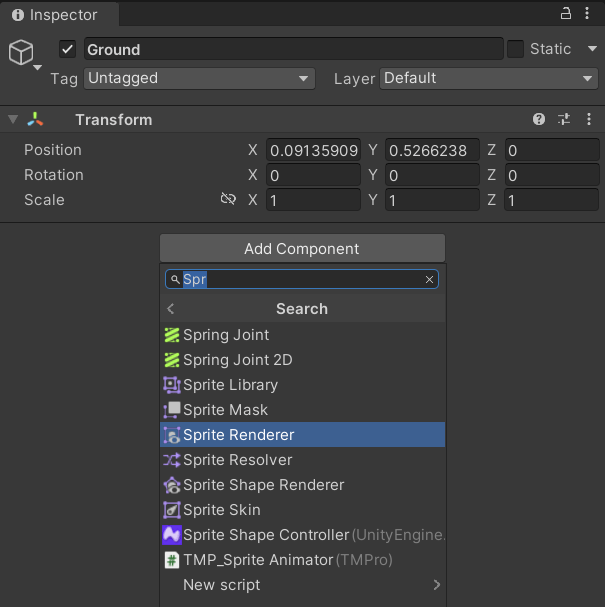
- 新增平台GameObject
把剛剛新增的GameObject加上SpriteRenderer
(善用搜尋會快很多)
14
平台製作
- 新增平台GameObject
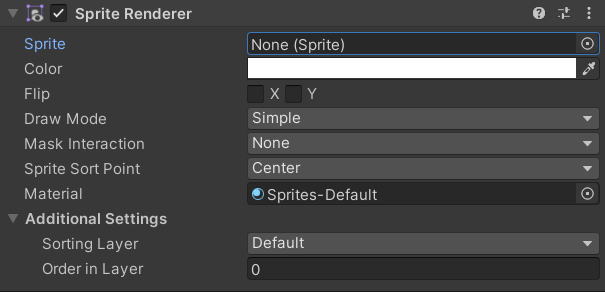
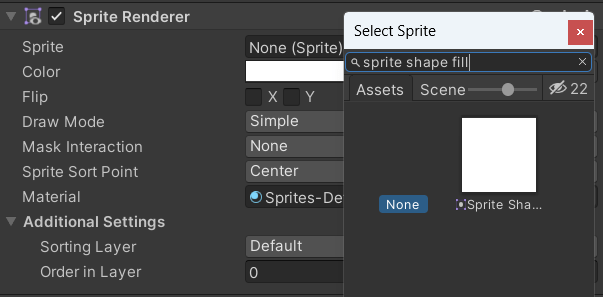
15
在SpriteRenderer的Sprite框裡
按下右邊的圓形(綠框)
搜尋打上Sprite Shape Fill後便會出現一個矩形
點下去
(若只有None可以按右上角的眼睛(綠框))
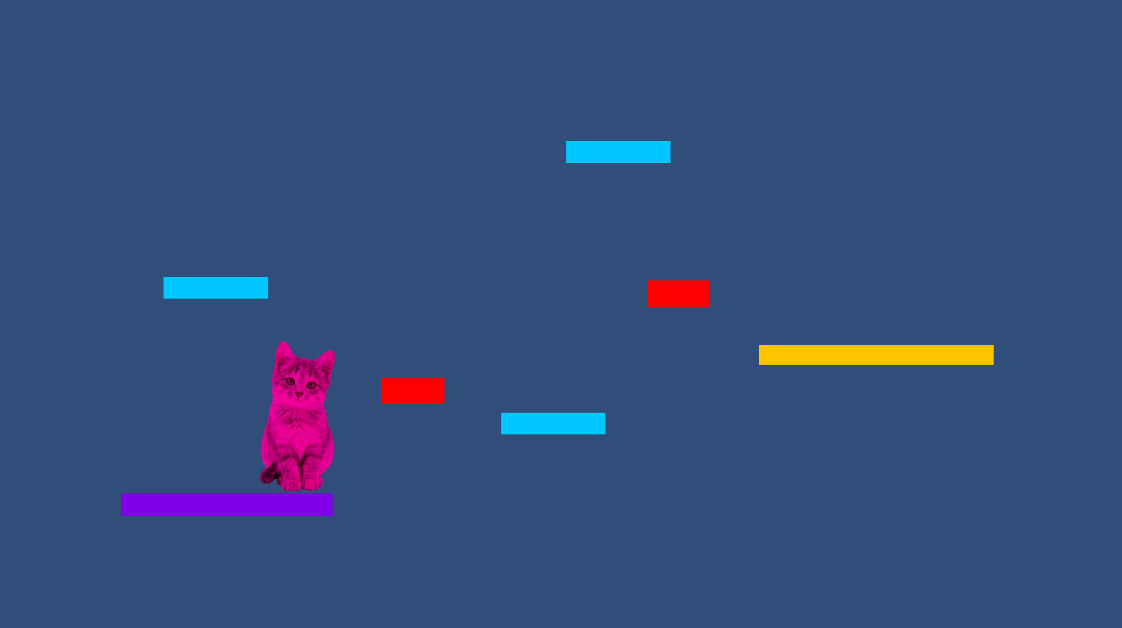
平台製作
- 新增平台GameObject
你就得到一個可以自行調整長寬、位置跟顏色的平台了!
也把他加上Collider 2D就完成啦~也可以多複製幾個擺出來
16

本堂課內容
本堂課內容
RigidBody(鋼體)
1

這是什麼?
Rigidbody,也就是鋼體
是將GameObject跟物理引擎結合的核心Component
能夠讓GameObject在物理的控制下做出行動
如力、重力、扭力矩等
2
另外
兩個Collider要發生碰撞也需要其中一個GameObject有Rigidbody才行
屬性與設定
3
屬性與設定
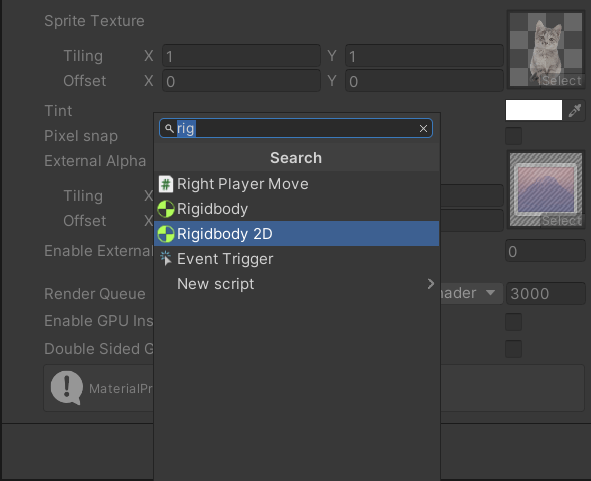
- 加入Rigidbody
在遊戲角色上加一個Rigidbody 2D
(善用搜尋會快很多)
4
屬性與設定
5
- 屬性說明
Rigidbody類型
- Dynamic:會碰撞,可受推拉力、重力影響,有質量
- Kinematic:可在腳本控制下移動,不受推拉力、重力、碰撞所影響,所以沒有質量但有速度,消耗效能低
- Static:完全不會動,目前沒有用過,可以想想看會用在哪
物理材質
鋼體(也就是GameObject)的質量
移動阻力(無限大則不能開始移動、可以立刻停止移動)
轉動阻力(無限大不能開始轉動、不能停止轉動)
重力倍數(0則不受其影響)
碰撞偵測模式
是否模擬
- Discrete:離散模式,僅偵測移動後新位置的碰撞
- Continuous:連續模式,更密集地偵測所有碰撞,可以避免穿模,但很吃效能
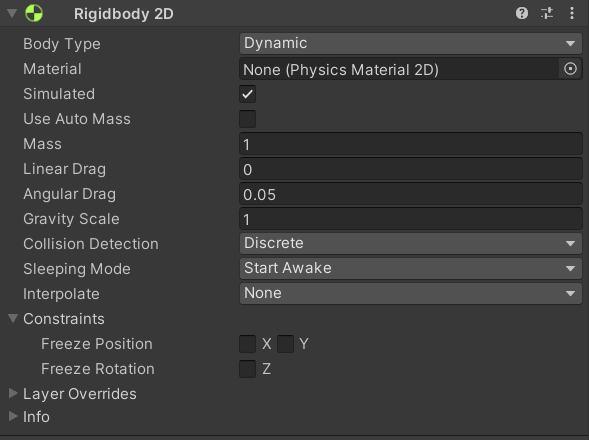
凍結X/Y軸(不可移動)
凍結Z軸(不可旋轉)
屬性與設定
6
- 常用成員
屬性與設定
7
- 常用成員
using System.Collections;
using System.Collections.Generic;
using UnityEngine;
public class RigidbodySample : MonoBehaviour
{
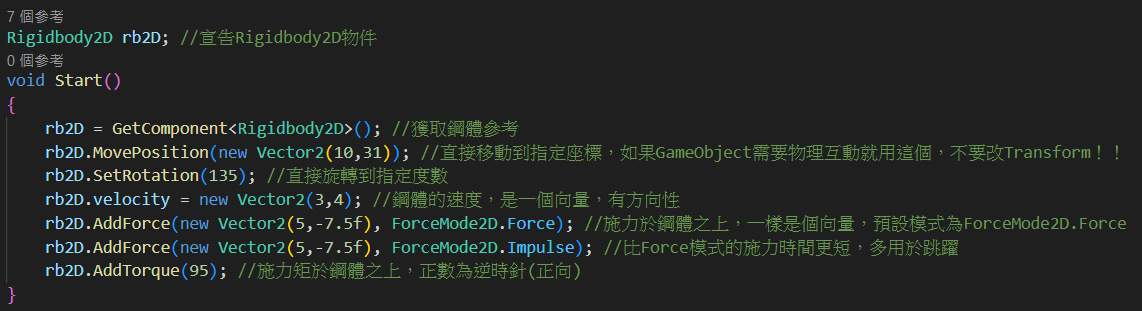
Rigidbody2D rb2D; //宣告Rigidbody2D物件
void Start()
{
rb2D = GetComponent<Rigidbody2D>(); //獲取鋼體參考
rb2D.MovePosition(new Vector2(10,31)); //直接移動到指定座標,如果GameObject需要物理互動就用這個,不要改Transform!!
rb2D.SetRotation(135); //直接旋轉到指定度數
rb2D.velocity = new Vector2(3,4); //鋼體的速度,是一個向量,有方向性
rb2D.AddForce(new Vector2(5,-7.5f), ForceMode2D.Force); //施力於鋼體之上,一樣是個向量,預設模式為ForceMode2D.Force
rb2D.AddForce(new Vector2(5,-7.5f), ForceMode2D.Impulse); //比Force模式的施力時間更短,多用於跳躍
rb2D.AddTorque(95); //施力矩於鋼體之上,正數為逆時針(正向)
}
}
屬性與設定
8
新增了Rigidbody 2D之後
你的遊戲角色就會掉到平台上了!
但他還沒辦法移動...

- 新增之後...
自訂材質
Unity裡面也可以自訂碰撞器表面的材質
用來做出不同的碰撞/接觸效果
9
當在Unity裡新增Collider和Rigidbody之後
他們的預設材質會是None 因為你還沒有設定


自訂材質
10
由於摩擦力可能造成角色卡牆等不必要的問題
我不想讓遊戲角色有磨擦力
按下左上的Assets --> Create --> 2D --> Physics Material 2D
取個名字之後看到Inspector
- 新增材質
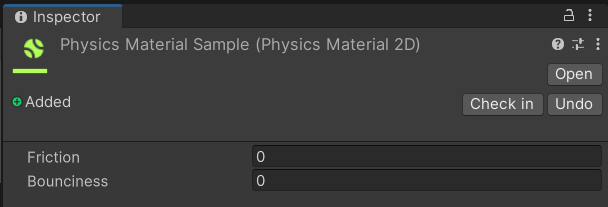
摩擦係數
恢復係數(0~1,0不會反彈,1則為彈性碰撞,沒有能量損耗)(以上建立在Physical-Base的移動上,等等會說)
自訂材質
11
之後把這個拖進Collider和Rigidbody的Material框框裡
- 設定材質
本堂課內容
本堂課內容

移動&跳躍
- 跳躍功能目標
1
- 移動腳本
上次的因為沒有考慮物理互動
所以這次要用另一個移動的方式(但輸入方式一樣兩種都行)
舊版:
移動&跳躍
using System.Collections;
using System.Collections.Generic;
using UnityEngine;

public class PhysicalOldPlayerMoveSample : MonoBehaviour
{
    float horizontal; //水平軸值,-1~1
    float vx; //水平方向移動速度

    [SerializeField] float moveSpeed = 200f; //移動速度

    Rigidbody2D rb2D; //鋼體

    SpriteRenderer spriteR; //圖像渲染器(獲取Sprite邊界)
    [SerializeField] float xBound; //水平邊界
    [SerializeField] float yBound; //垂直邊界
    Vector3 spriteRBound; //Sprite邊界

    void Start() {
        rb2D = GetComponent<Rigidbody2D>(); //取得鋼體Component參考
        spriteR = GetComponent<SpriteRenderer>(); //取得渲染器Component參考
        spriteRBound = spriteR.bounds.size/2; //Vector直接除2可以得到半長寬

        yBound = 5f;
        xBound = yBound/9f*16f; //16:9
    }

    void Facing(){ //前面講過的翻轉,以軸值來判斷角色移動方向,讓角色能左右轉向(之後可以把功能像這樣包裝成函式會很好管理)
        if(horizontal <= -0.01f && transform.localScale.x > 0){
            transform.localScale = new Vector3(-transform.localScale.x,transform.localScale.y,transform.localScale.z);
        }
        else if(horizontal >= 0.01f && transform.localScale.x < 0){
            transform.localScale = new Vector3(-transform.localScale.x,transform.localScale.y,transform.localScale.z);
        }
    }

    void Move(){ //負責移動的函式
        vx = horizontal * Time.deltaTime * moveSpeed; //計算移動速度

        if(transform.localPosition.x + spriteRBound.x < xBound && transform.localPosition.x - spriteRBound.x > -xBound){ //邊界限制
            rb2D.velocity = new Vector2(vx,rb2D.velocity.y); //更改鋼體速度
        }
        else if((transform.localPosition.x + spriteRBound.x >= xBound && horizontal >= 0) || (transform.localPosition.x - spriteRBound.x <= -xBound && horizontal <= 0)){
            rb2D.velocity = new Vector2(0,rb2D.velocity.y); //不移動(速度為0)
        }
        else{
            rb2D.velocity = new Vector2(vx,rb2D.velocity.y); //更改鋼體速度
        }
    }

    void Update(){ //輸入一律放在Update裡
        horizontal = Input.GetAxis("Horizontal"); //回傳平滑處理過的水平軸值(-1~1)

        Facing();
    }

    void FixedUpdate() { //移動程式放在FixedUpdate裡
        Move();
    }
}
2
- 移動腳本
新版:
移動&跳躍
using System.Collections;
using System.Collections.Generic;
using UnityEngine.InputSystem; //這要自己加!!沒加用不了Input System
using UnityEngine;
using System;

public class PhysicalPlayerInputActionSample : MonoBehaviour
{
    [SerializeField] InputAction movement; //可於編輯器修改的InputAction class實例
    float vx; //一次水平方向移動距離

    public Vector2 input;
    float horizontalInput; //水平軸值

    Rigidbody2D rb2D;

    [SerializeField] float moveSpeed = 10f; //移動速度

    SpriteRenderer spriteR; //圖像渲染器(獲取Sprite邊界)
    [SerializeField] float xBound; //水平邊界
    [SerializeField] float yBound; //垂直邊界
    Vector3 spriteRBound; //Sprite邊界

    void Start()
    {
        rb2D = GetComponent<Rigidbody2D>(); //取得鋼體Component參考
        spriteR = GetComponent<SpriteRenderer>(); //取得渲染器Component參考
        spriteRBound = spriteR.bounds.size/2; //Vector直接除2可以得到半長寬

        yBound = 5f;
        xBound = yBound/9f*16f;
    }

    private void OnEnable() { //啟用物件時同時啟用InputAction
        movement.Enable();
    }

    private void OnDisable() { //停用物件時同時停用InputAction
        movement.Disable();
    }

    void Facing(){ //翻轉方向
        if(horizontalInput <= -0.01f && transform.localScale.x > 0){
            transform.localScale = new Vector3(-transform.localScale.x,transform.localScale.y,transform.localScale.z);
        }
        else if(horizontalInput >= 0.01f && transform.localScale.x < 0){
            transform.localScale = new Vector3(-transform.localScale.x,transform.localScale.y,transform.localScale.z);
        }
    }

    void Move(){ //負責移動的函式
        vx = horizontalInput * Time.deltaTime * moveSpeed; //計算移動速度

        if(transform.localPosition.x + spriteRBound.x < xBound && transform.localPosition.x - spriteRBound.x > -xBound){
            rb2D.velocity = new Vector2(vx,rb2D.velocity.y); //更改鋼體速度
        }
        else if((transform.localPosition.x + spriteRBound.x >= xBound && horizontalInput >= 0) || (transform.localPosition.x - spriteRBound.x <= -xBound && horizontalInput <= 0)){
            rb2D.velocity = new Vector2(0,rb2D.velocity.y); //不移動(速度為0)
        }
        else{
            rb2D.velocity = new Vector2(vx,rb2D.velocity.y); //更改鋼體速度
        }
    }

    void Update() {
        input = movement.ReadValue<Vector2>(); //讀取前面Input System的Vector2 Value
        horizontalInput = input.x; //水平軸值

        Facing();
    }

    void FixedUpdate() {
        Move();
    }
}
3
- 移動腳本
寫好之後記得拖進角色
之後改好速度
按AD應該就可以移動啦~
移動&跳躍
4
- 跳躍腳本
當你在做的是一個上帝視角遊戲
Z軸會是上方
所以不會有「跳躍」這回事
直接用上次的上下左右移動方式就好
移動&跳躍
5
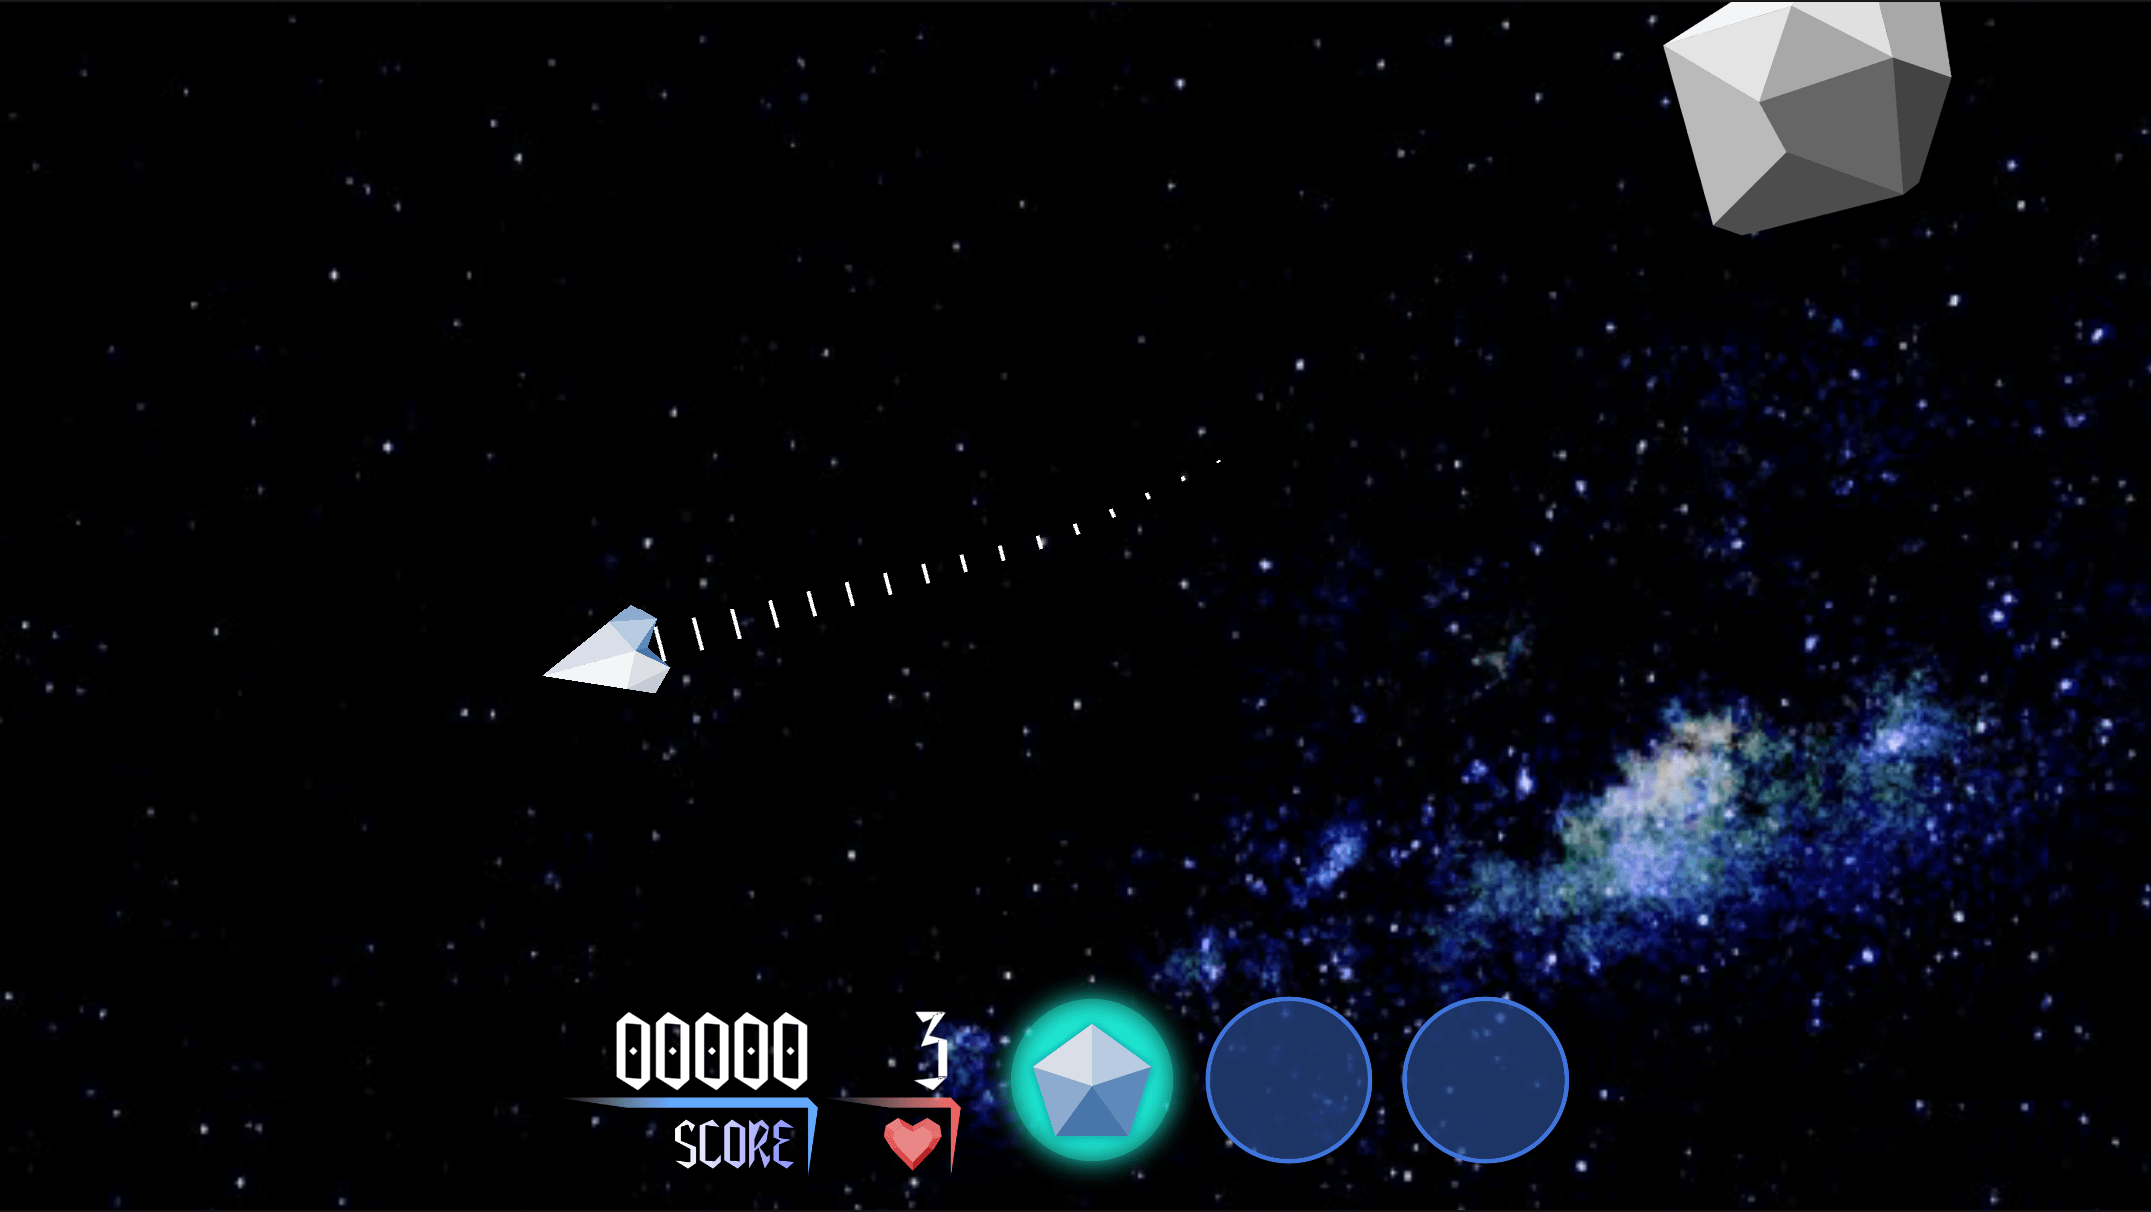
- 跳躍腳本
但如果你做的是平台遊戲或其他
則會需要有跳躍的功能
移動&跳躍
6
要做到跳躍
我們要達成幾個目標
- 跳躍輸入偵測
- 跳躍動作
- 偵測角色是否在地面上,不在地面上不可以起跳
- 跳躍腳本---跳躍輸入偵測
這很簡單
我們用Input.GetKeyDown()就能輕鬆偵測指定按鍵被按下
移動&跳躍
7
增加判斷按鍵按下的Code

要用到前面的Rigidbody.AddForce函式
移動&跳躍
8
增加宣告
- 跳躍腳本---跳躍動作
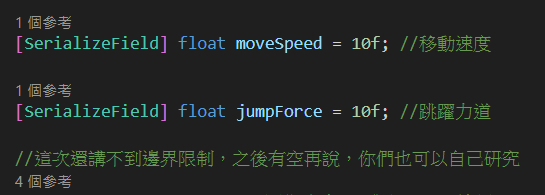
增加施力程式

舊版:
移動&跳躍
9
- 跳躍腳本---跳躍動作
using System.Collections;
using System.Collections.Generic;
using UnityEngine;

public class PhysicalOldPlayerMoveSample : MonoBehaviour
{
    float horizontal; //水平軸值,-1~1
    float vx; //水平方向移動速度

    [SerializeField] float moveSpeed = 200f; //移動速度

    [SerializeField] float jumpForce = 10f; //跳躍力道

    Rigidbody2D rb2D; //鋼體

    SpriteRenderer spriteR; //圖像渲染器(獲取Sprite邊界)
    [SerializeField] float xBound; //水平邊界
    [SerializeField] float yBound; //垂直邊界
    Vector3 spriteRBound; //Sprite邊界

    void Start() {
        rb2D = GetComponent<Rigidbody2D>(); //取得鋼體Component參考
        spriteR = GetComponent<SpriteRenderer>(); //取得渲染器Component參考
        spriteRBound = spriteR.bounds.size/2; //Vector直接除2可以得到半長寬

        yBound = 5f;
        xBound = yBound/9f*16f; //16:9
    }

    void Facing(){ //前面講過的翻轉,以軸值來判斷角色移動方向,讓角色能左右轉向(之後可以把功能像這樣包裝成函式會很好管理)
        if(horizontal <= -0.01f && transform.localScale.x > 0){
            transform.localScale = new Vector3(-transform.localScale.x,transform.localScale.y,transform.localScale.z);
        }
        else if(horizontal >= 0.01f && transform.localScale.x < 0){
            transform.localScale = new Vector3(-transform.localScale.x,transform.localScale.y,transform.localScale.z);
        }
    }

    void Move(){ //負責移動的函式
        vx = horizontal * Time.deltaTime * moveSpeed; //計算移動速度

        if(transform.localPosition.x + spriteRBound.x < xBound && transform.localPosition.x - spriteRBound.x > -xBound){ //邊界限制
            rb2D.velocity = new Vector2(vx,rb2D.velocity.y); //更改鋼體速度
        }
        else if((transform.localPosition.x + spriteRBound.x >= xBound && horizontal >= 0) || (transform.localPosition.x - spriteRBound.x <= -xBound && horizontal <= 0)){
            rb2D.velocity = new Vector2(0,rb2D.velocity.y); //不移動(速度為0)
        }
        else{
            rb2D.velocity = new Vector2(vx,rb2D.velocity.y); //更改鋼體速度
        }
    }

    void Jump(){
        if(Input.GetKeyDown(KeyCode.Space)){ //Input.GetKeyDown()在按鍵按下的一瞬間會回傳True
            rb2D.AddForce(new Vector2(0,jumpForce),ForceMode2D.Impulse); //施一個大小為(0,jumpForce的脈衝力於鋼體上)
        }
    }

    void Update(){ //輸入一律放在Update裡
        horizontal = Input.GetAxis("Horizontal"); //回傳平滑處理過的水平軸值(-1~1)

        Facing();
    }

    void FixedUpdate() { //移動程式放在FixedUpdate裡
        Move();
        Jump();
    }
}
新版:
移動&跳躍
10
- 跳躍腳本---跳躍動作
using System.Collections;
using System.Collections.Generic;
using UnityEngine.InputSystem; //這要自己加!!沒加用不了Input System
using UnityEngine;
using System;

public class PhysicalPlayerInputActionSample : MonoBehaviour
{
    [SerializeField] InputAction movement; //可於編輯器修改的InputAction class實例
    float vx; //一次水平方向移動距離

    public Vector2 input;
    float horizontalInput; //水平軸值

    Rigidbody2D rb2D;

    [SerializeField] float moveSpeed = 200f; //移動速度

    [SerializeField] float jumpForce = 10f; //跳躍力道

    SpriteRenderer spriteR; //圖像渲染器(獲取Sprite邊界)
    [SerializeField] float xBound; //水平邊界
    [SerializeField] float yBound; //垂直邊界
    Vector3 spriteRBound; //Sprite邊界

    void Start()
    {
        rb2D = GetComponent<Rigidbody2D>(); //取得鋼體Component參考
        spriteR = GetComponent<SpriteRenderer>(); //取得渲染器Component參考
        spriteRBound = spriteR.bounds.size/2; //Vector直接除2可以得到半長寬

        yBound = 5f;
        xBound = yBound/9f*16f; //16:9
    }

    private void OnEnable() { //啟用物件時同時啟用InputAction
        movement.Enable();
    }

    private void OnDisable() { //停用物件時同時停用InputAction
        movement.Disable();
    }

    void Facing(){ //翻轉方向
        if(horizontalInput <= -0.01f && transform.localScale.x > 0){
            transform.localScale = new Vector3(-transform.localScale.x,transform.localScale.y,transform.localScale.z);
        }
        else if(horizontalInput >= 0.01f && transform.localScale.x < 0){
            transform.localScale = new Vector3(-transform.localScale.x,transform.localScale.y,transform.localScale.z);
        }
    }

    void Move(){ //負責移動的函式
        vx = horizontalInput * Time.deltaTime * moveSpeed; //計算移動速度

        if(transform.localPosition.x + spriteRBound.x < xBound && transform.localPosition.x - spriteRBound.x > -xBound){
            rb2D.velocity = new Vector2(vx,rb2D.velocity.y); //更改鋼體速度
        }
        else if((transform.localPosition.x + spriteRBound.x >= xBound && horizontalInput >= 0) || (transform.localPosition.x - spriteRBound.x <= -xBound && horizontalInput <= 0)){
            rb2D.velocity = new Vector2(0,rb2D.velocity.y); //不移動(速度為0)
        }
        else{
            rb2D.velocity = new Vector2(vx,rb2D.velocity.y); //更改鋼體速度
        }
    }

    void Jump(){
        if(Input.GetKeyDown(KeyCode.Space)){ //Input.GetKeyDown()在按鍵按下的一瞬間會回傳True
            rb2D.AddForce(new Vector2(0,jumpForce),ForceMode2D.Impulse); //施一個大小為(0,jumpForce的脈衝力於鋼體上)
        }
    }

    void Update() {
        input = movement.ReadValue<Vector2>(); //讀取前面Input System的Vector2 Value
        horizontalInput = input.x; //水平軸值

        Facing();
    }

    void FixedUpdate() {
        Move();
        Jump();
    }
}
完成之後就可以跳躍了!
也可以調整重力參數來改變下落速度喔
移動&跳躍
11
這很正常
因為現在還沒做是否在地上的判斷
所以一直按空白鍵可以一直施力在角色上
所以他會飛走
但是你可能會說
:學長我的角色飛走了
- 跳躍腳本---跳躍動作
移動&跳躍
12
- 跳躍腳本---地面偵測
有兩個地面偵測的方法
- Collider(較差)
- Raycast(較好)
我希望能都講但不知道會不會不夠時間
如果超過時間的話
還請各位多包涵😅
移動&跳躍
13
前面有說Collider可以偵測兩個GameObject之間的碰撞
以下三個函式就可以做到:
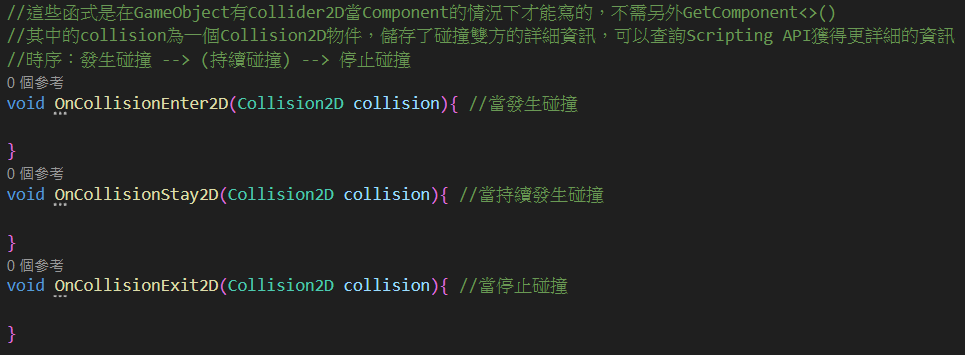
- 跳躍腳本---Collider地面偵測
移動&跳躍
14
- 跳躍腳本---Collider地面偵測
再提到另一個前面有稍微講到的概念:Tag
可以理解成標籤
有將遊戲角色分類的能力

移動&跳躍
15
- 跳躍腳本---Collider地面偵測
先按下Inspector裡上方的Tag --> Add Tag...
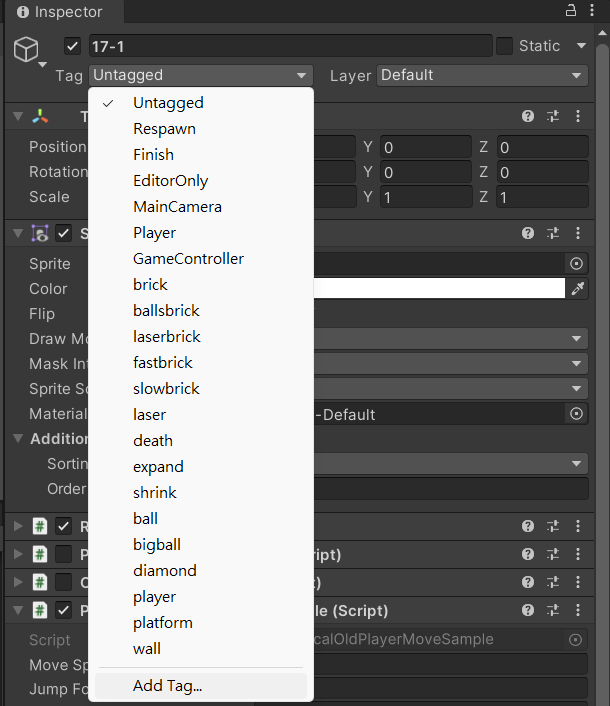
我有這麼多是因為有另一個遊戲在背後開發
移動&跳躍
16
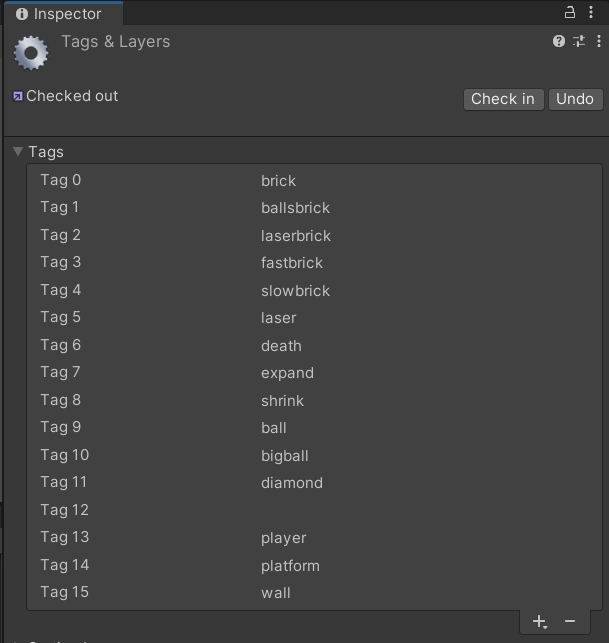
- 跳躍腳本---Collider地面偵測
之後會看到這個畫面
按右下角的「+」 --> 輸入名字 --> 按save

移動&跳躍
17
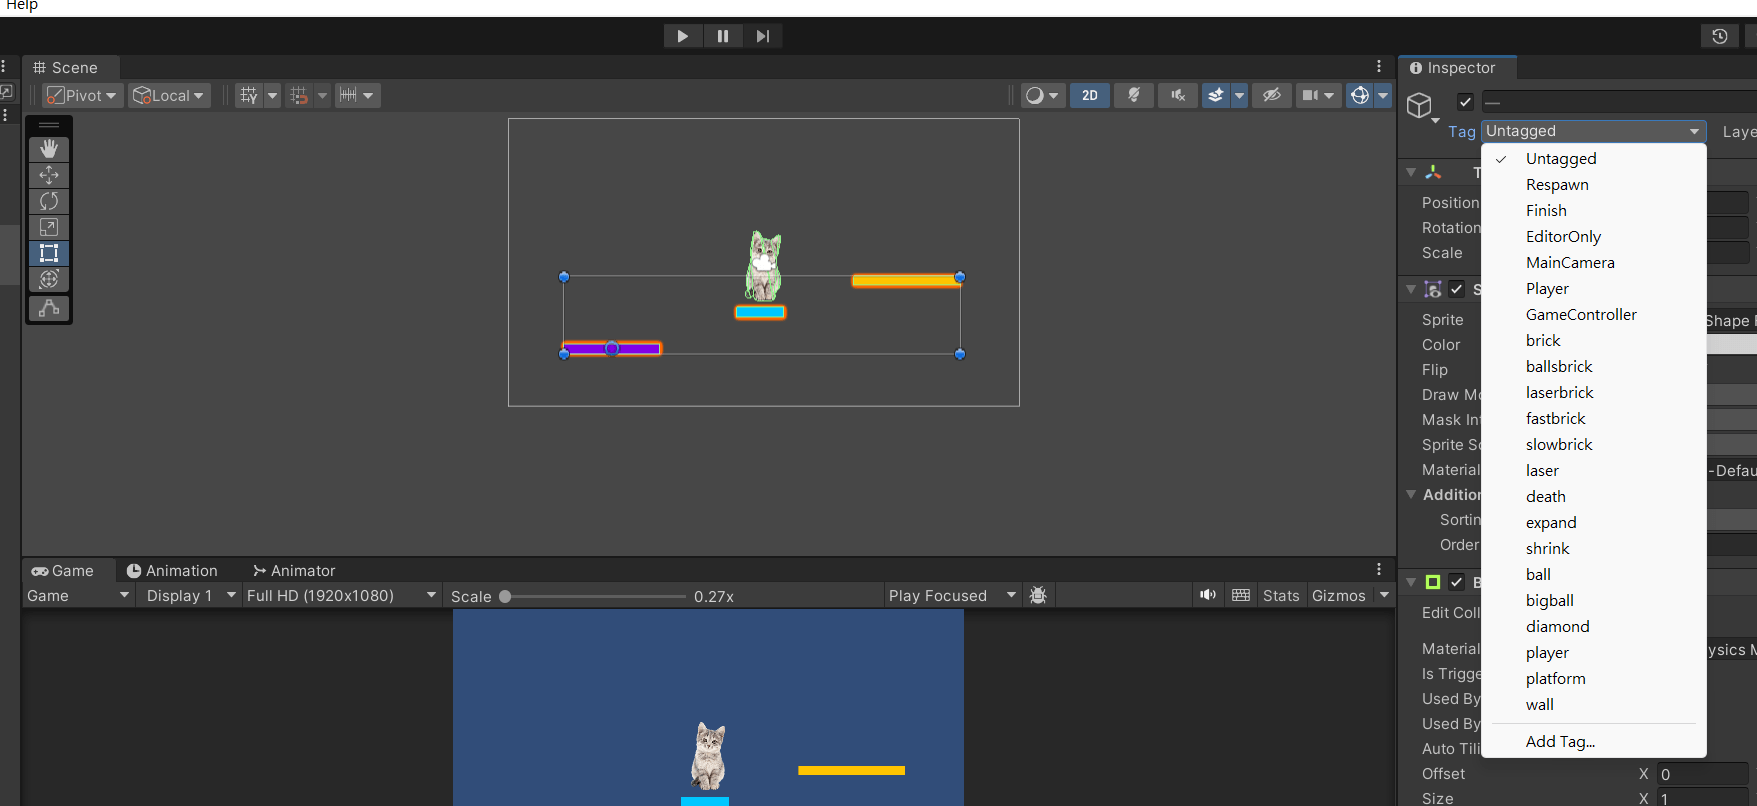
- 跳躍腳本---Collider地面偵測
把平台全選加入tag
移動&跳躍
18
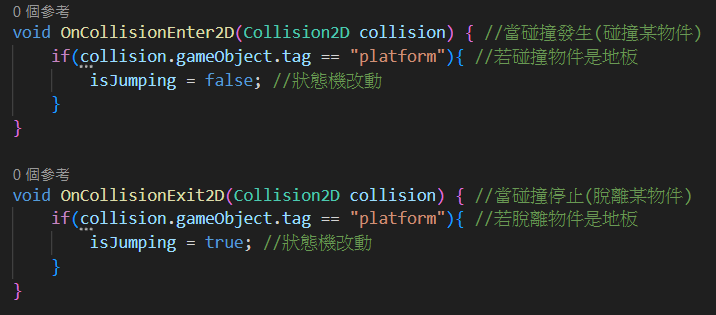
- 跳躍腳本---Collider地面偵測
接著加入狀態機宣告

碰撞偵測函式
移動&跳躍
19
- 跳躍腳本---Collider地面偵測
以及判斷式
判斷是否在空中才進行施力

大功告成!
移動&跳躍
20
- 跳躍腳本---Collider地面偵測
舊版:
using System.Collections;
using System.Collections.Generic;
using UnityEngine;

public class PhysicalOldPlayerMoveSample : MonoBehaviour
{
    float horizontal; //水平軸值,-1~1
    float vx; //水平方向移動速度

    [SerializeField] float moveSpeed = 200f; //移動速度

    [SerializeField] float jumpForce = 10f; //跳躍力道

    Rigidbody2D rb2D; //鋼體

    bool isJumping = true; //跳躍狀態機,true表示正在跳躍,無法再跳一次;false則表示可以跳躍

    SpriteRenderer spriteR; //圖像渲染器(獲取Sprite邊界)
    [SerializeField] float xBound; //水平邊界
    [SerializeField] float yBound; //垂直邊界
    Vector3 spriteRBound; //Sprite邊界

    void Start() {
        rb2D = GetComponent<Rigidbody2D>(); //取得鋼體Component參考
        spriteR = GetComponent<SpriteRenderer>(); //取得渲染器Component參考
        spriteRBound = spriteR.bounds.size/2; //Vector直接除2可以得到半長寬

        yBound = 5f;
        xBound = yBound/9f*16f; //16:9
    }

    void Facing(){ //前面講過的翻轉,以軸值來判斷角色移動方向,讓角色能左右轉向(之後可以把功能像這樣包裝成函式會很好管理)
        if(horizontal <= -0.01f && transform.localScale.x > 0){
            transform.localScale = new Vector3(-transform.localScale.x,transform.localScale.y,transform.localScale.z);
        }
        else if(horizontal >= 0.01f && transform.localScale.x < 0){
            transform.localScale = new Vector3(-transform.localScale.x,transform.localScale.y,transform.localScale.z);
        }
    }

    void Move(){ //負責移動的函式
        vx = horizontal * Time.deltaTime * moveSpeed; //計算移動速度

        if(transform.localPosition.x + spriteRBound.x < xBound && transform.localPosition.x - spriteRBound.x > -xBound){ //邊界限制
            rb2D.velocity = new Vector2(vx,rb2D.velocity.y); //更改鋼體速度
        }
        else if((transform.localPosition.x + spriteRBound.x >= xBound && horizontal >= 0) || (transform.localPosition.x - spriteRBound.x <= -xBound && horizontal <= 0)){
            rb2D.velocity = new Vector2(0,rb2D.velocity.y); //不移動(速度為0)
        }
        else{
            rb2D.velocity = new Vector2(vx,rb2D.velocity.y); //更改鋼體速度
        }
    }

    void OnCollisionEnter2D(Collision2D collision) { //當碰撞發生(碰撞某物件)
        if(collision.gameObject.tag == "platform"){ //用tag判斷碰撞物件是否為地板
            isJumping = false; //狀態機改動
        }
    }

    void OnCollisionExit2D(Collision2D collision) { //當碰撞停止(脫離某物件)
        if(collision.gameObject.tag == "platform"){ //用tag判斷脫離物件是否為地板
            isJumping = true; //狀態機改動
        }
    }

    void Jump(){
        if(Input.GetKeyDown(KeyCode.Space)){ //Input.GetKeyDown()在按鍵按下的一瞬間會回傳True
            if(!isJumping){
                isJumping = true; //因為OnCollisionExit可能有時間誤差,有時會施兩次力產生暴跳,所以要加一個狀態機改動在這
                rb2D.AddForce(new Vector2(0,jumpForce),ForceMode2D.Impulse); //施一個大小為(0,jumpForce的脈衝力於鋼體上
            }
        }
    }

    void Update(){ //輸入一律放在Update裡
        horizontal = Input.GetAxis("Horizontal"); //回傳平滑處理過的水平軸值(-1~1)

        Facing();
    }

    void FixedUpdate() { //移動程式放在FixedUpdate裡
        Move();
        Jump();
    }
}
移動&跳躍
21
- 跳躍腳本---Collider地面偵測
新版:
using System.Collections;
using System.Collections.Generic;
using UnityEngine.InputSystem; //這要自己加!!沒加用不了Input System
using UnityEngine;
using System;

public class PhysicalPlayerInputActionSample : MonoBehaviour
{
    [SerializeField] InputAction movement; //可於編輯器修改的InputAction class實例
    float vx; //一次水平方向移動距離

    public Vector2 input;
    float horizontalInput; //水平軸值

    Rigidbody2D rb2D;

    [SerializeField] float moveSpeed = 200f; //移動速度

    [SerializeField] float jumpForce = 10f; //跳躍力道

    bool isJumping = true; //跳躍狀態機,true表示正在跳躍,無法再跳一次;false則表示可以跳躍

    SpriteRenderer spriteR; //圖像渲染器(獲取Sprite邊界)
    [SerializeField] float xBound; //水平邊界
    [SerializeField] float yBound; //垂直邊界
    Vector3 spriteRBound; //Sprite邊界

    void Start()
    {
        rb2D = GetComponent<Rigidbody2D>(); //取得鋼體Component參考
        spriteR = GetComponent<SpriteRenderer>(); //取得渲染器Component參考
        spriteRBound = spriteR.bounds.size/2; //Vector直接除2可以得到半長寬

        yBound = 5f;
        xBound = yBound/9f*16f;
    }

    private void OnEnable() { //啟用物件時同時啟用InputAction
        movement.Enable();
    }

    private void OnDisable() { //停用物件時同時停用InputAction
        movement.Disable();
    }

    void Facing(){ //翻轉方向
        if(horizontalInput <= -0.01f && transform.localScale.x > 0){
            transform.localScale = new Vector3(-transform.localScale.x,transform.localScale.y,transform.localScale.z);
        }
        else if(horizontalInput >= 0.01f && transform.localScale.x < 0){
            transform.localScale = new Vector3(-transform.localScale.x,transform.localScale.y,transform.localScale.z);
        }
    }

    void Move(){ //負責移動的函式
        vx = horizontalInput * Time.deltaTime * moveSpeed; //計算移動速度

        if(transform.localPosition.x + spriteRBound.x < xBound && transform.localPosition.x - spriteRBound.x > -xBound){
            rb2D.velocity = new Vector2(vx,rb2D.velocity.y); //更改鋼體速度
        }
        else if((transform.localPosition.x + spriteRBound.x >= xBound && horizontalInput >= 0) || (transform.localPosition.x - spriteRBound.x <= -xBound && horizontalInput <= 0)){
            rb2D.velocity = new Vector2(0,rb2D.velocity.y); //不移動(速度為0)
        }
        else{
            rb2D.velocity = new Vector2(vx,rb2D.velocity.y); //更改鋼體速度
        }
    }

    void OnCollisionEnter2D(Collision2D collision) { //當碰撞發生(碰撞某物件)
        if(collision.gameObject.tag == "platform"){ //用tag判斷碰撞物件是否為地板
            isJumping = false; //狀態機改動
        }
    }

    void OnCollisionExit2D(Collision2D collision) { //當碰撞停止(脫離某物件)
        if(collision.gameObject.tag == "platform"){ //用tag判斷脫離物件是否為地板
            isJumping = true; //狀態機改動
        }
    }

    void Jump(){
        if(Input.GetKeyDown(KeyCode.Space)){ //Input.GetKeyDown()在按鍵按下的一瞬間會回傳True
            if(!isJumping){
                isJumping = true; //因為OnCollisionExit可能有時間誤差,有時會施兩次力產生暴跳,所以要加一個狀態機改動在這
                rb2D.AddForce(new Vector2(0,jumpForce),ForceMode2D.Impulse); //施一個大小為(0,jumpForce的脈衝力於鋼體上
            }
        }
    }

    void Update() {
        input = movement.ReadValue<Vector2>(); //讀取前面Input System的Vector2 Value
        horizontalInput = input.x; //水平軸值

        Facing();
    }

    void FixedUpdate() {
        Move();
        Jump();
    }
}
移動&跳躍
22
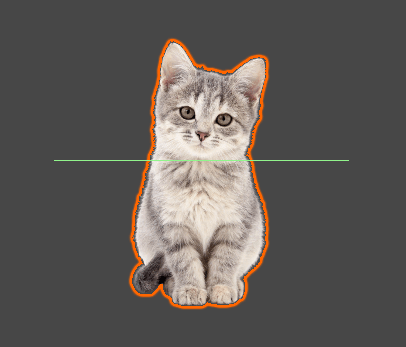
- 跳躍腳本---Raycast地面偵測
剛剛我們使用Collider來做地面偵測
缺點是如果角色在掉落前再次碰到平台
那麼玩家就可以再跳一次
而且因Collider的特性,有些精細的碰撞會有縫隙以致無法偵測
如果我們想解決這個問題呢?
✋
移動&跳躍
23
- 跳躍腳本---Raycast地面偵測
這東西有點難理解
但不錯用
所以我還是介紹了
Raycast!
可以理解成從一個指定的中心點做一條有寬度的射線
經旋轉後指向某個方向
射線範圍內與Collider的碰撞會被以「RaycastHit2D」的資料型態回傳
包含碰到的Collider資訊(GameObject等)、在哪個位置碰撞到之類的
移動&跳躍
24
- 跳躍腳本---Raycast地面偵測
首先
Raycast自己不是單獨的Component
他是包含在Physics2D class底下的方法
分成Box(矩形)/Capsule(膠囊形)/Circle(圓形)三種
這次我選擇BoxCast示範(也可以用其他的)

移動&跳躍
25
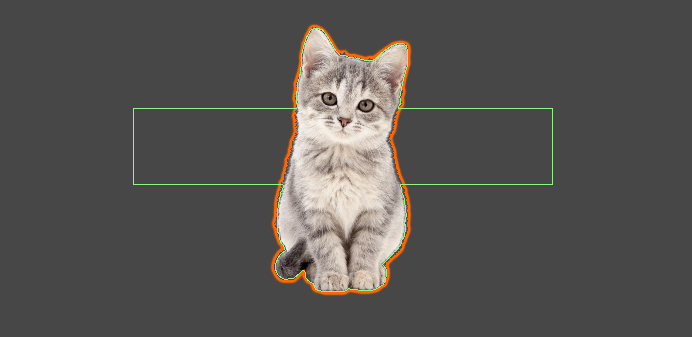
- 跳躍腳本---Raycast地面偵測
點進API的BoxCast說明可以看到一坨參數

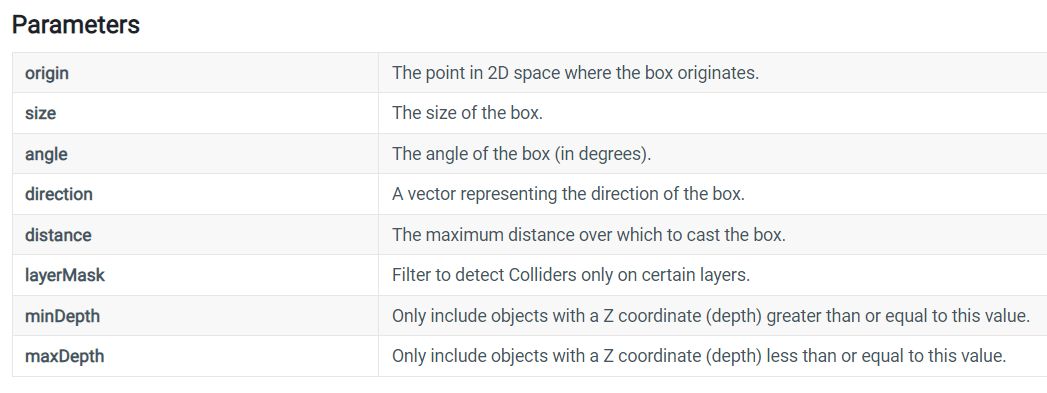
指定的中心點
矩形大小(射線寬度)
旋轉角度
方向向量
射線長度(矩形長度)
偵測指定Layer中的GameObject
Z軸最低
Z軸最高
Layer是啥??
移動&跳躍
26
- 跳躍腳本---Raycast地面偵測
一個類似圖層的東西
前面講到的Sorting Layer就是他
除了可以幫很大量的東西初步分類
也可以將同種的GameObject放在同個Layer裡
然後篩選要偵測的
(Collider2D裡也有個Layer Overrides可以改
等等可以用之前的遊戲示範效果給你們看)
Layer
移動&跳躍
27
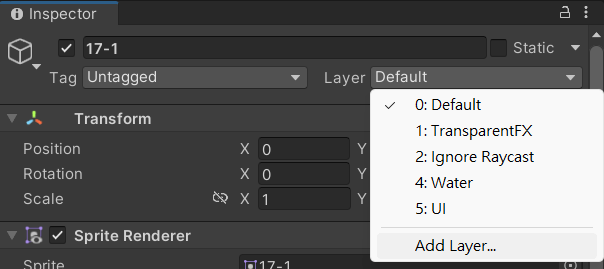
- 跳躍腳本---Raycast地面偵測
這裡我們要用Layer來區分玩家與平台
按下Inspector右上方的Layer選單 --> Add Layer...
移動&跳躍
28
- 跳躍腳本---Raycast地面偵測
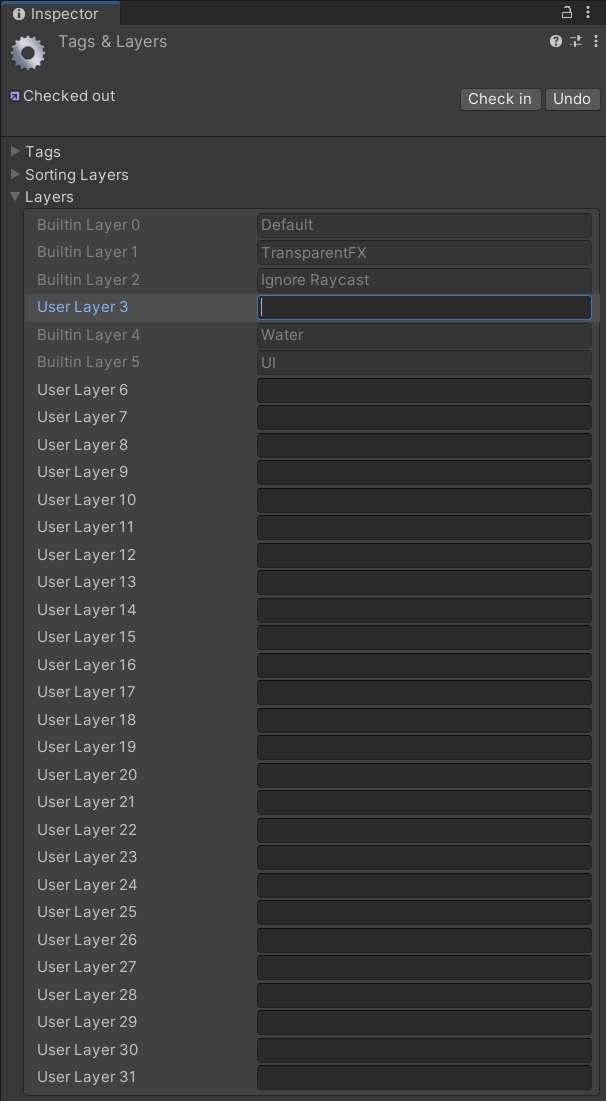
隨便選一個空格填入名字
移動&跳躍
29
- 跳躍腳本---Raycast地面偵測
之後全選平台
按下Inspector右上方的Layer選單 --> 你的Layer名稱
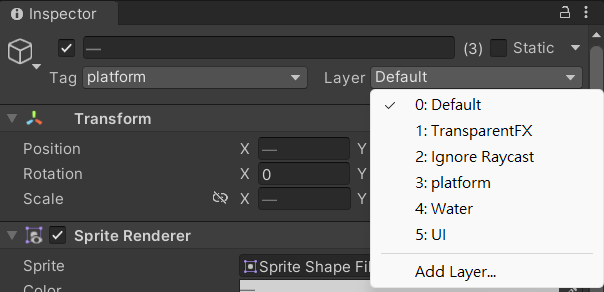
Layer就設定好了
移動&跳躍
30
- 跳躍腳本---Raycast地面偵測
再來開始寫程式
(可以複製一份出來改)
加入宣告

取得參考
移動&跳躍
31
- 跳躍腳本---Raycast地面偵測
接著是主程式

移動&跳躍
32
- 跳躍腳本---Raycast地面偵測
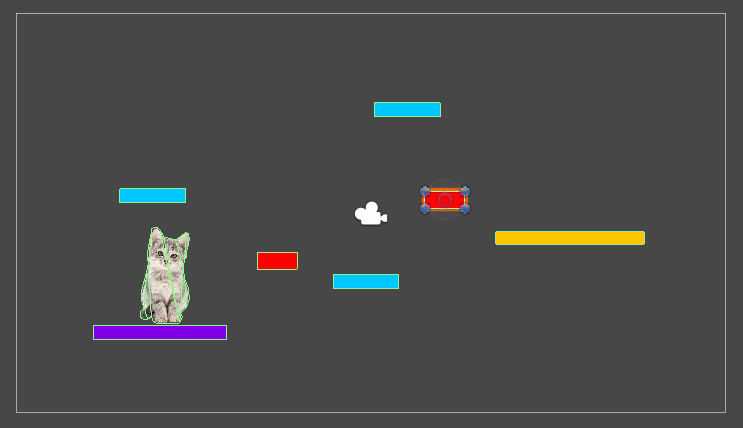
最後是判斷
就大功告成啦!

還有除錯(寫在Update裡)

移動&跳躍
33
- 跳躍腳本---Raycast地面偵測
舊版
using System.Collections;
using System.Collections.Generic;
using UnityEngine;
public class PhysicalOldPlayerMoveSampleRC : MonoBehaviour
{
float horizontal; //水平軸值,-1~1
float vx; //水平方向移動速度
[SerializeField] float moveSpeed = 200f; //移動速度
[SerializeField] float jumpForce = 10f; //跳躍力道
Rigidbody2D rb2D; //鋼體
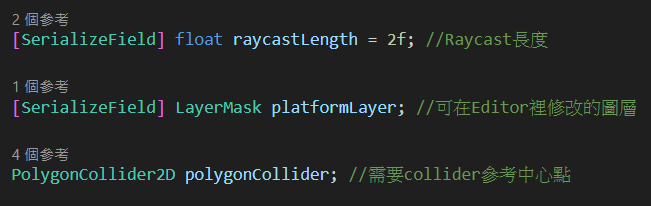
[SerializeField] float raycastLength = 2f; //Raycast長度
[SerializeField] LayerMask platformLayer; //可在Editor裡修改的圖層
PolygonCollider2D polygonCollider; //需要collider參考中心點
SpriteRenderer spriteR; //圖像渲染器(獲取Sprite邊界)
[SerializeField] float xBound; //水平邊界
[SerializeField] float yBound; //垂直邊界
Vector3 spriteRBound; //Sprite邊界
void Start() {
rb2D = GetComponent<Rigidbody2D>(); //取得鋼體Component參考
polygonCollider = GetComponent<PolygonCollider2D>();
spriteR = GetComponent<SpriteRenderer>(); //取得渲染器Component參考
spriteRBound = spriteR.bounds.size/2; //Vector直接除2可以得到半長寬
yBound = 5f;
xBound = yBound/9f*16f; //16:9
}
void Facing(){ //前面講過的翻轉,以軸值來判斷角色移動方向,讓角色能左右轉向(之後可以把功能像這樣包裝成函式會很好管理)
if(horizontal <= -0.01f && transform.localScale.x > 0){
transform.localScale = new Vector3(-transform.localScale.x,transform.localScale.y,transform.localScale.z);
}
else if(horizontal >= 0.01f && transform.localScale.x < 0){
transform.localScale = new Vector3(-transform.localScale.x,transform.localScale.y,transform.localScale.z);
}
}
void Move(){ //負責移動的函式
vx = horizontal * Time.deltaTime * moveSpeed; //計算移動速度
if(transform.localPosition.x + spriteRBound.x < xBound && transform.localPosition.x - spriteRBound.x > -xBound){ //邊界限制
rb2D.velocity = new Vector2(vx,rb2D.velocity.y); //更改鋼體速度
}
else if((transform.localPosition.x + spriteRBound.x >= xBound && horizontal >= 0) || (transform.localPosition.x - spriteRBound.x <= -xBound && horizontal <= 0)){
rb2D.velocity = new Vector2(0,rb2D.velocity.y); //不移動(速度為0)
}
else{
rb2D.velocity = new Vector2(vx,rb2D.velocity.y); //更改鋼體速度
}
}
bool IsOnGround(){
RaycastHit2D rh2D = Physics2D.BoxCast(polygonCollider.bounds.center,spriteRBound/4,0f,Vector2.down,raycastLength,platformLayer);
/*
參數由左向右:
中心點:polygonCollider.bounds.center,也就是collider的中心點
大小:sprite的一半
旋轉角度:0度
方向向量:朝下
長度:0.1
碰撞圖層:platformLayer
*/
if(rh2D.collider != null){ //因為已經隔離platform所以可以直接這樣寫
return true;
}
else{
return false;
}
}
void Jump(){
if(Input.GetKeyDown(KeyCode.Space)){ //Input.GetKeyDown()在按鍵按下的一瞬間會回傳True
Debug.Log("Jump");
if(IsOnGround()){
rb2D.AddForce(new Vector2(0,jumpForce),ForceMode2D.Impulse); //施一個大小為(0,jumpForce的脈衝力於鋼體上
}
}
}
void Update(){ //輸入一律放在Update裡
horizontal = Input.GetAxis("Horizontal"); //回傳平滑處理過的水平軸值(-1~1)
Facing();
Debug.DrawLine(polygonCollider.bounds.center,polygonCollider.bounds.center+Vector3.down*raycastLength); //繪製一條跟Raycast長度一樣的線來除錯
}
void FixedUpdate() { //移動程式放在FixedUpdate裡
Move();
Jump();
}
}
移動&跳躍
34
- 跳躍腳本---Raycast地面偵測
新版
using System.Collections;
using System.Collections.Generic;
using UnityEngine.InputSystem; //這要自己加!!沒加用不了Input System
using UnityEngine;
using System;

public class PhysicalPlayerInputActionSampleRC : MonoBehaviour
{
    [SerializeField] InputAction movement; //可於編輯器修改的InputAction class實例
    float vx; //一次水平方向移動距離

    public Vector2 input;
    float horizontalInput; //水平軸值

    Rigidbody2D rb2D;

    [SerializeField] float moveSpeed = 200f; //移動速度

    [SerializeField] float jumpForce = 10f; //跳躍力道

    [SerializeField] float raycastLength = 2f; //Raycast長度

    [SerializeField] LayerMask platformLayer; //可在Editor裡修改的圖層

    PolygonCollider2D polygonCollider; //圖像渲染器(獲取Sprite邊界)

    SpriteRenderer spriteR; //圖像渲染器(獲取Sprite邊界)
    [SerializeField] float xBound; //水平邊界
    [SerializeField] float yBound; //垂直邊界
    Vector3 spriteRBound; //Sprite邊界

    void Start()
    {
        rb2D = GetComponent<Rigidbody2D>(); //取得鋼體Component參考
        polygonCollider = GetComponent<PolygonCollider2D>();
        spriteR = GetComponent<SpriteRenderer>(); //取得渲染器Component參考
        spriteRBound = spriteR.bounds.size/2; //Vector直接除2可以得到半長寬

        yBound = 5f;
        xBound = yBound/9f*16f;
    }

    private void OnEnable() { //啟用物件時同時啟用InputAction
        movement.Enable();
    }

    private void OnDisable() { //停用物件時同時停用InputAction
        movement.Disable();
    }

    void Facing(){ //翻轉方向
        if(horizontalInput <= -0.01f && transform.localScale.x > 0){
            transform.localScale = new Vector3(-transform.localScale.x,transform.localScale.y,transform.localScale.z);
        }
        else if(horizontalInput >= 0.01f && transform.localScale.x < 0){
            transform.localScale = new Vector3(-transform.localScale.x,transform.localScale.y,transform.localScale.z);
        }
    }

    void Move(){ //負責移動的函式
        vx = horizontalInput * Time.deltaTime * moveSpeed; //計算移動速度

        if(transform.localPosition.x + spriteRBound.x < xBound && transform.localPosition.x - spriteRBound.x > -xBound){
            rb2D.velocity = new Vector2(vx,rb2D.velocity.y); //更改鋼體速度
        }
        else if((transform.localPosition.x + spriteRBound.x >= xBound && horizontalInput >= 0) || (transform.localPosition.x - spriteRBound.x <= -xBound && horizontalInput <= 0)){
            rb2D.velocity = new Vector2(0,rb2D.velocity.y); //不移動(速度為0)
        }
        else{
            rb2D.velocity = new Vector2(vx,rb2D.velocity.y); //更改鋼體速度
        }
    }

    bool IsOnGround(){
        RaycastHit2D rh2D = Physics2D.BoxCast(polygonCollider.bounds.center,spriteRBound/4,0f,Vector2.down,raycastLength,platformLayer);
        /*
        參數由左向右:
            中心點:polygonCollider.bounds.center,也就是collider的中心點
            大小:sprite的一半
            旋轉角度:0度
            方向向量:朝下
            長度:0.1,太短要改長不然可能會偵測不到
            碰撞圖層:platformLayer
        */

        if(rh2D.collider != null){ //因為已經隔離platform所以可以直接這樣寫
            return true;
        }
        else{
            return false;
        }
    }

    void Jump(){
        if(Input.GetKeyDown(KeyCode.Space)){ //Input.GetKeyDown()在按鍵按下的一瞬間會回傳True
            if(IsOnGround()){
                rb2D.AddForce(new Vector2(0,jumpForce),ForceMode2D.Impulse); //施一個大小為(0,jumpForce的脈衝力於鋼體上
            }
        }
    }

    void Update() {
        input = movement.ReadValue<Vector2>(); //讀取前面Input System的Vector2 Value
        horizontalInput = input.x; //水平軸值

        Facing();
        Debug.DrawLine(polygonCollider.bounds.center,polygonCollider.bounds.center+Vector3.down*raycastLength); //繪製一條跟Raycast長度一樣的線來除錯
    }

    void FixedUpdate() {
        Move();
        Jump();
    }
}
移動&跳躍
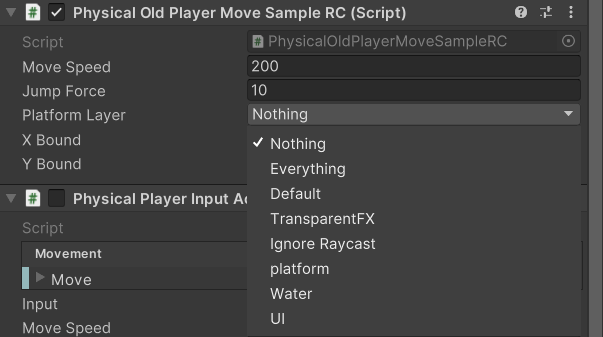
35
- 跳躍腳本---Raycast地面偵測
腳本丟進Inspector裡之後記得要設定Layer再執行喔
本堂課內容
本堂課內容
陷阱&鏡頭跟追
1

- 碰撞偵測腳本
陷阱&鏡頭跟追
2
先用前面建立平台的方式建立幾個紅色的方塊當陷阱
記得加入Collider之後複製幾個
(切記 這個做法不正確 之後會教怎麼使用Prefab 會了之後就不要用複製的了喔)
- 碰撞偵測腳本
陷阱&鏡頭跟追
3
再來就是寫腳本
開一個新的
using System.Collections;
using System.Collections.Generic;
using UnityEngine;

public class TrapSample : MonoBehaviour
{
    GameObject cat; //宣告遊戲物件
    [SerializeField] Vector3 startpos;

    void Start(){
        cat = GameObject.FindGameObjectWithTag("Player"); //用FindGameObjectWithTag()參考Tag為Player的角色
    }

    void OnCollisionEnter2D(Collision2D collision){
        if(collision.gameObject == cat){ //判斷碰撞對象是否為貓
            cat.GetComponent<Rigidbody2D>().position = startpos; /*用GameObject的GetComponent<>()
                                                                   取得貓的鋼體之後移動回起點*/
        }
    }
}
- 碰撞偵測腳本
陷阱&鏡頭跟追
4
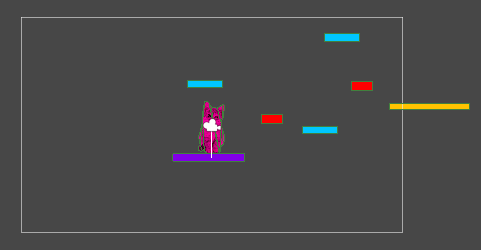
把腳本拖進陷阱的Inspector之後自訂起點就完成啦~
現在貓碰到陷阱之後應該就會回到起點了
陷阱&鏡頭跟追
5
現在我想讓鏡頭的中心一直擺在角色的中心
直接來寫程式吧
- 鏡頭跟追腳本
using System.Collections;
using System.Collections.Generic;
using UnityEngine;

public class CameraTrackingSample : MonoBehaviour
{
    Transform catTrans; //宣告Transform物件
    void Start()
    {
        catTrans = GameObject.FindGameObjectWithTag("cat").transform; //用FindGameObjectWithTag()參考Tag為cat的角色並參考其Transform
    }

    void Update()
    {
        transform.position = new Vector3(catTrans.position.x,catTrans.position.y,-10); //不斷改動鏡頭Transform的x和y
    }
}
陷阱&鏡頭跟追
6
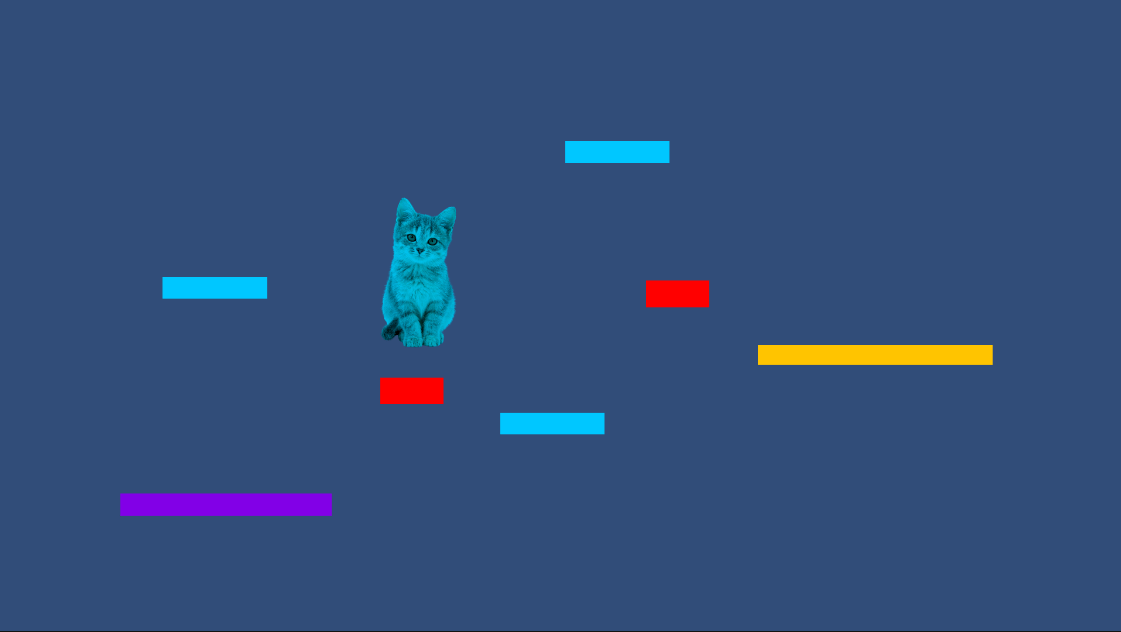
之後把腳本拖進Main Camera的Inspector
鏡頭應該就會跟著角色移動啦~
- 鏡頭跟追腳本
陷阱&鏡頭跟追
7
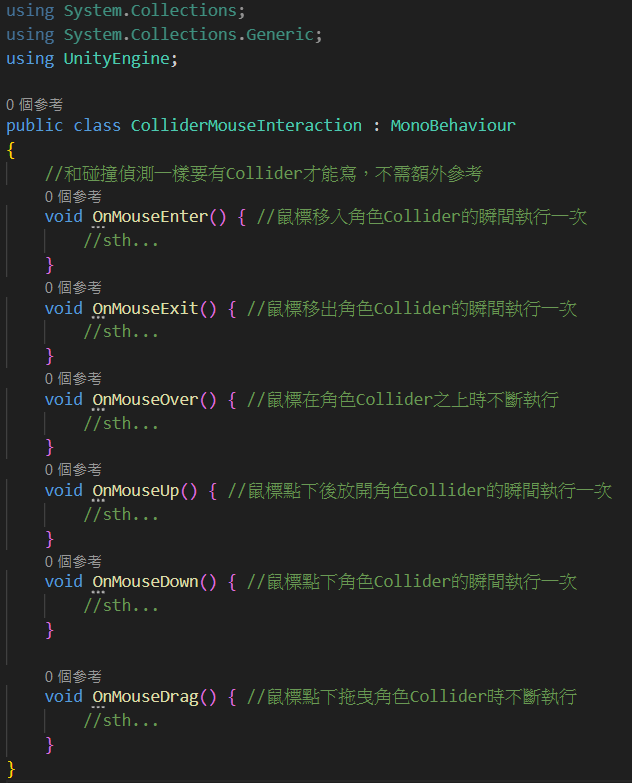
- 番外:滑鼠+碰撞器
如果你的遊戲有需要拖動、點擊的元件,可以透過Collider輕鬆達成
但UI介面有Unity內建的系統可以用,所以按鈕等功能不需要用Collider來實現,之後會教
陷阱&鏡頭跟追
8
- 滑鼠+碰撞器:地圖自訂Pt.1
第一版程式(開新腳本)
using System.Collections;
using System.Collections.Generic;
using UnityEngine;
using UnityEngine.InputSystem; //要讀取鼠標位置需使用InputSystem,記得using

public class CustomizableMapFirst : MonoBehaviour
{
    void OnMouseDrag() { //當滑鼠在角色上拖動時
        //用Mouse.current.position.y.value讀取鼠標的位置
        /*由於初始坐標系為(0,0)~(1920,1080),所以我們要先 -(960,540) 之後讓它變成(-960,-540)~(960,540)後
          再 /(1920,1080)*(16,9) 才能轉換成現在的坐標系(-8.3333,-5)~(8.3333,5)*/
        //將角色Position的x和y設為換算後滑鼠Position的x和y,z不變
        transform.position = new Vector3((Mouse.current.position.x.value-960)/1920*16,(Mouse.current.position.y.value-540)/1080*9,transform.position.z);
    }
}
好簡單喔!
陷阱&鏡頭跟追
9
- 滑鼠+碰撞器:地圖自訂Pt.1
把腳本拖進陷阱的Inspector之後
試著拖曳看看
你會發現陷阱雖然有跟著鼠標在相對移動
但位置不是在鼠標上
為什麼?
陷阱&鏡頭跟追
10
- 滑鼠+碰撞器:地圖自訂Pt.1
經過實驗之後
我發現鼠標的座標是相對於畫面的
當鏡頭移動(x,y)的時候
鼠標的位置不會隨鏡頭位置而變
換算後依然是(-8.3333,-5)~(8.3333,5)
但實際上座標系統中心已經不是(0,0)
這時候再用鼠標位置定位
就會相對於鼠標產生(-x,-y)的偏移
陷阱&鏡頭跟追
11
- 滑鼠+碰撞器:地圖自訂Pt.1
實際演示!
陷阱&鏡頭跟追
12
- 滑鼠+碰撞器:地圖自訂Pt.1
所以我們需要將這個偏移量矯正回來
怎麼做?
把換算出的鼠標x,y座標加上相機x,y即可
using System.Collections;
using System.Collections.Generic;
using UnityEngine;
using UnityEngine.InputSystem; //要讀取鼠標位置需使用InputSystem,記得using

public class CustomizableMap : MonoBehaviour
{
    Transform mainCameraTrans; //宣告相機Transform物件

    void Start()
    {
        mainCameraTrans = GameObject.FindGameObjectWithTag("MainCamera").transform; //用FindGameObjectWithTag()參考Tag為MainCamera的角色並參考其Transform
    }

    void OnMouseDrag() { //當滑鼠在角色上拖動時
        //用Mouse.current.position.y.value讀取鼠標的位置
        /*由於初始坐標系為(0,0)~(1920,1080),所以我們要先 -(960,540) 之後讓它變成(-960,-540)~(960,540)後
          再 /(1920,1080)*(16,9) 才能轉換成現在的坐標系(-8.3333,-5)~(8.3333,5)*/
        //由於鼠標座標是相對於畫面,因此需將換算出的座標加上相機座標才可矯正偏移
        //將角色Position的x和y設為換算後滑鼠Position的x和y,z不變
        transform.position = new Vector3((Mouse.current.position.x.value-960)/1920*16+mainCameraTrans.position.x,(Mouse.current.position.y.value-540)/1080*9+mainCameraTrans.position.y,transform.position.z);
    }
}
陷阱&鏡頭跟追
13
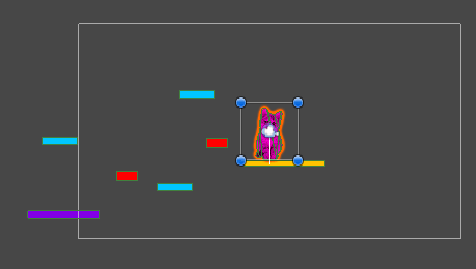
- 滑鼠+碰撞器:地圖自訂Pt.1
之後將腳本拖到所有的平台和陷阱的Inspector裡
你應該就可以獲得一張可以單次自訂的地圖了
不錯吧~
大家也可以試著做一些優化
比如拖曳的時候讓角色不要受重力影響
才不會修改的時候一直往下掉之類的
做出來可以跟我分享
期待大家的創意!
陷阱&鏡頭跟追
14
- 滑鼠+碰撞器:地圖自訂Pt.1
:但我想儲存地圖還有新增地圖物件欸
那就要用到之後會教的Prefab和UI系統啦
但我們這學期不會再見面了(好像吧
所以下學期記得再來上課~
(如果我肝沒爆的話應該還是我上課la
希望大家喜歡這學期的課!也謝謝大家的捧場~
(這堂課好像是最多人來上的o(≧∀≦)o 我好快樂
下學期我們不見不散~
Q&A&DO

建北電資Unity遊戲開發小社第3、4堂
By MH Yang


