Marc Hauschildt
Web Technologies and Computer Software Development Instructor at Kirkwood Community College in Cedar Rapids, IA.
Week 13
-- ---------------------------------
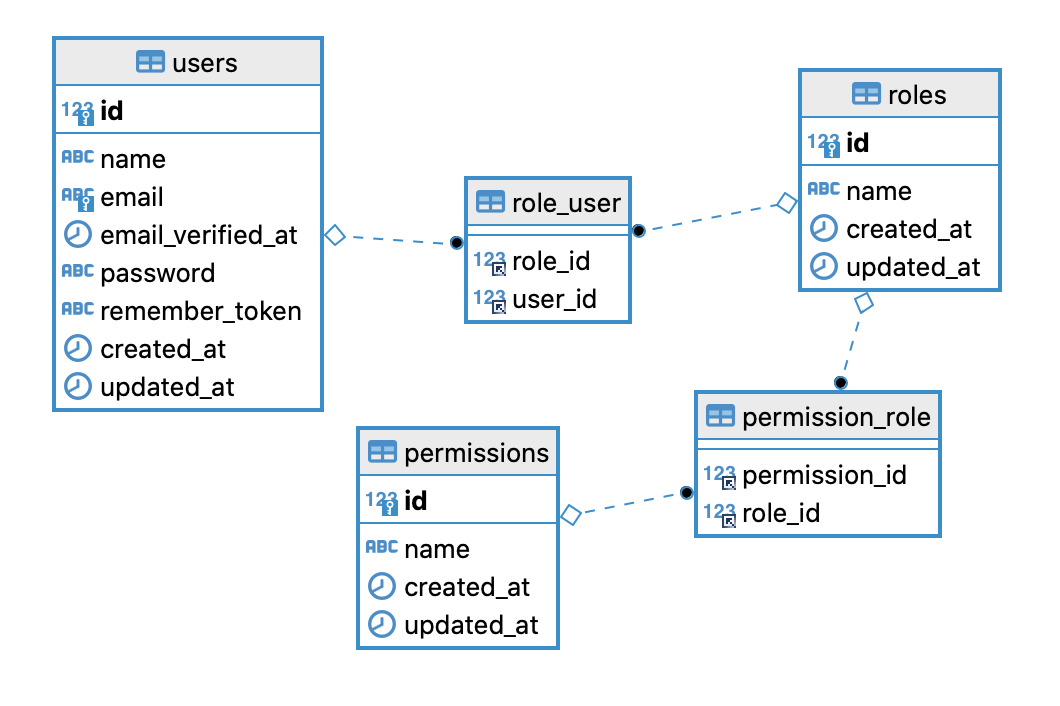
-- 1. `users`
-- Stores the main user account info.
-- ---------------------------------
CREATE TABLE users (
id INT AUTO_INCREMENT PRIMARY KEY,
first_name VARCHAR(50) NOT NULL,
last_name VARCHAR(50) NOT NULL,
email VARCHAR(100) NOT NULL UNIQUE,
password_hash VARCHAR(255) NOT NULL,
created_at TIMESTAMP DEFAULT CURRENT_TIMESTAMP,
updated_at TIMESTAMP DEFAULT CURRENT_TIMESTAMP ON UPDATE CURRENT_TIMESTAMP
);
-- ---------------------------------
-- 2. `roles`
-- Stores the available roles (e.g., ADMIN, USER, GUEST).
-- ---------------------------------
CREATE TABLE roles (
id INT AUTO_INCREMENT PRIMARY KEY,
name VARCHAR(50) NOT NULL UNIQUE,
description VARCHAR(255)
);
-- ---------------------------------
-- 3. `permissions`
-- Stores specific actions (e.g., CREATE_POST, DELETE_USER).
-- ---------------------------------
CREATE TABLE permissions (
id INT AUTO_INCREMENT PRIMARY KEY,
name VARCHAR(100) NOT NULL UNIQUE,
description VARCHAR(255)
);
-- ---------------------------------
-- 4. `user_roles` (Junction Table)
-- Maps users to roles (Many-to-Many).
-- ---------------------------------
CREATE TABLE user_roles (
user_id INT NOT NULL,
role_id INT NOT NULL,
PRIMARY KEY (user_id, role_id),
FOREIGN KEY (user_id) REFERENCES users(id) ON DELETE CASCADE,
FOREIGN KEY (role_id) REFERENCES roles(id) ON DELETE CASCADE
);
-- ---------------------------------
-- 5. `permission_role` (Junction Table)
-- Maps permissions to roles (Many-to-Many).
-- ---------------------------------
CREATE TABLE permission_role (
permission_id INT NOT NULL,
role_id INT NOT NULL,
PRIMARY KEY (permission_id, role_id),
FOREIGN KEY (permission_id) REFERENCES permissions(id) ON DELETE CASCADE,
FOREIGN KEY (role_id) REFERENCES roles(id) ON DELETE CASCADE
);INSERT INTO roles (name, description) VALUES
('SCHOOL_ADMIN', 'Rec Center Admin: Can manage facilities, leagues, scores, and users.'),
('STUDENT', 'Student: Can join leagues, create teams, and view schedules.');INSERT INTO permissions (name, description) VALUES
-- Base "User" Permissions (for all logged-in users)
('MANAGE_OWN_PROFILE', 'Allows user to update their personal info and password.'),
('USE_MESSAGING', 'Allows user to send/receive messages with other participants.'),
-- Student Permissions
('VIEW_LEAGUES', 'Allows user to browse and search available leagues and activities.'),
('REGISTER_FOR_LEAGUE', 'Allows user to register as an individual for a league.'),
('CREATE_TEAM', 'Allows user to create a new team as a captain.'),
('MANAGE_TEAM_INVITATIONS', 'Allows user to accept or decline invitations to a team.'),
('VIEW_OWN_SCHEDULE', 'Allows user to view their personal and team game schedule.'),
('VIEW_STANDINGS', 'Allows user to view league standings and team statistics.'),
-- School Admin Permissions
('MANAGE_FACILITIES', 'Allows user to C/R/U/D locations, fields, and courts.'),
('MANAGE_SCHEDULES', 'Allows user to C/R/U/D leagues, activities, and games.'),
('MANAGE_REGISTRATIONS', 'Allows user to view and approve team registrations.'),
('MANAGE_SCORES', 'Allows user to enter and confirm game scores.'),
('SEND_ANNOUNCEMENTS', 'Allows user to send messages to individuals, teams, and leagues.');-- --- Assign permissions to STUDENT role ---
INSERT INTO permission_role (role_id, permission_id) VALUES
-- Base permissions
((SELECT id FROM roles WHERE name = 'STUDENT'), (SELECT id FROM permissions WHERE name = 'MANAGE_OWN_PROFILE')),
((SELECT id FROM roles WHERE name = 'STUDENT'), (SELECT id FROM permissions WHERE name = 'USE_MESSAGING')),
-- Student-specific permissions
((SELECT id FROM roles WHERE name = 'STUDENT'), (SELECT id FROM permissions WHERE name = 'VIEW_LEAGUES')),
((SELECT id FROM roles WHERE name = 'STUDENT'), (SELECT id FROM permissions WHERE name = 'REGISTER_FOR_LEAGUE')),
((SELECT id FROM roles WHERE name = 'STUDENT'), (SELECT id FROM permissions WHERE name = 'CREATE_TEAM')),
((SELECT id FROM roles WHERE name = 'STUDENT'), (SELECT id FROM permissions WHERE name = 'MANAGE_TEAM_INVITATIONS')),
((SELECT id FROM roles WHERE name = 'STUDENT'), (SELECT id FROM permissions WHERE name = 'VIEW_OWN_SCHEDULE')),
((SELECT id FROM roles WHERE name = 'STUDENT'), (SELECT id FROM permissions WHERE name = 'VIEW_STANDINGS'));
-- --- Assign permissions to ADMIN role ---
-- Admins get all permissions: their own, plus all student permissions.
INSERT INTO permission_role (role_id, permission_id) VALUES
-- Base permissions
((SELECT id FROM roles WHERE name = 'SCHOOL_ADMIN'), (SELECT id FROM permissions WHERE name = 'MANAGE_OWN_PROFILE')),
((SELECT id FROM roles WHERE name = 'SCHOOL_ADMIN'), (SELECT id FROM permissions WHERE name = 'USE_MESSAGING')),
-- Student view permissions (Admins need to see what students see)
((SELECT id FROM roles WHERE name = 'SCHOOL_ADMIN'), (SELECT id FROM permissions WHERE name = 'VIEW_LEAGUES')),
((SELECT id FROM roles WHERE name = 'SCHOOL_ADMIN'), (SELECT id FROM permissions WHERE name = 'REGISTER_FOR_LEAGUE')),
((SELECT id FROM roles WHERE name = 'SCHOOL_ADMIN'), (SELECT id FROM permissions WHERE name = 'CREATE_TEAM')),
((SELECT id FROM roles WHERE name = 'SCHOOL_ADMIN'), (SELECT id FROM permissions WHERE name = 'MANAGE_TEAM_INVITATIONS')),
((SELECT id FROM roles WHERE name = 'SCHOOL_ADMIN'), (SELECT id FROM permissions WHERE name = 'VIEW_OWN_SCHEDULE')),
((SELECT id FROM roles WHERE name = 'SCHOOL_ADMIN'), (SELECT id FROM permissions WHERE name = 'VIEW_STANDINGS')),
-- Admin-specific permissions
((SELECT id FROM roles WHERE name = 'SCHOOL_ADMIN'), (SELECT id FROM permissions WHERE name = 'MANAGE_FACILITIES')),
((SELECT id FROM roles WHERE name = 'SCHOOL_ADMIN'), (SELECT id FROM permissions WHERE name = 'MANAGE_SCHEDULES')),
((SELECT id FROM roles WHERE name = 'SCHOOL_ADMIN'), (SELECT id FROM permissions WHERE name = 'MANAGE_REGISTRATIONS')),
((SELECT id FROM roles WHERE name = 'SCHOOL_ADMIN'), (SELECT id FROM permissions WHERE name = 'MANAGE_SCORES')),
((SELECT id FROM roles WHERE name = 'SCHOOL_ADMIN'), (SELECT id FROM permissions WHERE name = 'SEND_ANNOUNCEMENTS'));-- Note: 'hashed_password_...' is just a placeholder for a real bcrypt/argon2 hash
INSERT INTO users (first_name, last_name, email, password_hash) VALUES
('Brett', 'School Admin', 'brett.baumgart@kirkwood.edu', 'hashed_password_for_brett'),
('Alex', 'Student', 'alex.student@student.kirkwood.edu', 'hashed_password_for_alex');
-- Assign roles to users
INSERT INTO user_roles (user_id, role_id) VALUES
((SELECT id FROM users WHERE email = 'brett.baumgart@kirkwood.edu'), (SELECT id FROM roles WHERE name = 'SCHOOL_ADMIN')),
((SELECT id FROM users WHERE email = 'alex.student@student.kirkwood.edu'), (SELECT id FROM roles WHERE name = 'EDITOR'));SELECT
u.id, u.first_name, u.last_name, u.email,
r.name AS role_name,
p.name AS permission_name
FROM
users u
JOIN
user_roles ur ON u.id = ur.user_id
JOIN
roles r ON ur.role_id = r.id
JOIN
permission_role pr ON r.id = pr.role_id
JOIN
permissions p ON pr.permission_id = p.id
WHERE
u.email = 'brett.baumgart@kirkwood.edu';# To learn more about how to use Nix to configure your environment
# see: https://developers.google.com/idx/guides/customize-idx-env
{ pkgs, ... }: {
# Which nixpkgs channel to use.
channel = "stable-23.11"; # or "unstable"
# Use https://search.nixos.org/packages to find packages
packages = [
pkgs.zulu17
pkgs.maven
pkgs.bash # new line
];
# Sets environment variables in the workspace
env = {};
idx = {
# Search for the extensions you want on https://open-vsx.org/ and use "publisher.id"
extensions = [
"vscjava.vscode-java-pack"
"google.gemini-cli-vscode-ide-companion"
];
# new previews section
previews = {
enable = true;
previews = {
web = {
# This is the final, corrected command.
command = [
"bash"
"-c"
"mvn spring-boot:run -Dspring-boot.run.arguments=--server.port=$PORT"
];
manager = "web";
};
};
};
workspace = {
# Runs when a workspace is first created with this `dev.nix` file
onCreate = {
install = "mvn clean install";
};
# Runs when a workspace is (re)started
onStart = {
run-server = "PORT=3000 mvn spring-boot:run";
};
};
};
}java --version, it will say:openjdk 17.0.8.1 2023-08-24 LTS
pkgs.zulu17 to pkgs.zulu21 in the dev.nix file.mvn --version, will display Apache Maven 3.9.5
Open IntelliJ and click New Project from the welcome screen.
In the new project window, select Spring Boot from the list on the left.
Fill out the project details. Here are the most important ones:
Name: recleagues (or your own project name)
Language: Select Java
Type: Select Maven
JDK: Make sure a recent JDK (like 17 or 21) is selected.
Group: edu.kirkwood (or your own domain)
Artifact: recleagues (this will match your project's name)
Click Next.
Now you'll pick your "Dependencies." These are the Spring Boot tools you want to include. For a simple "Hello World" web app, you only need one:
In the search bar, type "web".
Select Spring Web. This is the dependency that includes Spring MVC and the embedded Tomcat server.
Click Create (or Finish). IntelliJ will download all the necessary files and build your project. This might take a minute.
Tomcat is a web server (or more specifically, a "servlet container"). Its job is to listen for incoming web requests and pass them to the correct part of your Java application.
With Jakarta EE, you first had to install and run a Tomcat server, and then you would deploy your application (as a .war file) to that server.
When you added the spring-boot-starter-web dependency, Spring Boot downloads the Tomcat code (as a library, just like any other .jar file), packages that Tomcat code inside your application, and configures it to start automatically when your application runs.
Add application.properties to the .gitignore file.
Make git forget about the application.properties file.
https://stackoverflow.com/questions/1274057/how-do-i-make-git-forget-about-a-file-that-was-tracked-but-is-now-in-gitignore
The file name should change from green to brown
In the Project panel , navigate to src/main/java/edu/kirkwood/projectname.
Right-click on the com.example.projectname package and select New > Java Class.
Name the class HomeController. Add the following code.
@RestController: This tells Spring that this class will handle web requests.
@GetMapping("/"): This tells Spring to run the hello() method when someone visits the main root URL "/".
// Your package path and name

import org.springframework.web.bind.annotation.GetMapping;
import org.springframework.web.bind.annotation.RestController;

@RestController
public class HomeController {

    @GetMapping("/")
    public String hello() {
        return "Hello World!";
    }
}ProjectNameApplication.java file in the same package that was created automatically.Click the green play button next to the class name inside the file.
A Run panel will open at the bottom of the screen. Wait for it to build and start. You'll know it's ready when you see a message like Tomcat started on port 8080 (http).
Open your web browser and go to http://localhost:8080.
You should see your "Hello World!" message in the browser.
When you click the green "run" button, your main method starts Spring, and Spring starts up the internal Tomcat server.
You don't need to install Tomcat on your computer at all. Your app is the server. This self-contained package is what makes it so easy to run your app.
YourProjectApplication.java is the main entry point of your entire program. When you click the green "run" button, this is the file that starts everything.
@SpringBootApplication: This annotation tells Spring Boot to start the Tomcat server and scan the current package (and all sub-packages) for other special classes you've written, like your HomeController.
In the HomeController.java file, @RestController tells Spring Boot two things:
This class is designed to handle web requests.
Any string, object, or list you return from a method should be sent directly to the browser as data (like plain text or JSON), not as a view to be rendered (like a JSP file).
@GetMapping is short for "Map a GET request to this method."
A GET request is the most common type of web request. It's what your browser sends when you type in a URL or click a link. It means "I want to get information."
("/"): This is the URL path it's listening for. The single / means the "root" or main page of your site.
When you go to http://localhost:8080, your browser is making a GET request to the / path.
Whe Tomcat receives this request, Spring sees that @GetMapping("/") is the exact match for this request. It then runs your hello() method.
If you changed the annotation to @GetMapping("/hello"), you would have to go to http://localhost:8080/hello to see your "Hello World!" message.
Think of this like a restaurant:
Tomcat is the head waiter. It stands at a table (http://localhost:8080) waiting for customers (web requests).
A Request comes in from a browser, like an order for GET / ("I'd like the homepage!").
Tomcat (the waiter) takes that order and carries it to the kitchen.
Spring Boot (the chef) finds the right recipe—your @GetMapping("/") method in HelloController.
Your Code (the recipe) runs and produces the dish ("Hello World!").
Tomcat picks up the finished dish, carries it back to the customer, and presents it (sends "Hello World!" to the browser).
As needed, we can copy and paste the XML for the dependencies you want from the Spring Initializr website (just select them and click "Explore" to see the XML) or find them on Maven Central.
Spring Boot DevTools: This is a huge time-saver. Whenever you save a change in your Java code, it will automatically restart the server for you. This makes your development loop much faster.
After you save the pom.xml file, IntelliJ will show a small Maven icon in the top-right or bottom-right corner. Click it to "Reload" the project, which will download and add your new dependencies.
IntelliJ doesn't automatically compile files on save by default.
Go to File > Settings (or IntelliJ IDEA > Settings on Mac).
Navigate to Build, Execution, Deployment > Compiler.
Check the box that says Build project automatically.
Click Apply.
In the same Settings window, go to Advanced Settings (it's at the very bottom of the list on the left).
Look for the "Compiler" section.
Check the box for Allow auto-make to start even if developed application is currently running.
Click OK.
Run the application (if it's running, stop and start it again).
In HomeController.java, change the return string from "Hello World!" to something else, like "Hello Name!".
Save the file or go back to the browser. Wait a few seconds while Spring Boot automatically restarts the server.
Refresh your browser, and you should see the change.
A 5-6 second delay is normal for a standard restart.
By default, Spring Boot creates every object (bean) in your application the moment it starts. As your app grows, this gets slower. You can tell Spring to be "lazy" and only create objects when they are actually needed.
src/main/resources/application.properties.
Add this line:
spring.main.lazy-initialization=true
Save and run your app again.
Right now, your app is so small (only one controller) that initialization takes milliseconds—you don't see the benefit.
Today: It saves 0.01 seconds.
After months of development (with 50 classes): It will save 2-3 seconds every time you restart.
For small changes (like changing text inside a method), you don't need to restart the server at all! You can inject the new code directly into the running application.
Stop your current run. Click the Debug icon (the little green bug) instead of the Run (play) icon.
Now, change some text inside your hello() method.
A "Code changed" button will appear saying "Apply Hotswap".
IntelliJ will simply "swap" the new code into the running memory.
When to use which?
Use Hot Swap (Debug Mode): When changing logic inside a method (e.g., changing strings, math, if-statements).
Use DevTools Restart: When adding new methods, new classes, or changing configuration.
Spring Boot uses a feature called "Profiles" to manage different configurations for different environments. This mechanism allows you to run the exact same compiled code on your local computer and your production server, but with different database connections, security settings, or error handling rules.
application-dev.properties (Local Development) This file contains settings specific to your local machine.application-prod.properties (Production) This file contains settings for your live server.
spring.datasource.url=jdbc:mysql://localhost:3306/petclinic
spring.datasource.username=root
spring.datasource.password=local_password
spring.datasource.url=jdbc:mysql://prod-db-server.internal:3306/petclinic
spring.datasource.username=admin
spring.datasource.password=secure_production_passwordYou need to build the create... locations feature for the Rec Center Admin. This feature needs to save the new location's details (like "Main Gym - Court 1") into your MySQL database.
Which "starter" dependency that we discussed handles all the Create, Read, Update, and Delete (CRUD) operations for your database?
Spring Data JPA is the magic wand for all your database tasks. You tell it what you want (like "save this location"), and it handles writing all the messy SQL code to make it happen.
You add the spring-boot-starter-web dependency to your project. What is the primary thing Spring Boot's "auto-configuration" does for you?
A) It automatically writes your HelloController class for you. B) It automatically finds and starts an embedded Tomcat server. C) It automatically buys a domain name (like my-rec-app.com) for you.
D) It automatically writes your HTML files.
You want a new method in your HelloController to run only when a user types http://localhost:8080/schedule into their browser's address bar.
Which annotation should you put directly above your new method to make this work?
A) @RestController("/schedule")
B) @GetMapping("/schedule")
C) @SpringBootApplication
D) @RequestMapping("/schedule")
Spring Data JPA lets you create "Repository" interfaces that automatically handle Create, Read, Update, and Delete (CRUD) operations.
Lombok is a library that automatically writes your "boilerplate" code, like getters, setters, and constructors, by just adding an annotation (e.g., @Data).
MySQL Driver: The specific driver that allows Java and Spring Data JPA to communicate with your MySQL database.
You do not need to add the Hibernate Core dependency as it is bundled with Spring Data JPA.
But you must add the MySQL database driver.
Add these dependencies to your pom.xml file.
<dependency>
    <groupId>org.springframework.boot</groupId>
    <artifactId>spring-boot-starter-data-jpa</artifactId>
</dependency>
<dependency>
    <groupId>com.mysql</groupId>
    <artifactId>mysql-connector-j</artifactId>
    <scope>runtime</scope>
</dependency>
<dependency>
    <groupId>org.projectlombok</groupId>
    <artifactId>lombok</artifactId>
    <optional>true</optional>
</dependency>-MN Milestone (e.g., -M3)
Experimental
Used for early testing and providing feedback on major, incomplete features. Avoid for main development.
-RCN
Release Candidate (e.g., -RC2)
Stable, Pre-Final
Used for final testing before a major release. It's generally stable, but the non-suffixed version is better.
No Suffix
General Availability (GA)
Stable
This is the final, production-ready version that has passed all tests and is recommended for use.
You should NOT specify the version for a standard spring-boot-starter-* dependency. You should leave the <version> tag off.
When you created your project, your pom.xml included this:
The <parent> dependency automatically sets the version for all the official starter dependencies (like spring-boot-starter-web, spring-boot-starter-data-jpa, etc.).
This ensures that the version of Spring Boot you chose is using the exact, tested, and compatible version of the Data JPA starter and Hibernate that are guaranteed to work together.
If you explicitly specify the version, you override this automated system, risking a version conflict that could break your application.
<parent>
    <groupId>org.springframework.boot</groupId>
    <artifactId>spring-boot-starter-parent</artifactId>
    <version>3.5.7</version> <relativePath/>
</parent>The <relativePath> tag specifies the path to the parent POM file relative to the current project's pom.xml.
When it's not empty: If you were building a multi-module project where the parent POM was located one directory up (e.g., ../pom.xml), you would put ../pom.xml inside this tag. Maven would first check that local path for the parent file.
When it's empty (like yours): By leaving the tag empty (<relativePath/>), you are telling Maven to not look for the parent POM in the local file system. Instead, Maven relies entirely on the default behavior described by the comment: to lookup the parent from the repository.
For standard Spring Boot projects, leaving <relativePath/> empty is the correct way to ensure your project inherits all the necessary settings (like managed versions and default plugins) directly from the official Spring Boot Starter Parent artifact.
## Database Connection Details
spring.datasource.url=jdbc:mysql://[your_database_host]:3306/[your_database_name]?useSSL=false&serverTimezone=UTC
spring.datasource.username=[your_mysql_username]
spring.datasource.password=[your_mysql_password]
spring.datasource.driver-class-name=com.mysql.cj.jdbc.Driver

## JPA and Hibernate Configuration
spring.jpa.hibernate.ddl-auto=update
spring.jpa.show-sql=true
spring.jpa.hibernate.ddl-auto is a setting that tells Hibernate (the tool inside JPA) how to handle database structure.
update for development, to add new tables and columns when you add new classes without deleting existing data.spring.jpa.show-sql is a helpful setting that prints the actual SQL queries Hibernate runs to your console. Great for debugging!package edu.kirkwood.model;
import jakarta.persistence.*;
import lombok.Data;
import lombok.NoArgsConstructor;
import java.util.Set;
@Entity
@Table(name = "users")
@Data
@NoArgsConstructor
public class User {
@Id
@GeneratedValue(strategy = GenerationType.IDENTITY)
private Long id;
@Column(name = "first_name", nullable = false, length = 50)
private String firstName;
@Column(name = "last_name", nullable = false, length = 50)
private String lastName;
@Column(nullable = false, unique = true, length = 100)
private String email;
@Column(name = "password_hash", nullable = false, length = 255)
private String password; // Will be used by Spring Security
// Many-to-Many Relationship with Role
@ManyToMany(fetch = FetchType.EAGER) // Fetch roles immediately when a user is loaded
@JoinTable(
name = "user_roles", // Name of the junction table in MySQL
joinColumns = @JoinColumn(name = "user_id"), // Column in user_roles that references the 'users' table
inverseJoinColumns = @JoinColumn(name = "role_id") // Column in user_roles that references the 'roles' table
)
private Set<Role> roles;
// createdAt and updatedAt can often be handled by Spring Data Auditing,
}package edu.kirkwood.model;
import jakarta.persistence.*;
import lombok.Data;
import lombok.NoArgsConstructor;
import java.util.Set;
@Entity
@Table(name = "roles")
@Data
@NoArgsConstructor
public class Role {
@Id
@GeneratedValue(strategy = GenerationType.IDENTITY)
private Long id;
@Column(nullable = false, unique = true, length = 50)
private String name; // e.g., "ADMIN", "STUDENT"
private String description;
// Mapped by the 'roles' field in the User entity.
@ManyToMany(mappedBy = "roles")
private Set<User> users;
// We will add the relationship to Permissions later.
}Create a new package named "repository"
Create a new Interface inside that package named "UserRepository". Have it extend JpaRepository<T, ID>.
package edu.kirkwood.repository;

import edu.kirkwood.model.User;
import org.springframework.data.jpa.repository.JpaRepository;
import java.util.Optional;

// UserRepository inherits all standard CRUD methods from JpaRepository
public interface UserRepository extends JpaRepository<User, Long> {

    // Spring Data JPA automatically writes the SQL query for this!
    Optional<User> findByEmail(String email);
}
JpaRepository, you automatically inherit dozens of methods, making it easy to fulfill data-related user stories:
save(User)
INSERT or UPDATE
Creating new accounts, managing profile changes.
findById(Long id)
SELECT * WHERE id = ?
Viewing a specific user's profile.
findAll()
SELECT *
Admin listing of all students.
delete(User)
DELETE
Deleting an account (if necessary).
The method Optional<User> findByEmail(String email) is the key to your login functionality.
Spring Data JPA looks at the method name (findByEmail) and says: "Write a SQL query that finds a User where the email column matches the string parameter."
It then automatically writes and executes the correct SQL query for you (e.g., SELECT * FROM users WHERE email = ?).
The result is wrapped in an Optional<User>, which is a safe way to handle cases where the user might not exist.
Create a new repository interface called "RoleRepository".
Have it extend JpaRepository<Role, Long>.
package edu.kirkwood.repository;

import edu.kirkwood.model.Role;
import org.springframework.data.jpa.repository.JpaRepository;
import java.util.Optional;

// The RoleRepository inherits standard CRUD methods
public interface RoleRepository extends JpaRepository<Role, Long> {

    // This finds a role by its unique name (e.g., getting the 'ADMIN' role to assign to a user)
    Optional<Role> findByName(String name);
}
The findByName() method is essential because you will often need to look up a role based on its label (like "STUDENT" or "ADMIN") to assign it to a new user upon registration.
Spring Data JPA automatically converts findByName into the SQL query: SELECT * FROM roles WHERE name = ?.
The next step is to create the Service Layer—for your business logic—which will use the User and Role repositories to manage user registration and authentication.
The Service Layer separates the business logic (what your app does) from the data access (how your app talks to the database) and the presentation layer (how users interact with the app).
Create a new package named "service".
Create an Interface named "UserService" inside it.
package edu.kirkwood.service;

import edu.kirkwood.model.User;

public interface UserService {

    /**
     * Handles business logic for registering a new user (password hashing, role assignment).
     * @param user The user object containing the new user's details.
     * @return The saved User object.
     */
    User registerNewUser(User user);

    // We will add methods here later (e.g., findUserByEmail, updateProfile)
}A service implementation is where the actual code lives. We use Dependency Injection here to get access to our repositories.
Create a new sub-package named "service.impl".
Create a Class named "UserServiceImpl" inside it.
package edu.kirkwood.service.impl;

import edu.kirkwood.model.User;
import edu.kirkwood.repository.UserRepository;
import edu.kirkwood.repository.RoleRepository;
import edu.kirkwood.service.UserService;
import org.springframework.stereotype.Service;

@Service // Tells Spring to manage this class as a Service component
public class UserServiceImpl implements UserService {

    private final UserRepository userRepository;
    private final RoleRepository roleRepository;

    // Dependency Injection
    // Spring automatically finds the necessary Repository implementations...
    public UserServiceImpl(UserRepository userRepository, RoleRepository roleRepository) {
        // and injects them into the constructor when it creates this service.
        this.userRepository = userRepository;
        this.roleRepository = roleRepository;
    }

    @Override
    public User registerNewUser(User user) {
        // TODO: complete the following steps
        // 1. Password Hashing (Crucial for security!)
        // 2. Default Role Assignment (assigning the "STUDENT" role)
        // 3. Final save using userRepository.save(user);

        return userRepository.save(user);
    }
}
Dependency Injection is a programming technique where a class receives the objects (its dependencies) it needs to function from an external source, rather than creating them itself.
Because you added @Service to the class, Spring knows:
How to create UserServiceImpl.
What dependencies (UserRepository, RoleRepository) are needed to build it.
How to find those dependencies (because they are interfaces that extend JpaRepository, Spring already has implementations ready).
Easier Testing: When you write a unit test for UserServiceImpl, you don't need a real database. You can easily inject a "mock" version of UserRepository that pretends to save data, allowing you to test your service logic in isolation.
Flexibility: If you decide to switch from MySQL to PostgreSQL later, you only change the configuration file and dependencies; none of your Java service code has to change.
Decoupling: Your service is not tied to the specifics of how the repository is created, making the code much cleaner and more organized.
Spring Security will manage logging in, logging out, and protecting endpoints. It's how you'll make sure only a Rec Center Admin can delete locations and a Student cannot.
Add these dependencies to the pom.xml file.
<dependency>
    <groupId>org.springframework.boot</groupId>
    <artifactId>spring-boot-starter-security</artifactId>
</dependency>
<dependency>
    <groupId>org.springframework.security</groupId>
    <artifactId>spring-security-test</artifactId>
    <scope>test</scope>
</dependency>
The spring-security-test library provides utility classes and annotations that make it much easier to test your security setup.
Without it, simulating a logged-in user or an Admin with specific roles (like SCHOOL_ADMIN) would be very difficult in your unit tests.
The next step is to set up the password encoder and then implement the logic inside your UserServiceImpl class.
You must never store plain-text passwords in your database. Spring Security provides the BCryptPasswordEncoder for highly secure hashing.
We need to tell Spring how to create and manage this encoder by defining it as a "Bean" in a configuration class.
Create a new package named "config".
Create a class named "SecurityConfig" inside it.
package edu.kirkwood.config;

import org.springframework.context.annotation.Bean;
import org.springframework.context.annotation.Configuration;
import org.springframework.security.crypto.bcrypt.BCryptPasswordEncoder;
import org.springframework.security.crypto.password.PasswordEncoder;

@Configuration // Tells Spring this class contains bean definitions
public class SecurityConfig {

    @Bean // This method's return value will be managed by Spring's container
    public PasswordEncoder passwordEncoder() {
        // BCrypt is a standard, strong hashing algorithm for passwords.
        return new BCryptPasswordEncoder();
    }
}Creating the AuthController is the next step in getting your user registration process fully functional.
Rename the package that contains the HomeController to "controller".
Move "YourProjectApplication.java" and "YourProjectApplicationTest.java" to the base package.
Create a class named "AuthController" in the controller package.
package edu.kirkwood.controller;

import edu.kirkwood.model.User;
import edu.kirkwood.service.UserService;
import org.springframework.http.HttpStatus;
import org.springframework.http.ResponseEntity;
import org.springframework.web.bind.annotation.*;

@RestController // Tells Spring this class handles web requests and returns data (JSON/XML)
@RequestMapping("/api/auth") // Base path for all methods in this controller
public class AuthController {

    private final UserService userService;

    // Dependency Injection - the UserService we created
    public AuthController(UserService userService) {
        this.userService = userService;
    }

    // Maps HTTP POST requests to the /api/auth/register URL
    @PostMapping("/register")
    public ResponseEntity<String> registerUser(@RequestBody User user) {
        try {
            // Call the Service Layer for business logic (hashing password, assigning role)
            userService.registerNewUser(user);

            // Return a success response
            return new ResponseEntity<>("User registered successfully!", HttpStatus.CREATED);
        } catch (RuntimeException e) {
            // Return an error response if the email already exists or a role is missing
            return new ResponseEntity<>("Registration failed: " + e.getMessage(), HttpStatus.BAD_REQUEST);
        }
    }
}@RestController
Marks the class to handle web requests and automatically converts the return value into a response body (like JSON or plain text).
This is the entry point for your application's API.
@RequestMapping("/api/auth")
Sets the base URL for this entire controller.
All endpoints here will start with /api/auth/.
@PostMapping("/register")
Maps this specific method to handle HTTP POST requests sent to /api/auth/register.
POST is the standard method for sending data to create a new resource.
@RequestBody User user
Instructs Spring to automatically take the JSON data sent in the request body (e.g., first name, email, password) and convert it into a Java User object.
This saves you the huge amount of work of manually parsing the JSON data.
ResponseEntity<String>
Allows you to return not just the data, but also the HTTP Status Code (like 201 Created or 400 Bad Request).
HttpStatus.CREATED (201) is the standard success code for a new resource being created.
By Marc Hauschildt


