Node.js
Advanced Node.js

Marcin Kieruzel
I'm a softwear developer based in Poland. JavaScript is my main language since couple of years. I do both frontend and backend development.
On daily basic I run small softwear house in Warsawa, Poland.
We work for numerous clients like National Polish Radio, Orange Polska, Polish Parliment.

Day 1
- Node.js internals: Node.js runtime, V8 engine, libuv library.
- Node.js module system.
- Processes, Threads and the Thread Pool.
- Events and Event-Driven Architecture.
- Advantages and disadvantages of using Node.js compared to other technologies.
- Event loop.
- Callbacks, promises, async/await.
- Streams and buffers for handling large amounts of data.
- How to use Node.js Workers for computationally intensive workload.
Day 2
- Architectural patterns in Node.js.
- Using TypeScript to write Node.js applications.
- Frameworks in Node.js: Express.js, Koa.js, Nest.js, etc.
- Using design patterns with examples: factory, builder, decorator, strategy, etc.
- Middlewares.
- RESTful API design principles.
- API versioning.
- Best practices for WEB APIs in Node.js.
- Advanced database techniques: indexing, improving performance in queries (ex: pagination) using ORMs (like Sequelize): seeds, migrations, complex joins, n+1 problem.
Day 3
- Building scalable applications with Node.js (horizontally duplication, building microservices).
- Microservices in Node.js: decomposing a monolithic application into microservices, inter-service communication, etc.
- Using message brokers like Kafka, RabbitMQ, ActiveMQ to handle messaging between different components of the system.
- Developing real-time collaborative (and scalable) applications with WebSockets and Redis. Publish/subscribe pattern.
- Performance optimization techniques (data caching, load balancing, etc).
- Using debugging techniques
Day 4
- Authentication, secure communications, secure coding practices (preventing web application vulnerabilities like SQL injection)
- Security testing with tools like Burp, OWASP ZAP.
- Testing RESTful APIs in Node.js.
- Profiling techniques.
- Monitoring / metrics.
- Continuous integration and deployment.
Breaks
Coffee break – 11.30
Lunch break – 13.00
Coffee break – 15.30
Introduce yourself
please ;)
What's yout experience with node.js so far
What for do you use node on daily basis
What do you expect from this course
https://gitlab.com/Kieruzel/node_course_day_1
Node.js is an open-source, server-side runtime environment that allows developers to run JavaScript code outside of a web browser. It is built on the V8 JavaScript engine, which is the same engine used by Google Chrome, and it enables developers to use JavaScript for both client-side and server-side development.
Key features and characteristics of Node.js include:
-
Non-blocking I/O: Node.js is designed to handle asynchronous operations efficiently. This means it can handle many concurrent connections and I/O operations without blocking the execution of other code, making it well-suited for building scalable and high-performance applications.
-
Event-driven architecture: Node.js uses an event-driven, single-threaded model for handling requests and events. It uses an event loop to efficiently manage asynchronous operations and respond to events such as incoming HTTP requests or file system operations.
What is node.js?
-
NPM (Node Package Manager): Node.js comes with a package manager called npm, which is one of the largest package ecosystems in the world. Developers can easily install and manage third-party libraries and modules using npm, which helps accelerate development.
-
Cross-platform: Node.js is compatible with various operating systems, including Windows, macOS, and Linux, making it a versatile choice for building applications that can run on different platforms.
-
Lightweight and fast: Node.js is known for its speed and efficiency, thanks to its use of the V8 engine and its non-blocking I/O model.
Node.js is commonly used for building web applications, real-time applications (such as chat applications and online gaming), APIs and various other types of networked and server-side applications. It has gained popularity in recent years due to its ability to create highly responsive and scalable applications using JavaScript on both the client and server sides.
Ryan Dahl
The founder of Node.js first presented it on JSConf Europe in Berlin in 2009.

since 2015 The Node Foundation is responsible for maintaining the project.
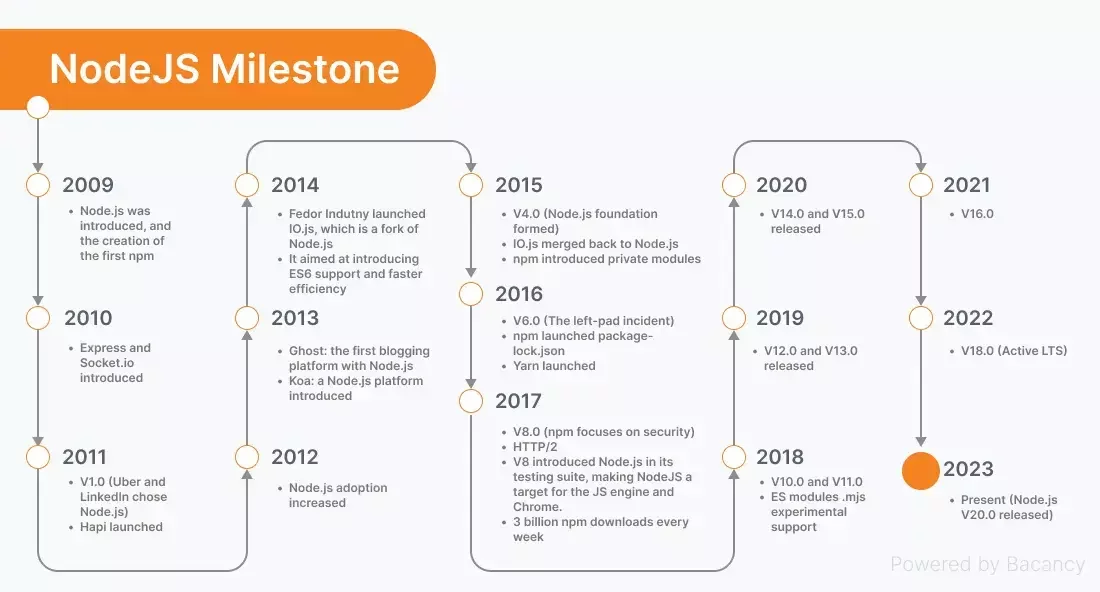
A glimps on the history
Node building blocks

Core modules
Node.js provides a set of core modules that are available out of the box for building applications. These core modules provide essential functionality for various tasks, such as working with files, handling network communication, and more. Here are some of the most commonly used Node.js core modules:
-
fs (File System): The
fsmodule allows you to work with the file system. You can read, write, update, and manipulate files and directories. -
http and https: These modules enable you to create HTTP and HTTPS servers and make HTTP requests. They are crucial for building web servers and interacting with web services.
-
path: The
pathmodule provides utilities for working with file and directory paths, making it easier to work with file system paths in a platform-independent manner.
Core modules
-
os (Operating System): The
osmodule provides information about the operating system on which Node.js is running. You can access information such as CPU architecture, platform, and memory usage. -
util: The
utilmodule includes various utility functions that can be helpful in working with JavaScript objects and functions. It provides features like inheritance, debugging, and formatting. -
events: Node.js is built around an event-driven architecture, and the
eventsmodule provides theEventEmitterclass, which allows you to create custom event emitters and handle events in your applications. -
stream: The
streammodule provides an interface for working with readable and writable streams, allowing you to efficiently process data, such as reading or writing large files or handling network data.
Core modules
-
querystring: The
querystringmodule provides methods for parsing and formatting URL query strings, making it useful for working with URL parameters. -
crypto: The
cryptomodule offers cryptographic functionality, including encryption, decryption, hashing, and more. It's commonly used for securing data and implementing authentication. -
url: The
urlmodule provides utilities for URL manipulation and parsing. It allows you to work with URLs and their components easily. -
dns: The
dnsmodule allows you to perform DNS (Domain Name System) resolution and related tasks, such as looking up IP addresses for domain names. -
events: Node.js uses an event-driven architecture, and the
eventsmodule provides the foundation for working with events and event emitters.
Is Node written in JS
The answer is partially.
It's JavaScript as well as C++
Feel free to visit
https://github.com/nodejs/node
and try to find some source code of some popular node.js function
Libuv
Libuv is a critical component of Node.js that plays a key role in its asynchronous I/O operations and event loop. It is not exclusive to Node.js and is actually a separate library that Node.js utilizes to manage various operating system-level functionalities in a platform-independent way.
Here are the main roles and functions of libuv in Node.js:
-
Event Loop: Libuv provides the event loop that Node.js uses to manage asynchronous operations. The event loop is a central part of Node.js's non-blocking I/O model, allowing it to efficiently handle many concurrent connections and tasks.
-
Cross-Platform Abstraction: Libuv abstracts many platform-specific details related to I/O operations, threading, and system-level operations. This allows Node.js to be relatively platform-independent and work consistently on various operating systems, including Windows, macOS, and various Linux distributions.
Libuv
-
I/O Operations: Libuv provides APIs for asynchronous I/O operations, such as file I/O, network I/O (including TCP and UDP sockets), and system timers. These operations are crucial for building high-performance applications in Node.js.
-
Threading: While JavaScript itself in Node.js is single-threaded, libuv can manage multiple threads in the background for certain tasks, such as file operations. This helps offload potentially blocking operations to worker threads, keeping the main event loop free for handling other tasks.
-
Concurrency: Libuv provides mechanisms for handling concurrency through features like worker threads, which enable developers to execute CPU-bound operations without blocking the event loop.
Libuv
In summary, libuv is the underlying library that enables Node.js to efficiently manage asynchronous I/O operations, work on multiple platforms, and provide a non-blocking, event-driven runtime environment. It plays a vital role in making Node.js a versatile and high-performance choice for building various types of applications, especially those that require handling a large number of concurrent connections or I/O-bound operations.
Is Node.js really single threaded?
Event loop is single threaded!!!
Libuv has the capacity of default 4 threads in a pool to run asynchronus operations!!!
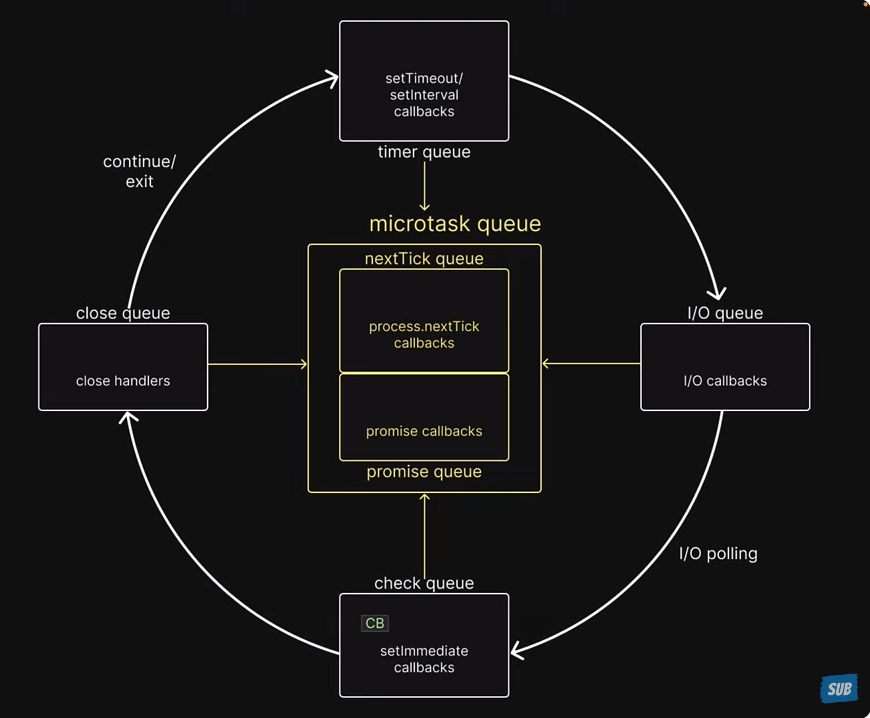
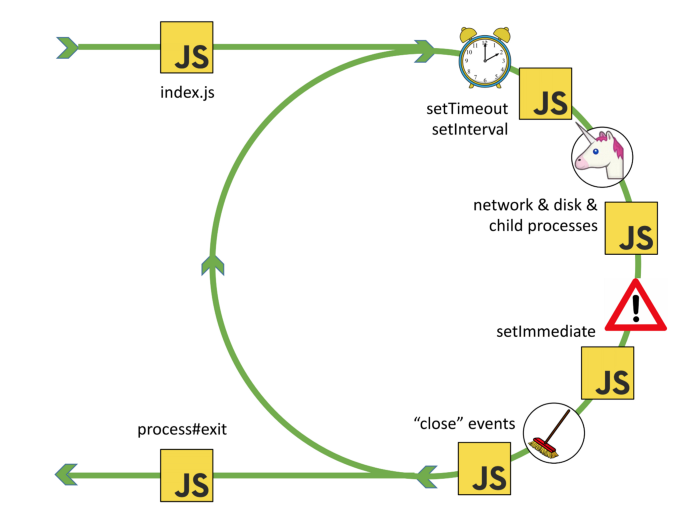
Event loop
Here's a simplified step-by-step overview of how the event loop works:
- An event or asynchronous operation is initiated, and a callback function is associated with it.
- The event loop continues to execute other code.
- When the event or operation completes, it is placed in the event queue.
- The event loop checks the event queue for pending events.
- If there are events in the queue, it dequeues them one by one and executes their associated callback functions.
- This process continues in a loop, allowing the program to handle multiple asynchronous operations and events concurrently.
Event loop
-
Task Queue (or Callback Queue): This is where asynchronous tasks like setTimeout callbacks, setInterval callbacks, and I/O callbacks (e.g., for file operations or network requests) are placed. These tasks have a lower priority than microtasks and are executed after the microtask queue is empty.
-
Microtask Queue (or Job Queue): This is where microtasks are placed. Microtasks are typically tasks with higher priority that need to be executed as soon as possible. Examples of microtasks include Promises, Mutation Observer callbacks, and process.nextTick (in Node.js).
I/O Pooling
In Node.js, I/O pooling refers to a mechanism used to efficiently manage and execute asynchronous input/output (I/O) operations, such as reading from files or making network requests. It is a key part of Node.js's architecture for handling non-blocking I/O operations and ensuring that your Node.js applications can efficiently manage multiple concurrent I/O operations without excessive resource consumption. Here's how I/O pooling works in Node.js:
-
Request Queue: When an I/O operation is initiated in a Node.js application, such as reading data from a file or making a network request, a request for that operation is placed in a request queue.
-
Worker Threads: Node.js maintains a pool of worker threads (also known as the thread pool) that are responsible for executing I/O operations. These worker threads are separate from the main JavaScript execution thread and are typically implemented using platform-specific threading mechanisms.
I/O Pooling
-
Concurrency Control: The worker threads are managed in such a way that a limited number of threads are available in the pool. This is done to prevent resource contention and ensure that the system doesn't become overloaded with too many concurrent I/O operations.
-
Dispatching Requests: As requests for I/O operations are added to the request queue, the Node.js runtime dispatches these requests to the available worker threads in the pool.
-
I/O Operation Execution: The worker threads execute the I/O operations asynchronously. While a worker thread is busy performing an I/O operation, it does not block the main JavaScript event loop or other worker threads, allowing the application to remain responsive.
I/O Pooling
-
Callback Execution: Once an I/O operation is completed, the associated callback function (provided by the developer) is called. This allows the application to handle the results of the I/O operation or continue with other tasks.
By using a pool of worker threads and managing concurrency, Node.js can efficiently handle a large number of I/O operations without blocking the main event loop. This design is critical for building high-performance, non-blocking applications that can handle many concurrent connections or perform I/O-bound tasks, such as serving web requests or reading data from multiple files simultaneously.
Event Loop
Event Loop
Modules
- Small surface area
- Small modules
This is the basic attitude towards node.js modules. Let's keep it simple and let's reveal as little as possible.
The revealing module pattern
Common.js
Here are the key features and concepts of CommonJS modules in Node.js:
-
Module Format: Each CommonJS module typically corresponds to a single file on the filesystem. The module format follows a specific structure, where each module encapsulates its code and data.
-
Exports and Imports:
module.exports: This object is used to export functions, objects, or values from a module. Anything assigned tomodule.exportsbecomes accessible to other modules that require this module.require(): This function is used to import functionality from other modules. It allows you to load and use the exports of another module within your code.
Common.js
-
Synchronous Loading: CommonJS modules are loaded synchronously. When you use
require(), the module is loaded and evaluated before continuing with the execution of the current module. This synchronous loading can lead to performance bottlenecks in certain situations. -
Caching: Node.js caches the results of module loading. Once a module is loaded, subsequent
require()calls for the same module will return a cached copy, ensuring that the module is not evaluated multiple times.
ECMAScript Modules
Key Differences Between ECMAScript and CommonJS Modules:
-
Syntax: ECMAScript modules use the
importandexportsyntax, whereas CommonJS modules userequireandmodule.exports. -
Loading: ESM are loaded asynchronously, while CommonJS modules are loaded synchronously.
-
Top-level Code: In CommonJS, top-level code runs immediately when a module is required. In ESM, the entire module's top-level code runs first before any of its exports are available to other modules.
-
Static Analysis: The
importandexportstatements in ESM allow for static analysis of dependencies, which can result in faster load times through techniques such as tree-shaking.
Dynamic Import
Syntax:
Dynamic imports use the import() function, which returns a Promise that resolves to the module object.
javascriptCopy code

import('./module.js').then((module) => { // Use the module });
Dynamic Import
Use Cases:
-
Code Splitting: One of the most common use cases for dynamic import is code splitting. With code splitting, you can divide your code into smaller chunks and load them only when needed, which can significantly reduce the initial load time of your application.
-
Lazy Loading: Modules can be lazily loaded, meaning they are only loaded when they are actually needed. This is particularly useful for large applications where loading all modules upfront would be inefficient.
-
Conditional Loading: You can conditionally load modules based on certain criteria, such as user interactions, feature flags, or the user’s browser capabilities.
-
Load Modules from Variable Paths: Since the argument to
import()is a string, you can programmatically generate the path to the module you want to load.
Callback Pattern
The callback pattern in Node.js is a widely used approach to handle asynchronous operations. It involves passing a function as an argument (the "callback") to another function, and that callback function gets called when the asynchronous operation is completed. This pattern is prevalent in Node.js due to its non-blocking, event-driven architecture, which relies heavily on asynchronous operations for tasks like file I/O, network requests, and database queries.
Here’s a general breakdown of how the callback pattern works in Node.js:
Basic Structure:
A typical callback function in Node.js follows this pattern:
Callback Pattern
function asynchronousOperation(parameters, callback) {
  // Perform the asynchronous operation

  // Once the operation is completed:
  if (errorOccurred) {
    return callback(new Error('An error occurred'));
  }

  callback(null, result);
}

asynchronousOperation(parameters, (err, result) => {
  if (err) {
    console.error(err.message);
    return;
  }

  console.log('Result:', result);
});
Callback Pattern / Drawbacks
-
Callback Hell / Pyramid of Doom: A common issue with the callback pattern is that it can lead to deeply nested and hard-to-read code, especially when multiple asynchronous operations depend on the results of previous ones.
-
Error Handling: Errors need to be consistently handled in every callback, leading to repetitive and verbose code.
const fs = require('fs');

fs.readFile('file1.txt', 'utf8', (err, data1) => {
  if (err) {
    console.error('Failed to read file1:', err);
    return;
  }
  fs.readFile('file2.txt', 'utf8', (err, data2) => {
    if (err) {
      console.error('Failed to read file2:', err);
      return;
    }
    fs.readFile('file3.txt', 'utf8', (err, data3) => {
      if (err) {
        console.error('Failed to read file3:', err);
        return;
      }
      const result = data1 + data2 + data3;
      fs.writeFile('result.txt', result, 'utf8', (err) => {
        if (err) {
          console.error('Failed to write result:', err);
          return;
        }
        console.log('Result saved to result.txt');
        // More nested callbacks could follow...
      });
    });
  });
});
Hell Yeah
Callback
In Node.js callback are everywhere. One of the best know are those of fs (File System Modules)
Events
EventEmitter is a core module in Node.js that enables handling and creating events. It provides a means for objects to communicate with each other in an asynchronous fashion. Events are used extensively in Node.js for various purposes, such as handling HTTP requests, dealing with file I/O operations, and more.
Events
Basic Usage of EventEmitter:
First, you need to import the events module
Then, you can create an instance of EventEmitter
Emitting Events:
You can emit events using the emit method:
const EventEmitter = require('events');
const myEmitter = new EventEmitter();
myEmitter.emit('eventName');
Events
myEmitter.on('eventName', () => {
  console.log('Event Fired!');
});

myEmitter.on('once', () => {
  console.log('Event Fired!');
});

myEmitter.addListener('eventName', () => {
  console.log('Event Fired!');
});
Usage
Events
myEmitter.off('eventName', name);


myEmitter.removeListener('eventName', name);
myEmitter.removeAllListeners('eventName');
Usage
Events
class MyEmitter extends EventEmitter {}

const myEmitterInstance = new MyEmitter();
myEmitterInstance.on('event', () => {
  console.log('An event occurred!');
});
myEmitterInstance.emit('event');
Extending event emitter
Events
Use Cases in Node.js:
EventEmitters are used extensively across various core modules in Node.js, such as:
-
Streams: Streams are instances of
EventEmitter. They emit events likedata,end,error, andfinishto handle streaming data. -
HTTP Servers: An HTTP server emits events like
request,connection, andclosefor handling HTTP requests. -
File System: The
fsmodule uses events for handling asynchronous file I/O operations.
Events
In plain english what's the diffrence between callback and event emitter.
Single callback can call back one function while event emitter ones added can react to many events
Promises
Promises in Node.js, and JavaScript in general, are a pattern for managing asynchronous operations more comfortably than using callbacks. A Promise represents a value that may not be available yet but will be resolved at some point in the future.
A Promise is in one of three states:
- Pending: The initial state; the promise is neither fulfilled nor rejected.
- Fulfilled: The operation completed successfully, and the promise has a resulting value.
- Rejected: The operation failed, and the promise has a reason for the failure.
Promises
Creating a Promise
You can create a Promise using the Promise constructor:
In this example, resolve and reject are functions that change the state of the promise:
-
resolve(value): Fulfills the promise with the provided value. -
reject(reason): Rejects the promise with the provided reason.
const myPromise = new Promise((resolve, reject) => {
  const success = true;

  if (success) {
    resolve('The operation was successful.');
  } else {
    reject('The operation failed.');
  }
});
Promises
Promise.all() is a method in JavaScript that helps to handle multiple promises concurrently. It takes an iterable of promises as an input and returns a single promise that resolves when all of the input promises have resolved, or rejects if any of the input promises have rejected.
Syntax
Promise.all(iterable);Promises
Promise.allSettled() is a method in JavaScript that returns a promise that resolves after all of the given promises have either resolved or rejected. It is part of the ECMAScript 2020 specification.
const promise1 = Promise.resolve(3);
const promise2 = new Promise((resolve, reject) => setTimeout(reject, 100, 'foo'));
const promises = [promise1, promise2];

Promise.allSettled(promises).
  then((results) => results.forEach((result) => console.log(result)));

// expected output:
// { status: 'fulfilled', value: 3 }
// { status: 'rejected', reason: 'foo' }
Promises
Promise.allSettled() is a method in JavaScript that returns a promise that resolves after all of the given promises have either resolved or rejected. It is part of the ECMAScript 2020 specification.
Return Value
A promise that resolves to an array of objects, each representing the outcome of each promise in the iterable. Each object has a status property, which can be either 'fulfilled' or 'rejected', and depending on the status, it also has either a value property (if fulfilled) or a reason property (if rejected).
Promises
Promise.race() is a method in JavaScript that can be used to determine the outcome of the first settled promise in an iterable of promises. The "race" is between multiple asynchronous operations, and whichever completes first (either resolves or rejects) determines the result of the Promise.race().
const promise1 = new Promise((resolve) => {
  setTimeout(resolve, 500, 'one');
});

const promise2 = new Promise((resolve) => {
  setTimeout(resolve, 100, 'two');
});

Promise.race([promise1, promise2]).then((value) => {
  console.log(value); // "two" - as it gets resolved faster
});
Promises
Parameters
-
iterable: An iterable object such as an Array, a String, a Map, a Set, or anything that implements the Iterable protocol. Each element in the iterable is passed toPromise.resolve().
Return Value
-
A single Promise that resolves to an array of the results of the input promises. The array of results maintains the same order as the input promises.
Behavior
-
If all the input promises resolve,
Promise.all()resolves with an array of their resolved values, maintaining the order of the input promises. -
If any of the input promises are rejected,
Promise.all()immediately rejects with the reason of the first promise that was rejected. -
If the iterable passed is empty,
Promise.all()will resolve synchronously.
Promises
async/await is a syntax introduced in ES2017 (ECMAScript 2017) to work with asynchronous code in JavaScript, allowing developers to write asynchronous code in a more synchronous-like fashion. It is built on top of Promises and is compatible with any function that returns a Promise.
async Keyword
The async keyword is used to declare an asynchronous function, which returns a Promise.
await Keyword
The await keyword is used inside an async function to wait for a Promise to settle (resolve or reject).
async function myAsyncFunction() {
  // ...
}
const result = await someAsyncFunction();
Promises
Error Handling
You can use try...catch statements to handle errors in async/await just like with synchronous code.
async function fetchData() {
  try {
    const data = await fetch('https://api.example.com/data');
    const json = await data.json();
    return json;
  } catch (error) {
    console.error('Error fetching data:', error);
  }
}
Buffers
Buffers in Node.js are built-in objects that provide a way to work with binary data directly in memory, without having to convert it to strings or other data types first. Buffers are particularly useful when dealing with I/O operations, such as reading from or writing to files, interacting with network protocols, or handling binary data from streams.
Creating Buffers
There are several ways to create buffers:
//Allocating a Buffer of a Specified Size:
//This creates a buffer with the specified number of bytes.
const buffer = Buffer.alloc(10);
Buffers
Creating a Buffer from an Existing Array or Buffer: This creates a new buffer containing the same data.
const bufferFromArray = Buffer.from([1, 2, 3, 4, 5]);
const bufferFromBuffer = Buffer.from(bufferFromArray);
Buffers
Creating a Buffer from a String: This creates a new buffer containing a string. You can specify the encoding if needed (the default is 'utf8').
const stringBuffer = Buffer.from('Hello, World!', 'utf8');Buffers
Accessing Data: You can access and modify data in a buffer similarly to how you would with an array.
const buffer = Buffer.from('Hello, World!');
console.log(buffer[0]); // 72 (ASCII code for 'H')
buffer[0] = 104; // Changes 'H' to 'h'
Buffers
Slicing Buffers: You can create a new buffer that references a subset of another buffer's data.
const buffer = Buffer.from('Hello, World!');
const slice = buffer.slice(0, 5);
console.log(slice.toString()); // 'Hello'
Buffers
Copying Buffers: You can copy data from one buffer to another.
const buffer1 = Buffer.from('Hello');
const buffer2 = Buffer.alloc(5);
buffer1.copy(buffer2);
console.log(buffer2.toString()); // 'Hello'
Buffers
Converting Buffers to Strings: You can convert a buffer's contents to a string using the toString() method, specifying the encoding if necessary.
const buffer = Buffer.from('Hello, World!', 'utf8');
console.log(buffer.toString()); // 'Hello, World!'
Buffers
Use Cases of Buffers
- File I/O: Reading and writing binary data to and from files.
- Network I/O: Sending and receiving binary data over the network.
- Stream Processing: Working with data streams, such as audio or video feeds.
Streams

Streams
Streams in Node.js are an essential part of the platform and are used to handle streaming data. They provide an efficient way to handle reading from and writing to different data sources and destinations without needing to load the entire data into memory. Streams work with small chunks of data at a time, making them a great choice for handling large files, network communications, or any other scenario where data might be transmitted in chunks.
Streams
Types of Streams
There are four fundamental types of streams in Node.js:
-
Readable Streams: These streams allow you to read data from a source. For example, when you're reading data from a file or from an HTTP response.
-
Writable Streams: These streams allow you to write data to a destination. For example, writing data to a file or sending data in an HTTP request.
-
Duplex Streams: These streams are both readable and writable. An example of a duplex stream is a TCP socket.
-
Transform Streams: These streams are a type of duplex stream where the output is computed based on the input. They are used to modify or transform the data as it is written and read. An example would be a compression stream.
Streams
Working with Streams
-
Readable Streams: You can listen to events like 'data' to receive chunks of data and 'end' to know when the data has been fully read.
const fs = require('fs');
const readableStream = fs.createReadStream('example.txt');
readableStream.on('data', (chunk) => {
  console.log(`Received ${chunk.length} bytes of data.`);
});
readableStream.on('end', () => {
  console.log('There will be no more data.');
});
Streams
Working with Streams
Writable Streams: You can use methods like write to write data to the stream and end to finish writing.
const fs = require('fs');
const writableStream = fs.createWriteStream('example.txt');
writableStream.write('Hello, World!');
writableStream.end('Ending the write stream.');
Streams
Working with Streams
Duplex and Transform Streams: You can use these streams both for reading and writing data.
const { Duplex } = require('stream');
const duplexStream = new Duplex({
  read(size) {
    // Implementation for reading
  },
  write(chunk, encoding, callback) {
    // Implementation for writing
    callback();
  }
});
Streams
Pipe
The pipe method is a crucial part of working with streams in Node.js. It provides a way to take the output of one stream and pipe it as input to another stream, creating a chain of streams. This is especially helpful for tasks like copying files, compressing data, or transforming data as it flows from one place to another.
const fs = require('fs');
const zlib = require('zlib');

const readStream = fs.createReadStream('input.txt');
const writeStream = fs.createWriteStream('output.txt');
const gzipStream = zlib.createGzip();

readStream.pipe(gzipStream).pipe(writeStream);
Readable instance
import { Readable } from "stream";
import Chance from "chance";
const chance = new Chance();
export class RandomStream extends Readable {
  constructor(options) {
    super(options);
    this.emittedBytes = 0;
  }
  _read(size) {
    const chunk = chance.string({ length: size });
    this.push(chunk, "utf8");
    this.emittedBytes += chunk.length;
    if (chance.bool({ likelihood: 5 })) {
      this.push(null);
    }
  }
}

const randomStream = new RandomStream()
randomStream
.on('data', (chunk) => {
console.log(`Chunk received (${chunk.length} bytes): ${chunk.
toString()}`)
})
Readable instance
import { Readable } from "stream";
import Chance from "chance";
const chance = new Chance();
let emittedBytes = 0;
const randomStream = new Readable({
  read(size) {
    const chunk = chance.string({ length: size });
    this.push(chunk, "utf8");
    emittedBytes += chunk.length;
    if (chance.bool({ likelihood: 5 })) {
      this.push(null);
    }
  },
});
// now use randomStream instance directly ...
Simplified version
Modes
1. Binary Mode (Buffer Mode):
- In binary mode, streams deal with data in the form of buffers.
- This mode is suitable for handling binary data, such as files, images, or any other form of non-text data.
- When a stream is in binary mode, it emits and accepts data as instances of
Buffer.
2. Object Mode:
- In object mode, streams can emit and receive non-binary data, such as objects.
- This mode is useful when you need to stream discrete chunks of data that are not represented as strings or buffers.
- To enable object mode, you can set the
objectModeoption totruewhen creating the stream.
Object Mode
Here is an example of how you can create a readable stream in object mode:
const { Readable } = require('stream');

const objectStream = new Readable({
  objectMode: true,
  read() {}
});

objectStream.push({ foo: 'bar' });
objectStream.push({ baz: 'qux' });
objectStream.push(null); // Signals the end of the stream

objectStream.on('data', (data) => {
  console.log(data); // Logs the objects
});
Text like mode
- Even though Node.js streams do not have an explicit "text mode," when dealing with text data, streams can operate with strings.
- By default, readable streams emit data as buffers, but you can set the encoding to convert buffer data to strings.
- For writable streams, when you write a string, it gets converted to a buffer (unless the stream is in object mode).
Here is an example of a readable stream emitting strings:
const { Readable } = require('stream');

const stringStream = new Readable({
  encoding: 'utf8', // Setting encoding to utf8
  read() {}
});

stringStream.push('Hello, ');
stringStream.push('world!\n');
stringStream.push(null); // Signals the end of the stream

stringStream.on('data', (data) => {
  console.log(data); // Logs strings
});
Readable instance
import { Readable } from "stream";
const mountains = [
  { name: "Everest", height: 8848 },
  { name: "K2", height: 8611 },
  { name: "Kangchenjunga", height: 8586 },
  { name: "Lhotse", height: 8516 },
  { name: "Makalu", height: 8481 },
];
const mountainsStream = Readable.from(mountains);
mountainsStream.on("data", (mountain) => {
  console.log(`${mountain.name.padStart(14)}\t${mountain.height}m`);
});
No need for explicitly set objectMode in this case
Writable stream
const { Writable } = require('stream');

class ConsoleWritable extends Writable {
  _write(chunk, encoding, callback) {
    // Convert the chunk to a string and write it to the console
    console.log(chunk.toString());
    // Call the callback to signal that the write operation has completed
    callback();
  }
}

// Create an instance of the ConsoleWritable stream
const consoleStream = new ConsoleWritable();

// Write data to the stream
consoleStream.write('Hello, ');
consoleStream.write('World!\n');
consoleStream.end('Goodbye, Stream!\n');

consoleStream.on('finish', () => {
  console.log('Finished writing to the console stream');
});

consoleStream.on('error', (err) => {
  console.error('An error occurred:', err);
});
Writable stream
const { Writable } = require('stream');

const consoleStream = new Writable({
  write(chunk, encoding, callback) {
    // Convert the chunk to a string and write it to the console
    console.log(chunk.toString());
    // Call the callback to signal that the write operation has completed
    callback();
  }
});

// Write data to the stream
consoleStream.write('Hello, ');
consoleStream.write('World!\n');
consoleStream.end('Goodbye, Stream!\n');

consoleStream.on('finish', () => {
  console.log('Finished writing to the console stream');
});

consoleStream.on('error', (err) => {
  console.error('An error occurred:', err);
});
Transform Stream
A transform stream in Node.js is a type of duplex stream that can be used to manipulate or transform the data as it is read or written. To create an instance of a transform stream, you can use the Transform class from the stream module.
The Transform class has a _transform method for handling the transformation of data, and a _flush method for any additional processing that needs to occur after all the data has been transformed.
Below is an example of how to create a transform stream that converts input text to uppercase and adds a line about the end of the stream when the stream is finished:
Promises
const { Transform } = require('stream');

const upperCaseTransform = new Transform({
  transform(chunk, encoding, callback) {
    // Convert the chunk to uppercase
    this.push(chunk.toString().toUpperCase());
    callback();
  },
  flush(callback) {
    // Additional data to be added at the end of the stream
    this.push('\nAll data has been converted to uppercase!\n');
    callback();
  }
});

// Using the transform stream
process.stdin.pipe(upperCaseTransform).pipe(process.stdout);

upperCaseTransform.on('finish', () => {
  console.log('\nFinished transforming data');
});

upperCaseTransform.on('error', (err) => {
  console.error('An error occurred:', err);
});
Transform Stream
- The
transformmethod converts each chunk of data to uppercase and pushes it to the output. - The
flushmethod adds a line to the output to indicate that all data has been converted to uppercase. It gets called when the stream is ending. - We are piping
process.stdin(standard input) to our transform stream, and then piping the transform stream toprocess.stdout(standard output), so anything you type in the terminal gets converted to uppercase and printed back out. - Event listeners for 'finish' and 'error' are added to handle the completion of the stream and any errors that might occur.
You can run this script and type into the terminal to see the transform stream in action. After you’re done, you can press Ctrl+D to end the input stream, which will trigger the flush method and end the transform stream.
Transform Stream
Simplified version
const { Transform, pipeline } = require('stream');

const upperCaseTransform = new Transform({
  transform(chunk, encoding, callback) {
    this.push(chunk.toString().toUpperCase());
    callback();
  },
  flush(callback) {
    this.push('\nAll data has been converted to uppercase!\n');
    callback();
  }
});

pipeline(
  process.stdin,
  upperCaseTransform,
  process.stdout,
  (err) => {
    if (err) {
      console.error('An error occurred:', err);
    } else {
      console.log('\nFinished transforming data');
    }
  }
);
Worker Threads
Worker threads in Node.js provide a way to perform CPU-intensive JavaScript operations in parallel, which can improve the performance of your application. Node.js is single-threaded by default, running on the V8 JavaScript runtime and using non-blocking I/O operations to handle concurrency. However, for CPU-bound tasks (tasks that require significant CPU time, as opposed to waiting on I/O), this model can become a bottleneck.
Introduction to Worker Threads:
The Worker Threads module enables the use of threads that execute JavaScript in parallel. Each worker thread runs in its own V8 instance, ensuring that they don’t share the same memory or global state. Communication between the main thread and worker threads is achieved through a messaging system.
Worker Threads
How to Use Worker Threads:
To use worker threads, you need to import the worker_threads module. You can create a new worker using the Worker class, and communicate between the main thread and the worker thread using postMessage and on('message').
Worker Threads
Here is a basic example of how to use worker threads:
const { Worker, isMainThread, parentPort } = require('worker_threads');

if (isMainThread) {
  // This code is executed in the main thread
  const worker = new Worker(__filename);

  worker.on('message', (msg) => {
    console.log('Message from worker:', msg);
  });

  worker.postMessage('Hello from main thread!');
} else {
  // This code is executed in the worker thread
  parentPort.on('message', (msg) => {
    console.log('Message from main thread:', msg);
    parentPort.postMessage('Hello from worker thread!');
  });
}
Worker Threads
1. CPU-Intensive Tasks:
If your application involves heavy computational tasks that block the event loop, worker threads can be beneficial. Examples include image processing, complex calculations, or data compression.
2. Utilizing Multi-Core Processors:
Node.js runs in a single thread by default, which means it doesn’t take full advantage of multi-core processors. Worker threads allow you to create multiple threads, each running in its own V8 instance, enabling parallel execution of tasks.
3. Background Processing:
For tasks that can be executed in the background without blocking the main application, worker threads can be a good fit. This ensures that your main event loop remains free to handle I/O operations and user requests.
4. Isolating Unstable or Unsafe Code:
If you have parts of your application that are unstable or could potentially crash, running them inside a worker thread can isolate them from the main application, preventing them from affecting its stability.
Can I share memory between threads
Yes, you can share memory between threads in Node.js using SharedArrayBuffer. SharedArrayBuffer allows you to create a shared memory space that multiple threads can read from and write to. This enables more efficient communication between threads as you can use this shared memory to exchange data without needing to copy it or send messages.
Shared Memory
const { Worker, isMainThread, parentPort, workerData } = require('worker_threads');

if (isMainThread) {
  // This code is executed in the main thread

  // Create a SharedArrayBuffer of size 4 bytes (an Int32Array view requires 4 bytes)
  const sharedBuffer = new SharedArrayBuffer(4);
  const sharedArray = new Int32Array(sharedBuffer);

  // Initialize the shared memory with a value
  sharedArray[0] = 42;

  const worker = new Worker(__filename, { workerData: sharedBuffer });

  worker.on('message', () => {
    console.log('Main thread: Value in shared memory:', sharedArray[0]);
  });

} else {
  // This code is executed in the worker thread
  const sharedArray = new Int32Array(workerData);

  console.log('Worker thread: Value in shared memory:', sharedArray[0]);

  // Modify the shared memory
  sharedArray[0] = 96;

  parentPort.postMessage('Worker has updated the shared memory');
}
Cluster mode
Cluster mode in Node.js allows you to create child processes that run simultaneously and share the same server port. This is particularly beneficial for taking full advantage of multi-core systems, as it enables you to run a separate instance of the Node.js event loop in each core, potentially leading to better performance and higher throughput.
How Cluster Mode Works:
When you use cluster mode, the Node.js process that is started initially is the master process. The master process can spawn a number of worker processes, which are essentially separate instances of the Node.js runtime, each running in its own thread and with its own event loop. These worker processes can all share the same server port, and the master process manages the distribution of incoming connections between them.
Cluster mode
Key Concepts and Components:
-
Master Process: This is the initial process started when you run your Node.js application in cluster mode. It is responsible for creating worker processes and managing them.
-
Worker Processes: These are the separate instances of your application that run in their own thread, have their own event loop, and can handle incoming connections.
-
Load Balancing: The master process distributes incoming network connections to the worker processes in a round-robin fashion by default, though this can be configured to use other strategies.
-
Inter-process Communication (IPC): The master and worker processes can communicate with each other using IPC.
Cluster mode
Benefits of Using Cluster Mode:
-
Improved Performance: By taking full advantage of multi-core systems, you can improve the performance of your application.
-
Enhanced Reliability: If one worker process crashes, it does not bring down the entire application. The master process can simply spawn a new worker process to replace the crashed one.
Cluster mode
const cluster = require('cluster');
const http = require('http');
const numCPUs = require('os').cpus().length;

if (cluster.isMaster) {
  console.log(`Master ${process.pid} is running`);

  // Fork workers
  for (let i = 0; i < numCPUs; i++) {
    cluster.fork();
  }

  cluster.on('exit', (worker, code, signal) => {
    console.log(`Worker ${worker.process.pid} died`);
  });
} else {
  // Workers can share any TCP connection
  // In this case it is an HTTP server
  http.createServer((req, res) => {
    res.writeHead(200);
    res.end('Hello World\n');
  }).listen(8000);

  console.log(`Worker ${process.pid} started`);
}
Cluster mode
Considerations:
- While cluster mode can significantly improve the performance of your application, it also introduces additional complexity. You need to manage the worker processes and handle the distribution of incoming connections.
- Cluster mode is most beneficial for CPU-bound tasks. If your application is I/O-bound, the built-in load balancing of the Node.js cluster module may be sufficient for your needs, and additional worker processes might not lead to a significant performance improvement.
- Worker processes run in isolation, and if they need to share state or communicate with each other, you will need to implement a communication mechanism (e.g., using IPC or an external database).
pm2
Key Features of PM2:
1. Process Management:
PM2 allows you to manage application processes. You can start, stop, restart, delete, and list running processes. It supports both JavaScript and JSON for process configuration.
2. Load Balancer:
PM2 comes with a built-in load balancer that helps in distributing incoming traffic to various instances of the application, thereby improving the performance and reliability of the application.
3. Cluster Mode:
PM2 can run your application in cluster mode without any modifications to the code. This makes full use of multi-core processors, as each core can run a separate instance of the application.
4. Zero-Downtime Deployment:
With PM2, you can reload your application without any downtime. This is essential for critical applications where availability is a top priority.
pm2
Key Features of PM2:
5. Monitoring:
PM2 provides a set of tools to monitor the application’s performance and health. You can monitor CPU usage, memory usage, request per minute, and more. It also supports integration with Keymetrics, a PM2 service that provides a web-based interface to monitor and manage your applications.
6. Logging:
PM2 can manage logs generated by your applications. You can configure log rotation and setup error and output logs for better log management.
7. Startup Scripts:
PM2 can generate and configure startup scripts. This ensures that your application restarts upon server reboot, improving the resilience of your application.
8. Update on the Fly:
You can update your application without stopping it, ensuring zero downtime during deployments.
Child processes
In Node.js, the child_process module is used to create and manage child processes. A child process is a process spawned by another process (the parent), and it can run simultaneously with the parent process. This module provides the ability to spawn new processes, communicate with them, and manage their lifecycle.
Child processes
1. spawn()
- This function is used to create a new process.
- It takes the command to run, an array of arguments, and an options object as parameters.
- It returns a
ChildProcessinstance. - The
ChildProcessinstance provides streams (stdin,stdout,stderr) to communicate with the process.
const { spawn } = require('child_process');
const ls = spawn('ls', ['-lh', '/usr']);

ls.stdout.on('data', (data) => {
  console.log(`stdout: ${data}`);
});

ls.stderr.on('data', (data) => {
  console.log(`stderr: ${data}`);
});

ls.on('close', (code) => {
  console.log(`child process exited with code ${code}`);
});
Child processes
2. exec()
- This function is used to create a new shell process and run a given command.
- It takes a command string, an options object, and a callback function as parameters.
- The callback function is called when the process terminates, and it receives the standard output and error as arguments.
const { exec } = require('child_process');
exec('ls -lh /usr', (error, stdout, stderr) => {
  if (error) {
    console.error(`exec error: ${error}`);
    return;
  }
  console.log(`stdout: ${stdout}`);
  console.error(`stderr: ${stderr}`);
});
Child processes
3. fork()
- This function is a special case of
spawn()used to spawn new Node.js processes. - It takes a module to run, an array of arguments, and an options object as parameters.
- Unlike
spawn(), the parent and child can communicate with each other using an inter-process communication (IPC) channel.
const { fork } = require('child_process');
const n = fork(`${__dirname}/sub.js`);

n.on('message', (m) => {
  console.log('PARENT got message:', m);
});

n.send({ hello: 'world' });
Child processes
Use Cases for Child Processes:
-
Performing CPU-Intensive Operations: Running CPU-bound tasks in a child process prevents them from blocking the event loop, ensuring that the main application remains responsive.
-
Parallel Execution: You can achieve parallel execution of tasks by running them in separate processes.
-
Running Shell Commands: The
exec()andexecFile()functions allow you to run shell commands and scripts from within your Node.js application. -
Creating a Workflow of Processes: You can create pipelines or workflows where the output of one process is used as the input for another.
Child processes
Considerations:
-
While child processes can improve performance for CPU-bound tasks, they introduce additional overhead due to inter-process communication and the creation of new processes.
-
Care should be taken when dealing with user input or untrusted data to prevent command injection vulnerabilities, especially when using
exec()orexecFile(). -
Managing and handling errors and exit codes from child processes is crucial to ensure the reliability of your application.
IPC Channel
An IPC (Inter-Process Communication) channel is a mechanism that allows different processes to communicate and share data with each other. In the context of Node.js, when you create a child process using the fork() method from the child_process module, an IPC channel is established between the parent process and the forked child process.
IPC Channel
Key Characteristics of IPC Channel in Node.js:
1. Bidirectional Communication:
-
The IPC channel enables bidirectional communication, meaning that the parent process and the child process can send messages to each other.
2. Asynchronous:
-
The communication over the IPC channel is asynchronous, making it suitable for non-blocking operations in a Node.js environment.
3. Object Serialization:
-
When a message is sent through the IPC channel, it is serialized (converted to a format that can be transmitted over the channel). When the message is received, it is deserialized back into an object.
4. Event-Driven:
-
The communication is event-driven. Processes can listen for
messageevents to receive messages from the IPC channel.
Child processes
In Node.js, the child_process module is used to create and manage child processes. A child process is a process spawned by another process (the parent), and it can run simultaneously with the parent process. This module provides the ability to spawn new processes, communicate with them, and manage their lifecycle.
Thank You ;)
Copy of deck
By noinputsignal


