
Micro Frontends
December 2023
Instructor
Marcin Kieruzel
I'm a Software Engineer.
I run a small software house –
No Input Signal (www.NoInputSignal.com).
We do front-end and back-end development and graphic design. We specialize in React, React Native, Node.js and some PHP and Python as well. We're working for numerous client like National Polish Radio, National Polish Railways, Orange.

Instructor
Marcin Kieruzel
My name is pronounced [ˈmart͡ɕin]
which is probably hard to repeat for you. English version Martin would be fine as well.

Schedule
Start time: 10:00
End time: 17:00
Couple of small break
Lunch breaks: 13:00
Outline of the course
Introduction
Overview of micro-frontend architecture and core concepts
Fundamentals and some advanced stuff of React
Getting Started
Setting up the development environment
Basics of module federation
Other frontend frameworks
Outline of the course
Building Micro Frontends
Creating a project structure using React
Converting to micro-frontends
Modifying micro-frontend apps
Sharing dependencies and linking multiple apps
Integrating Host/Containers with Micro Frontends
Build-time vs run-time integrations
Assembling the app components
Outline of the course
Working with CSS in Micro Frontends
Modifying the header component
Understanding CSS in JS libraries
Common issues with CSS in Micro Frontends
Debugging and fixing issues
Outline of the course
Configuring Authentication in Micro Frontends
Implementation approaches
Communicating authentication changes
Adding an auth deploy config
Deploying Micro Frontends
Requirements for deployment
Implementing the CI/CD pipeline
Testing the pipeline
Running the deployment
Verifying the deployment
Our project
We're going to create real estate agency app.
Introduction
What is React?
➡️ React is a JavaScript library for building interactive user interfaces.
➡️ It is a free and open - source front - end Javascript library for building user interfaces based on UI components.
*By user interfaces, we mean the elements that users see and interact with on-screen.
*By library, we mean React provides helpful functions to build UI, but leaves it up to the developer where to use those functions in their application.
sources: Next.js.org & Wikipedia
What is React?
In practice React is for building and rendering html in a dynamic and performant way.
Writing html in a declarative way is tedious. You may not leverage any logic into it. Its just markup. So from the very beginning of the web there was an effort to generate it dynamically.
Here comes PHP, templating languages such as jinja, twig, blade or razor.
sources: Next.js.org & Wikipedia
What is React?
In most of those cases it was just generating html strings on a server. Pretty often in request time or through some caching system. In JavaScript we do that with tiny little function that has been with us since the very beginning of JavaScript.
document.createElement("div")So why not to generate the whole html with this function and basically keep the model of HTML in JavaScript? Basically that's the idea that stands behind React, Angular, Backbone and many others.
What is React?
Hence in JavaScript case this process of generating html is more sophisticated (JS interacts with DOM API not just creates html string) and happens in the browser not on a server.
This is sometimes called SPA (Single Page Application)
It also means, however, that building a complete React application from the ground up requires some effort. Developers need to spend time configuring tools and reinventing solutions for common application requirements.
source: Next.js.org
sources: Next.js.org & Wikipedia
Who created React and Why?
Original Author: Jordan Walke
Initial Release: May 29, 2013 | 10 years ago
Story: In 2011, as Facebook’s Ad app began to pick up major momentum, their code began seeing a myriad of new updates and team members which became overwhelming and hard to manage after a while. In an attempt to help remedy this problem, Jordan Walke created FaxJS, a prototype which made this process more efficient. This was the birth of what would later evolve into the version of React that we all currently know and love today.
Main React Concepts
➡️ Virtual DOM
➡️ JSX
➡️ One - Way Data Binding
Virtual DOM
What is DOM?
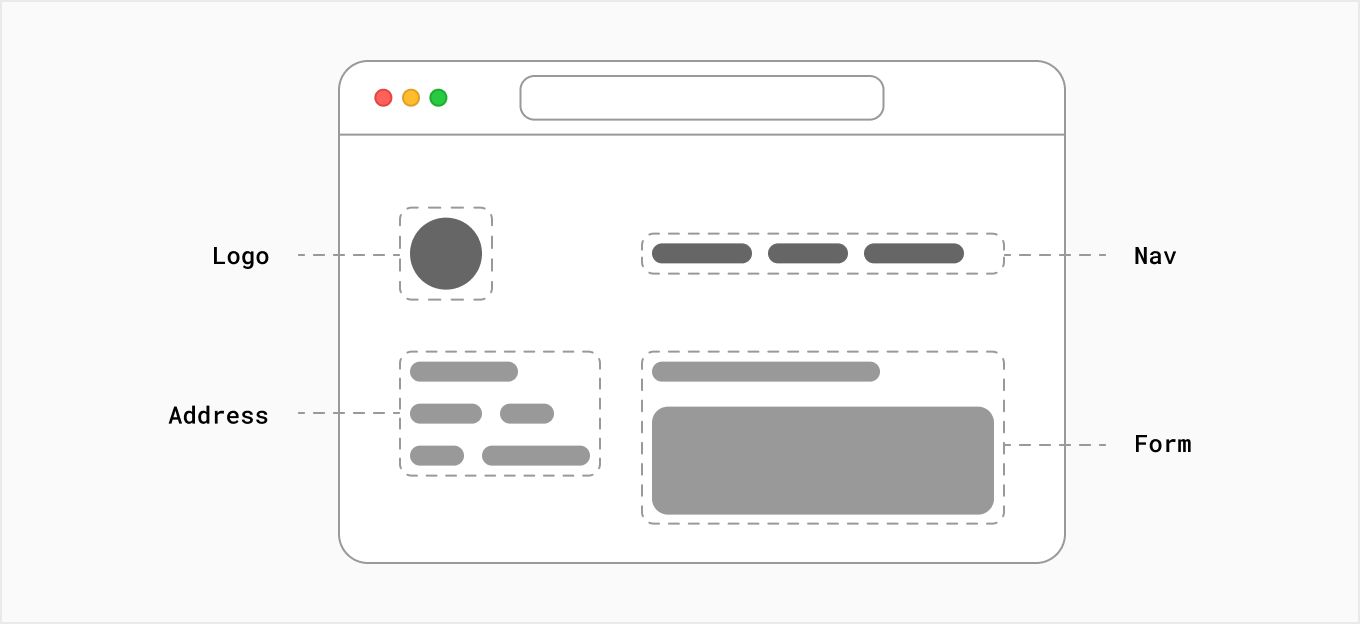
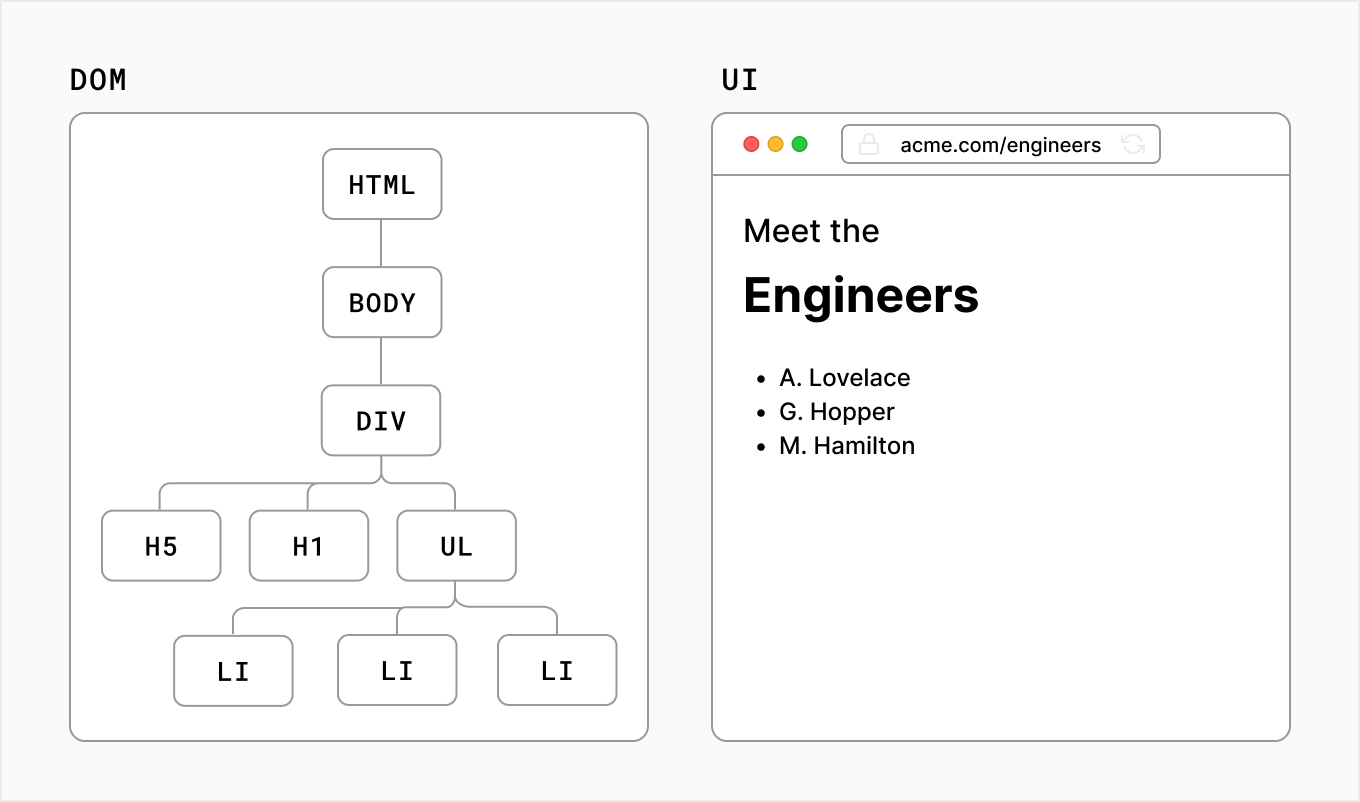
DOM - stands for Document Object Model
The DOM is an object representation of the HTML elements. It acts as a bridge between your code and the user interface, and has a tree-like structure with parent and child relationships.

source: Nexj.js.org
source: Next.js.org
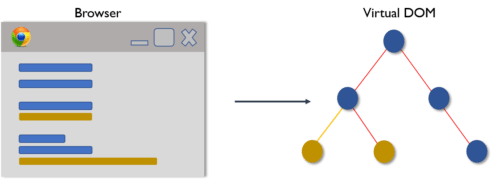
What is Virtual DOM or VDOM?
A virtual DOM object is a representation of a DOM object, like a lightweight copy.
It has the same properties as a real DOM object, but it lacks the real thing’s power to directly change what’s on the screen.
In React, for every DOM object, there is a corresponding “virtual DOM object.”
source: codeacademy.com
Why do you need virtual DOM?
While this is simple enough, once you start performing continuous mutations, more complexity arises. This is why the virtual DOM was created - to allow you to write declarative content (like the string in the innerHTML example) while harnessing performance by making only pinpoint changes to the DOM.
source: dev.to
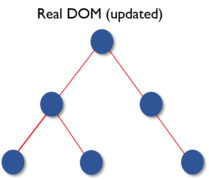
Virtual DOM Process
Once Virtual DOM contains all the updated changes, it is then compared with the Real DOM and the difference is calculated between them.
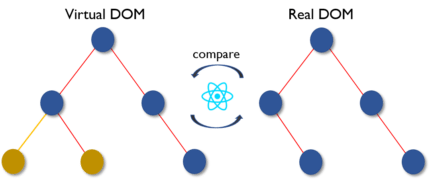
Once the difference is calculated the real DOM will update only the new components that have actually changed.This is called Reconciliation. Virtual DOM is faster and more effective than Real DOM as it just focuses on the updated components instead of updating the entire DOM.
Virtual DOM plays a major role in boosting the performance of the applications.
Only those few objects are changed in the real DOM that was the outcome of the comparison between the previous states and the new states. This feature made things move faster and also reduced cost.
React Fiber is a complete reimplementation of the React core algorithm, introduced in React 16. It's a highly technical internal feature, but understanding its principles can give you a better insight into how React works under the hood, and how it achieves efficiency and flexibility in updating the UI.
Fiber
Reconciliation Algorithm: Fiber is the name of the new reconciliation algorithm in React. Reconciliation is the process React uses to diff the tree of React elements (the virtual DOM) to know what parts of the actual DOM need to be updated. This process is crucial for React's performance and forms the core of its declarative API.
Fiber
Incremental Rendering: One of the main goals of Fiber is to enable incremental rendering. This means React can pause, resume, and reuse work as needed, instead of doing everything in a single pass. This is a significant improvement over the previous algorithm (often referred to as "Stack Reconciler"), which was more linear and less flexible.
Fiber
Tasks Prioritization: Fiber allows React to prioritize certain updates over others. For instance, updates from user interactions like clicks or typing can be given higher priority than less critical updates like data fetching. This leads to a more responsive user interface, as high-priority updates are processed faster.
Fiber
Concurrency: Fiber lays the foundation for concurrent features in React, such as Concurrent Mode and Suspense. These features leverage the ability of Fiber to work on multiple tasks at a time, improving the handling of asynchronous data fetching and rendering.
Fiber
Backward Compatibility: Despite being a complete rewrite, React Fiber maintains backward compatibility with the older React versions. This means that applications written in older versions of React can benefit from Fiber's improvements without a complete rewrite.
Fiber
Technical Details
-
Fiber Node: Each component in React gets a Fiber node, which contains information about the component, its inputs (props), state, and the output (the DOM updates it induces). These nodes form a tree structure for the application.
-
Double Buffering: React Fiber uses a double buffering technique where it keeps two trees: the current tree representing the current state of the UI, and the work-in-progress tree representing the new state of the UI.
-
Work Loop: The Fiber algorithm works in a loop, often referred to as the Fiber loop. It performs work on units of the tree (fibers), and can pause and resume this work to ensure that high-priority tasks (like user inputs) are not blocked.
Impact on Development
While React Fiber is an internal mechanism, understanding its existence and capabilities can be helpful for developers:
- It explains why certain updates in React are very fast and responsive.
- It sheds light on how newer features like hooks, Concurrent Mode, and Suspense fit into the React ecosystem.
- It provides a window into the future capabilities of React, as the Fiber architecture is designed to be extensible and future-proof.
JSX
JSX stands for JavaScripts XML
- JSX allows us to write HTML in React. (source: w3schools.com)
- a syntax extension of JavaScript which allows users to write React components.
JSX
JavaScript uses a method called createElement() to generate an html node. After the element has been made you may append the element to the document.
const div = document.createElement("div");
div.innerText = "Hello World";
document.querySelector("body").appendChild(div);
JSX
React uses a very similar approach, but createElement() method is applied to the React object not to the document.
Of course, you can use React.createElement() method straightforwardly, but it would pretty soon turn out to be tedious and complicated with lots of hard-to-follow curly braces. Thanks to JSX we can write React.createElement in a more declarative way.

Examine Babel Repl to see how JSX translates to JS
JSX
Basically the syntax resembles html with a few differences.
<img /> //always close tag
...
<p contentEditable={true}> //use camelcase
...
<p>{Math.pow(2,2)}</p> //inject JS in curly braces
...
<div style={{width: "200px", height: "200px"}}>
</div> //add inline styles as an object
...
<div style={{width: "200px", height: "200px"}}>
{["a", "b", "c"]}
</div> //arrays with primitives would get split automaticly into separate values
same as <div>a b c</div>
One - Way Data Binding
In one-way data binding one of the following conditions can be followed. Component to View: Any change in component data would get reflected in the view. View to Component: Any change in View would get reflected in the component’s data. (source: geeksforgeeks.org)
One-way data binding will bind the data from the component to the view (DOM) or from view to the component. One-way data binding is unidirectional/one-way. You can only bind the data from component to the view or from view to the component. (source: pluralsight.com)
What is one-way binding?

The Angular framework uses a two-way binding approach that changes the model state automatically when any change is made in the UI element and vice versa. The React library uses a one-way approach. This approach allows the change in the UI elements only after a change is made in the model state. The two-way approach seems to be easier, but React’s one-way approach is more effective for projects with large amounts of coding.
Props & State
Props stands for properties.
It is a special keyword in React which is used for passing data from one component to another. Logically, components are just like JavaScript functions. They accept random inputs (called “props”) and return React elements which tell what should be displayed on the screen. (source:knowledgehut.com)
Props are used to pass data, whereas state is for managing data. Data from props is read-only, and cannot be modified by a component that is receiving it from outside.
State data can be modified by its own component, but is private (cannot be accessed from outside).(source: freecodecamp.org)
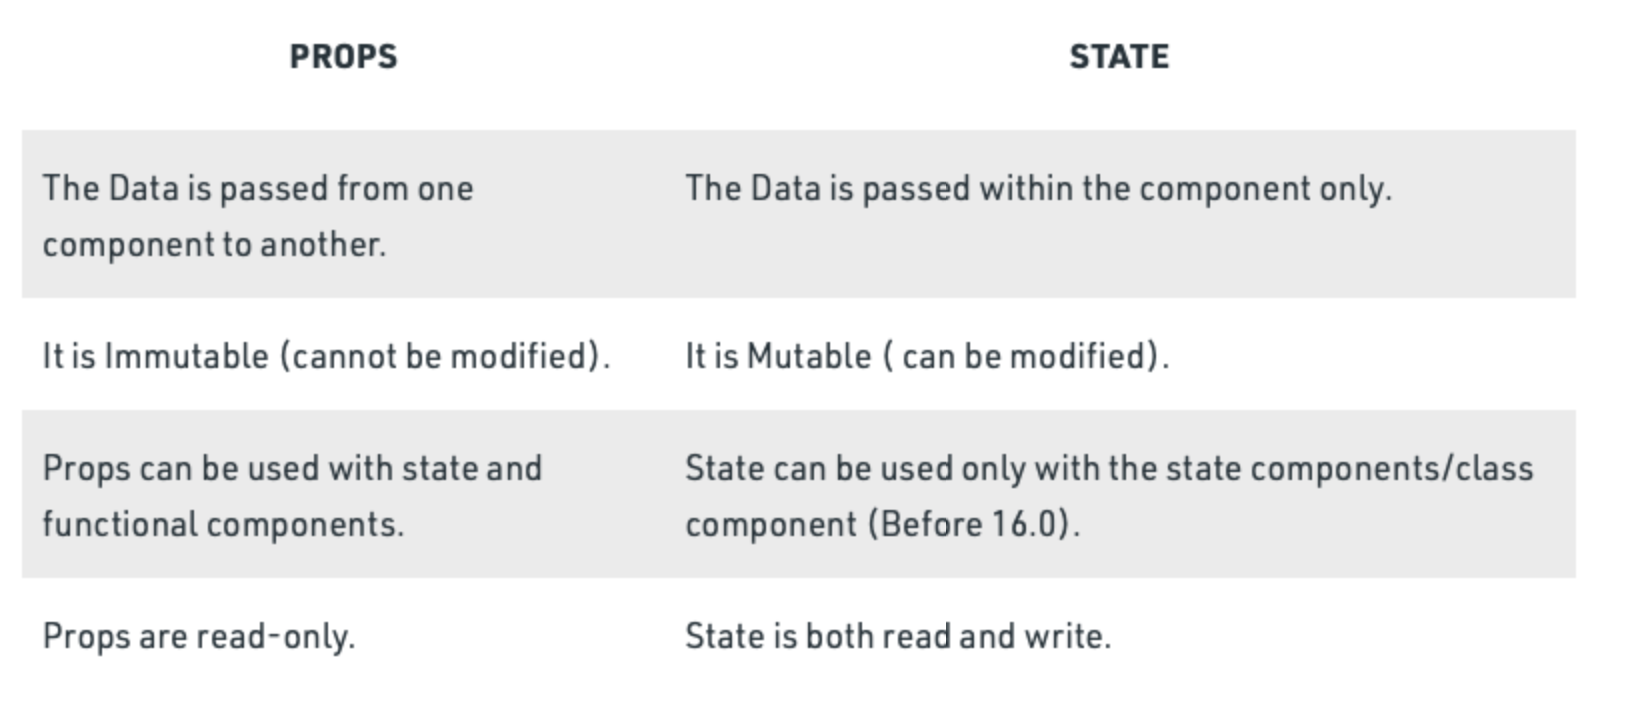
Difference between props and state:
State
The state is a built-in React object that is used to contain data or information about the component. A component's state can change over time; whenever it changes, the component re-renders.
//Class component
class App extends React.Component {
	constructor() {
    	this.state = {
        counter: 1
        }
    }
}
//Function component
const App = () => {
const [counter, setCounter] = useState(0)
}source:https://www.simplilearn.com/tutorials/reactjs-tutorial/reactjs-state
State
Because of this nature of React internal state it must not be modified straight forward. Instead of that we use special method to not only change the state but cause the rerendering accordingly.
//Class component
class App extends React.Component {
	constructor() {
    	this.state = { counter: 1 }
    }

    change() {
    	// this.state = 2 – WRONG!
    	this.setState({counter: 2})
    }
    ...
}
//Function component
const App = () => {
const [counter, setCounter] = useState(0)
const change = () => {
// counter = 2 WRONG!
setCounter(2)
}
}Getting started
Lets examine two scenarios:
- We start a new project and it's going to be 100% React. We assume to have our frontend decoupled from backend and we assume some kind of communication between those two (like REST API).
- We have and existing project and we're not going to rewrite it totally to React. Our goal is to inject it in some part of the application.
Getting started
Starting from scratch:
If we start a new project and it's going to be headless (decoupled from backend) probably the best way is to use some kind of boilerplate.
Hence: Create React App, Next.js, Remix, Gatsby
This approach will save you a lot of configuration. All those libraries comes with a bunch of ready-to-use templates.
Getting started
Getting started
Adding React to an existing project or just out of curiosity wanting to know what happens under the hood.
React works the best when it's a standalone headless application but of course there is nothing wrong with adding it to existing project.
Possible disadvantages of this approach:
- Hence the part of your app that is react may not be in sync with other parts and generally because of VDOM would behave in different way.
Getting started
Binding React to HTML.
Typically React application comes with just a tiny html file with couple of most highest in order tags (html, body, head) in it. It usually comes with a container element where we inject our React app.
Getting started
Binding React to HTML.
Typically React application comes with just a tiny html file with couple of most highest in order tags (html, body, head) in it. It comes with a container element where we inject our React app as well.
Since we are right now somehow between two big versions of React. React 16 and 17 is still the most popular and you probably find this version in most of the tutorials and articles. At the same time React 18 is already here with lots of significant changes.
Getting started
In both cases we reference the container div from our html file and inject our app into it.
// Before
import { render } from 'react-dom';
const container = document.getElementById('app');
render(<App tab="home" />, container);

// After React 18.*.*
import { createRoot } from 'react-dom/client';
const container = document.getElementById('app');
const root = createRoot(container); // createRoot(container!) if you use TypeScript
root.render(<App tab="home" />);
Getting started
react-dom by design works in the browser. We'll cover this topic later while running through Next.js documentation but it's worth to mention that react-com has its sibling that works on a server (in node.js enironmanet). It's reacDOMServer.
We'll use that for ServerSideRendering and generally to save jsx as static files (strings).
SSR
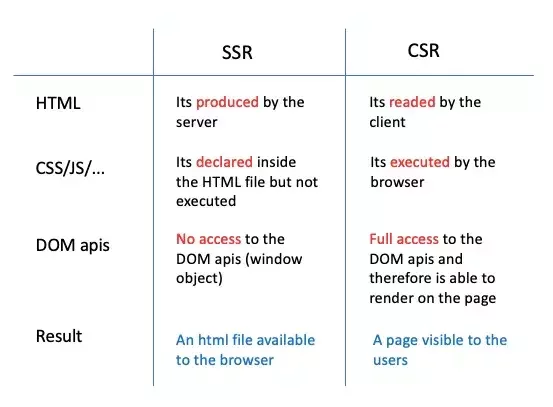
Server-Side Rendering (SSR) in React refers to the process of rendering React components on a server rather than in the browser. This technique sends a fully rendered page to the client, allowing the content to be visible even before all JavaScript files are downloaded and parsed. SSR can significantly improve performance, especially in terms of initial page load time and search engine optimization (SEO).
How Server-Side Rendering Works:
-
Request to Server: When a user requests a page, the request is sent to the server.
-
Render on Server: The server executes the React code to render the components into HTML.
-
Send HTML to Browser: The server sends this HTML to the user's browser as the response to the request. This HTML is the initial view of the page.
-
Load JavaScript: In the background, the browser downloads the JavaScript files associated with the page.
-
Hydrate: Once the JavaScript loads, React "hydrates" the page. This means it attaches event handlers and allows the React code to take over, turning the static content into a fully interactive application.
SSR vs CSR
Data Flow in React
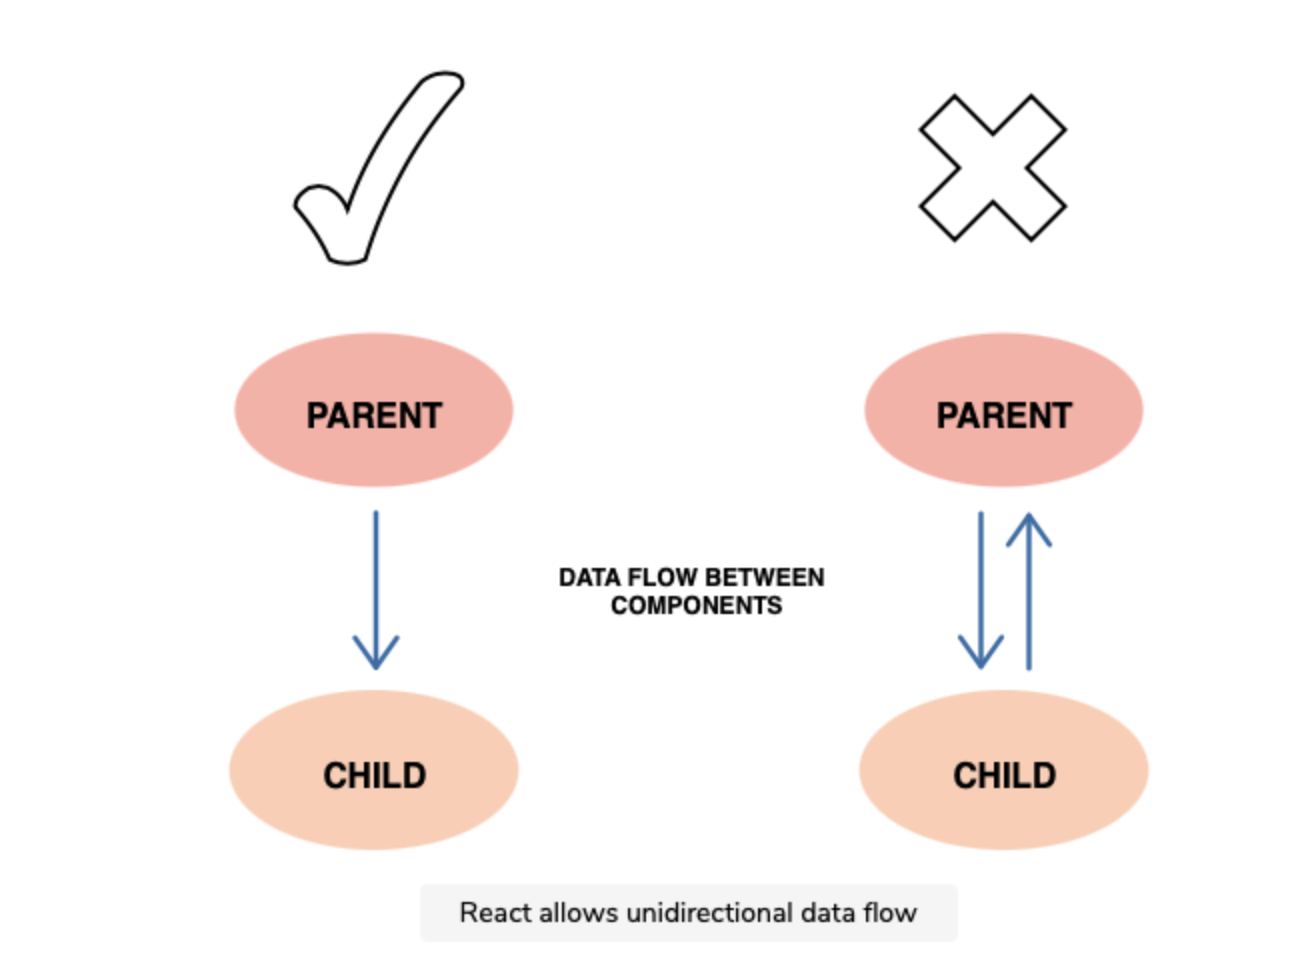
What is unidirectional data flow in React?
Unidirectional data flow describes a one-way data flow where the data can move in only one pathway when being transferred between different parts of the program.
React, a Javascript library, uses unidirectional data flow. The data from the parent is known as props. You can only transfer data from parent to child and not vice versa.This means that the child components cannot update or modify the data on their own, making sure that a clean data flow architecture is followed. This also means that you can control the data flow better.
(source: Sheza Munir educative.io)
(source: Sheza Munir educative.io)
Effect of state changes
In React, each state is owned by one component. Due to the unidirectional flow, the changes made on the state of the component will only affect the children and not the parents or siblings.
Advantages of unidirectional data flow
There are many advantages of unidirectional data flow, some of which are listed below:
- Debugging One-way data flow makes debugging much easier. When the developer knows where the data is coming from and where it is going, they can dry run (or use tools) to find the problems more efficiently.
- Better control Having data flow in one direction makes the program less prone to errors and gives the developer more control.
- Efficiency As the used libraries are wary of the limitations and specifications of the unidirectional flow, extra resources are not wasted, leading to an efficient process.
source: Sheza Munir educative.io
React Components
What are components?
Components are independent and reusable bits of code. They serve the same purpose as JavaScript functions, but work in isolation and return HTML (JSX). Components come in two types, Class components and Function components.
As for now (2022) class components are rarely used. Prior to version 16.8 they were the only way to use component internal state. Since that version hooks has been present and thanks to them we can do without class.
What is a Class Component?
Class Component
A class component must include the extends React.Component statement. This statement creates an inheritance to React.Component, and gives your component access to React.Component’s functions.
The component also requires a render() method, this method returns HTML.
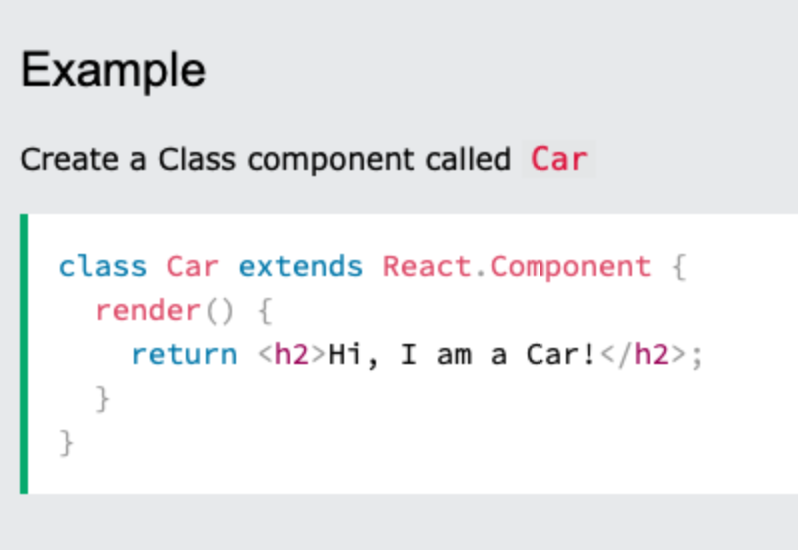
Note: When creating a React component, the component’s name MUST start with an upper case letter.
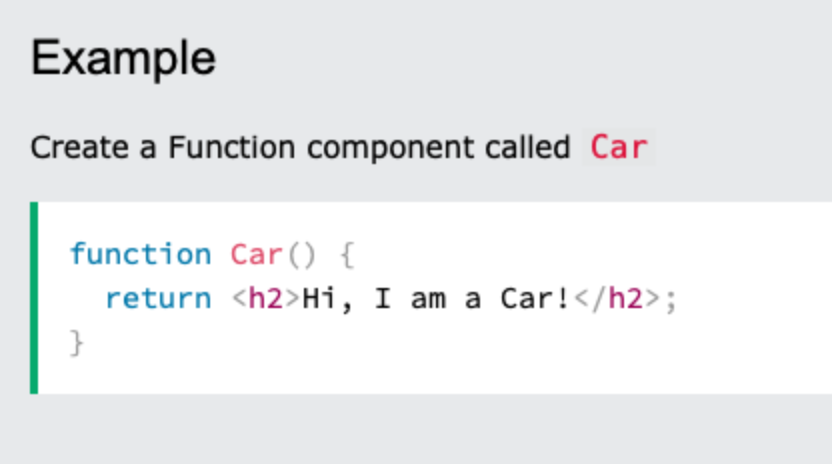
What is a Functional Component?
A Function component also returns HTML, and behaves much the same way as a Class component, but Function components can be written using much less code, are easier to understand.
Demystifying components?
Let's try to demystify components a bit. In JavaScript, we use functions to create objects. Class syntax is just a syntactical sugar build on top of functions.
function Person(name) {
	this.name = name
}

const me = new Person("Martin")
class Person {
constructor(name){
this.name = name
}
}
const me = new Person("Marcin")Demystifying components?
When JavaScript references html element it creates an object of a specific type.
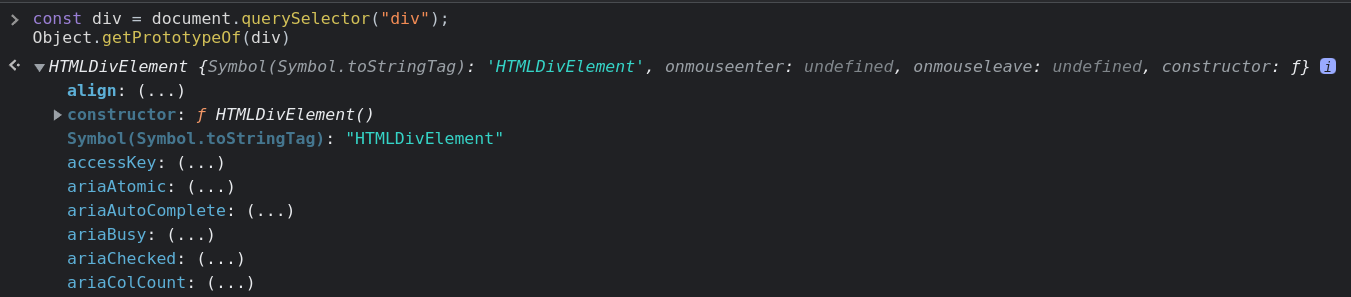
The same happens when it creates element.

Demystifying components?
So components simply creates html nodes as objects. Under the hood, we have a well known object instantiation.
function Person({name}) {
	this.name = name
}

//const me = new Person("Martin")
<Person name="Marcin" />
class Person {
constructor(name){
this.name = name
}
}
//const me = new Person("Marcin")
<Person name="Marcin" />What is instantiate object in JavaScript?
Instantiation refers to the creation of an object. Following that, instantiation patterns refer to the myriad ways to create instances of objects.
source: https://dev.to/mconner89/a-quick-guide-to-instantiation-in-javascript-6n
React Lazy
React.lazy is a function in React that allows you to perform code-splitting in a component-based manner. Introduced in React 16.6, it helps in lazy loading components, which is a technique to split your code into various bundles that can be loaded on demand, instead of loading everything upfront. This is particularly useful for improving the initial load time of large web applications.
How React.lazy Works:
-
Dynamic Imports:
React.lazyworks with dynamic imports in JavaScript. A dynamic import returns a promise that resolves to a module with a default export containing a React component. -
Usage: When a component is exported using
React.lazy, React will automatically load the component when it is first rendered in the UI. Until then, the component's script will not be downloaded
const LazyComponent = React.lazy(() => import('./LazyComponent'));
Integrating with Suspense:
-
React.lazyshould be used in conjunction withSuspensefrom React.Suspenseallows you to specify a loading state (like a spinner or a message) while the lazy-loaded component is being downloaded.
import React, { Suspense } from 'react';

const LazyComponent = React.lazy(() => import('./LazyComponent'));

function MyComponent() {
  return (
    <Suspense fallback={<div>Loading...</div>}>
      <LazyComponent />
    </Suspense>
  );
}
React Hooks
- Hooks let you use state and other React features without writing a class.
- Hooks are a new addition in React 16.8 react.js
- Hooks allow us to hook into React features such as state and lifecycle methods.
source:w3schools.com
Hook Rules
There are 3 rules for hooks:
- Hooks can only be called inside React function components.
- Hooks can only be called at the top level of a component.
- Hooks cannot be conditional.
Note: Hooks will not work in React class components.
Read this for more info about Hooks⬇️
useState
useState is the most basic React Hook. It's used to assign the state to the component and to optionally change the state.
The signature of the hook is a tuple where the first element is the state itself and the second element is the setter function.
const [count, setCount] = useState(0);Each state has its own initial value. It's null by default but we may assign any initial value (It's 0 in the example above).
useState
import React, { useState } from 'react';

function Example() {
  // Declare a new state variable, which we'll call "count"
  const [count, setCount] = useState(0);

  return (
    <div>
      <p>You clicked {count} times</p>
      <button onClick={() => setCount(count + 1)}>
        Click me
      </button>
    </div>
  );
}
Let's keep in mind that each state change makes the component render (return again).
useState
import React, { useState } from 'react';

function Example() {
  // Declare a new state variable, which we'll call "count"
  const [count, setCount] = useState(0);
  const [color, setColor] = useState("blue");

  return (
    <div>
      <p>You clicked {count} times</p>
      <button onClick={() => setCount(count + 1)}>
        Click me
      </button>
      <button
      	style={{background: color}}
		onClick={() => {
        	setColor(prev => prev === "blue" ? "red" : "blue")
            }
        }>
        Click me
      </button>
    </div>
  );
}
Feel free to add as many states as you want.
useState
import React, { useState } from 'react';

function Example() {
  // Declare a new state variable, which we'll call "count"
  const [count, setCount] = useState({count: 0});
  const [color, setColor] = useState("blue");

  return (
    <div>
      <p>You clicked {count} times</p>
      <button onClick={() => setCount(prev => {count: prev.count + 1})}>
        Click me
      </button>

    </div>
  );
}
You may as well create a state which value is scalar – object or array.
useState
//When we don't need the previous value
setCount(10);

//When we want to update state base on it's actual value
setCount(prev => ({count: prev.count + 1}));
Setter function has exactly one argument. It can be function or any other value. In case it's a function you may safely reference the actual state and modify it.
useEffect
import React, { useState, useEffect } from 'react';

function Example() {
  const [count, setCount] = useState(0);

  useEffect(() => {
    // Update the document title using the browser API
    document.title = `You clicked ${count} times`;
  });

  return (
    <div>
      <p>You clicked {count} times</p>
      <button onClick={() => setCount(count + 1)}>
        Click me
      </button>
    </div>
  );
}
useEffect hook allows you to perform side effects in your components. Some examples of side effects are: fetching data, directly updating the DOM, and timers. useEffect accepts two arguments.
source:https://www.w3schools.com/react
useEffect
  useEffect(() => {
    // Update the document title using the browser API
    document.title = `You clicked ${count} times`;
  });
First argument of the hook is always a callback function. It's says whenever anything changes in the component (props or state) function shall execute.
useEffect
  useEffect(() => {
    const interval = setInterval(() => console.log("I'm still alive"), 1000);

    return () => clearInterval(interval)
  });
In numerous cases you would like to "clean up" after your component. In the example below we have an interval.
Imagine that your component disappeared from UI, the interval would still be functioning. To prevent that we can clean up any intervals, unresolved api call etc. on return. We do so returning the callback with cleanups from the hook.
useEffect
  useEffect(() => {
    console.log("I'm reacting to first render")
  }, []);

  useEffect(() => {
    console.log("I'm reacting to a specific change")
  }, [anyValue]);
As for now our hook has reacted to any state or props change. But we can easily make it react to any particular state or props change. We need to add a second parameter which is an array of values that the hook is supposed to observe. If the array is empty it means that the callback will work just once after the first render.
useEffect
Be careful with useEffect hook. It can be tricky and if you overdo it, it will lead to callback hell (hard to follow and debug sequence of state changes).
Callback Hell is essentially nested callbacks stacked below one another forming a pyramid structure. Every callback depends/waits for the previous callback, thereby making a pyramid structure that affects the readability and maintainability of the code.
source:https://www.geeksforgeeks.org/what-to-understand-callback/
useMemo
useMemo allows us to cache any heavy computations in our components. Each function inside your component would execute on each render.
const memoizedValue = useMemo(() => computeExpensiveValue(a, b), [a, b]);In the example above computeExpensiveValue would execute only if any of a or b changes.
React.memo()
When it comes to memoization, there is one more method worth mentioning. When parent components render all, its children render accordingly even if nothing changes actually inside it. To cache the component and prevent rendering, whenever parent component renders, we may memoize it.
const MyComponent = React.memo(function MyComponent(props) {
  /* render using props */
} /* optional comaparison function (prevProps, nextProps) => { ... } */);
In react memo, it will render only if any of its props changes. The comparison is shallow in this case so we might need a second parameter to compare props.
React.memo()
Do not overuse React.memo – it might me tempting to use it everywhere but comparing props is a procedure that consumes resources as well. Consider if memoization is worth this expense. In numerous cases, memoization would harm your performance not increase it.
useCallback
useCallback is one of the toughest to understand. In fact, on the Internet there are plenty of misleading information about it.
Function is just an object (like everything in JavaScript under the hood). So, while comparing props (for example in React.memo process) any callback sent to the children components would be a different prop and would cause rerendering.
{} === {} // FalsyuseCallback
Thanks to useCallback the callback function will not be recreated on each render. The same as with useMemo it takes the second parameter with the list of dependencies. When those dependencies changes the function is recreated accordingly.
...
const memoizedCallback = useCallback(
  () => {
    doSomething(a, b);
  },
  [a, b],
);

return <Child callback={memoizedCallback} />
...

function Child = React.memo(({callback}) => {
...
})
useRef
With useRef hook we can reference the actual DOM element as we would have done this with methods like document.querySelector. This simply means that ref stays intact of the full component life-cycle and it is mutable.
The common use case is when you want to reference DOM elements imperatively.
function TextInputWithFocusButton() {
  const inputEl = useRef(null);
  const onButtonClick = () => {
    // `current` points to the mounted text input element
    inputEl.current.focus();
  };
  return (
    <>
      <input ref={inputEl} type="text" />
      <button onClick={onButtonClick}>Focus the input</button>
    </>
  );
}
useRef
To access current ref value we use its current attribute.
function TextInputWithFocusButton() {
  const inputEl = useRef(null);
  const onButtonClick = () => {
    // `current` points to the mounted text input element
    inputEl.current.focus();
  };
  return (
    <>
      <input ref={inputEl} type="text" />
      <button onClick={onButtonClick}>Focus the input</button>
    </>
  );
}
useRef
The second important function of refs is its ability to expose DOM elements to third party libraries inside react components. As you know React operates with the boundaries of virtual DOM but most third party libraries don't. One of the most popular examples is the usage of Google Maps in React Component.
const map = new google.maps.Map(
    document.getElementById("map") as HTMLElement, // use ref instead
    {
      zoom: 4,
      center: uluru,
    }
  );
You may as well use event jQuery with ref. Another example: animations with GSAP, sliders ect.
useRef
There is a rare occasion when you might need to listen to the process of attaching and detaching ref to an element in a child component. It can be useful in animations.
In this case you can use the so-called callback ref.
https://reactjs.org/docs/hooks-faq.html#how-can-i-measure-a-dom-node
https://codesandbox.io/s/818zzk8m78
forwardRef
There is an infrequent occurrence when we might need to access the ref of a child component from the parent perspective. It happens with animations and when it comes to small reusable components like button.
const FancyButton = React.forwardRef((props, ref) => (
  <button ref={ref} className="FancyButton">
    {props.children}
  </button>
));

// You can now get a ref directly to the DOM button:
const ref = React.createRef();
// you may now access the ref of a button from parent perspective
// for example ref.current.focus()
<FancyButton ref={ref}>Click me!</FancyButton>;
useReducer
Another pretty useful hook is useReducer. Not that popular but definitely worth mentioning. Basically, it's the same as useState but it allows us to deal with complicated and nested states. It also allows us to carry out complicated mutations of the state.
const [state, dispatch] = useReducer(reducer, initialArg, init);- reducer – a function with two arguments a state and an action.
- initial state
- optional function - is to initiate state in a lazy manner.
useReducer
The most important part is the reducer function. We may conduct complicated mutations of the state there.
An action must have its type and optionally a set of data attached to the action. It's conventionally named payload. In reducer we check the type either with a switch statement or with an if statement and we mutate it accordingly.
function reducer(state, action) {
  switch (action.type) {
    case 'increment':
      return {count: state.count + action.payload};
    case 'decrement':
      return {count: state.count - action.payload};
    case 'reset':
      return init(action.payload);
    default:
      throw new Error();
  }
}
The concept of reducer function is widely used in Redux as well.
useDefferedValue
The useDeferredValue hook is a feature introduced in React 18 as part of its concurrent rendering capabilities. This hook is used to help with performance optimization, especially in scenarios where you have a mix of high-priority updates and low-priority updates in your component.
const deferredValue = useDeferredValue(value);useDefferedValue
-
Purpose: The main purpose of
useDeferredValueis to allow a component to render a "deferred" version of a value during heavy rendering tasks. This means that React can delay updating this part of the UI to prioritize more urgent updates, like input fields or animations, ensuring that these urgent tasks remain responsive. -
How It Works: When you pass a value to
useDeferredValue, React keeps track of both the current and next versions of that value. If the component is busy with high-priority updates, React will render the component with the current (older) value of theuseDeferredValue. Once the high-priority tasks are completed, it will re-render with the updated (newer) value. -
Use Case Example: A common use case is with a search input field and a list of search results. Typing in the search field is a high-priority update (since it needs to feel responsive), while updating the search results can be lower priority. If rendering the search results is resource-intensive, you can use
useDeferredValuefor the search results. This way, the input field stays responsive, and the results update shortly after, without slowing down the typing experience.
useDefferedValue
React's Rendering Strategy: This hook is part of React's strategy to enable the UI to be interactive even when there's a lot of rendering work happening in the background. It's a tool for balancing responsiveness and consistency.
Remember, useDeferredValue is most useful in scenarios where you have expensive rendering operations and you want to keep certain parts of your UI (like input fields) highly responsive. It's a part of the concurrent features in React that allow for a more graceful rendering strategy, particularly in complex applications.
useTransition
The useTransition hook in React is another feature introduced as part of its concurrent mode capabilities. This hook is designed to help manage state transitions in your application, particularly for scenarios where you want to differentiate between urgent updates and transitions that can be delayed without impacting user experience. It's particularly useful in optimizing the rendering of components for a smoother and more responsive interface.
useTransition
Purpose: The main goal of useTransition is to enable your application to remain responsive during complex state transitions. When you have operations that might take a while to complete (like fetching data from an API or rendering a large list), useTransition allows you to keep the UI interactive while these operations are in progress.
How It Works: When you use useTransition, you get two values: isPending and startTransition. The startTransition function is used to mark certain state updates as lower priority, meaning they can be interrupted by more urgent updates (like typing in an input field). The isPending value is a boolean that tells you whether there is a deferred state update in progress.
useTransition
Use Case Example: A common use case is for handling input fields that filter a large list of items. Typing in the input field should feel responsive, so these updates are high priority. However, filtering and re-rendering the list can be computationally expensive and doesn't need to happen immediately for each keystroke. By wrapping the state update for the list filtering in startTransition, you can defer this update, keeping the input field responsive.
useTransition
In your component, you would use startTransition to wrap any state updates or operations that can be deferred. The isPending value can be used to show a loading indicator or some other UI feedback to indicate that a background operation is in progress.
const [isPending, startTransition] = useTransition();

const [input, setInput] = useState('');
const [list, setList] = useState([]);
const [isPending, startTransition] = useTransition();

const updateList = (newInput) => {
  // This update can be deferred
  startTransition(() => {
    setList(filterListBasedOnInput(newInput));
  });
};

const handleInputChange = (e) => {
  setInput(e.target.value);
  updateList(e.target.value);
};
Custom Hooks
A custom Hook doesn’t need to have a specific signature. We can decide what it takes as arguments, and what, if anything, it should return. In other words, it’s just like a normal function. Its name should always start with use so that you can tell at a glance that the rules of Hooks apply to it.
source: Read ⬇️ https://reactjs.org/docs/hooks-custom.html
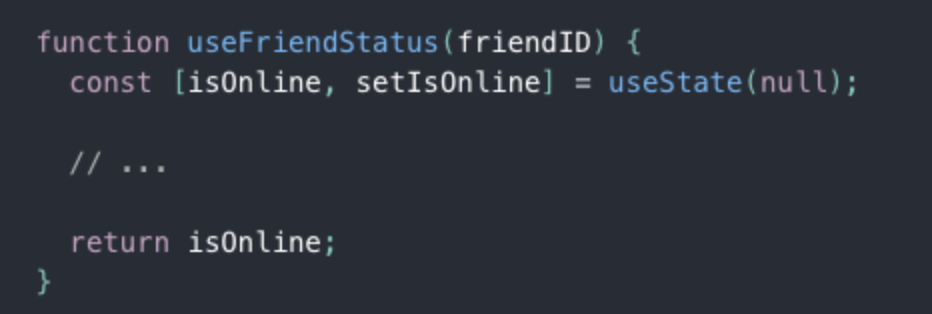
Example:
The purpose of our useFriendStatus Hook is to subscribe us to a friend’s status. This is why it takes friendID as an argument, and returns whether this friend is online:
Custom Hooks offer the flexibility of sharing logic that wasn’t possible in React components before. You can write custom Hooks that cover a wide range of use cases like form handling, animation, declarative subscriptions, timers, and probably many more we haven’t considered. What’s more, you can build Hooks that are just as easy to use as React’s built-in features.
Synthetic Events in React.js
Why do we use synthetic events in ReactJS?
In ReactJS, there are events by which user uses to interact with an application UI. React listens to events at the document level, after receiving events from the browser, React wraps these events with a wrapper that has a similar interface as the local browser event, which helps us to use methods like preventDefault().
Why use such a wrapper?
So, often we use different browsers where the same event has different names. Here wrapper does is triggering all the different names for the same event effect. Therefore, whenever we are triggering an event in a ReactJS, we are not actually trying to trigger the real DOM event, instead, we are using the ReactJS custom event type, which is the synthetic event.
The examples of the synthetic events are onClick(), onBlur() and onChange(). These all are not real DOM events but react synthetic events.
Benefits of using synthetic events:
- Cross browsers applications are easy to implement.
- Synthetic events are that ReactJS reuses these events objects, by pooling them, which increase the performance.
How does it look like?
In the old days of JavaScript we used to attach event to html elements in a inline manner.
<button onclick="myFunction()">Click me</button>With React it's very similar.
As with many other syntax in React we also use the Camel Case here.
<button onClick={(e) => {

    console.log(e.currentTarget);

}}>Click me</button>
Camel Case the use of a capital letter to begin the second word in a compound name or phrase, when it is not separated from the first word by a space: Examples of camel case include "iPod" and "GaGa". https://dictionary.cambridge.org/dictionary/english/camel-case
Synthetic events
There are couple of ways on how to write an event callback.
//Inline
<button onClick={(e) => {

    console.log(e.currentTarget);

}}>Click me</button>

//With a named function
const handleClick = () => console.log(e.currentTarget)

<button onClick={handleClick}>Click me</button>

//With a named function and additional parameters
const handleClick = (e,b) => console.log(e.currentTarget, b)

<button onClick={(e) => handleClick(e, "some value")}>Click me</button>
Events with forms
We need special consideration when it comes to forms. In React we have so called controlled components. In this case it simply means that we store internal state of the form inputs in React state.
Events with forms
const Form = () => {
  const [formState, setFormState] = useState({
    name: "",
    lastName: "",
  });

  return (
    <form onSubmit={e => e.preventDefault()}>
      <input
        value={formState.name}
        onChange={(e) =>
          setFormState({ ...formState, name: e.currentTarget.value })
        }
      />
      <input
        value={formState.lastName}
        onChange={(e) =>
          setFormState({ ...formState, lastName: e.currentTarget.value })
        }
      />
      <button>Send</button>
    </form>
  );
};
Events with forms
- each input keeps its value in the React state
- each input has its onChange method
Events with forms
React provides a unified API for inputs. All of them act the same way.
<textarea value={this.state.value} onChange={this.handleChange} />
//not <textarea>Some text</textarea>

<select value={this.state.value} onChange={this.handleChange}>
	<option value="grapefruit">Grapefruit</option>
</select>
// not
<select>
	<option value="grapefruit">Grapefruit</option>
</select>
Global State Management
What is state management?
It refers to managing the state of one or several user interface control systems like that of radio controls, action buttons, input fields, etc. It is a programming technique for User Interface in which the state of a single UI control completely or partially depends on the state of all the other UI controls.
source: https://www.simplilearn.com/tutorials/asp-dot-net-tutorial/state-management-in-asp-net
Global state is the data we manage across multiple components. Global state is necessary when we want to get and update data anywhere in our app, or in multiple components at least. A common example of global state is authenticated user state.
source: https://www.freecodecamp.org/news/how-to-manage-state-in-your-react-apps/
Flux Architecture
React Context API
Redux
Flux Architecture
One of the more common design patterns is called the MVC design pattern, which stands for model, view, controller. This pattern organizes your code into three boxes:
- The raw data that will be the model of your application
- The logic that takes that raw data and turns into functions that will control the state of the application
- The user interface where your client will interact with and view the application
As applications scale, the MVC data flow can become more of a problem because MVC applications have data that can move in multiple directions, creating two-way data flows. Code is difficult to maintain. If we want to iterate on problems quickly, this way of writing the code is not going to work.
Facebook solved this problem with the creation of the Flux Architecture.
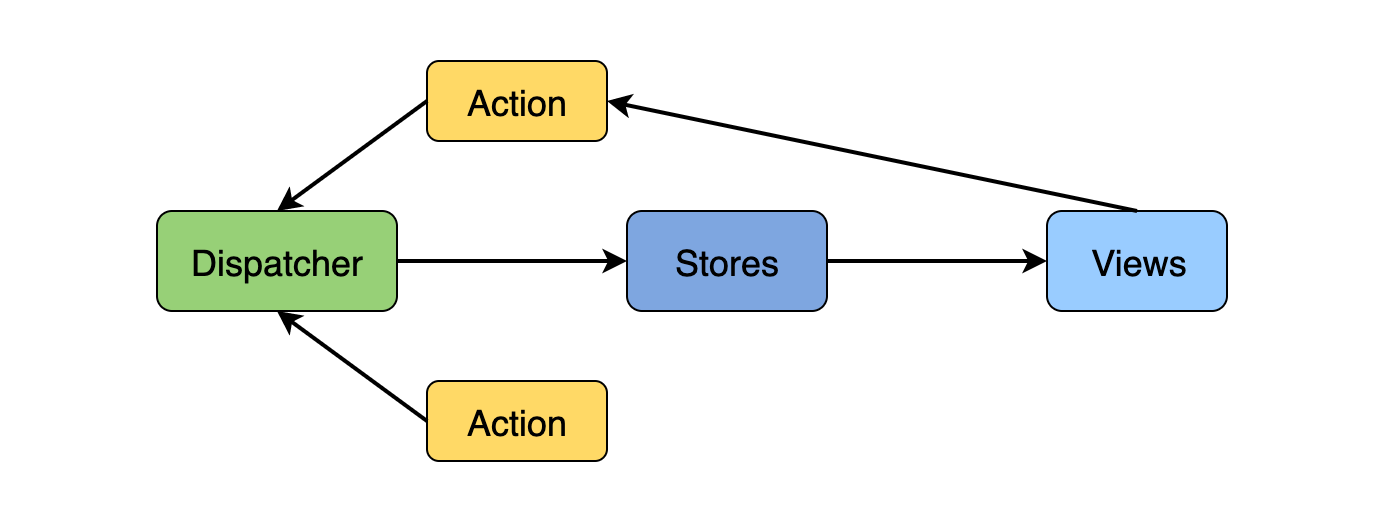
Flux Architecture – a design pattern that only allows data to flow in one direction while working in conjunction with React to only update a web page when the state of a component changes.
Parts of the Flux Architecture
The Facebook Chat problem
React Context API
What is Context API?
The React Context API is a way for a React app to effectively produce global variables that can be passed around. This is the alternative to "prop drilling" or moving props from grandparent to child to parent, and so on. Context is also touted as an easier, lighter approach to state management using Redux.
Context API is a (kind of) new feature added in version 16.3 of React that allows one to share state across the entire app (or part of it) lightly and with ease.
source: https://www.loginradius.com/blog/engineering/react-context-api/
Read: https://reactjs.org/docs/context.html#api
What is React 16 context API and why should you care?
Context is designed to share data that can be considered “global” for a tree of React Components.
It sits next to React to props and state.
In other words, Context provides a way to pass data through the component tree without having to pass props down manually at every level.
https://ipraveen.medium.com/react-basic-how-react-16-context-api-work-7257591589fc
React Context
Lets start with context. First of all we need to initialize it.
Create context and pass its initial values. Usually you'd like to export the context cause you'd need it in children components that would come in separate files.
import React from 'react';
export const TestContext = React.createContext({
someState: null,
setSomeState: () => null
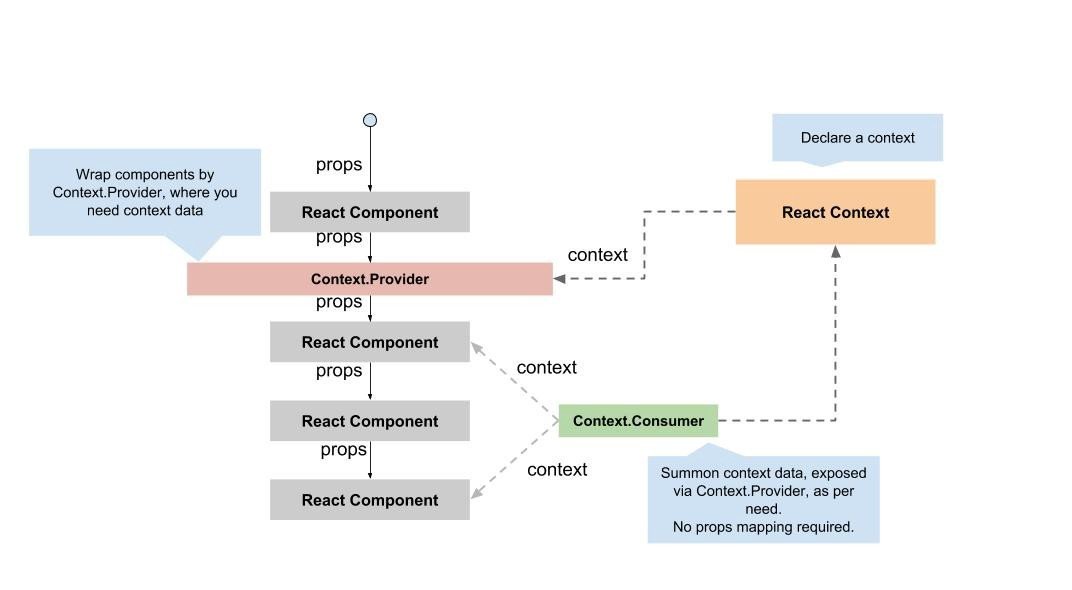
})Context Provider
With ContextProvider you can set up some values that would be available throughout its ancestors. So Child component and its children can access those values.
Whats more? Because we take those values from state each ancestor may as well modify the state.
const SomeComponent = () => {
    const [someState, setSomeState] = useState([])

    return <TestContext.Provider value={{someState, setSomeState}}>
        <Child />
    </TestContext.Provider>
}
Context Consumer
Then we may access the context from within child component with Consumer
const Child = () => {
  return (
    <TestContext.Consumer>
      {({ someState, setSomeState }) => {
        return (
          <>
            <h1
              onClick={() => {
                setSomeState("Hello world!!!");
              }}
            >
              {someState}
            </h1>
          </>
        );
      }}
    </TestContext.Consumer>
  );
};
Context Consumer
And the same with slightly more concise hook syntax.
const Child = () => {
  const { someState, setSomeState } = useContext(TestContext);
  return (
    <>
      <h1
        onClick={() => {
          setSomeState("Hello world!!!");
        }}
      >
        {someState}
      </h1>
    </>
  );
};
Redux Architecture
Redux is a library that acts as a state container and helps to manage your application data flow. It is similar to Flux architecture and has a lot in common with it.
The Redux Architecture takes what we already know about the Flux Architecture and expands it so it is more efficient for grander, more complex applications.
The two biggest improvements that Redux offers is one store that is accessible and subscriptable to all React components, and a reducer inside that store that will determine the changes to your application’s state.
Much of the architecture to Redux is very similar to that of Flux Architecture.

Parts of the Redux Architecture
One Store to Hold State
When we think about the Flux Architecture and how it works, we know it has a unidirectional data flow. We tend to think of our React applications in terms of parent-child relationships. What if we had a child component that said, for instance, needed to talk to a cousin?
If using Flux Architecture, the state would be lifted up to both components’ nearest common ancestor. This gets to be a bit complex when that nearest common ancestor is five generations back. This can lead to a problem called props drilling and makes your code a bit less readable. This is where Redux comes in.
https://www.educative.io/blog/react-design-patterns-best-practices#flux
Redux
Redux usually comes with React but in fact it's completely independent and can as well work standalone or with other libraries. Lets examine the React usage of React.
We have a useful wrapper for redux here. Its called react-redux.
https://www.educative.io/blog/react-design-patterns-best-practices#flux
Redux
react-redux proposes the Provider component. It suppose to be at the very top of React node tree.
import React from 'react'
import ReactDOM from 'react-dom'
import { Provider } from 'react-redux'

import App from './App'
import store from './store'

ReactDOM.render(
  // Render a `<Provider>` around the entire `<App>`,
  // and pass the Redux store to as a prop
  <React.StrictMode>
    <Provider store={store}>
      <App />
    </Provider>
  </React.StrictMode>,
  document.getElementById('root')
)
Redux
Historicly store is a combination of reducers. Reducer is a special immutable function responsible for state mutation.
// Create a "reducer" function that determines what the new state
// should be when something happens in the app
function counterReducer(state = initialState, action) {
  // Reducers usually look at the type of action that happened
  // to decide how to update the state
  switch (action.type) {
    case 'counter/incremented':
      return { ...state, value: state.value + 1 }
    case 'counter/decremented':
      return { ...state, value: state.value - 1 }
    default:
      // If the reducer doesn't care about this action type,
      // return the existing state unchanged
      return state
  }
}

// Create a new Redux store with the `createStore` function,
// and use the `counterReducer` for the update logic
const store = Redux.createStore(counterReducer)
Redux
Since the last major version Redux promotes slightly different approach – the usage of @reduxjs/toolkit
import { configureStore, ThunkAction, Action } from '@reduxjs/toolkit';
import counterReducer from '../features/counter/counterSlice';

export const store = configureStore({
  reducer: {
    counter: counterReducer,
    // clients: clientsReducer
    // bankBalance: bankBalanceReducer
  },
});

export type AppDispatch = typeof store.dispatch;
export type RootState = ReturnType<typeof store.getState>;
export type AppThunk<ReturnType = void> = ThunkAction<
  ReturnType,
  RootState,
  unknown,
  Action<string>
>;
Redux
With toolkit you woild configureStore and use so called slices instead of reducers.
import { configureStore, ThunkAction, Action } from '@reduxjs/toolkit';
import counterReducer from '../features/counter/counterSlice';

export const store = configureStore({
  reducer: {
    counter: counterReducer,
    // clients: clientsReducer
    // bankBalance: bankBalanceReducer
  },
});

export type AppDispatch = typeof store.dispatch;
export type RootState = ReturnType<typeof store.getState>;
export type AppThunk<ReturnType = void> = ThunkAction<
  ReturnType,
  RootState,
  unknown,
  Action<string>
>;
import { createAsyncThunk, createSlice, PayloadAction } from '@reduxjs/toolkit';
import { RootState, AppThunk } from '../../app/store';
import { fetchCount } from './counterAPI';
export const counterSlice = createSlice({
name: 'counter',
initialState,
reducers: {
increment: (state) => {
state.value += 1;
},
decrement: (state) => {
state.value -= 1;
},
incrementByAmount: (state, action: PayloadAction<number>) => {
state.value += action.payload;
},
},
});
export const { increment, decrement, incrementByAmount } = counterSlice.actions;
export const selectCount = (state: RootState) => state.counter.value;
export default counterSlice.reducer;const data = useSelector(state => state.counter)
const dispatch = useDispatch()
// dispatch({type: "increment"})Redux
We can access redux store with two handy hooks. useSelector to select the state and useDispatch to dispatch an action.
The End of React.js Course.
See you on the next one! 😉 ➡️
Microfrontends – Day 1
By noinputsignal


