


Juan Romero-Luis
Science Communication & UX Researcher
Teacher Juan Romero Luis
Feb 29, 2024
Unit 4
bit.ly/BWD23U4
N
bit.ly/BWD23U4
Is CSS a programming language?
CSS, or Cascading Style Sheets, is not a programming language, but a style sheet language used for describing the look and formatting of a document written in HTML.
p {

color: red;

}
Selector
Property
Property value
Declaration
p {
color: blue;
line-height: 1.5;
font-size: 14px;
}h1, h2, h3 {
color: purple;
text-align: center;
}<p style="color: red;">This is an example of inline CSS.</p>
p {
color: red;
}
page.html
<!DOCTYPE html>
<html>
	<head>
	  <style>
	    p {
	      color: red;
	    }
	  </style>
	</head>
	<body>
    <!-- The content of the document... -->
	</body>
</html>
page.html
<!DOCTYPE html>
<html>
	<head>
	   <link rel="stylesheet" type="text/css" href="styles.css">
	</head>
	<body>
	   <!-- The content of the document... -->
	</body>
</html>
page.html
p {
  color: red;
}
styles.css
🎯 Step by step activity. Be quite and pay attention to your teacher.
<!DOCTYPE html>
<html>

<head>
    <title>HTML page to practice CSS</title>
    <meta name="description" content="This is a web to be used as a template for students to practices CSS.">
    <meta name="author" content="Your awesome teacher.">
    <meta name="copyright" content="This has no rights dude!" />
</head>

<body>
    <h1>This is a Heading</h1>
    <p>Lorem ipsum dolor sit amet, consectetur adipiscing elit. Nam quis quam arcu. Phasellus libero leo, congue nec consectetur non, gravida vel est. <span>Ut venenatis augue vitae eros interdum, non placerat risus gravida uisque mollis ligula non libero suscipit semper.</span> Suspendisse finibus elementum quam viverra lobortis. Vivamus vel mi acortor vestibulum tristique a id ipsum. Suspendisse euismod tortor id sem euismod dignissim. Ut et lectus at metus <strong>pharetra condimentum vel in nisl.</strong> Nullam eu varius massa. Aenean viverra sollicitudin magna a iaculis. Nunc sollicitudin urna eget lacus ullamcorper porttitor. Etiam et magna magna. Phasellus ut tempor diam. Suspendisse at sem et dui congue porta.</p>
    <ul>
        <li>Item 1</li>
        <li>Item 2
            <ul>
                <li>Subitem 2.1</li>
                <li>Subitem 2.2
                    <ul>
                        <li>Subitem 2.2.1</li>
                        <li>Subitem 2.2.2</li>
                    </ul>
                </li>
            </ul>
        </li>
        <li>Item 3
            <ol>
                <li>Subitem 3.1</li>
                <li>Subitem 3.2
                    <ol>
                        <li>Subitem 3.2.1</li>
                        <li>Subitem 3.2.2</li>
                    </ol>
                </li>
            </ol>
        </li>
        <li>Item 4
            <ul>
                <li>Subitem 4.1</li>
                <li>Subitem 4.2</li>
            </ul>
        </li>
    </ul>
    <div>
        <h2>This is a sub-heading inside a div</h2>
        <p>In vel elit risus. Phasellus sodales risus eget lacus consectetur, a laoreet nulla tincidunt. <a href="https://www.example.com" target="_blank">Orci varius natoque penatibus</a> et magnis dis parturient montes, nascetur ridiculus mus. <i>Phasellus fringilla rutrum elit rutrum aliquam.</i></p>
        <quote>Phasellus fringilla rutrum elit rutrum aliquam. Sed molestie nunc volutpat convallis consequat. Maecenas ut nisi lobortis, placerat lacus non, semper velit. Vestibulum tempor elit nec lorem dignissim vulputate. </quote>
				<p>Sed molestie nunc volutpat convallis consequat. Maecenas ut nisi lobortis, placerat lacus non, semper velit. Vestibulum tempor elit nec lorem <i>dignissim vulputate.</i> Nullam arcu diam, sollicitudin vel nisi non, scelerisque vulputate nulla.</p>
    </div>
</body>

</html>
Teacher Juan Romero Luis
Mar 6, 2024
Unit 4
bit.ly/BWD23U4
bit.ly/BWD23U4
/* This is a comment */
  p
   {
    color: red;
} <!DOCTYPE html> <html> <head> <title>My First Website</title> </head> <body> <h1>Welcome to my website!</h1> <p>This is a paragraph.</p> </body> </html>
<html> element is the root of the tree.<head> and <body> elements are children of the <html> element.<title> element is a child of the <head> element and grandchild of <html>.<h1> and <p> elements are children of the <body> element and grandchildren of <html>.
bit.ly/BWD23U4
p {
color: blue;
line-height: 1.5;
font-size: 14px;
}
h1, div, quote {
text-align: center;
}This selector is used to select a group of elements that have a specific class attribute.
<!DOCTYPE html>
<html>
	<head>
	   <link rel="stylesheet" type="text/css" href="styles.css">
	</head>
	<body>
		<p class="name-class">This is a paragraph.</p>
		<blockquote class="name-class"> This is a blockquote. </blockquote>
	</body>
</html>
page.html
.name-class {
  color: red;
}
styles.css
<!DOCTYPE html>
<html>
	<head>
	   <link rel="stylesheet" type="text/css" href="styles.css">
	</head>
	<body>
		<p class="name-class">This is a paragraph.</p>
		<blockquote class="name-class"> This is a blockquote. </blockquote>
	</body>
</html>
page.html
p.name-class {
  color: red;
}
styles.css
This selector is used to select a specific element with a certain ID.
<!DOCTYPE html>
<html>
	<head>
	   <link rel="stylesheet" type="text/css" href="styles.css">
	</head>
	<body>
    	<h1 id="name-id"> Title </h1>
		<p class="name-class">This is a paragraph.</p>
		<blockquote class="name-class"> This is a blockquote. </blockquote>
	</body>
</html>
#name-id {
  text-align: center;
}
styles.css
page.html
It is used to select elements with certain attributes or attribute values.
<!DOCTYPE html>
<html>
	<head>
	   <link rel="stylesheet" type="text/css" href="styles.css">
	</head>
	<body>
		<p>This is a<a href="https://www.facebook.com" target="_blank"> link.</a></p>
	</body>
</html>
a[target="_blank"], a[href="https://example.com"]
	{
 	 background-color: lightgray;
	}
styles.css
page.html
📝 Deliverable Up4.1 Practicing classes and id selectors
Create an HTML document and past the HTML content included in the first box.
Create aa CSS in the route you want and paste the content in the second box.
Follow the instructions in the CSS document and include your CSS in the right place (after the corresponding comment).
Use the following cheatsheet to know which declarations you need to include. If you do not find the declaration use Google to find the right declaration.
<DOCTYPE html>
<html>
  <head>
    <meta charset="UTF-8">
    <title>Selectors Exercise</title>
    <link rel="stylesheet" type="text/css" href="my-folder/selectors.css">
  </head>

  <body>
    <h1 id="my-first-id">Selectors Exercise</h1>

    <p><span>This is a standalone paragraph within the body.</span> Nullam finibus nisl at nulla dictum mattis. Vestibulum elementum varius dictum. Ut elementum mi dolor, in fermentum erat tristique vel. Integer pulvinar nunc sit amet vehicula semper. Ut a libero dictum, placerat neque ultrices, vulputate nisl. Praesent in gravida orci, ac maximus nisl. Suspendisse sit amet aliquet sem.</p>

    <div>
      <p class="my-first-class"><span><strong>I am a paragraph with a class within a div.</strong></span> Maecenas et libero in nibh pretium pharetra non ut arcu. Curabitur ante dui, iaculis in egestas at, suscipit non nunc. Aenean egestas, odio quis ultricies vehicula, nunc dui tristique nisl, ac luctus massa turpis eget tellus. <a href="https://udit.es" terget="_blank" alt="This is the link description">Class aptent taciti</a> sociosqu ad litora torquent per conubia nostra, per inceptos himenaeos. Proin vestibulum purus et ante auctor, a dignissim urna mattis. Curabitur tincidunt tellus libero, vitae dapibus velit dapibus quis. Cras ornare neque orci, eu elementum sem vehicula nec
</p>
			<div>
				<p class="my-first-class">This is paragrag within a second div. </p>
			</div>
      <p><span>I am a paragraph with an ID within a div.</span> In volutpat dui sapien, id faucibus neque pulvinar quis. Nullam finibus nisl at nulla dictum mattis. Vestibulum elementum varius dictum. Ut elementum mi dolor, in fermentum erat tristique vel. Integer pulvinar nunc sit amet vehicula semper. Ut a libero dictum, placerat neque ultrices, vulputate nisl. <span class="my-first-class">Praesent in gravida orci</span>, ac maximus nisl. Suspendisse sit amet aliquet sem. Aenean vitae lorem mauris. Ut mattis maximus ante, quis interdum tellus bibendum ac. Donec dictum quis purus eu porttitor. Curabitur sollicitudin risus ac tincidunt pulvinar. </p>
      <h2>This is a subheading</h2>
      <p>This is a paragraph within a div.</p>
    </div>

    <div class="my-second-class">
      <h2>Tasks</h2>
      <ul>
        <li>Walk Dog <input type="checkbox" checked></li>
        <li>Feed Dog <input type="checkbox" checked></li>
        <li>Wash Dog <input type="checkbox"></li>
      </ul>
    </div>

    <div>
      <h2 id="my-second-id">This is another subheading</h2>
      <p>This is another paragraph within a div. Ut elementum mi dolor, in fermentum erat tristique vel. Integer pulvinar nunc sit amet vehicula semper. Ut a libero dictum, placerat neque ultrices, vulputate nisl. Praesent in gravida orci, ac maximus nisl. Suspendisse sit amet aliquet sem.</p>
      <p><span>I'm the second paragraph inside this div!</span> Integer pulvinar nunc sit amet vehicula semper. Ut a libero dictum, placerat neque ultrices, vulputate nisl. Praesent in gravida orci, ac maximus nisl.</p>
    </div>

    <p><span>This is another standalone paragraph.</span> Integer pulvinar nunc sit amet vehicula semper. Ut a libero dictum, placerat neque ultrices, vulputate nisl. <span class="my-first-class">Praesent<span> in gravida orci, ac maximus nisl.</p>

    <div>
      <h2 id="my-third-id">Another less awesome h2</h2>
      <p><span>This is yet another paragraph within a div.</span> Curabitur ante dui, iaculis in egestas at, suscipit non nunc. Aenean egestas, odio quis ultricies vehicula, nunc dui tristique nisl, ac luctus massa turpis eget tellus. Class aptent taciti sociosqu ad litora torquent per conubia nostra, per inceptos himenaeos. <span class="my-first-class">Proin</span> vestibulum purus et ante auctor, a dignissim urna mattis. Curabitur tincidunt tellus libero, vitae dapibus velit dapibus quis. Cras ornare neque orci, eu elementum sem vehicula nec.</p>
      <p>One last paragraph here! Nulla iaculis, lorem vel auctor scelerisque, ante risus porttitor leo, ut sollicitudin turpis ex eu nunc. In <a href="https://www.facebook.com">aliquet maximus consequat</a>. Suspendisse eu laoreet mi. Sed ligula velit, iaculis at consequat et, pulvinar quis tortor. </p>
      <a href="https://www.facebook.com">Another link to Facebook</a>
    </div>

    <p>Yet another standalone paragraph at the end.</p>
  </body>

</html>
/*DO NOT MAKE CHANGES IN THE HTML DOCUMENT. WORK IN THIS CSS DOCUMENT */
/* Give the <body> element a background color of #bdc3c7 */


/* Make both <h1> and <h2> elements a color of your choice */


/* Make all <h2> elements underlined */


/* Transform the text of the element that contains 'my-first-id' into uppercase*/


/* Make all <li> elements blue (pick your own hexadecimal blue)*/


/* Give everything with the class 'my-first-class' a specific font size*/


/* Give paragraphs with the class 'my-first-class' a background color*/


/* Change the background color on paragraphs that have id 'my-first-id' */


/* Give all span elements a dark background color of your choice */


/* Give all span elements a light text color */


/* Give the span with 'my-first-class' class a different background color */


/** BONUS CHALLENGES **/
/* Give the element with id 'my-first-id' a 2px solid blue border (pick your own rgb blue) */


/* Make all inputs have a 3px red border */


/* Try to apply a CSS declaration to links that point to the Facebook page using the attribute selector*/
Teacher Juan Romero Luis
Mar 7, 2024
Unit 4
bit.ly/BWD23U4
bit.ly/BWD23U4
QU4.1
Review about the basics of CSS selector:pseudo-class
{
property: value;
} Pseudo-classes in CSS are used to define a special state of an element.
a:link {
  color: blue;
}
is used to select links that the user has not yet visited.
a:visited {
  color: purple;
}
is used to select links that the user has already visited.
div:hover {
  color: red;
}
is used to select an element when the user's pointer is over it.
a:hover {
  color: purple;
}
button:hover {
  color: purple;
}
is used to select an element at the moment it is being activated
(like when a button is being clicked).
button:active {
  background-color: green;
}
is used to select an element when it has focus. This is often used to add special styles to form elements when they are being interacted with by the user.
input:focus {
  border: 2px solid blue;
}
is used to select the first child element inside a parent element.
ul li:first-child {
  color: red;
}
p i:first-child {
  color: blue;
}
is used to select the last child element inside a parent element.
ul li:last-child {
  color: green;
}
p i:last-child {
  color: blue;
}
📝 Deliverable Up4.2: Practicing pseudo-classes
Create a new HTML document and paste the first-box HTML code into it.
Create a CSS document and create a link to it in the HTML document. Then paste second-box content into it.
Now, follow the instruction given in the CSS document.
body {
	background-color: #ea6153;
}

section {
	position: absolute;
	top: 50%;
	left: 50%;
	transform: translate(-50%, -50%);
}

div {
	width: 100px;
	height: 100px;
	float: left;
	color: white;
	font-family: sans-serif;
	text-align: center;
	box-sizing: border-box;
	padding-top: 40px;
	margin-right: 20px;
	margin-bottom: 20px;
	border: 2px solid white;
}

/* Use the first-child pseudo-class to turn the first box purple ONLY*/

/* Use the hover pseudo-class to turn the second box black when hovered over */

/* Change the color of the third box and change the active state of the third box by introducing a shadow */

/* Turn the last box's background color pink when clicking on it */

/** EXTRA BONUS **/
/* Create 4 more boxes (you need to modify the HTML for this) and include a gradient background for each of them */

/* Change the opacity when hovered over in all four new boxes */

/* Change the active state to your boxes. Choose the behavior yourself */
<!DOCTYPE html>
  <html>
    <head>
      <meta charset="UTF-8" />
      <title>Selectors Exercise</title>
      <link rel="stylesheet" typ="text/css" href="my-folder/selectors.css" />
    </head>
    <body>
      <section>
        <div>First child</div>
        <div class="boxy">Hover</div>
        <div class="boxy2">Nth-of-type</div>
        <a href="#"><div>Last child</div></a>
      </section>
    </body>
  </html>
Click for tips
Tips for this activity:
:link : This pseudo-class is used to select links that the user has not yet visited.:visited : This is used to select links that the user has already visited.
:hover : This pseudo-class is used to select an element when the user's pointer is over it. This can also be used on div.
:active : This is used to select an element at the moment it is being activated (like when a button is being clicked).
:focus : This is used to select an element when it has focus. This is often used to add special styles to form elements when they are being interacted with by the user.
:first-child : This is used to select the first child element inside a parent element.
:last-child : This is used to select the last child element inside a parent element.
Teacher Juan Romero Luis
Mar 13, 2024
Unit 4
bit.ly/BWD23U4
bit.ly/BWD23U4
Review QU4.2
Review elements, id, class and pseudo-classes.wtf { color: red; }
p {
  color: red;
}
#wtf {
  color: red;
}
a:hover {
  color: red;
}
  selector::pseudo-element
   {
    property: value;
   }
Pseudo-elements in CSS are used to style certain parts of an element.
p::first-line {
  color: blue;
  text-transform: uppercase;
}
is used to style the first line of a block-level element.
p::first-letter {
  color: red;
  font-size: 40px;
}
is used to style the first letter of a block-level element.
p::before {
  content: "Read this - ";
  color: green;
}
are used to insert content before or after an element's content.
p::after {
  content: " - Thank you!";
  color: green;
}
p::selection {
  background: yellow;
  color: black;
}
is used to style a section of an element that has been selected by a user.
li::marker {
  color: green;
  content: "> ";
}
is used to style the bullet points in a list.
📝 Deliverable Up4.2: Practicing pseudo-classes
Create a new HTML document, create the basic document structure and paste first-box HTML code into the body.
Create a CSS document and create a link to it in the HTML document. Then paste second-box content into it.
Now, follow the instruction given in the CSS document.
body {
  padding: 50px;
  font-family: arial;
}

section {
  display: flex;
  flex-direction: row;
  flex-wrap: wrap;
  align-items: stretch;
  justify-content: space-between;
}

.boxy1, .boxy2, .boxy3 {
  border: 1px solid #ccc;
  padding: 10px;
  margin: 0 5px 10px 5px;
  flex: 1;
}

img {
  max-width: 100%;
}

h3 {
  margin: 25px 0;
  font-weight: 700;
}

p {
  line-height: 1.5em;
}

@media only screen and (max-width: 700px) {
  section {
    flex-direction: column;
  }
}

/* Before every paragraph insert the name of the author for example "Juan Romero Luis -" Make it look different from the rest of the text */


/* Insert a day of the week (Monday, Tuesday, Wednesday) starting with "|" sign, after every h3. Try to use a different one for every heading*/


/* Change the color when selecting text in paragraphs, and a different one when selecting h3 text */

/* Change the size of the first letter of eache paragraph */


/*BONUS CHALLENGES - Let's continue practicing the different types of selectors for CSS */
/* Change the background color to one that you like. Use HEX to insert the color. */


/* Change the border color PAY ATTENTION: border color might be already in the CSS document*/


/* Change the hover state of all div: include a background color */


/* Change the hover state of images: make them a bit transparent */


/* Add three different links to all three images in the HTML document */
<section>
  <div class="boxy1">
    <img src="https://images.pexels.com/photos/1719490/pexels-photo-1719490.jpeg" alt="Airport" />
      <h3>Arrivals</h3>
      <p>Lorem ipsum dolor sit amet, consectetur adipiscing elit. Phasellus congue, quam a pretium pellentesque, est nunc ornare nulla, nec imperdiet libero velit ut quam. Nulla leo purus, interdum molestie arcu sed, interdum accumsan odio. Class aptent taciti sociosqu ad litora torquent per conubia nostra, per inceptos himenaeos. Cras mollis, sapien et mattis malesuada, mauris felis dictum arcu, in condimentum nulla lorem eget sapien. Nulla dictum erat quis fermentum pulvinar. Donec at ex nulla. Phasellus eu velit tincidunt, bibendum metus sit amet, consectetur diam. Vestibulum tellus libero, mattis vitae scelerisque ullamcorper, egestas vitae libero. Nullam consequat luctus sodales. Orci varius natoque penatibus et magnis dis parturient montes, nascetur ridiculus mus. Sed fermentum sem nec orci gravida interdum. Duis quis mauris vulputate, pellentesque dolor vitae, commodo arcu.
</p>
    </div>
  <div class="boxy2">
    <img src="https://images.pexels.com/photos/175656/pexels-photo-175656.jpeg?auto=compress&cs=tinysrgb&w=1260&h=750&dpr=1" alt="Airplain" />
    <h3>Airplain</h3>
    <p>Ut ut commodo nulla. Vestibulum sit amet enim et justo condimentum tristique. Etiam laoreet varius nulla a luctus. Praesent non magna ac libero consequat molestie vitae mattis tellus. Proin finibus, sem ac ornare lobortis, odio augue sodales quam, a scelerisque metus libero laoreet nulla. Pellentesque auctor ac purus ac tincidunt. Vivamus sit amet augue tincidunt, pellentesque mi vitae, consequat erat. Vivamus elementum auctor massa in gravida. Phasellus mollis, dolor sed tempor dapibus, libero urna cursus leo, quis suscipit magna ligula vel quam. Mauris lacus dui, rhoncus at venenatis in, vulputate dictum eros. Vestibulum vitae tellus feugiat, vehicula libero ac, fermentum erat. Etiam sollicitudin vestibulum elit, a tempus metus commodo eu. Pellentesque pretium eros sed lorem lobortis, suscipit semper nibh elementum. Donec ultricies mi id arcu egestas tempor a sit amet quam.</p>
    </div>
  <div class="boxy3">
    <img src="https://images.pexels.com/photos/842991/pexels-photo-842991.jpeg?auto=compress&cs=tinysrgb&w=1260&h=750&dpr=1" alt="A person waiting" />
    <h3>The wait</h3>
    <p> Cras sit amet porttitor leo. Aliquam erat sem, mattis non ornare ut, volutpat quis lectus. In hac habitasse platea dictumst. Nullam at suscipit massa, vehicula scelerisque lectus. Vivamus rhoncus sem eu velit convallis tempor. Maecenas commodo condimentum erat vel tempus. Phasellus quam mi, commodo ac turpis at, blandit congue sapien. Mauris id ante id urna varius blandit. Vestibulum lacinia euismod erat, ac tincidunt libero malesuada ac. Vivamus finibus dui nec metus viverra posuere.

Pellentesque tristique, justo at mattis lobortis, felis mi auctor urna, et dictum risus turpis vel leo. Aenean at fringilla ipsum, eget interdum lorem. Sed nec consequat tellus. Curabitur accumsan maximus molestie. In metus sapien, pulvinar at rutrum id, accumsan eu erat. Etiam in tortor auctor purus interdum interdum sit amet ac diam.</p>
  </div>
</section>
Click for tips
Tips for this activity:
::first-line: This pseudo-element is used to style the first line of a block-level element.::first-letter: This pseudo-element is used to style the first letter of a block-level element.:hover : This pseudo-class is used to select an element when the user's pointer is over it. This can also be used on div.::before & ::after: These pseudo-elements are used to insert content before or after an element's content.
::selection: This pseudo-element is used to style a section of an element that has been selected by a user.
::marker: This pseudo-element is used to style the bullet points in a list.
Remember that you can use any cheetsheet you find on the web, like this one, or this one.
Teacher Juan Romero Luis
Mar 14, 2024
Unit 4
bit.ly/BWD23U4
bit.ly/BWD23U4
Review QU4.3.
Review Pseudo-elements and morebit.ly/BWD23U4
is used to select elements that are descendants of a specific element.
div p {
  color: blue;
}
is used to select elements that are direct children of a specific element.
div > p {
  color: green;
}
is used to select an element that is the immediate sibling following another element.
p + p {
  color: green;
}
🎯 Activity: Understanding Combinators
<!DOCTYPE html>
<html lang="en-US">
  <head>
    <link type="text/css" rel="stylesheet" href="styles.css" />
  </head>
  <body>
    <h2>Practicing combinators in CSS</h2>
    <div id="parent1">
      <p>Parent's first child (paragraph)</p>
      <div id="child1">
        <p>Child's first child (paragraph)</p>
        <p>Child's second child (paragraph)</p>
      </div>
      <p>Parent's third child (paragraph)</p>
    </div>
    <div id="parent2">
      <p>Parent's first child (paragraph)</p>
      <div id="child2">
        <p>Child's first child (paragraph)</p>
        <p>Child's second child (paragraph)</p>
      </div>
      <p>Parent's third child (paragraph)</p>
    </div>
    <div id="parent3">
      <p>Parent's first child (paragraph)</p>
      <div id="child3">
        <p>Child's first child (paragraph)</p>
        <p>Child's second child (paragraph)</p>
      </div>
      <p>Parent's third child (paragraph)</p>
    </div>
  </body>
</html>
div {
	padding: 5px;
	margin: 10px;
	border: 1px solid blue;
  }

/* Make all paragraphs inside the #parent1 div have the color blue. Using descendant combinator */


/* Make all paragraphs that are direct descendant of the #parent2 div have the color red. Using child combinator*/


/* Make the paragraph that is the immediate sibling of the #child3 div have the color orange. Using cext-sibling combinator*/
Teacher Juan Romero Luis
Mar 20, 2024
Unit 4
bit.ly/BWD23U4
bit.ly/BWD23U4
Review QU4.4.
Review about combinators in CSSis a scoring system that determines which style rules are applied to an element when there is a conflict between CSS rules. Each type of selector has a different point value:
Universal selectors (*)
Regular elements (HTML), or pseudo-elements
Inline styles
Classes, pseudo-classes, or attributes
!important rule
ID selectors
In terms of CSS imports, the following order is applied:
Inline stye
Internal style
External style
Who is winning?
🎯 Activity: Specificity in CSS
<!DOCTYPE html>
<html lang="en-US">
  <head>
			<link type="text/css" rel="stylesheet" href="styles.css">
  </head>
  <body>
    <div id="content" class="highlight">
      <h1>Hello, world!</h1>
    </div>
  </body>
</html>
Teacher Juan Romero Luis
Mar 21, 2024
Unit 4
bit.ly/BWD23U4
bit.ly/BWD23U4
Review QU4.5.
Review about specificity in CSSContent
Padding
Boroder
Margin
Content
Padding
Boroder
Margin
p {
width: 300px;
height: 200px;
padding: 20px;
border: 20px, solid, white;
margin: 20px;
}
<!DOCTYPE html>
<html lang="en-US">
  <head>
    <style>
      .box {
        width: 200px;
        height: 200px;
        border: 2px solid black;
        margin: 10px;
        padding: 20px;
        text-align: center;
      }
    </style>
  </head>
  <body>
    <div class="box">This is a box.</div>
  </body>
</html>
🎯 Step by step activity. Be quite and pay attention to your teacher.
Shortcut
div {
  padding-top: 50px;
  padding-right: 30px;
  padding-bottom: 50px;
  padding-left: 80px;
}
Regular
div {
  padding: 25px 50px 75px 100px;
}
Shortcut
div {
  margin-top: 20px;
  margin-right: 30px;
  margin-bottom: 20px;
  margin-left: 30px;
}
Regular
div {
  margin: 20px 30px 20px 30px;
}
📝 Deliverable Up4.4: Practicing box model with a form
Create an HTML document and paste the first box content in the body section (do not forget to link the CSS). Before you continue, read the HTML code to understand its DOM structure.
Create a CSS document and paste the second box code. Before you continue, read it to understand how the layout is created using the CSS code.
Follow the next steps:
<div class="login-page">
  <div class="form">
    <form class="login-form">
      <input type="text" placeholder="username"/>
      <input type="password" placeholder="password"/>
      <button>login</button>
      <p class="message">Not registered? <a href="#">Create an account</a></p>
    </form>
  </div>
</div>
body {
  background: #ffecbd;
}

.login-page {
  width: 360px;
  padding: 8% 0 0;
  margin: auto;
}

.form {
  position: relative;
  z-index: 1;
  background: #FFFFFF;
  max-width: 360px;
  text-align: center;
  box-shadow: 0 0 20px 0 rgba(0, 0, 0, 0.2), 0 5px 5px 0 rgba(0, 0, 0, 0.24);
}
.form input {
  font-family: "Times", serif;
  outline: 0;
  background: #f2f2f2;
  width: 100%;
  border: 0;
  box-sizing: border-box;
  font-size: 14px;
}
.form button {
  font-family: "Times", serif;
  text-transform: uppercase;
  background: #4CAF50;
  border: 0;
  color: #FFFFFF;
  font-size: 14px;
  -webkit-transition: all 0.3 ease;
  transition: all 0.3 ease;
  cursor: pointer;
}
.form button:hover,.form button:active,.form button:focus {
  background: #ffdb00;
  color: #000011;
}
.form .message {
  color: #b3b3b3;
  font-size: 12px;
}

.form .message a {
  color: #4CAF50;
  text-decoration: none;
}
Click if you are bored
If you are bored and have finished, you can try the following steps:
Teacher Juan Romero Luis
Apr 3, 2024
Unit 4
bit.ly/BWD23U4
bit.ly/BWD23U4
Review QU4.6.
Review about the box modelShortcut
div {
  border-width: 5px;
  border-style: solid;
  border-color: red;
}
Regular
div {
  border: 5px solid red;
}
div {
  border-top: 5px solid red;
  border-right: 10px dotted green;
  border-bottom: 5px dashed blue;
  border-left: 10px double purple;
}
div {
    height: 100px;
    width: 50%;
}
|
auto |
The browser calculates the height. This is the default value. |
| length | Defines the height in px, cm, etc. |
| % | Defines the height in percent of the containing block |
| initial | Sets the height to its default value |
| inherit | The height will be inherited from its parent element |
div {
    width: 100%;
    max-width: 900px;
}
| height | Sets the height of an element |
| max-height | Sets the maximum height of an element |
| max-width | Sets the maximum width of an element |
| min-height | Sets the minimum height of an element |
| min-width | Sets the minimum width of an element |
| width | Sets the width of an element |
🎯 Activity: playing with borders
In other words, create this page.
Teacher Juan Romero Luis
Apr 4, 2024
Unit 4
bit.ly/BWD23U4
| cm | centimeters |
| mm | millimeters |
| in | inches (1in = 96px = 2.54cm) |
| px* | pixels (1px = 1/96th of 1in) |
| pt | points (1pt = 1/72 of 1in) |
| pc | picas (1pc = 12 pt) |
*Pixels (px) are relative to the viewing device. On low-dpi devices, 1px represents one device pixel (dot) of the display.
⚠️ Decimal number with period
In absolute lengths, the decimal number is represented by a point, not a comma.
body {
  font-size: 16px;
}

div {
  font-size: 1.5em; /* 24px */
}
unit is relative to the font-size of its closest parent.
body {
  font-size: 16px; /* 1rem = 16px */
}

h1 {
  font-size: 2em; /* 2em = 2x16px = 32px */
}

p {
  font-size: 1em; /* 1em = 1x16px = 16px */
  line-height: 1.5rem; /* 1.5rem = 1.5x16px = 24px */
}
(root em) is also elative to the font-size, but unlike 'em', it's relative to the root, or the html element, not the parent.
div {
  width: 50vw; /* The div will take up 50% of the viewport's width. */
}
unit stands for viewport width. It's a relative unit that represents 1% of the width of the viewport.
⚠️ The viewport
The term 'viewport' refers to the size of the browser window.
div {
  height: 70vh; /* The div will take up 70% of the viewport's height. */
}
unit stands for viewport height. Similar to 'vw', it's a relative unit that represents 1% of the height of the viewport.
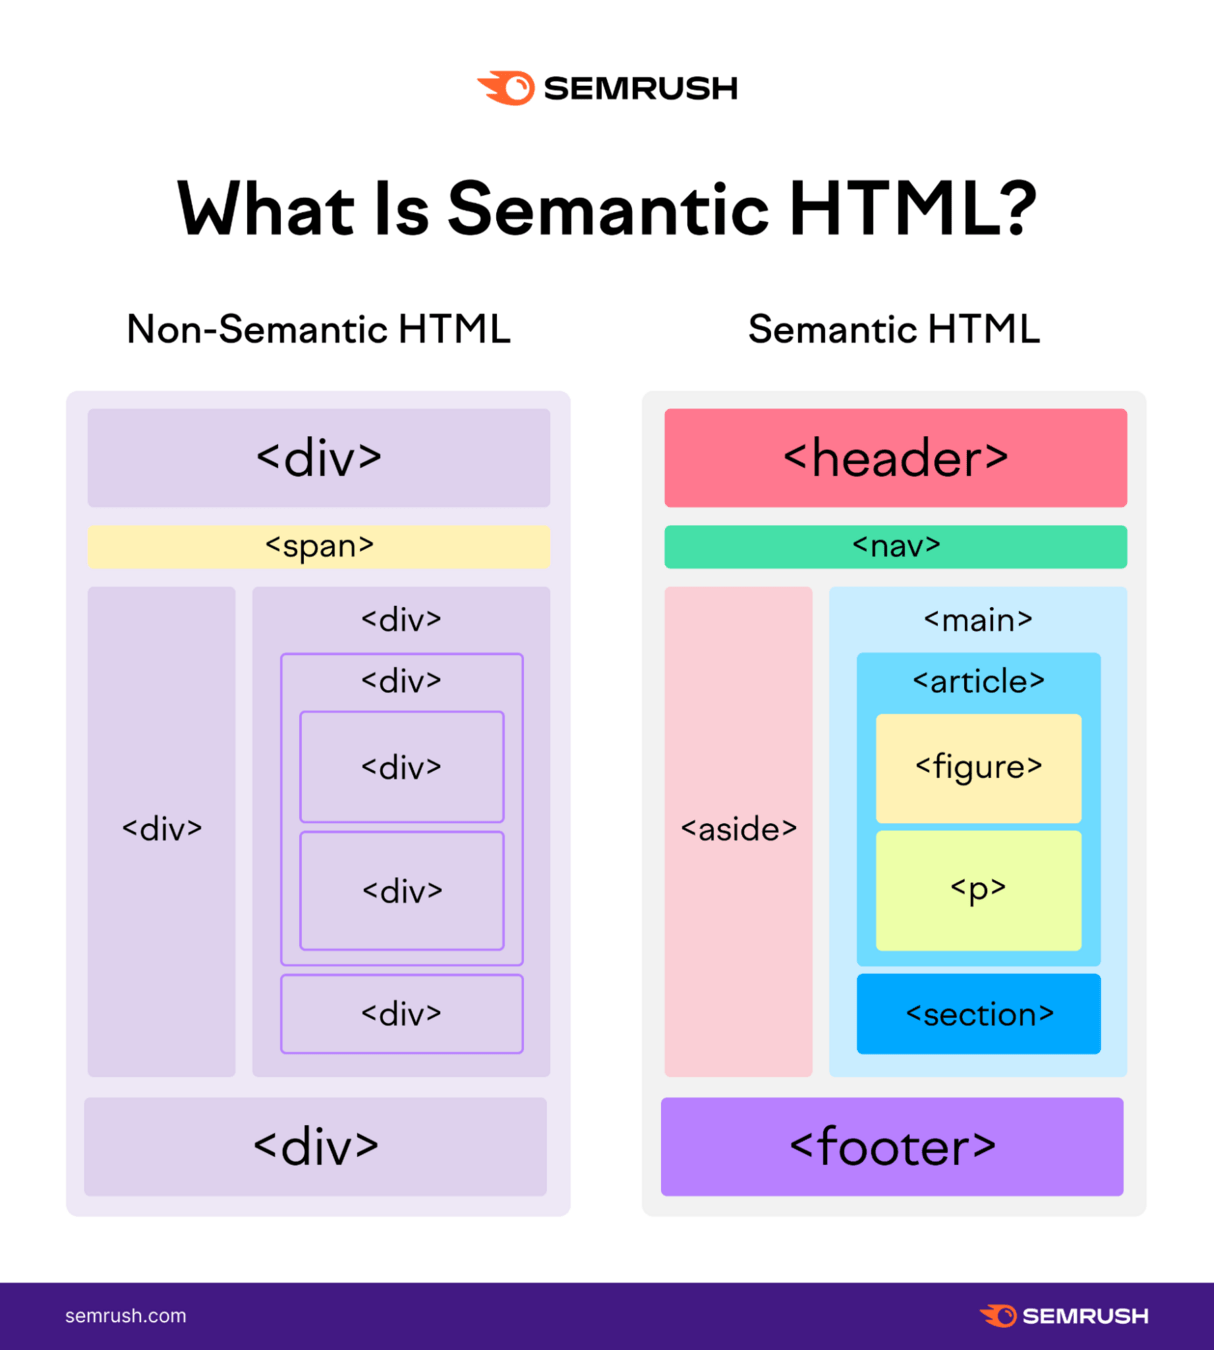
is typically a large strip at the top of the page featuring a prominent heading, logo, and possibly a tagline.
<!DOCTYPE html>
<html lang="en-US">
  <head>
  </head>
  <body>
    <header>
      <h1>Header</h1>
    </header>
  </body>
links to the main sections of the site, usually represented by menu buttons or tabs. It does need to be in the header, it can be a separate component.
  <body>
    <header>
    	<nav>
          <ul>
            <li><a href="#">Home</a></li>
            <li><a href="#">Our team</a></li>
            <li><a href="#">Projects</a></li>
            <li><a href="#">Contact</a></li>
          </ul>
    	</nav>
    </header>
  </body>
is a large central area containing the unique content of a given webpage.
  <body>
    <header>
    	<nav>
          <ul>
            <li><a href="#">Home</a></li>
            <li><a href="#">Our team</a></li>
            <li><a href="#">Projects</a></li>
            <li><a href="#">Contact</a></li>
          </ul>
    	</nav>
    </header>
    <main>
      <section>
      	<h2> Content of the section </h2>
      </section>
    </main>
  </body>
⚠️ The main content is typically divided into various content subsections, represented by <article>, <section>, and <div> elements.
includes peripheral information, links, quotes, ads, etc., often contextually related to the main content.
  <body>
    <main>
      <section>
      	<h2> Content of the section </h2>
      </section>
      <aside>
     	 <ul>
            <li><a href="#">About us</a></li>
            <li><a href="#">Our team</a></li>
            <li><a href="#">Projects</a></li>
            <li><a href="#">Contact</a></li>
         </ul>
      </aside>
    </main>
  </body>
is a strip at the bottom of the page, usually containing fine print, copyright notices, or contact information.
  <body>
    <main>
		...
    </main>
    <footer>
          <p>©Copyright 2050 by nobody. All rights reversed.</p>
    </footer>
  </body>
🎯 Replicating a simple document semantic web structure.
Download this file.
Create an HTML document using semantic elements to replicate the web structure.
Teacher Juan Romero Luis
Apr 10, 2024
Unit 4
bit.ly/BWD23U4
bit.ly/BWD23U4
Review QU4.6.
Review about the box model<head> <link href="URL" rel="stylesheet"> </head>
body {
  font-family: "Font name", sans-serif;
}
/*CSS stylesheet*/
@import url('URL');

body {
  font-family: "Font family", sans-serif;
}
🎯 Step by step activity. Be quite and listen to your teacher.
N
N
📝 Deliverable Up4.5 Font link and @import method
Upload the HTML file you created for the step by step activity. Make sure both @import and link methods are correctly implemented and fonts load in the browser view.
By Juan Romero-Luis


