ENPM809V
Fundamentals and Review of ENPM691
What we are covering
- Intel x86_64 Assembly
- Linux Filesystem
- Processes
- Buffer Overflows from ENPM691
- pwntools overview
- Classwork
Intel 64-bit Assembly
Why 64 bit?
- Supports a much larger amount of virtual memory and physical memory
- Allows computers to hold more than 4gb of memory
- Ability to support more registers
- Bigger operands
- Additional instructions
Registers
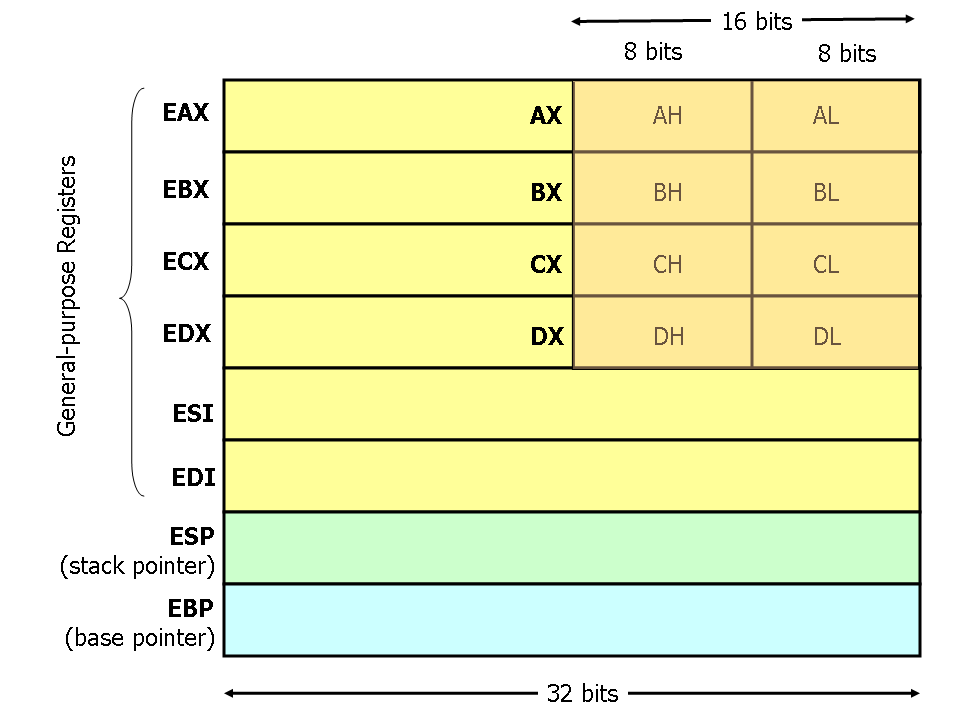
Registers
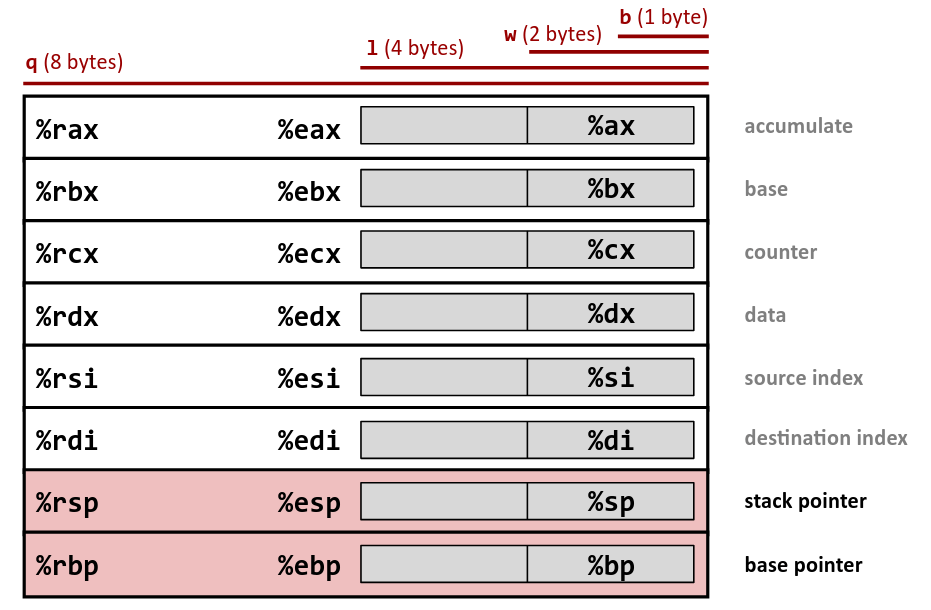
https://hackmd.io/@paolieri/x86_64
https://flint.cs.yale.edu/cs421/papers/x86-asm/asm.html
Registers
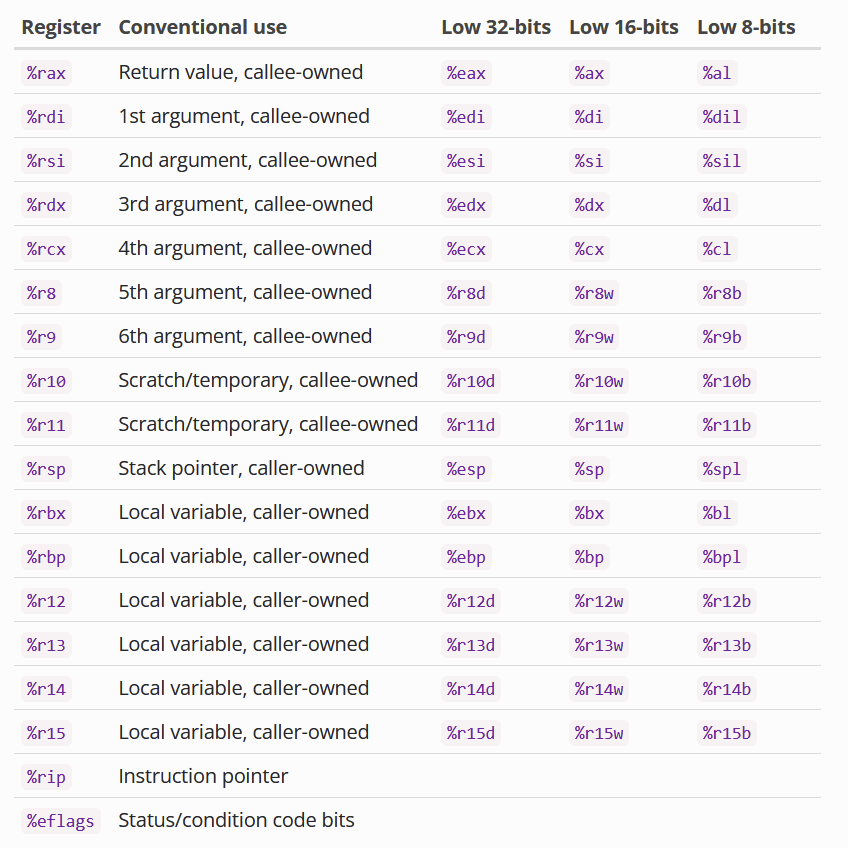
Certain Registers are callee-owned (owned by the function that just got called)
Certain Registers are caller-owned (owned by the function that calls the other function)
If A calls B, A is the caller and B is the callee.
Based on the calling convention (will explain later).
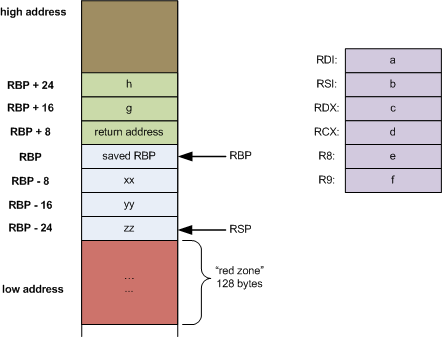
x86_64 Calling Convention
Also called the SYSTEM V calling convention
Function Parameters
- rdi - First parameter
- rsi - Second Parameter
- rdx - Third Parameter
- rcx - fourth parameter
- r8 -fifth parameter
- r9 - sixth paramter
- Any others - Stack
Return value is stored in rax
Other things to know:
Floating point arguments: XMM0 - XMM7
Addrressing
Determining the place in memory where we want to get data (aka finding the address we want to access).
Terminology
- Scale: A 2-bit constant factor that is either 1, 2, 4, or 8.
-
Index: Any general purpose register (
rax,rbx, &c). - Base: Any general purpose register.
- Displacement: An integral offset. This is normally limited to 32 bits even in 64-bit mode but can be 64-bits with a few select encodings.
Addrressing
Using these terminology, they are categorized into different "modes" of addressing. In other words, we add/multiply them in different ways to get a result we want.
Addressing
Displacement - absolute addressing (mov rcx, rbx)Base - One layer of indirection (mov rcx, [rbx])Base + Index - (mov [rax+rbx], rcx) - Accessing ArraysBase + Displacement - (mov rax, [rbx+0x1234]) - structuresBase + Index + Displacement - (mov rax, [rbx + rcv + 0x1234)Base + (Index * Scale) (mov rax, [rbx*8]) - Good for accessing an array of pointers(Index * Scale) + Displacement - (mov rax, [rbx*4 + 0x1234]) Good for statically accessible arrays (global)Base + (Index * Scale) + Displacement - best for 2d arraysRIP Relative addressing - addressing relative to RIP
In depth (and in intel Syntax) https://blog.yossarian.net/2020/06/13/How-x86_64-addresses-memory
Addressing
movl $1, 0x604892         # direct (address is constant value)
movl $1, (%rax)           # indirect (address is in register %rax)

movl $1, -24(%rbp)        # indirect with displacement
                            (address = base %rbp + displacement -24)

movl $1, 8(%rsp, %rdi, 4) # indirect with displacement and scaled-index
                            (address = base %rsp + displ 8 + index %rdi * scale 4)

movl $1, (%rax, %rcx, 8) # (special case scaled-index, displ assumed 0)

movl $1, 0x8(, %rdx, 4)  # (special case scaled-index, base assumed 0)

movl $1, 0x4(%rax, %rcx) # (special case scaled-index, scale assumed 1)
Size of Data
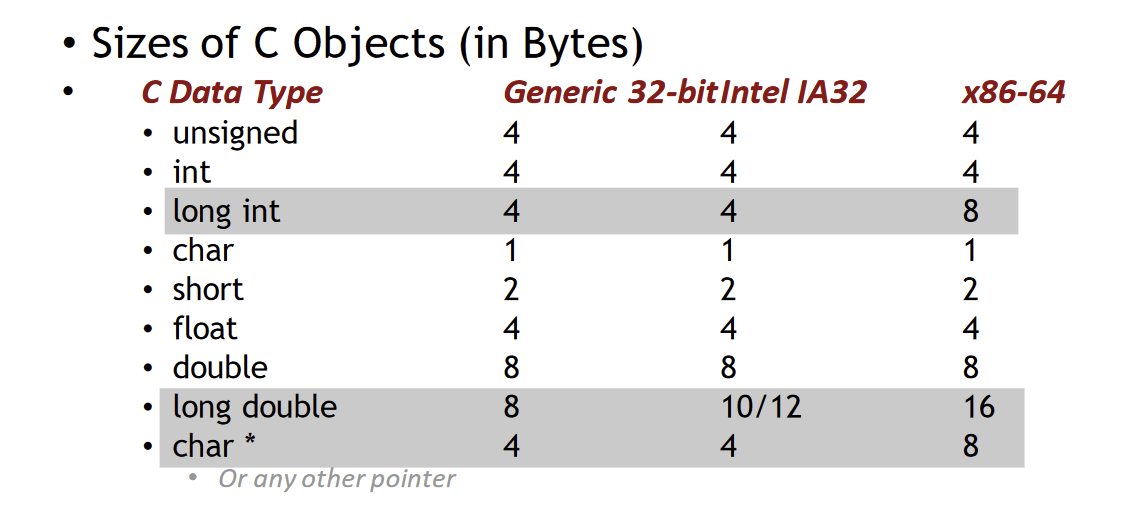
Credit: Kenneth Miltenberger
Instructions
- Long word l (4 Bytes) ↔ Quad word q (8 Bytes)
-
New instructions (in AT&T):
- movl ➙ movq
- addl ➙ addq
- sall ➙ salq
- etc.
- 32-bit instructions that generate 32-bit results
-
Set higher order bits of destination register to 0
- Example: addl
Credit: Kenneth Miltenberger
Other Differences
-
Relative addressing using the instruction pointer (RIP)
-
32-bit, invalid:
- AT&T: MOVL 8(%EIP), EAX
- Intel: MOV EAX, [EIP + 8]
-
64-bit, valid:
- AT&T: MOVQ 8(%RIP), RAX
- Intel: MOV RAX, [RIP + 8]
-
32-bit, invalid:
- *can check the manual to see if MOV(L/Q) is necessary
Credit: Kenneth Miltenberger
Linux Filesystem
What is it?
- The Linux Filesystem is the way that data is stored to the harddrive
- Also contains information regarding processes and connected devices
- Root directory is /. User directories are located in /home/<username>
What is it?
- Often called Virtual Filesystem because it is an abstraction layer for FS like EXT4, FAT32, etc.
- Why is it done this way?
- Kernel can support various implementation
- Easy interoperation between various file system types
What is it?
- Often called Virtual Filesystem because it is an abstraction layer for FS like EXT4, FAT32, etc.
- Why is it done this way?
- Kernel can support various implementation
- Easy interoperation between various file system types
Application
Write()
Read()
sys_write
sys_read
Firmware
EXT4, FAT32 ...
Hierarchy
- /bin - Essential cmd line utilities
- /boot - Boot loader files
- /dev - Physical and Virtual Device Files
- /etc - Static configuration files
- /home - User home directories
- /lib(64) - Library files
- /media - Mount points for removable devices
- /mnt - Temporarily mounted FS
- /opt - Additional Software
- /proc - Virtual Filesystem (we will get more into this)
Hierarchy
- /root - Home directory for root user
- /run - Run time variable data
- /sbin - System binaries (fsck, init, route)
- /srv - Served data (e.g. FTP, HTTP servers)
- /sys - Information about drives, kernel
- /tmp - Temporary FS (memory backed)
- /usr - Multiuser binaries
- /var - Variable Files
File System Implementations
- ext4 - Extended File System version 4
- Used by most Linux distributions, originally developed in 1993
- Slides will be covering this file system primarily
- XFS - Extended File System
- High performance 64 bit journaling FS
- Default for RedHat/CentOS
- SquashFS
- Read-only Filesystem for low-memory devices
- JFS
- 64 bit journaling Filesystem
- Default for AIX
Filesystem Layout
Disk
Partition
Block
Block
Block
Block
Filesystem Layout
- Block - basic unit of a filesystem
- Boot Block
- Superblock
- i-node table
- Data block
- Partition - Where filesystems are contained
- Disk - Contains multiple partitions
Filesystem Layout
- Boot block
- First block in the file system
- Used to help the OS boot
- Superblock
- Follows the boot block
- Stores metadata for the file system
- Number of blocks
- Size of Blocks
- Size of i-node table
- type of file system
- etc
Filesystem Layout
- I-node table
- List of index nodes
- Contains metadata about a file
- Data block - well... it's exactly as it sounds
I-nodes (Inodes)
- Used to represent files and directories
- Contains metadata about the file such as size, physical location, owner, group, etc.
- Files are assigned an I-node number on creation
- Unique identifier to help with indexing
- The number of i-nodes on a system is fixed
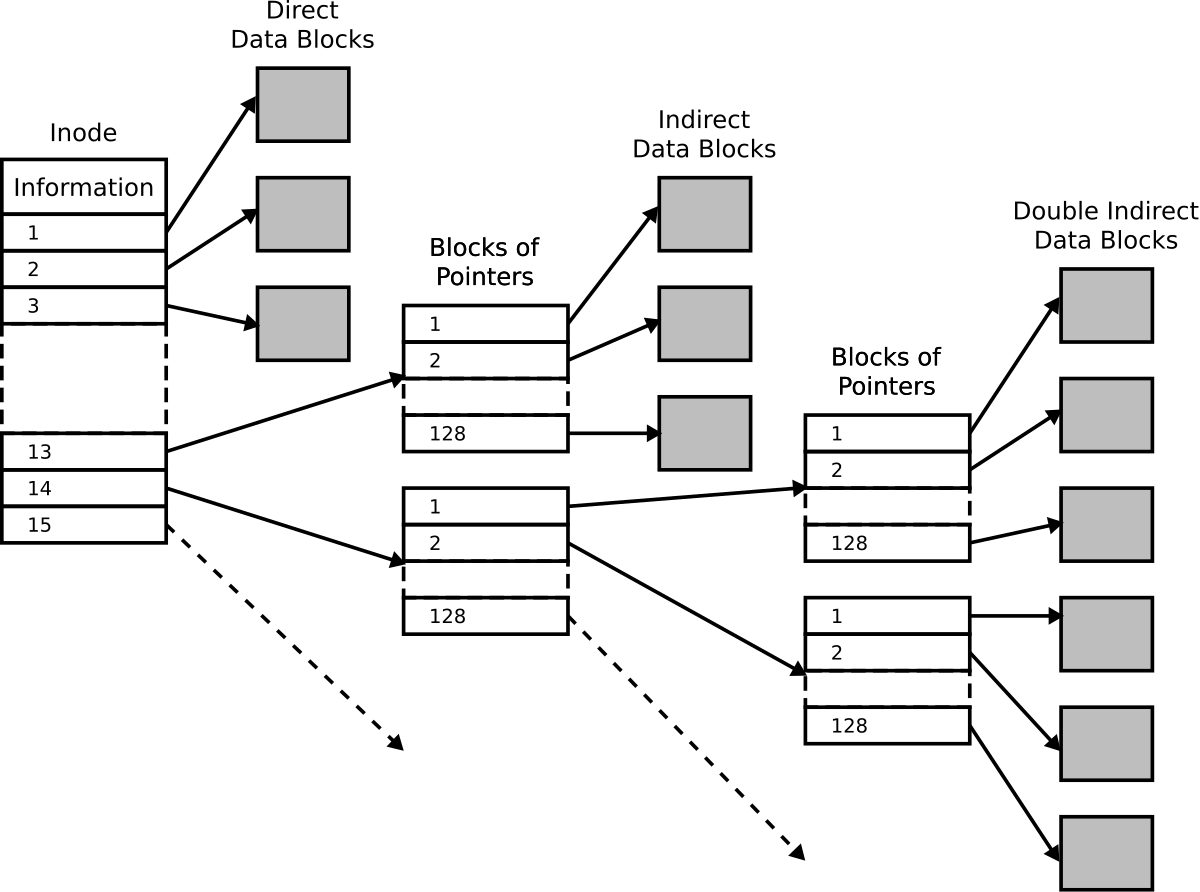
https://en.wikipedia.org/wiki/Inode_pointer_structure
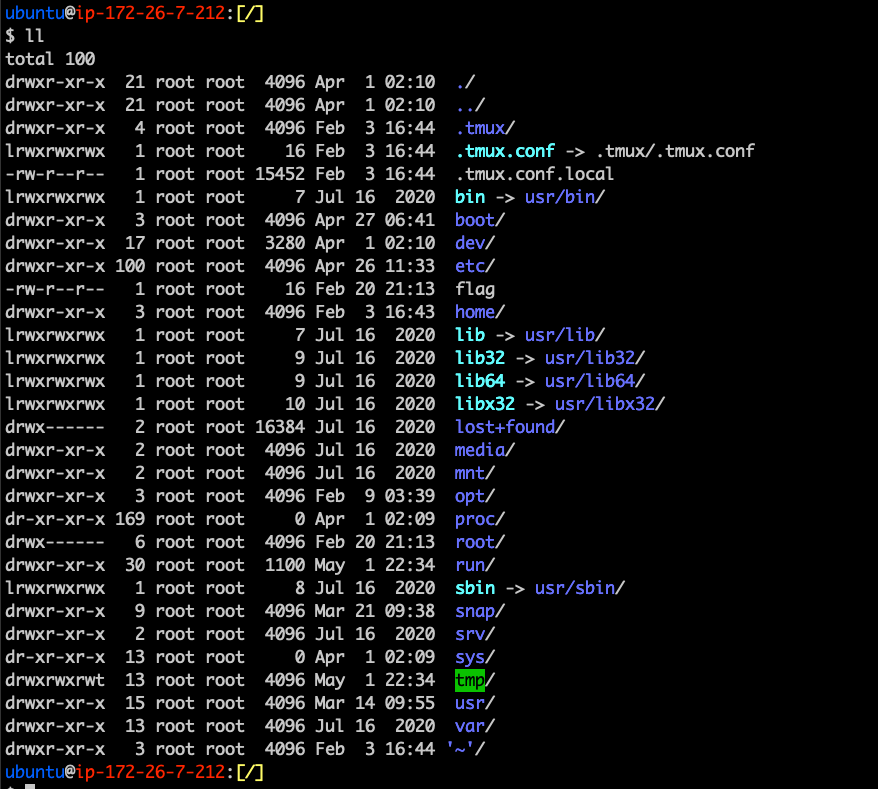
How to View Filesystem Metadata
A Very Deep Dive
Explore your Linux FS
See what you can discover about your user directory. Based on what we found.
Processes
What are they?
- Processes are running applications.
- They are the fundamental concept for working with programs
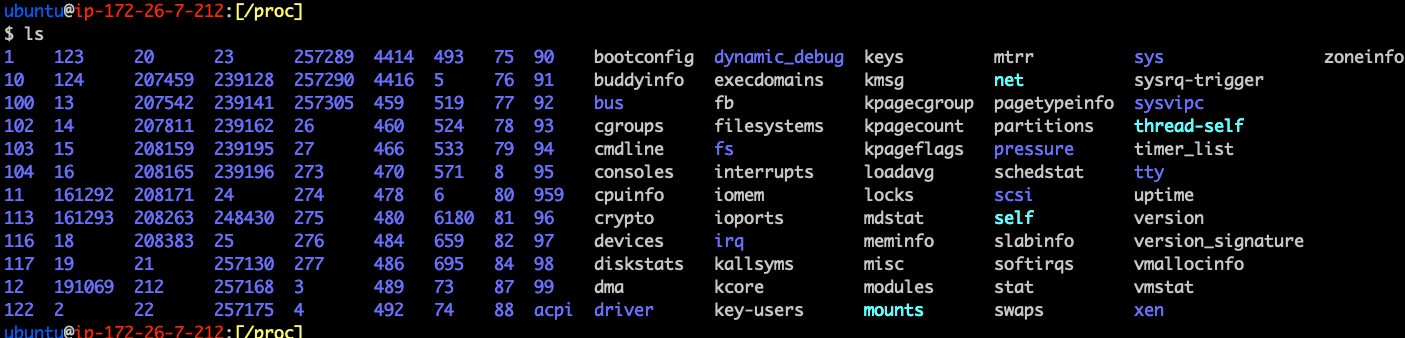
/proc
- Otherwise known as the procfs
- In-memory file system containing details about processes
- Contains information like memory, stack, addresses, referenced shared libraries, etc.
/proc exercise
- Run the command ls /proc
- Gain familiarity by navigating around the /proc path
- What do you think is in /proc/cmdline?
- See /proc/cpuinfo and /proc/meminfo
- See man 5 proc for more info
/proc/<pid>
- Contains all the details about a running application
- cmdline - the command line used to run the process
- cwd - the current working directory
- environ - details about the working environment
- exe - a symbolic link to the actual binary
- fd - A subdirectory containing any file descriptors used by the program
- maps - a list of anything mapped into the process
- status - Displays information about the process
- task - A subdirectory containing threads of the process

What's also useful about it?
- Can read/write kernel settings via the shell from procfs as if they were on disk
- Can also use a standard API to configure the procfs as well
- setrlimit
- getrlimit
- prlimit
How Do We Create Them?
- Create a process via a command line argument
- We can use either the fork() or clone() system call
- Clone is the successor to fork (fork but more powerful)
- This is what is being done when launching an executable
Types of Processes
- Parent Processes
- The orginator (generally when someone executes a program)
- Child Processes
- A process that has either been forked or cloned from a parent process
- Zombie Processes
- A process that is killed, but still is showing as a running process
- Orphan Processes
- A child process which it's parent is killed (and the child didn't cleanup via SIGCHLD
- Daemon Processes
- Processes that run in the background
Review ENPM691
Why are we learning how to exploit?
- Understand the mindset of an attacker
- Determine how they discover vulnerabilities
- Prevent vulnerabilities in the first place
Types of Vulnerabilities We Exploited
- Integer Over/Under flow
- Format String Vulnerabilities
- Buffer Overflows
- Off By One vulnerabilities
Today, we will focus on buffer overflows!
Classic Buffer Overflow
Classic Buffer Overflow
This means we can jump to anywhere we want
ret2shellcode
- We need to make sure we have a buffer to overflow
- Figure out how many bytes to overwrite return address
- Construct shellcode to do what we like
- Construct payload
- We can put shellcode inside the buffer
- We can put shellcode just after RET
- Situational dependent
- Make sure we use a NOP sled for any bytes we need to overwrite
- Profit
How Can We Write Shellcode
- Google for it
- Compile it in C
- Use pwntools shellcraft (we will get into that)
When would you compile shellcode vs use pwntools shellcraft?
gcc -nostdlib-static shellcode.s -o shellcode-elf #This assembles it into C
objcopy --dump-section .text=shellcode-raw shellcode-elf #We extract the shellcode from the assembled ELF file
Where is the return address?
- Ask ChatGPT
- (not actually, it's not that simple)
- Create a really long string in python and send it in (make sure you can differentiate from it)
- An easier way is to use pwntools cyclic <num_char> utility or GDB-GEF pattern create <num_char>
What does this look like in the end?
Shellcode
NOP Sled
Return Address
Shellcode
NOP Sled
Return Address
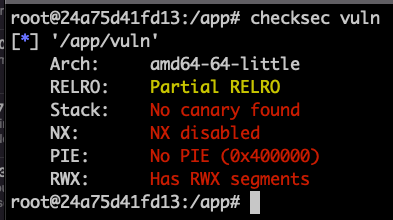
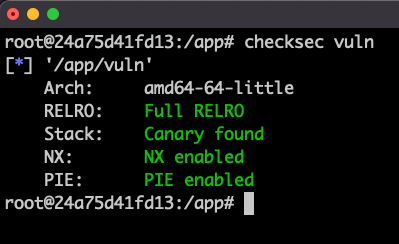
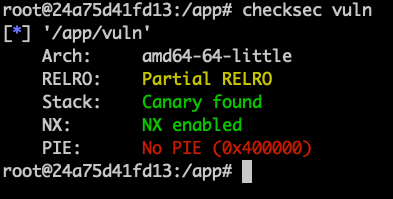
Mitigations Added to Prevent Exploitation
- ASLR
- PIE/PIC
- DEP
- NX
- RELRO
ASLR - Address Space Layout Randomization
- Randomizes stack addresses so they are different on every run.
- Enabled by default
- Can be disabled in a number of ways
- Prevents inserting shellcode in the stack and then calling it
- How do you think we can bypass this?
PIC/PIE - Position Independent Code/Executable
- PIC/PIE binary and all of its dependencies are loaded into random locations within virtual memory each time the application is executed.
- Makes Return Oriented Programming (ROP) attacks much more difficult to execute reliably.
- ASLR for the rest of memory
Tools For Analysis And Exploitation
- Debuggers - GDB + GEF, PWNDBG, PEDA
- Reverse Engineering Tools - Ghidra, Radare2, IDA Pro
- Dynamic Analysis Tools - Strace, Ltrace
- Many Many More
"Pop Quiz"
int some_function()
{
    char buff[128];
    gets(buff);
    printf("%s\n", buffer);
    return 0;
}
int main() {
int a = 0;
scanf("%d", &a);
printf("a = %d\n", a);
printf("Adding 1 to a...\n");
a = a + 1;
printf("a = %d\n", a);
return 0;
}void another_function(char *arg1)
{
char name[128];
strcpy(name, arg1);
printf("Hello %s\n", name);
}
int main(int argc, char **argv)
{
if (argc < 2) # checking arg length
{
printf("Usage: %s <your name>\n", argv[0]);
return 0;
}
another_function(argv[1]); # Call the vulnerable function
return 0;
}Classic Buffer Overflow
int some_function()
{
    char buff[128];
    gets(buff);
    printf("%s\n", buffer);
    return 0;
}
Classic Buffer Overflow
int some_function()
{
    char buff[128];
    gets(buff);
    printf("%s\n", buffer);
    return 0;
}
pwntools
What is it?
- It is a package in python to help make binary exploitation easier
- Used a lot in CTFs and for POC exploits
pwn
- Toolkit optimized for CTFs
- This is what we are going to use for the course
- Imports everything from the top level of pwnlib in addition to some submodules
- Makes it easier for us to start writing exploitation scripts
pwnlib
- This module is the “clean” python-code. As a rule, we do not think that importing
pwnlibor any of the submodules should have any significant side-effects (besides e.g. caching). - For the most part, you will also only get the bits you import. You for instance would not get access to
pwnlib.util.packingsimply by doingimport pwnlib.util.
Installation
-
Optional: Create a virtual environment
-
python3 -m pip install venvorsudo apt install python3-venv - python3 -m venv <name_of_venv>
source /path/to/venv/bin/activate
-
python3 -m pip install pwntools- Try running command
pwnorchecksec- If they work, you are good!
- If not, try restarting the terminal
Command Line Tools
-
pwn template: creates a starter template for us
pwn template --host <ip> --port <port> <binary> > solve.py
-
pwn asm: Assembles code into binary given assembly code
- Think compiling
-
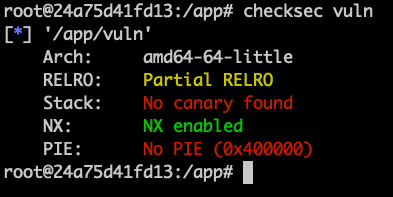
pwn checksec: check the security level of a binary
checksec <binary>
Command Line Tools
- pwn disasm: disassemble code given a binary
-
pwn shellcraft: generate shellcode
- Think generating assembly
- pwn dbg: Debug a program utilizinng GDB
-
pwn cyclic: Repeatedly generate random bytes and find its offset
- Helpful for finding how many bytes you need to start controlling ret
- Lots more - do pwn --help or pwn <module> --help to learn more
- You will also see these command line tools be a part of pwntools modules too
Example
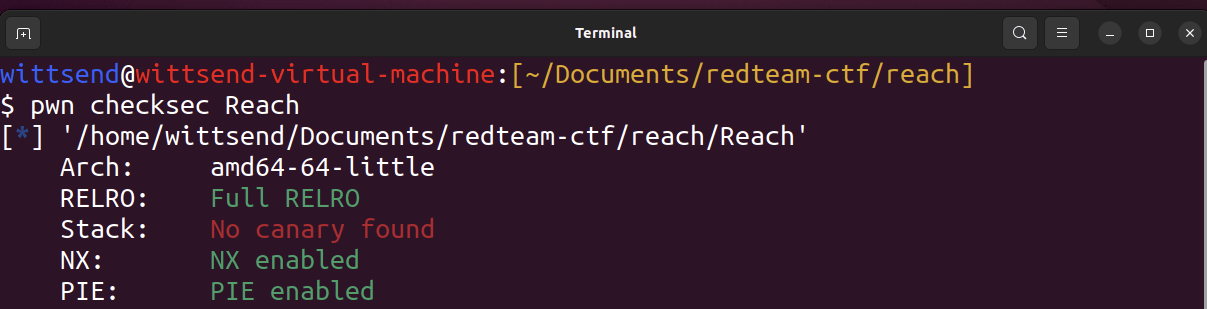
wittsend@wittsend-virtual-machine:[~/Documents/redteam-ctf/reach]
$ pwn template Reach
#!/usr/bin/env python3
# -*- coding: utf-8 -*-
# This exploit template was generated via:
# $ pwn template Reach
from pwn import *

# Set up pwntools for the correct architecture
exe = context.binary = ELF(args.EXE or 'Reach')

# Many built-in settings can be controlled on the command-line and show up
# in "args".  For example, to dump all data sent/received, and disable ASLR
# for all created processes...
# ./exploit.py DEBUG NOASLR


def start(argv=[], *a, **kw):
    '''Start the exploit against the target.'''
    if args.GDB:
        return gdb.debug([exe.path] + argv, gdbscript=gdbscript, *a, **kw)
    else:
        return process([exe.path] + argv, *a, **kw)

# Specify your GDB script here for debugging
# GDB will be launched if the exploit is run via e.g.
# ./exploit.py GDB
gdbscript = '''
tbreak main
continue
'''.format(**locals())

#===========================================================
#                    EXPLOIT GOES HERE
#===========================================================
# Arch:     amd64-64-little
# RELRO:    Full RELRO
# Stack:    No canary found
# NX:       NX enabled
# PIE:      PIE enabled

io = start()

shellcode = asm(shellcraft.sh())
payload = fit({
    32: 0xdeadbeef,
    'iaaa': [1, 2, 'Hello', 3]
}, length=128)
io.send(payload)
flag = io.recv(...)
log.success(flag)

io.interactive()
Documentation
- https://docs.pwntools.com/en/latest/
Classwork
Go to pwn.college ENPM809V introduction module and do the classwork! Objective is to do a ret2win: buffer overflow and call another function within the same program.
Acknowledgement
Some of the slides were derived from Drake Petersen who gave me permission to use them for the course.
ENPM809V - Fundamentals of Linux
By Ragnar Security


