Arduino & Unity3d
Interfacing through USB
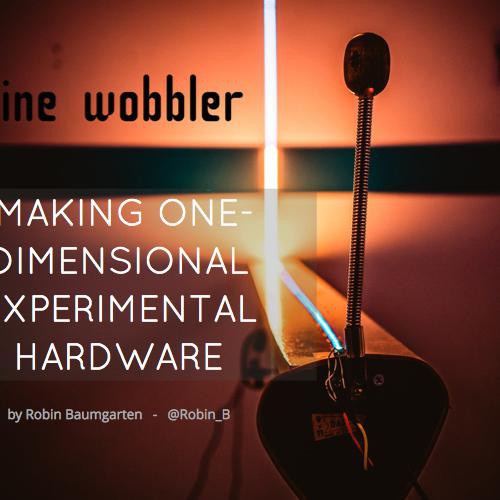
A micro-talk by @Robin_B
Approaches
Serial
MIDI
Joystick
Serial communication
Pros:
+ Works on standard Arduinos
+ Built-in support in Unity3D
Cons:
- Byte-based, need to do parsing
- Unity implementation of Serial is buggy and incomplete
- I had weird bluescreens using threads in Unity
Serial: Sending from Arduino
Sending:
void setup() { Serial.begin(9600);Serial.println("hello");} void loop() {}
Serial: Receiving on Arduino
 void setup()
{
        Serial.begin(9600);
}

void loop()
{
        if (Serial.available() > 0)
        {
                byte incomingByte = Serial.read();

                Serial.print("I received: ");
                Serial.println(incomingByte, DEC);
        }
}Serial on Unity3d
Switch to full .NET 2.0 compatibility
(Edit - Project Settings - Player)
(Edit - Project Settings - Player)

Serial on Unity3d
Reading a line from a Serial COM Port in Unity:
SerialPort stream = new SerialPort("COM4", 9600); void Start () {stream.Open(); //Open the Serial Stream. } void Update () { string value = stream.ReadLine(); //Read the information string[] data = value.Split(','); // ... }
Serial in Unity
Random bits:
- Get all port names with SerialPort.GetPortNames()
- Set low readline timeout with stream.ReadTimeout() to avoid locking the program (or use threading)
- Arduino Serial Monitor will block serial port, close it before running your unity script
-
Interlude: Teensy

Arduino compatible microchip, ca. £20, http://www.pjrc.com/teensy/
Interlude: Teensy
Advantages over other Arduinos:
- More everything (analog & digital ports, speed, memory, analog accuracy)
- 12 touch sensitive pins
- Can act as USB Joystick, Keyboard, Mouse, MIDI device
Drawback: 3.3V architecture (some accessories expect 5V signals)
Enabling Special Teensy USB Modes

Joystick
Pros:
- Plug & Play
- Directly control 6 joystick axes & 32 buttons, 1 Hat Switch
Cons:
- Not very expandable
- Teensy only (Arduino clone)
- One way communication
(or google "teensy joystick")

Joystick: Sending
Teensy Example:
void setup() {} void loop() {Joystick.X(512); // from 0 - 1023, center at 512 Joystick.Y(1); Joystick.button(1, 1); delay(100); Joystick.button(1, 0); delay(100); }
In Unity3D:
Configure joystick using Input Manager (Edit - Project Settings - Input Manager)
Then Input.GetAxis("axisname") or Input.GetButton("buttonname")
MIDI
Pros:
+ Bidirectional communication
+ Simple management of 256+ different controls
Cons:
- Standard accuracy only 7 bit (0-127)
- Requires some work to get into Unity
Midi: Unity3d
How to get MIDI into Unity3D:
- Unity Pro plugin: MIDI Unified ($90)
- Unity Free requires a 'bridge' to interact with MIDI
Win + Mac command line tool that sends midi commands between Arduino (Teensy) and the MidiController in Unity.
(demo)
Midi: Arduino (Teensy) side
Sending data:
void setup() { } void loop() { usbMIDI.sendControlChange( 1, // control (0-255)50, // value (0-127)1); // channel (0-15)}
MIDI: ARDUINO (TEENSY) SIDE
Receiving data:
void setup()
{
	usbMIDI.setHandleControlChange(OnControlChange);
}

void OnControlChange(byte channel, byte control, byte value)
{
	// do something when receiving control data
}

void loop()
{
}
MIDI: Sending Data from Unity
MidiOut and MidiInput are scripts provided with the midi-bridge.
Sending:
MidiOut.SendControlChange(MidiChannel.Ch1, control, value);Receiving:
float input = MidiInput.GetKnob (channel, knobNumber); // 0.0f - 1.0fResources
Slides & Sliders: http://h3h.de
Arduino - Unity 3D communication
By Robin Baumgarten
Arduino - Unity 3D communication
Short intro on how to interface Arduinos with Unity3D