


陳信嘉
Shinjia Chen
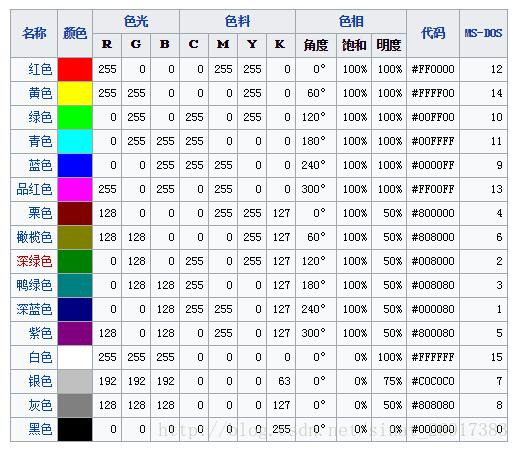
BGR
Gray
BGR
HSV
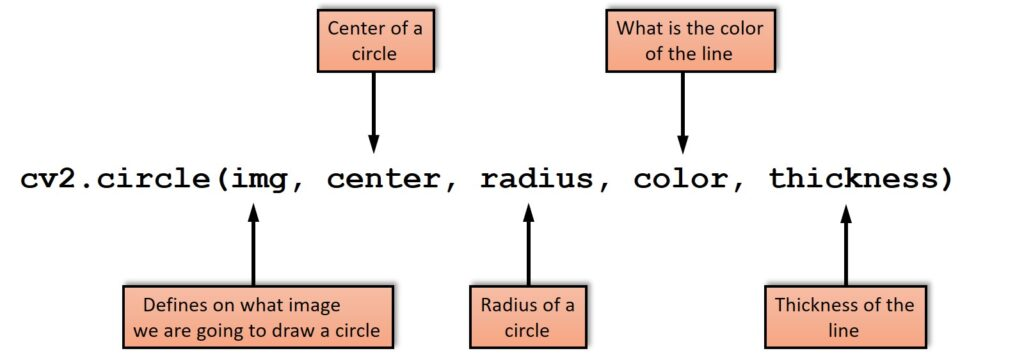
cv2.cvtColor(img, flag)
cv2.cvtColor(img, cv2.COOR_BGR2GRAY)
cv2.cvtColor(img, cv2.COOR_BGR2HSV)
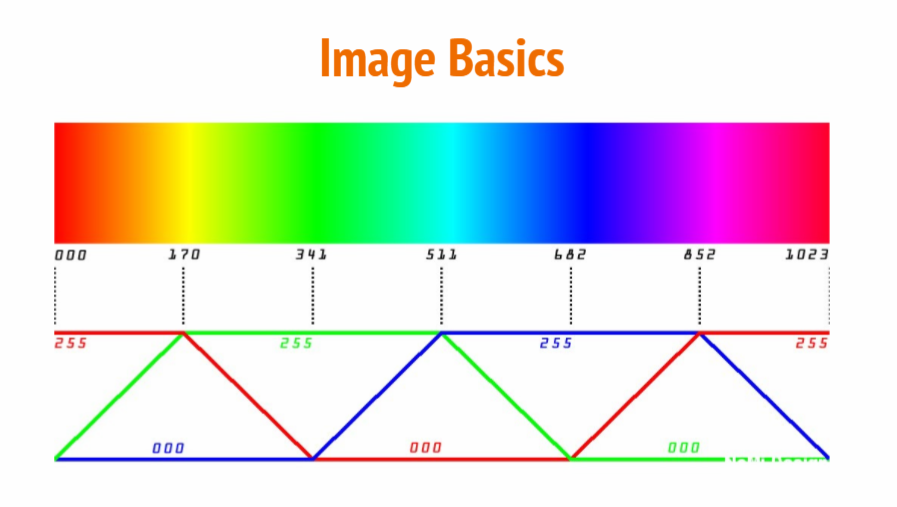
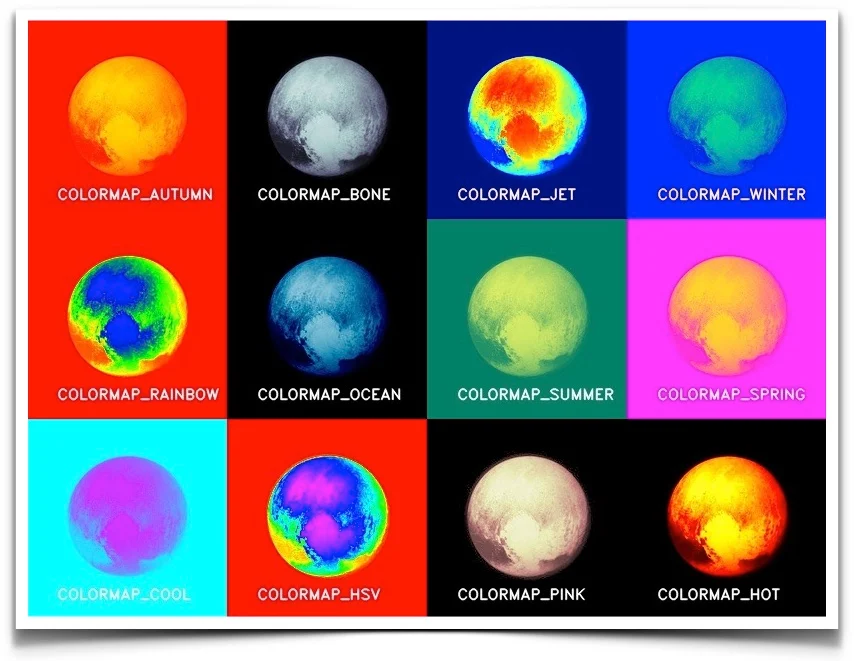
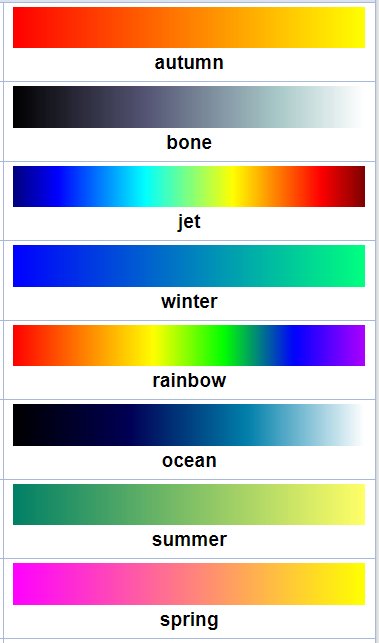
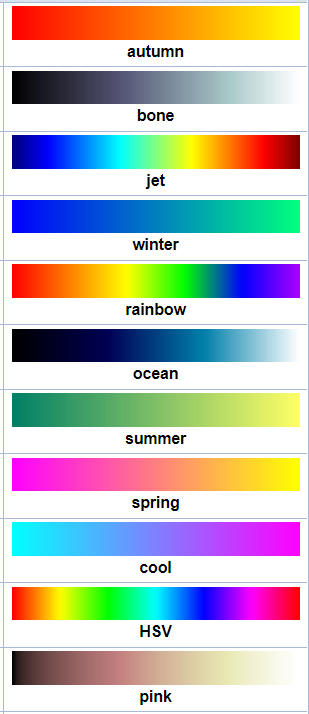
(0) Autumn
(1) Bone
(2) Jet
(3) Winter
(4) Rainbow
(5) Ocean
(6) Summer
(7) Spring
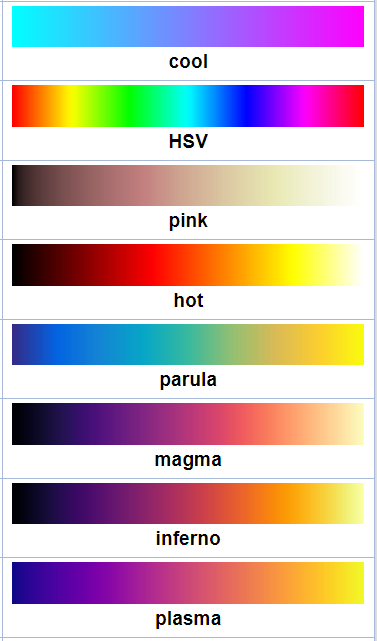
(8) Cool
(9) HSV
(10) Pink
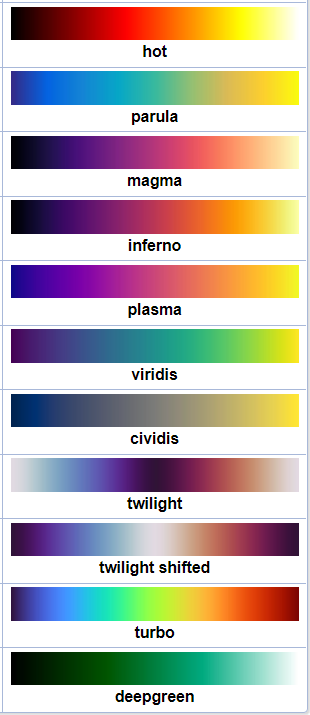
(11) Hot
(12) Parula
(13) Magma
(14) Inferno
(15) Plasma
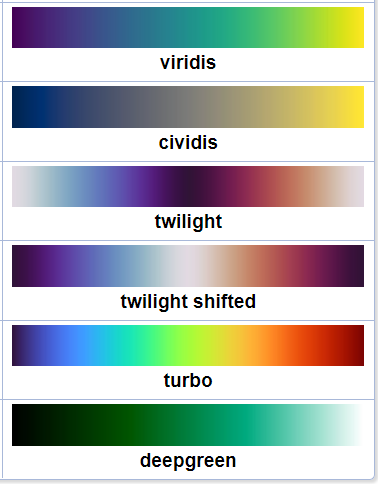
(16) Viridis
(17) Cividis
(18) Twilight
(19) Twilight Shifted
(20) Turbo
(21) DeepGreen
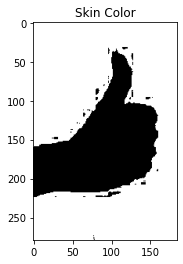
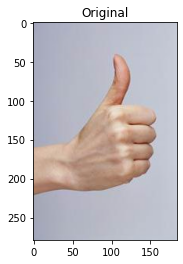
人體膚色偵測
Scaling
縮放:直接使用 resize() 函式進行處理
縮放的內插法 (interpolation methods)
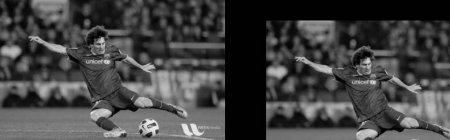
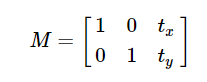
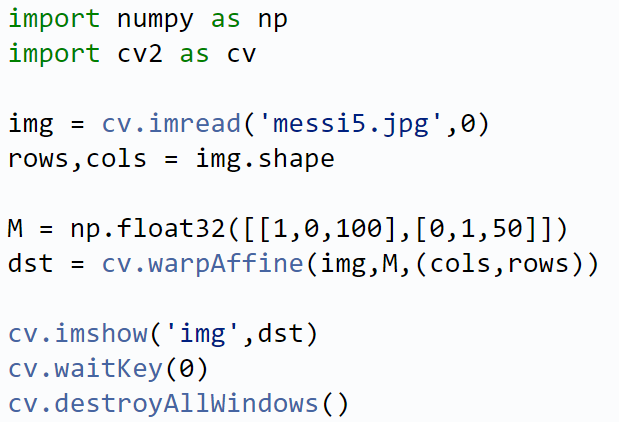
Translation
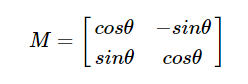
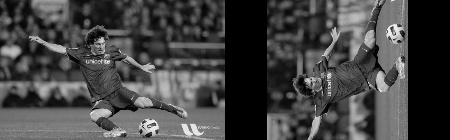
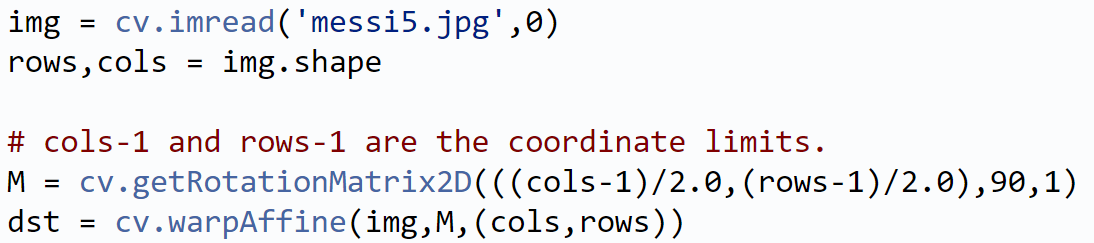
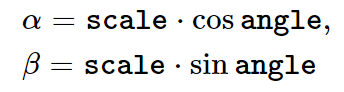
Rotation
指定旋轉中心
可同時縮放
旋轉角度
因同時考慮縮放
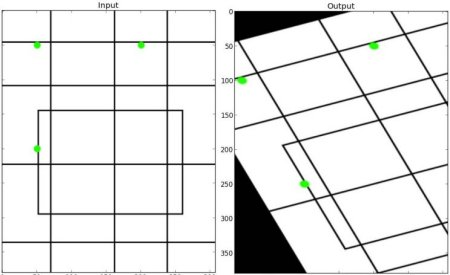
Affine
仿射:從一個座標系,映射到另一個座標系
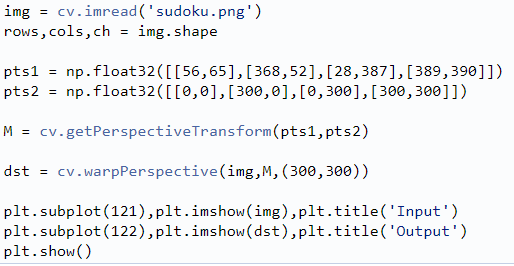
Perspective
透視法
# Changing the color of the image
img[:] = (255,255,255)
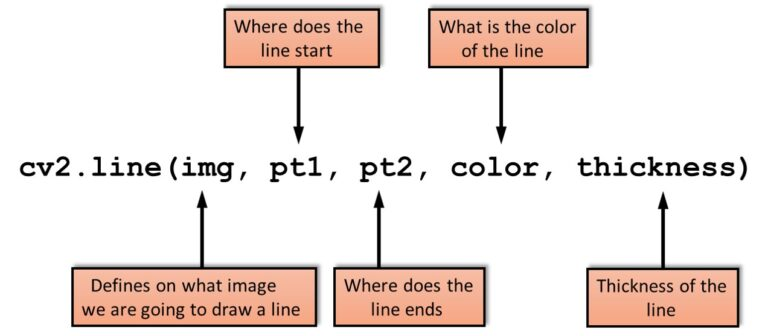
# Drawing a black line
cv2.line(img, (0,0), (500,500), (0,0,0), (10))
# Drawing a blue line
cv2.line(img, (0,500), (500,0), (255,0,0), (20))
# Drawing a red line
cv2.line(img, (0,250), (250,0), (0,0,255), (5))
# Drawing a green line
cv2.line(img, (500,250), (0,250), (0,255,0), (30))
# Drawing a yellow line
cv2.line(img, (500,250), (250,500), (0,200,200), (10))
# Drawing a violet line
cv2.line(img, (250,0), (500,250), (200,50,100), (10))
# Drawing a cyan line
cv2.line(img, (0,250), (250,500), (255,255,0), (15))
# Drawing a orange line
cv2.line(img, (250,0), (250,500), (0,100,255), (10))
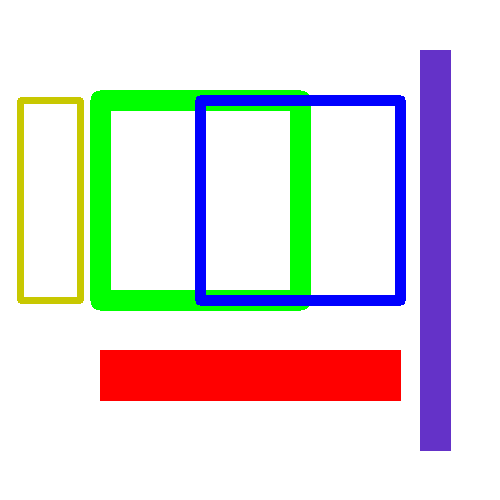
cv2_imshow(img)# Drawing a green rectangle
cv2.rectangle(img, (100,100), (300,300), (0,255,0), (20))
# Drawing a blue rectangle
cv2.rectangle(img, (200,100), (400,300), (255,0,0), (10))
# Drawing a red rectangle. Negative parameter -1
# indicates that we want to draw filled shape
cv2.rectangle(img, (100,350), (400,400), (0,0,255), (-1))
# Drawing a yellow rectangle
cv2.rectangle(img, (20,100), (80,300), (0,200,200), (5))
# Drawing a violet rectangle
cv2.rectangle(img, (420,50), (450,450), (200,50,100), (-1))
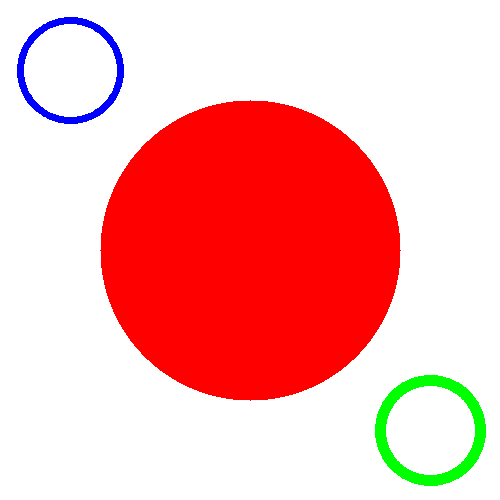
cv2_imshow(img)# Drawing a red circle. Negative parameter -1
# indicates that we want to draw filled shape
cv2.circle(img, (250,250), 150, (0,0,255), (-1))
# Drawing a blue circle
cv2.circle(img, (70,70), 50, (255,0,0), (5))
# Drawing a green circle
cv2.circle(img, (430,430), 50, (0,255,0), (10))
cv2_imshow(img)# Creating our image
img = np.zeros((500, 500, 3), dtype="uint8")
# Drawing a red arrow
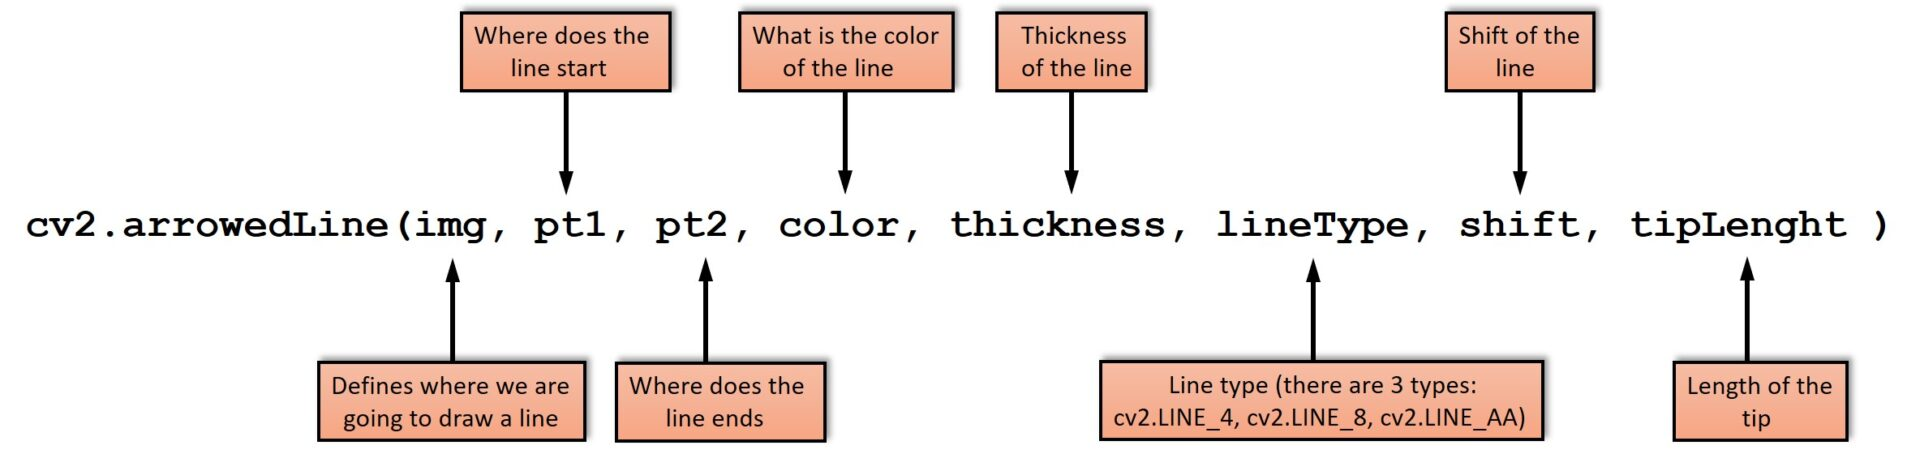
cv2.arrowedLine(img, (100,100), (400,100), (0,0,255), (10), 8,0,0.1)
# Drawing a blue arrow
cv2.arrowedLine(img, (100,200), (400,200), (255,0,0), (20), 8,0,0.3)
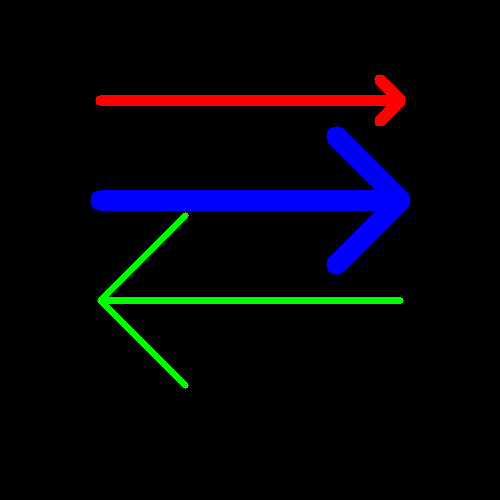
# Drawing a green arrow
cv2.arrowedLine(img, (400,300), (100,300), (0,255,0), (5), 8,0,0.4)
cv2_imshow(img)# Drawing a red ellipse. Negative parameter -1
# indicates that we want to draw a filled shape.
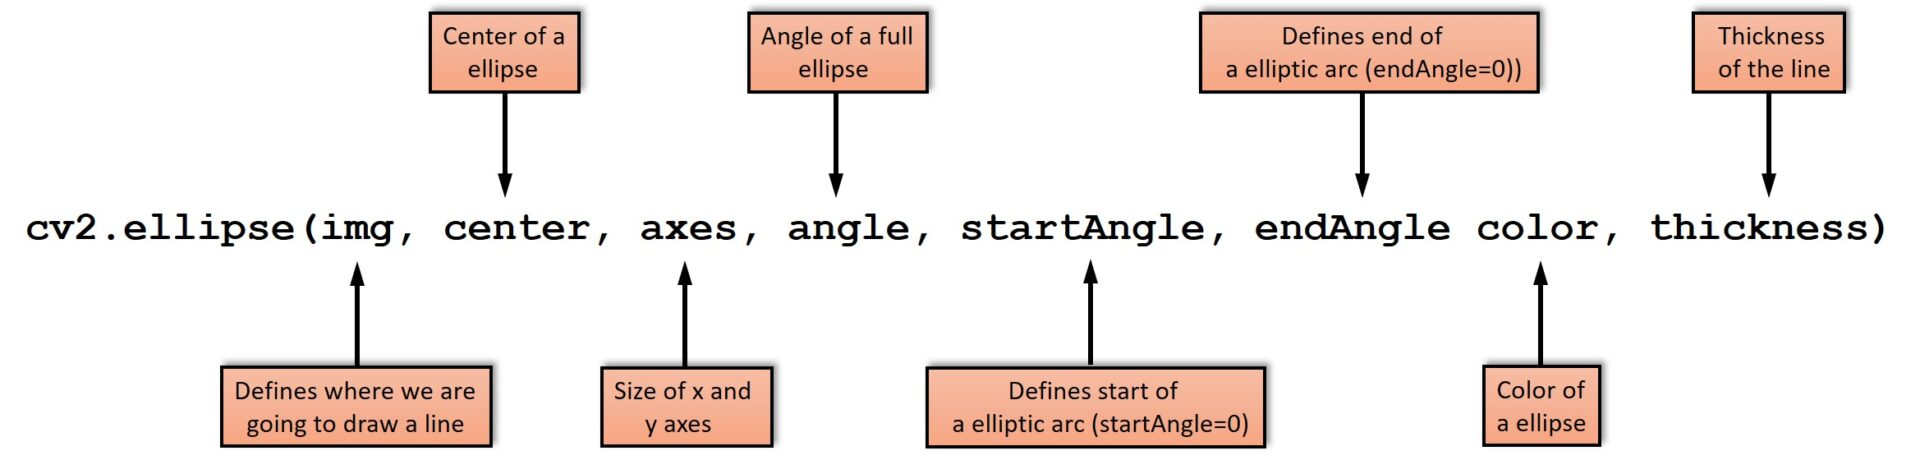
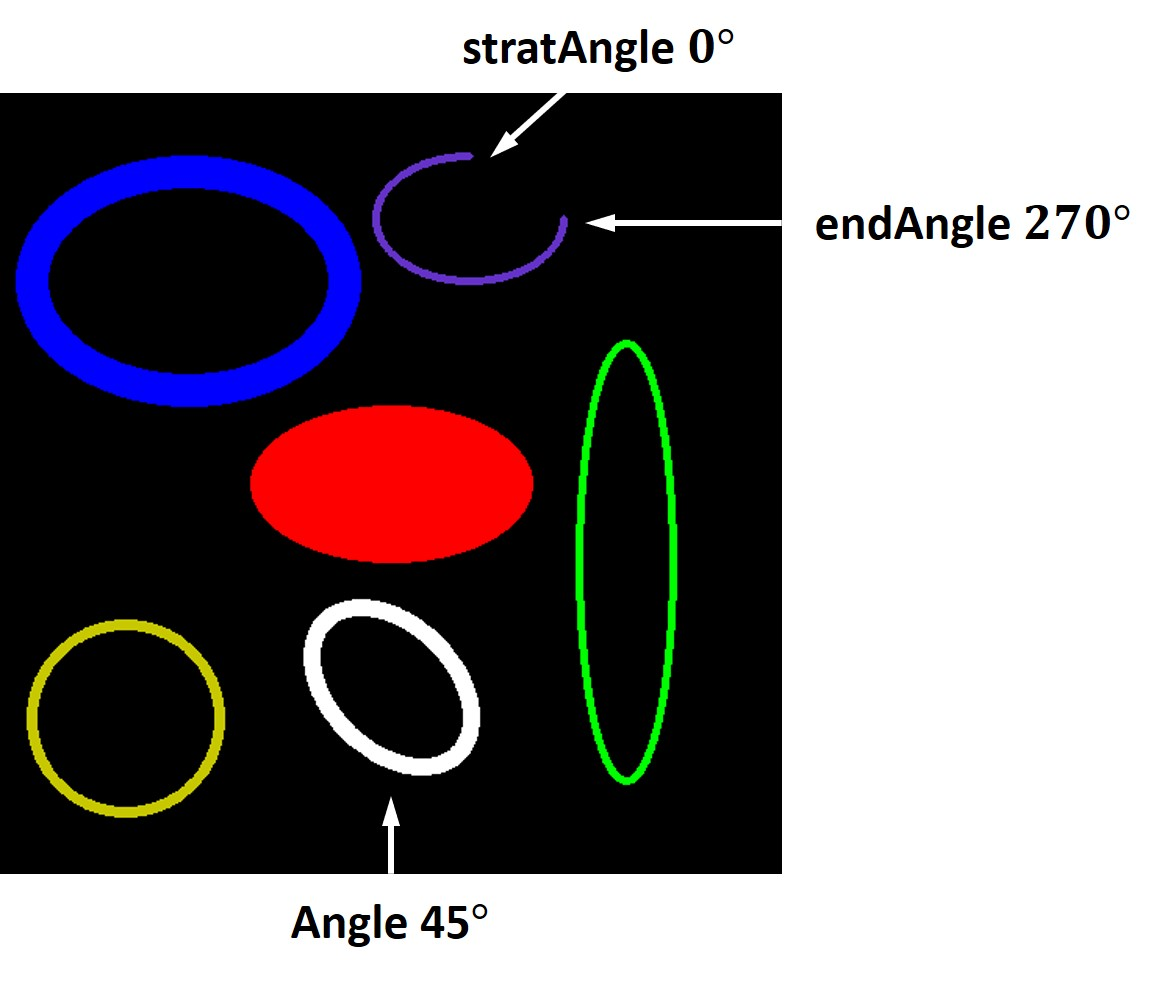
cv2.ellipse(img, (250,250), (90,50), 0, 0, 360, (0,0,255), (-1))
# Drawing a blue ellipse.
cv2.ellipse(img, (120,120), (100,70), 0,0,360, (255,0,0), (20))
# Drawing a green ellipse.
cv2.ellipse(img, (400,300), (30,140),0,0,360, (0,255,0), (3))
# Drawing a yellow one. If we have same values for the axes
# we can draw a circle
cv2.ellipse(img, (80,400), (60,60), 0, 0, 360, (0,200,200), (6))
# Drawing a white ellipse with an angle of 45 degrees
cv2.ellipse(img, (250,380), (60,40), 45,0,360, (255,255,255), (10))
# Drawing a violet ellipse with an end angle of 270 degrees
cv2.ellipse(img, (300,80), (60,40),0,0,270, (200,50,100), (3))
cv2_imshow(img)# Drawing a line
cv2.line(img, (0, 0), (500, 500), (255,0,0), 3)
# Drawing a rectangle
cv2.rectangle(img, (0, 0), (150, 150), (0,0,255), 3)
# Function cv2.clipLine clips the segment against the defined rectangle
# We defining pt1 and pt2 (segment inside rectangle)
# and starting and ending point of our line
ret, p1, p2 = cv2.clipLine((0, 0, 150, 150), (0, 0), (500, 500))
if ret:
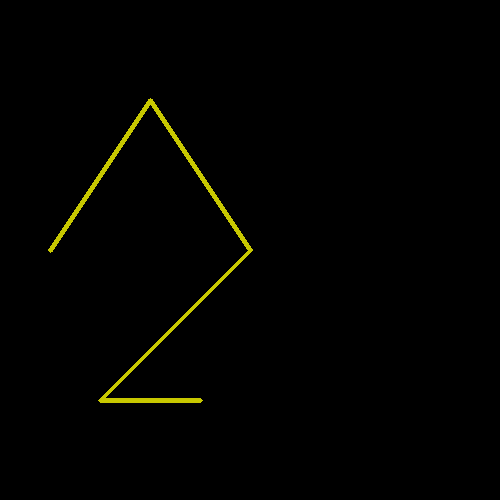
cv2.line(img,p1,p2,(0,255,0),3)# Creating a Numpy array of points
pts = np.array([[50, 250], [150, 100], [250, 250],[100,400],[200,400]], np.int32)
# Creating a yellow polygon. Parameter "False" indicates
# that our line is not closed
cv2.polylines(img, [pts], False, (0,200,200), 3)
cv2_imshow(img)# Creating a Numpy array of points
pts = np.array([[50, 250], [150, 100], [250, 250],[100,400],[200,400]], np.int32)
# Creating a yellow polygon. Parameter "False" indicates
# that our line is not closed
cv2.polylines(img, [pts], False, (0,200,200), 3)
# Creating an array of points
pts = np.array([[350, 200], [400, 150], [450, 200],[430,250],[370,250]], np.int32)
# Creating a red pentagon
cv2.polylines(img, [pts], True, (0,0,255), 5)
# Creating an array of points
pts = np.array([[350, 80], [400, 120], [450, 80]], np.int32)
# Creating a blue triangle
cv2.polylines(img, [pts], True, (255,0,0), 8)
# Creating an array of points
pts = np.array([[200,50], [300, 50], [300, 150],[200,150]], np.int32)
# Creating a green rectangle
cv2.polylines(img, [pts], True, (0,255,0), 10)
# Creating an array of points
pts = np.array([[300, 300], [400, 300], [300, 400],[400,400]], np.int32)
# # Creating a violet polygon
cv2.polylines(img, [pts], True, (200,50,100), 3)
cv2_imshow(img)# Choosing our font
font=cv2.FONT_ITALIC
# Writing our text
cv2.putText(img,"OpenCV with Python!", (90,250), font, 1, (255,255,255), 3, cv2.LINE_AA)
cv2_imshow(img)import numpy as np
import cv2
from PIL import ImageFont, ImageDraw, Image
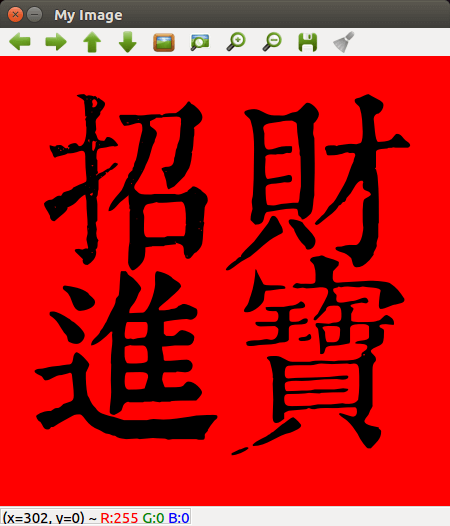
img = np.zeros((450, 450, 3), np.uint8)
# 將背景設定為大紅色
img[:] = (0, 0, 255)
# 文字
text = '招財n進寶'
# 指定 TTF 字體檔
fontPath = "./康熙字典體.ttf"
# 載入字體
font = ImageFont.truetype(fontPath, 192)
# 將 NumPy 陣列轉為 PIL 影像
imgPil = Image.fromarray(img)
# 在圖片上加入文字
draw = ImageDraw.Draw(imgPil)
draw.text((30, 30), text, font = font, fill = (0, 0, 0))
# 將 PIL 影像轉回 NumPy 陣列
img = np.array(imgPil)
cv2.imshow('My Image', img)
cv2.waitKey(0)
cv2.destroyAllWindows()By 陳信嘉


