Full Stack DevOps Pipeline with GitHub Actions and Azure Cloud
- By Shreya Prasad and Nishkarsh Raj
AGENDA
- Introduction to MERN stack
- Setup MongoDB
- Create Node.js app with Express.js
- Build React frontend
- Connect backend to frontend using Axios
- Host your Application on GitHub
- CI/CD using GitHub Actions and Docker
- Infrastructure Automation using Terraform for Azure Cloud
- Deploying the WebApp on Azure using GitHub Actions
Introduction to MERN stack

MongoDB

Express.js
React.js
Node.js
A document-based open source database
A web application framework for Node.js.
A JavaScript front-end library for building user interfaces.
JavaScript run-time environment that executes JavaScript code outside of a browser (such as a server).
Setup MongoDB
Step 1. Create an account on MongoDB Atlas at https://account.mongodb.com/account/login

After you get logged in, click the green button to create a new project and then the green button to build a new cluster.

Step 2: Choose your cloud provider

Step 3: Configure your security

Step 4: Retrieve connection information


Time to code!
Initial Setup
- Install Node.js from https://nodejs.org/en/download/
2. Verify installation by typing node --version in the terminal
3. Create initial React project using following command:
npx create-react-app mern-exercise-tracker
cd mern-exercise-tracker
npm start
Backend
Inside the root folder (“mern-exercise-tracker”), create a new folder and change into the folder by running the following commands in the terminal:
mkdir backend
cd backend
npm init -y
npm install express cors mongoose dotenv
npm install -g nodemon
Create backend server!
const express = require('express');
const cors = require('cors');

require('dotenv').config();

const app = express();
const port = process.env.PORT || 5000;

app.use(cors());
app.use(express.json());

app.listen(port, () => {
    console.log(`Server is running on port: ${port}`);
});
server.js
nodemon server
Start server:
Connect to our database in MongoDB Atlas
const uri = process.env.ATLAS_URI;
mongoose.connect(uri, { useNewUrlParser: true, useCreateIndex: true }
);
const connection = mongoose.connection;
connection.once('open', () => {
  console.log("MongoDB database connection established successfully");
})
At the top of server.js, after the line
cont cors = requre('cors');,
add the following line to require mongoose:
const mongoose=require(‘mongoose’);
Now, after the line
app.use(express.json());
add:
Make connection work!


Add this to .env file
ATLAS_URI=mongodb+srv://mean123:<password>@cluster0-91icu.gcp.mongodb.net/test?retryWrites=trueReplace <password> with the password you set up for your user.
“MongoDB database connection established successfully”
Database Schema
Create database schema using Mongoose: Exercises and Users.
Inside the backend folder, create a new folder named “models”. Inside that folder create two files named exercise.model.js and user.model.js.
const mongoose = require('mongoose');

const Schema = mongoose.Schema;

const userSchema = new Schema({
  username: {
    type: String,
    required: true,
    unique: true,
    trim: true,
    minlength: 3
  },
}, {
  timestamps: true,
});

const User = mongoose.model('User', userSchema);

module.exports = User;
user.model.js
const mongoose = require('mongoose');

const Schema = mongoose.Schema;

const exerciseSchema = new Schema({
  username: { type: String, required: true },
  description: { type: String, required: true },
  duration: { type: Number, required: true },
  date: { type: Date, required: true },
}, {
  timestamps: true,
});

const Exercise = mongoose.model('Exercise', exerciseSchema);

module.exports = Exercise;
exercise.model.js
Server API endpoints
Inside the backend folder, create a new folder named “routes”. Inside that folder create two files named exercises.js and users.js.
const exercisesRouter = require('./routes/exercises');
const usersRouter = require('./routes/users');

app.use('/exercises', exercisesRouter);
app.use('/users', usersRouter);
Toward the end of server.js, right before the line app.listen(port, function() , add:
const router = require('express').Router();
let User = require('../models/user.model');

router.route('/').get((req, res) => {
  User.find()
    .then(users => res.json(users))
    .catch(err => res.status(400).json('Error: ' + err));
});

router.route('/add').post((req, res) => {
  const username = req.body.username;

  const newUser = new User({username});

  newUser.save()
    .then(() => res.json('User added!'))
    .catch(err => res.status(400).json('Error: ' + err));
});

module.exports = router;
Add this to users.js
const router = require('express').Router();
let Exercise = require('../models/exercise.model');

router.route('/').get((req, res) => {
  Exercise.find()
    .then(exercises => res.json(exercises))
    .catch(err => res.status(400).json('Error: ' + err));
});

router.route('/add').post((req, res) => {
  const username = req.body.username;
  const description = req.body.description;
  const duration = Number(req.body.duration);
  const date = Date.parse(req.body.date);

  const newExercise = new Exercise({
    username,
    description,
    duration,
    date,
  });

  newExercise.save()
  .then(() => res.json('Exercise added!'))
  .catch(err => res.status(400).json('Error: ' + err));
});

module.exports = router;
Add this to exercises.js
You can test your server API in Postman!
router.route('/:id').get((req, res) => {
  Exercise.findById(req.params.id)
    .then(exercise => res.json(exercise))
    .catch(err => res.status(400).json('Error: ' + err));
});
router.route('/:id').delete((req, res) => {
  Exercise.findByIdAndDelete(req.params.id)
    .then(() => res.json('Exercise deleted.'))
    .catch(err => res.status(400).json('Error: ' + err));
});
router.route('/update/:id').post((req, res) => {
  Exercise.findById(req.params.id)
    .then(exercise => {
      exercise.username = req.body.username;
      exercise.description = req.body.description;
      exercise.duration = Number(req.body.duration);
      exercise.date = Date.parse(req.body.date);

      exercise.save()
        .then(() => res.json('Exercise updated!'))
        .catch(err => res.status(400).json('Error: ' + err));
    })
    .catch(err => res.status(400).json('Error: ' + err));
});
Add this code after the routes you already added in “exercises.js”.
The backend is complete and now it is time to start the frontend!
Make sure the frontend development web server is running. If it’s not, you can start it with the following command in a terminal:
npm start
npm install bootstrap
import React from 'react';
import "bootstrap/dist/css/bootstrap.min.css";

function App() {
 return (
   <div className="container">
     Hello World
   </div>
 );
}

export default App;
We can get rid of most of the default code in App.js. All we need is:
Let’s set up React Router!
npm install react-router-dom
import React from 'react';
import { BrowserRouter as Router, Route } from "react-router-dom";
import "bootstrap/dist/css/bootstrap.min.css";

function App() {
 return (
   <Router>
     <div className="container">
       Hello World
     </div>
   </Router>
 );
}

export default App;
Embed the JSX code in a <Router></Router> element. App.js should look like this:
<Navbar />
<br/>
<Route path="/" exact component={ExercisesList} />
<Route path="/edit/:id" component={EditExercise} />
<Route path="/create" component={CreateExercise} />
<Route path="/user" component={CreateUser} />
Inside the <Router> element we will add the router configuration. Replace “Hello World” with:
import React from 'react';
import { BrowserRouter as Router, Route } from "react-router-dom";
import "bootstrap/dist/css/bootstrap.min.css";

import Navbar from "./components/navbar.component"
import ExercisesList from "./components/exercises-list.component";
import EditExercise from "./components/edit-exercise.component";
import CreateExercise from "./components/create-exercise.component";
import CreateUser from "./components/create-user.component";

function App() {
  return (
    <Router>
      <div className="container">
        <Navbar />
        <br/>
        <Route path="/" exact component={ExercisesList} />
        <Route path="/edit/:id" component={EditExercise} />
        <Route path="/create" component={CreateExercise} />
        <Route path="/user" component={CreateUser} />
      </div>
    </Router>
  );
}

export default App;
Full code of App.js after the imports are added:
In the same directory as App.js, create a new directory called ‘components’. Inside that directory create a file called ‘navbar.component.js’. Here is the code for that file:
import React, { Component } from 'react';
import { Link } from 'react-router-dom';

export default class Navbar extends Component {

  render() {
    return (
      <nav className="navbar navbar-dark bg-dark navbar-expand-lg">
        <Link to="/" className="navbar-brand">ExcerTracker</Link>
        <div className="collpase navbar-collapse">
        <ul className="navbar-nav mr-auto">
          <li className="navbar-item">
          <Link to="/" className="nav-link">Exercises</Link>
          </li>
          <li className="navbar-item">
          <Link to="/create" className="nav-link">Create Exercise Log</Link>
          </li>
          <li className="navbar-item">
          <Link to="/user" className="nav-link">Create User</Link>
          </li>
        </ul>
        </div>
      </nav>
    );
  }
}-
exercises-list.component.js
-
edit-exercise.component.js
-
create-exercise.component.js
-
create-user.component.js
Next, create four more files in the components directory with the following names:
import React, { Component } from 'react';

export default class ExercisesList extends Component {
  render() {
    return (
      <div>
        <p>You are on the Exercises List component!</p>
      </div>
    )
  }
}
exercises-list.component.js:
import React, { Component } from 'react';

export default class EditExercise extends Component {
  render() {
    return (
      <div>
        <p>You are on the Edit Exercise component!</p>
      </div>
    )
  }
}
edit-exercise.component.js:
import React, { Component } from 'react';

export default class CreateExercise extends Component {
  render() {
    return (
      <div>
        <p>You are on the Create Exercise component!</p>
      </div>
    )
  }
}
create-exercise.component.js:
create-user.component.js:
import React, { Component } from 'react';

export default class CreateUser extends Component {
  render() {
    return (
      <div>
        <p>You are on the Create User component!</p>
      </div>
    )
  }
}
The Create Exercise Component
import React, { Component } from 'react';
import DatePicker from 'react-datepicker';
import "react-datepicker/dist/react-datepicker.css";

export default class CreateExercise extends Component {
  constructor(props) {
    super(props);

    this.onChangeUsername = this.onChangeUsername.bind(this);
    this.onChangeDescription = this.onChangeDescription.bind(this);
    this.onChangeDuration = this.onChangeDuration.bind(this);
    this.onChangeDate = this.onChangeDate.bind(this);
    this.onSubmit = this.onSubmit.bind(this);

    this.state = {
      username: '',
      description: '',
      duration: 0,
      date: new Date(),
      users: []
    }
  }
The Create Exercise Component
 componentDidMount() {
    this.setState({
      users: ['test user'],
      username: 'test user'
    });
  }

  onChangeUsername(e) {
    this.setState({
      username: e.target.value
    });
  }

  onChangeDescription(e) {
    this.setState({
      description: e.target.value
    });
  }

  onChangeDuration(e) {
    this.setState({
      duration: e.target.value
    });
  }

  onChangeDate(date) {
    this.setState({
      date: date
    });
  }
onSubmit(e) {
e.preventDefault();
const exercise = {
username: this.state.username,
description: this.state.description,
duration: this.state.duration,
date: this.state.date,
};
console.log(exercise);
window.location = '/';
}
render() {
    return (
      <div>
        <h3>Create New Exercise Log</h3>
        <form onSubmit={this.onSubmit}>
          <div className="form-group">
            <label>Username: </label>
            <select ref="userInput"
                required
                className="form-control"
                value={this.state.username}
                onChange={this.onChangeUsername}>
                {
                  this.state.users.map(function(user) {
                    return <option
                      key={user}
                      value={user}>{user}
                      </option>;
                  })
                }
            </select>
          </div>
          <div className="form-group">
            <label>Description: </label>
            <input  type="text"
                required
                className="form-control"
                value={this.state.description}
                onChange={this.onChangeDescription}
                />
          </div>
 <div className="form-group">
            <label>Duration (in minutes): </label>
            <input
                type="text"
                className="form-control"
                value={this.state.duration}
                onChange={this.onChangeDuration}
                />
          </div>
          <div className="form-group">
            <label>Date: </label>
            <div>
              <DatePicker
                selected={this.state.date}
                onChange={this.onChangeDate}
              />
            </div>
          </div>

          <div className="form-group">
            <input type="submit" value="Create Exercise Log" className="btn btn-primary" />
          </div>
        </form>
      </div>
    )
  }
}
Run this in the terminal:
npm install react-datepicker
You can now test out the app so far! If you add an exercise, you will see it logged to the console.
Connecting frontend to backend!
import React, { Component } from 'react';
import axios from 'axios';

export default class CreateUser extends Component {
  constructor(props) {
    super(props);

    this.onChangeUsername = this.onChangeUsername.bind(this);
    this.onSubmit = this.onSubmit.bind(this);

    this.state = {
      username: ''
    }
  }

  onChangeUsername(e) {
    this.setState({
      username: e.target.value
    })
  }

  onSubmit(e) {
    e.preventDefault();

    const user = {
      username: this.state.username
    }

    console.log(user);

    axios.post('http://localhost:5000/users/add', user)
      .then(res => console.log(res.data));

    this.setState({
      username: ''
    })
  }
render() {
return (
<div>
<h3>Create New User</h3>
<form onSubmit={this.onSubmit}>
<div className="form-group">
<label>Username: </label>
<input type="text"
required
className="form-control"
value={this.state.username}
onChange={this.onChangeUsername}
/>
</div>
<div className="form-group">
<input type="submit" value="Create User" className="btn btn-primary" />
</div>
</form>
</div>
)
}
}Let's test things out!
- Start server: nodemon server
- Point your web browser to localhost:3000/user and try adding a new username.


import React, { Component } from 'react';
import DatePicker from 'react-datepicker';
import "react-datepicker/dist/react-datepicker.css";
import axios from 'axios';

export default class EditExercise extends Component {
  constructor(props) {
    super(props);

    this.onChangeUsername = this.onChangeUsername.bind(this);
    this.onChangeDescription = this.onChangeDescription.bind(this);
    this.onChangeDuration = this.onChangeDuration.bind(this);
    this.onChangeDate = this.onChangeDate.bind(this);
    this.onSubmit = this.onSubmit.bind(this);

    this.state = {
      username: '',
      description: '',
      duration: 0,
      date: new Date(),
      users: []
    }
  }
componentDidMount() {
    axios.get('http://localhost:5000/exercises/'+this.props.match.params.id)
      .then(response => {
        this.setState({
          username: response.data.username,
          description: response.data.description,
          duration: response.data.duration,
          date: new Date(response.data.date)
        })
      })
      .catch(function (error) {
        console.log(error);
      })

    axios.get('http://localhost:5000/users/')
      .then(response => {
        this.setState({ users: response.data.map(user => user.username) });
      })
      .catch((error) => {
        console.log(error);
      })
  }

  onChangeUsername(e) {
    this.setState({
      username: e.target.value
    });
  }

  onChangeDescription(e) {
    this.setState({
      description: e.target.value
    });
  }
onChangeDuration(e) {
    this.setState({
      duration: e.target.value
    });
  }

  onChangeDate(date) {
    this.setState({
      date: date
    });
  }

  onSubmit(e) {
    e.preventDefault();

    const exercise = {
      username: this.state.username,
      description: this.state.description,
      duration: this.state.duration,
      date: this.state.date,
    };

    console.log(exercise);

    axios.post('http://localhost:5000/exercises/update/'+this.props.match.params.id, exercise)
      .then(res => console.log(res.data));

    window.location = '/';
  }
render() {
    return (
      <div>
        <h3>Edit Exercise Log</h3>
        <form onSubmit={this.onSubmit}>
          <div className="form-group">
            <label>Username: </label>
            <select ref="userInput"
                className="form-control"
                value={this.state.username}
                onChange={this.onChangeUsername}>
                {
                  this.state.users.map(function(user) {
                    return <option
                      key={user}
                      value={user}>{user}
                      </option>;
                  })
                }
            </select>
          </div>
          <div className="form-group">
            <label>Description: </label>
            <input  type="text"
                required
                className="form-control"
                value={this.state.description}
                onChange={this.onChangeDescription}
                />
          </div>
          <div className="form-group">
            <label>Duration (in minutes): </label>
            <input
                type="text"
                className="form-control"
                value={this.state.duration}
onChange={this.onChangeDuration}
/>
</div>
<div className="form-group">
<label>Date: </label>
<DatePicker
selected={this.state.date}
onChange={this.onChangeDate}
/>
</div>
<div className="form-group">
<input type="submit" value="Edit Exercise Log" className="btn btn-primary" />
</div>
</form>
</div>
)
}
}We’re done! We now have a fully functional MERN exercise tracker app using MongoDB Atlas 🎉
What is Open Source?
A software for which the original source code is made freely available and may be redistributed and modified according to the requirement of the user.
What is GitHub?
GitHub is a web-based version-control and collaboration platform for software developers.
Host your Application on GitHub

Create a Repository

Title Text

Pushing Application from Workstation to GitHub using Git Bash
$ git init
$ git config --global user.name "[GitHub Username]"
$ git config --global user.email "[GitHub Primary Email]"
$ git add [filename]/[.]
$ git commit -m "[Commit Message]"
$ git remote add origin "[Repository URL]"
$ git branch -M main
$ git push -u origin main


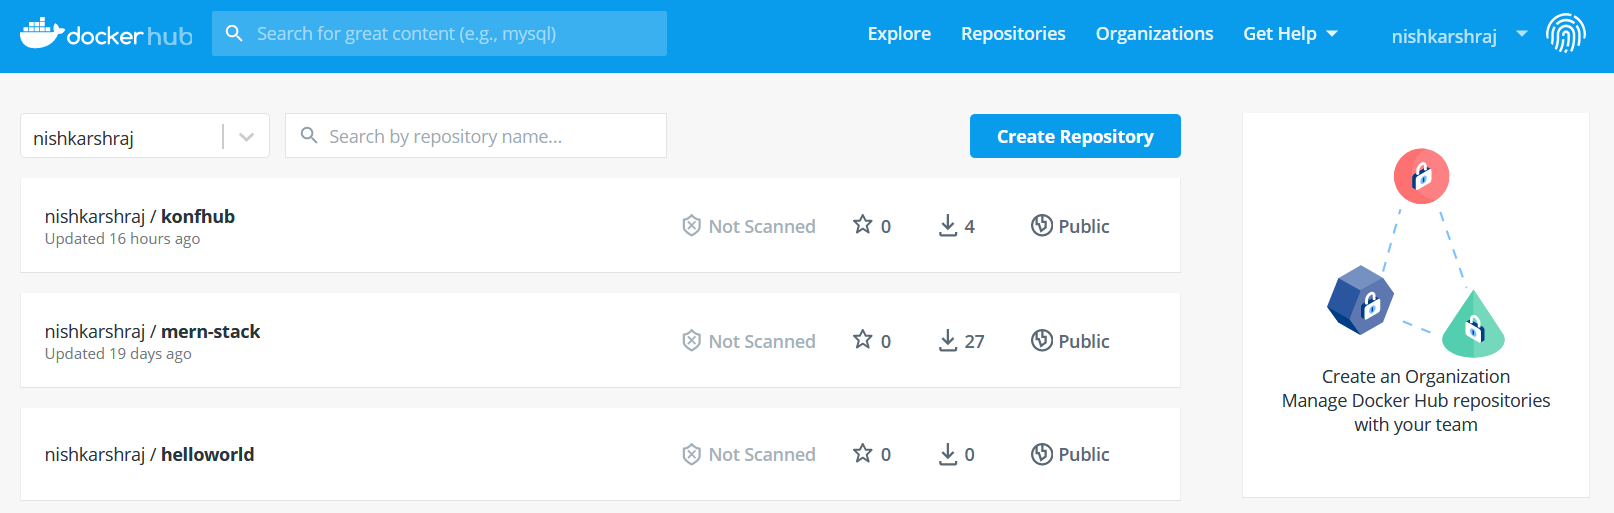
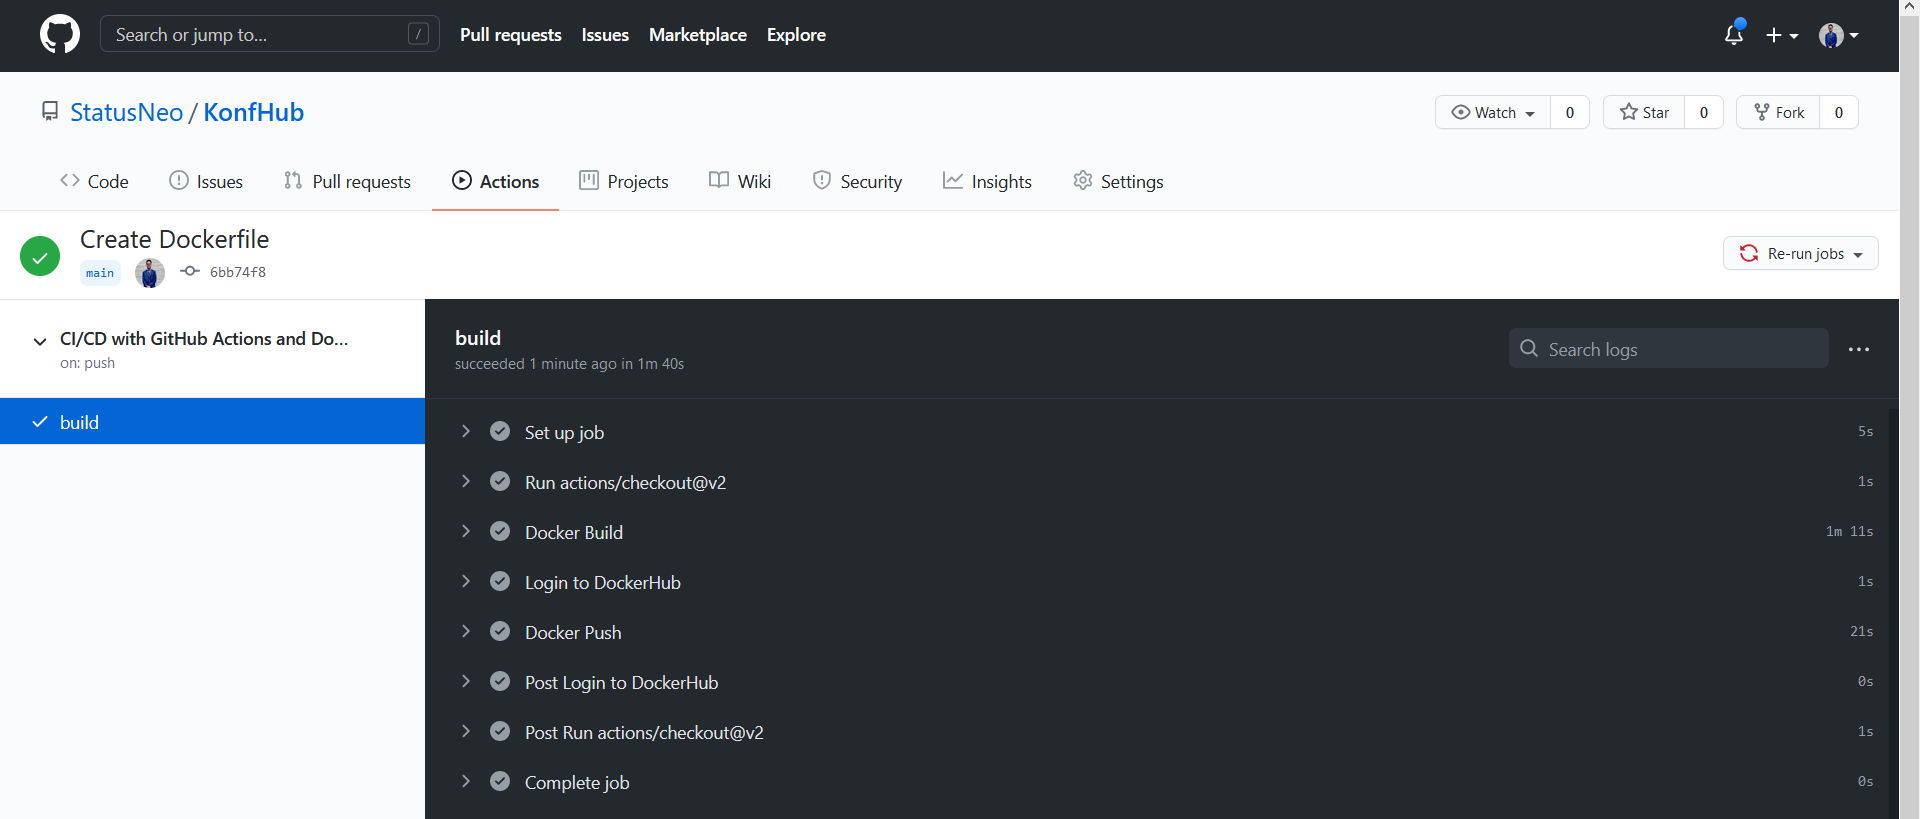
CI/CD using GitHub Actions and Docker


FROM    node:10-alpine
WORKDIR /usr/src/app
COPY    . .
RUN     npm install
RUN     npm run client-install

EXPOSE  3000
CMD     [ "npm", "run", "dev" ]
Dockerfile
name: CI/CD with GitHub Actions and Docker

on:
  push:

jobs:

  build:
    runs-on: ubuntu-latest

    steps:
      - uses: actions/checkout@v2

      - name: Docker Build
        run: docker build -t nishkarshraj/ossdays .

      - name: Login to DockerHub
        uses: docker/login-action@v1
        with:
          username: ${{ secrets.username }}
          password: ${{ secrets.password }}

      - name: Docker Push
        run: docker push nishkarshraj/ossdays
GitHub Actions for Docker Build and Push


Launching Docker Containers on Local Workstation


Infrastructure Automation for Azure Cloud using Terraform


provider "azurerm" {
    version = "~>1.32.0"
    subscription_id = "[Subscriber ID]"
    client_id = "[Application ID]"
    client_secret = "[Password]"
    tenant_id = "[Tenant]"
}
Create Provider.tf file
Create Main.tf file
resource "azurerm_resource_group" "rg"{
    name = "noicecurse"
    location = "East Asia"
}


Deploying the WebApp on Azure Cloud using GitHub Actions


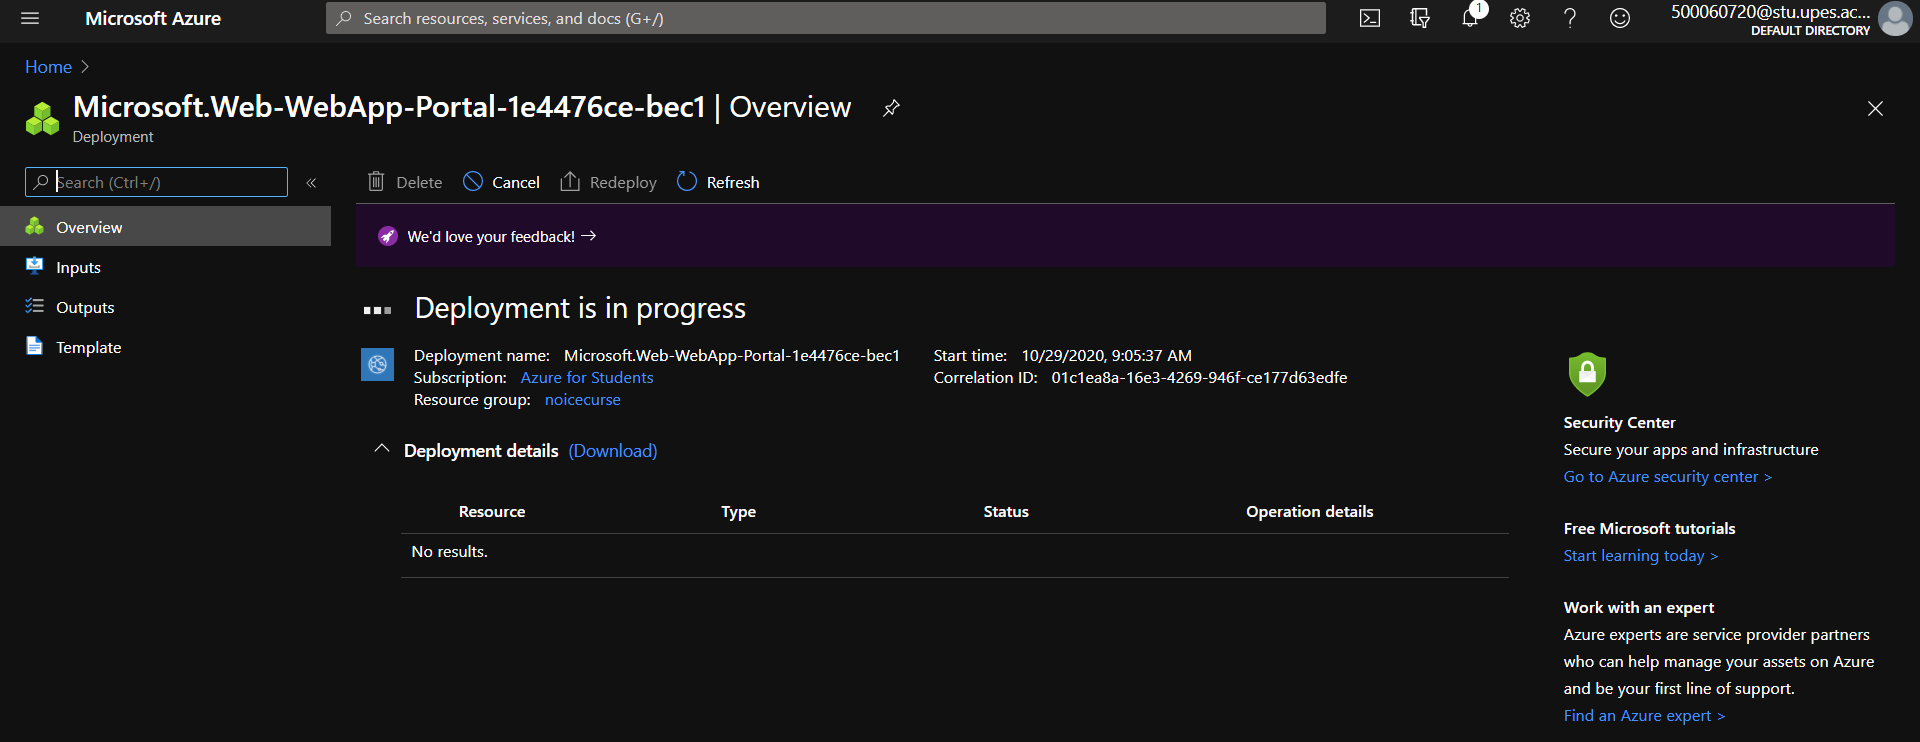


on:
  push

env:
  AZURE_WEBAPP_NAME: konfdemo
  AZURE_WEBAPP_PACKAGE_PATH: '.'
  NODE_VERSION: '10.x'

jobs:
  build-and-deploy:
    name: Build and Deploy
    runs-on: ubuntu-latest
    steps:
    - uses: actions/checkout@v2
    - name: Use Node.js ${{ env.NODE_VERSION }}
      uses: actions/setup-node@v1
      with:
        node-version: ${{ env.NODE_VERSION }}
    - name: npm install, build, and test
      run: |
        # Build and test the project, then
        # deploy to Azure Web App.
        npm install
        npm run client-install
        npm run build --if-present

    - name: 'Deploy to Azure WebApp'
      uses: azure/webapps-deploy@v2
      with:
        app-name: ${{ env.AZURE_WEBAPP_NAME }}
        publish-profile: ${{ secrets.AZURE_WEBAPP_PUBLISH_PROFILE }}
        package: ${{ env.AZURE_WEBAPP_PACKAGE_PATH }}


References
- https://github.com/StatusNeo/KonfHub
- https://hub.docker.com/repository/docker/nishkarshraj/ossdays
- https://azure.microsoft.com/en-in/free
- https://git-scm.com/book/en/v2
- https://www.terraform.io/
- https://www.docker.com/
- https://github.com/features/actions
ossdays
By Shreya Prasad

