Front-end programming

react
Before react
Early years
Back in the late 90's, early 2000's, programmers only had access to basic HTML, CSS, and JavaScript.
At the time, a user's interaction with a website was mostly based on simple forms being sent to/from the server, or links being clicked.

JQuery
There was a time when displaying a website's content on different browsers meant programming different versions of that website with the different JavaScript engines in mind.
With jQuery, a unified way of manipulating the DOM appeared; developers had to focus only on the library's syntax and what they wanted to implement.
The rise of web applications
With the power and freedom provided by jQuery, developers started building larger, more complex features.
Eventually websites turned into full applications, like Facebook, for example, where users got to log in, check a news feed, message their friends, etc.

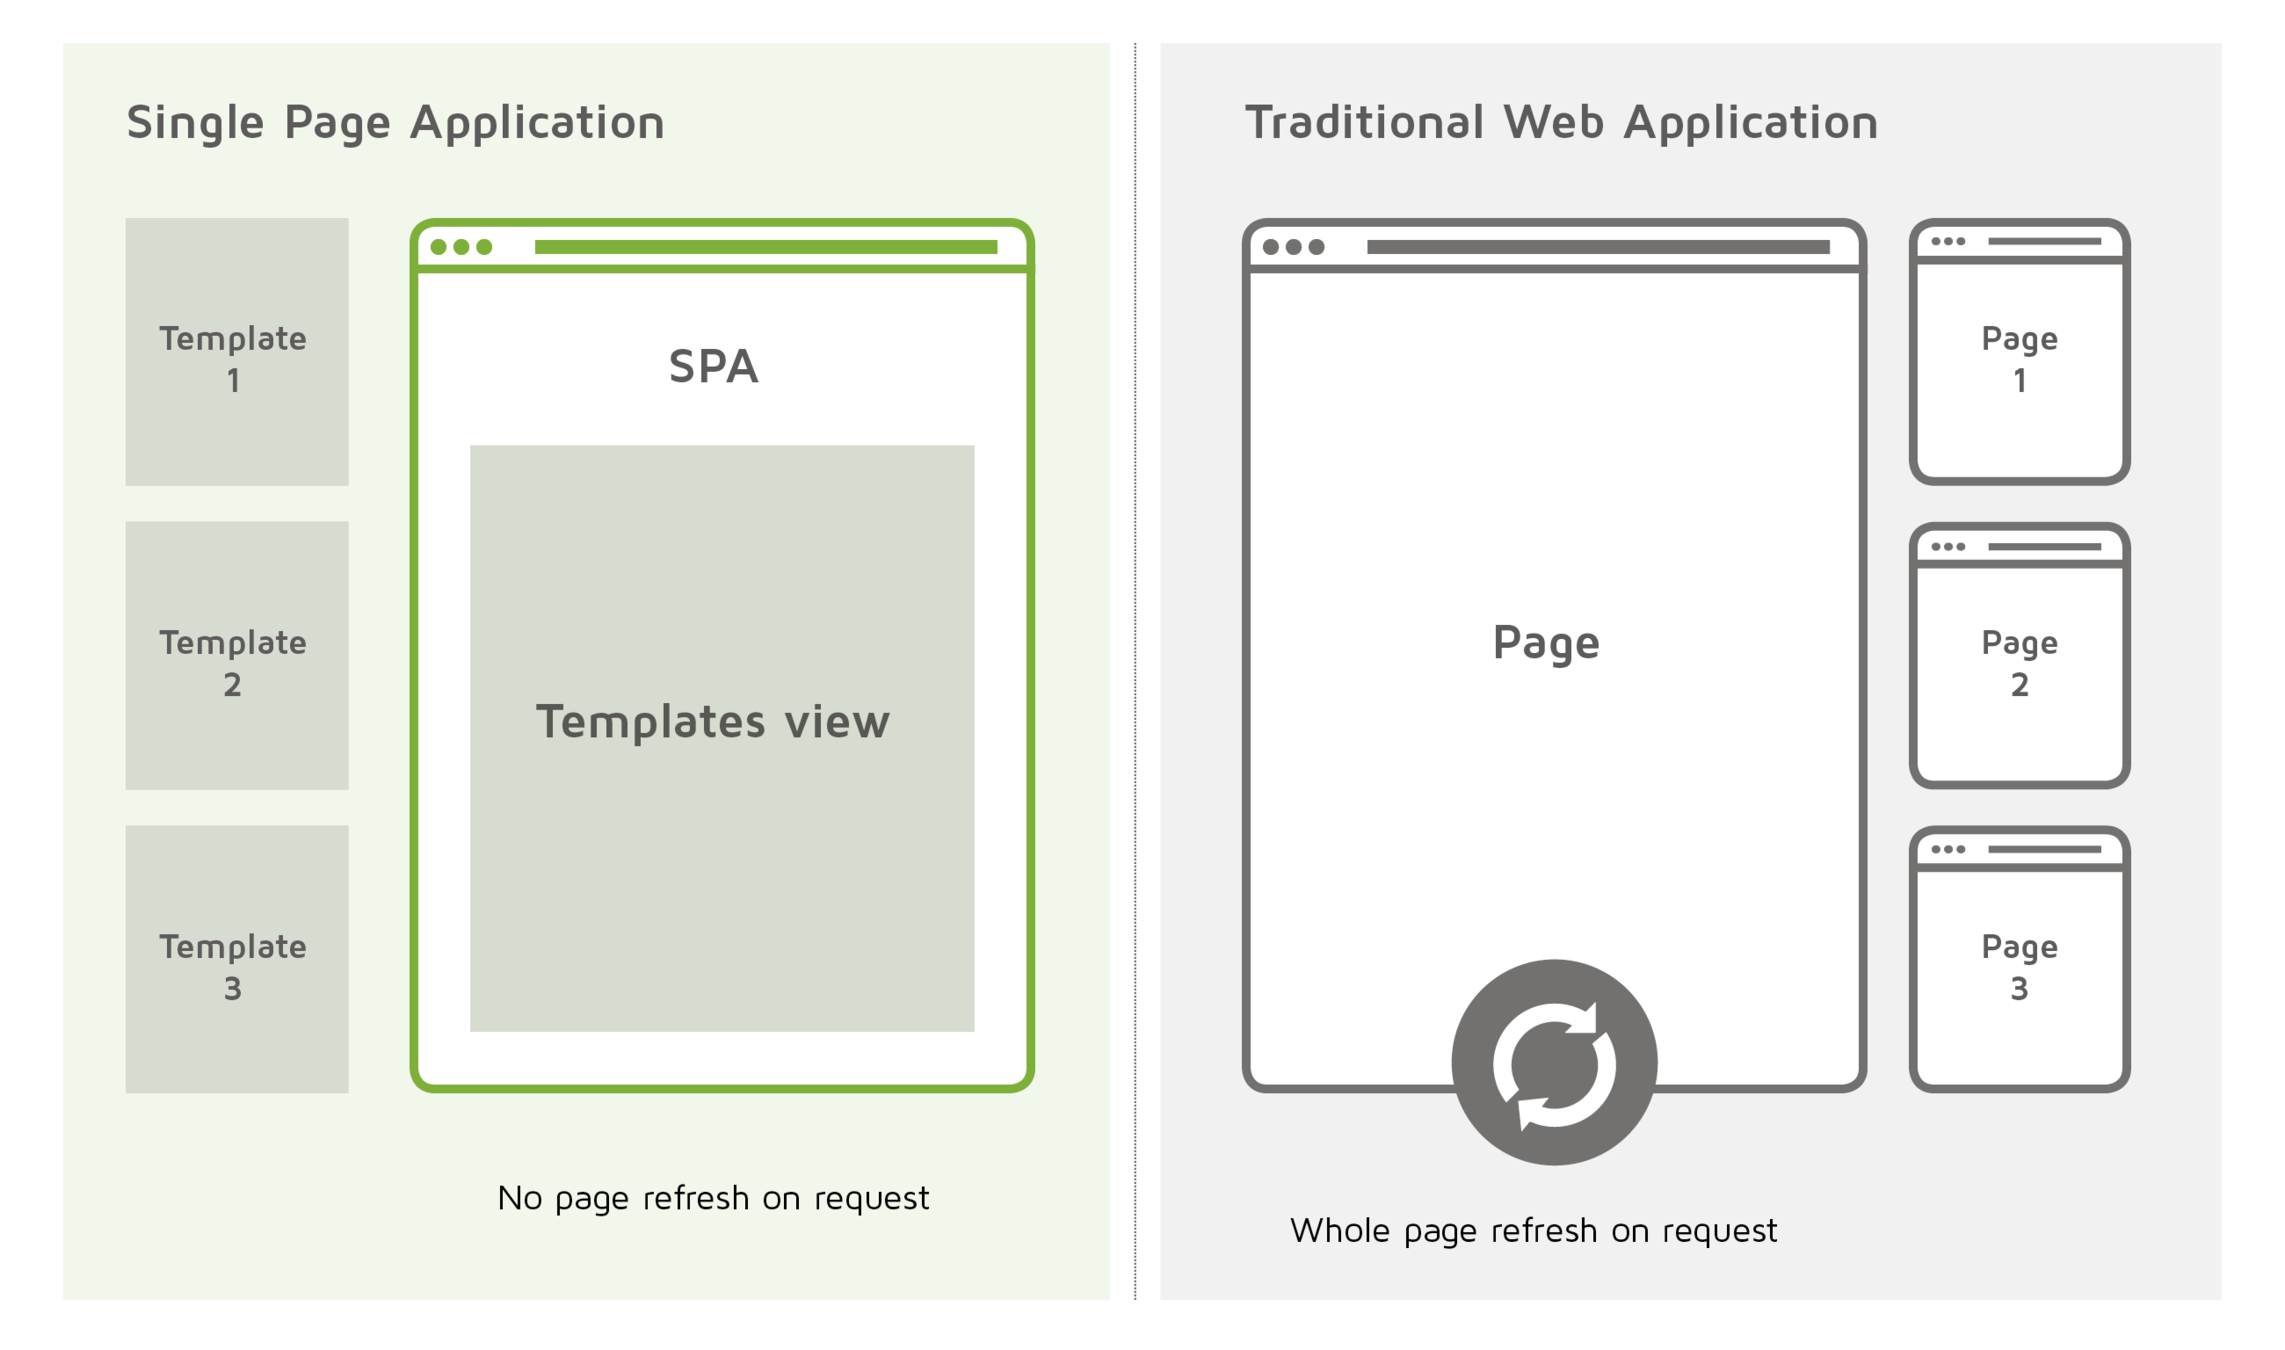
Single page applications
jQuery and Ajax enabled developers to focus a lot more on JavaScript than HTML, leading to the origin of Single Page Applications.
SPAs act more like desktop applications. We stay on the same page the entire time, and JavaScript updates the DOM.
In other words, it's possible to sign into an application and interact with it without ever speaking to the server again.
ANGULARJS
Angular JS was created by Google, and in 2010 it became the standard for building applications.

Angular allowed us to build large systems using containers to organize the different parts of an application (views, controllers, filters...).
A new problem
As apps got progressively bigger and more complex, new problems started to take form.
One problem in particular gave Facebook developers several headaches: State Management and Data Flow.

A user clicks a button that updates a particular area of the page, and that particular area change triggers another update in another area, and so on, and so on.
The birth of react
AngularJS was creating more problems than solving them for Facebook developers, so they decided to come up with a solution of their own: React.

React was released in 2013 and it quickly took off because it developed a completely new way of building front-end applications.
A side note on angular
In 2014, AngularJS developers realized that their way of architecting the framework wasn't enough for building good, scalable applications.
At this time, they decided to completely rewrite the framework which marked the birth of the Angular framework that is used today (version 2.0 and up).
AngularJS is in Long Term Support until the end of 2021, after which it will no longer be updated. Companies are upgrading to the newer Angular version, but quite a lot moved on to other frameworks.
React remains the most popular front-end framework today.
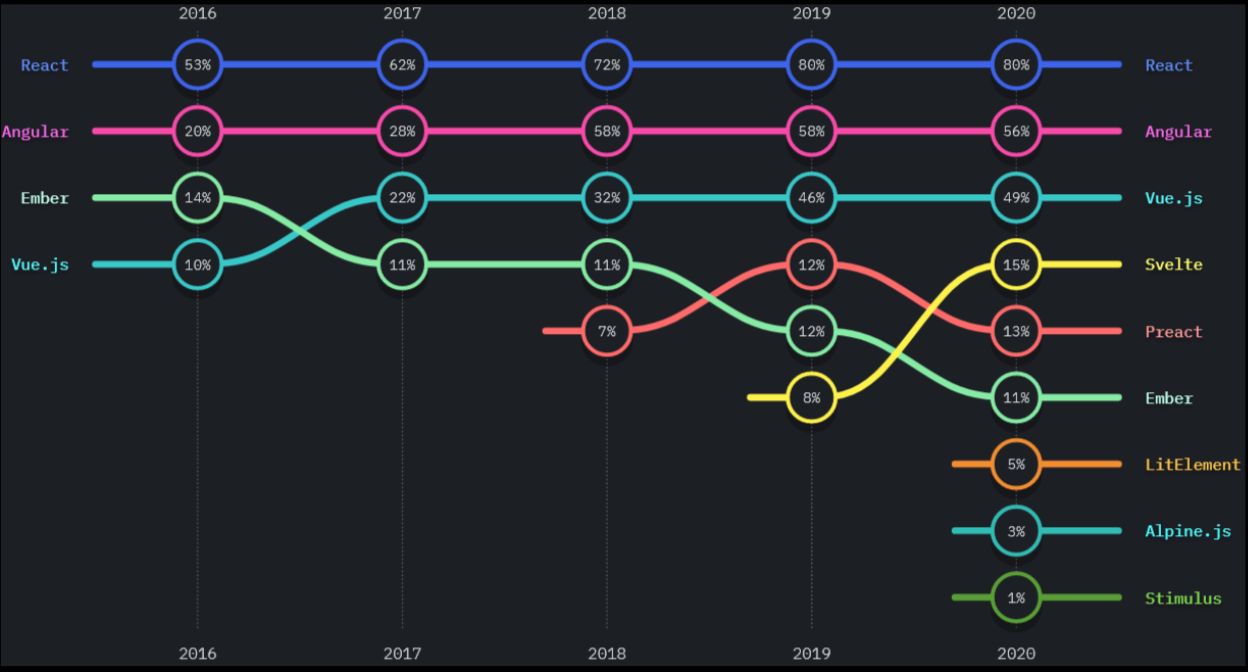
OVERVIEW OF FRONTEND FRAMEWORKS
Here's a quick overview of some results from a 2020 survey with 20 thousand+ participants, regarding the usage of FE frameworks:
famous apps using react


NEXT
But what makes React so great?
Let's take a look at some of Reacts's basic principles.
REACT Principles
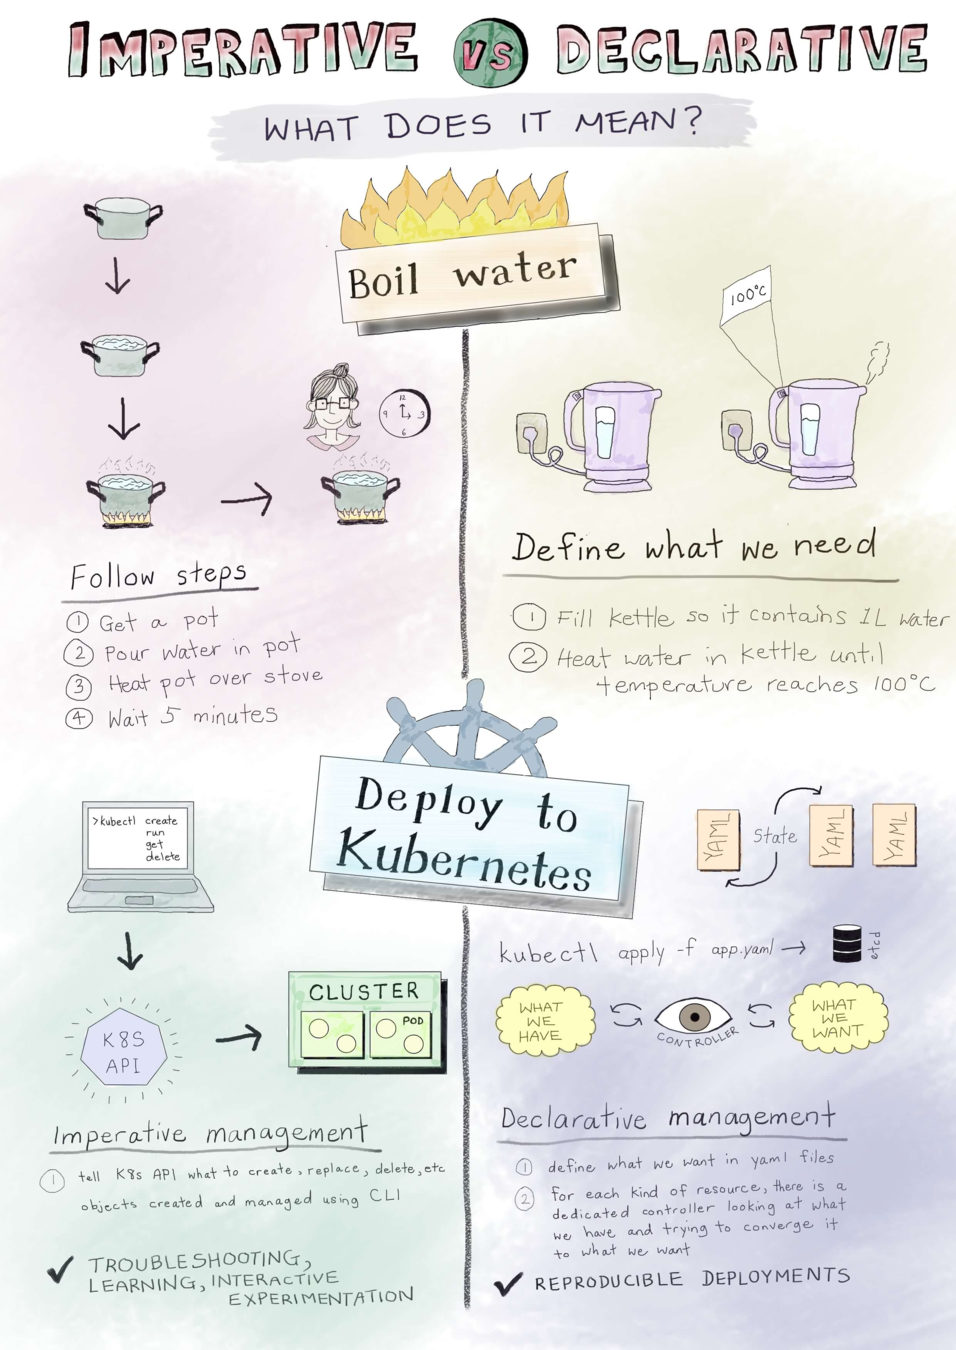
Declarative Programming
Before React, frameworks used an Imperative programming paradigm, allowing us to directly change individual parts of our app by manipulating the DOM.
React, however, came up with a new approach: we tell React what we want to change, and React does it for us. This is called Declarative programming. But... why?
The cost of dom manipulation
DOM manipulation is one of the biggest performance bottlenecks. It takes a considerable amount of time for DOM changes to take place.
This happens because the browser needs to do two operations:
- Change the element and add it to the page
- Refloat, i.e., recalculate the page's layout
React takes care of this process for us, finding the best way to use/manipulate the DOM. But... how?
virtual dom
The virtual DOM is a programming concept where an ideal, or “virtual”, representation of a UI is kept in memory and synced with the “real” DOM.
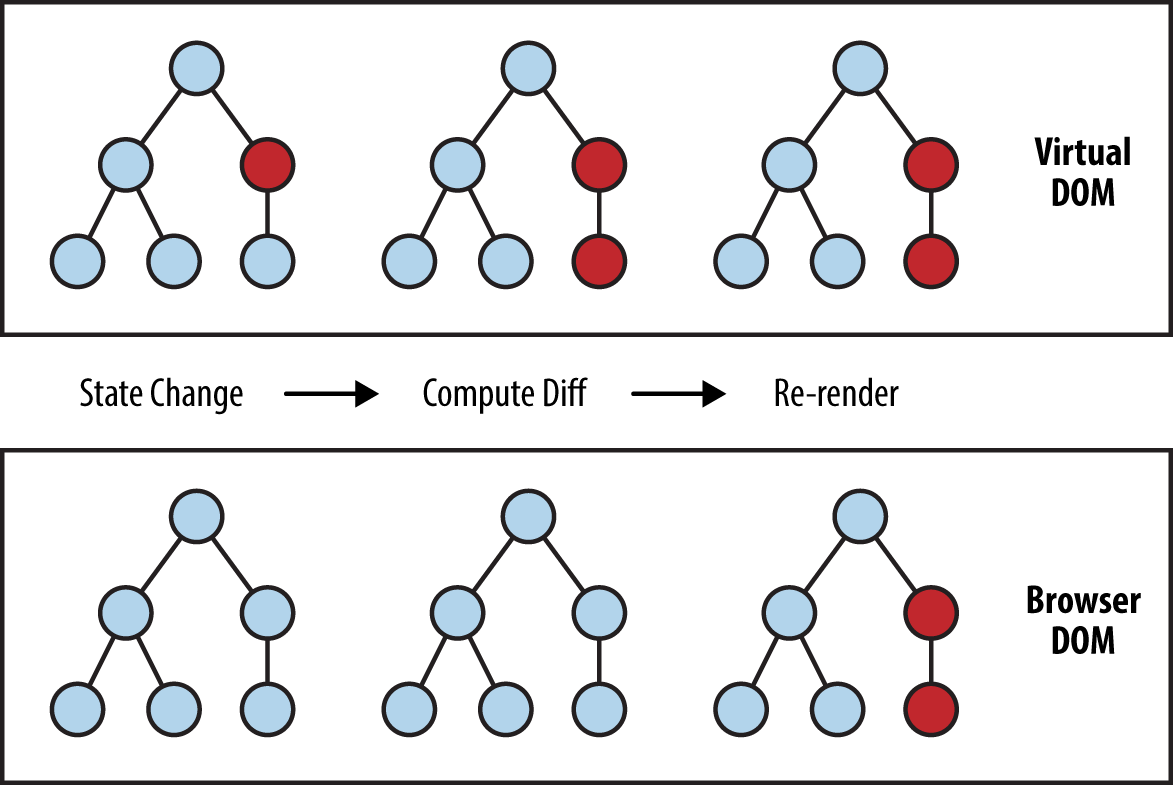
VDOM
The VDOM approach enables the declarative API of React.
It abstracts out the attribute manipulation, event handling, and manual DOM updating that we would have to do to build our app.

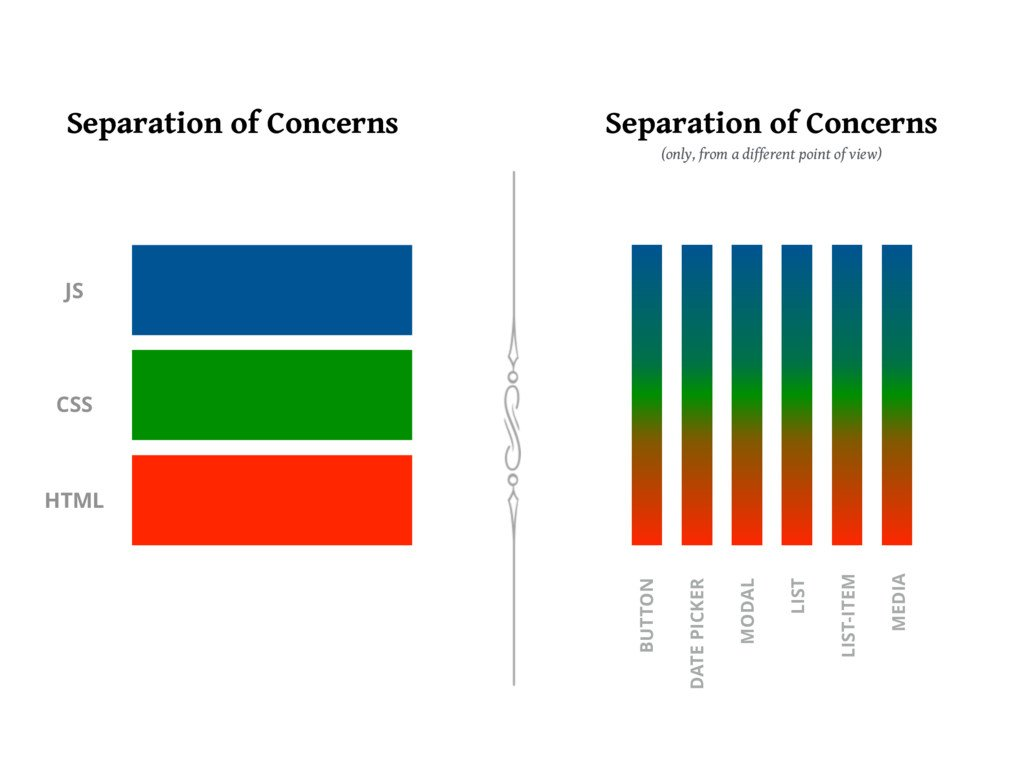
Separation of concerns
Most MVC frameworks separate technologies instead of separating concerns.
Separation of concerns is a design principle for partitioning a computer program into distinct sections. Each section addresses a specific concern.
React, however, uses components to separate concerns.
Component-based architecture
React is designed around the concept of reusable components.
Everything in React is a component that we use to build a web app like lego blocks.
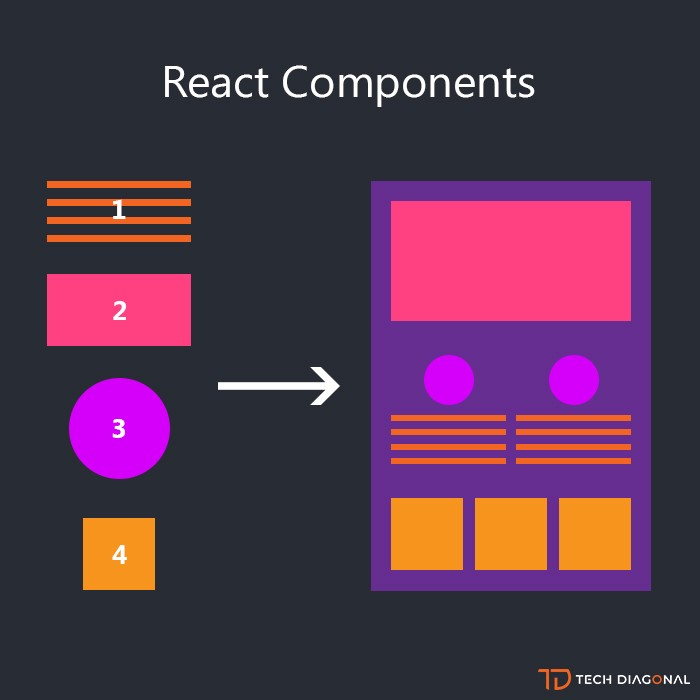
React components
Components are reusable, composable, maintainable, testable, and know how to render themselves into the DOM.
- REUSABLE - A component can be copied to multiple locations within the same app, or even be used in a different one.
- COMPOSABLE - A component may contain other smaller components.
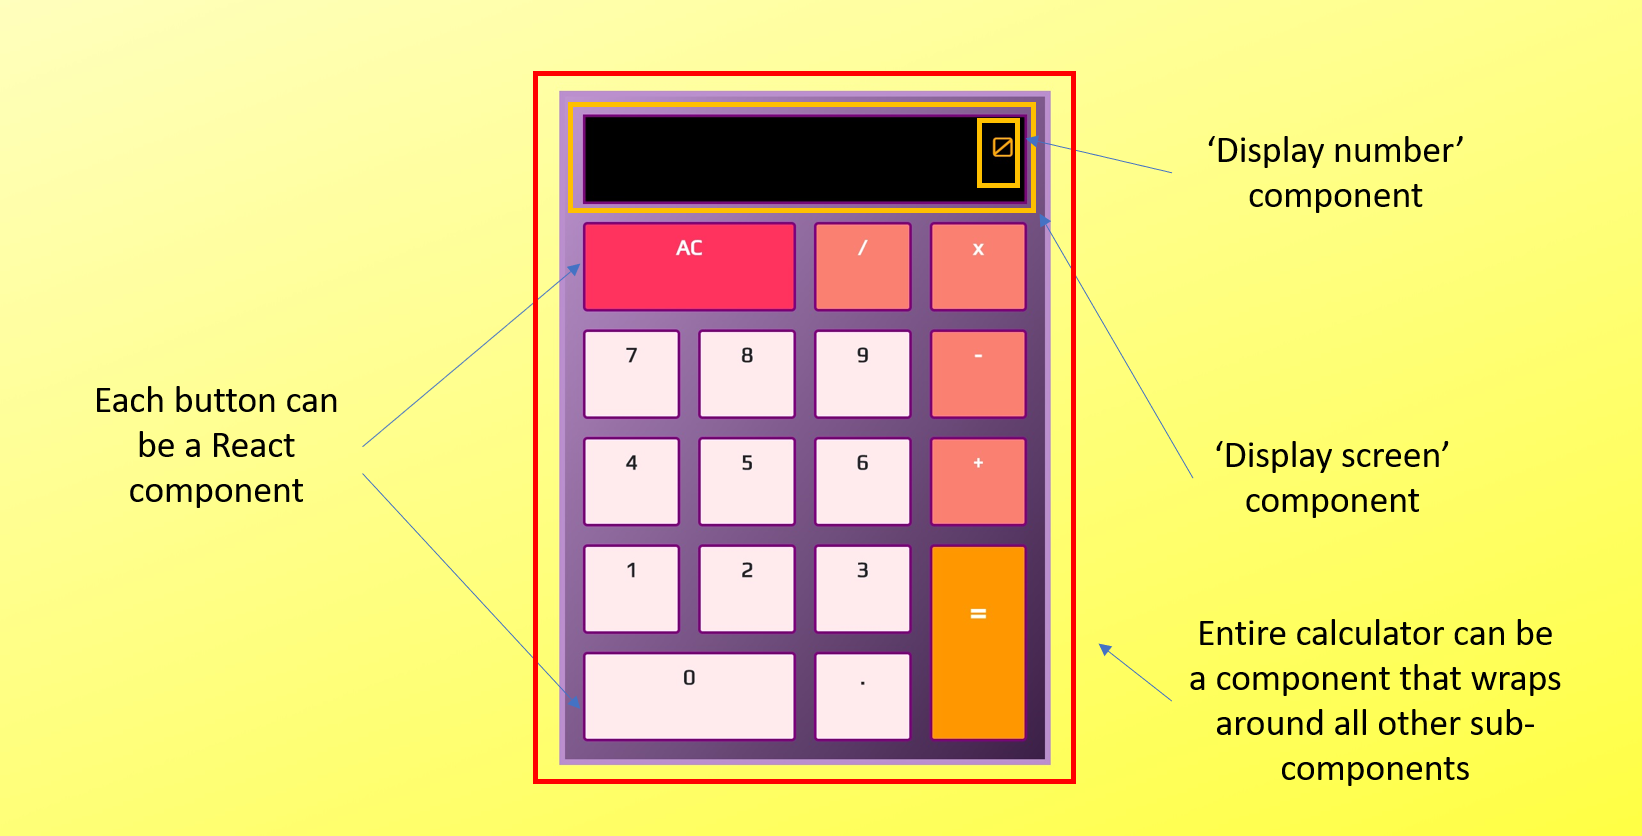
But... what is a component?
React components
Components are JavaScript functions that receive some input (props), and return something similar to HTML.
Components can be built as simple functions or as ES6 classes.
function Welcome(props) {
  return <h1>Hello, {props.name}</h1>;
}

// OR
class Welcome extends React.Component {
  render() {
    return <h1>Hello, {this.props.name}</h1>;
  }
}
Function and Class components have additional features that we will discuss later.
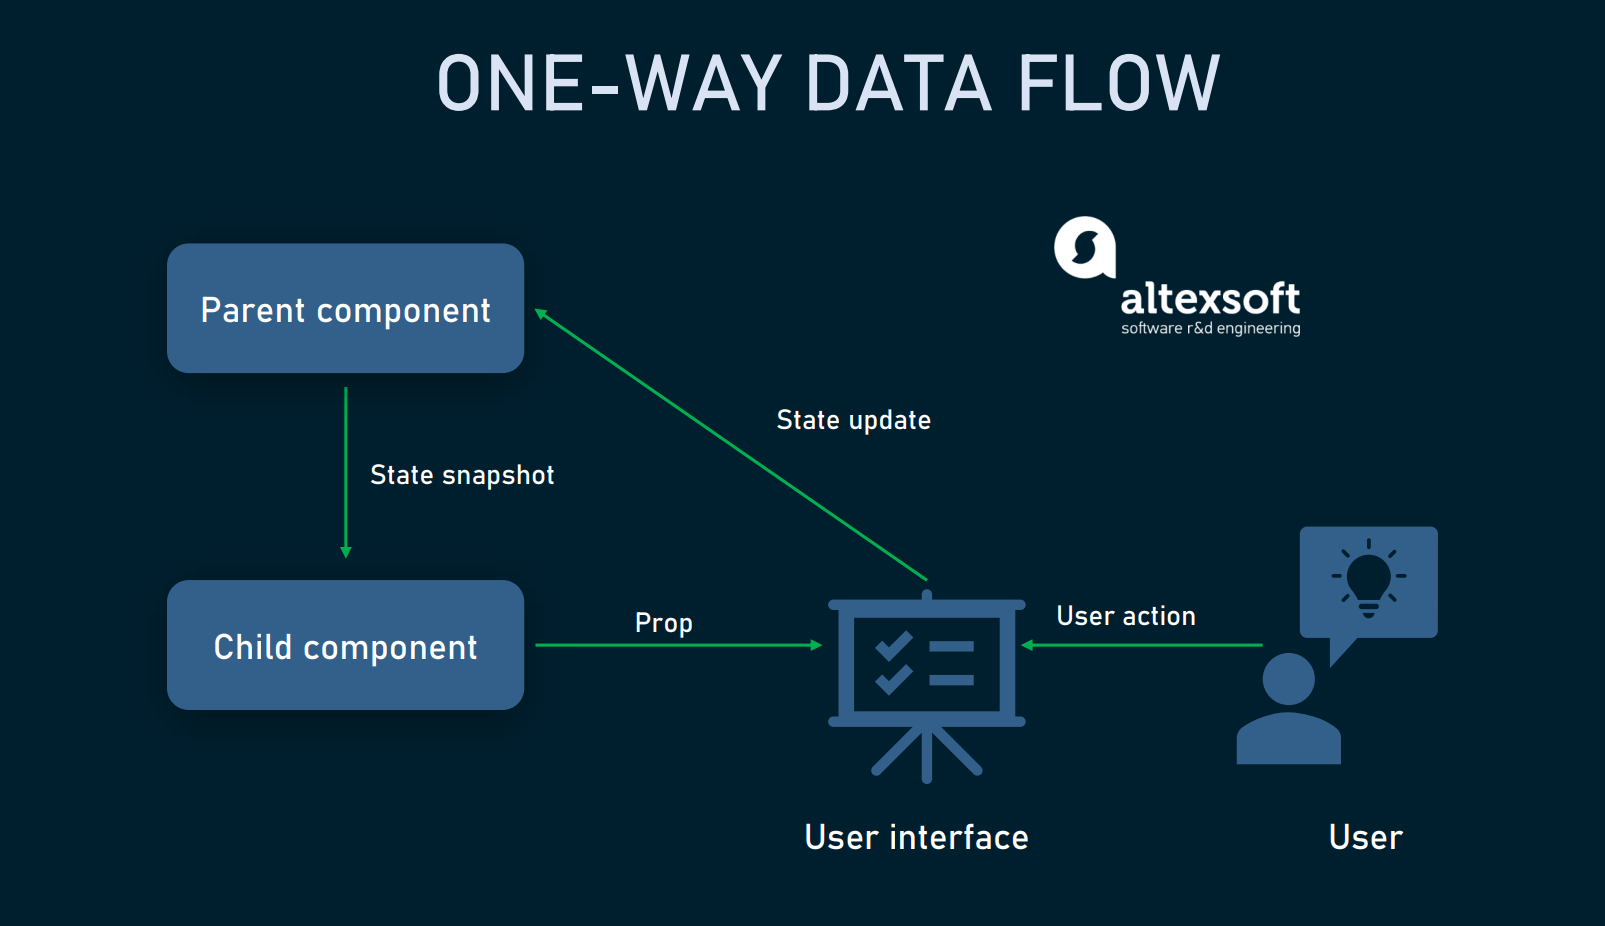
one-way data flow
React components are functional in nature: they receive information through arguments and pass information via their return values.
This is called unidirectional (or one-way) data flow.
An important rule in React is that components should not change the received input (props).
Alternatively, components can be stateful (instead of stateless), that is, they can have a state that saves/updates data relevant for its functions.
one-way data flow
Components are rendered as a function of the application state.
User events can trigger explicit state mutations.
State mutations will re-render components.
LearN once, write anywhere
React doesn't make assumptions s about the rest of our technology stack.
This means we can develop new features in React without rewriting existing code.
React can also render on the server using Node and power mobile apps using React Native.
react first steps
REACT DEVELOPer tools
React Developer Tools is a browser extension that allows for inspection of React components.
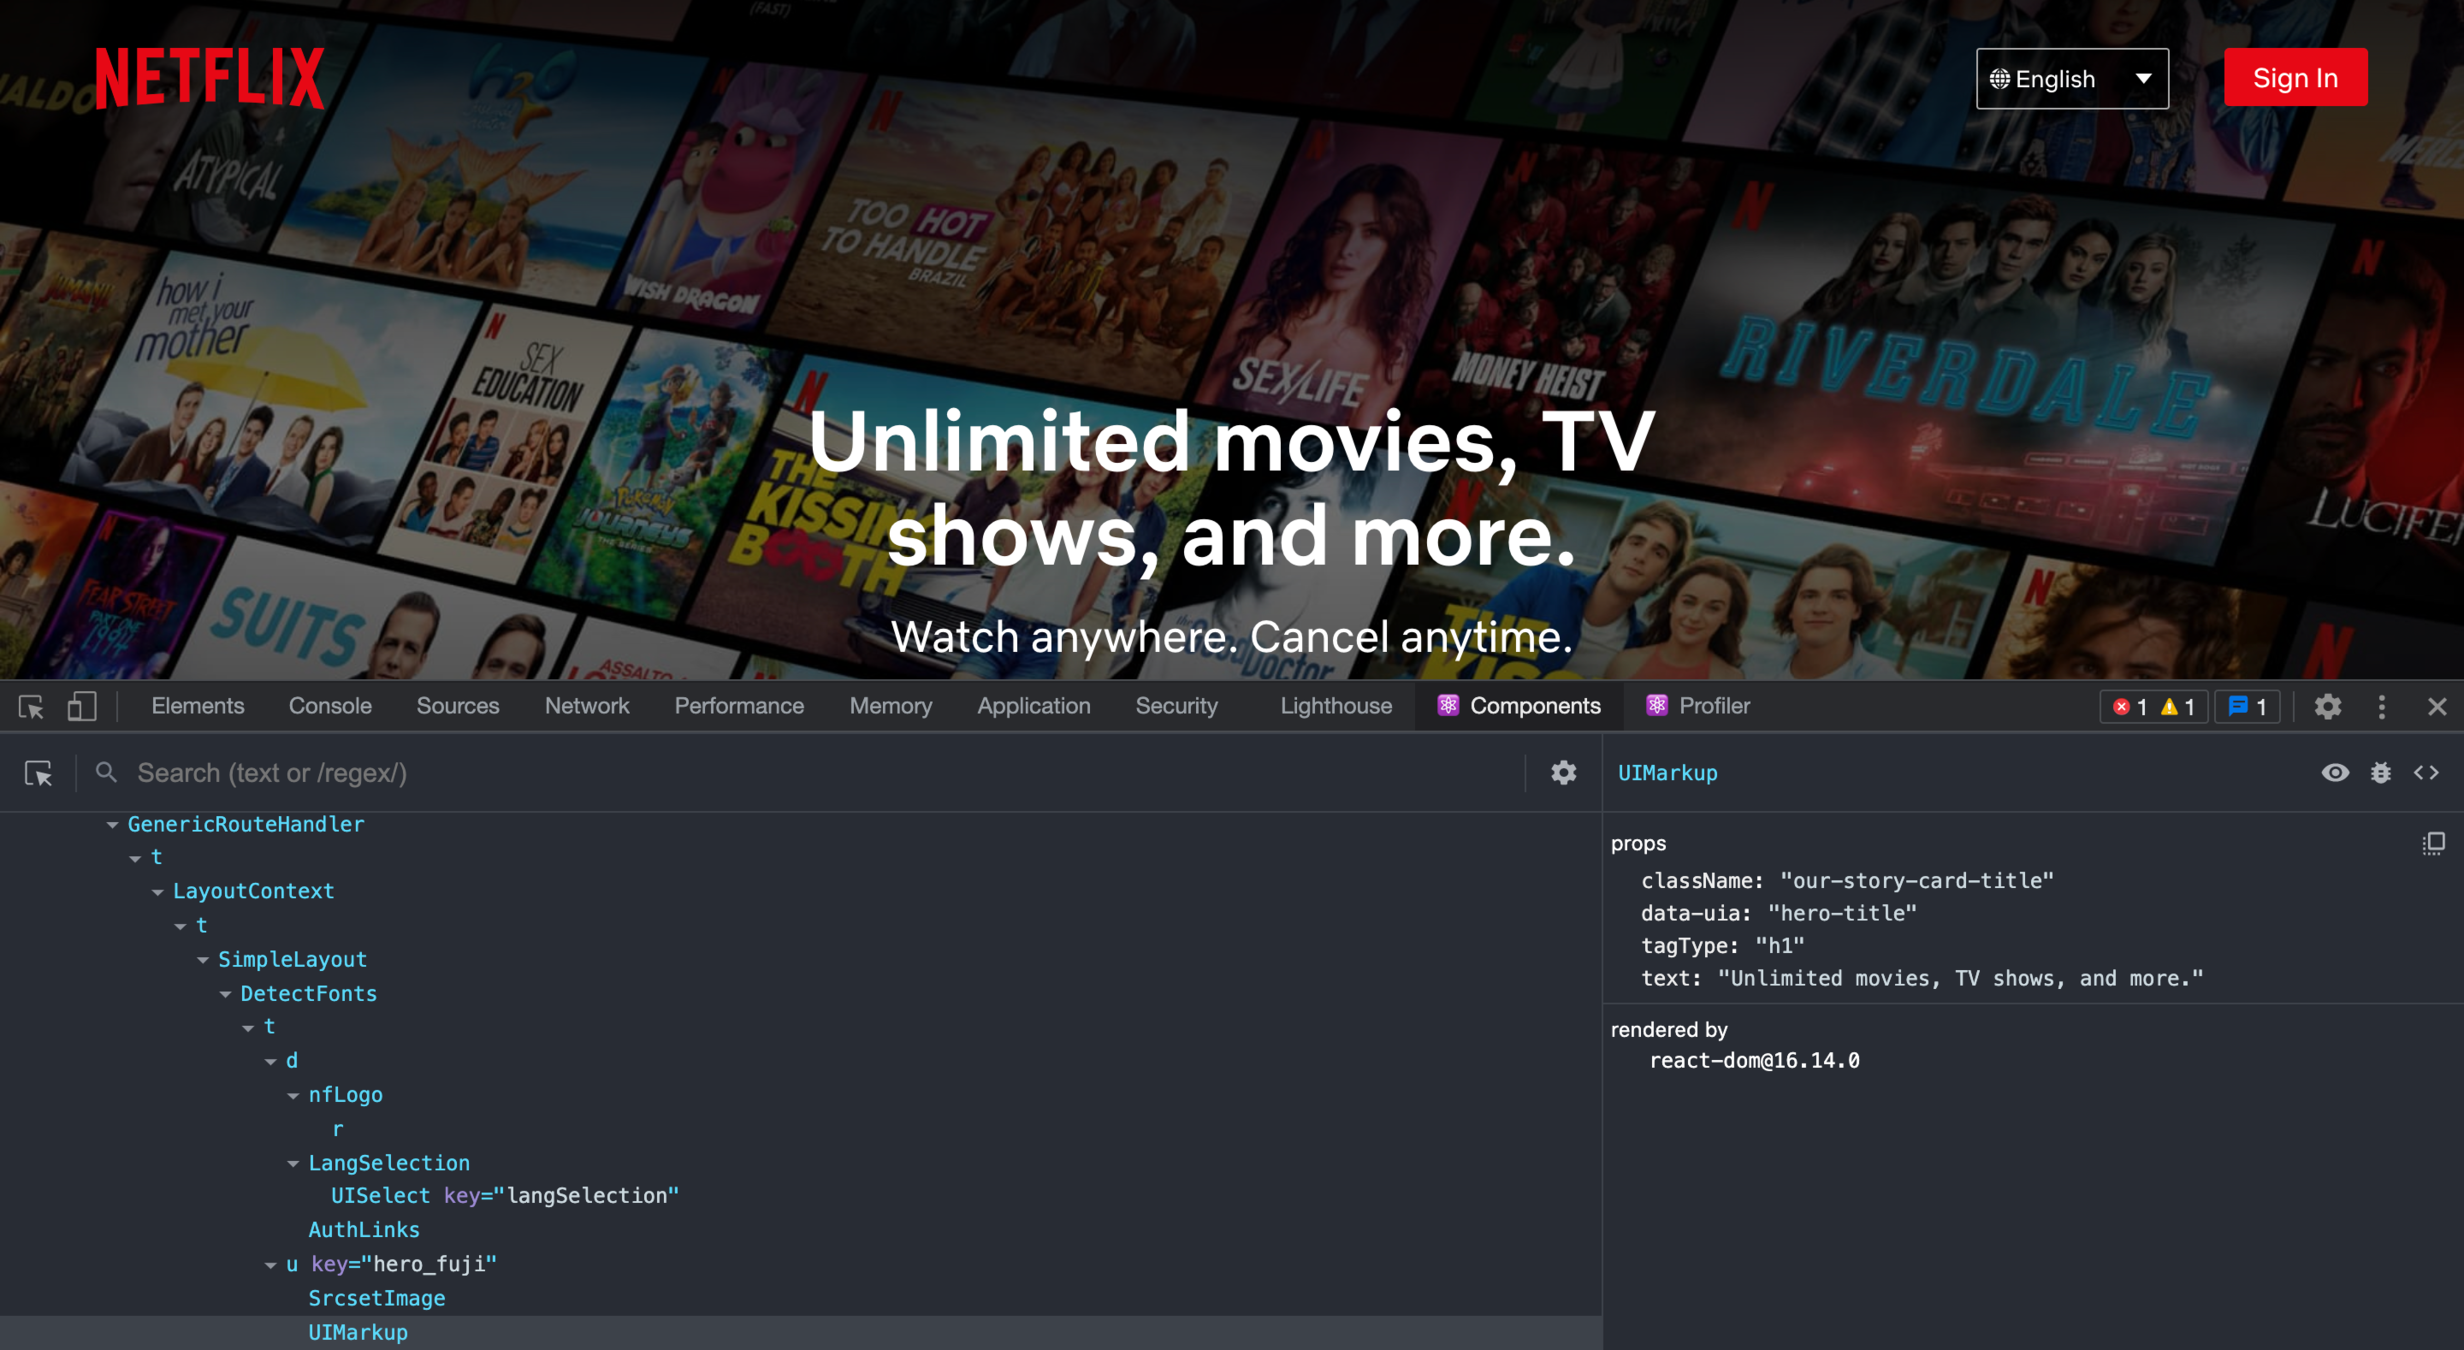
Live coding
Inspection Of A Website Built With React
create react app
Create React App is the official CLI for creating React applications with zero setup.
$ npx create-react-app my-app

// RUN THE APPLICATION
$ cd my-app
$ npm start

// OR
$ yarn start
Live coding
React Hello World With create-react-app
JSX
javascript xml
JSX is a syntax extension to JavaScript that is used in React to create React elements.
// without JSX
const element = React.createElement('h1', null, 'Hello, World!');

// with JSX
const element = <h1>Hello, World!</h1>;
JSX is just syntactic sugar for React.createElement(component, props, ...children).
Why JSX?
React embraces the fact that rendering logic is inherently coupled with other UI logic, like:
- how events are handled
- how the state changes over time
- how the data is prepared for display
As we've seen before, React separates concerns with loosely coupled units that contain both markup and logic.
React DOES NOT require the use of JSX. However, JSX comes useful as a visual aid when working with UI inside the JS code.
Using JSX
We can put any valid JavaScript expression inside the curly braces in JSX, from math calculations to function results.
const name = 'Alex Biggs';
const element = <h1>Hello, {name}</h1>;

ReactDOM.render(
  element,
  document.getElementById('root')
);
Using JSX
We split JSX over multiple lines for readability, and wrap the expression in parenthesis to avoid the pitfalls of automatic semicolon insertion.
function formatUser(user) {
  return user.firstName + ' ' + user.lastName;
}

function greet(user) {
  if (user) {
    return (<h1>
              Hello, {formatUser(user)}!
            </h1>);
  }
  return (<h1>
            Hello, Stranger!
          </h1>);
}

ReactDOM.render(
  greet(),
  document.getElementById('root')
);
specifying attributes with jsx
Because JSX is closer to JavaScript than to HTML, React DOM uses camelCase property naming convention instead of HTML attribute names.
// use curly braces for expressions
const imgElement = <img src={user.avatarUrl}></img>;

// use quotes for strings
const divElement = <div className="section"></div>;
Inline styles
The style attribute can be used to style a React component.
Inline styles are normally used for dynamic computed styles. CSS classes are generally more efficient.
const style = {
  color: 'hotpink',
  fontSize: '100px'
}

// styled react element
const text = <p style={style} />;
Live coding
Change Previously Created React Project
React Elements
React elements
Elements are the smallest building block of React apps.
React elements are plain, immutable, objects that describe what should be rendered on the screen. Unlike browser DOM elements, React elements are cheap to create.
React DOM takes care of updating the DOM to match the React elements.
const element = <h1>Hello, World!</h1>;Elements are what components are made of.
Rendering an element
With create-react-app, in the HTML file created, there is a <div> with the id root.
<div id="root"></div>This node is called a root DOM node because everything inside it will be managed by React DOM.
In order to render a React element into a root DOM node, we need to pass both elements to ReactDOM.render().
const element = <h1>Hello, world</h1>;

ReactDOM.render(
      element,
      document.getElementById('root')
);
Updating a rendered element
Because React elements are immutable, once we create an element, we can’t change its children or attributes.
With what we know so far, the only way to update an element would be to create a new one and pass it to render().
Live Coding
The Random Number Button
React components
React components
React Components are JavaScript functions (or classes)
that accept input properties (called props) and return a React Element that describes what should be displayed on the screen.
// React function component
function Welcome(props) {
  return <h1>Hello, {props.name}</h1>;
}

// React class component
class Welcome extends React.Component {
  render() {
    return <h1>Hello, {this.props.name}</h1>;
  }
}
Function and Class components both have some additional features that we will discuss later.
component syntax
Components should always start with a capital letter.
This is because:
- They are easier to identify this way
- To distinguish between React elements and DOM tags (React treats components starting with lowercase letters as DOM tags)
function Welcome(props) {
  return <h1>Hello, {props.name}</h1>;
}
Rendering components
React elements can also represent user-defined components.
// Button Component
function Button(props) {
  return (
    <button onClick={props.action}>
      {props.name}
    </button>
  )
}

function action() {
  console.log('button clicked');
}


function App() {
  return (
    <div className='App'>
      <Button name='Click' action={action}></Button>
    </div>
  );
}
Rendering components
When React sees an element representing a user-defined component, it passes JSX attributes and children to this component as a single object: props.
ReactDOM.render(
  <App />,
  document.getElementById('root')
);- We call ReactDOM.render() with the <App /> element
- React calls the App component which in turn calls the Button component with the correct props
- Our Button component returns a button element as result
- React DOM efficiently updates the DOM to match the elements above
Complex components
function Comment(props) {
  return (
    <div className="Comment">
      <div className="UserInfo">
        <img className="Avatar"
          src={props.author.avatarUrl}
          alt={props.author.name}
        />
        <div className="UserInfo-name">
          {props.author.name}
        </div>
      </div>
      <div className="Comment-text">
        {props.text}
      </div>
      <div className="Comment-date">
        {formatDate(props.date)}
      </div>
    </div>
  );
}
How can we improve this code?
Extracting components
Part of React's beauty lies in the ability to split big, complex components into smaller ones.
(...)

function UserInfo(props) {
  return (
    <div className="UserInfo">
      <Avatar user={props.user} />
      <div className="UserInfo-name">
        {props.user.name}
      </div>
    </div>
  );
}

(...)
Live coding
Components
immutable Props
props should never be modified; all React components must act like pure functions, when it comes to their props.
Of course, application UIs are dynamic and change over time, so how do we deal with that? That's when state comes in.
state
state is a property that holds a component's state. It allows React components to change their output over time in response to user actions without violating the props rule.
Without hooks (which we will cover in the future), we only have access to state in class components.
Class components
render() will be called each time a state update happens, but as long as we render <Clock /> into the same DOM node, only a single instance of the Clock class will be used.
But how do we update state?
class Clock extends React.Component {
  constructor(props) {
    super(props);
    this.state = {date: new Date()};
  }

  render() {
    return (
      <div>
        <h1>Hello, world!</h1>
        <h2>It is {this.state.date.toLocaleTimeString()}.</h2>
      </div>
    );
  }
}
Lifecycle methods
Each component has several “lifecycle methods” that we can override to run code at particular times in the process.

mounting phase
componentDidMount() is invoked after the component output has been rendered to the DOM.
This would be a good place to set up our timer.
componentDidMount() {
  this.timerID = setInterval(
    () => this.tick(),
    1000
  );
}
this.props is set up by React and this.state has special meaning. However, we are free to add additional fields to the class if we need them (timerID).
tick() {
  this.setState({
    date: new Date()
  });
}
unmounting phase
componentWillUnmount() is called when a component is being removed from the DOM.
componentWillUnmount() {
  clearInterval(this.timerID);
}
It’s very important to free up resources taken by the components when they are destroyed.
In our case, if the Clock component is ever removed from the DOM, React will call the componentWillUnmount() lifecycle method, and the timer is stopped.
State update rules
We should not modify state directly.
this.state.name = 'Ian';The above line WILL NOT trigger the re-rendering of the component. We should ALWAYS use the setState() method.
The only place where we can assign this.state directly is the constructor.
state update rules
State updates are merged.
componentDidMount() {
  fetchPosts().then(response => {
    this.setState({
      posts: response.posts
    });
  });

  fetchComments().then(response => {
    this.setState({
      comments: response.comments
    });
  });
}
When we call setState(), React merges the object provided into the current state.
this.setState({comments}) leaves this.state.posts intact, but completely replaces this.state.comments.
Live coding
State Update
React Events
events with react
Apart from a few syntax differences, handling events with React elements is very similar to handling events on DOM elements.
- React events are named using a camelCase convention
- With JSX we pass a function as the event handler
// In HTML
<button onclick="myFunc()">
  Click me!
</button>

// In JSX
<button onClick={myFunc}>
  Click me!
</button>
Synthetic events
In React, event handlers will be passed instances of SyntheticEvent, a cross-browser wrapper around the browser’s native event.
It has the same interface as the browser’s native event, including stopPropagation() and preventDefault(), except the events work identically across all browsers.
Event listeners
When we define a component using an ES6 class, a common pattern is for an event handler to be a method on the class itself.
class Button extends React.Component {
  constructor(props) {
    super(props);
    this.state = { buttonOn: true };
  }

  handleClick = () => {
    (...)
  }

  render() {
    return (
      <button onClick={this.handleClick}></button>
    );
  }
}
Live codinG
Events
Exercise
Find The Emoji
REACT Lists
Basic list component
In React, if we need a list, it is usually rendered inside a component.
function NumberList(props) {
  const numbers = props.numbers;
  const listItems = numbers.map((number) =>
    <li>{number}</li>
  );
  return (
    <ul>{listItems}</ul>
  );
}

const numbers = [1, 2, 3, 4, 5];

ReactDOM.render(
  <NumberList numbers={numbers} />,
  document.getElementById('root')
);
Rendering Multiple Components
Remember the emoji exercise?
retrieveEmojis() {
  return this.props.emojiData.map(emoji => (
    <EmojiItem
      symbol={emoji.symbol}
      title={emoji.title}
    />
  ));
}
retrieveEmojis() returns an array of EmojiItem objects.
Rendering Multiple Components
We can build collections of elements and include them in JSX using curly braces {}.
<div>{this.retrieveEmojis()}</div>When running the code above, a warning will be present in our dev tools.

Keys
A “key” is a special string attribute we need to include when creating lists of elements.
Keys help React identify which items have changed, are added, or are removed.
The best way to pick a key is to use a string that uniquely identifies a list item among its siblings.
Keys
It's common for keys to be IDs from our data.
const todoItems = todos.map((todo) => {
  return (
    <li key={todo.id}>
      {todo.text}
    </li>);
});
If an ID isn't available, then the item index can also be used as a last resort key. However, if the order of the items is prone to change, this might not be the best idea.
But why do we need these keys?
An Efficience problem
When recursing on the children of a DOM node, React iterates over both lists of children at the same time and generates a mutation whenever there’s a difference.
<ul>
  <li>Mariah</li>
  <li>Vivian</li>
</ul>

<ul>
  <li>Piper</li>
  <li>Mariah</li>
  <li>Vivian</li>
</ul>
When inserting an element in the beginning, React will mutate every child instead of realising it can keep the <li>Mariah</li> and <li>Vivian</li> subtrees intact.
This is inefficient.
Keys to the rescue
When children have keys, React uses the key to match children in the original tree with children in the subsequent tree.
<ul>
  <li key="1">Mariah</li>
  <li key="2">Vivian</li>
</ul>

<ul>
  <li key="3">Piper</li>
  <li key="1">Mariah</li>
  <li key="2">Vivian</li>
</ul>
Now React knows that the element with key '3' is the new one, and the elements with the keys '1' and '2' have just moved.
Live coding
React Lists
REACT forms
Forms
HTML form elements work a bit differently from other DOM elements in React, because they naturally keep some kind of internal state.
React forms, like native forms, have the default behaviour of browsing to a new page when the user submits the form.
FORMS
In HTML, form elements typically maintain their own state and update it based on user input. In React, mutable state is typically kept in the state property of components, and only updated with setState().
We can combine the two by making the React state be the “single source of truth”.
The React component that renders a form also controls what happens in that form on subsequent user input, and it's called a Controlled Component.
controlled components
With a controlled component, the input’s value is always driven by the React state. Other attributes of the input can be defined by the Components' state (e.g., name).
class NameForm extends React.Component {
  constructor(props) {
    super(props);
    this.state = {value: ''};
  }

  handleChange = (event) => {
    this.setState({value: event.target.value});
  }

  handleSubmit = (event) => {
    (...)
    event.preventDefault();
  }

  render() {
    return (
      <form onSubmit={this.handleSubmit}>
        <label>
          Name:
          <input type="text" value={this.state.value} onChange={this.handleChange} />
        </label>
        <input type="submit" value="Submit" />
      </form>
    );
  }
}
The value can be passed to other elements/components, can be reset due to some event, and can be validated while the user introduces input.
Conditional rendering
We can render (or not) elements according to specific conditions. Conditional rendering can be dependent, for example, on the state of a form.
class MyForm extends React.Component {
  constructor(props) {
    super(props);
    this.state = { username: '' };
  }

  myChangeHandler = (event) => {
    this.setState({username: event.target.value});
  }

  render() {
    let header = '';

    if (this.state.username) {
      header = <h1>Hello {this.state.username}</h1>;
    } else {
      header = '';
    }

    return (
      <form>
      {header}
      <p>Enter your name:</p>
      <input
        type='text'
        onChange={this.myChangeHandler}
      />
      </form>
    );
  }
Form elements: TextArea
In React, a <textarea> uses a value attribute to define its text, instead of its inner content (or children) as is in HTML.
<form onSubmit={this.handleSubmit}>
  <label>
    Essay:
    <textarea value={this.state.value} onChange={this.handleChange} />
  </label>
  <input type="submit" value="Submit" />
</form>
FORM ELEMENTS: SELECT
React uses a value attribute on the root <select> tag to define the selected option. The <option> elements are still defined as children of <select>.
<select multiple={true} value={this.state.values} onChange={this.handleChange}>
  <option value="grapefruit">Grapefruit</option>
  <option value="lime">Lime</option>
  <option value="coconut">Coconut</option>
  <option value="mango">Mango</option>
</select>
We can also pass an array into the value attribute, allowing us to select multiple options.
live coding
Forms And Controlled Components
uncontrolled components
In most cases it's recommended to use controlled components to implement forms. In a controlled component, form data is handled by a React component.
Alternatively, however, we can use uncontrolled components, where form data is handled by the DOM itself.
Uncontrolled components may be used when the form is very simple, when there is no need for validation while filling the form, or when integrating non-React code.
live coding
Forms And Uncontrolled Components
EXERCISE
Todo List
Let's create a simple to-do list page. You can start off with a pre-existing list of to-dos. These to-dos are a simple object with an id and description.
Present the list of to-dos in the page, and allow the user to remove a to-do when it's done. For this, you can add a button, a checkbox, or any other method that seems applicable.
Additionally, allow users to add new to-dos, by providing a simple form. Suggestion: The id can be defined by using the current timestamp.
REACT Router
single page applications
We've discussed Single Page Applications in the past, and the advantages of implementing them.
These advantages are the same when creating a React SPA, but so are the challenges.
One of these challenges is related to routing.
spa vs. users
When users navigate our app, they expect that:
- The URL displayed in the address bar always reflects the content being displayed.
- They can use the browser's back and forward buttons successfully.
- They can navigate to a particular view directly using the appropriate URL.
With SPAs we don't have the default navigation provided by the browser, since browsers are built around the idea of clicking links and getting HTML files.
So, how do we solve this?
Routing
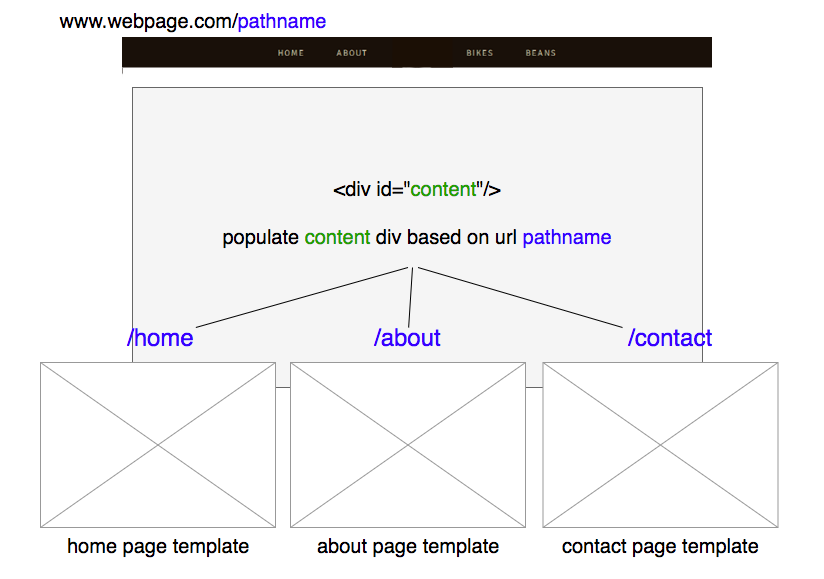
Routing is when we try to map URLs to destinations that aren't physical pages such as the individual views in a single-page app.
There are a few JavaScript libraries that help us out with routing implementation, one of them being the React Router library.
react router
React Router provides routing capabilities to SPAs built in React.
It extends what we already know about React in a familiar, declarative way.
React Router contains a few navigational components that we can use to create both web and mobile applications.

components
There are three primary categories of components in React Router:
- routers - <BrowserRouter>
- route matchers - <Route> and <Switch>
- navigation - <Link>, <NavLink>, and <Redirect>
routers
At the core of every React Router application should be a router component.
For web projects, react-router-dom provides the <BrowserRouter> component.
This component uses regular URL paths that are configured in our app. To use it, we just need to make sure the router is rendered at the root of our element hierarchy,
<Browser router>
function App () {
  return (
    <BrowserRouter>
      <div className='App'>
      </div>
    </BrowserRouter>
  );
}
router matchers
There are two route matching components: Switch and Route.
When a <Switch> is rendered, it searches through its <Route> elements to find one whose path matches the current URL. When it finds one, it renders that <Route> and ignores all others.
We should put <Route>s with more specific paths before less-specific ones.
router matchers
function App() {
  return (
    <div>
      <Switch>
        <Route path="/">
          <Home />
        </Route>
        <Route path="/about">
          <About />
        </Route>
      </Switch>
    </div>
  );
}


// What will happen when we try to access
// 'http://ourapp.com/about'?
navigation
React Router provides a <Link> component to create links in our application. Wherever we render a <Link>, an anchor (<a>) will be rendered in our HTML document.
The <NavLink> is a special type of <Link> that can style itself as "active" when its to prop matches the current location. We can use this "active" class to style the component however we want.
Any time that we want to force navigation, we can render a <Redirect>. When a <Redirect> renders, it will navigate using its to prop.
Navigation
<Link to="/">Home</Link>// When the URL is /about, this renders:
// <a href="/about" className="active">About</a>
// When it's something else:
// <a href="/about">About</a>
<NavLink to="/about" activeClassName="active">
About
</NavLink>
<Redirect to="/login" />installing react router
React Router Core is published to npm so we can install it with either npm or yarn.
npm install react-router-dom
// OR
yarn add react-router-dom
using react router
<BrowserRouter>
  <div className='App'>
    <nav>
      <Link className="link" to="/">Route 1</Link>
      <Link className="link" to="/about">Route 2</Link>
      <Link className="link" to="/users">Route 3</Link>
    </nav>

    <Switch>
      <Route path="/route1">
        <Route1 />
      </Route>
      <Route path="/route2">
        <Route2 />
      </Route>
      <Route path="/route3">
        <Route3 />
      </Route>
    </Switch>
  </div>
</BrowserRouter>
Live coding
Basic Routing
Exercise
A Multiple Route SPA

REACT hooks
React state
So far, we've been following one rule:
If we need to have access to state, we create a class component. Otherwise, creating a function component would suffice.
However, in version 16.8, React gave us a new feature that changed this premise: Hooks.
but why?
Hooks came to solve a variety of complaints that React developers have made over the years.
- Classes and lifecycle methods are confusing
- React Components quickly became complex and hard to refactor/test (due to stateful logic)
- Having to constantly switch between function components, class components, higher-order components, and render props, makes our code inconsistent
- Class code doesn't minify well
- ...
hooks
Hooks are a way for us to write function components but gain access to functionality that was previously only available if we used class components.
Hooks are backwards compatible, and there are no plans of eliminating classes from React.

Before Hooks
class App extends React.Component {
  constructor() {
    super();

    this.state = {
      name: 'Fred',
      age: '32'
    };
  }

  handleClick = () => {
    const newName = this.state.name === 'Fred' ? 'Bree' : 'Fred';
    this.setState({ name: newName });
  }

  render() {
    return (
        <Card>
          <h1> {this.state.name} </h1>
          <button onClick={this.handleClick}>
            Change Name
          </button>
        </Card>
    );
  }
}
State Hook
const App = () => {
  // useState() is a function that receives a parameter and returns an array with two values.
  // The first value represents the state value we're setting.
  // The second one is a function that allows us to set the previous state property
  const [name, setName] = useState('Fred');

  return (
    <Card>
      <h1> {name} </h1>
      <button onClick={() => setName(name === 'Fred' ? 'Bree' : 'Fred')}>Change Name</button>
    </Card>
  );
};
A Hook is a special function that lets you “hook into” React features.
useState() allows function components to have access to internal state features.
Live coding
Using The State Hook
Before hooks
class App extends React.Component {
  constructor(props) {
    super(props);
    this.state = {
      count: 0
    };
  }

  componentDidMount() {
    document.title = `You clicked ${this.state.count} times`;
  }
  componentDidUpdate() {
    document.title = `You clicked ${this.state.count} times`;
  }

  render() {
    return (
      <Card>
        <h1>You clicked {this.state.count} times</h1>
        <button onClick={() => this.setState({ count: this.state.count + 1 })}>
          Click me
        </button>
      </Card>
    );
  }
}
effect hook
useEffect() lets us perform side effects in function components. It is similar to componentDidMount() and componentDidUpdate().
function App() {
  const [count, setCount] = useState(0);

  useEffect(() => {
    document.title = `You clicked ${count} times`;
  });

  return (
    <Card>
      <h1>You clicked {count} times</h1>
      <button onClick={() => setCount(count + 1)}>
        Click me
      </button>
    </Card>
  );
}
Live coding
Using The Effect Hook
hooks rules
Hooks are JavaScript functions, but we need to follow two rules when using them:
-
Only Call Hooks at the Top Level
-
Only Call Hooks from React Functions
rule 1
Only Call Hooks at the Top Level
We should never call Hooks inside loops, conditions, or nested functions.
By following this rule, we ensure that Hooks are called in the same order each time a component renders. That’s what allows React to correctly preserve the state of Hooks between multiple useState() and useEffect() calls.
live coding
Hooks First Rule
rule 2
Only Call Hooks from React Functions
We should not call Hooks from regular JavaScript functions. Instead, we can either call them from React function components or from custom Hooks.
By following this rule, we ensure that all stateful logic in a component is clearly visible from its source code.
custom hooks
React provides us with a few Hooks we can use (and can be found here). However, we can also build our own.
A custom Hook is a JavaScript function whose name starts with ”use” and that may call other Hooks.
Building our own Hooks lets us extract component logic into reusable functions.
live coding
Custom Hooks
EXERCISE
Emoji App, But Make It Hooks Friendly
webpack
Abstraction, abstraction
create-react-app:
- sets up our development environment
- lets us use the latest JavaScript features
- provides a nice developer experience
- optimises our app for production
and the best thing is that it does all this without us having to write a single line of configuration code.
Under the hood, create-react-app is using both Babel and webpack, but in order to use it, we don't need to know a single thing about either of them.
CREATE-react-app cons
create-react-app isn't all sunshine and rainbows. It comes with a few drawbacks:
- it's difficult to add custom build configs
- comes with a lot of unnecessary code that we end up deleting
- takes away our control (and knowledge) of the app we're creating
With these cons in mind, it is time to take off our training wheels, and say goodbye to create-react-app .

WebPacK
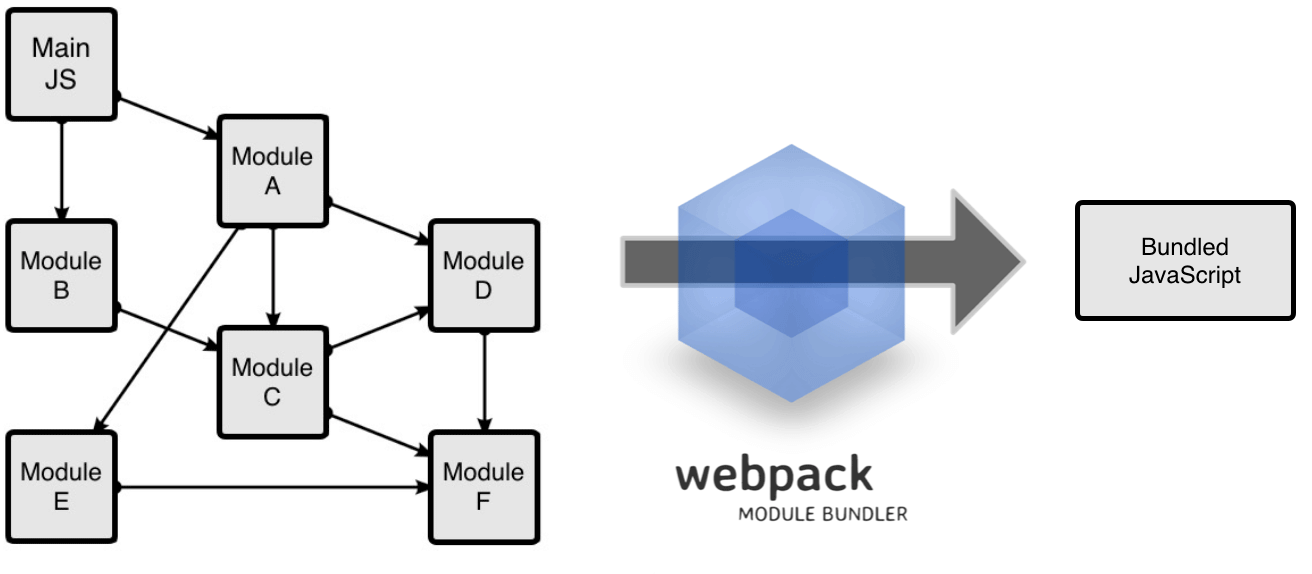
webpack is a static module bundler for modern JavaScript applications. It's basically used to compile JavaScript modules.
When webpack processes our application, it internally builds a dependency graph from one or more entry points and combines every module our project needs into one or more bundles.
core concepts
To get started with webpack, we need to understand its Core Concepts:
- Entry
- Output
- Loaders
- Plugins
- Mode
entry
An entry point indicates which module webpack should use to begin building its dependency graph.
webpack will figure out which other modules and libraries that entry point depends on (directly and indirectly).
// IN webpack.config.js
module.exports = {
  entry: './path/to/my/entry/file.js',
};
If we don't specify an entry point's value, by default it will be ./src/index.js.
output
The output property tells webpack where to emit the bundles it creates and how to name these files.
module.exports = {
  entry: './path/to/my/entry/file.js',
  output: {
    path: path.resolve(__dirname, 'build'),
    filename: 'my-first-webpack.bundle.js',
  },
};
It defaults to ./dist/main.js for the main output file.
loaders
webpack only understands JavaScript and JSON files.
Loaders allow webpack to process other types of files and convert them into valid modules that can be consumed by our application and added to the dependency graph.
module.exports = {
  module: {
    rules: [
      {
        test: /\.css$/,
        use: [{ loader: 'css-loader' }]
      }
    ]
  },
};
We are telling the webpack compiler that, when it comes across a path that resolves to a '.css' file inside of an import statement, it should use the css-loader to transform it before adding it to the bundle.
plugins
In order to use a plugin, you need to require() it and add it to the plugins array.
const HtmlWebPackPlugin = require('html-webpack-plugin');

module.exports = {
  plugins: [
    new HtmlWebPackPlugin({
      template: './src/index.html',
    }),
  ]
};
The HtmlWebpackPlugin simplifies creation of HTML files to serve our webpack bundles. The plugin will generate an HTML5 file for you that includes all your webpack bundles in the body using script tags.
More webpack plugins here.
mode
By setting the mode parameter to either development, production or none, we can enable webpack's built-in optimisations that correspond to each environment.
The default value is production.
module.exports = {
  mode: 'production',
};
live coding
Setting Up A React Project With webpack
babel
Transpilers
Transpilers (or source-to-source compilers) are tools that read source code written in one programming language, and produce the equivalent code in either another language or another version of the same language.
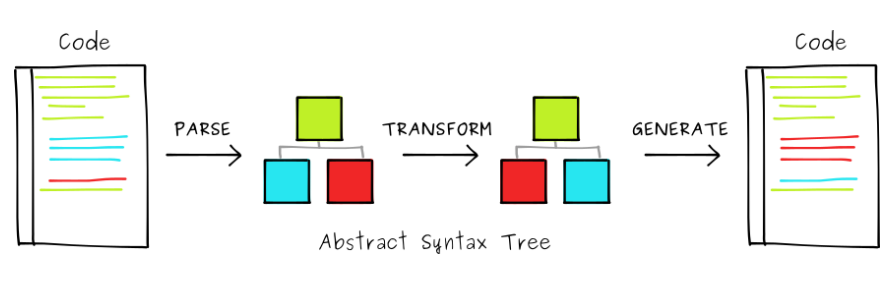
Babel is mainly used to convert ECMAScript 2015+ code into a backwards compatible version of JavaScript in current and older browsers or environments.
// Babel Input: ES2015 arrow function
[1, 2, 3].map(n => n + 1);

// Babel Output: ES5 equivalent
[1, 2, 3].map(function(n) {
  return n + 1;
});
Babel can also convert JSX into ES5 syntax.

Installing babel
Babel comes packaged as a node module, so its installation is via npm.
// install Babel's core library
npm install @babel/core --save-dev

// installs Babel's ES6 to ES5 transpiler
npm install @babel/preset-env --save-dev

// installs Babel's React/JSX to ES5 transpiler
npm install @babel/preset-react --save-dev

// installs Babel's loader for webpack
npm install babel-loader --save-dev
Live coding
Babel Configuration
React
By Soraia Veríssimo


