Front-End Programming

Web Development
Web Technologies
web technologies
Web technologies are the various tools and techniques that are utilised in the process of communication between different types of devices on the Web.
These include:
- Browsers
- HTML & CSS
- Protocols
- Programming Languages
- Web Development Frameworks
- Other APIs & Data Formats
Browsers
Browsers are the web clients.
They request information, receive it, and then process it in a way we can understand.


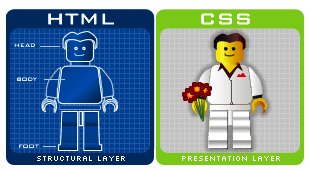
HTML & CSS
It's thanks to HTML, that the web browsers know what to show once they receive the response. Thanks to CSS we can customise the way HTML elements are displayed on screen.
Protocols
The instructions for how to pass information back and forth between computers and devices are commonly known as protocols.
Major protocols used on the Web, and with which we are already familiar with, include:
- HTTP
- REST
programming languages
As we've discussed before, JavaScript is the Lingua Franca when we're talking about client-side web programming.
However, in the backend, other languages may also be used.


web development framewroks
Web development frameworks are tools that a developer can use to avoid doing the simple/mundane/boring tasks, and instead get right to work on the the fun part.
Popular web frameworks include:


other apis & data formats
Data being transferred over the web (to/from a web server) is stored in a structured called a data format.
The most popular data formats include:
- JSON
- XML
- CSV
document object model
Javascript and the browser
JavaScript was created with the purpose of being a web scripting language, so browsers could gain the ability to execute some code without making yet another request to the web server.
This code being executed on the browser mostly manipulates something called the DOM.
Document object model
DOM is a language neutral interface that allows dynamic access and update to the contents, structure, and style of web pages.
Browsers use layout engines to parse HTML into a DOM tree and render it on screen.
Document object model
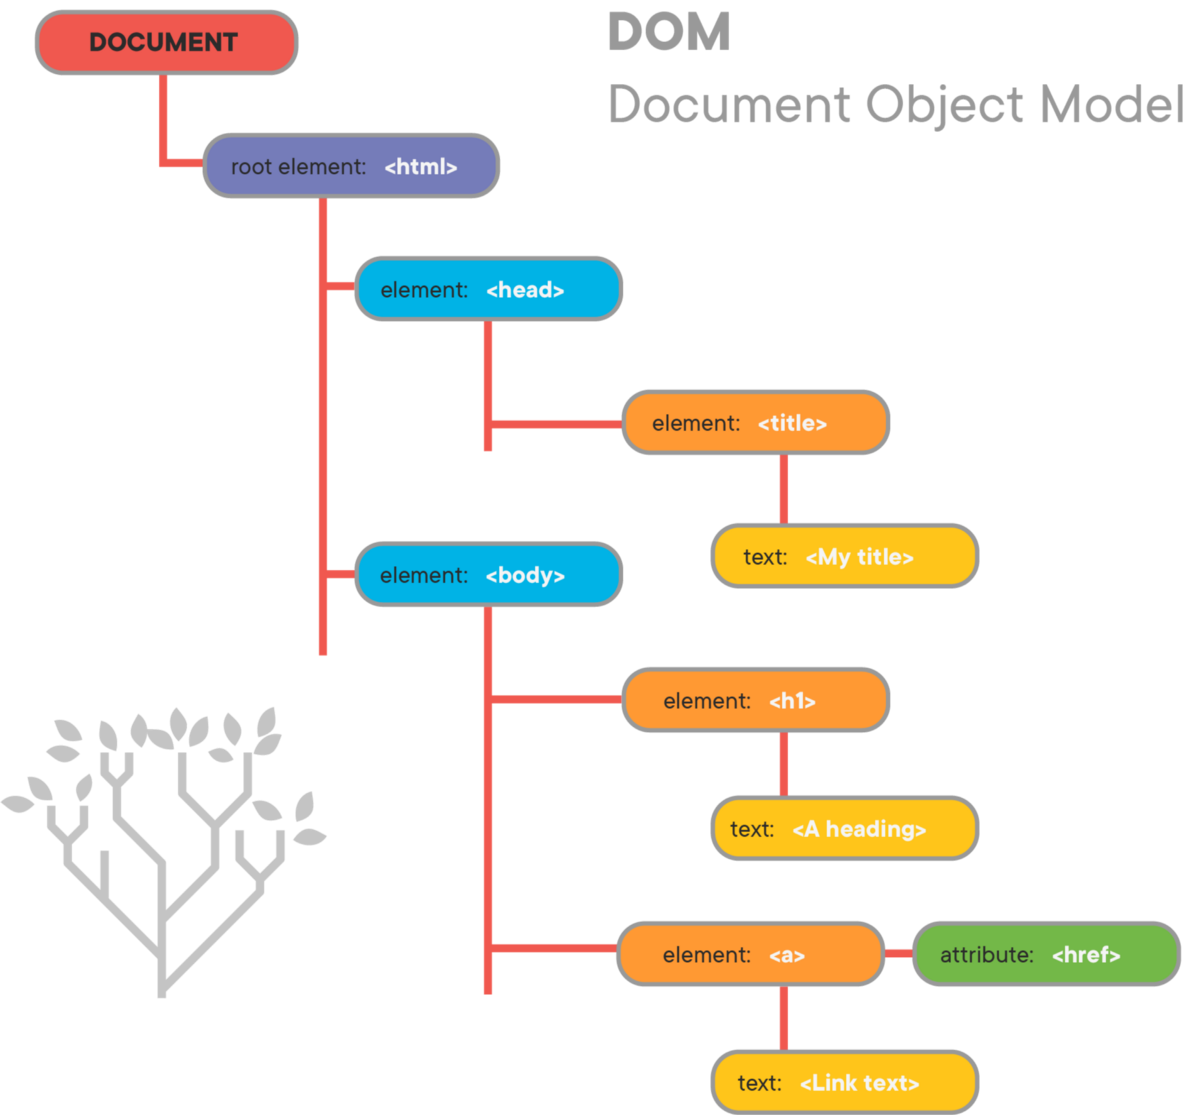
In the Document Object Model, documents have a logical structure which is very much like a tree.
The name "Document Object Model" was chosen because it is an "object model" as used in the traditional object oriented design sense.
The nodes in the previous diagram do not represent a data structure; they represent objects, which have functions and identity.
The window object
On the top of the DOM tree it's the Window node. This object represents a browser containing a DOM.
The document property points to the DOM loaded in that window.
window.onload = () => {
    let heading = document.createElement('h1');
    let text = document.createTextNode('Friday, Friday, Gotta get down on Friday. ♫');
    heading.appendChild(text);
    document.body.appendChild(heading);
}
Manipulating the dom
document.body is the object representing the <body> tag.
Running the code will turn the background of the <body> element red.
document.body.style.backgroundColor = 'red';manipulating the dom
The document node provides methods for creating new nodes and accessing pre-existent ones.
// CREATING A NEW ELEMENT
document.createElement('p');

// GETTING AN ELEMENT WITH A GIVEN ID
document.getElementById('logo');

// GETTING A LIST OF ELEMENTS WITH THE GIVEN CLASS
document.getElementByClassName('text');

// GETTING A LIST OF ELEMENTS WITH THE SAME TAG NAME
document.getElementByTagName('h1');

// GETTING A LIST OF ELEMENTS WITH THE SAME CLASS INSIDE AN ELEMENT WITH THE GIVEN ID
document.getElementById('header').getElementByClassName('text');
Full API here.
TRAVERSING the dom
After retrieving a DOM element there are a number of properties that are common to every element and can be used to get other elements from anywhere in the DOM tree.
const element = document.getElementById('form');

// THE PARENT NODE
element.parentNode

// THE FIRST CHILD
element.firstChild

// THE LAST CHILD
element.lastChild

// ALL CHILD NODES
element.childNodes
Full API here.
accessing attributes
Most HTML attributes of an element can be accessed through the object property of the same name.
const element = document.getElementById('logo');

// SET A NEW HEIGHT TO THE ELEMENT ABOVE
element.style.height = '100px';

// REPLACE THE LOGO
element.src = 'https://images.ctfassets.net/vdinc3339dpx/1vgosB8l5B9HDtFWgp3L9D/971af0e1164e4d0b734952125a35f660/logo-cust-fri-day-200x120.png';
element contents
// GETTING THE HTML CONTAINED WITHIN THE ELEMENT
let content = headerElement.innerHTML;

// SETTING THE HTML OF THE ELEMENT
let htmlString = '<h1>A title</h1>';
headerElement.innerHTML = htmlString;

// GETTING THE TEXT CONTENT OF AN ELEMENT
let textContent = h1Element.textContent;

// SETTING THE TEXT CONTENT OF AN ELEMENT
let text = 'Hi.';
h1Element.textContent = text;
dom events
Events are actions or occurrences which the system tells us about so we can respond to them in some way if desired.
Events are fired inside the browser window, and tend to be attached to a specific item that resides in it — this might be a single element, set of elements, the HTML document loaded in the current tab, or the entire browser window.
dom events - examples
- The user selects a certain element.
- The user hovers the cursor over a certain element.
- The user chooses a key on the keyboard.
- The user resizes or closes the browser window.
- A web page finishes loading.
- A form is submitted.
- A video is played, paused, or finishes.
- An error occurs.
dom events - a code example
const button = document.getElementById('color-button');

button.onclick = () => {
  document.body.style.backgroundColor = 'hotpink';
}
event target
EventTarget is an interface implemented by DOM nodes that can receive events and may have listeners for them.
const hell = () => {
  console.log("You're going to hell.");
};

const h1 = document.getElementById("text");

h1.addEventListener("click", hell);
event propagation
When an event happens, the element's event handlers are first fired and the element's parents' event handlers are fired next.
This propagation will keep happening until we've reached the root element (document).
This behaviour is called event bubbling.
Live coding
Event Propagation
EXERCISE
Using the DOM API, show a web page that lists the following users:
const data = [
    { "id": 1, "name": "Johnny Moustache", "email": "moustache_johnny@mail.com", "phone": "962390123" },
    { "id": 2, "name": "Mary Lucky", "email": "mary_l@mail.com", "phone": "928748910" },
    { "id": 3, "name": "Tom Vinegar", "email": "vingegartom@mail.com", "phone": "912901846" },
    { "id": 4, "name": "Katy Berry", "email": "kberry90@mail.com", "phone": "962490218" },
    { "id": 5, "name": "Barry Dotter", "email": "dotdotbarry@mail.com", "phone": "934628750" },
    { "id": 6, "name": "Tony Coast", "email": "tonycoast123@mail.com", "phone": "912034785" }
]
Ajax
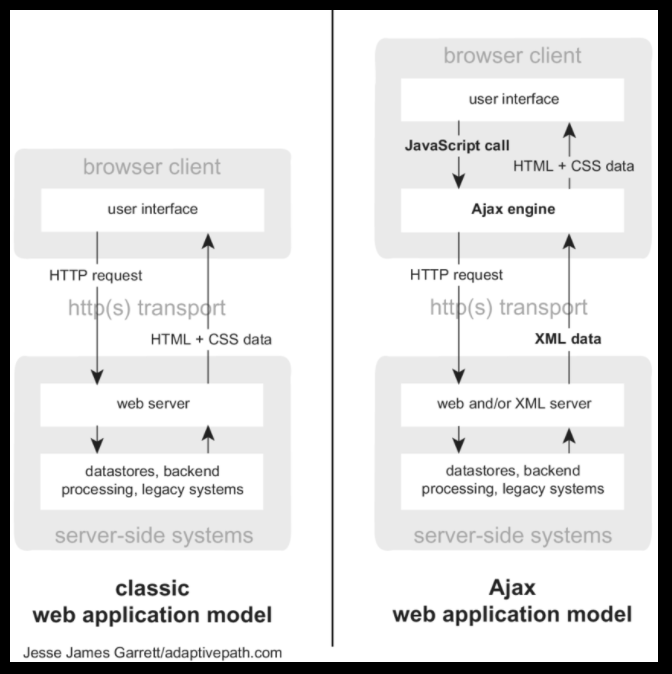
Ajax model
Ajax is short for Asynchronous JavaScript And XML. It is a technique that combines several technologies in order to communicate with servers and update webpages without reloading.
Its main building block is the XMLHttpRequest object.
xmlhttprequest
An XMLHttpRequest (shortened to XHR) object is used to communicate with a server in the background. It can be used to provide or receive data in any format, not just XML (JSON, simple text format)
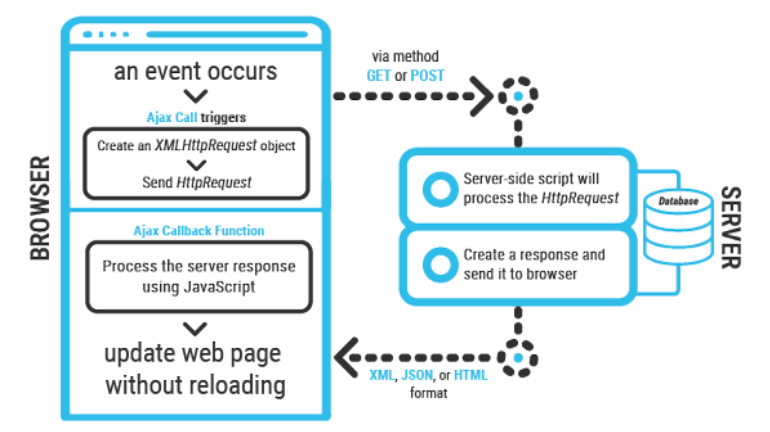
The general process of using Ajax/XHR is as follows:
- An event occurs to request communication (e.g., submit form);
- a XHR object is created and used to send request to server;
- Server receives and handles request, sends response;
- Response is handled by a callback function and the webpage is updated if necessary.
creating and sending requests
In order to use its functionalities, we must create an XHR object first.
Once its created, we can use the open() method in order to create the necessary HTTP request:
XMLHttpRequest.open(method, url[, async[,...)
The first argument indicates the HTTP method (e.g., "GET", "POST"), and the second defines the URL where the request will be sent to.
Note: This method has the optional argument to force the request to be synchronous, but it is mostly deprecated.
let xhr = new XMLHttpRequest();
//...
xhr.open("get", "http://www.mysite.com/info");
//...
xhr.send();
Sending and encoding requests
As shown, sending the request is done by simply calling the send() method. This method can specify the body's request, if necessary.
Both the URI in the open() method and the provided body in send() should be encoded in order to create proper requests and avoid errors.
Additional steps might be taken before sending or opening the request:
- Define the necessary headers for the request (for example, to specify the type of content the client accepts);
- Add event listeners to the XHR object to track the request's progress.
let xhr = new XMLHttpRequest();
//add event listener BEFORE open
xhr.addEventListener("load", function(){...});
xhr.open('POST','submitform.php');
//Add request headers BEFORE sending
xhr.setRequestHeader('Content-type', 'application/x-www-form-urlencoded');
xhr.send(encodedParameters);
state of request
It is possible to follow the progress of the request, from the moment of creation until the response is fully received.
The property XMLHttpRequest.onreadystatechange property is used to add an event handler to changes in the state of the request.
The readyState property can be read to know the current specific state, from the following:
- UNSENT: The XMLTTPRequest object was created, but not open().
- OPENED: The open() method was called.
- HEADERS_RECEIVED: The send() method was called, and the response headers and status have been received.
- LOADING: The response is being received.
- DONE: The process is finished, either with a fully downloaded response, or failure errors.
state of request
The event handler function provided to onreadystatechange normally checks the readyState property and executes related operations (for example, provide feedback to user).
Additionally, there are specific events for the downloading (or uploading) of data during the request: progress, load, error, abort, timeout, ...
Event handler functions can be added to these events (before calling open()) using addEventListener() or the related on<event> property.
let xhr = new XMLHttpRequest();

xhr.addEventListener("progress", onUpdatedProgress);
xhr.addEventListener("load", onLoadingComplete);
xhr.addEventListener("error", onTransferFailed);

//Alternative
xhr.onprogress = unpdateProgress;
//...
xhr.open("get", "http://www.mysite.com/info");
receiving the response from server
Once the request has finished (e.g., when the 'load' event triggered or readyState is at DONE), the response from the server may be read using the XHR properties:
response - may contain an ArrayBuffer, Blob, JS Object, ...
responseText - contains plain text data
responseXML - contains a XML or HTML document
Note: responseText may contain the response data converted into string (e.g., HTML or JSON). It can be parsed accordingly, and used instead of the other response properties.
The response property to be read and its contents depend on the indicated response type.
jquery
jquery
jQuery is a JavaScript library that solves some issues and simplifies some functionalities of plain JavaScript.
It is mainly used to manipulate the DOM, to handle events and to perform AJAX operations.
It is a quite popular library, highly compatible even with older browsers, and extensible with the use of plugins for specific tasks.
//Traversing and manipulating DOM elements
$( "button.continue" ).html( "Next Step..." )

//Event handling
$( "#button-container button" ).on( "click", function( event ) {...});

//AJAX operations
$.ajax({
  url: "/api/getWeather",
  data: {
    zipcode: 97201
  },
  success: function( result ) {...}
});
Adding the jquery library
As it is an external library, jQuery must be manually added to the site.
It can be added by downloading and hosting the library (in a JS file format), or by including it from a Content Delivery Network (CDN).
Besides the library version, it is possible to choose uncompressed, minified or slim copies of the library file, to be used either in production or development phase of the site.
<html>
  <head>

  <!-- Including downloaded jQuery library -->
  <script src="jquery-3.6.0.min.js"></script>
  <!-- Or obtaining it from a CDN that hosts it -->
   <script src="https://code.jquery.com/jquery-3.6.0.min.js"></script>
  </head>

///
using jquery
The jQuery library uses a basic syntax with the following format:
$(selector).action()
The '$' sign (alias for 'jQuery') is a property that provides access to the methods and properties of the library.
The selector, based on CSS selectors, is used to query HTML elements.
The action is a method that is applied to the selected elements. It can also represent an event to which we add a listener callback function.
$(document).ready(function(){

  //It is good practice to wait for the document to be
  //fully loaded before running any code

});
using jquery
The jQuery library contains a wide variety of methods and properties, which can be summarized into some categories:
Events - methods to attach, trigger, remove events to the document or to specific elements. An event object is provided that can be used to access event information (such as the target element).
Effects and Animation - methods that work as shorthand for specific animations (e.g., fadeIn() ). It is also possible to create custom animations, and control the animation queue (e.g., by adding, removing, delaying animations).
Manipulate HTML/CSS - Several methods are provided for HTML/CSS access/manipulation, from editing elements' classes, editing style properties, changing elements' content, and so on.
overview of jquery methods
Traversing HTML elements - methods that facilitate moving through elements, traversing the DOM tree in any direction.
AJAX - methods that simplify the use of AJAX functionalities.

$.get(url, function(data, status){
    //...
});
let xhr = new XMLHttpRequest();
xhr.addEventListener("load", onLoadingComplete);
xhr.open("get", url);
xhr.send();Exercise
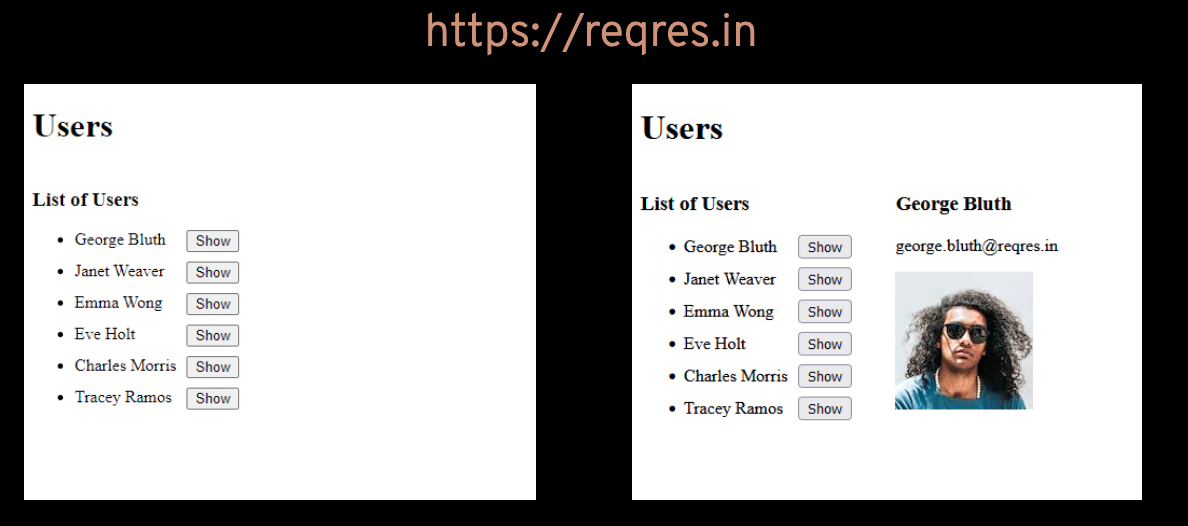
Users List With jQuery
Create a simple HTML page that presents a list of users. When the "show" button next to a user's name is clicked, the details of that user are presented next to the list.
Use AJAX and jQuery to obtain the data to be presented, and to manipulate the page's content as well.
Extra: use the effects functionalities of jQuery to animate the user details (e.g., to fade in).
The data to use for this site can be obtained from the API of:
Fecth Api
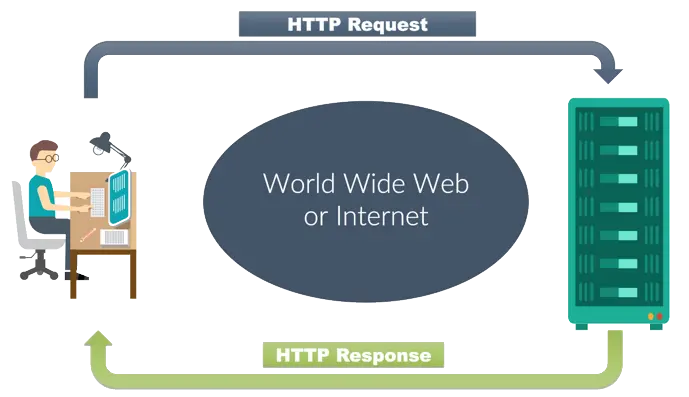
HTTP Requests
HTTP requests let us send or receive data from a server.
JavaScript has a few modules and methods that allow us to make HTTP requests.
ajax
Ajax is the traditional way to make an asynchronous HTTP request.
To make an HTTP call in Ajax, you need to initialise a new XMLHttpRequest object, specify the URL endpoint and the HTTP method.
const http = new XMLHttpRequest();
const url = 'http://myrentacar.com/api/users';

// the open() method ties the HTTP method and URL endpoint together
http.open('GET', url);

// the send() method fires the request
http.send();

// onreadystatechange is an event handler
// readyState can have one of five possible values; 4 means the request is done
http.onreadystatechange = function() {
  if(this.readyState === 4 && this.status === 200){
      console.log(http.responseText)
  }
};
jquery
jQuery has many methods to easily handle HTTP requests.
$.ajax is one of the simplest.
$(document).ready(function(){

    $('.btn').click(function(){
        $.ajax({
            url: 'http://myrentacar.com/api/users',
            type: 'GET',
            success: function(result) {
                console.log(result);
            },
            error: function(error) {
                console.log(error);
            }
        });
    });
});
We can also use the $.get or $.post methods.
fetch
The Fetch API is a modern web API that allows us to make HTTP requests to servers from web browsers.
The Fetch API can perform all the tasks that the XMLHttpRequest object can do, but its syntax is much cleaner and simpler. Also, the Fetch API uses Promises.
const responsePromise = fetch(resource [, init]);fetch()
The fetch() method takes one mandatory argument: the path to the resource we want to fetch.
It returns a Promise that resolves to the Response to that request, even if the server response is an HTTP error status.
fetch(url)
    .then(response => {
        // handle the response
    })
    .catch(error => {
        // handle the error
    });
Request object
The fetch() method can also receive a Request object as argument.
const data = {
    method: 'POST',
    body: '{"foo": "bar"}'
}

const request = new Request('https://example.com', data);
init object
The fetch() method can optionally receive an init object as the second argument.
Init is an object containing custom settings that we might want to apply to the request. The possible options include the HTTP method, request headers, cache, etc.
const init = {
  method: 'GET',
  headers: myHeaders
};

fetch(url, init).then(response => {
        // handle the response
}); (...)
Response promise
The returned Promise from fetch() will resolve once the response is available. It does NOT reject on HTTP errors — it only rejects on network errors.
(...)

fetch(url, init)
    .then(response => {
        if (!response.ok) {
            throw new Error(`HTTP error! status: ${response.status}`);
        }
    return response.json();
})
  .catch(error => console.error(error));
(...)
Response metadata
From the Response object, we can access other metadata like headers, response status, url, etc.
(...)

fetch(url, init).then(response => {
    console.log(response.headers.get('Content-Type'));
    console.log(response.status);
    console.log(response.url);
});
live coding
Fetch Felizarda From GitHub
Exercise
GitHub API - Search Users
CORS
legitimate cross-site requests
It's common for a website to request data from another website. For example, a video shown on a website is typically stored on a video streaming site such as YouTube.
That's also the idea behind CDNs.

Many websites store scripts, images, and other resources on CDNs to improve the browsing experience.
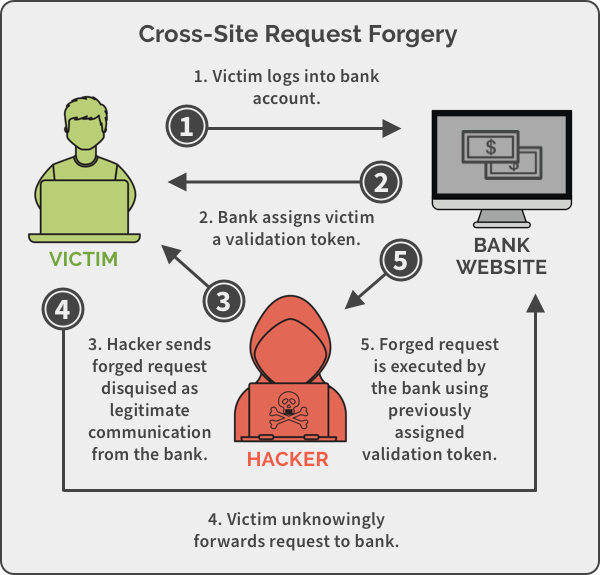
CSRF
Cross-site requests might be a source of security problems.
If a website asks the web browser to retrieve data from another website without the user’s consent, and such request isn't handled correctly, an attacker can launch a cross-site request forgery attack.
Combined with social engineering to persuade users to open malicious links, CSRF attacks can have serious consequences.
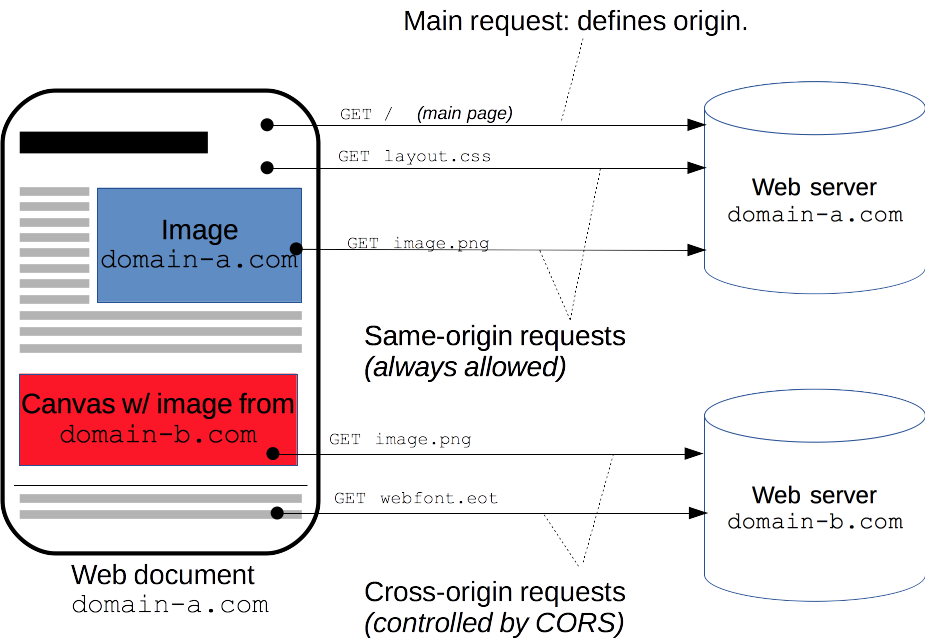
same-origin policy
The same-origin policy is a security mechanism enforced by browsers that restricts how a script loaded by one origin can interact with a resource from another origin.
Two URLs have the same origin if the protocol, port (if specified), and host are the same for both.
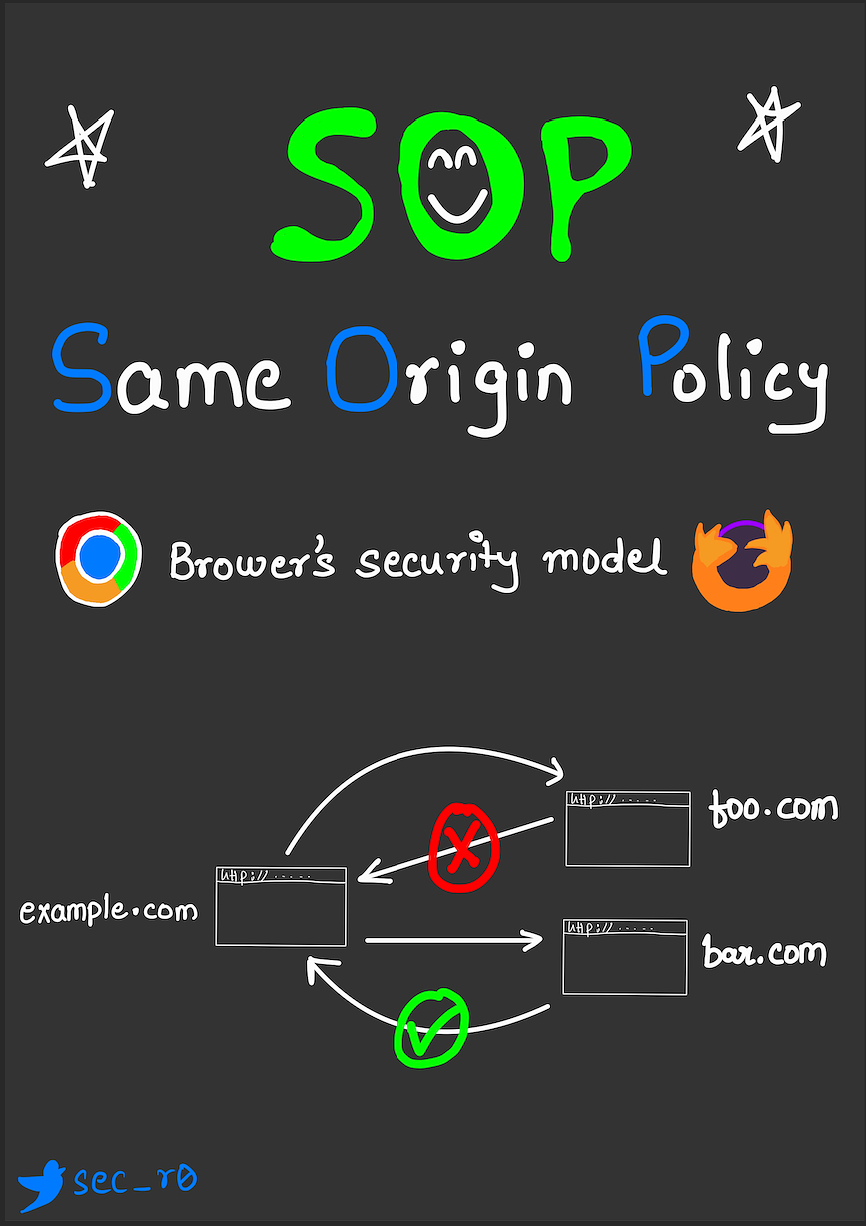
To allow cross-origin access, we need to use CORS.
But what exactly is CORS?
Cross-origin resource sharing
CORS is an HTTP-header based mechanism that allows a server to tell the browser any origins other than its own from which it should permit the loading of resources.
CORS VS FETCH api
The Fetch API follows the same-origin policy.
This means that a web application using this API can only request resources from the same origin the application was loaded from unless the response from other origins includes the right CORS headers.
// Allow all
Access-Control-Allow-Origin: *

// Alow a single domain
Access-Control-Allow-Origin: 'https://example.com'
CORS FAILURES
CORS failures result in errors, but for security reasons, specifics about the error are not available to JavaScript. All the code knows is that an error occurred (a Promise rejected, for example).
The only way to determine what specifically went wrong is to look at the browser's console for details.

simple requests
async function fetchData() {
  const response = await fetch('https://bar.other/resources/public-data/');
  // waits until the request completes...
  console.log(response);
}
// CLIENT (BROWSER) HEADER
GET /resources/public-data/ HTTP/1.1
Host: bar.other
Mozilla/5.0 (Macintosh; Intel Mac OS X 10_15_7) AppleWebKit/537.36 (KHTML, like Gecko) Chrome/92.0.4515.107 Safari/537.36
Accept: text/html,application/xhtml+xml,application/xml;q=0.9,*/*;q=0.8
Accept-Language: en-us,en;q=0.5
Accept-Encoding: gzip,deflate
Connection: keep-alive
Origin: https://example.com
The request header to focus on is Origin.
It shows that the invocation is coming from https://example.com.
simple requests
async function fetchData() {
  const response = await fetch('https://bar.other/resources/public-data/');
  // waits until the request completes...
  console.log(response);
}
// SERVER HEADER
HTTP/1.1 200 OK
Date: Fri, 13 Aug 2021 16:55:50 GMT
Server: Apache/2
Access-Control-Allow-Origin: *
Keep-Alive: timeout=2, max=100
Connection: Keep-Alive
Transfer-Encoding: chunked
Content-Type: application/xmlIn response, the server sends back an Access-Control-Allow-Origin header with *, which means that the resource can be accessed by any origin.
preflighted requests
A preflight request is a small request that is sent by the browser before the actual request. It contains information like which HTTP method is used, as well as if any custom HTTP headers are present.
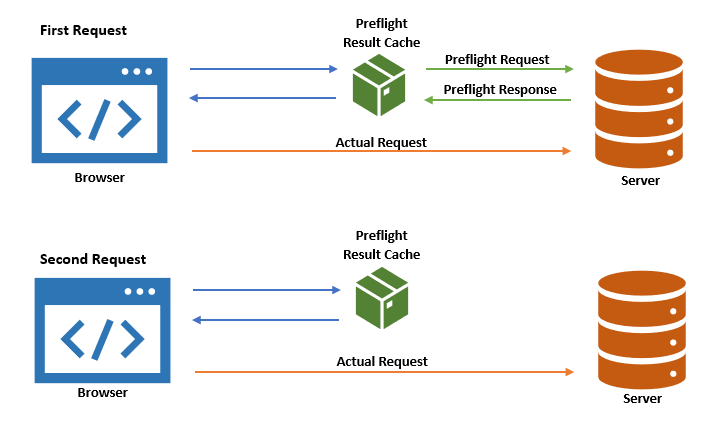
Preflight requests are automatically fired by the browser if the request doesn't meet a set of conditions. These conditions can be found here.
LIVE CODING
Rentacar API && CORS
CURL
cURL, which stands for client URL, is a command line tool that developers use to transfer data to and from a server.

The most basic command in curl is curl [options] <url>.
The curl command is followed by the URL, from which we would like to retrieve some kind of data.
curl example.com
// In this case, it would return
// the html source for example.com
live coding
cURL
libcurl
Underlying the curl command is the libcurl development library, which has bindings for almost any codebase, allowing us to to take advantage of curl powers from within our language or system of choice.
libcurl supports all the protocols that curl supports, including HTTP, HTTPS, FTP, FTPS, SMTP, SMTPS, etc. It also supports user+password authentication.
why use curl?
curl is useful for testing API endpoints. Before tools like Postman existed, curl was the go-to method to performing API calls and check if they were working.
Because curl is designed to be used without user interaction, it's ideal for use in a script. Also, thanks to libcurl, we can integrate it in most applications.
curl does not follow SOP/CORS like the browser.
Live coding
frutyvice with fetch and curl
wget
GNU's Wget is an alternative to curl, although it isn't as powerful. Wget isn't powered by a library like curl is, for example.
Both are command line tools, and both work with the HTTP protocol. Wget's major advantage over curl is the ability to download recursively.
// Create a mirror image of Google's
// with only one try per document
// saving the log of the activities to a log file
wget -r -t1 http://www.gnu.com -o mirror.log
Json web token
JSON Web Token (JWT) is an open standard that defines a way for securely transmitting information between parties as a JSON object.
This information can be verified and trusted because it is digitally signed using a secret (with the HMAC algorithm) or a public/private key pair.
JSON Web Tokens are useful for authorisation and information exchange.

JSON Web Token s consist of three parts separated by dots:
- Header - it usually contains the type of the token and the signing algorithm being used.
- Payload - contains the claims which are statements about an entity and additional data. These include expiration times, authorisation roles, etc.
- Signature - used to verify if the message wasn't changed along the way, and if the sender is who it said it was. It's created from the header and payload.
JWT
JWT - An example

HMAC
HMAC stands for Hash-based Message Authentication.
It's a message authentication code obtained by running a cryptographic hash function (like MD5, SHA1, and SHA256) over the data (to be authenticated) and a shared secret key.
The secret key will be defined by us.
base64
Base64 is a group of similar binary-to-text encoding schemes that represent binary data in an ASCII string format, using 64 different characters.
Base64 encoding schemes are commonly used when there is a need to encode binary data that needs to be stored and transferred over media that are designed to deal with ASCII.
This is to ensure that the data remain intact without modification during transport.
JWT AnD authentication
In authentication, when the user successfully logs in using their credentials, a JSON Web Token will be returned. We should not keep tokens longer than required.
Whenever the user wants to access a protected route or resource, the user agent should send the JWT, typically in the Authorisation header using the Bearer schema. The name “Bearer authentication” can be understood as “give access to the bearer of this token.”
Authorization: Bearer <token>This can be, in certain cases, a stateless authorization mechanism.
Live coding
Rentacar With JWT
Single page applications
A Single Page Application (SPA) is a web page that presents information and interacts with the user without ever requiring loading new pages.
After the first single load of the application, containing the initial necessary HTML/CSS/JavaScript content, any other content that is required will be dynamically loaded.
This allows for more efficient and dynamic websites, with shorter load times and potentially better user experience.
single page application
As we discussed previously, AJAX allows for server communication without requiring page loading. For this reason, AJAX was one of the most common methods of creating SPAs.
The jQuery library later on allowed for simpler use of AJAX and other JS functionalities for creating SPAs. Fetch API more recently provided easier server communication functionalities.
Nowadays, there are many JavaScript frameworks that can be used to create SPAs, such as Angular, React, Vue, and many others.
creating a spa
We have gone through some of the benefits of using Single Page Applications, but there are some disadvantages to consider:
Its dynamic nature implies some difficulties regarding SEO optimization. Nowadays, as SPAs are very widespread, search engines and crawlers have improved their performance for this type of websites.
Nevertheless, when discoverability is vital for the business, traditional multi-page applications might be a better choice.
COMPARISON TO MULTI-PAGE APPLICATIONS
Similar issues arise regarding web analytics and security tools that rely on page loads or more static applications.
Additionally, there can be issues with page history navigation, as new pages are not loaded for new contexts. This can be solved by changing the URL for different states, using fragment identifiers, or even store/retrieve state using History API.
COMPARISON TO MULTI-PAGE APPLICATIONS
//Clicking on this anchor tag will change the URL:
//www.mysite.com/current-page#section
//And the page will scroll to the element with
//the corresponding id
<a href="#section"></a>
//...
<div id="section"></div>
Create your own personal website as a single page application.
It should start with a simple loading screen, which should fade out once the page and its contents have been obtained.
Your page should have:
A navbar that is always visible when you scroll down the page. It should have a menu with the sections of the page and links to them.
When one of the links is clicked, the page should "jump" or scroll to the respective element of the page. You can use the concept of fragment identifiers for this navigation.
The selected menu item should have a different appearance to differentiate from the others.
Exercise
Single Page Application
An about section, with a brief personal description.
A skills section, where you present the skills you've developed until now. This information should be written in a JSON file.
Each skill has at least a title and description.
And finally, a contacts section, with links for each of your relevant work contacts.
Use async/await, promises, Fetch API and jQuery to populate and interact with your page.
Exercise
Single Page Application
A very simple loading screen, where the ellipsis are animated: one appears after the other and then loops back, infinitely.
Exercise
Demo

After the content has been loaded, where we see the navbar, the home section, with my github avatar and a simple welcome message.
Exercise
Demo

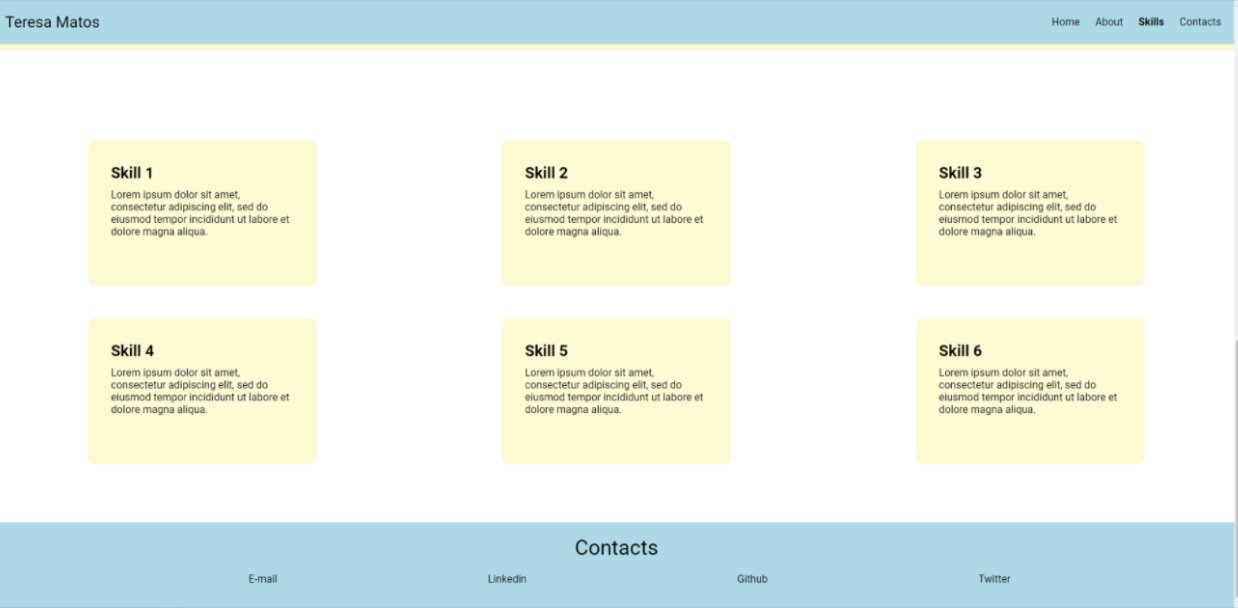
Finally, a preview of the skills and contact sections. Notice that the skills are displayed evenly in a grid.
Exercise
Demo
Web Development
By Soraia Veríssimo


