Distributed Node #1

Nest.js quick start
Course goal
Build a distributed, highly-available, micro-service based, scalable, cloud-agnostic NodeJS app!
Technologies


Workflow
- 30+ minutes of theory presentation
- <1 hour of practice
- The trainer(s) will implement the course project online with live comments
- Several trainers (2+) will be present at every lesson. The main trainer will conduct a lecture and live coding, other trainers will provide live-code assistance + filling silence moments
- The main trainer will be rotated depending on the course topic
- In the end, there will be a finished project, which students may run and investigate on their own
Every meeting:
Interested participants can be invited to a live coding session https://visualstudio.microsoft.com/ru/services/live-share/
Section 1: User service
- Nest.js setting up
- CRUD user operations
- DI, IoC, MVC, DTO, other patterns and techniques
- REST API
Section 2: Databases
- SQL vs NoSQL
- Pulling Mongo image
- Setting up Nest + mongo
- Persisting users to DB
Section 4: CI/CD
- PR process
- CI services overview
- CD vs CD
- GitHub Actions integration
- CI/CD configurations
- Docker hub
- Pushing Docker images to hub via CI/CD
Section 3: Docker
- Intro
- Base usage
- Docker-compose
- Docker networks
Section 5: Caching
- Overview
- Redis
- Nestjs + redis
Section 6: Chat service
- WS vs HTTP2
- Socket.IO
- Writing the chat service
Section 7: Kubernetes
- Quick intro
- Services and discovery
- Wrapping our current configuration to a K8S YAML
- Scaling
- High availability
- Monitoring tools
Section 8: Gateway
- API gateway,
- Load balancing strategies
- Introducing Traefik
- Sticky sessions pros and cons
Section 9: Event streaming
- MQs overview
- Kafka internals
- Adding kafka cluster to k8s via Helm
- Nest.js integration with Kafka
Section 10: Security
- HTTPS, local SSL cert, MiM attack
- Authentication
- Authorization
- OAUTH2 vs JWT
- Setting up a ForwardAuth Traefik middleware
- Integrating with Facebook login
Section 11: Clouds
- AWS/Azure/GCloud
- Managed k8s services
- Deploying chat to the AWS cloud - costing overview
User service
Nest.js/TS/Etc
Chat service
nodes
Public :443 HTTPS


OAuth 2 provider
OAuth interceptor
HTTP/REST
WS/Socket.IO

Users cache
Messages cache
User disabled notification
Private Kubernetes cluster
HTTPS
WS
Get user details on connection
Forward auth / HMAC signature headers validation
Expected app in the end of the training
Broker

The UI will be implemented behind the scene
How we will work

Please don't be shy
Join Telegram channel


Setup working environment
vscode
live-share plugin
Please download this two things
Setup Nest CLI
# You should have latest LTS Node version
$ node -v

# Install nest tools globally
$ npm install -g @nestjs/cli

# I am going to use yarn
yarn -v

# check nest installed correctly
$ nest --help
The Nest CLI is a command-line interface tool that helps you to initialize, develop, and maintain your Nest applications. It assists in multiple ways, including scaffolding the project, serving it in development mode, and building and bundling the application for production distribution. It embodies best-practice architectural patterns to encourage well-structured apps.
User-service CRUD
Nest.js
Why Nest?
We going to use Nest because
It's great for demonstrating DI/IoC and OOP concepts
It has built-in adapters for Kafka, Redis, WS, Socket.IO, Passport, etc
It provides you with a solid opinionated architectural framework
Fits good for big teams with lots of newbies
TypeScript development experience
Fast prototyping with CLI
Nest.js vs Express
Nest is extremely opinionated and it forces an architecture that is legtiamte and solid.
Let's create a CRUD service!
$ nest new user-service

$ cd user-service

# https://docs.nestjs.com/recipes/crud-generator
$ nest g resource users

$ yarn start:dev
When you run nest new, Nest generates a boilerplate application structure by creating a new folder and populating an initial set of files. You can continue working in this default structure, adding new components, as described throughout this documentation. We refer to the project structure generated by nest new as standard mode.
Project overview
fetch('http://localhost:3000/users', {
    method: 'POST',
    headers: {
        'Accept': 'application/json',
        'Content-Type': 'application/json'
    },
    body: JSON.stringify({
        username: 'root',
        password: 'admin'
    })
})
Create a user
import { User } from './entities/user.entity';
import { Injectable, NotFoundException } from '@nestjs/common';
import { CreateUserDto } from './dto/create-user.dto';
import { UpdateUserDto } from './dto/update-user.dto';
import { v4 as uuid } from 'uuid';

@Injectable()
export class UsersService {
  private users: User[] = [];

  async create(createUserDto: CreateUserDto) {
    await new Promise((res) => setTimeout(() => res(1), 1000));
    const user = new User(
      uuid(),
      createUserDto.username,
      createUserDto.password,
    );
    this.users.push(user);
    return user;
  }

  findAll() {
    return this.users;
  }

  findOne(id: string) {
    const user = this.users.find((u: User) => u.id === id);
    console.log(this.users)
    if (!user) {
      throw new NotFoundException(`User with id:${id} doesn't exist`);
    }
    return user;
  }

  update(id: string, updateUserDto: UpdateUserDto) {
    const user = this.findOne(id);
    user.password = updateUserDto.password ?? user.password;
    user.username = updateUserDto.username ?? user.username;
    return user;
  }

  remove(id: string) {
    this.users = this.users.filter((u) => u.id !== id);
    return id;
  }
}
User svc
Controllers & REST
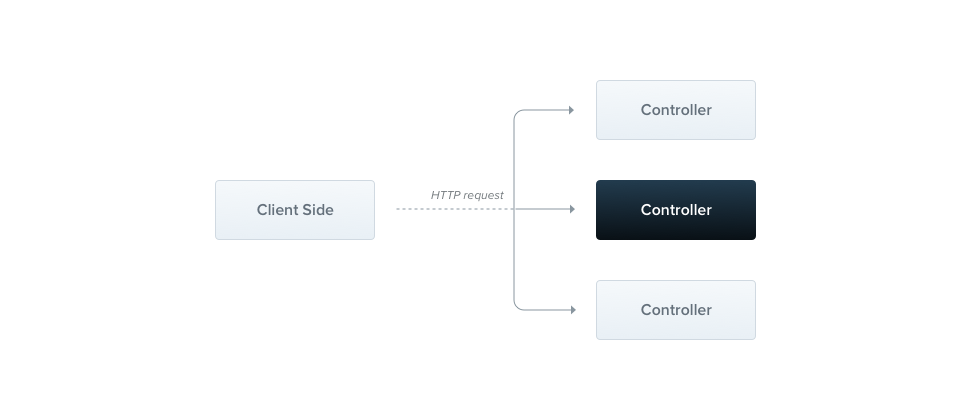
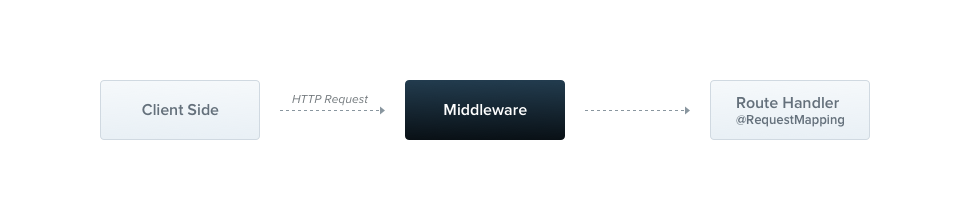
A controller's purpose is to receive specific requests for the application. The routing mechanism controls which controller receives which requests. Frequently, each controller has more than one route, and different routes can perform different actions.
Controllers are responsible for handling incoming requests
import { Controller, Get, Req } from '@nestjs/common';

@Controller('cats')
export class CatsController {
  @Get(':id')
  findAll(@Param('id') id: string): string {
    return 'This action return a cat with an id ' + id;
  }
}
To create a controller using the CLI, simply execute the $ nest g controller cats command.
Nest.js Controller
@Controller('cats')
export class CatsController {
  @Post()
  create(@Body() createCatDto: CreateCatDto) {
    return 'This action adds a new cat';
  }

  @Get()
  findAll(@Query() query: ListAllEntities) {
    return `This action returns all cats (limit: ${query.limit} items)`;
  }

  @Get(':id')
  findOne(@Param('id') id: string) {
    return `This action returns a #${id} cat`;
  }

  @Put(':id')
  update(@Param('id') id: string, @Body() updateCatDto: UpdateCatDto) {
    return `This action updates a #${id} cat`;
  }

  @Delete(':id')
  remove(@Param('id') id: string) {
    return `This action removes a #${id} cat`;
  }
}
Request types
DTO vs DAO
Data Transfer Object
Data Access Object
Encapsulates the logic for retrieving, saving and updating data in your data storage
Contains only data, used to pass it through different parts of application


Talking about Controllers
Is Nest.js based app is a MVC app?
MVC
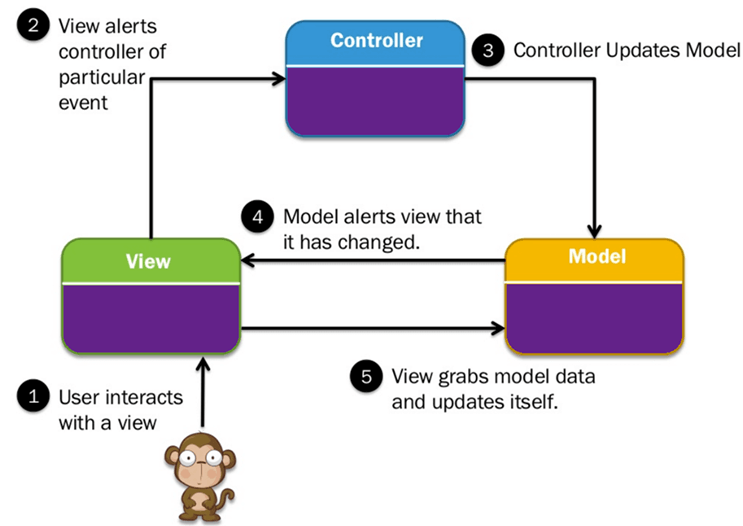
Nest.JS allows you to build an MVC app but doesn't force you.

+
handlebarsjs
Nestjs
What about REST ?
Nestjs Controllers are not designed to work with HTTP/REST only
NestJS controller abstraction layer

Abstract controller
@SubscribeMessage('cat')
handleEvent(@MessageBody() catMessage: CreateCatDto): string {
  return 'This action adds a new cat';
}
@MessagePattern('cat')
killDragon(@Payload() catMessage: CreateCatDto): string {
return 'This action adds a new cat';
}@Post('cat')
create(@Body() cat: CreateCatDto) {
return 'This action adds a new cat';
}
*
Mediator
FSUC
Fat Stupid Ugly Controllers
Pádraic Brady, Zend Framework

FSUC is antipattern
We should inject services and separate business domain from the infrastructure code
Inject controller parameters
Modules
A module is a class annotated with a @Module() decorator. The @Module() decorator provides metadata that Nest makes use of to organize the application structure
Dependency Inversion Principle (DIP) is a software design guideline which boils down to two recommendations about de-coupling a class from its concrete dependencies:
- 'High-level modules should not depend on low-level modules. Both should depend on abstractions.'
- 'Abstractions should not depend upon details. Details should depend upon abstractions.'
Dependency Injection is an Inversion of Control technique for supplying objects ('dependencies') to a class by way of the Dependency Injection Design Pattern. Typically passing dependencies via one of the following:
- A constructor
- A public property or field
- A public setter

IoC container
| Interface | Details |
|---|---|
| cacheSvc | Redis |
| databaseSvc | Mongo |
Reads configuration

Running the code
Automatically injects service implementation based on config
The IoC container creates an object of the specified class and also injects all the dependency objects through a constructor, a property or a method at run time and disposes it at the appropriate time. This is done so that we don't have to create and manage objects manually.
import { Injectable } from '@nestjs/common';
import { Cat } from './interfaces/cat.interface';

@Injectable()
export class CatsService {
  private readonly cats: Cat[] = [];

  findAll(): Cat[] {
    return this.cats;
  }
}
First, we define a provider. The @Injectable() decorator marks the CatsService class as a provider.
Then we request that Nest inject the provider into our controller class:
import { Controller, Get } from '@nestjs/common';
import { CatsService } from './cats.service';
import { Cat } from './interfaces/cat.interface';

@Controller('cats')
export class CatsController {
  constructor(private catsService: CatsService) {}

  @Get()
  async findAll(): Promise<Cat[]> {
    return this.catsService.findAll();
  }
}
Finally, we register the provider with the Nest IoC container:
import { Module } from '@nestjs/common';
import { CatsController } from './cats/cats.controller';
import { CatsService } from './cats/cats.service';
@Module({
controllers: [CatsController],
providers: [CatsService],
})
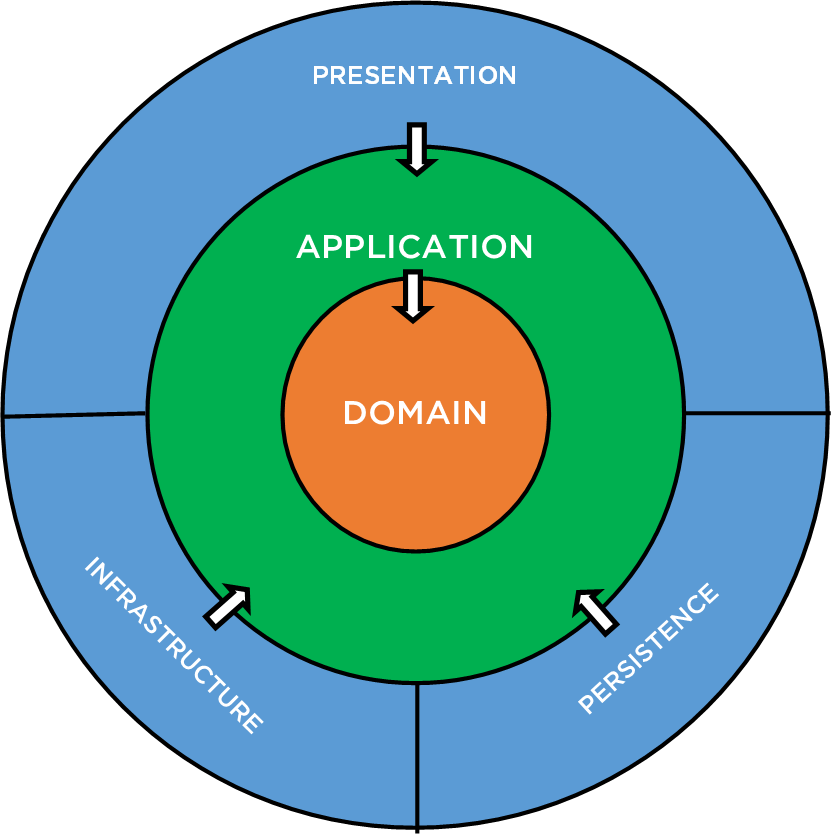
export class AppModule {}Clean architecture
Independent of UI
Independent of database
Easily testable
Independent of infrastructure services
We have a gap with our module configuration
const configServiceProvider = {
  provide: ConfigService,
  useClass:
    process.env.NODE_ENV === 'development'
      ? DevelopmentConfigService
      : ProductionConfigService,
};

@Module({
  providers: [configServiceProvider],
})
export class AppModule {}
Within object-oriented design, interfaces provide layers of abstraction that simplify code and create a barrier preventing coupling to dependencies.
Dynamic providers
import { Module } from '@nestjs/common';
import { UsersService } from './users.service';
import { UsersController } from './users.controller';

@Module({
  controllers: [UsersController],
  providers: [
    {
      provide: 'IUserService',
      useClass: UsersService,
    },
  ],
})
export class UsersModule {}
Using an interface in module
import { UpdateUserDto } from './../dto/update-user.dto';
import { CreateUserDto } from './../dto/create-user.dto';

export default interface IUserService {
  create(createUserDto: CreateUserDto);

  findAll();

  findOne(id: string);

  update(id: string, updateUserDto: UpdateUserDto);

  remove(id: string);
}
An interface
Validation

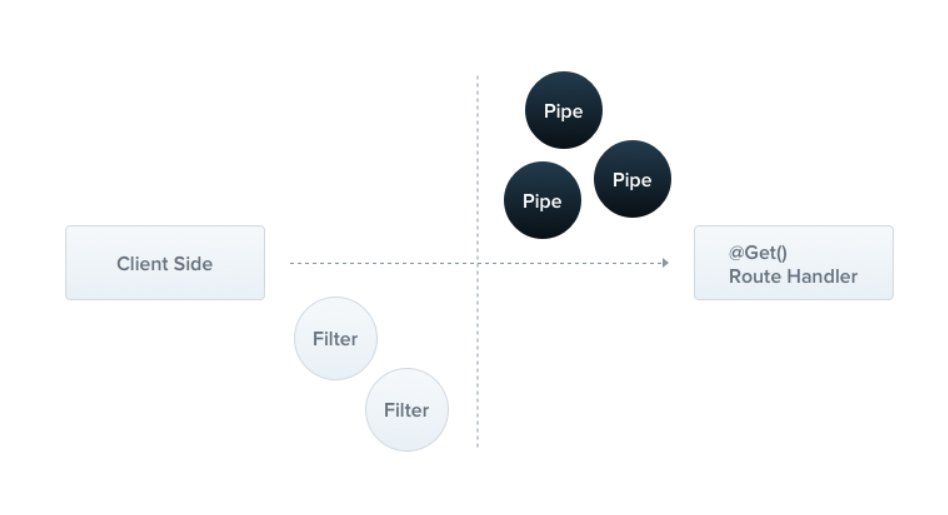
A pipe is a class annotated with the @Injectable() decorator. Pipes should implement the PipeTransform interface.
Pipes
Pipes have two typical use cases:
- transformation: transform input data to the desired form (e.g., from string to integer)
- validation: evaluate input data and if valid, simply pass it through unchanged; otherwise, throw an exception when the data is incorrect

Pipes
@Get(':id')
async findOne(@Param('id', ParseIntPipe) id: number) {
  return this.catsService.findOne(id);
}
To use a pipe, we need to bind an instance of the pipe class to the appropriate context. In our ParseIntPipe example, we want to associate the pipe with a particular route handler method, and make sure it runs before the method is called.
Binding pipes
Custom pipes
import { PipeTransform, Injectable, ArgumentMetadata } from '@nestjs/common';

@Injectable()
export class ValidationPipe implements PipeTransform {
  transform(value: any, metadata: ArgumentMetadata) {
    const error = // validate value
    if (error) {
      throw new BadRequestException('Validation failed');
    }
    return value;
  }
}
Every pipe must implement the transform() method to fulfill the PipeTransform interface contract.
Lets add some magic!
import { IsEmail, IsNotEmpty } from 'class-validator';

export class CreateUserDto {
  @IsEmail()
  email: string;

  @IsNotEmpty()
  password: string;
}
We can define field validation rules directly in DTO
async function bootstrap() {
  const app = await NestFactory.create(ApplicationModule);
  app.useGlobalPipes(new ValidationPipe());
  await app.listen(3000);
}
bootstrap();
And use a global validation Pipe
We still can apply pipes on class level
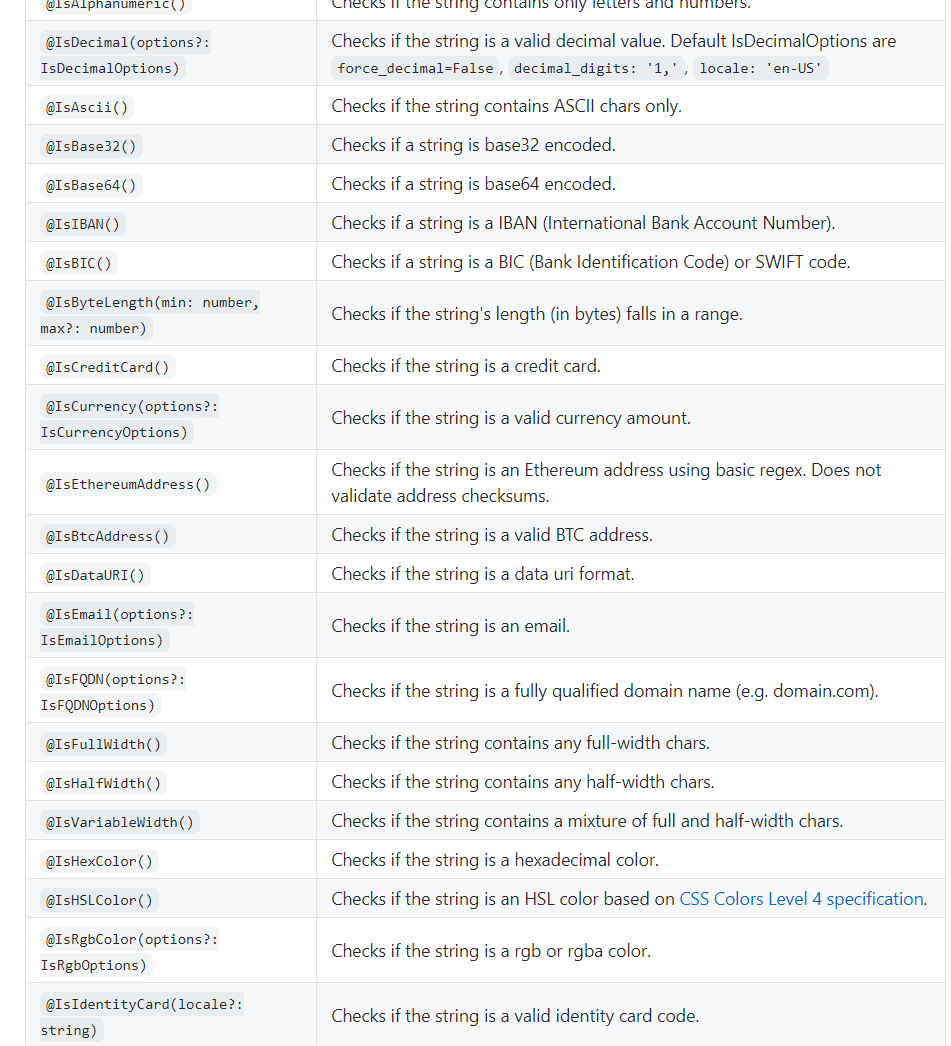
class-validator
export class Post {
  @Length(10, 20)
  title: string;

  @Contains('hello')
  text: string;

  @IsInt()
  @Min(0)
  @Max(10)
  rating: number;

  @IsEmail()
  email: string;

  @IsFQDN()
  site: string;

  @IsDate()
  createDate: Date;
}
Configuration
Depending on the environment, different configuration settings should be used. For example, usually the local environment relies on specific database credentials, valid only for the local DB instance
Installation
yarn add @nestjs/configIn Node.js applications, it's common to use .env files, holding key-value pairs where each key represents a particular value, to represent each environment. Running an app in different environments is then just a matter of swapping in the correct .env file.
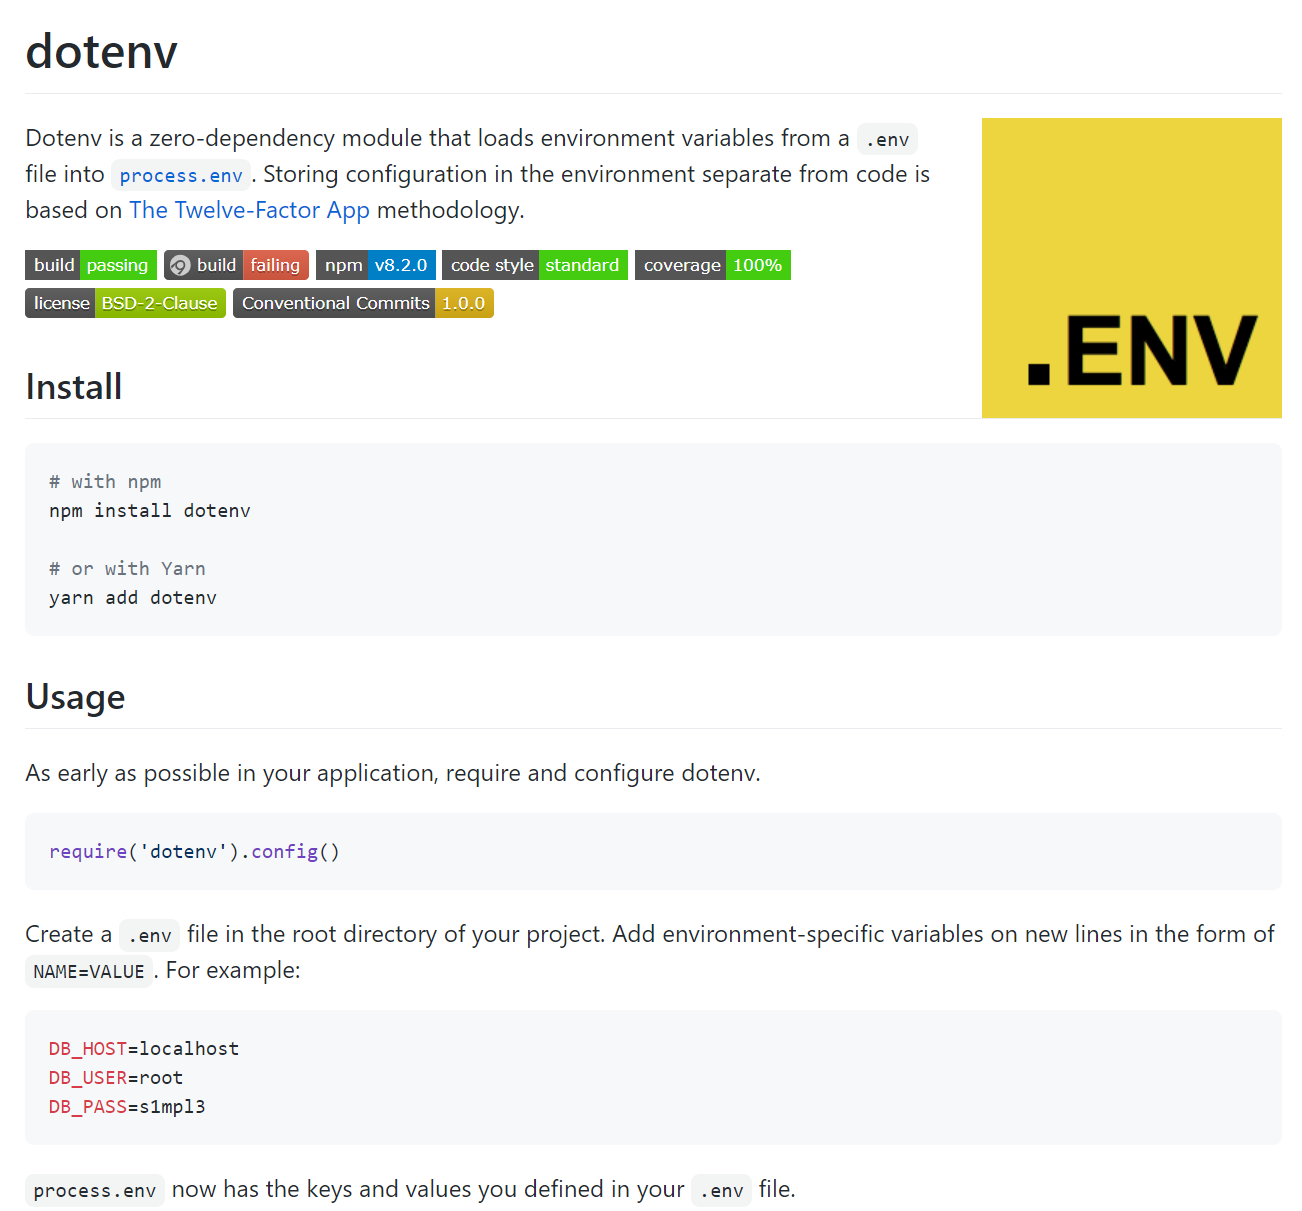
DB_HOST=localhost
DB_USER=root
DB_PASS=s1mpl3
Create a .env file in the root directory of your project. Add environment-specific variables on new lines in the form of NAME=VALUE.
.env file
@Module({
  imports: [UsersModule, ConfigModule.forRoot()],
  controllers: [AppController],
  providers: [AppService],
})
export class AppModule {}
Define ConfigModule in the root module
ConfigModule
Should I commit my .env file?
No. We strongly recommend against committing your .env file to version control. It should only include environment-specific values such as database passwords or API keys. Your production database should have a different password than your development database.
Should I have multiple .env files?
No. We strongly recommend against having a "main" .env file and an "environment" .env file like .env.test. Your config should vary between deploys, and you should not be sharing values between environments.
What happens to environment variables that were already set?
if there is a variable in your .env file which collides with one that already exists in your environment, then that variable will be skipped.
Logger

Logger
Nest comes with a built-in text-based logger which is used during application bootstrapping and several other circumstances such as displaying caught exceptions (i.e., system logging). This functionality is provided via the Logger class in the @nestjs/common package.
const app = await NestFactory.create(ApplicationModule, {
  logger: ['error', 'warn'],
});
await app.listen(3000);
You can fully control the behavior of the logging system, including any of the following:
-
disable logging entirely
-
specify the log level of detail (e.g., display errors, warnings, debug information, etc.)
-
override timestamp in the default logger (e.g., use ISO8601 standard as date format)
-
completely override the default logger
-
customize the default logger by extending it
-
make use of dependency injection to simplify composing and testing your application
You can also make use of the built-in logger, or create your own custom implementation, to log your own application-level events and messages.
Using the logger for application logging
import { Logger, Injectable } from '@nestjs/common';

@Injectable()
class MyService {
  private readonly logger = new Logger(MyService.name);

  doSomething() {
    this.logger.log('Doing something...');
  }
}
If we supply a custom logger via app.useLogger(), it will actually be used by Nest internally. That means that our code remains implementation agnostic, while we can easily substitute the default logger for our custom one by calling app.useLogger().
Logging best practices

Logging cons
Logging means more code
Logging isn't free
The more you log, the less you can find
The logfile that cried Wolf

Winston
import winston, { format, transports } from "winston";

export class LoggerConfig {
  private readonly options: winston.LoggerOptions;

  constructor() {
    this.options = {
      exitOnError: false,
      format: format.combine(format.colorize(), format.timestamp(), format.printf(msg => {
        return `${msg.timestamp} [${msg.level}] - ${msg.message}`;
      })),
      transports: [new transports.Console({ level: "debug" })], // alert > error > warning > notice > info > debug
    };
  }

  public console(): object {
    return this.options;
  }
}
import { Module } from '@nestjs/common';
import { WinstonModule } from 'nest-winston';
import * as winston from 'winston';
const logger: LoggerConfig = new LoggerConfig();
@Module({
imports: [WinstonModule.forRoot(logger.console())],
})
export class AppModule {}winston is designed to be a simple and universal logging library with support for multiple transports. A transport is essentially a storage device for your logs. Each winston logger can have multiple transports (see: Transports)
Debugging


"start:debug": "nest start --debug --watch"Coding Horror guy got an interesting post about logging problem and why abusive logging could be a time waste in certain conditions.
Execute the following task to run nest app in debug mode
{
    "version": "0.2.0",
    "configurations": [
        {
            "type": "node",
            "request": "attach",
            "name": "Attach NestJS WS",
            "port": 9229,
            "restart": true,
            "stopOnEntry": false,
            "protocol": "inspector"
        }
    ]
}
VS Code debug configuration
You can also set up launch configuration instead of attach
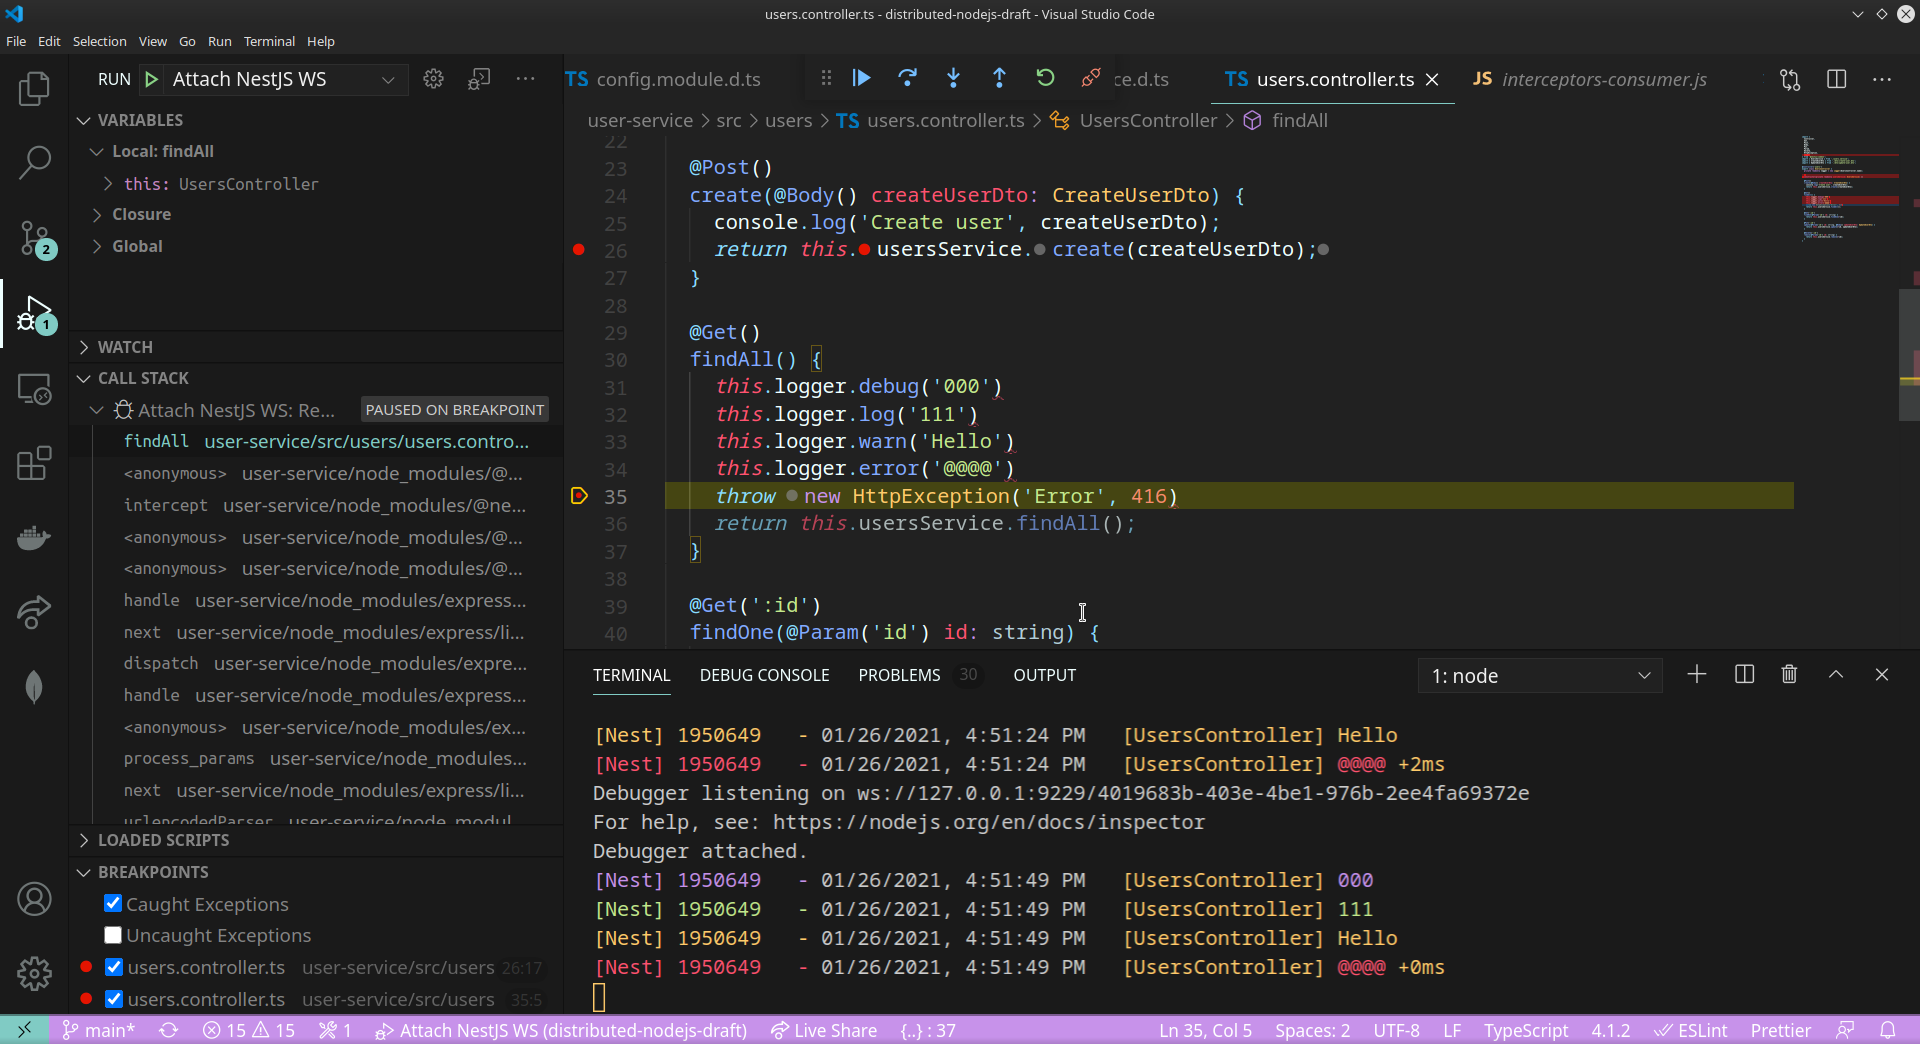
Debugging with VS Code
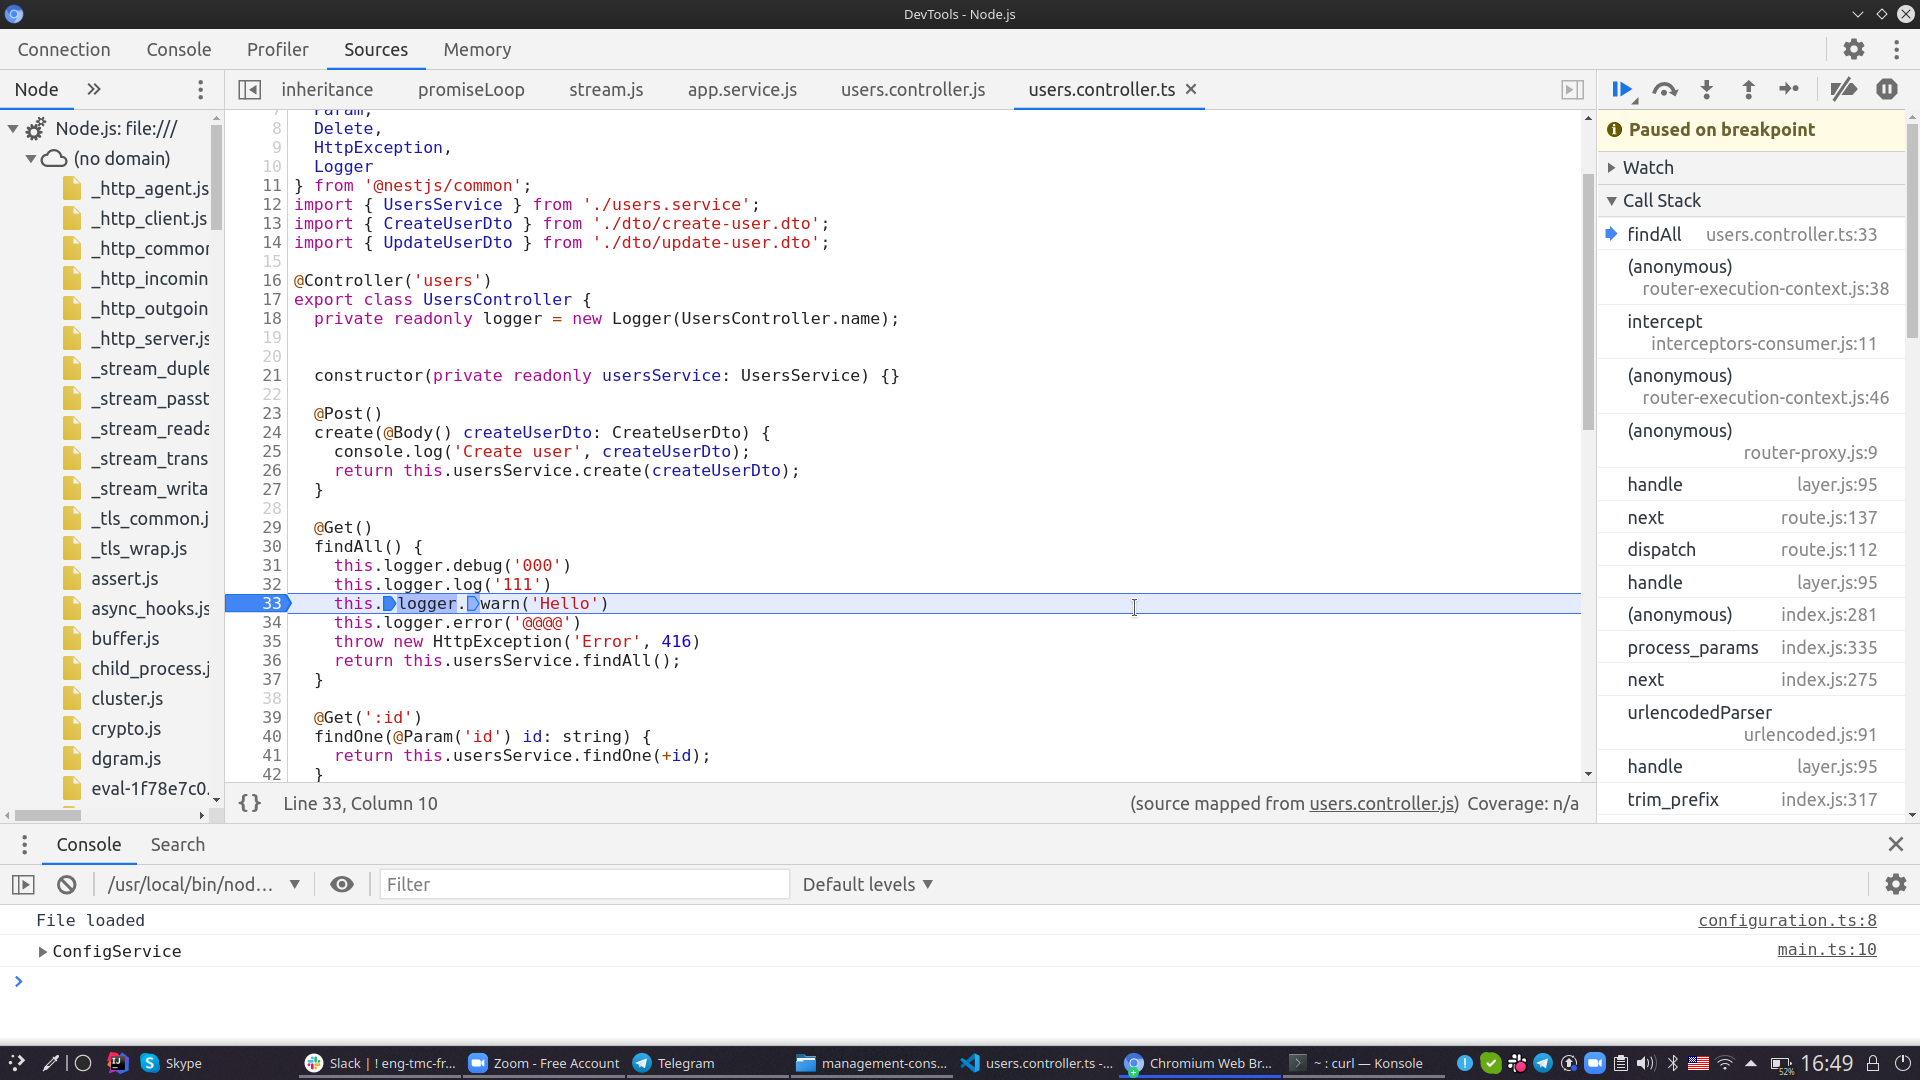
Debugging with Chrome dev-tool
ger

The OpenAPI Specification, originally known as the Swagger Specification, is a specification for machine-readable interface files for describing, producing, consuming, and visualizing RESTful web services
Use Swagger to document and define RESTful API
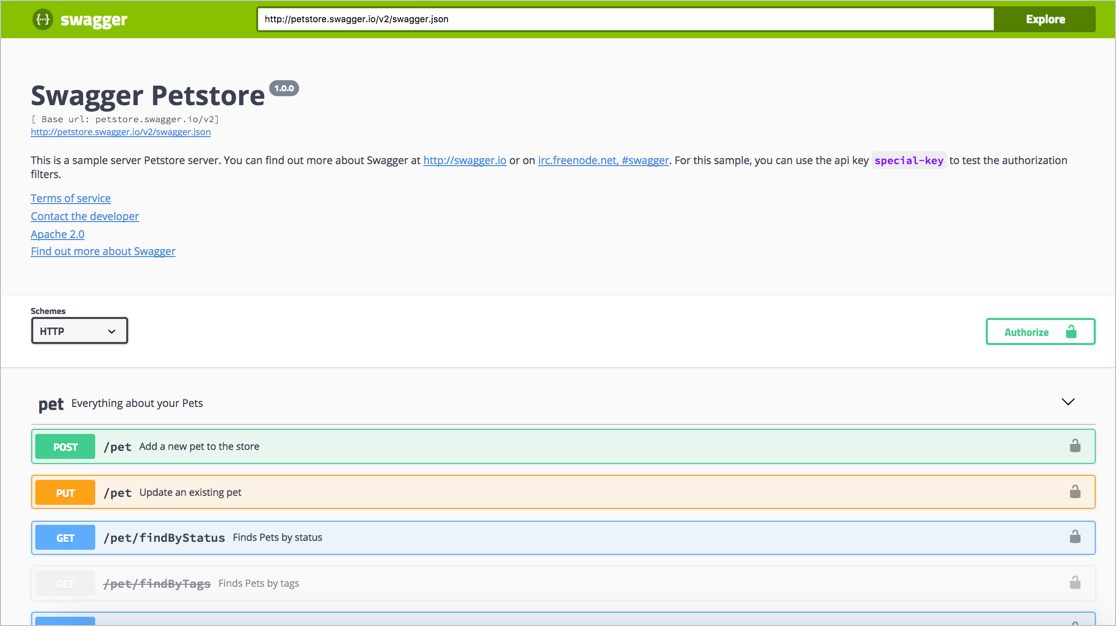
Swagger UI allows anyone — be it your development team or your end consumers — to visualize and interact with the API’s resources without having any of the implementation logic in place.
// 20210203120304
// http://localhost:3001/api-json

{
  "openapi": "3.0.0",
  "info": {
    "title": "Users API",
    "description": "This API allows you to manipulate users data",
    "version": "1.0",
    "contact": {

    }
  },
  "tags": [
    {
      "name": "users",
      "description": ""
    }
  ],
  "servers": [

  ],
  "components": {
    "schemas": {
      "CreateUserDto": {
        "type": "object",
        "properties": {
          "username": {
            "type": "string",
            "description": "The user name",
            "example": "admin"
          },
          "password": {
            "type": "string",
            "description": "Users password",
            "example": "1234",
            "minLength": 4,
            "maxLength": 10
          }
        },
        "required": [
          "username",
          "password"
        ]
      },
      "User": {
        "type": "object",
        "properties": {
          "id": {
            "type": "string"
          }
        },
        "required": [
          "id"
        ]
      },
      "UpdateUserDto": {
        "type": "object",
        "properties": {
          "comment": {
            "type": "string"
          },
          "username": {
            "type": "string",
            "description": "The user name",
            "example": "admin"
          },
          "password": {
            "type": "string",
            "description": "Users password",
            "example": "1234",
            "minLength": 4,
            "maxLength": 10
          }
        },
        "required": [
          "username",
          "password"
        ]
      }
    }
  },
  "paths": {
    "/": {
      "get": {
        "operationId": "AppController_getHello",
        "parameters": [

        ],
        "responses": {
          "200": {
            "description": ""
          }
        }
      }
    },
    "/users": {
      "post": {
        "operationId": "UsersController_create",
        "summary": "",
        "description": "Creates a user",
        "parameters": [

        ],
        "requestBody": {
          "required": true,
          "content": {
            "application/json": {
              "schema": {
                "$ref": "#/components/schemas/CreateUserDto"
              }
            }
          }
        },
        "responses": {
          "201": {
            "description": "",
            "content": {
              "application/json": {
                "schema": {
                  "$ref": "#/components/schemas/User"
                }
              }
            }
          }
        }
      },
      "get": {
        "operationId": "UsersController_findAll",
        "parameters": [

        ],
        "responses": {
          "200": {
            "description": "",
            "content": {
              "application/json": {
                "schema": {
                  "type": "array",
                  "items": {
                    "$ref": "#/components/schemas/User"
                  }
                }
              }
            }
          }
        }
      }
    },
    "/users/{id}": {
      "get": {
        "operationId": "UsersController_findOne",
        "parameters": [
          {
            "name": "id",
            "required": true,
            "in": "path",
            "schema": {
              "type": "string"
            }
          }
        ],
        "responses": {
          "200": {
            "description": "",
            "content": {
              "application/json": {
                "schema": {
                  "$ref": "#/components/schemas/User"
                }
              }
            }
          }
        }
      },
      "put": {
        "operationId": "UsersController_update",
        "parameters": [
          {
            "name": "id",
            "required": true,
            "in": "path",
            "schema": {
              "type": "string"
            }
          }
        ],
        "requestBody": {
          "required": true,
          "content": {
            "application/json": {
              "schema": {
                "$ref": "#/components/schemas/UpdateUserDto"
              }
            }
          }
        },
        "responses": {
          "200": {
            "description": "",
            "content": {
              "application/json": {
                "schema": {
                  "$ref": "#/components/schemas/User"
                }
              }
            }
          }
        }
      },
      "delete": {
        "operationId": "UsersController_remove",
        "parameters": [
          {
            "name": "id",
            "required": true,
            "in": "path",
            "schema": {
              "type": "string"
            }
          }
        ],
        "responses": {
          "200": {
            "description": "",
            "content": {
              "application/json": {
                "schema": {
                  "type": "string"
                }
              }
            }
          }
        }
      }
    }
  }
}
JSON configuration
yarn add @nestjs/swagger swagger-ui-expressInstallation
To begin using it, we first install the required dependencies.
Once the installation process is complete, open the main.ts file and initialize Swagger using the SwaggerModule
  const config = new DocumentBuilder()
    .setTitle('Users API')
    .setDescription('This API allows you to manipulate users data')
    .setVersion('1.0')
    .addTag('users')
    .build();
  const document = SwaggerModule.createDocument(app, config);
  SwaggerModule.setup('api', app, document);
It’s automatically generated from your OpenAPI (formerly known as Swagger) Specification, with the visual documentation making it easy for back end implementation and client side consumption.
Setup swagger metadata
@Post()
async create(@Body() createCatDto: CreateCatDto) {
  this.catsService.create(createCatDto);
}
The SwaggerModule searches for all @Body(), @Query(), and @Param() decorators in route handlers to generate the API document. It also creates corresponding model definitions by taking advantage of reflection
Types and parameters
@ApiProperty({
  description: 'The age of a cat',
  minimum: 1,
  default: 1,
})
age: number;
Schema fields definition
ApiProperty() decorator allows you to specify OpenApi schema fields
"compilerOptions": {
    "plugins": [
      {
        "name": "@nestjs/swagger",
        "options": {
          "introspectComments": true
        }
      }
    ]
  }
Update your nest-cli config
TypeScript's metadata reflection system has several limitations which make it impossible to, for instance, determine what properties a class consists of or recognize whether a given property is optional or required
export class CreateUserDto {
  /**
   * The user name
   * @example 'admin'
   */
  @IsNotEmpty()
  username: string;

  /**
   * Users password
   * @example '1234'
   */
  @IsNotEmpty()
  @MinLength(4)
  @MaxLength(10)
  password: string;
}
Comments introspection
Schema will be generated based on comments
We haven't discussed yet
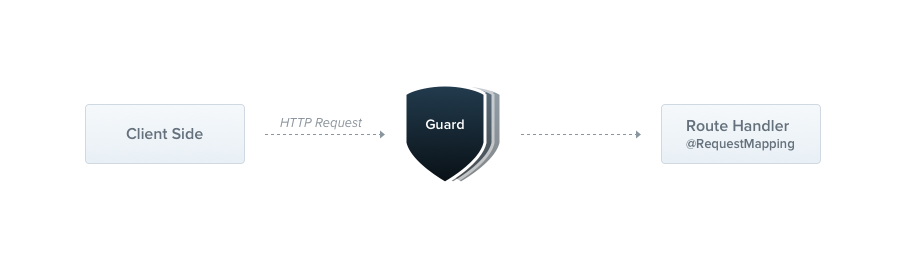
Guards
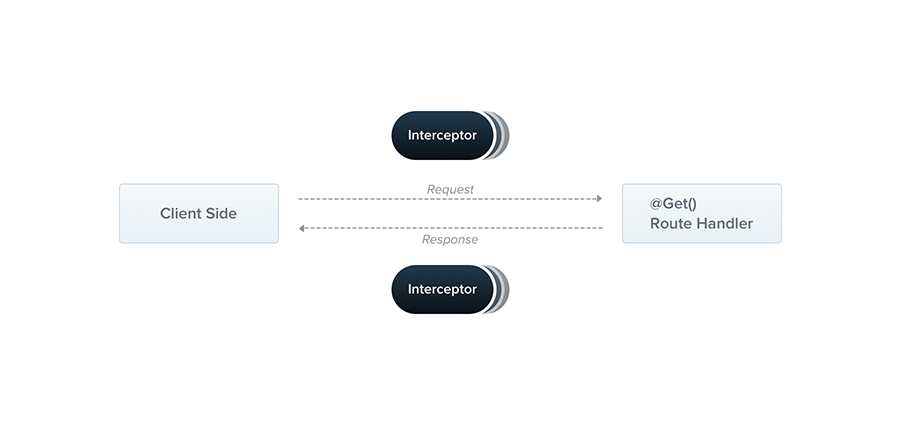
Interceptors
Middlewares
Source code
Thank you!
Distributed Node #1
By Vladimir Vyshko
Distributed Node #1
Nest.js quick start


