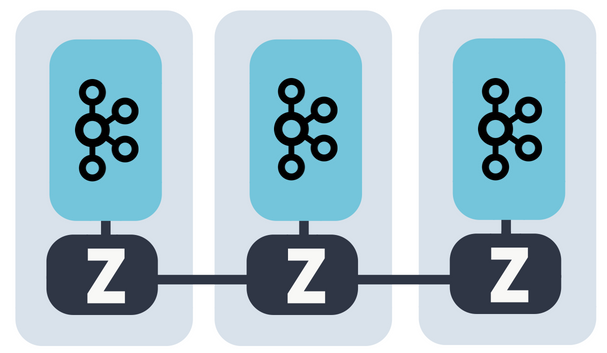
Distributed Node #9
Messaging queues

Connecting microservices


Replicated chat container 2
Host 1
Host 2
Replicated chat container 1
How we can organize communication of users on different nodes ?
?
I don't see my friend in the chat !
The friend
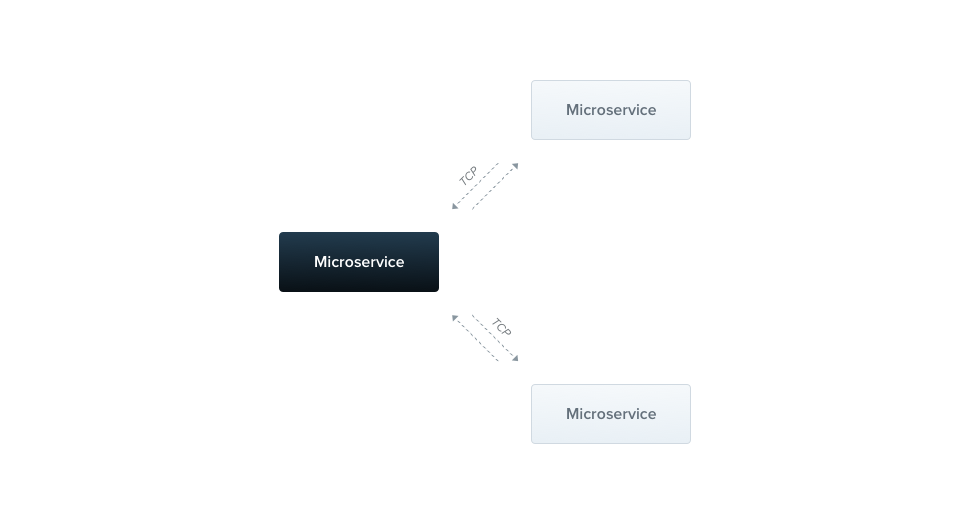
Let's try to keep it simple!
TCP connection between services
UDP
connection between services
HTTP/2
based notifications
Connection mesh Nightmare
Looks like simple to implement, but let's consider following issues:
Reconnection
implementation
Packets loss
Service discovery
Tightly Coupled
In many cases a brokerless design just doesn’t work
Other way to setup the

Is by using
The Messaging Queue (Broker) Design
In this architecture, all communication is routed via a group of brokers.
Broker 1
Broker 2
Broker N
...
Leader
Brokers cluster
Producer 1
Producer 2
Any broker node / external service
Consumer 1
Consumer 2
Produces message
pulls the message

We don't know where events come from
And we can process them in parallel
Such an approach also gives birth to a concept of streams. Each topic is essentially a stream of messages. Any subscriber can tap into these streams as and when required. The possibilities of modeling a system design using streams is endless.
Most messaging brokers support load balancing out of the box. This makes the overall architecture much simpler and highly scalable. Some brokers (like RabbitMQ) have built-in retries and more for making the communication channel more reliable.
Service discovery is not required when using a messaging backend. All microservices act as clients. The only service which needs to be discoverable is the message broker.
A messaging backend makes it easier to distribute workload and aggregate the results. The best part is that adding worker microservices can be done transparently without having to update the other microservices.
Load Balancing
Service Discovery
Stream Based Design
Fan In and Fan Out
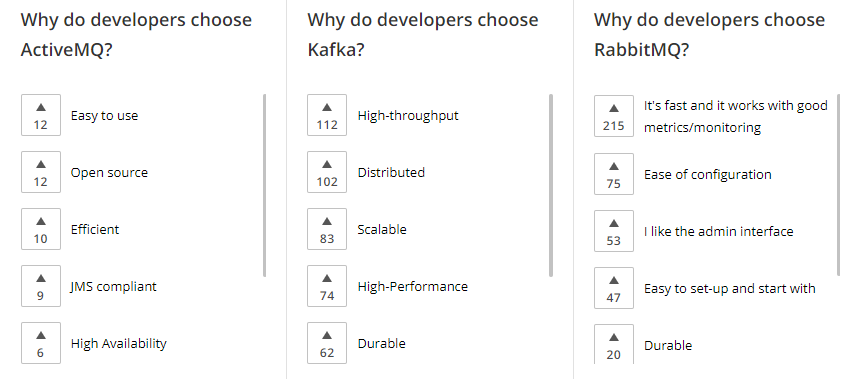
What are some pros of using Brokers Messeging services ?

Cons of using MQs
More resources usage
Brokers horizontal scaling & maintanance
SRE work may be simplified by using Kubernetes and Helm

What MQs can be used in our app?

Apache ActiveMQ is an open source message broker written in Java together with a full Java Message Service (JMS) client.

RabbitMQ is an open-source message-broker written in the Erlang by Pivotal Software

Apache Kafka is an open-source stream-processing software platform developed by LinkedIn and donated to the Apache Software Foundation, written in Scala and Java.
There are many more...
These are the most popular

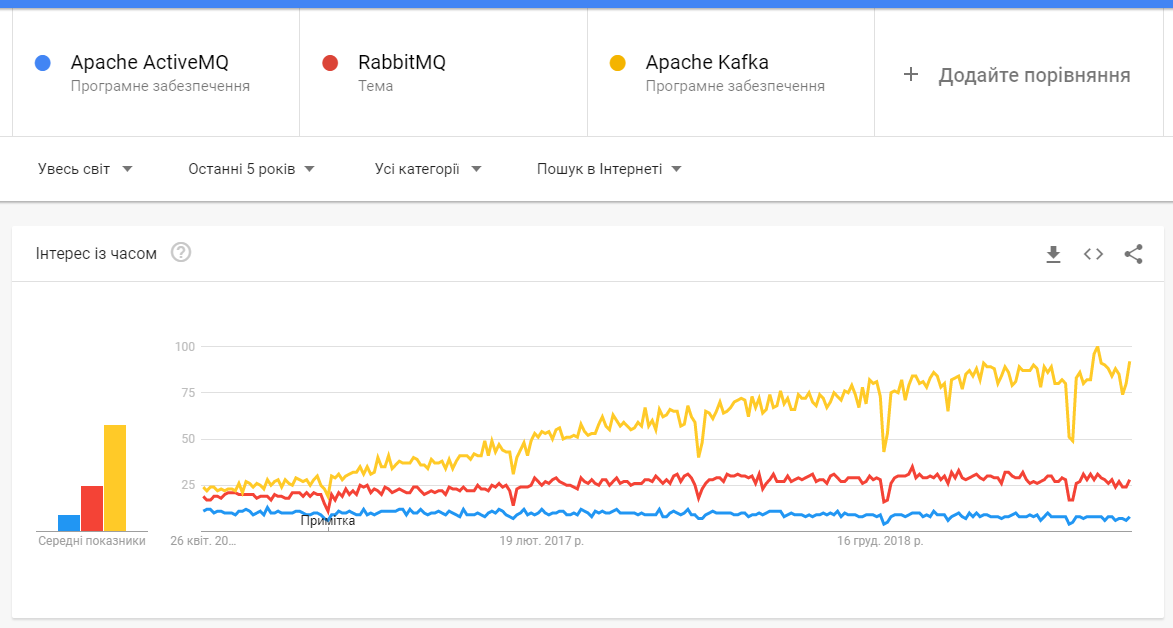
High level comparison
Kafka vs ActiveMQ
Key differences:
-
Kafka producer doesn’t wait for acknowledgments from the broker. Overall throughput will be high if the broker can handle the messages as fast as a producer. ActiveMQ had to maintain the delivery state of every message.
-
Kafka has a more efficient storage format. On average, each message had an overhead of 9 bytes in Kafka, versus 144 bytes in ActiveMQ. This means that ActiveMQ was using 70% more space than Kafka.
-
Kafka is a pull-based messaging system and ActiveMQ is push-based messaging system. Publisher will send messages to all consumers in ActiveMQ. The consumer will pull messages at his own time in Kafka.
-
In Kafka - A consumer can rewind back to an old offset and re-consume data. It is useful when you fix some issues and decide to re-play the old messages post-issue resolution.
Due to the above efficiencies, Kafka throughput is 2x - 4x times more than normal messaging systems like ActiveMQ and RabbitMQ.
Why we chose Apache Kafka?

Kafka
(However, it depends on your configuration and more precisely on the variables acks, min.insync.replicas and replication.factor)
RabbitMQ
(Federation and/or Shovel)
RabbitMQ
(Clustering plugin)
ActiveMQ
From the Kafka web-page
Apache Kafka overview
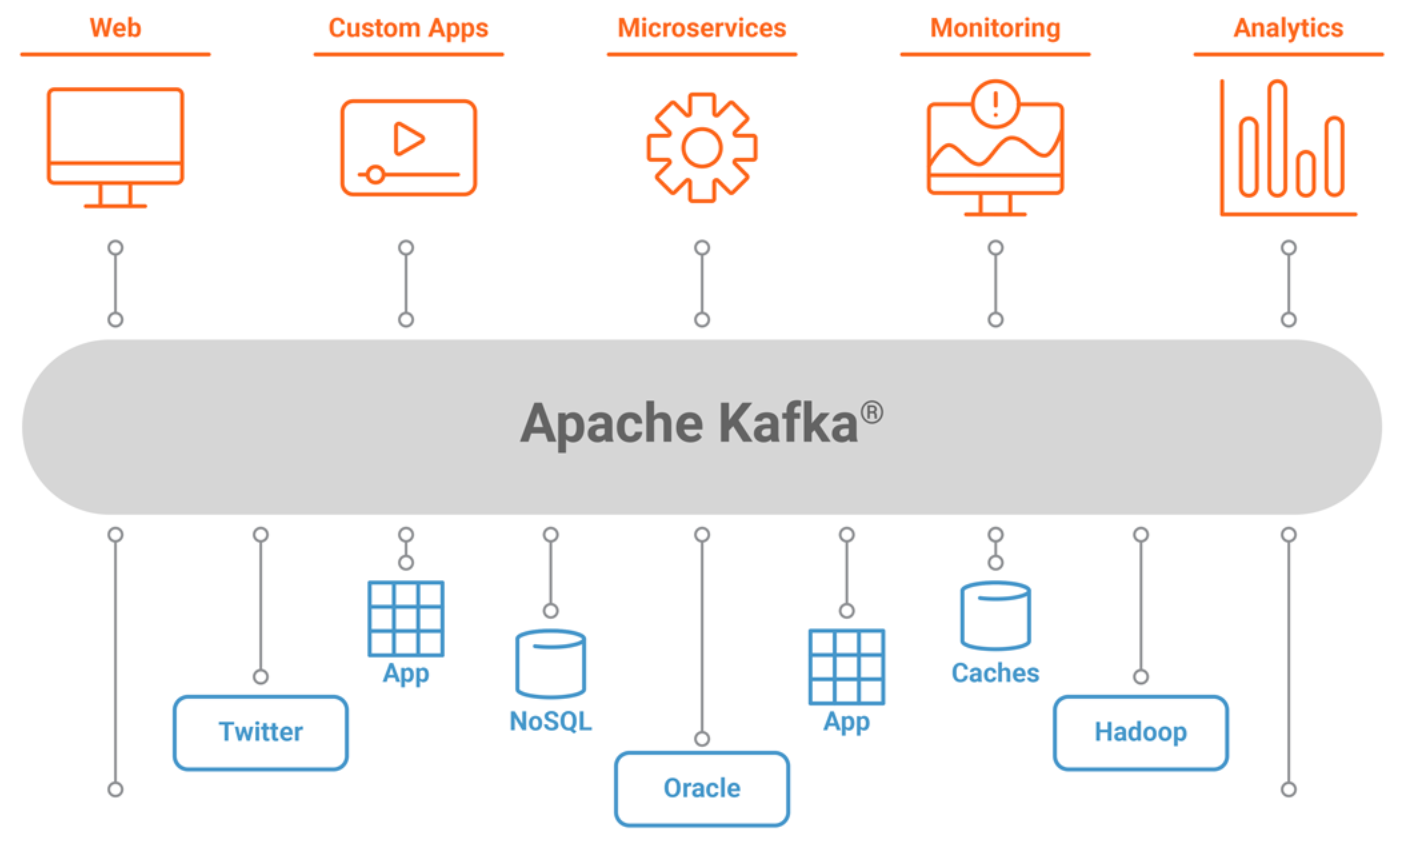
High level architecture , looks like the following figure.
Part of the Hadoop ecosystem, Apache Kafka is a distributed commit log service that functions much like a publish/subscribe messaging system, but with better throughput, built-in partitioning, replication, and fault tolerance
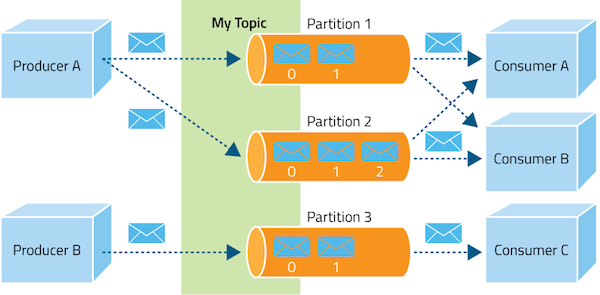
Topic Partitions
Topic partition is the unit of parallelism in Kafka. On both the producer and the broker side, read/write can be done fully in parallel
Partition 1
1
2
3
4
Producer
Partition 2
1
2
Partition N
1
2
3
...
Topic
Consumer goup
Consumer 1
Consumer N
...
Replication factor
Broker 1
Broker 2
Broker 3
Partition 1
Partition 2
Partition 3
Replication factor =
1
2
3
Partition 1
replica
Partition 2
replica
Partition 3
replica
Partition 1
replica
Partition 3
replica
Partition 2
replica
Partitions = 3

Now we are ready to set up our Kafka cluster
almost...

Apache Kafka can't work without the external Zookeeper server
What is Zookeeper?
ZooKeeper is a centralized service for maintaining configuration information, naming, providing distributed synchronization, and providing group services. All of these kinds of services are used in some form or another by distributed applications.
Why is Zookeeper necessary for Apache Kafka?
Controller election
If a node by some reason is shutting down, it’s the controller’s responsibility to tell all the replicas to act as partition leaders in order to fulfill the duties of the partition leaders on the node that is about to fail.
Configuration Of Topics
The configuration regarding all the topics including the list of existing topics, the number of partitions for each topic, the location of all the replicas, list of configuration overrides for all topics and which node is the preferred leader, etc.
Access control lists
Access control lists or ACLs for all the topics are also maintained within Zookeeper.
Membership of the cluster
Zookeeper also maintains a list of all the brokers that are functioning at any given moment and are a part of the cluster.
Setup Kafka
# Step 1 — Creating a User for Kafka
# Since Kafka can handle requests over a network, you should create a dedicated user for it. This minimizes damage to your Ubuntu machine should the Kafka server be compromised. We will create a dedicated kafka user in this step, but you should create a different non-root user to perform other tasks on this server once you have finished setting up Kafka.

# Logged in as your non-root sudo user, create a user called kafka with the useradd command:

sudo useradd kafka -m
#The -m flag ensures that a home directory will be created for the user. This home directory, /home/kafka, will act as our workspace directory for executing commands in the sections below.

#Set the password using passwd:

sudo passwd kafka
#Add the kafka user to the sudo group with the adduser command, so that it has the privileges required to install Kafka’s dependencies:

sudo adduser kafka sudo
#Your kafka user is now ready. Log into this account using su:

su -l kafka
#Now that we’ve created the Kafka-specific user, we can move on to downloading and extracting the Kafka binaries.

Step 2 — Downloading and Extracting the Kafka Binaries
#Let’s download and extract the Kafka binaries into dedicated folders in our kafka user’s home directory.

#To start, create a directory in /home/kafka called Downloads to store your downloads:

mkdir ~/Downloads
#Use curl to download the Kafka binaries:

curl "https://www.apache.org/dist/kafka/2.1.1/kafka_2.11-2.1.1.tgz" -o ~/Downloads/kafka.tgz
#Create a directory called kafka and change to this directory. This will be the base directory of the Kafka installation:

mkdir ~/kafka && cd ~/kafka
#Extract the archive you downloaded using the tar command:

tar -xvzf ~/Downloads/kafka.tgz --strip 1
#We specify the --strip 1 flag to ensure that the archive’s contents are extracted in ~/kafka/ itself and not in another directory (such as ~/kafka/kafka_2.11-2.1.1/) inside of it.

#Now that we’ve downloaded and extracted the binaries successfully, we can move on configuring to Kafka to allow for topic deletion.

#Step 3 — Configuring the Kafka Server
#Kafka’s default behavior will not allow us to delete a topic, the category, group, or feed name to which messages can be published. To modify this, let’s edit the configuration file.

#Kafka’s configuration options are specified in server.properties. Open this file with nano or your favorite editor:

nano ~/kafka/config/server.properties
#Let’s add a setting that will allow us to delete Kafka topics. Add the following to the bottom of the file:

~/kafka/config/server.properties
delete.topic.enable = true
#Save the file, and exit nano. Now that we’ve configured Kafka, we can move on to creating systemd unit files for running and enabling it on startup.

#Step 4 — Creating Systemd Unit Files and Starting the Kafka Server
#In this section, we will create systemd unit files for the Kafka service. This will help us perform common service actions such as starting, stopping, and restarting Kafka in a manner consistent with other Linux services.

#Zookeeper is a service that Kafka uses to manage its cluster state and configurations. It is commonly used in many distributed systems as an integral component. If you would like to know more about it, visit the official Zookeeper docs.

#Create the unit file for zookeeper:

sudo nano /etc/systemd/system/zookeeper.service
#Enter the following unit definition into the file:

/etc/systemd/system/zookeeper.service
[Unit]
Requires=network.target remote-fs.target
After=network.target remote-fs.target

[Service]
Type=simple
User=kafka
ExecStart=/home/kafka/kafka/bin/zookeeper-server-start.sh /home/kafka/kafka/config/zookeeper.properties
ExecStop=/home/kafka/kafka/bin/zookeeper-server-stop.sh
Restart=on-abnormal

[Install]
WantedBy=multi-user.target
#The [Unit] section specifies that Zookeeper requires networking and the filesystem to be ready before it can start.

#The [Service] section specifies that systemd should use the zookeeper-server-start.sh and zookeeper-server-stop.sh shell files for starting and stopping the service. It also specifies that Zookeeper should be restarted automatically if it exits abnormally.

#Next, create the systemd service file for kafka:

sudo nano /etc/systemd/system/kafka.service
#Enter the following unit definition into the file:

/etc/systemd/system/kafka.service
[Unit]
Requires=zookeeper.service
After=zookeeper.service

[Service]
Type=simple
User=kafka
ExecStart=/bin/sh -c '/home/kafka/kafka/bin/kafka-server-start.sh /home/kafka/kafka/config/server.properties > /home/kafka/kafka/kafka.log 2>&1'
ExecStop=/home/kafka/kafka/bin/kafka-server-stop.sh
Restart=on-abnormal

[Install]
WantedBy=multi-user.target
#The [Unit] section specifies that this unit file depends on zookeeper.service. This will ensure that zookeeper gets started automatically when the kafka service starts.

#The [Service] section specifies that systemd should use the kafka-server-start.sh and kafka-server-stop.sh shell files for starting and stopping the service. It also specifies that Kafka should be restarted automatically if it exits abnormally.

#Now that the units have been defined, start Kafka with the following command:

sudo systemctl start kafka
#To ensure that the server has started successfully, check the journal logs for the kafka unit:

sudo journalctl -u kafka
#You should see output similar to the following:

#Output
#Jul 17 18:38:59 kafka-ubuntu systemd[1]: Started kafka.service.
#You now have a Kafka server listening on port 9092.

#While we have started the kafka service, if we were to reboot our server, it would not be started automatically. To enable kafka on server boot, run:

sudo systemctl enable kafka
#Now that we’ve started and enabled the services, let’s check the installation.

#Step 5 — Testing the Installation
#Let’s publish and consume a “Hello World” message to make sure the Kafka server is behaving correctly. Publishing messages in Kafka requires:

#A producer, which enables the publication of records and data to topics.
#A consumer, which reads messages and data from topics.
#First, create a topic named TutorialTopic by typing:

~/kafka/bin/kafka-topics.sh --create --zookeeper localhost:2181 --replication-factor 1 --partitions 1 --topic TutorialTopic
#You can create a producer from the command line using the kafka-console-producer.sh script. It expects the Kafka server’s hostname, port, and a topic name as arguments.

#Publish the string "Hello, World" to the TutorialTopic topic by typing:

#echo "Hello, World" | ~/kafka/bin/kafka-console-producer.sh --broker-list localhost:9092 --topic TutorialTopic > /dev/null
#Next, you can create a Kafka consumer using the kafka-console-consumer.sh script. It expects the ZooKeeper server’s hostname and port, along with a topic name as arguments.

#The following command consumes messages from TutorialTopic. Note the use of the --from-beginning flag, which allows the consumption of messages that were published before the consumer was started:

~/kafka/bin/kafka-console-consumer.sh --bootstrap-server localhost:9092 --topic TutorialTopic --from-beginning
#If there are no configuration issues, you should see Hello, World in your terminal:

#Output
#Hello, World
#The script will continue to run, waiting for more messages to be published to the topic. Feel free to open a new terminal and start a producer to publish a few more messages. You should be able to see them all in the consumer’s output.

#When you are done testing, press CTRL+C to stop the consumer script. Now that we have tested the installation, let’s move on to installing KafkaT.
microk8s helm install my-kafka --namespace kafka -f 07-kafka-config.yaml bitnami/kafka

kafkacat -b host:9092 chat-topic -C
kafkacat -b host:9092 chat-topic -P

microk8s helm upgrade my-kafka --namespace kafka -f 07-kafka-config.yaml bitnami/kafka

microk8s helm delete my-kafka

## kafka-config.yaml

# k create ns kafka
# helm install my-kafka --namespace kafka -f 07-values.yaml bitnami/kafka --version 12.6.2
# k exec -it my-kafka-0 -n kafka -- /bin/bash
# /opt/bitnami/kafka/bin/kafka-topics.sh --list --zookeeper my-kafka-zookeeper:2181

replicaCount: 2

## Kafka provisioning
##
zookeeper:
  replicaCount: 2

provisioning:
  enabled: true

  image:
    registry: docker.io
    repository: bitnami/kafka
    tag: 2.7.0-debian-10-r30
    ## Specify a imagePullPolicy
    ## Defaults to 'Always' if image tag is 'latest', else set to 'IfNotPresent'
    ## ref: http://kubernetes.io/docs/user-guide/images/#pre-pulling-images
    ##
    pullPolicy: IfNotPresent
    ## Optionally specify an array of imagePullSecrets (secrets must be manually created in the namespace)
    ## ref: https://kubernetes.io/docs/tasks/configure-pod-container/pull-image-private-registry/
    ## Example:
    ## pullSecrets:
    ##   - myRegistryKeySecretName
    ##
    pullSecrets: []

    ## Set to true if you would like to see extra information on logs
    ##
    debug: false

  resources:
    # We usually recommend not to specify default resources and to leave this as a conscious
    # choice for the user. This also increases chances charts run on environments with little
    # resources, such as Minikube. If you do want to specify resources, uncomment the following
    # lines, adjust them as necessary, and remove the curly braces after 'resources:'.
    limits: {}
    #   cpu: 250m
    #   memory: 1Gi
    requests: {}
    #   cpu: 250m
    #   memory: 256Mi

  topics:
  - name: chat-topic
    partitions: 1
    replicationFactor: 1
    # https://kafka.apache.org/documentation/#topicconfigs
    config:
      max.message.bytes: 64000
      flush.messages: 1
Nest microservices
In Nest, a microservice is fundamentally an application that uses a different transport layer than HTTP.
Transporters
Redis Pub/Sub
Kafka
gRPC
NATS
export const kafkaConfig = (): KafkaOptions => ({
  transport: Transport.KAFKA,
  options: {
    client: {
      clientId: 'my-client',
      brokers: [process.env.KAFKA_URL],
    },
    consumer: {
      groupId: process.env.HOSTNAME || 'default-consumer',
    },
  },
});
Kafka config
It's a function to resolve env variables at runtime
We going to need it several times
import { kafkaConfig } from './kafkaConfig';
import { NestFactory } from '@nestjs/core';
import { AppModule } from './app.module';
import { NestIoKafkaAdapter } from './socket-adapter/KafkaAdapter';

async function bootstrap() {
  const app = await NestFactory.create(AppModule, { cors: true });
  app.connectMicroservice(kafkaConfig());
  await app.startAllMicroservicesAsync();
  await app.listen(process.env.PORT);
}
bootstrap();
Register a Kafka microservice
We can connect several microservices in one app
@Controller()
export class Kfk {
  constructor(private readonly chat: ChatGateway) {}

  @EventPattern('chat-topic')
  processKafkaMessage(@Payload() message: ChatKafkaMessage) {
    console.log('New kafka message', message.value);
   // do staff
  }
}
Create a controller
Now we can react to a kafka messages
Send messages?

import { ConfigModule } from '@nestjs/config';
import { Module } from '@nestjs/common';
import { AppController } from './app.controller';
import { AppService } from './app.service';
import { ChatModule } from './chat/chat.module';
import { ClientsModule } from '@nestjs/microservices';
import { kafkaConfig } from './kafkaConfig';

@Module({
  imports: [
    ConfigModule.forRoot(),
    ClientsModule.register([
      {
        name: 'KAFKA_CLIENT',
        ...kafkaConfig(),
      },
    ]),
    ChatModule,
  ],
  controllers: [AppController],
  providers: [AppService],
})
export class AppModule {}
Register a client
And inject it
import { kafkaConfig } from './kafkaConfig';
import { Inject, Injectable, OnModuleInit } from '@nestjs/common';
import { Client, ClientKafka } from '@nestjs/microservices';

@Injectable()
export class AppService implements OnModuleInit {
  constructor(@Inject('KAFKA_CLIENT') private kafkaClient: ClientKafka) {
    this.client.subscribeToResponseOf('chat-topic');
  }

  onModuleInit() {
    this.client
      .emit('chat-topic', 'Hey,  ' + new Date())
      .subscribe(() => console.log('Sent'));
  }
}
Use it in providers and controllers

+

To add socket.io adapter we need to use Nest adapter

import { kafkaConfig } from './../kafkaConfig';
import { ClientKafka } from '@nestjs/microservices';
import { INestApplicationContext } from '@nestjs/common';
import { IoAdapter } from '@nestjs/platform-socket.io';
import * as Adapter from 'socket.io-adapter';
import {
  Consumer,
  Kafka,
} from '@nestjs/microservices/external/kafka.interface';
import { Server } from 'socket.io';

function parseObject(data: string) {
  try {
    return JSON.parse(data);
  } catch (e) {
    console.warn('Cant parse', data);
  }
}

class SocketIoKafkaAdapter extends Adapter {
  constructor(private nsp, private kafkaClient: ClientKafka) {
    super(nsp);
    if (this.nsp.name === '/chat') {
      this.init();
    }
  }

  async init() {
    const client: Kafka = this.kafkaClient.createClient();
    const consumer: Consumer = client.consumer({
      groupId: kafkaConfig().options.consumer.groupId + '-adapter',
    });
    await consumer.connect();
    await consumer.subscribe({
      topic: 'chat-topic',
    });

    consumer.run({
      eachMessage: async ({ message }) => {
        const data = parseObject(message.value.toString());
        if (data) {
          super.broadcast(data.packet, data.opts, true);
        }
      },
    });
  }

  broadcast(packet, opts) {
    this.kafkaClient.emit('chat-topic', { packet, opts, nsp: this.nsp.name });
  }
}

export class NestIoKafkaAdapter extends IoAdapter {
  constructor(app: INestApplicationContext, private kafkaClient: ClientKafka) {
    super(app);
  }

  createIOServer(port: number, options?: any): any {
    const server: Server = super.createIOServer(port, options);
    const client = this.kafkaClient;
    server.adapter(function (nsp) {
      if (nsp.name === '/chat') {
        return new SocketIoKafkaAdapter(nsp, client);
      }
      return new Adapter(nsp);
    });
    return server;
  }
}
And register it in bootstrap file
import { kafkaConfig } from './kafkaConfig';
import { NestFactory } from '@nestjs/core';
import { AppModule } from './app.module';
import { NestIoKafkaAdapter } from './socket-adapter/KafkaAdapter';

async function bootstrap() {
  const app = await NestFactory.create(AppModule, { cors: true });
  const kafka = await app.resolve('KAFKA_CLIENT');
  app.useWebSocketAdapter(new NestIoKafkaAdapter(app, kafka));
  app.connectMicroservice(kafkaConfig());
  await app.startAllMicroservicesAsync();
  await app.listen(process.env.PORT);
}
bootstrap();
We also lookup for a KafkaClient in the Nest container
Thank You!
Distributed Node #9
By Vladimir Vyshko
Distributed Node #9
Messaging queues


