Highly scalable chat in the cloud II
Attack of the clones

Intro
What do we need to know in order to write a fully-fledged production-ready application?


Agenda:
- Scaling chat application
- Balancing traffic between containers
- Connecting containers with Kafka
- Demo
Chat application:
vertical & horizontal scaling

What a server can't handle all user connections?

WS
WS
...lots of people..
Can we increase server resources?
How to handle high load?
HTTP

This is OK
I will add 128 GB RAM and more replace the CPU AMD Ryzen 9 3950X

Laura

Replacing hardware will require downtime,
lets add some separate cheap servers
Oprah

Horizontal Scaling
Vertical Scaling
VS
| No limitation of horizontal scaled instances | Hardware limitation |
| It is difficult to implement | It is easy to implement |
| It is costlier, as new server racks comprises of a lot of resources | It is cheaper as we need to just add new resources |
| It takes more time to be done | It takes less time to be done |
| No downtime | Downtime |
Which one is your choice ?
Examples
Horizontal scaling is almost always more desirable than vertical scaling because you don’t get caught in a resource deficit.
Scaling the Chat container
Chat Docker image
Container 1
Container 3
Container 2
Using the Docker
Easy!
docker run -p 3030:8080 -d localhost:32000/node-web-app:latest
docker run -p 3031:8080 -d localhost:32000/node-web-app:latest
docker run -p 3032:8080 -d localhost:32000/node-web-app:latest
Just create several instances of our chat containers on different ports

Right ?
What if I want to run them on different hosts, how to organise the communication ?
How to monitor and restart failed containers without manual actions ?
How to update the application automatically without downtime ?
Auto-scale ?
Load balancing ?
Configuration stores ?
SLI/SLO ?
Secrets?

There is a tool
with all this staff!

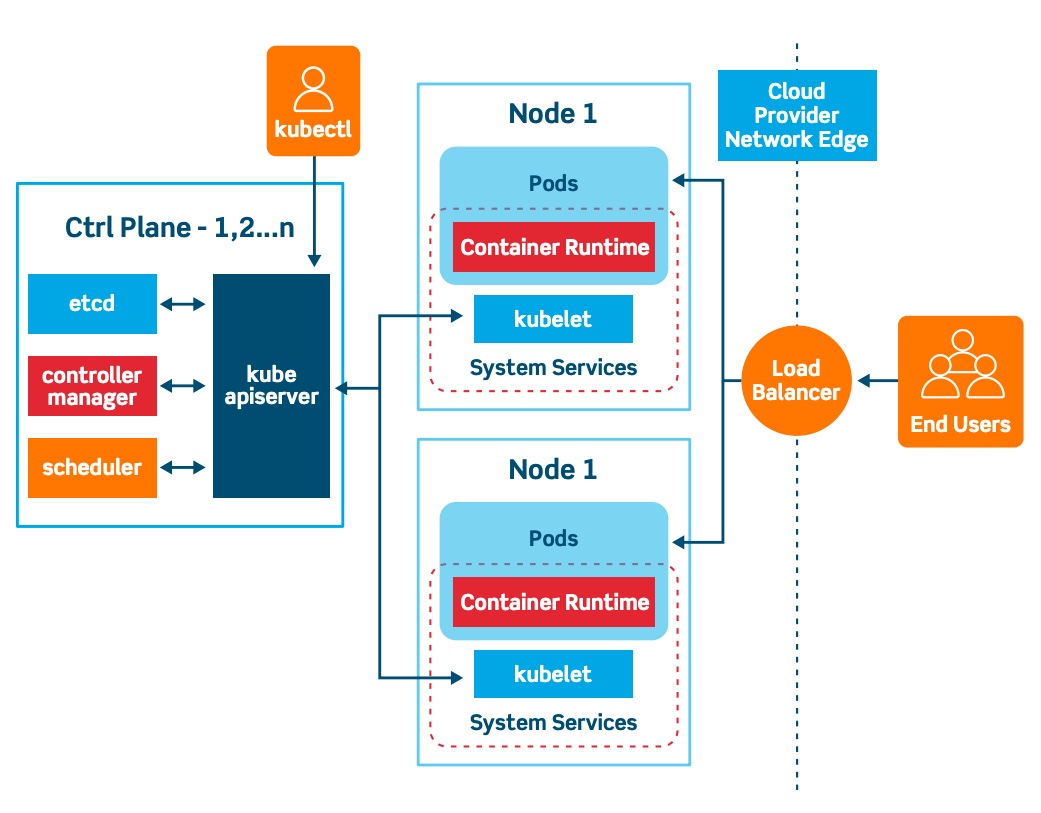
Kubernetes (commonly stylized as k8s) is an open-source container-orchestration system for automating application deployment, scaling, and management. It was originally designed by Google, and is now maintained by the Cloud Native Computing Foundation.
It aims to provide a "platform for automating deployment, scaling, and operations of application containers across clusters of hosts". It works with a range of container tools, including Docker.

Local development
Using Docker
Using docker-compose
Orchestrating via Kubernetes
Kubernetes Alternatives?

But Kubernetes is still the gold standart
What clouds support Kubernetes?
Amazon Elastic Kubernetes Service (EKS)

Azure Kubernetes Service (AKS)
Google Kubernetes Engine (GKE)

All of them...
Our strategy
1. Build a Docker chat image
2. Push it to a registry
3. Start a Kubernetes cluster
4. Create a Deployment configuration YAML file
5. Setup a replication factor 2 for the Chat Pod
6. Apply YAML config using kubectl CLI
7. Kill a chat Pod and watch how Kubernetes handles it
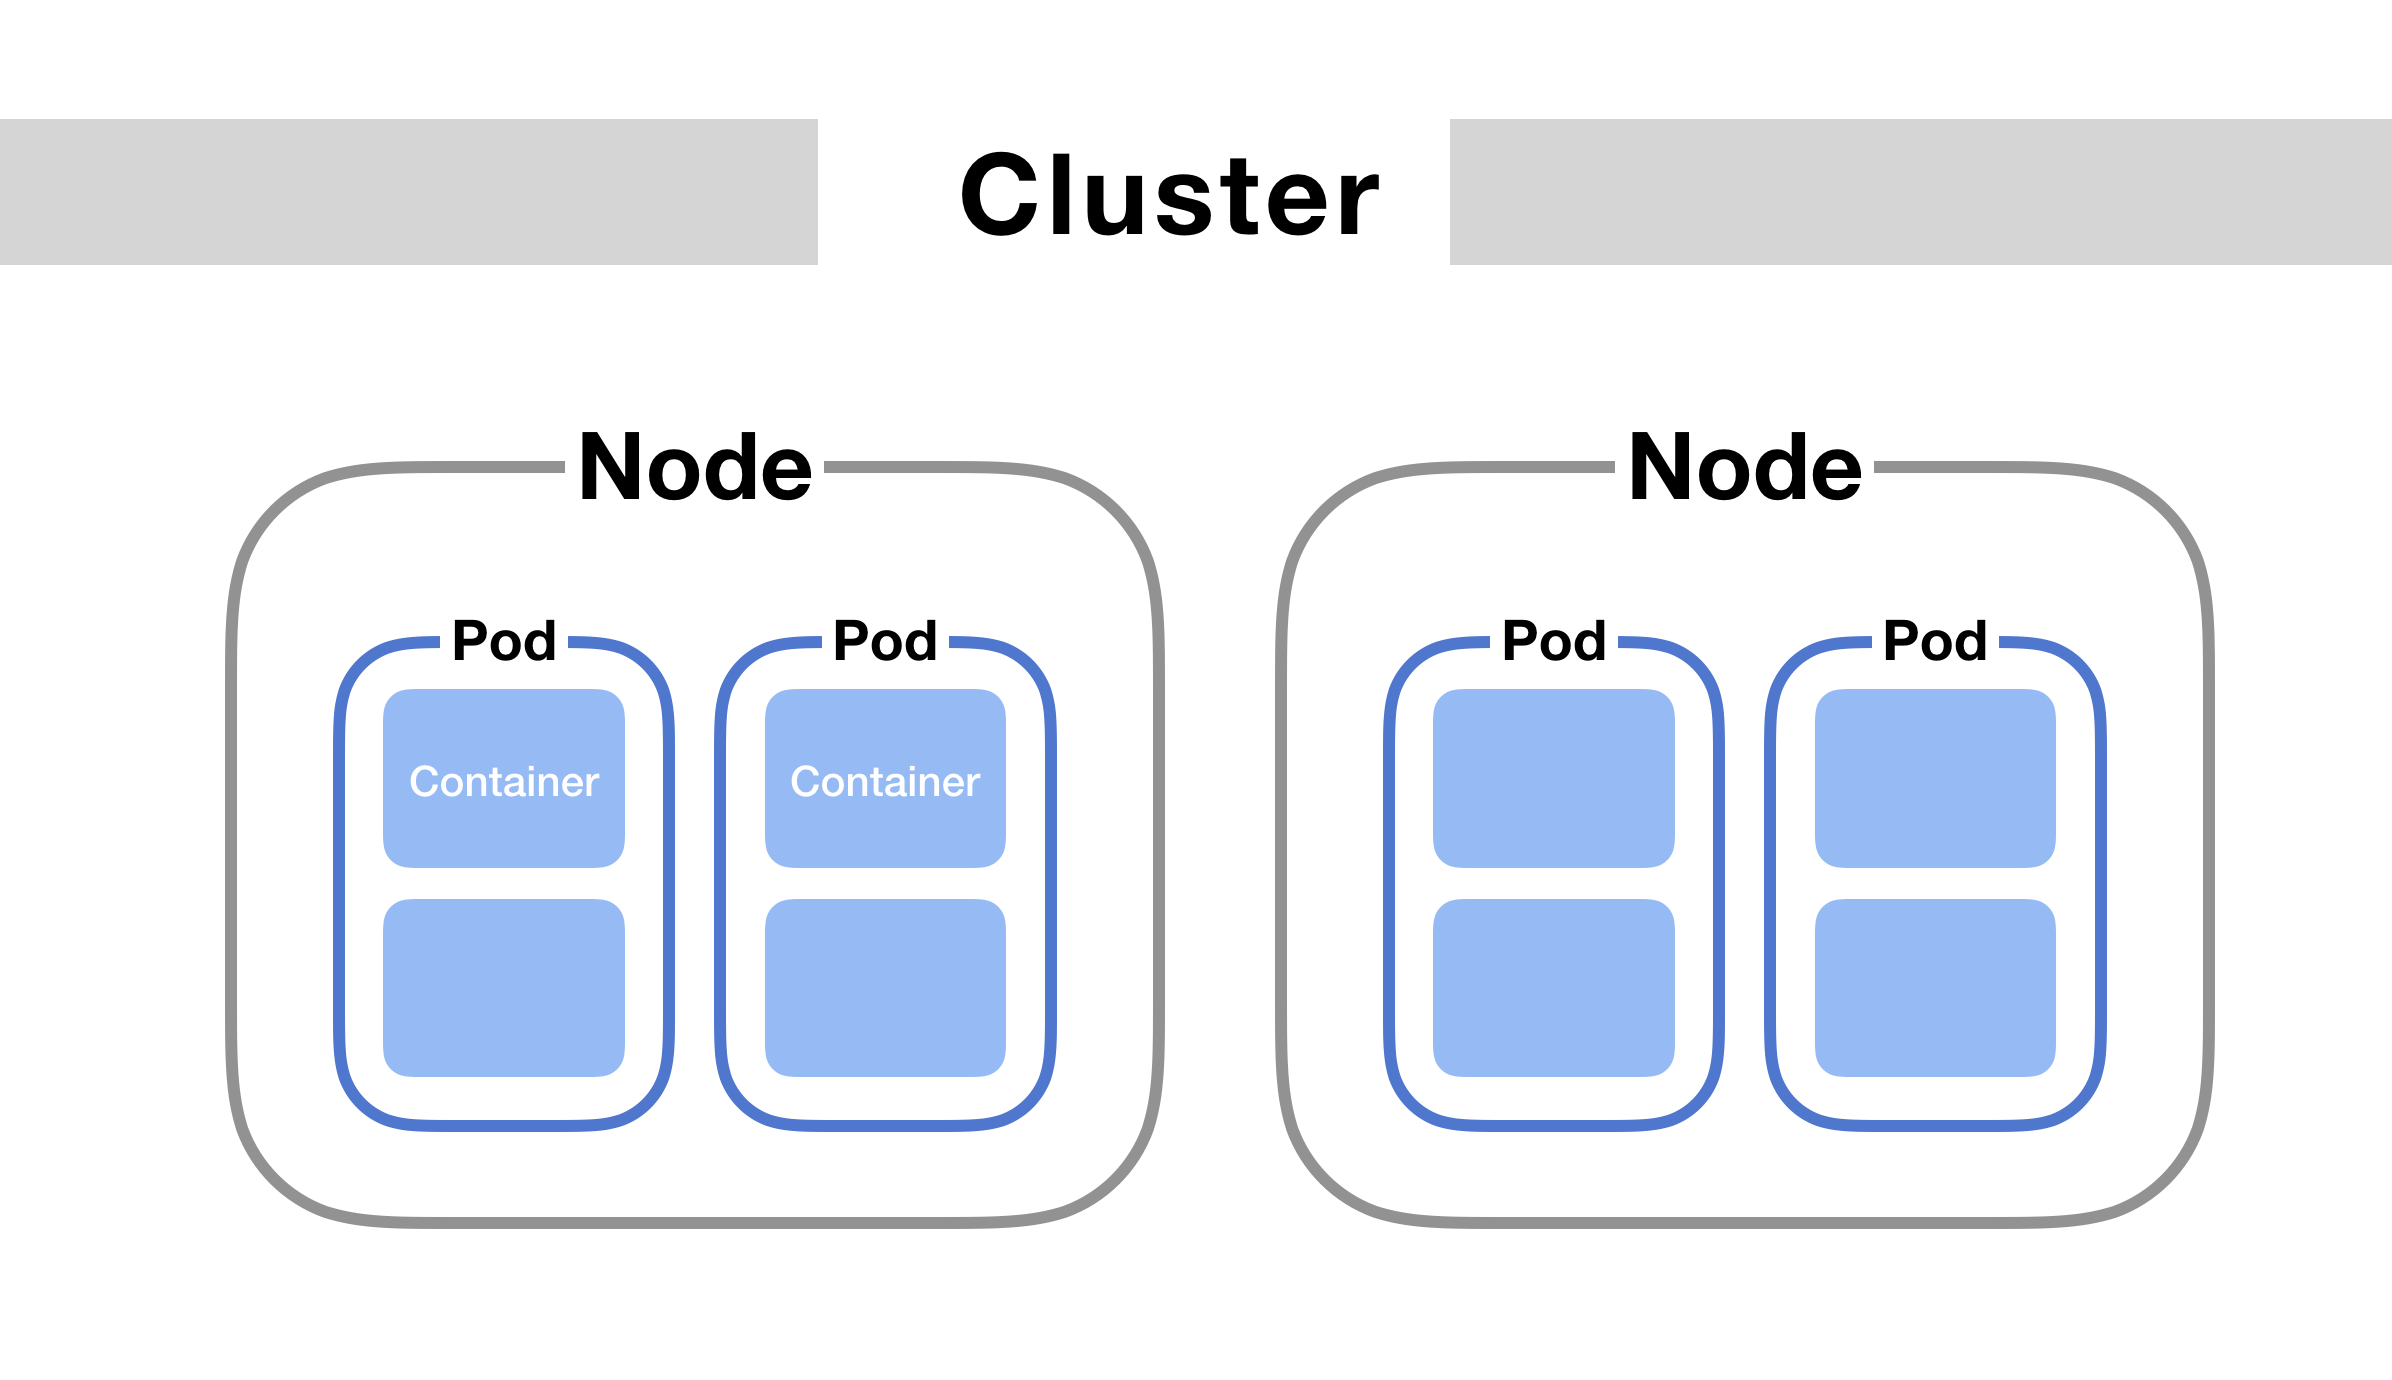
A Pod ?
A Pod (as in a pod of whales or pea pod) is a group of one or more containers (such as Docker containers), with shared storage/network, and a specification for how to run the containers.
Kubectl?

Kubectl controls the Kubernetes cluster manager.
kubectl create deployment nginx --image=nginx # Create NGINX deployment with 1 Pod (1 Container)

kubectl scale --replicas=3 deployment/nginx # Scale current NGINX servers to 3 replicas

kubectl delete deployment/nginx # delete everything
Cluster ?
YAML ?
Instead of writing commands evty time from scratch we can save them to a YAML file, and commit to the GitHub
kind: Deployment
apiVersion: apps/v1
metadata:
  namespace: default
  name: chat
  labels:
    app: chat
spec:
  replicas: 2
  selector:
    matchLabels:
      app: chat
  template:
    metadata:
      labels:
        app: chat
    spec:
      containers:
        - name: chat
          image: localhost:32000/node-web-app
          env:
            - name: KAFKA_ENABLED
              value: "false"
          ports:
            - name: web
              containerPort: 8080
Demo: starting the Kubernetes cluster
Accessing the Chat & load balancing

?
?
Now, when we have 2 Chat replicas, how to split users in 2 groups accessing the chat?
Introducing Kubernetes Services
An abstract way to expose an application running on a set of Pods as a network service.

With Kubernetes you don’t need to modify your application to use an unfamiliar service discovery mechanism. Kubernetes gives Pods their own IP addresses and a single DNS name for a set of Pods, and can load-balance across them.
apiVersion: v1
kind: Service
metadata:
  name: my-service
spec:
  selector:
    app: MyApp
  ports:
    - protocol: TCP
      port: 80
      targetPort: 9376
Service YAML
kind: Deployment
apiVersion: apps/v1
metadata:
  namespace: default
  name: chat
  labels:
    app: chat

spec:
  replicas: 2
  selector:
    matchLabels:
      app: chat
  template:
    metadata:
      labels:
        app: chat
    spec:
      containers:
        - name: chat
          image: localhost:32000/node-web-app
          env:
            - name: KAFKA_ENABLED
              value: "true"
          ports:
            - name: web
              containerPort: 8080

---
apiVersion: v1
kind: Service
metadata:
  name: chat

spec:
  ports:
    - protocol: TCP
      name: web
      port: 8080
  selector:
    app: chat
Chat Deployment + Service
Live demo
?
?
Our users randomly distributed using Kubenetes service
We need a way to balance requests between pods

Based on some rules...
What Is Load Balancing?
Load balancing refers to efficiently distributing incoming network traffic across a group of backend servers, also known as a server farm or server pool
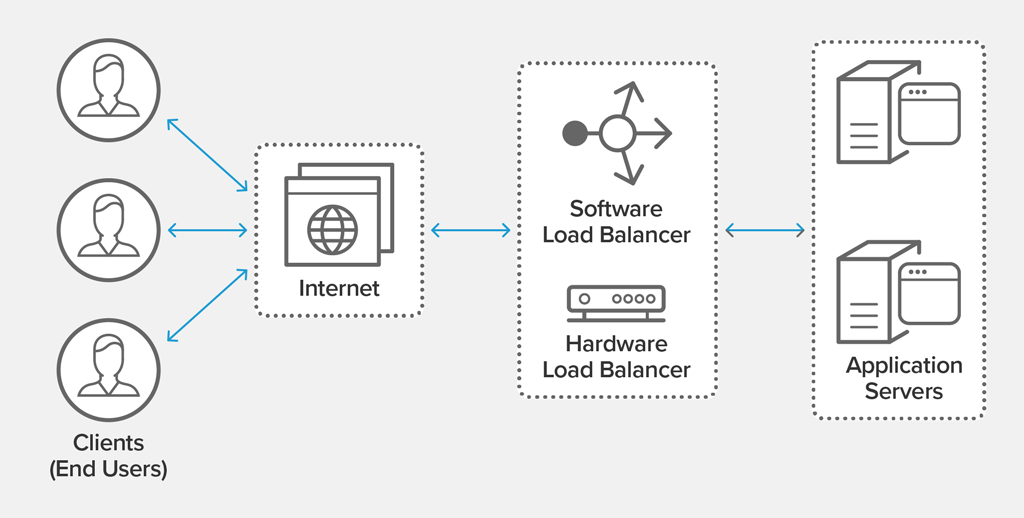
Benefits of Load Balancing
Reduced Downtime
Scalable
Redundancy
Efficiency
Flexibility
Load Balancing Algorithms
- Round Robin – Requests are distributed across the group of servers sequentially.
- Least Connections – A new request is sent to the server with the fewest current connections to clients. The relative computing capacity of each server is factored into determining which one has the least connections.
-
Least Time – Sends requests to the server selected by a formula that combines the
fastest response time and fewest active connections. Exclusive to NGINX Plus. -
Hash – Distributes requests based on a key you define, such as the client IP address or
the request URL. NGINX Plus can optionally apply a consistent hash to minimize redistribution
of loads if the set of upstream servers changes. - IP Hash – The IP address of the client is used to determine which server receives the request.
-
Random with Two Choices – Picks two servers at random and sends the request to the
one that is selected by then applying the Least Connections algorithm (or for NGINX Plus
the Least Time algorithm, if so configured).
Popular Load Balancers


We going to use
As its simple to deploy it to the Kubernetes cluster and its has lots of features
Traefik deployment
apiVersion: v1
kind: Service
metadata:
  name: traefik

spec:
  ports:
    - protocol: TCP
      name: web
      port: 8000
    - protocol: TCP
      name: admin
      port: 8080
    - protocol: TCP
      name: websecure
      port: 4443
  selector:
    app: traefik

---

apiVersion: v1
kind: ServiceAccount
metadata:
  namespace: default
  name: traefik-ingress-controller

---
kind: Deployment
apiVersion: apps/v1
metadata:
  namespace: default
  name: traefik
  labels:
    app: traefik

spec:
  replicas: 1
  selector:
    matchLabels:
      app: traefik
  template:
    metadata:
      labels:
        app: traefik
    spec:
      serviceAccountName: traefik-ingress-controller
      containers:
        - name: traefik
          image: traefik:v2.2
          args:
            - --api.insecure
            - --accesslog
            - --entrypoints.web.Address=:8000
            - --entrypoints.websecure.Address=:4443
            - --providers.kubernetescrd
            - --certificatesresolvers.myresolver.acme.tlschallenge
            - --certificatesresolvers.myresolver.acme.email=foo@you.com
            - --certificatesresolvers.myresolver.acme.storage=acme.json
            # Please note that this is the staging Let's Encrypt server.
            # Once you get things working, you should remove that whole line altogether.
            - --certificatesresolvers.myresolver.acme.caserver=https://acme-staging-v02.api.letsencrypt.org/directory
          ports:
            - name: web
              containerPort: 8000
            - name: websecure
              containerPort: 4443
            - name: admin
              containerPort: 8080

---
?
?
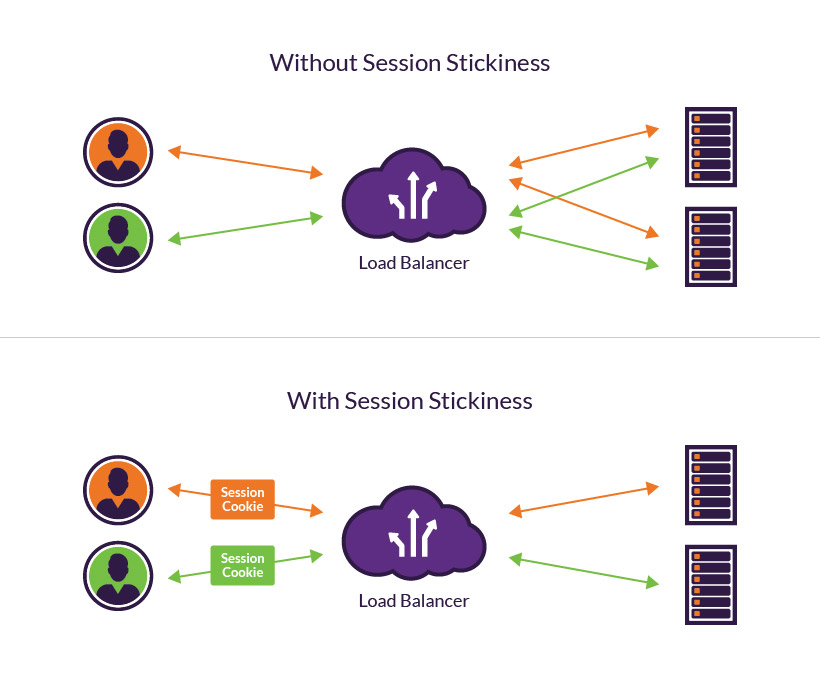
This is still not solved ?
We need a sticky session here! And it's supported by Traefik!
Sticky Session
Session stickiness, a.k.a., session persistence, is a process in which a load balancer creates an affinity between a client and a specific network server for the duration of a session, (i.e., the time a specific IP spends on a website). Using sticky sessions can help improve user experience and optimize network resource usage.
Sticky Session Pros&Cons
Pros:
- it's easy-- no app changes required.
- better utilizes local RAM caches (e.g. look up user profile once, cache it, and can re-use it on subsequent visits from same user)
Cons:
- if the server goes down, session is lost.
- depending on "sticky" implementation in your load balancer, may direct unequal load to some servers vs. others
- bringing a new server online doesn't immediately give the new server lots of load-- if you have a dynamic load-balancing system to deal with spikes, stickiness may slow your ability to respond quickly to a spike. That said, this is somewhat of a corner case and really only applies to very large and sophisticated sites.
- may hurt end-user response time
Defining Traefik "Sticky" IngressRoute

In Kubernetes, an Ingress is an object that allows access to your Kubernetes services from outside the Kubernetes cluster. You configure access by creating a collection of rules that define which inbound connections reach which services. This lets you consolidate your routing rules into a single resource
Ingress
apiVersion: traefik.containo.us/v1alpha1
kind: IngressRoute
metadata:
  name: simpleingressroute
  namespace: default
  annotations:
    traefik.ingress.kubernetes.io/affinity: "true"
    traefik.ingress.kubernetes.io/session-cookie-name: "sticky"
spec:
  entryPoints:
    - web
  routes:
  - match: PathPrefix(`/`)
    kind: Rule
    services:
    - name: chat
      port: 8080
      sticky:
        cookie:
          name: heyy
Demo
Connecting microservices

Replicated chat container 2
Host 1
Host 2
Replicated chat container 1
How we can organize communication of users on different nodes ?
?
I don't see my friend in the chat !
The friend
Let's try to keep it simple!
TCP connection between services
UDP
connection between services
HTTP/2
based notifications
Connection mesh Nightmare
Looks like simple to implement, but let's consider following issues:
Reconnection
implementation
Packets loss
Service discovery
Tightly Coupled
In many cases a brokerless design just doesn’t work
Other way to setup the

Is by using
The Messaging Queue (Broker) Design
In this architecture, all communication is routed via a group of brokers.
Broker 1
Broker 2
Broker N
...
Leader
Brokers cluster
Producer 1
Producer 2
Any broker node / external service
Consumer 1
Consumer 2
Produces message
pulls the message

We don't know where events come from
And we can process them in parallel
Such an approach also gives birth to a concept of streams. Each topic is essentially a stream of messages. Any subscriber can tap into these streams as and when required. The possibilities of modeling a system design using streams is endless.
Most messaging brokers support load balancing out of the box. This makes the overall architecture much simpler and highly scalable. Some brokers (like RabbitMQ) have built-in retries and more for making the communication channel more reliable.
Service discovery is not required when using a messaging backend. All microservices act as clients. The only service which needs to be discoverable is the message broker.
A messaging backend makes it easier to distribute workload and aggregate the results. The best part is that adding worker microservices can be done transparently without having to update the other microservices.
Load Balancing
Service Discovery
Stream Based Design
Fan In and Fan Out
What are some pros of using Brokers Messeging services ?

Cons of using MQs
More resources usage
Brokers horizontal scaling & maintanance
SRE work may be simplified by using Kubernetes and Helm

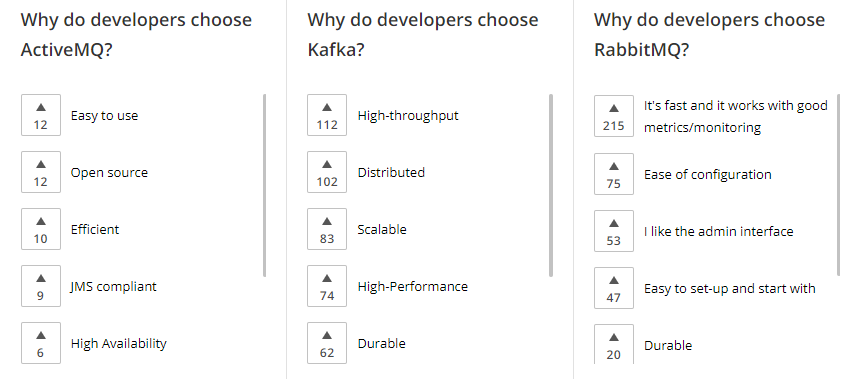
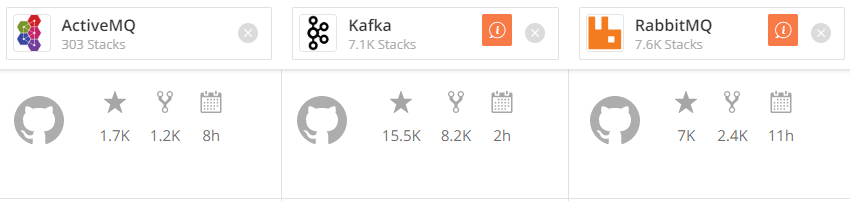
What MQs can be used in our app?

Apache ActiveMQ is an open source message broker written in Java together with a full Java Message Service (JMS) client.

RabbitMQ is an open-source message-broker written in the Erlang by Pivotal Software

Apache Kafka is an open-source stream-processing software platform developed by LinkedIn and donated to the Apache Software Foundation, written in Scala and Java.
There are many more...
These are the most popular
Why we chose Apache Kafka?
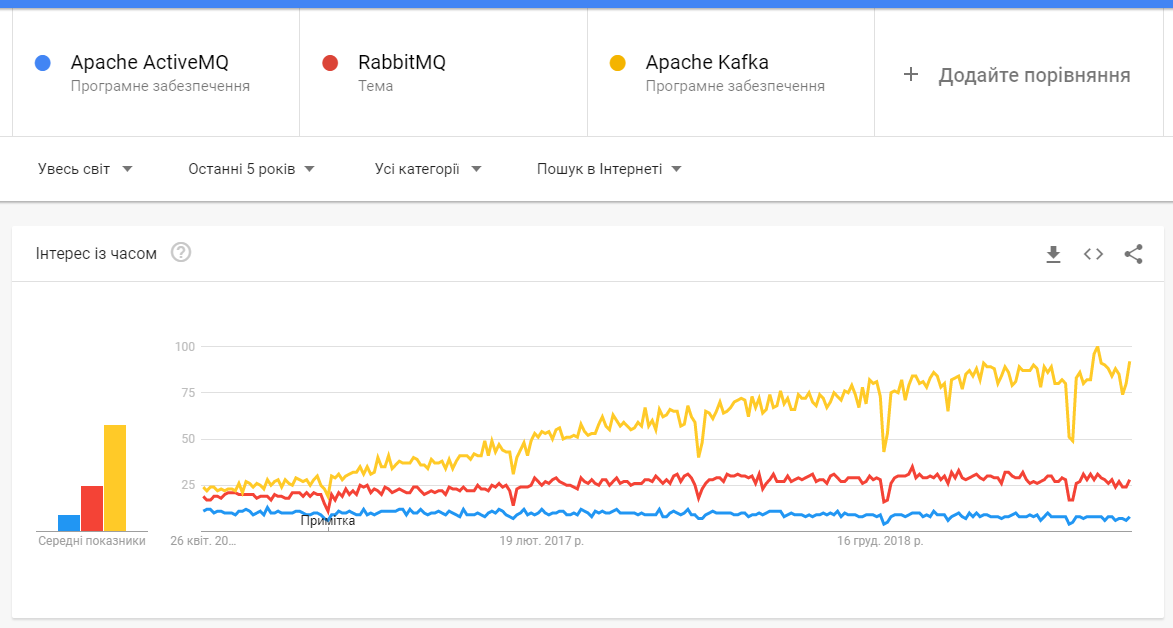
High level comparison
From the Kafka web-page
Kafka vs ActiveMQ
Key differences:
-
Kafka producer doesn’t wait for acknowledgments from the broker. Overall throughput will be high if the broker can handle the messages as fast as a producer. ActiveMQ had to maintain the delivery state of every message.
-
Kafka has a more efficient storage format. On average, each message had an overhead of 9 bytes in Kafka, versus 144 bytes in ActiveMQ. This means that ActiveMQ was using 70% more space than Kafka.
-
Kafka is a pull-based messaging system and ActiveMQ is push-based messaging system. Publisher will send messages to all consumers in ActiveMQ. The consumer will pull messages at his own time in Kafka.
-
In Kafka - A consumer can rewind back to an old offset and re-consume data. It is useful when you fix some issues and decide to re-play the old messages post-issue resolution.
Due to the above efficiencies, Kafka throughput is 2x - 4x times more than normal messaging systems like ActiveMQ and RabbitMQ.
Apache Kafka overview
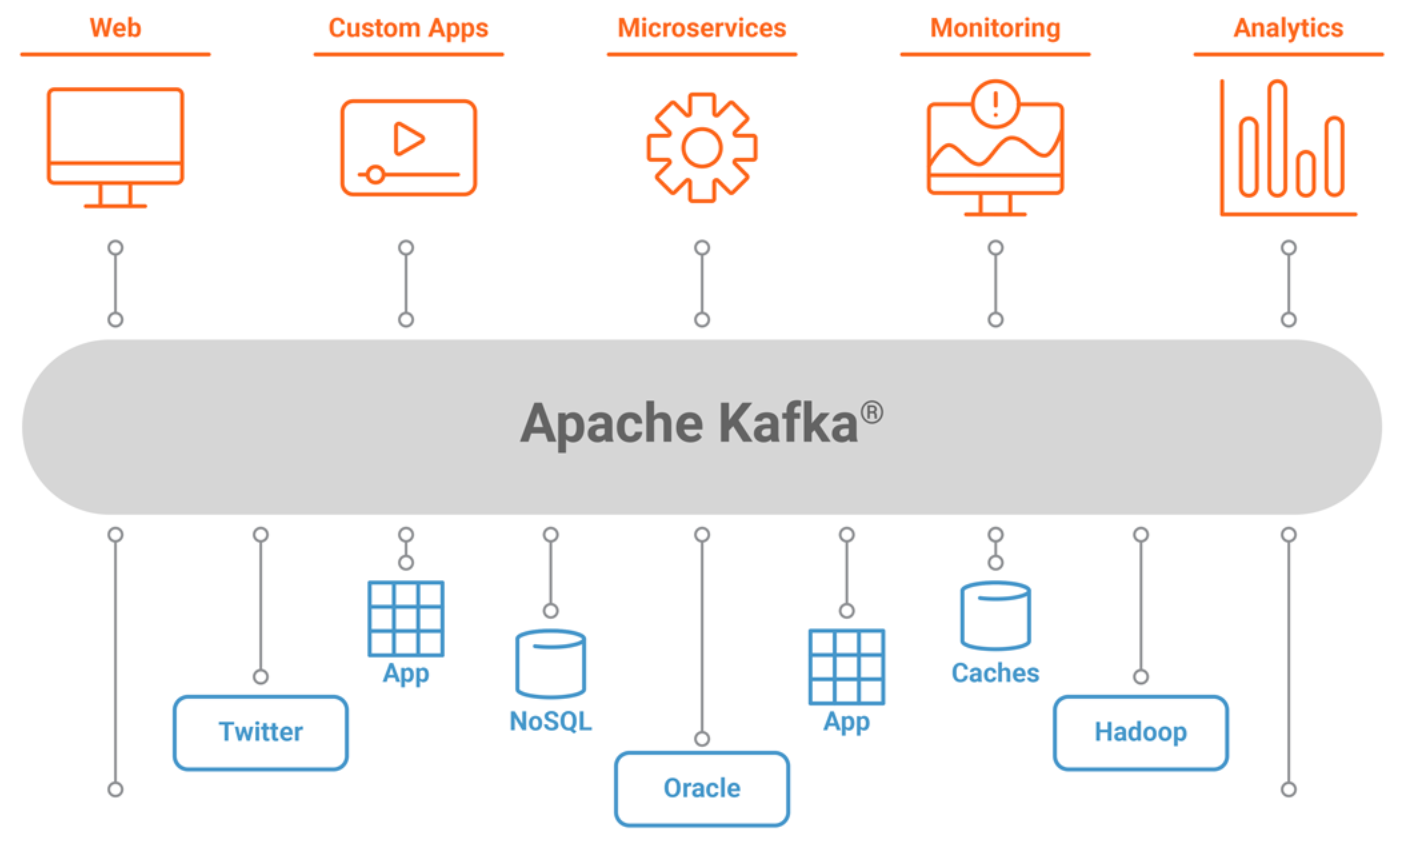
High level architecture , looks like the following figure.
Part of the Hadoop ecosystem, Apache Kafka is a distributed commit log service that functions much like a publish/subscribe messaging system, but with better throughput, built-in partitioning, replication, and fault tolerance
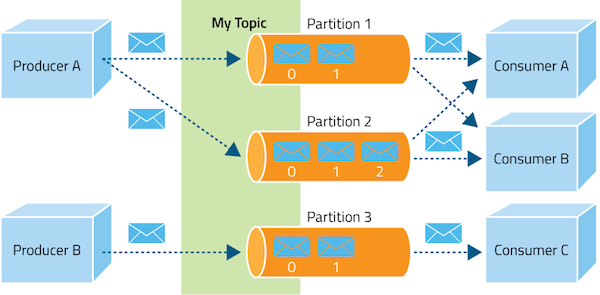
Topic Partitions
Topic partition is the unit of parallelism in Kafka. On both the producer and the broker side, read/write can be done fully in parallel
Partition 1
1
2
3
4
Producer
Partition 2
1
2
Partition N
1
2
3
...
Topic
Consumer goup
Consumer 1
Consumer N
...
Replication factor
Broker 1
Broker 2
Broker 3
Partition 1
Partition 2
Partition 3
Replication factor =
1
2
3
Partition 1
replica
Partition 2
replica
Partition 3
replica
Partition 1
replica
Partition 3
replica
Partition 2
replica
Partitions = 3

Now we are ready to set up our Kafka cluster
almost...

Apache Kafka can't work without the external Zookeeper server
What is Zookeeper?
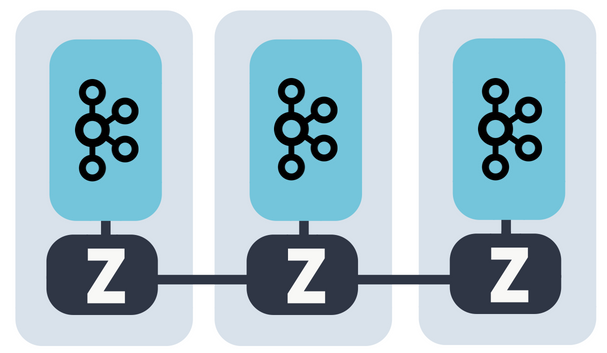
ZooKeeper is a centralized service for maintaining configuration information, naming, providing distributed synchronization, and providing group services. All of these kinds of services are used in some form or another by distributed applications.
Why is Zookeeper necessary for Apache Kafka?
Controller election
If a node by some reason is shutting down, it’s the controller’s responsibility to tell all the replicas to act as partition leaders in order to fulfill the duties of the partition leaders on the node that is about to fail.
Configuration Of Topics
The configuration regarding all the topics including the list of existing topics, the number of partitions for each topic, the location of all the replicas, list of configuration overrides for all topics and which node is the preferred leader, etc.
Access control lists
Access control lists or ACLs for all the topics are also maintained within Zookeeper.
Membership of the cluster
Zookeeper also maintains a list of all the brokers that are functioning at any given moment and are a part of the cluster.

Don't worry, we are learning new stuff which will very helpful for your future career
Setup Kafka
# Step 1 — Creating a User for Kafka
# Since Kafka can handle requests over a network, you should create a dedicated user for it. This minimizes damage to your Ubuntu machine should the Kafka server be compromised. We will create a dedicated kafka user in this step, but you should create a different non-root user to perform other tasks on this server once you have finished setting up Kafka.

# Logged in as your non-root sudo user, create a user called kafka with the useradd command:

sudo useradd kafka -m
#The -m flag ensures that a home directory will be created for the user. This home directory, /home/kafka, will act as our workspace directory for executing commands in the sections below.

#Set the password using passwd:

sudo passwd kafka
#Add the kafka user to the sudo group with the adduser command, so that it has the privileges required to install Kafka’s dependencies:

sudo adduser kafka sudo
#Your kafka user is now ready. Log into this account using su:

su -l kafka
#Now that we’ve created the Kafka-specific user, we can move on to downloading and extracting the Kafka binaries.

Step 2 — Downloading and Extracting the Kafka Binaries
#Let’s download and extract the Kafka binaries into dedicated folders in our kafka user’s home directory.

#To start, create a directory in /home/kafka called Downloads to store your downloads:

mkdir ~/Downloads
#Use curl to download the Kafka binaries:

curl "https://www.apache.org/dist/kafka/2.1.1/kafka_2.11-2.1.1.tgz" -o ~/Downloads/kafka.tgz
#Create a directory called kafka and change to this directory. This will be the base directory of the Kafka installation:

mkdir ~/kafka && cd ~/kafka
#Extract the archive you downloaded using the tar command:

tar -xvzf ~/Downloads/kafka.tgz --strip 1
#We specify the --strip 1 flag to ensure that the archive’s contents are extracted in ~/kafka/ itself and not in another directory (such as ~/kafka/kafka_2.11-2.1.1/) inside of it.

#Now that we’ve downloaded and extracted the binaries successfully, we can move on configuring to Kafka to allow for topic deletion.

#Step 3 — Configuring the Kafka Server
#Kafka’s default behavior will not allow us to delete a topic, the category, group, or feed name to which messages can be published. To modify this, let’s edit the configuration file.

#Kafka’s configuration options are specified in server.properties. Open this file with nano or your favorite editor:

nano ~/kafka/config/server.properties
#Let’s add a setting that will allow us to delete Kafka topics. Add the following to the bottom of the file:

~/kafka/config/server.properties
delete.topic.enable = true
#Save the file, and exit nano. Now that we’ve configured Kafka, we can move on to creating systemd unit files for running and enabling it on startup.

#Step 4 — Creating Systemd Unit Files and Starting the Kafka Server
#In this section, we will create systemd unit files for the Kafka service. This will help us perform common service actions such as starting, stopping, and restarting Kafka in a manner consistent with other Linux services.

#Zookeeper is a service that Kafka uses to manage its cluster state and configurations. It is commonly used in many distributed systems as an integral component. If you would like to know more about it, visit the official Zookeeper docs.

#Create the unit file for zookeeper:

sudo nano /etc/systemd/system/zookeeper.service
#Enter the following unit definition into the file:

/etc/systemd/system/zookeeper.service
[Unit]
Requires=network.target remote-fs.target
After=network.target remote-fs.target

[Service]
Type=simple
User=kafka
ExecStart=/home/kafka/kafka/bin/zookeeper-server-start.sh /home/kafka/kafka/config/zookeeper.properties
ExecStop=/home/kafka/kafka/bin/zookeeper-server-stop.sh
Restart=on-abnormal

[Install]
WantedBy=multi-user.target
#The [Unit] section specifies that Zookeeper requires networking and the filesystem to be ready before it can start.

#The [Service] section specifies that systemd should use the zookeeper-server-start.sh and zookeeper-server-stop.sh shell files for starting and stopping the service. It also specifies that Zookeeper should be restarted automatically if it exits abnormally.

#Next, create the systemd service file for kafka:

sudo nano /etc/systemd/system/kafka.service
#Enter the following unit definition into the file:

/etc/systemd/system/kafka.service
[Unit]
Requires=zookeeper.service
After=zookeeper.service

[Service]
Type=simple
User=kafka
ExecStart=/bin/sh -c '/home/kafka/kafka/bin/kafka-server-start.sh /home/kafka/kafka/config/server.properties > /home/kafka/kafka/kafka.log 2>&1'
ExecStop=/home/kafka/kafka/bin/kafka-server-stop.sh
Restart=on-abnormal

[Install]
WantedBy=multi-user.target
#The [Unit] section specifies that this unit file depends on zookeeper.service. This will ensure that zookeeper gets started automatically when the kafka service starts.

#The [Service] section specifies that systemd should use the kafka-server-start.sh and kafka-server-stop.sh shell files for starting and stopping the service. It also specifies that Kafka should be restarted automatically if it exits abnormally.

#Now that the units have been defined, start Kafka with the following command:

sudo systemctl start kafka
#To ensure that the server has started successfully, check the journal logs for the kafka unit:

sudo journalctl -u kafka
#You should see output similar to the following:

#Output
#Jul 17 18:38:59 kafka-ubuntu systemd[1]: Started kafka.service.
#You now have a Kafka server listening on port 9092.

#While we have started the kafka service, if we were to reboot our server, it would not be started automatically. To enable kafka on server boot, run:

sudo systemctl enable kafka
#Now that we’ve started and enabled the services, let’s check the installation.

#Step 5 — Testing the Installation
#Let’s publish and consume a “Hello World” message to make sure the Kafka server is behaving correctly. Publishing messages in Kafka requires:

#A producer, which enables the publication of records and data to topics.
#A consumer, which reads messages and data from topics.
#First, create a topic named TutorialTopic by typing:

~/kafka/bin/kafka-topics.sh --create --zookeeper localhost:2181 --replication-factor 1 --partitions 1 --topic TutorialTopic
#You can create a producer from the command line using the kafka-console-producer.sh script. It expects the Kafka server’s hostname, port, and a topic name as arguments.

#Publish the string "Hello, World" to the TutorialTopic topic by typing:

#echo "Hello, World" | ~/kafka/bin/kafka-console-producer.sh --broker-list localhost:9092 --topic TutorialTopic > /dev/null
#Next, you can create a Kafka consumer using the kafka-console-consumer.sh script. It expects the ZooKeeper server’s hostname and port, along with a topic name as arguments.

#The following command consumes messages from TutorialTopic. Note the use of the --from-beginning flag, which allows the consumption of messages that were published before the consumer was started:

~/kafka/bin/kafka-console-consumer.sh --bootstrap-server localhost:9092 --topic TutorialTopic --from-beginning
#If there are no configuration issues, you should see Hello, World in your terminal:

#Output
#Hello, World
#The script will continue to run, waiting for more messages to be published to the topic. Feel free to open a new terminal and start a producer to publish a few more messages. You should be able to see them all in the consumer’s output.

#When you are done testing, press CTRL+C to stop the consumer script. Now that we have tested the installation, let’s move on to installing KafkaT.
We are going to use
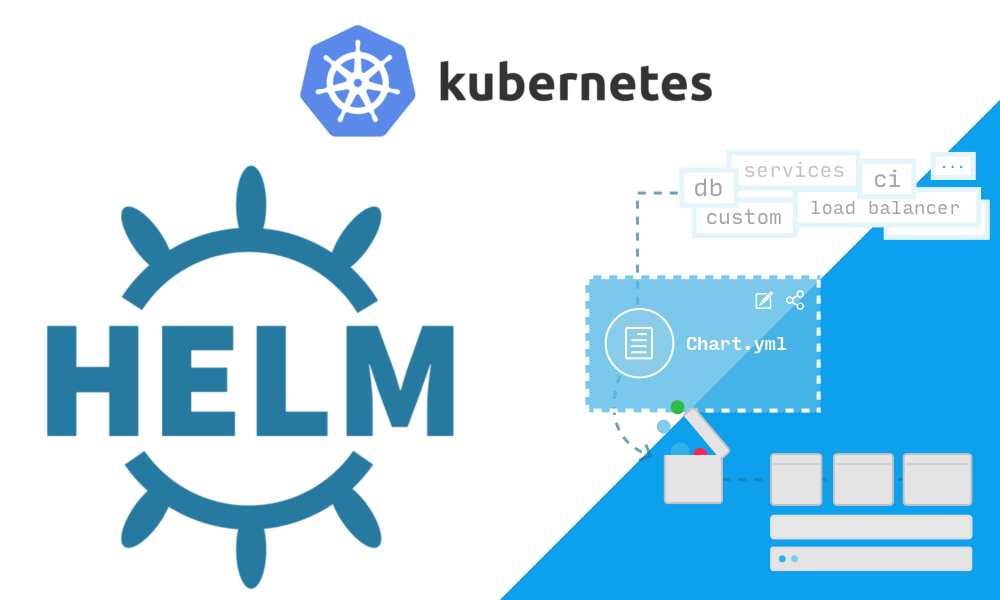
Helm is a tool for managing Charts. Charts are packages of pre-configured Kubernetes resources.
Use Helm to:
- Find and use popular software packaged as Helm Charts to run in Kubernetes
- Share your own applications as Helm Charts
- Create reproducible builds of your Kubernetes applications
- Intelligently manage your Kubernetes manifest files
- Manage releases of Helm packages
$ helm repo add incubator http://storage.googleapis.com/kubernetes-charts-incubator
$ kubectl create ns kafka
$ helm install --name my-kafka --namespace kafka incubator/kafka
To setup 3-Brokers Kafka cluster + Zookeeper

Return to Node
we going to use 2 things to make our Chat work with kafka
Code overview
Demo

Sticky
Sticky
Replica
1..N
Public :8000
Private Kubernetes cluster
WS
WS
WS
HTTP
HTTP
Broker 1
Leader
Broker 2
Broker K
Kafka
Producer
Consumer
Producer
Consumer
Resulting architecture
Zookeeper
quorum
What's next?
Dig into Kubernetes World
Add auth & WS security
Add scalable DB (Cassandra vs Mongo)
Compare Kafka vs Kafka streams vs Redis streams
Final: Deploy to the Cloud
Sticky
Sticky
Replica
1..N
Public :443
HTTPS
Private Kubernetes cluster
WS
WS
WS
HTTP
Kafka
Producer
Consumer
Producer
Consumer
Improvements

OAuth interceptor
Forward Auth

OAuth 2 provider
In- memory
temporary fast storage
for last messages/logged in users
?
Q&A
Links
- https://www.geeksforgeeks.org/horizontal-and-vertical-scaling-in-databases/
- https://docs.traefik.io/
- https://kafka.apache.org/uses
- https://github.com/helm/charts/tree/master/incubator/kafka
- https://www.npmjs.com/package/kafka-node
- https://www.npmjs.com/package/socket.io-adapter
- https://socket.io/docs/server-api/
Source code of the demo project
Episode I: Presentation
Other links
Chat in the cloud II
By Vladimir Vyshko
Chat in the cloud II
Second part of our chat story


