Title Text
Switching to React Native
In 2015 the F8 iOS app was built using React Native, but the Android version used native code; in previous years both were built using native iOS and Android code. Since then, React Native has been released for Android, which presented an opportunity to cut the surface area of the app’s logic and UI code. Some Facebook teams have seen around 85% re-use of app code when using React Native.
React Native also provides the benefit of being able to quickly prototype visual components in a tight loop with UI designers - something we’ll discuss in part two.
So, if we’ve switched to React Native, what else do we need to consider? Let’s start with the content.
Choosing a Data Layer
The 2014 and 2015 apps both used Parse Cloud Code as a data backend. Therefore when beginning to plan the 2016 app, Parse had the advantage by allowing re-use of existing data structures and getting started quickly.
There were other reasons for using Parse - much of the content displayed within the app needs to be updated with great frequency, up to and including during the conference itself, and it needs to be updatable without requiring any technical expertise (beyond familiarity with spreadsheet editing, for example). The Parse Cloud Code dashboard was the perfect tool to meet these needs.
Given all this, Parse became the best choice for this app’s data backend. In light of the Parse Cloud Code shutdown announcement, we decided to transition to use the newly open-sourced Parse Server and Parse Dashboard projects.
As React Native doesn’t need to be tightly connected to a data layer, for example development of the UI and app logic in a React Native app can be done with simple mock data. This means that as long as the structure of the data remains the same, you can swap the data source of a fully built app with minimal amounts of adjustment. For the F8 App this meant we could very easily transition from Parse Cloud Code to the open source Parse Server after the app had already been developed. We’ll cover this more in the data tutorial.
Data Access with React Native
To get Parse and React Native working together, there is an existing Parse + React package that provides the necessary binding tools, but there was a problem - due to the vagaries of conference wi-fi and connectivity, the F8 app must be able to work offline. Since Parse + React did not support offline syncing of data when the F8 app was being built, so we had to construct our own offline support.
There was another factor in making this decision - team size. Relay, for example, would be more appropriate for a larger team working at scale, but the F8 app was being developed by one person, with a few others in support for design. This has a big influence on the type of data access method you use in an app.
What about GraphQL and Relay? While they work extremely well with React Native, Relay did not (at the time) have built-in support for offline usage, and GraphQL wasn’t supported out of the box by Parse. Building the app using them would have required building APIs for GraphQL-Parse, and hacking together an offline storage method for Relay.
GraphQL server setup was also relatively complex for one person with a short deadline. Bearing in mind that when the app was being developed for release in the app stores, we wanted the simplest and fastest options, what other choices were there?
Given the above, Redux was the best choice for the app. Redux offers a simple implementation of the Flux architecture, providing more control over how the data can be stored and cached, essentially enabling the app to sync one-way from Parse Cloud.
For the app’s store version, Redux provided the best balance of functionality and ease of use for this app. After the app was released, we revisited this and built some usage of Relay and GraphQL into parts of the app, and we’ll cover that transition in the Relay and GraphQL Addendum.
Our Development Stack
With React Native as our chosen app framework, and Redux used for the data layer, we needed to pick some supporting technologies and tools:
- The open-sourced Parse Server provided data storage - running on Node.js.
- Flow was enabled to catch typing errors in our React Native JavaScript code.
- Unit tests for the Jest framework were written for more complex functions.
- We used the React Native Facebook SDK for quick iOS and Android access to Facebook integration.
- We used Facebook’s Nuclide editor on OSX with its built-in support for React Native.
- We used use git for version control, and stored progress on GitHub.
There are some additional small packages we used that we’ll highlight as we go through each tutorial.
Before you continue with later sections, we recommend you learn the basics about React.js from the project’s own tutorial - specifically its concept of modular components and JSX syntax. Then follow React Native’s introductory tutorial which will show you the basics about applying this to mobile apps.
Designing an App for Multiple Platforms
This is a series of tutorials designed to introduce React Native and its Open Source ecosystem in plain English, written alongside the building of the F8 2016 app for Android and iOS.
One of the major highlights of React Native is its simplicity around creating apps that can run on iOS and Android, without having to repeat most of the app logic in different native languages.
However, rather than “write once, run anywhere”, the philosophy of React Native has always been “learn once, write anywhere”. This subtle differences means that React Native apps should be tailored for each platform, rather than being identical everywhere.
From a UI perspective, as platforms have somewhat different visual styles, UI paradigms, or even technical capabilities, it makes sense to start with a common UI foundation, and then tweak it for each platform.
Before We Start
In this and subsequent tutorials, we’re going to be diving into the code of the app itself, so you should grab the source code and clone it somewhere you can conveniently browse. You could also follow our setup instructions to use this to run the app yourself locally, but for the purposes of this tutorial, you just need to see the source code itself.
The React Native Mindset
Before you write any React code, there is a very important concept about it that instructs how you think about every piece of a React app. This concept is that your code should re-use as much as possible.
This might seem at odds with the React Native idea of tailoring the visually app for each platform - where the temptation might be to create separate iOS and Android visual components - but it simply requires that the various parts of the React Native app still share as much overlap as possible.
When considering visual components in a React Native app, the key to success is to use platform abstractions. The developer and the designer determine a list of re-usable components in the app - such as “button”, “container”, “list row”, “header”, etc. - and only where needed do these components deviate from the common version.
Of course, some components are more complex than others, so let’s explore some different components in the F8 app
Varying Smaller Components
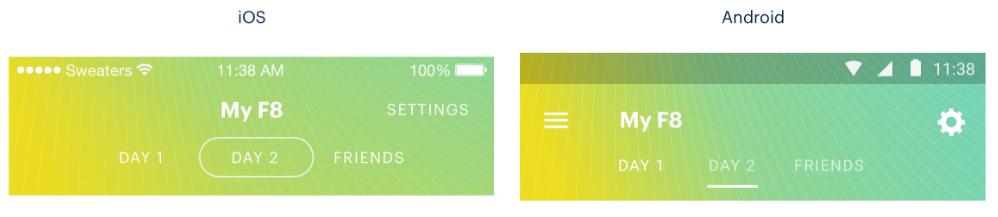
Here is an example from the F8 app:
On iOS, the tab segmentation controls use a rounded button style familiar to iOS users, while the Android version of the same component uses an underline style that better matches that platform. Both controls, however, perform the exact same function.
So, visually they’re a little bit different, but otherwise it’s worth repeating that they should re-use as much code as possible.
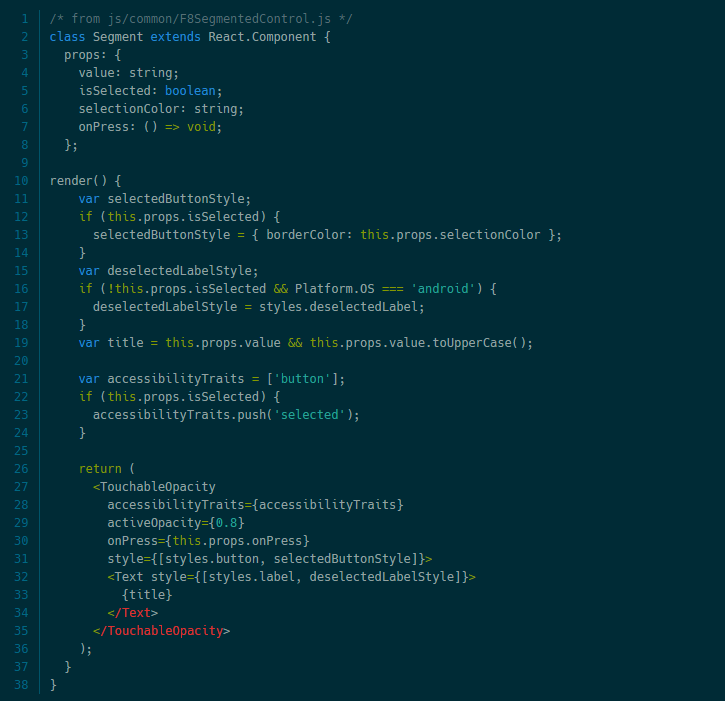
For a small component like this, we have a large amount of cross-platform overlap in the logic involved - it is a component which displays text buttons, each with ‘hover’ and ‘active’ styles, and the only difference is that slight visual variation - and so the best approach is to use a single component, and then use control statements when necessary.
Title Text
Title Text
Title Text
deck
By Chatchailim Lim


