Webpack

not another task runner tool
A task runner
- Task runner is an application that automates time consuming, repetitive and boring tasks.
- Allows to define steps, what they must do and how they are combined or chained.
A gulp example...
// Concatenate JS Files
gulp.task('scripts', function() {
    return gulp.src('src/js/*.js')
      .pipe(concat('main.js'))
      .pipe(gulp.dest('build/js'));
});

// Build CSS from SASS
gulp.task('sass', function() {
    return sass('src/scss/style.scss', {style: 'compressed'})
        .pipe(rename({suffix: '.min'}))
        .pipe(gulp.dest('build/css'));
});

// Complex task
gulp.task('default', ['scripts', 'sass']);
The webpack way
- Webpack is a module bundler and not a task runner.
- Analyzes dependencies among your modules (not only JS but also CSS, HTML, etc) and generates assets.
- Understands multiple standards for how to define dependencies and export values: AMD, CommonJS, ES6 modules, ...
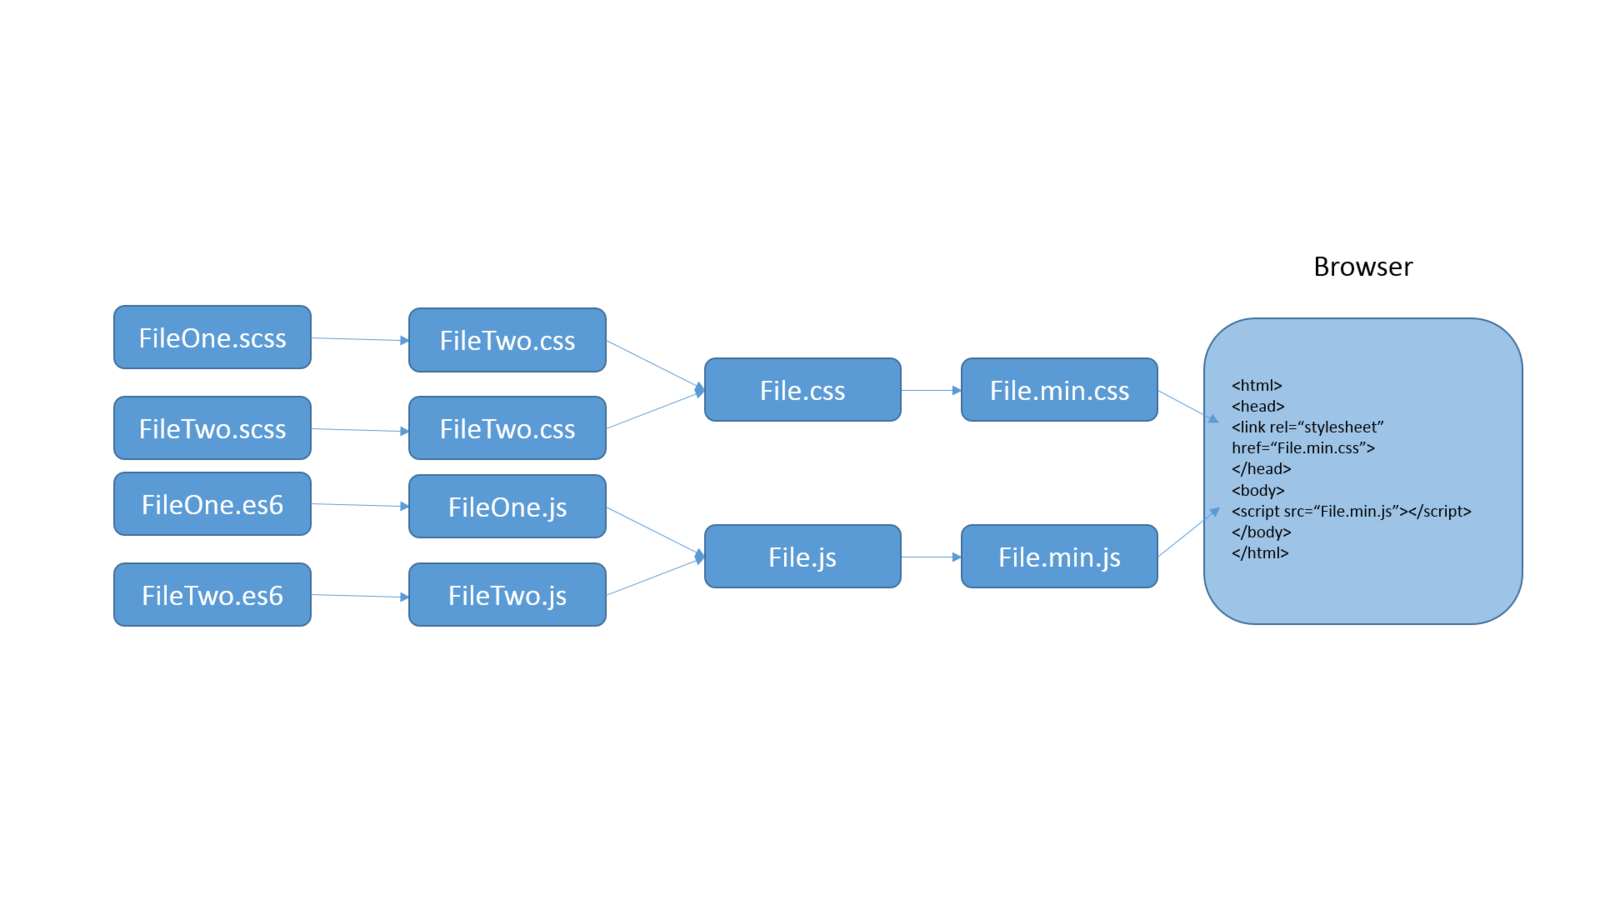
The flow

Traditional Build Tools

Webpack build

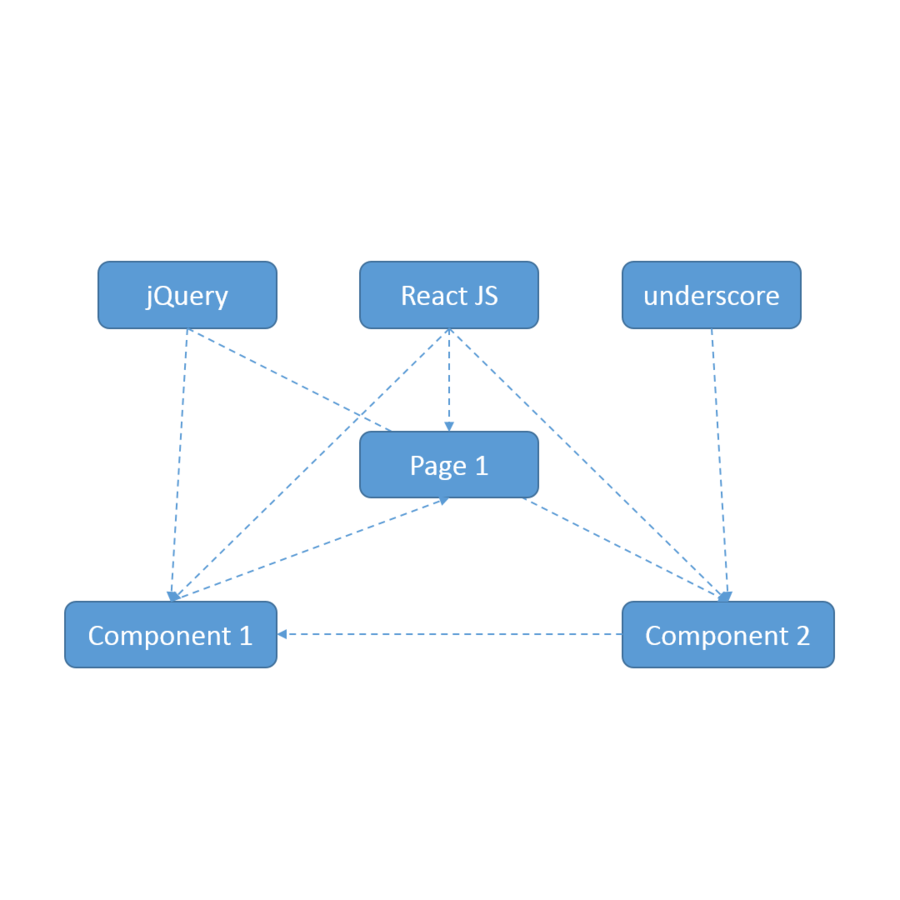
Module System

MODULE SYSTEM
//Component 2
//component2.js
var jquery = require('jquery');
var react = require('react');
var _ = require('underscore');

/*
    Code for a react component using jquery and underscore
*/
//Component 1
//component1.js
var jquery = require('jquery');
var react = require('react');
var component2 = require('./component2.js');
/*
Code for a react component using jquery and component2
*///Page 1
//page1.js
var react = require('react');
var component1 = require('./components/component1.js');
/*
Code for a react component using component1
*/Webpack CLI
Installation
npm install -g webpackBasic usage
webpack <entry> <output>Production flag
webpack ./app.js ./bundle.js -pwebpack ./app.js ./bundle.jsProduction flag with source maps
webpack ./app.js ./bundle.js -p -dWith code watcher
webpack ./app.js ./bundle.js -wWebpack Dev Server
Installation
npm install -g webpack-dev-serverBasic usage
webpack-dev-server <entry> --content-base ./webpack-dev-server ./app.js --content-base .///File ./index.html served @
http://localhost:8080/webpack-dev-server/Configuration
- Command Line Interface (Passed when executed)
- Using webpack API (for NodeJS) (Great to integrate with grunt, gulp or your own build scripts)
- Configuration file (Not a JSON, it is a JavaScript file, really a module)
Webpack can be configured through:
module.exports = {
    // configuration
};
Options
- context: Base directory for resolving the entry option. Note it is absolute path !!!
- entry: The entry point of your bundle (the initial file where your application starts). Can be a string, an array or an object (for multiple entries).
- output: Determines the out folder, file names, etc.
- module: Options affecting normal modules, like which one must be automatically loaded.
- resolve: Determines how modules are loaded.
- target: Compiles depending the target environment (browser, node, webworker, etc).
- devtool: Enhance debugging (generates map files).
- plugins: Additional plugins added to the compiler.
- ...
Three main conepts
- Entry points: The first JS code executed when a page is loaded. Dependencies are analyzed from this first module.
- Loaders: Transformations on a resource file. Each module is loaded through a loader (OMG !!! What a cacophony).
- Plugins: Injects themselves into the build process to make all sort of crazy things.
basic example

"use strict";

var path = require("path");
var Webpack = require("webpack");

// Our configuration
module.exports = {
	// Define the entry point
	entry: path.resolve(__dirname, "js", "app.js"),

	// Output configuration
	output: {
		path: path.resolve(__dirname, "assets"),
		filename: "budle.js"
	},

	module: {
		loaders: [
			// Inform about CSS loaders so that it can be bundled too
			{ test: /\.css$/, loader: "style-loader!css-loader" }
		]
	},

	// Generate source map files
	devtool: "source-map"
};
require("!style!css!../css/style.css");
var content = require("./content.js");

document.write(content);
app.js
module.exports = "It works !!!";content.js
body {
    background: yellow;
}
style.css

bundle.js
> webpack app.js bundle.js...AND WEBPACK PACKS...
...and to use it.
Simply include the bundle.js in your HTML page
<html>
    <head>
        <meta charset="utf-8">
    </head>
    <body>
        <script type="text/javascript" src="bundle.js"></script>
    </body>
</html>
Note, the CSS is included in the bundle but it is not applied until the bundle is loaded :(
Splitting code
- Webpack allows to define more than one entry point.
- Each entry can be packed with its own dependencies: in the same file, in a different file, or...
- common dependencies can be bundled together in a separated file. (See CommonsChunkPlugin)
- We can extract certain kind of contents to a different file (useful to pack all the CSS together). (See ExtractTextPlugin)
- Inject generated assets into HTML file. (See HtmlWebpackPlugin)
Loaders
- Compiles SASS, LESS, stylus, etc.
- Minimizes JS or CSS.
- Generate map files (useful for production debugging).
- Inline images and webfonts within CSS files as base64 (reducing number of server requests).
- Offers a different way to create modular CSS code:
- Allow to work with different scripting languages (you can require a CoffeScript module within a JS):
require("!style!css!./style.css");
h1 {
  color: green;
}
var cffile = require("coffee!./file.coffee");
var content = require("./content.js");
// Execute exported method con coffescript
cffile.someMethod();
document.write(content);Dependencies
- By default works fine with npm modules.
- Install modules with:
- Use it (note there are many ways to include external modules):
- Easy integration with bower.
var $ = require("jquery");

$("p").css("color", "red");
npm install jquery --saveA more complex example
Application characteristics
- Two different pages, each one with its own JavaScript code (two entry points).
- Each entry point is packed together with its dependencies.
- The CSS used for each entry is generated in a different asset file.
Code organization

"use strict";

var path = require("path");
var Webpack = require("webpack");
var ExtractTextPlugin = require("extract-text-webpack-plugin");


// Our configuration
module.exports = {

	// Define the entry point
	entry: {
	    app1: path.resolve(__dirname, "js", "app1.js"),
	    app2: path.resolve(__dirname, "js", "app2.js")
	},

	// Output configuration
	output: {
	    path: path.resolve(__dirname, "assets"),
	    filename: "[name].js",
	    chunkFilename: "[id].js"
	},

	module: {
	    loaders: [
		// Inform CSS modules must be bundled in another file.
		{
                    test: /\.css$/,
                    loader: ExtractTextPlugin.extract("style-loader", "css-loader")
                }
	    ]
	},

	plugins: [
	    // Extract all CSS content to a file
            new ExtractTextPlugin("[name].css")
	]

};
require("../css/style.css");
console.log("Running app1...");
var content = require("./content.js");
var log = require("./log.js");
log("At app1...");
document.write(content.app1);app1.js
module.exports = {
  app1: "It works for app1 !!!",
  app2: "It works for app2 !!!"
};
content.js
body {
    background: green;
    color: white;
}
style.css

module.exports = {
  app1: "It works for app1 !!!",
  app2: "It works for app2 !!!"
};
content.js
body {
    background: green;
    color: white;
}
style.css
body {
    background: green;
    color: white;
}
app2.css
require("../css/style.css");
require("../css/app2.css");

console.log("Running app2...");

var content = require("./content.js");
var log = require("./log.js");

log("At app2...");
document.write(content.app2);
app2.js
app1.js + app1.css
app2.js + app2.css
...AND WEBPACK PACKS...
Useful links
http://webpack.github.io/ Webpack
http://habrahabr.ru/post/245991/ webpack: 7 бед — один ответ
https://learn.javascript.ru/screencast/webpack Скринкаст WEBPACK
https://robots.thoughtbot.com/setting-up-webpack-for-react-and-hot-module-replacement Setting Up Webpack for React and Hot Module Replacement
THANKS FOR YOUR ATTENTION
webpack
Webpack
By Dima Pikulin
Webpack
- 1,287


