The Front-End Fresh Workshop

Agenda
Sept 25th
Front-End Engineering in 2024 & Mastering React

Oct 2nd
Building Large Scale Web Apps
Oct 9th
Building a Personal Brand & Breaking Into FAANG
Oct 16th
Leveling Up From Junior To Senior To Staff
Today's Agenda
Building Large Scale Web Apps
- State Management
- Personalization & A/B Testing
- Deployment + Monitoring
- Design Systems & Component Libraries
Introductions!
Adeyemi
Maliha
today's folks
Asmaa
Emad
Satya
Richard


Q/A!
Any questions before we get started?
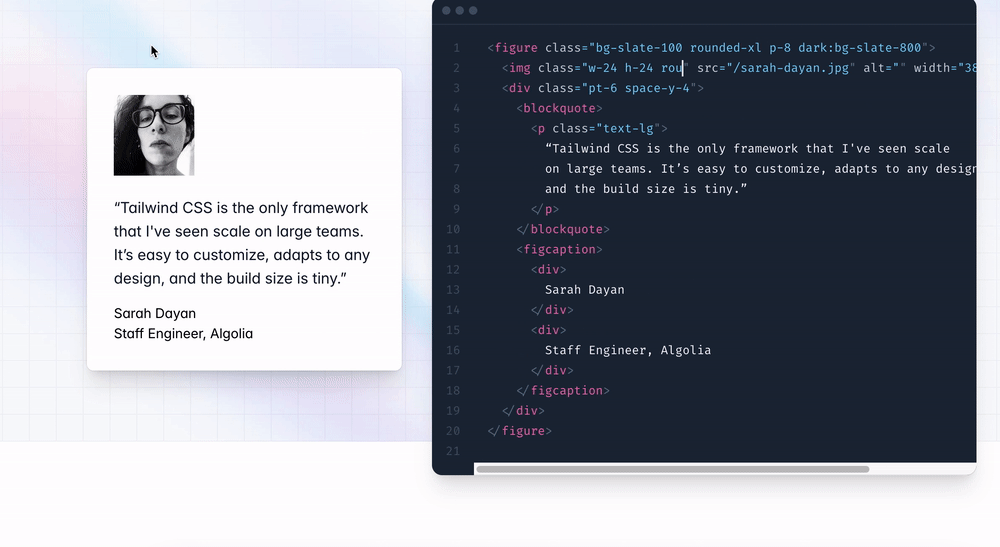
CSS
<form>
  <label for="name">Name:</label>
  <input type="text" id="name" name="name" />

  <label for="email">Email:</label>
  <input type="email" id="email" name="email" />

  <input type="submit" value="Submit" />
</form>
HTML
form {
  max-width: 400px;
  margin: 20px auto;
  padding: 20px;
  border: 1px solid #ccc;
  border-radius: 8px;
  background: #f9f9f9;
}

label {
  display: block;
  margin-bottom: 8px;
  font-weight: bold;
}

/* ... */
CSS
React
import React from 'react';
import './ContactForm.css';

function ContactForm() {
  return (
    <form>
      <label htmlFor="name">Name:</label>
      <input type="text" id="name" name="name" />

      <label htmlFor="email">Email:</label>
      <input type="email" id="email" name="email" />

      <input type="submit" value="Submit" />
    </form>
  );
}

export default ContactForm;
form {
  /* ...styles from your initial CSS... */
}

label {
  /* ...styles from your initial CSS... */
}

/* Additional styles if needed */
./ContactForm.css
React
import React from "react";
import styles from "./ContactForm.module.css";

function ContactForm() {
  return (
    <form className={styles.form}>
      <label htmlFor="name" className={styles.label}>
        Name:
      </label>
      <input
        type="text"
        id="name"
        name="name"
        className={styles.input}
      />

      <label htmlFor="email" className={styles.label}>
        Email:
      </label>
      <input
        type="email"
        id="email"
        name="email"
        className={styles.input}
      />

      <input
        type="submit"
        value="Submit"
        className={styles.button}
      />
    </form>
  );
}

export default ContactForm;
.form {
/* ...styles from your initial CSS... */
}
.label {
/* ...styles from your initial CSS... */
}
.input {
/* Input-specific styles */
}
.button {
/* Button-specific styles */
}
CSS Modules
./ContactForm.module.css
CSS Frameworks
CSS Frameworks
CSS Frameworks
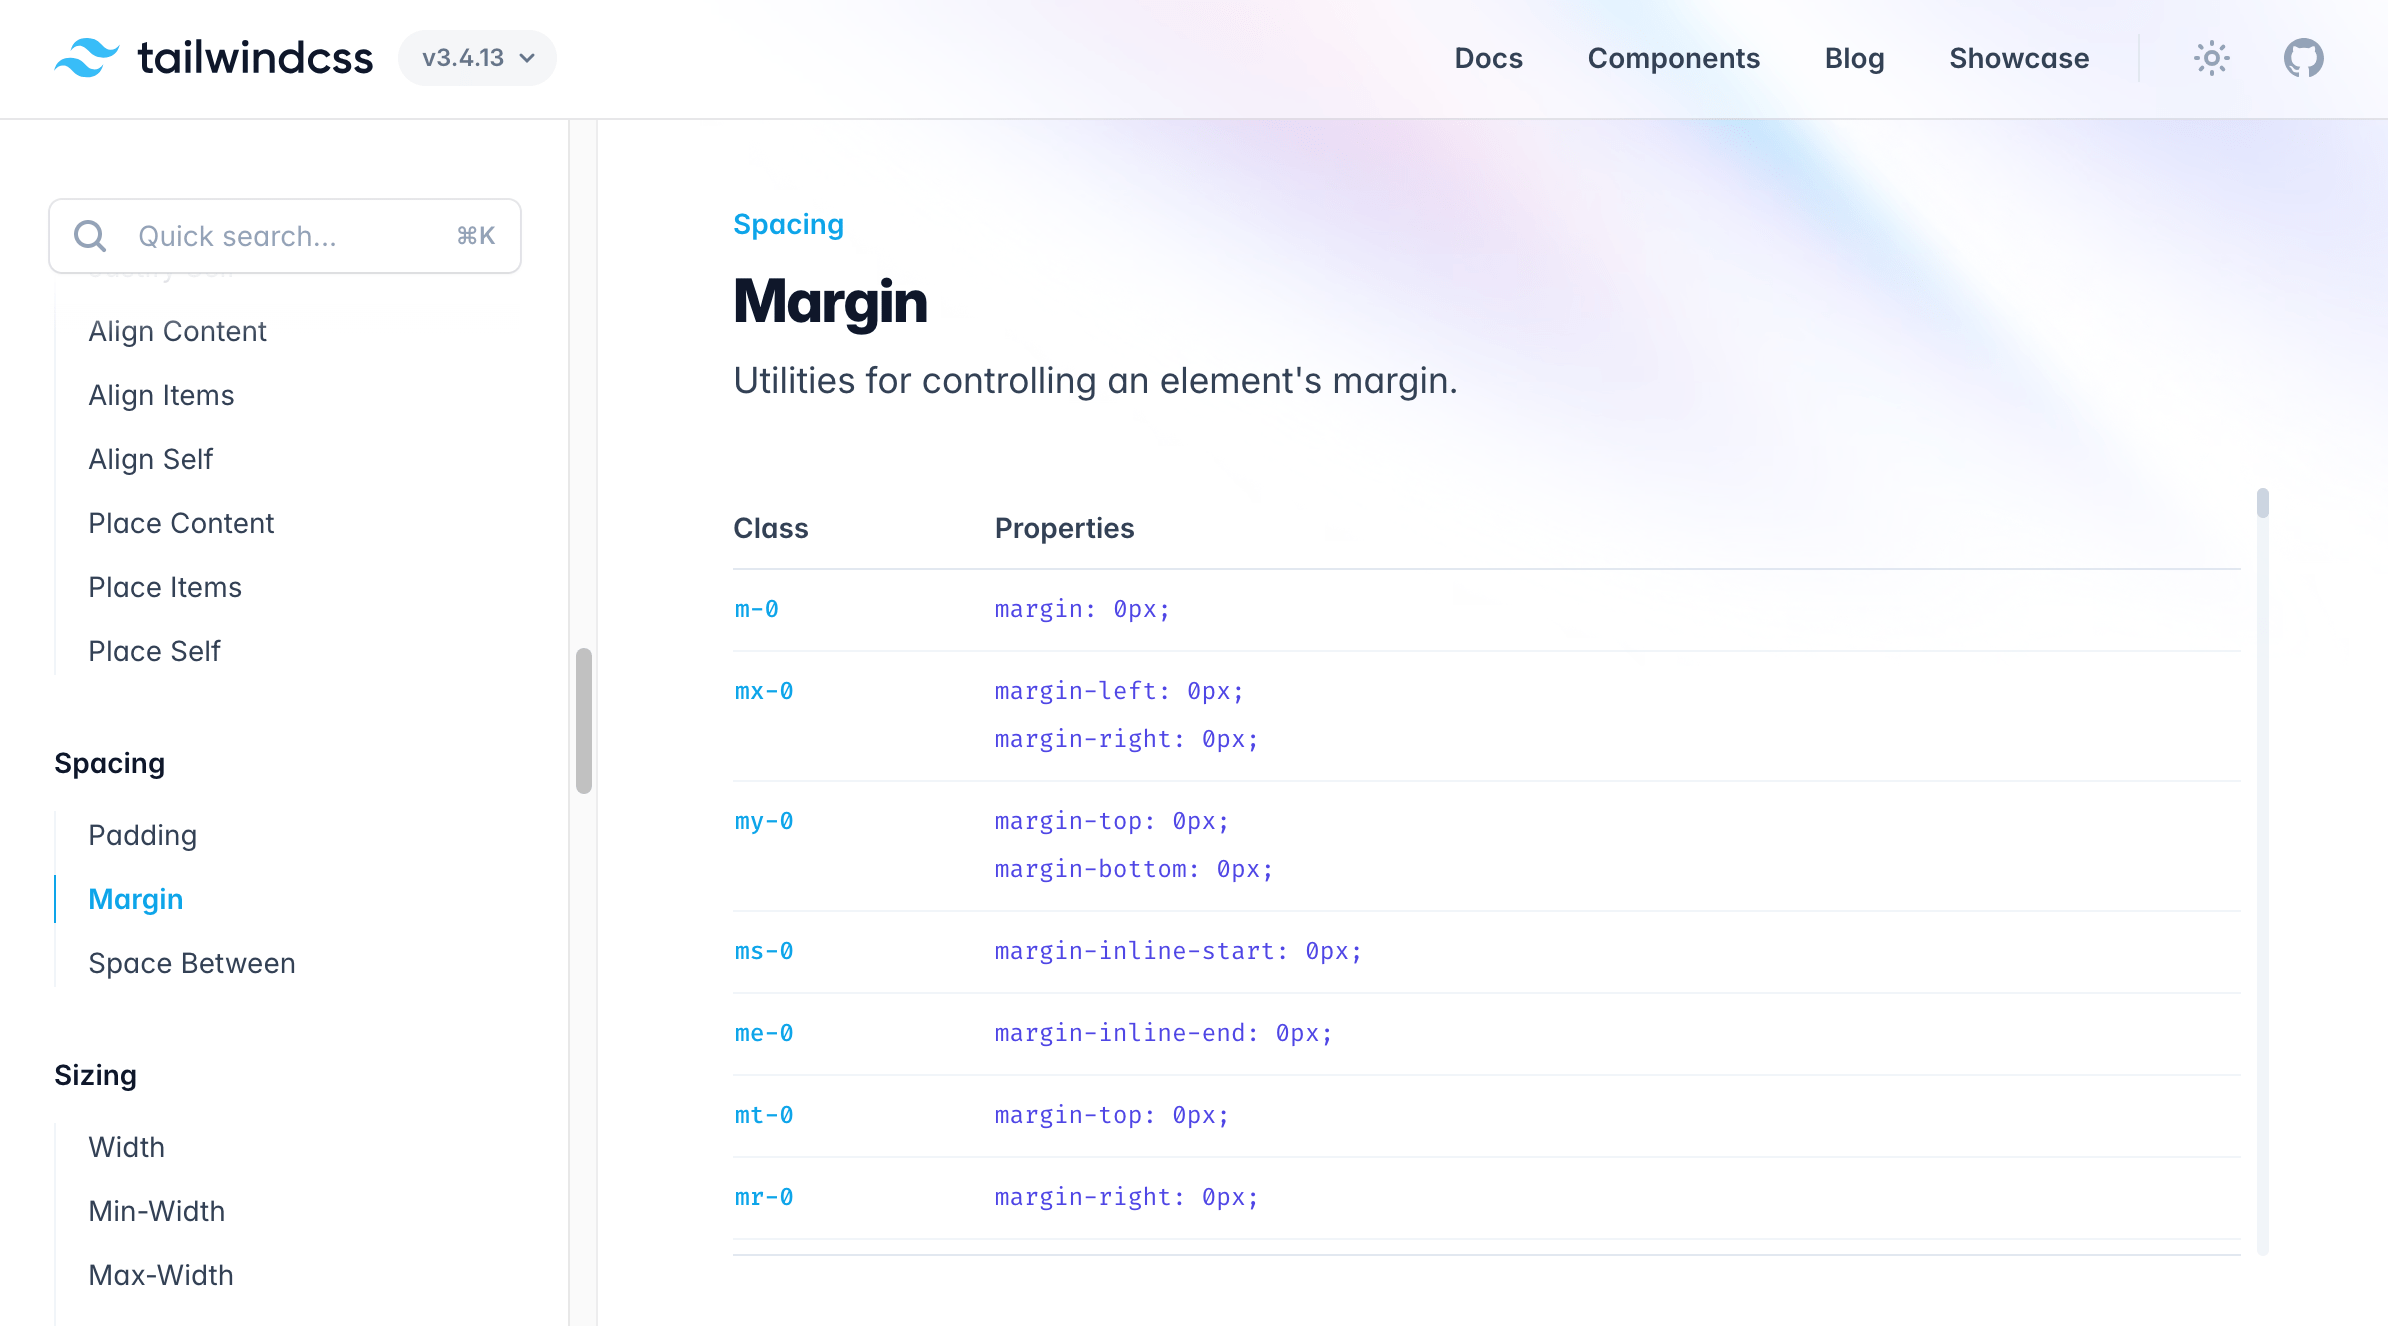
CSS Frameworks
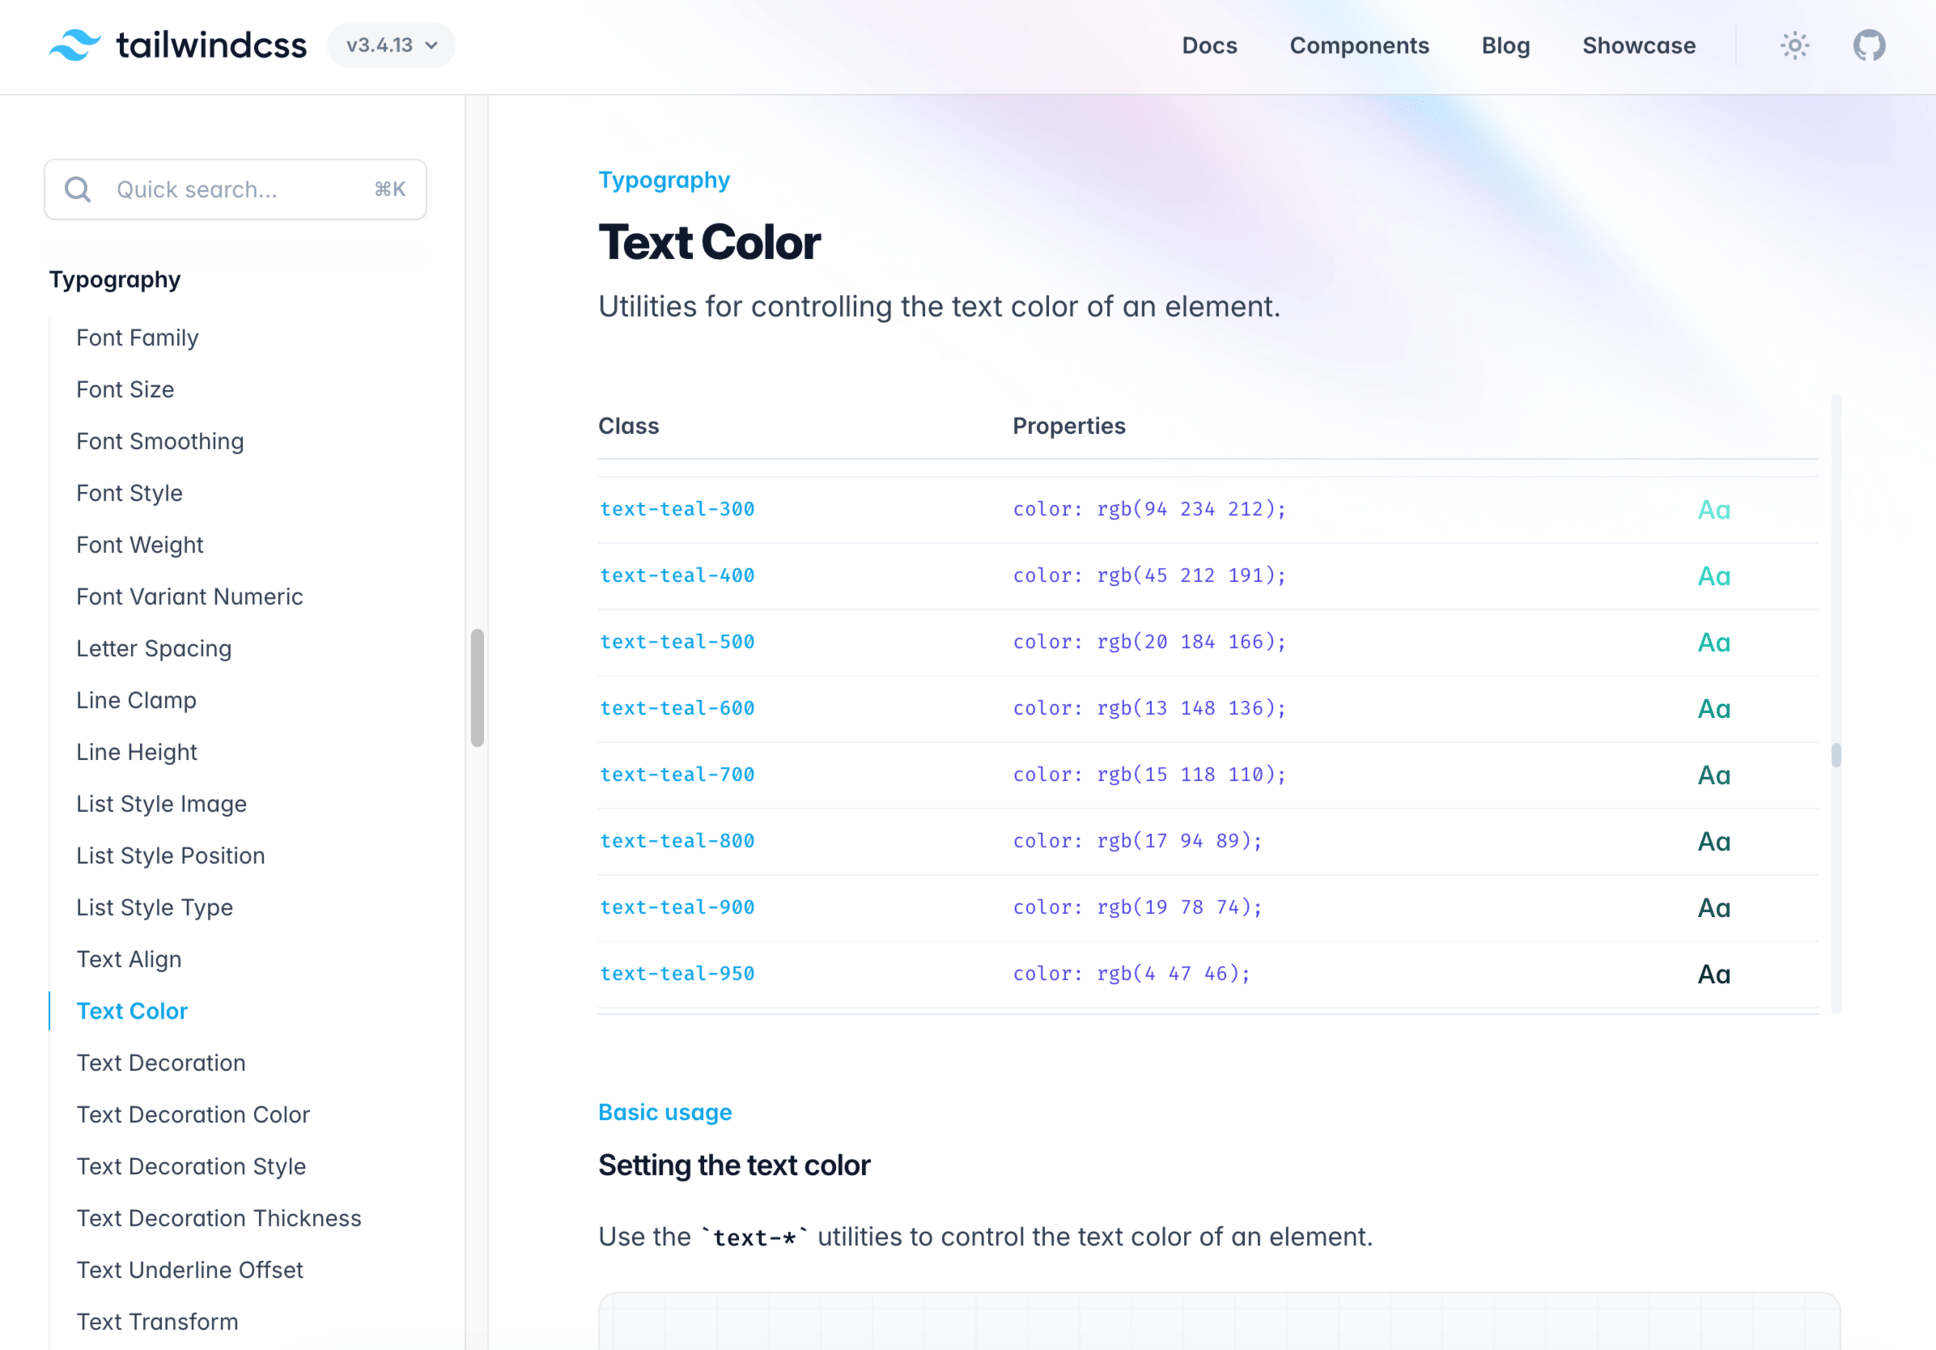
CSS Frameworks
import React from 'react';

const Button = ({ label, onClick, variant = 'primary' }) => {
  const baseStyles = 'py-2 px-4 font-semibold rounded';

  const variantStyles = {
    primary: 'bg-blue-500 text-white hover:bg-blue-600',
    secondary: 'bg-gray-500 text-white hover:bg-gray-600',
    danger: 'bg-red-500 text-white hover:bg-red-600',
  };

  return (
    <button
      className={`${baseStyles} ${variantStyles[variant]}`}
      onClick={onClick}
    >
      {label}
    </button>
  );
};

export default Button;
CSS Frameworks
import React from 'react';
import Button from './Button';

function App() {
  return (
    <div className="flex justify-center items-center h-screen">
      <Button label="Primary Button" onClick={() => alert('Clicked!')} />
      <Button
        label="Secondary Button"
        onClick={() => alert('Secondary clicked!')}
        variant="secondary"
      />
      <Button
        label="Danger Button"
        onClick={() => alert('Danger clicked!')}
        variant="danger"
      />
    </div>
  );
}

export default App;
Component Libraries

Component Libraries
Component Libraries
import * as React from "react"

import { Button } from "@/components/ui/button"
import { Card, CardContent, CardDescription, CardFooter, CardHeader, CardTitle } from "@/components/ui/card"
import { Input } from "@/components/ui/input"
import { Label } from "@/components/ui/label"
import { Select, SelectContent, SelectItem, SelectTrigger, SelectValue } from "@/components/ui/select"

export function CardWithForm() {
  return (
    <Card>
      <CardHeader>
        <CardTitle>Create project</CardTitle>
        <CardDescription>Deploy your new project in one-click.</CardDescription>
      </CardHeader>
      <CardContent>
        <form>
          <div className="grid w-full items-center gap-4">
            <div className="flex flex-col space-y-1.5">
              <Label htmlFor="name">Name</Label>
              <Input id="name" placeholder="Name of your project" />
            </div>
            <div className="flex flex-col space-y-1.5">
              <Label htmlFor="framework">Framework</Label>
              // ...
            </div>
          </div>
        </form>
      </CardContent>
      <CardFooter className="flex justify-between">
        <Button variant="outline">Cancel</Button>
        <Button>Deploy</Button>
      </CardFooter>
    </Card>
  )
}
Component Libraries
and so many more...
Component Libraries
What do companies like Doordash, Shopify, Meta, etc. do for their React apps?
Component Libraries
They often develop their own comprehensive component libraries and design systems for their React apps to ensure consistent UI/UX, improve developer efficiency, and maintain scalability across their platforms.
They develop their own to to address unique business needs and enforce brand consistency.
Component Libraries
and a lot more...
Component Libraries
Component Libraries
Design Systems
Component libraries are just one aspect of an overall Design System
A Design System is a collection of reusable components, guidelines, and assets that help teams build cohesive products.
Design Systems
Component libraries
Design Tokens
Typography Guidelines
Branding
Documentation
Iconography
Collaboration Tools (e.g. Figma)
etc.
Design Systems
Front-End Engineers
Designers
Product
Design Systems
Mobile (iOS)
Mobile (Android)
Web
Design Systems
Q/A!
and a small 5 min break...
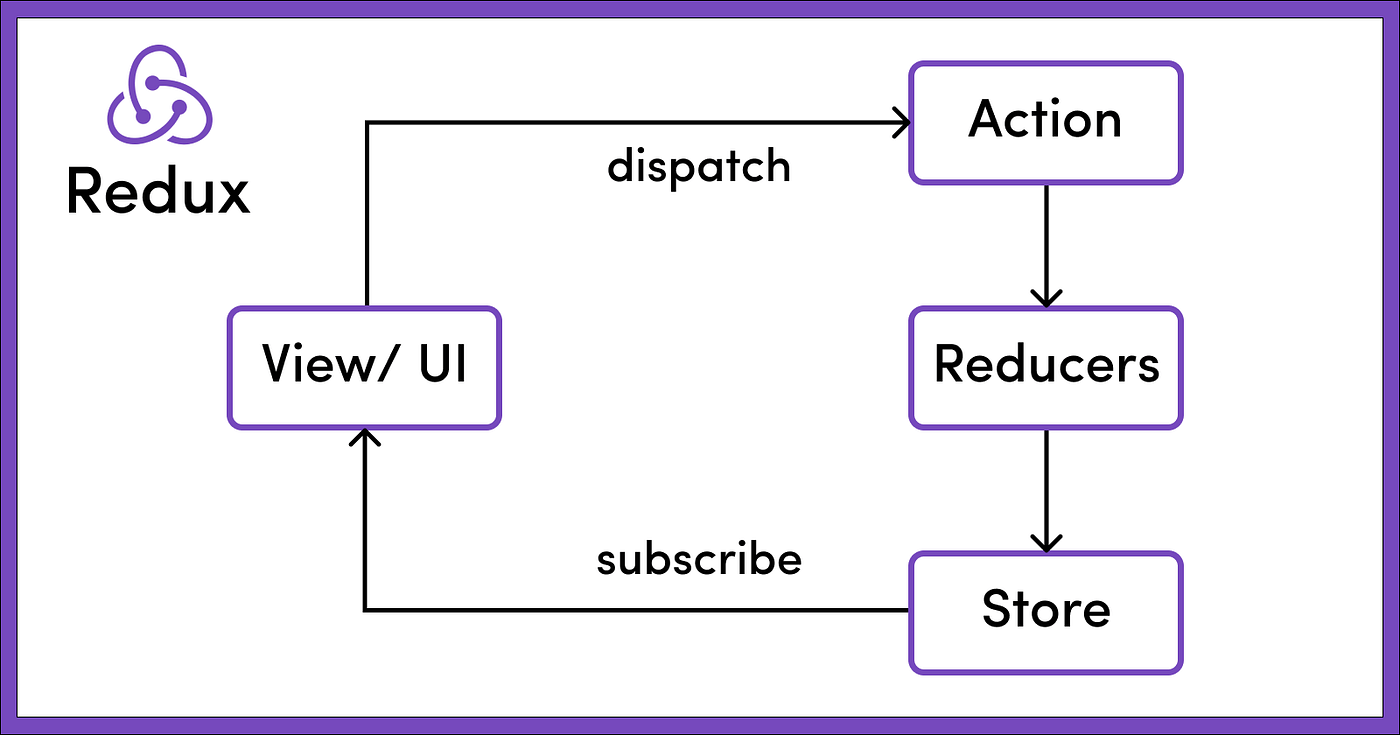
State Management
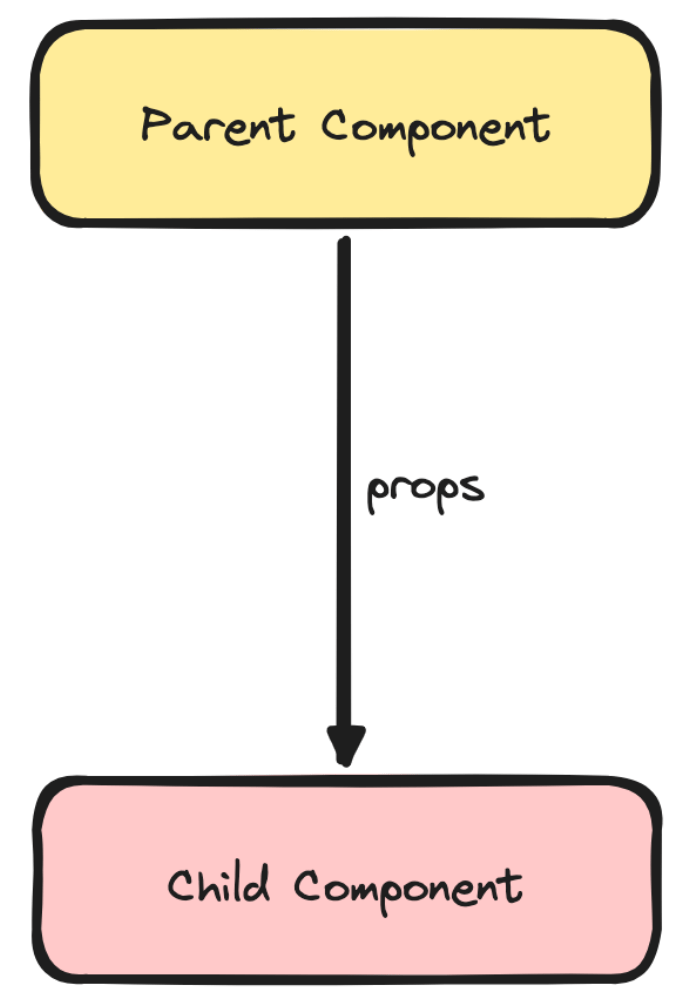
State Management
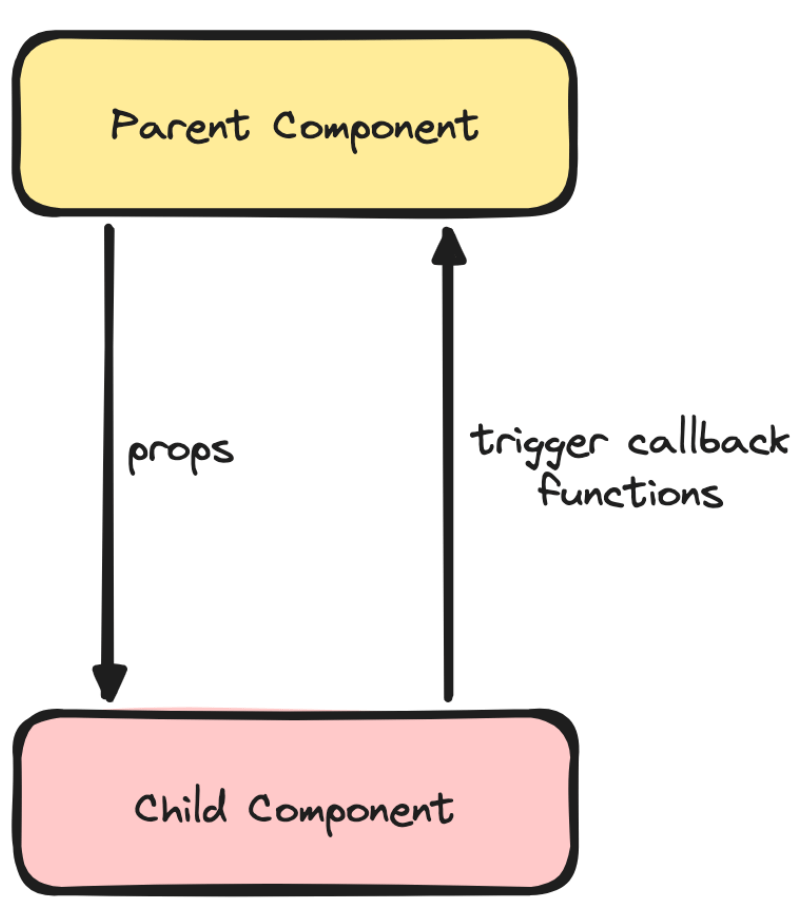
State Management
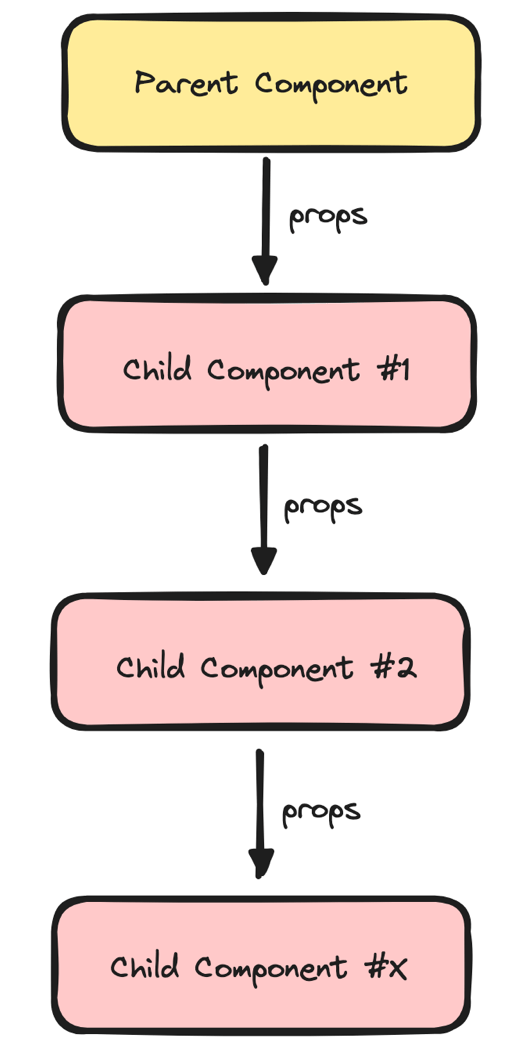
State Management
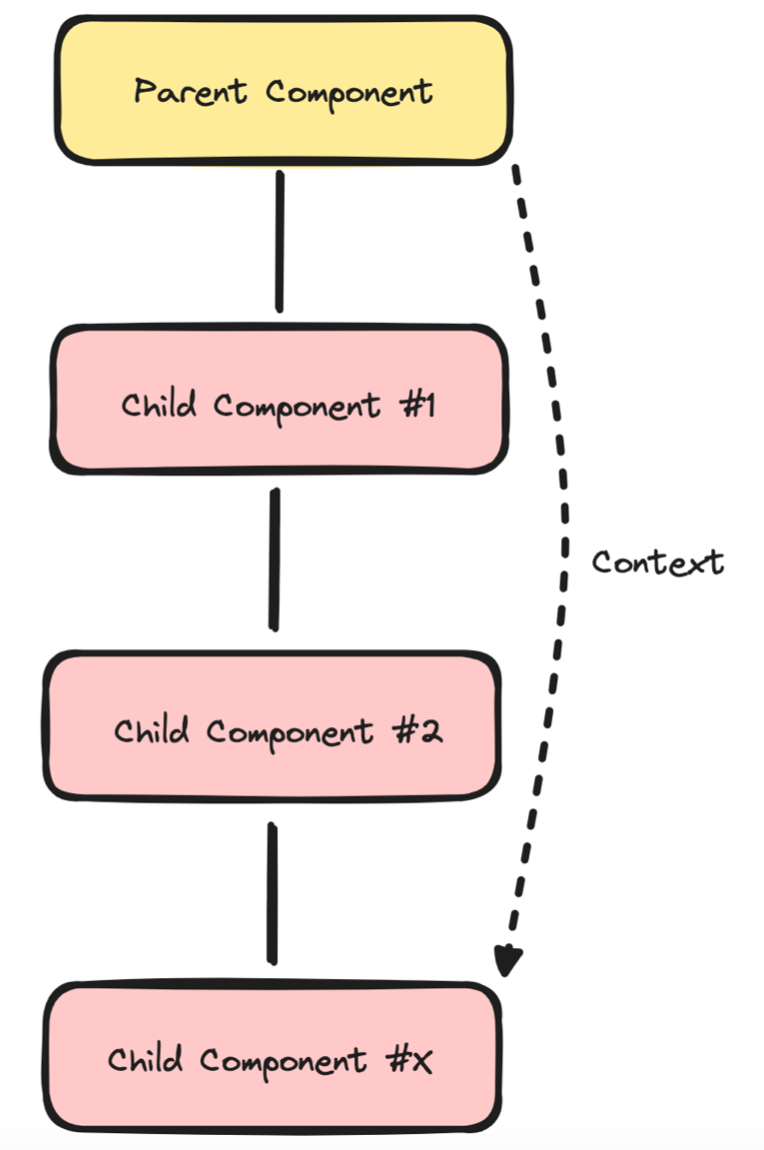
State Management
import React, {
  useState,
  createContext,
  useContext,
} from "react";

// Create a context
const MessageContext = createContext();

function App() {
  const [message, setMessage] = useState(
    "Hello World!",
  );

  return (
    // Provide the state to nested components
    <MessageContext.Provider
      value={{ message, setMessage }}
    >
      <Child1>
        <Child2>
          <Child3>
            <DeeplyNestedChild />
          </Child3>
        </Child2>
      </Child1>
    </MessageContext.Provider>
  );
}State Management
function DeeplyNestedChild() {
  /*
    Use the data directly without receiving it
    as a prop
  */
  const { message, setMessage } = useContext(
    MessageContext,
  );

  return (
    <div>
      <h1>{message}</h1>
      <button
        onClick={() =>
          setMessage(
            "Hello from nested component!",
          )
        }
      >
        Change Message
      </button>
    </div>
  );
}State Management
import React, { useState } from "react";

function App() {
  const [message, setMessage] = useState("Hello World!");

  return (
    <div>
      <h1>{message}</h1>
      <button
        onClick={() => setMessage("New Message!")}
      >
        Change Message
      </button>
    </div>
  );
}

export default App;
State Management
import React, { useReducer } from "react";

const initialState = {
  message: "Hello World!",
};

function reducer(state, action) {
  switch (action.type) {
    case "CHANGE_MESSAGE":
      return {
        ...state,
        message: action.payload,
      };
    default:
      throw new Error();
  }
}

function App() {
  const [state, dispatch] = useReducer(
    reducer,
    initialState,
  );

  return (
    <div>
      <h1>{state.message}</h1>
      <button
        onClick={() =>
          dispatch({
            type: "CHANGE_MESSAGE",
            payload: "New Message!",
          })
        }
      >
        Change Message
      </button>
    </div>
  );
}State Management
The additional steps in useReducer are helpful for separating the logic of how state is updated from the UI components.
This makes the management of data flow clearer and more predictable. With useReducer, state updates have descriptive action types, which help make it easier to trace where and how state changes occur.
State Management
State Management
import {
  createSlice,
  configureStore,
} from "@reduxjs/toolkit";

const initialState = {
  message: "Hello World!",
};

export const messageSlice = createSlice({
  name: "message",
  initialState,
  reducers: {
    changeMessage: (state, action) => {
      state.message = action.payload;
    },
  },
});

export const store = configureStore({
  reducer: messageSlice.reducer,
});
State Management
import { createRoot } from "react-dom/client";
import { Provider } from "react-redux";

import { App } from "./App";
import { store } from "./store";

const rootElement =
  document.getElementById("root");
const root = createRoot(rootElement);

root.render(
  <Provider store={store}>
    <App />
  </Provider>
);
State Management
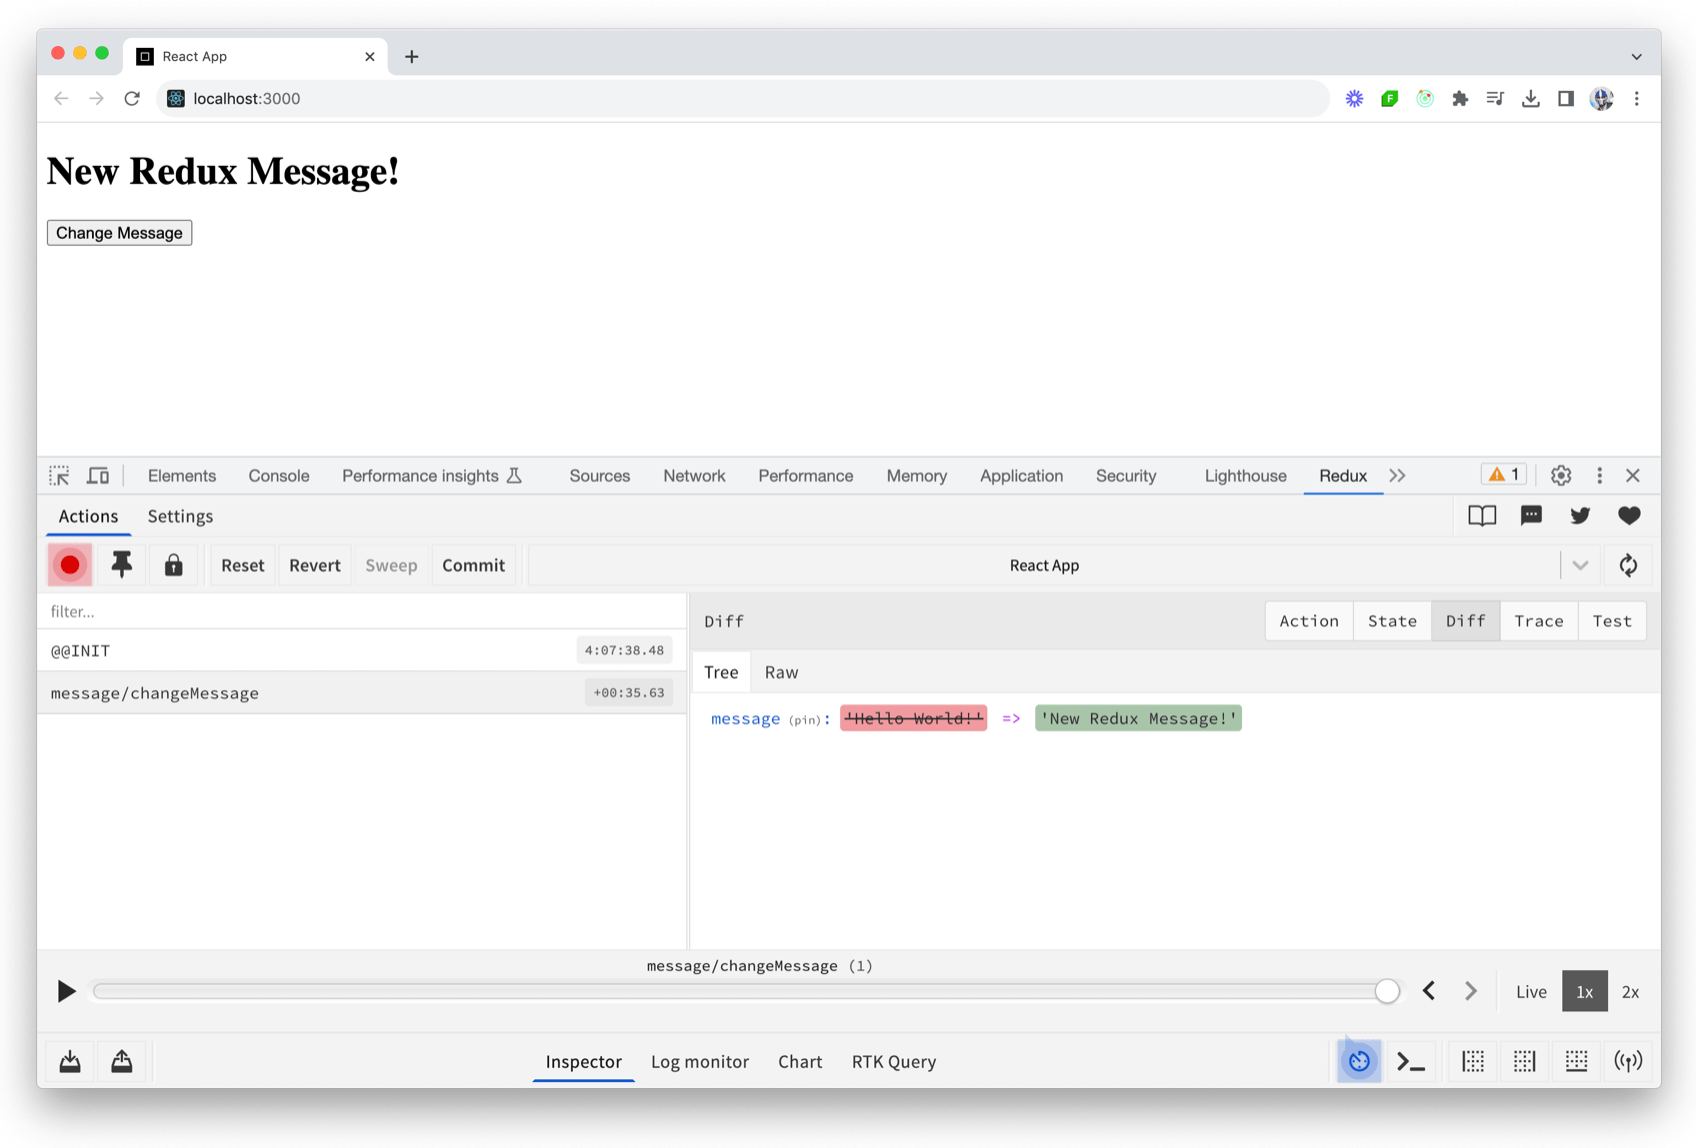
import React from "react";
import {
  useSelector,
  useDispatch,
} from "react-redux";
import { messageSlice } from "./store";

export function App() {
  const message = useSelector(
    (state) => state.message,
  );
  const dispatch = useDispatch();

  const handleChangeMessage = () => {
    dispatch(
      messageSlice.actions.changeMessage(
        "New Redux Message!",
      ),
    );
  };

  return (
    <div>
      <h1>{message}</h1>
      <button onClick={handleChangeMessage}>
        Change Message
      </button>
    </div>
  );
}

export default App;
State Management
State Management
State Management
- First, start with data-fetching considerations
- Next, gauge the necessity for more robust custom state management solutions.
- Evaluate the merit of simpler state management tools.
- Finally, always keep component state at the component level
State Management
Q/A!
Personalization & A/B Testing
Personalization refers to the practice of creating tailored experiences for individual users or groups based on their preferences, behavior, or other identifiable attributes.
Personalization
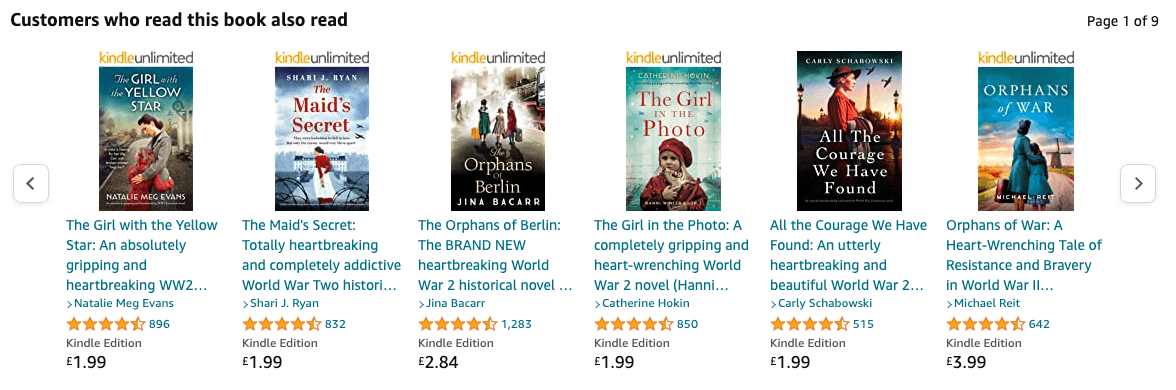
A website personalization example from Amazon; product recommendations based on customer data and intent
Personalization
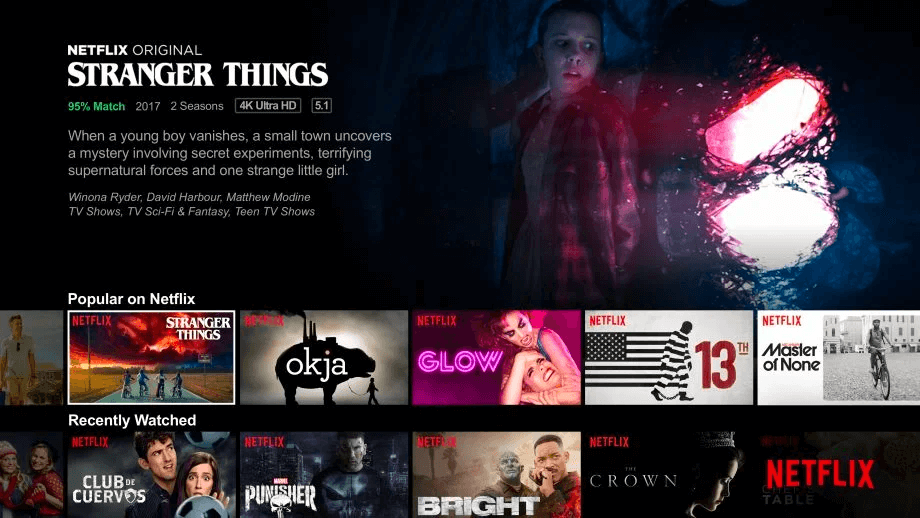
A website personalization example from Netflix; viewing recommendations based on customer data and reviews
Personalization
import React from "react";

// Create UserPreferences context
const UserContext = React.createContext({});

export const UserProvider = ({ children }) => {
  /*
   get user preferences information from
   external service/API
  */
  const userPreferences = getUserPreferences();

  return (
    <UserContext.Provider
      value={{ userPreferences }}
    >
      {children}
    </UserContext.Provider>
  );
};
Using context to store user preference info
Personalization
import { UserProvider } from './UserContext';

function App() {
  return (
    <UserProvider>
     {/* other components */}
    </UserProvider>
  );
}

export default App;
A/B Testing
A/B testing, also known as split testing or controlled experiments, is the method of comparing two or more versions of a web page, feature, or product against each other to determine which one performs better.
A/B Testing
Segmenting users
Serving different versions
Collecting data
Analyzing experiment results
A/B Testing


A/B Testing
Button Color Test
Hypothesis: Changing the color of a certain button to green will significantly increase the click-through rate when compared to the existing button color blue.
Objective: Determine which button color leads to higher click-through rates.
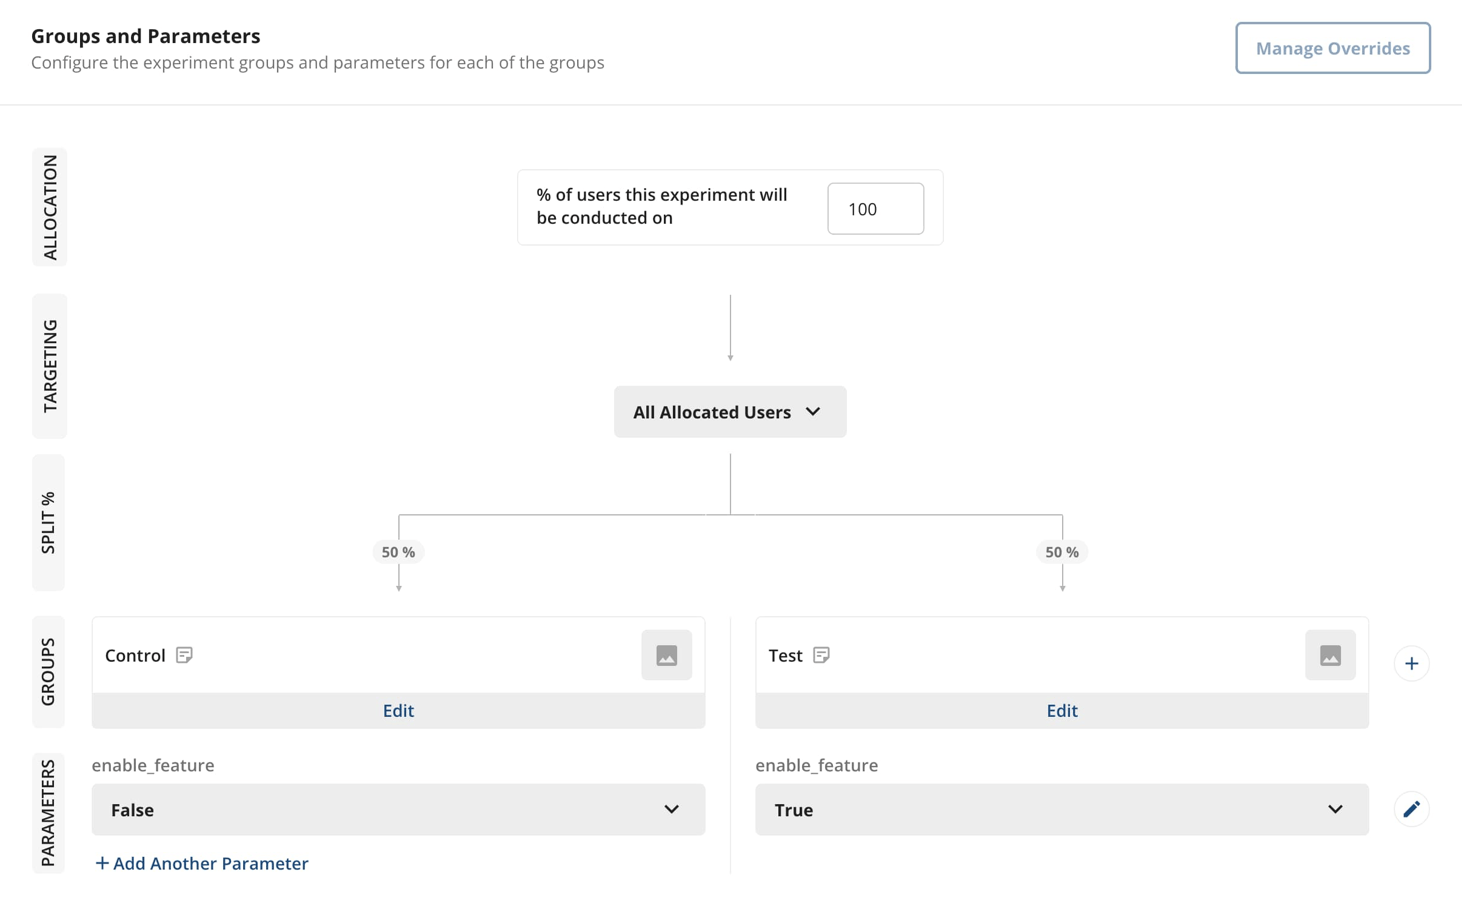
Setup: Create two variations of a button, one blue and one green. Serve one variation to 50% of all users and the other variation to the remaining 50% of users.
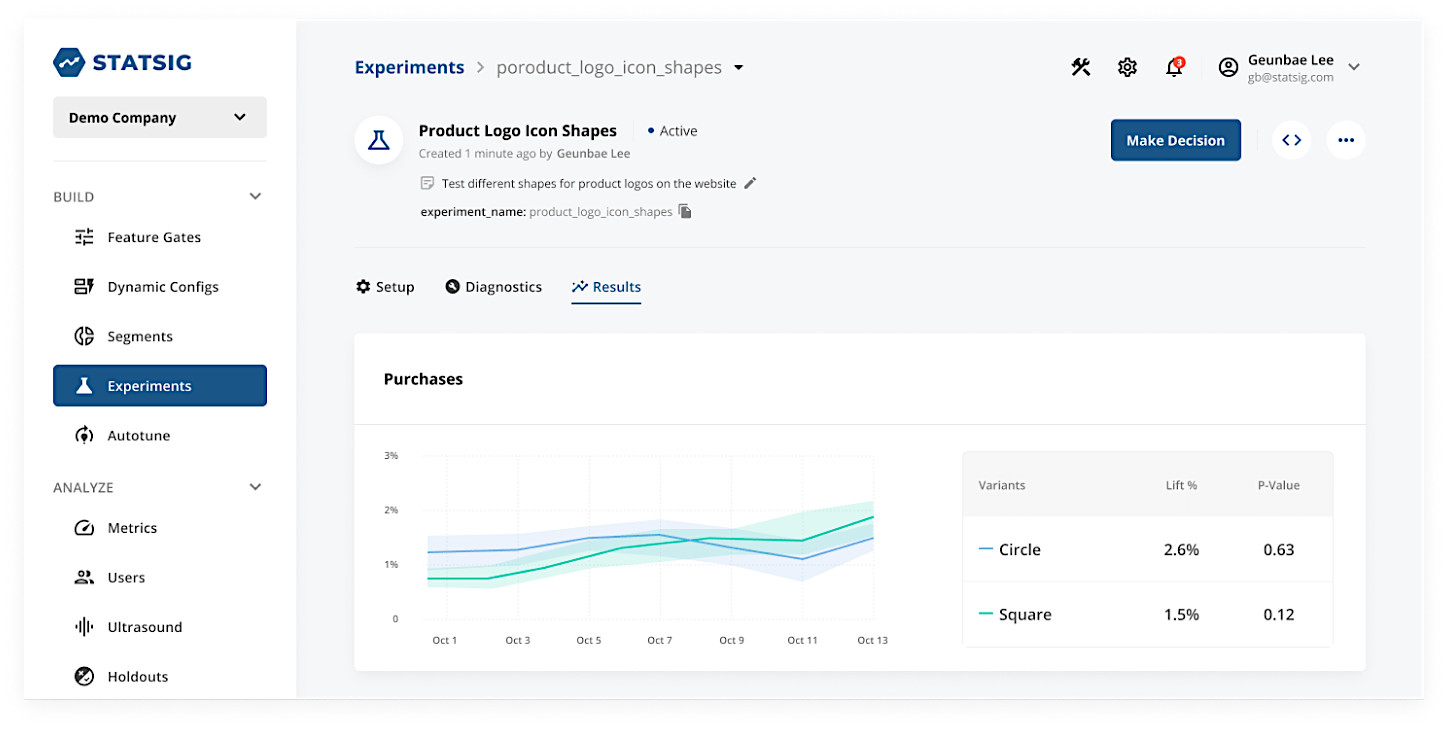
Data collection: Track button clicks for both variations using Statsig’s built-in event tracking.
Analysis: Compare the click-through rate of both variations to determine which color is more effective.
A/B Testing
A/B Testing

A/B Testing
import { StatsigProvider } from "statsig-react";

function App() {
  return (
    <StatsigProvider
      sdkKey="<STATSIG_CLIENT_SDK_KEY>"
      waitForInitialization={true}
    >
      <div className="App">
        {/* Rest of App ... */}
      </div>
    </StatsigProvider>
  );
}

export default App
A/B Testing
import { useExperiment } from "statsig-react";

function ButtonComponent() {
  // access experiment configuration
  const { config } = useExperiment(
    "button_color",
  );

  // access value of experiment parameter
  const showGreenButton = config.get(
    "enable_feature",
  );

  return (
    // ...
  )
}

export default ButtonComponent
A/B Testing
import {
  Statsig,
  useExperiment,
} from "statsig-react";

function ButtonComponent() {
  const { config } = useExperiment(
    "button_color",
  );

  const showGreenButton = config.get(
    "enable_feature",
  );

  const buttonColor = showGreenButton
    ? "green"
    : "blue";

  const onButtonClick = () => {
    // log button click
    Statsig.logEvent(
      "button_click",
      buttonColor,
    );
  };

  return (
    <button
      style={{ backgroundColor: buttonColor }}
      onClick={onButtonClick}
    >
      Click Me
    </button>
  );
}
A/B Testing
Feature Flags
In a large-scale web app, when we launch a new feature to users — there can be many instances where we may not want to launch the feature to 100% of all users right out of the box.
Feature Flags
Mitigate risk
Collect user feedback
Test the market
Ensuring a rollback plan
Feature Flags
Feature Flags

Feature Flags
import { useGate } from "statsig-react";

function ButtonComponent() {
  // Evaluate the feature flag
  const { value: isFeatureEnabled } = useGate(
    "new_button_color",
  );

  // Decide which button color to use
  const buttonColor = isFeatureEnabled
    ? "green"
    : "blue";

  return (
    <button
      style={{ backgroundColor: buttonColor }}
    >
      Click Me
    </button>
  );
}

export default ButtonComponent;
Feature Flags
Q/A!
Deployment & Monitoring
Deployment — getting our code from development to production (i.e., to our users).
Deployment
npm run build
Deployment

Static site
Deployment


Deployment
Client (React) app
Server app
Database
AWS/Digital Ocean/Heroku/etc.
Host Postgres/MongoDB
Deployment
Client (React) app
Server app
Can be deployed as a single server that outputs both the React client and handles backend server-side logic
isomorphic/universal app
Deployment
const express = require('express');
const path = require('path');

const app = express();

// Serve static files from the React app
app.use(express.static(path.join(__dirname, 'build')));

// API routes
app.get('/api/data', (req, res) => {
  res.json({ data: 'Some API data' });
});

// Serve the React app for all other routes
app.get('*', (req, res) => {
  res.sendFile(path.join(__dirname, 'build', 'index.html'));
});

app.listen(3000, () => {
  console.log('Server is running on port 3000');
});
Deployment
How can we ensure our app runs consistently across different environments?
How do we handle dependencies, configurations, and scalability in a seamless way?
Deployment

Docker allows us to package our entire React app, its environment, and dependencies into a container. This ensures that it runs consistently across different environments.
Deployment
# Step 1: Use an official Node.js image as the base image
FROM node:16-alpine

# Step 2: Set the working directory inside the container
WORKDIR /usr/src/app

# Step 3: Copy package.json and package-lock.json to the container
COPY package*.json ./

# Step 4: Install the app dependencies
RUN npm install

# Step 5: Copy the rest of the app's source code to the container
COPY . .

# Step 6: Build the React app for production
RUN npm run build

# Step 7: Use a lightweight web server (nginx) to serve the built app
FROM nginx:alpine

# Step 8: Copy the build output from the previous step to the nginx HTML directory
COPY --from=0 /usr/src/app/build /usr/share/nginx/html

# Step 9: Expose port 80 to allow external traffic to access the app
EXPOSE 80

# Step 10: Start the nginx server
CMD ["nginx", "-g", "daemon off;"]
Deployment

Deployment
When using cloud tools like AWS/GCP, we can provision a Virtual Machine or managed service to run a Docker Container.
Deployment
Deployment
Continuous Integration (CI), is the practice of automatically merging code changes from multiple developers into a single software project immediately after the changes are made.
Deployment
Deployment
-
In a Continuous Integration (CI) process, changes to the codebase are automatically tested and integrated.
-
When a developer commits new changes (e.g., attempting to merge into the 'main' branch), automated testing begins.
-
A CI server monitors the version control repository for new commits.
- When a new commit is detected, the CI server triggers a series of automated tests on the code.
Deployment
Linting/Code Formatting
Unit/Integration/E2E Tests
TypeScript Types
Accessibility Testing
Deployment
# .github/workflows/ci.yml
name: CI Pipeline

on:
  push:
    branches:
      - main
  pull_request:
    branches:
      - main

jobs:
  build:
    runs-on: ubuntu-latest
    steps:
      # Step 1: Checkout the code
      - name: Checkout repository
        uses: actions/checkout@v2

      # Step 2: Set up Node.js (using Node.js 16)
      - name: Setup Node.js
        uses: actions/setup-node@v2
        with:
          node-version: '16'

      # Step 3: Install dependencies
      - name: Install dependencies
        run: npm install

      # Step 4: Run Linting and Code Formatting (ESLint and Prettier)
      - name: Lint and Format Code
        run: |
          npm run lint
          npm run format:check

      # Step 5: Run TypeScript Type Checking
      - name: TypeScript Type Check
        run: npm run type-check

      # Step 6: Run Unit Tests
      - name: Run Unit Tests
        run: npm run test

      # Step 7: Run Integration and E2E Tests (using Cypress or Jest)
      - name: Run Integration and E2E Tests
        run: npm run test:e2e

      # Step 8: Run Accessibility Tests (example using axe-core or cypress-axe)
      - name: Run Accessibility Tests
        run: npm run test:accessibility

      # Step 9: Build the React app for production (optional)
      - name: Build for Production
        run: npm run build
Deployment
Deployment

Monitoring
Monitor Requests
Success/Errors
Monitor JS UI Errors
Monitoring

Monitoring
Monitoring
Monitoring
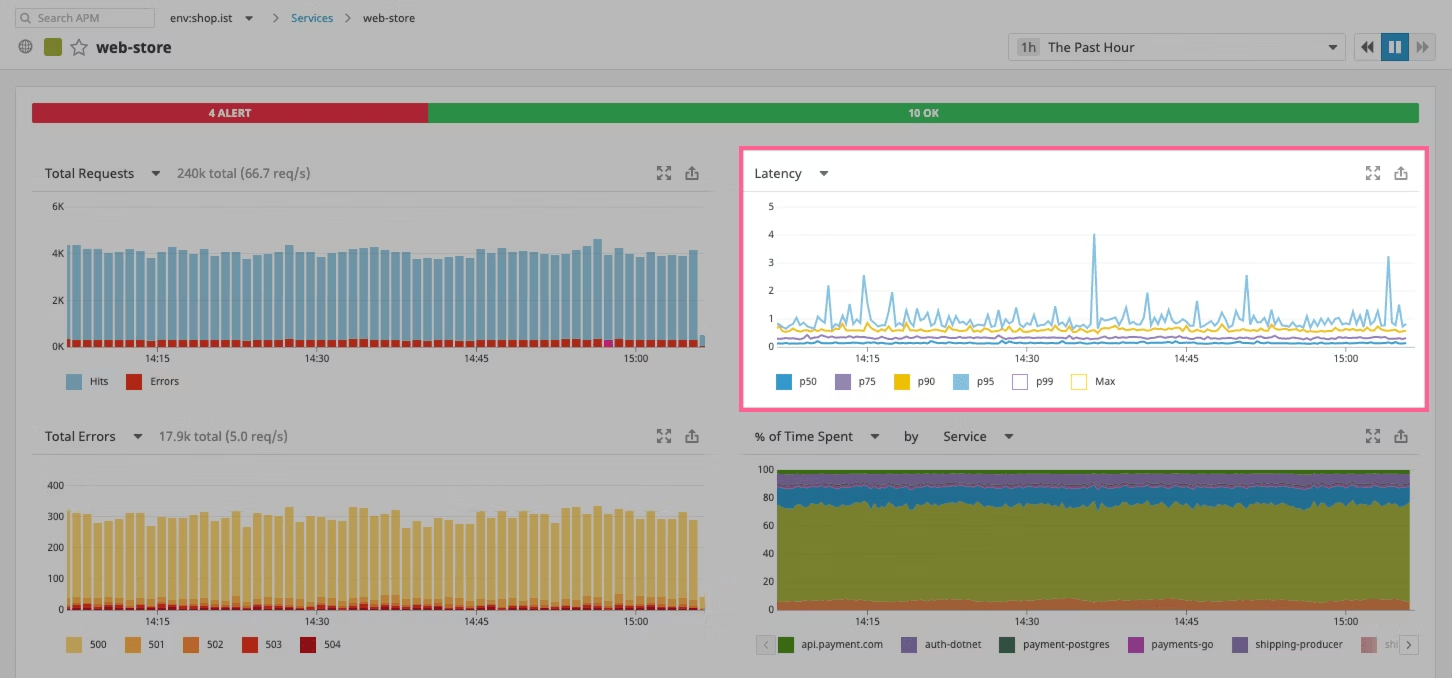
P99: The 99th percentile latency value means that 99% of the requests have a latency equal to or less than this value.
In simpler terms, it represents the worst-case latency for the fastest 99% of the requests. Only 1% of the requests take longer than this time.
Monitoring
P50: The 50th percentile latency value means that 50% of the requests have a latency equal to or less than this value.
The median latency
Monitoring
P50
P90
P95
P99
Monitoring
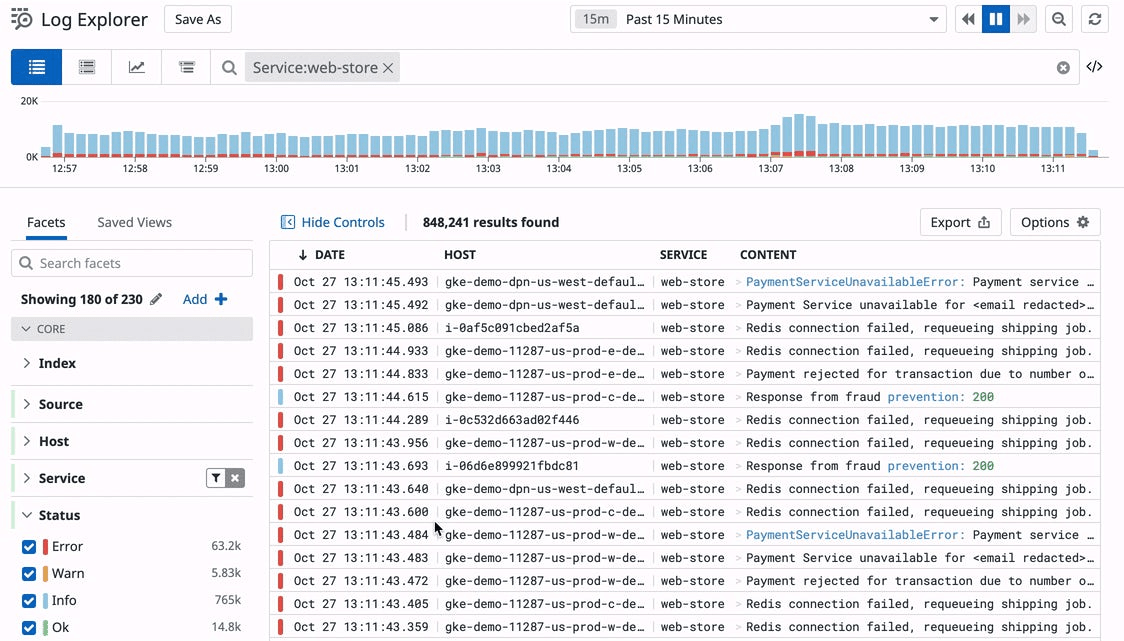
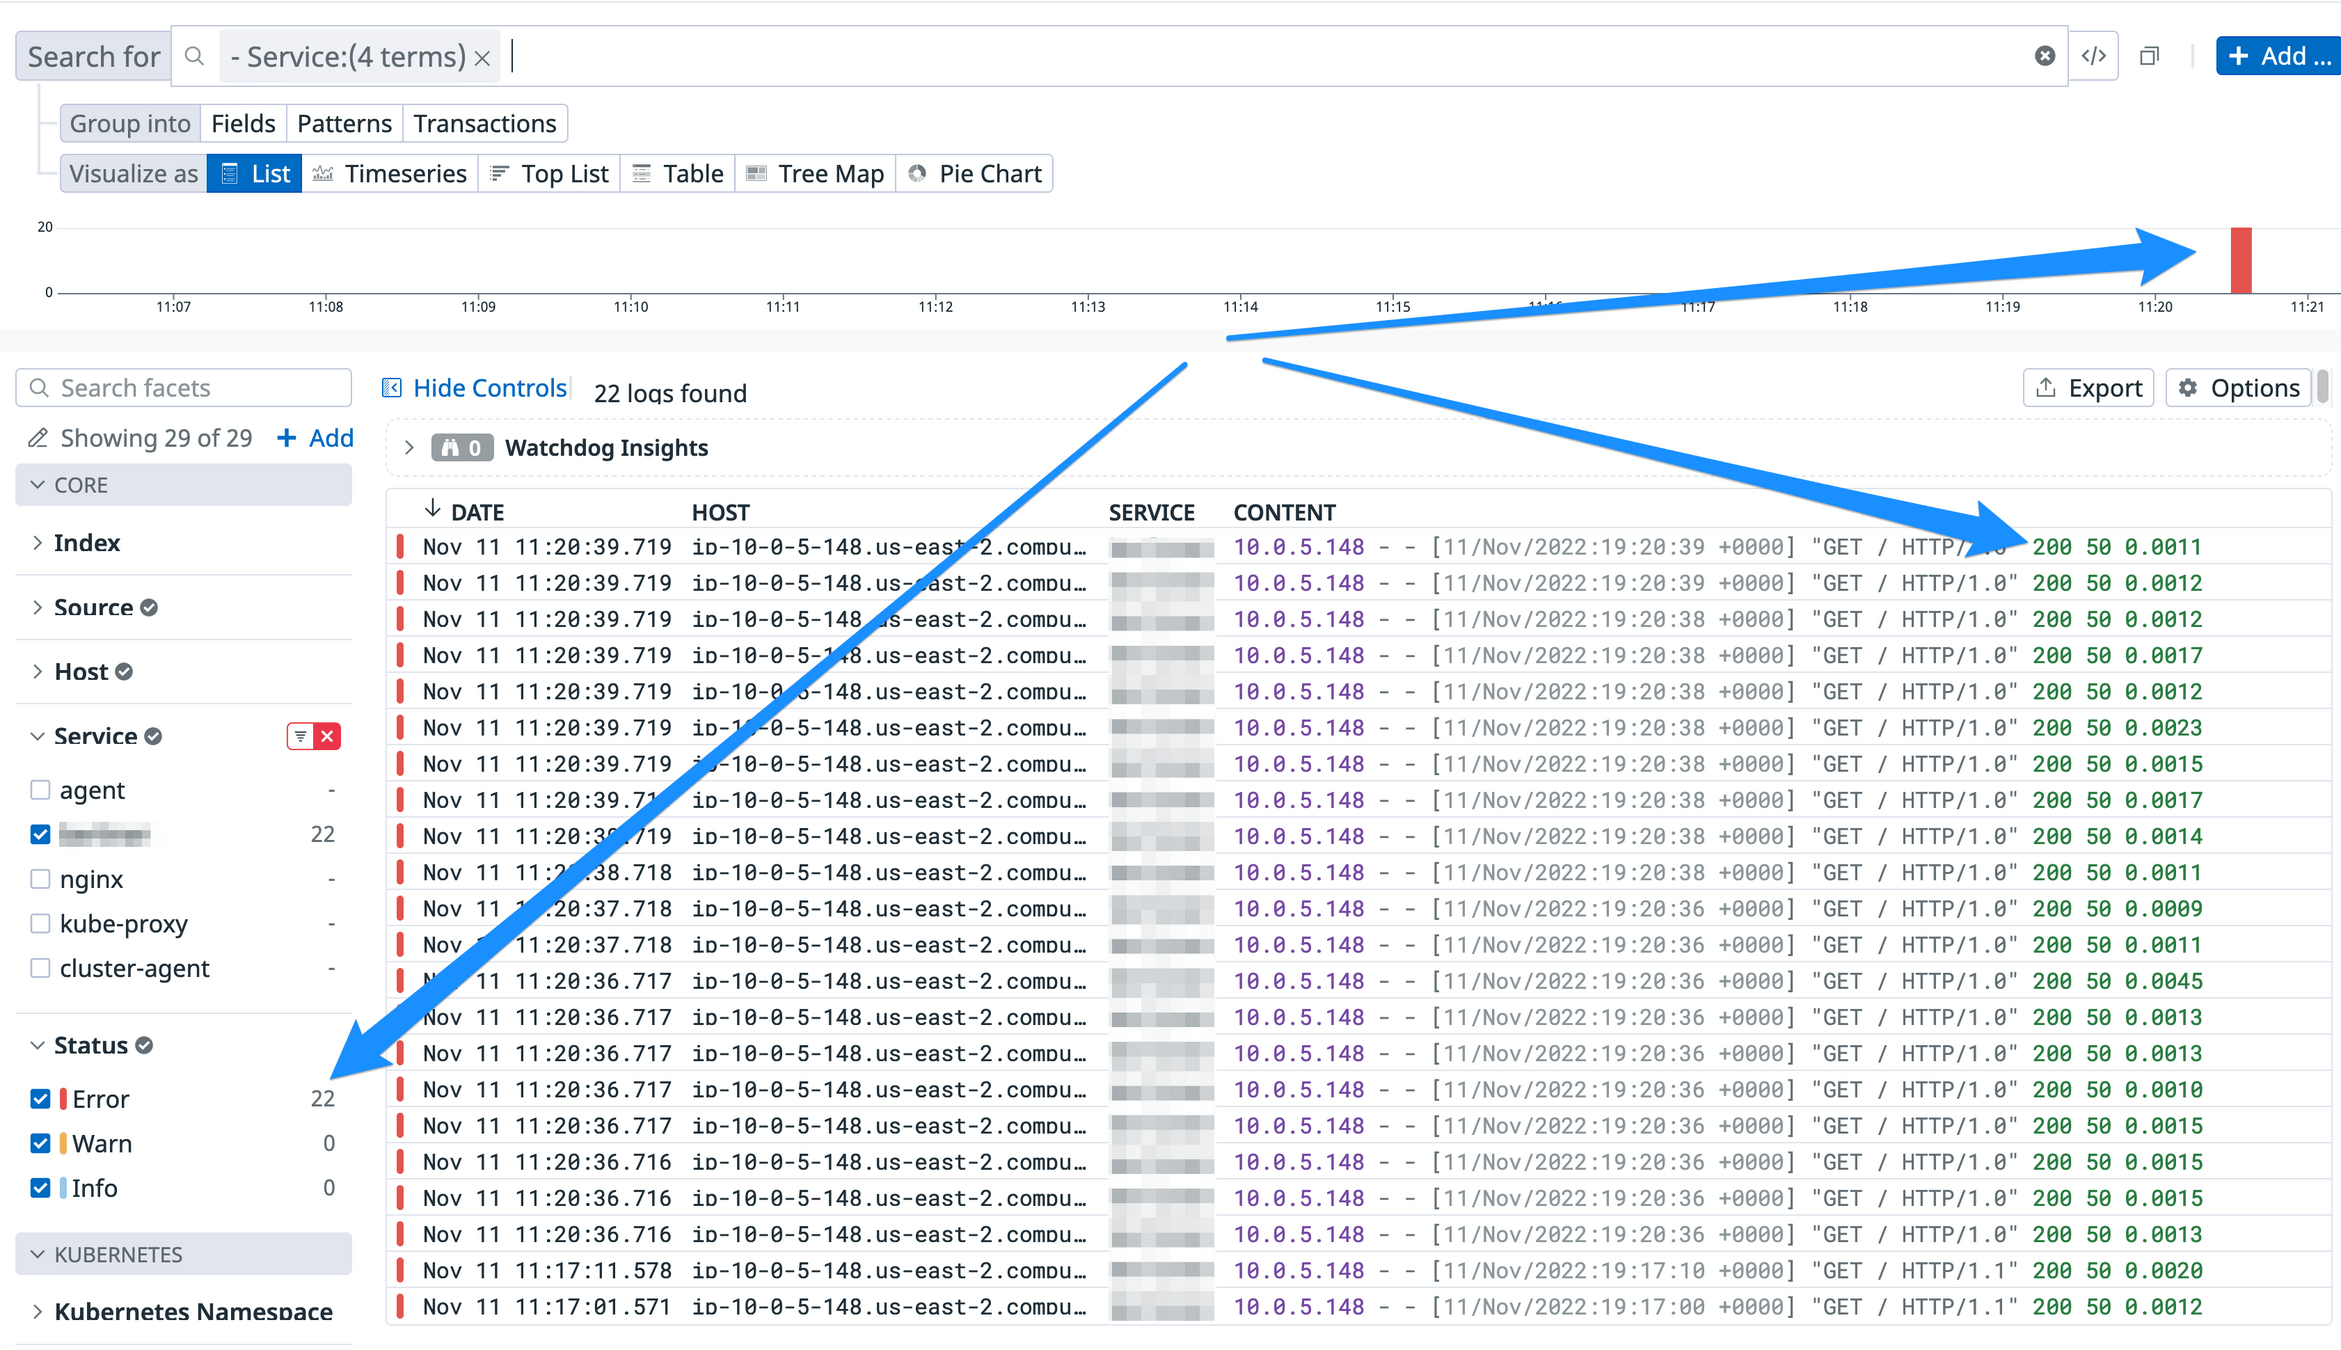
Logs
Monitoring
poetry add ddtrace
poetry install
from ddtrace import tracer
from ddtrace.contrib.flask import TraceMiddleware
from flask import Flask
app = Flask(__name__)
traced_app = TraceMiddleware(app, tracer, service="my-service", distributed_tracing=True)
Run the python service with instrumentation enabled
Monitoring
curl -X GET 'localhost:8080/notes'
{}
curl -X POST 'localhost:8080/notes?desc=hello'
( 1, hello)
curl -X GET 'localhost:8080/notes?id=1'
( 1, hello)
curl -X POST 'localhost:8080/notes?desc=newNote'
( 2, newNote)
curl -X GET 'localhost:8080/notes'
{ "1": "hello", "2": "newNote" }
Monitoring

Monitoring
Custom metrics
from datadog import initialize, api

# Set your Datadog API key
options = {
    'api_key': '<YOUR_API_KEY>',
    'app_key': '<YOUR_APP_KEY>'  # Optional, only needed for specific API endpoints
}

# Initialize the Datadog client
initialize(**options)

# Send a custom metric
try:
    api.Metric.send(
        metric='custom.metric',
        points=42,  # Value for the metric
        tags=['env:production'],  # Tags associated with the metric
        type='gauge'  # Optional, 'gauge' is the default type
    )
    print("Custom metric sent successfully!")
except Exception as e:
    print(f"Error sending custom metric: {e}")
Monitoring
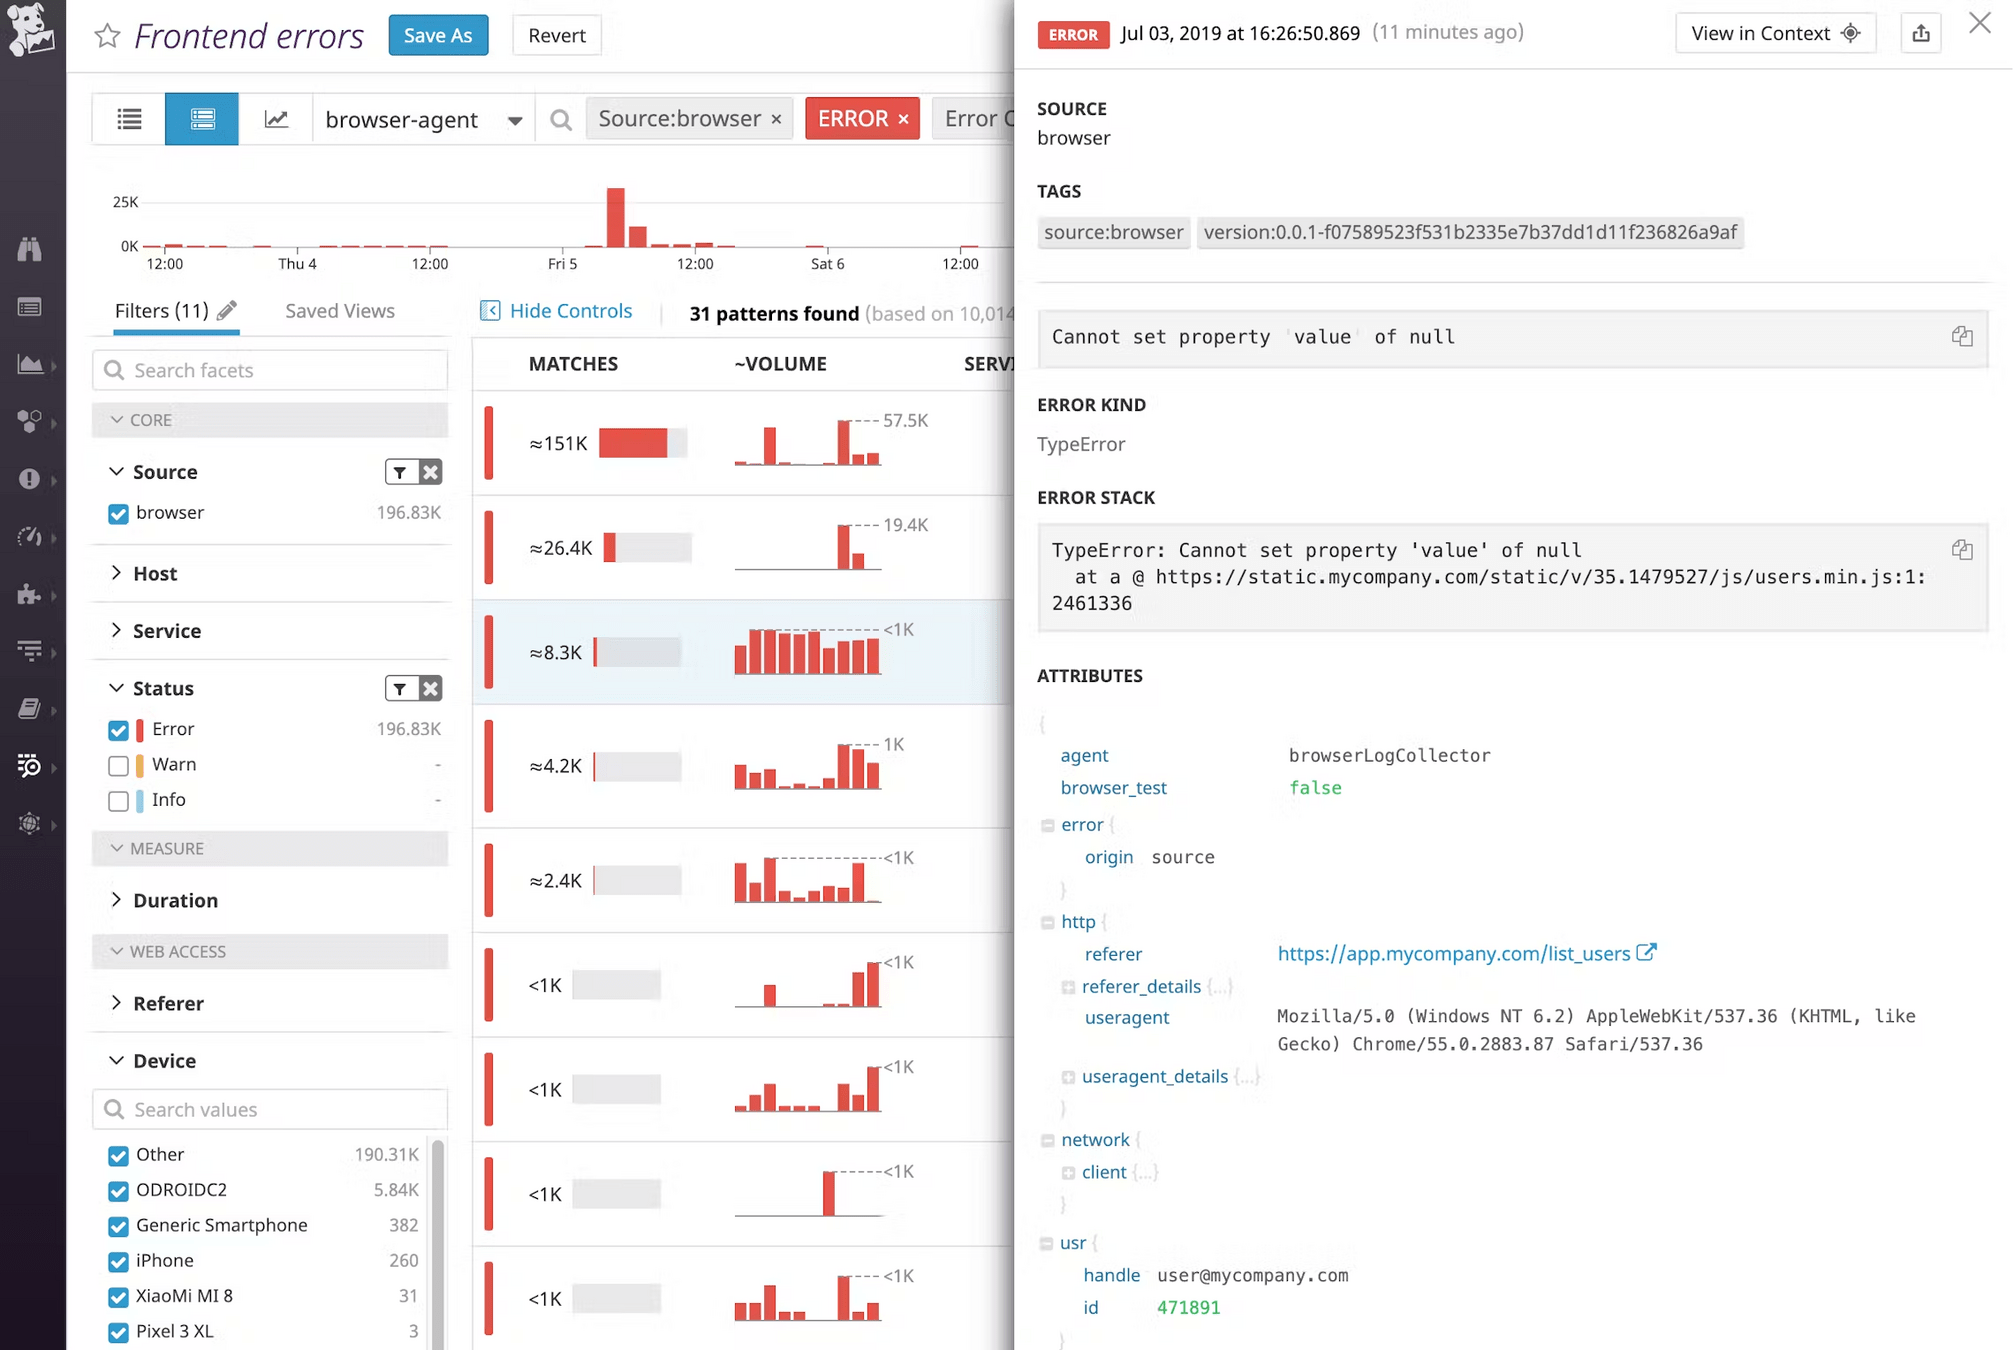
Monitor JS UI Errors
Monitoring
Monitoring
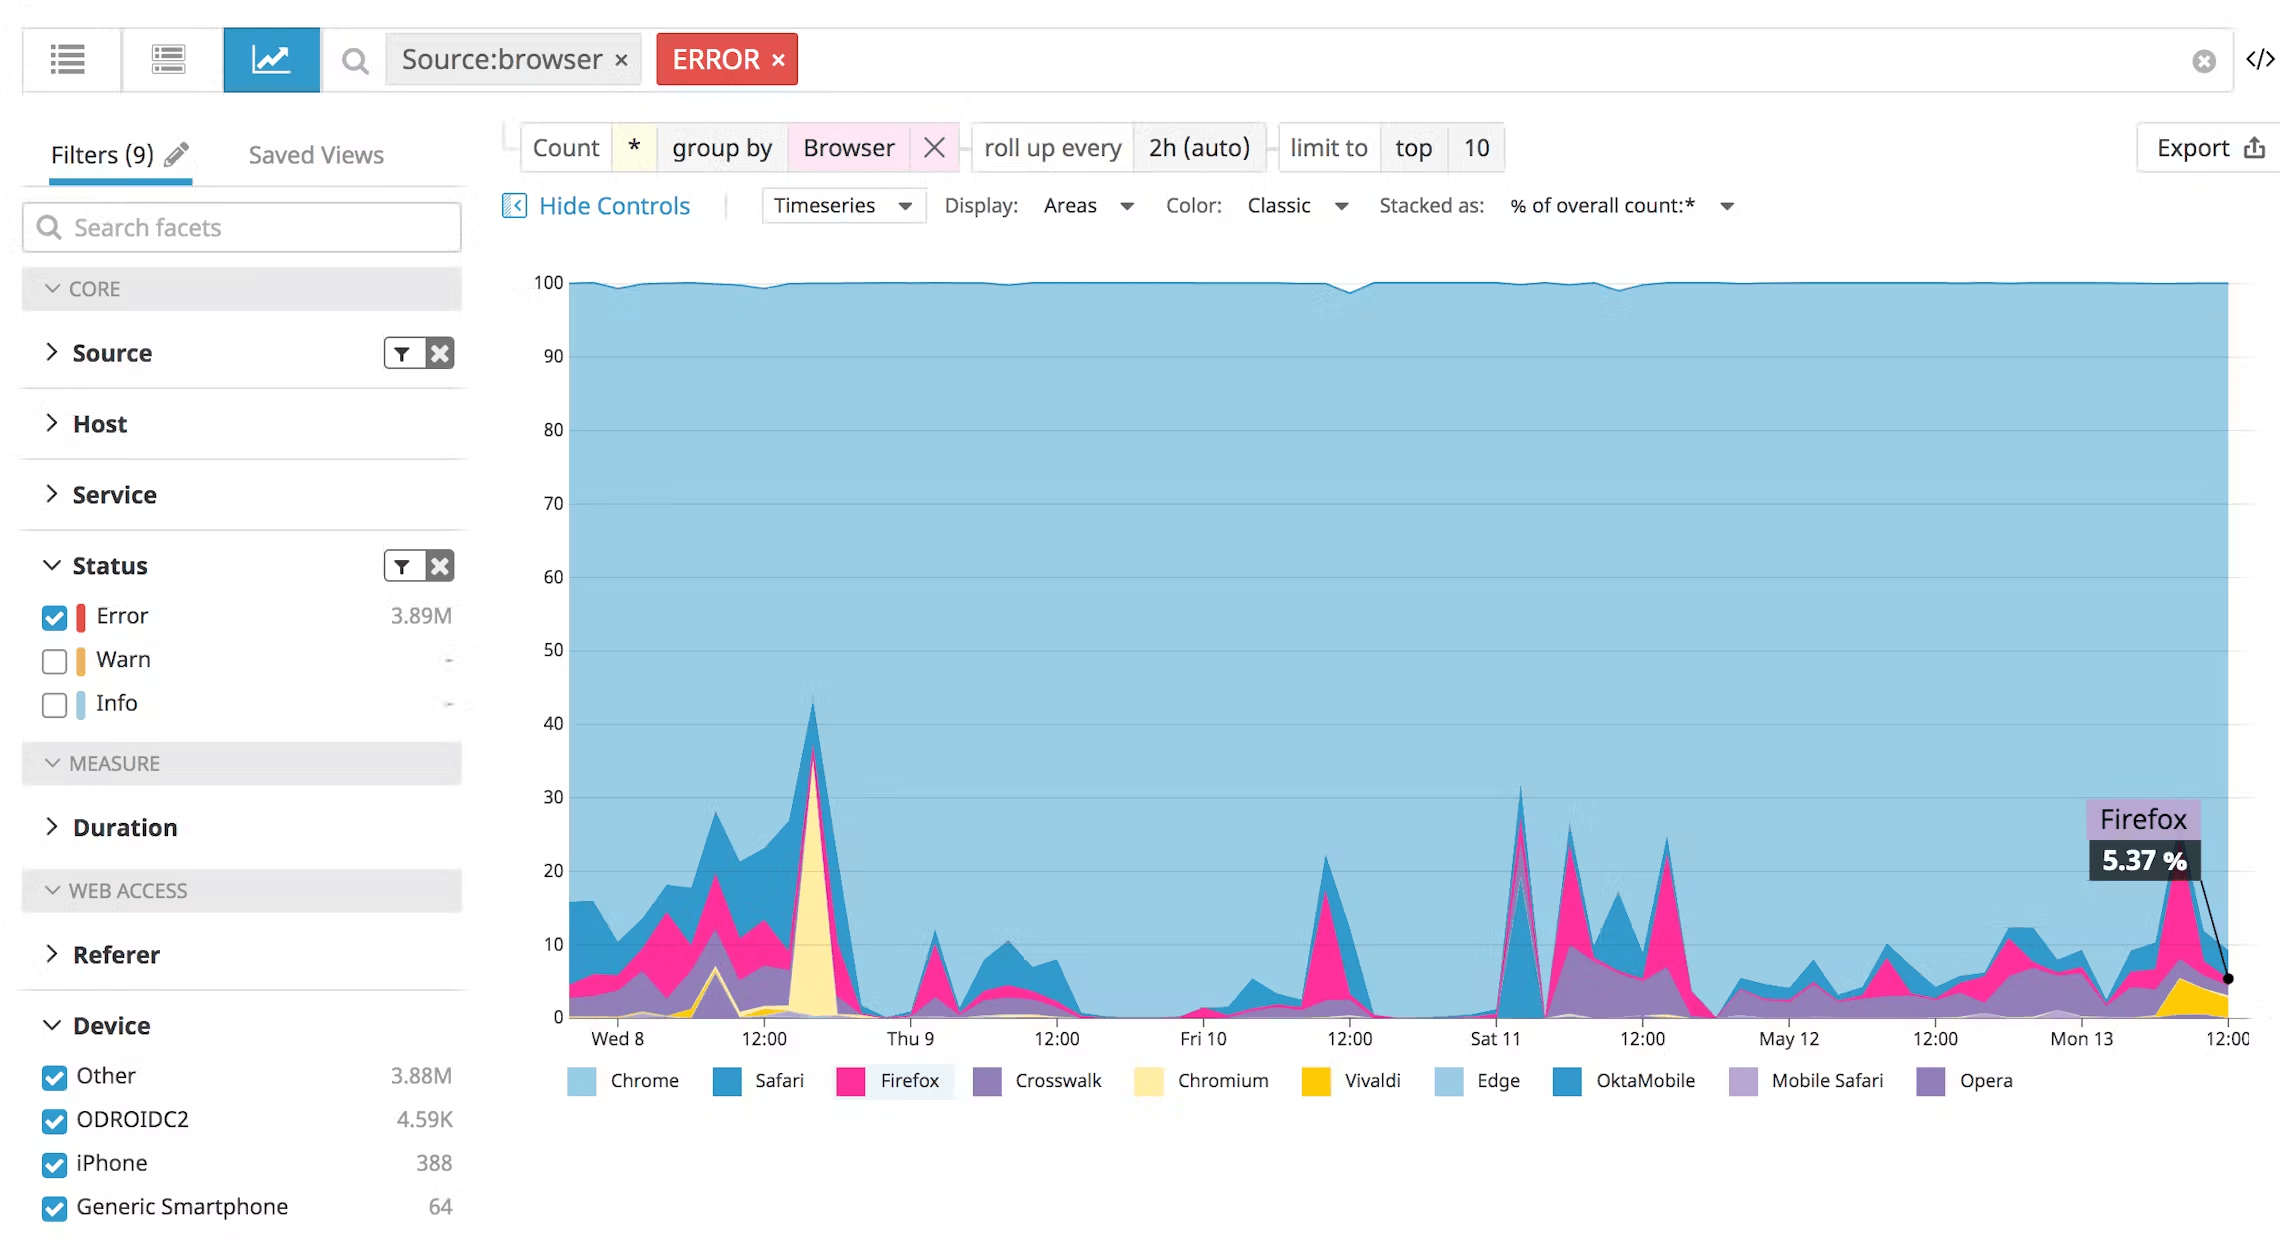
Monitoring
<html>
  <head>
    <title>Example to send logs to Datadog</title>
    <script type="text/javascript" src="https://www.datadoghq-browser-agent.com/datadog-logs-us.js"></script>
    <script>
      // Set your client token
      DD_LOGS.init({
        clientToken: '<CLIENT_TOKEN>',
        forwardErrorsToLogs: true,
    });

      // optionally add global metadata attribute--one attribute can be added at a time
      DD_LOGS.addLoggerGlobalContext('request_id', <REQUEST_ID>);
    </script>
   [ … ]
  </head>
[ … ]
</html>
Automatically collect JavaScript error logs and console logs
Monitoring
DD_LOGS.logger.info('signup button clicked', { env: 'dev', user_id: <USER_ID> })
Also send custom logs
Monitoring
Set up Application Performance Monitoring (APM)
Monitor Error Rates
Track Latency Percentiles (P99, P95, P50)
Capture Client-Side JavaScript Errors
Set Alerts + Downtime Alerts + ping the team/on-call
Front-End Fresh (Session #2)
#1 Try out a design/component library!
Take-home coding exercises
#2 Interact with Context/useReducer
#3 Look into CI/CD OR Datadog
Front-End Fresh (Session #2)
- Building a Personal Brand & Breaking Into FAANG
What's coming next week?
Front-End Fresh (Session #2)
Q/A
The Front-End Fresh Workshop (Oct 2nd)
By djirdehh

