SASS & SCSS
SASS & SCSS
Extension of CSS that adds power and elegance to the basic language
Allows to use variables, nested rules, mixins, inline imports, and more, all with a fully CSS compatible syntax
Keeps large stylesheets well-organized, and get small stylesheets up and running quickly
Features :
Fully CSS-compatible
Language extensions like variables, nesting and mixins
Useful functions for manipulating colors and other values
Well-formatted, customizable output
SASS & SCSS
There are two syntaxes available for Sass :
SCSS (Sassy CSS), extension of the syntax of CSS
SASS, more concise way of writing CSS. Indentations are used rather than brackets to indicate nesting, newlines rather than semicolons to seperate properties
SASS & SCSS
Variables :
$font-stack:    Helvetica, sans-serif;
$primary-color: #333;

body {
  font: 100% $font-stack;
  color: $primary-color;
}
store information that you want to reuse throughout your stylesheet
body {
  font: 100% Helvetica, sans-serif;
  color: #333;
}
converted to :
SASS & SCSS
Nesting :
nav {
  ul {
    margin: 0;
    padding: 0;
    list-style: none;
  }

  li { display: inline-block; }

  a {
    display: block;
    padding: 6px 12px;
    text-decoration: none;
  }
}
lets you nest your CSS selectors in a way that follows the same visual hierarchy of your HTML
nav ul {
  margin: 0;
  padding: 0;
  list-style: none;
}

nav li {
  display: inline-block;
}

nav a {
  display: block;
  padding: 6px 12px;
  text-decoration: none;
}
converted to :
SASS & SCSS
Partials :
You can create partial Sass files that contain little snippets of CSS that you can include in other Sass files. This is a great way to modularize your CSS and help keep things easier to maintain.
A partial is simply a Sass file named with a leading underscore. You might name it something like _partial.scss. The underscore lets Sass know that the file is only a partial file and that it should not be generated into a CSS file. Sass partials are used with the @import directive.
SASS & SCSS
import :
CSS has an import option that lets you split your CSS into smaller, more maintainable portions. The only drawback is that each time you use @import in CSS it creates another HTTP request.
Sass will takes the file and combines it with the file you're importing.
// _reset.scss
html,body,ul,ol {
   margin: 0;
  padding: 0;
}
// base.scss
@import 'reset';
body {
font: 100% Helvetica, sans-serif;
background-color: #efefef;
}html, body, ul, ol {
margin: 0;
padding: 0;
}
body {
font: 100% Helvetica, sans-serif;
background-color: #efefef;
}SASS & SCSS
mixins :
Some things in CSS are a bit tedious to write, especially with CSS3 and the many vendor prefixes that exist. A mixin lets you make groups of CSS declarations that you want to reuse throughout your site. You can even pass in values to make your mixin more flexible.
@mixin border-radius($radius) {
  -webkit-border-radius: $radius;
     -moz-border-radius: $radius;
      -ms-border-radius: $radius;
          border-radius: $radius;
}

.box { @include border-radius(10px); }
.box {
-webkit-border-radius: 10px;
-moz-border-radius: 10px;
-ms-border-radius: 10px;
border-radius: 10px;
}SASS & SCSS
extend / inheritance :
Using @extend lets you share a set of CSS properties from one selector to another. It helps keep your Sass very DRY.
.message {
  border: 1px solid #ccc;
  padding: 10px;
  color: #333;
}

.success {
  @extend .message;
  border-color: green;
}

.error {
  @extend .message;
  border-color: red;
}

.warning {
  @extend .message;
  border-color: yellow;
}
.message, .success, .error, .warning {
border: 1px solid #cccccc;
padding: 10px;
color: #333;
}
.success {
border-color: green;
}
.error {
border-color: red;
}
.warning {
border-color: yellow;
}SASS & SCSS
operators :
Doing math in your CSS is very helpful. Sass has a handful of standard math operators like +, -, *, /, and %.
.container { width: 100%; }


article[role="main"] {
  float: left;
  width: 600px / 960px * 100%;
}

aside[role="complementary"] {
  float: right;
  width: 300px / 960px * 100%;
}
.container {
width: 100%;
}
article[role="main"] {
float: left;
width: 62.5%;
}
aside[role="complementary"] {
float: right;
width: 31.25%;
}SASS & SCSS
referencing parent selectors : &
Sometimes it’s useful to use a nested rule’s parent selector in other ways than the default
a {
  font-weight: bold;
  text-decoration: none;
  &:hover { text-decoration: underline; }
  body.firefox & { font-weight: normal; }
}
a {
font-weight: bold;
text-decoration: none; }
a:hover {
text-decoration: underline; }
body.firefox a {
font-weight: normal; }& will be replaced with the parent selector as it appears in the CSS. This means that if you have a deeply nested rule, the parent selector will be fully resolved before the & is replaced
#main {
  color: black;
  a {
    font-weight: bold;
    &:hover { color: red; }
  }
}
#main {
color: black; }
#main a {
font-weight: bold; }
#main a:hover {
color: red; }
SASS & SCSS
nested properties :
CSS has quite a few properties that are in namespaces for instance, font-family, font-size, and font-weight are all in the font namespace. In CSS, if you want to set a bunch of properties in the same namespace, you have to type it out each time:
.funky {
  font: {
    family: fantasy;
    size: 30em;
    weight: bold;
  }
.funky {
font-family: fantasy;
font-size: 30em;
font-weight: bold; }
SASS & SCSS
placeholder selectors : %
Sass supports a special type of selector called a placeholder selector. These look like class and id selectors, except the # or . is replaced by %.
They’re meant to be used with the @extend directive.
On their own, without any use of @extend, rulesets that use placeholder selectors will not be rendered to CSS.
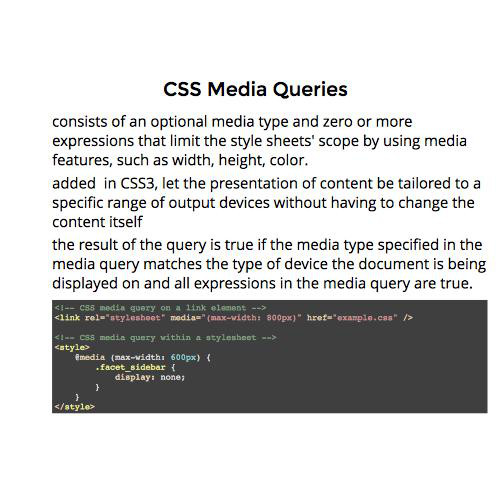
SASS & SCSS - at-rules
@media :
behave just like they do in plain CSS, with one extra capability: they can be nested in CSS rules:
.sidebar {
  width: 300px;
  @media screen and (orientation: landscape) {
    width: 500px;
  }
}
.sidebar {
width: 300px; }
@media screen and (orientation: landscape) {
.sidebar {
width: 500px; } }@media queries can also be nested within one another. The queries will then be combined using the and operator.
@media screen {
  .sidebar {
    @media (orientation: landscape) {
      width: 500px;
    }
  }
}
@media screen and (orientation: landscape) {
.sidebar {
width: 500px; } }
SASS & SCSS - at-rules
@at-root :
causes one or more rules to be emitted at the root of the document, rather than being nested beneath their parent selectors
.parent {
  ...
  @at-root .child { ... }
}
.parent { ... }
.child { ... }Or it can be used with a block containing multiple selectors:
.parent {
  ...
  @at-root {
    .child1 { ... }
    .child2 { ... }
  }
  .step-child { ... }
}
.parent { ... }
.child1 { ... }
.child2 { ... }
.parent .step-child { ... }
SASS & SCSS - control directives
if :
allows you to branch on a condition and returns only one of two possible outcomes. It can be used in any script context.
if(true, 1px, 2px) => 1px
if(false, 1px, 2px) => 2px
p {
@if 1 + 1 == 2 { border: 1px solid; }
@if 5 < 3 { border: 2px dotted; }
@if null { border: 3px double; }
}@if :
takes a SassScript expression and uses the styles nested beneath it if the expression returns anything other than false or null
p {
  border: 1px solid; }
SASS & SCSS - control directives
$type: monster;
p {
  @if $type == ocean {
    color: blue;
  } @else if $type == matador {
    color: red;
  } @else if $type == monster {
    color: green;
  } @else {
    color: black;
  }
}
The @if statement can be followed by several @else if statements and one @else statement.
p {
  color: green; }
SASS & SCSS - control directives
@for $i from 1 through 3 {
  .item-#{$i} { width: 2em * $i; }
}
repeatedly outputs a set of styles
.item-1 {
  width: 2em; }
.item-2 {
  width: 4em; }
.item-3 {
  width: 6em; }
@for :
@each :
usually has the form @each $var in <list or map>.
@each $animal in puma, sea-slug, egret, salamander {
  .#{$animal}-icon {
    background-image: url('/images/#{$animal}.png');
  }
}
.puma-icon {
background-image: url('/images/puma.png'); }
.sea-slug-icon {
background-image: url('/images/sea-slug.png'); }
.egret-icon {
background-image: url('/images/egret.png'); }
.salamander-icon {
background-image: url('/images/salamander.png'); }SASS & SCSS - control directives
$i: 6;
@while $i > 0 {
  .item-#{$i} { width: 2em * $i; }
  $i: $i - 2;
}
takes a SassScript expression and repeatedly outputs the nested styles until the statement evaluates to false
.item-6 {
  width: 12em; }

.item-4 {
  width: 8em; }

.item-2 {
  width: 4em; }
@while :
SASS & SCSS - function directives
$grid-width: 40px;
$gutter-width: 10px;

@function grid-width($n) {
  @return $n * $grid-width + ($n - 1) * $gutter-width;
}

#sidebar { width: grid-width(5); }
It is possible to define your own functions in sass and use them in any value or script context
#sidebar {
  width: 240px; }
SASS & SCSS - interpolation #{}
$name: foo;
$attr: border;
p.#{$name} {
  #{$attr}-color: blue;
}
You can also use SassScript variables in selectors and property names using #{} interpolation syntax:
p.foo {
  border-color: blue; }
SASS & SCSS - variable defaults
$content: "First content";
$content: "Second content?" !default;
$new_content: "First time reference" !default;

#main {
  content: $content;
  new-content: $new_content;
}
You can assign to variables if they aren’t already assigned by adding the !default flag to the end of the value.
This means that if the variable has already been assigned to, it won’t be re-assigned, but if it doesn’t have a value yet, it will be given one
#main {
  content: "First content";
  new-content: "First time reference"; }
Variables with null values are treated as unassigned by !default:
CSS - Session 4 - Preprocessors : SASS
By erdi taner gökalp