React
React Native
Fuyaode@逢甲大學
2017/09/05
About Me
- 傅耀德 (FuD、FuYaoDe)
- 創科資訊全端工程師
- 專注於 Node 生態體系
-
教學 / 經歷
- GitHub 1400 Star React Native UI 元件 react-native-app-intro
- 經營 React Natvie Taiwan 社群
- 2017 第 8 屆iT 邦鐵人賽 佳作
- 2017 HelloJS 講師 - React Native
- 2016 Trunk Studio - 前端開發 React / Redux 起手式
- 2016 HelloJS 講師 - React Native

React 介紹
Virtual DOM
- 複雜或頻繁的DOM操作通常是性能瓶頸產生的原因
-
定義 UI 要怎麼呈現,而負責 Render 和操作,由 React 負責
React Native 介紹
React Native 是什麼?
- 2013 年夏天 Facebook 內部駭客松的 Project。
- 2015 年 1 月 React.js Conf 發表, 2015 年 5 月正式發佈,當時只有 iOS 版本,2015 年 9 月 Android 才正式支援。
-
Learn once, write anywhere:Build mobile apps with React
- iOS
- Apple TV
- Android
- 用 JavaScript 撰寫真正的原生 App,不是所謂的 Mobile Web App、HTML5 App、 Hybrid App
其他類似的框架
- Ionic - Codova, AngularJS, Sass
- NativeScript - Angular, TypeScript, JavaScript
- Xamarin - C#
- PhoneGap- HTML, CSS, JavaScript
特色
- 使用同一套專案 Code Base 即可達成跨平台 App 開發建置與維護。
- 效能與使用體驗接近原生開發。
- 採用與 Web 前端相同的 REST API / JWT 存取後端資料服務。
- 維護人員進入門檻低(熟悉 JavaScript 語言之開發人員)。
- 可同步使用 iOS 與 Android 雙平台裝置進行測試與調校。
- 開發時可以快速的更新 UI,不用重新編譯。
- 免送審更新程式之機制,Microsoft CodePush。
- 更新週期快速 v0.40 以前每兩週 release 一個版本,目前每個月 release 一個版本。
- Product Pains - 讓社群投票表決 feature。
缺點
- 開發環境對於電腦硬體需求較高。
- 需熟悉了解 React。
showcase 官方頁面 ShowCase
中國 ShowCase
延伸閱讀
環境介紹、開發環境安裝
VM 連接教學
- 開啟 Genymotion。
- 開啟 Genymotion 當中的 Android 虛擬機 Custom Phone - 7.1.0 - API 25 - 768x1280,等待開機完成。
- 命令提示字元 cd 到 HelloJS 資料夾底執行指令。
$ adb devices
$ adb tcpip 5556- 開啟 VirtualBox 當中的 HelloJS-RNC9
- HelloJS-RNC9 出現 login 字樣,開啟網頁 http://localhost:9083/ide.html
- 到 C9 terminal 視窗輸入指令
$ adb connect $ip:5556
$ adb devices
/* 測試是否有連上 */
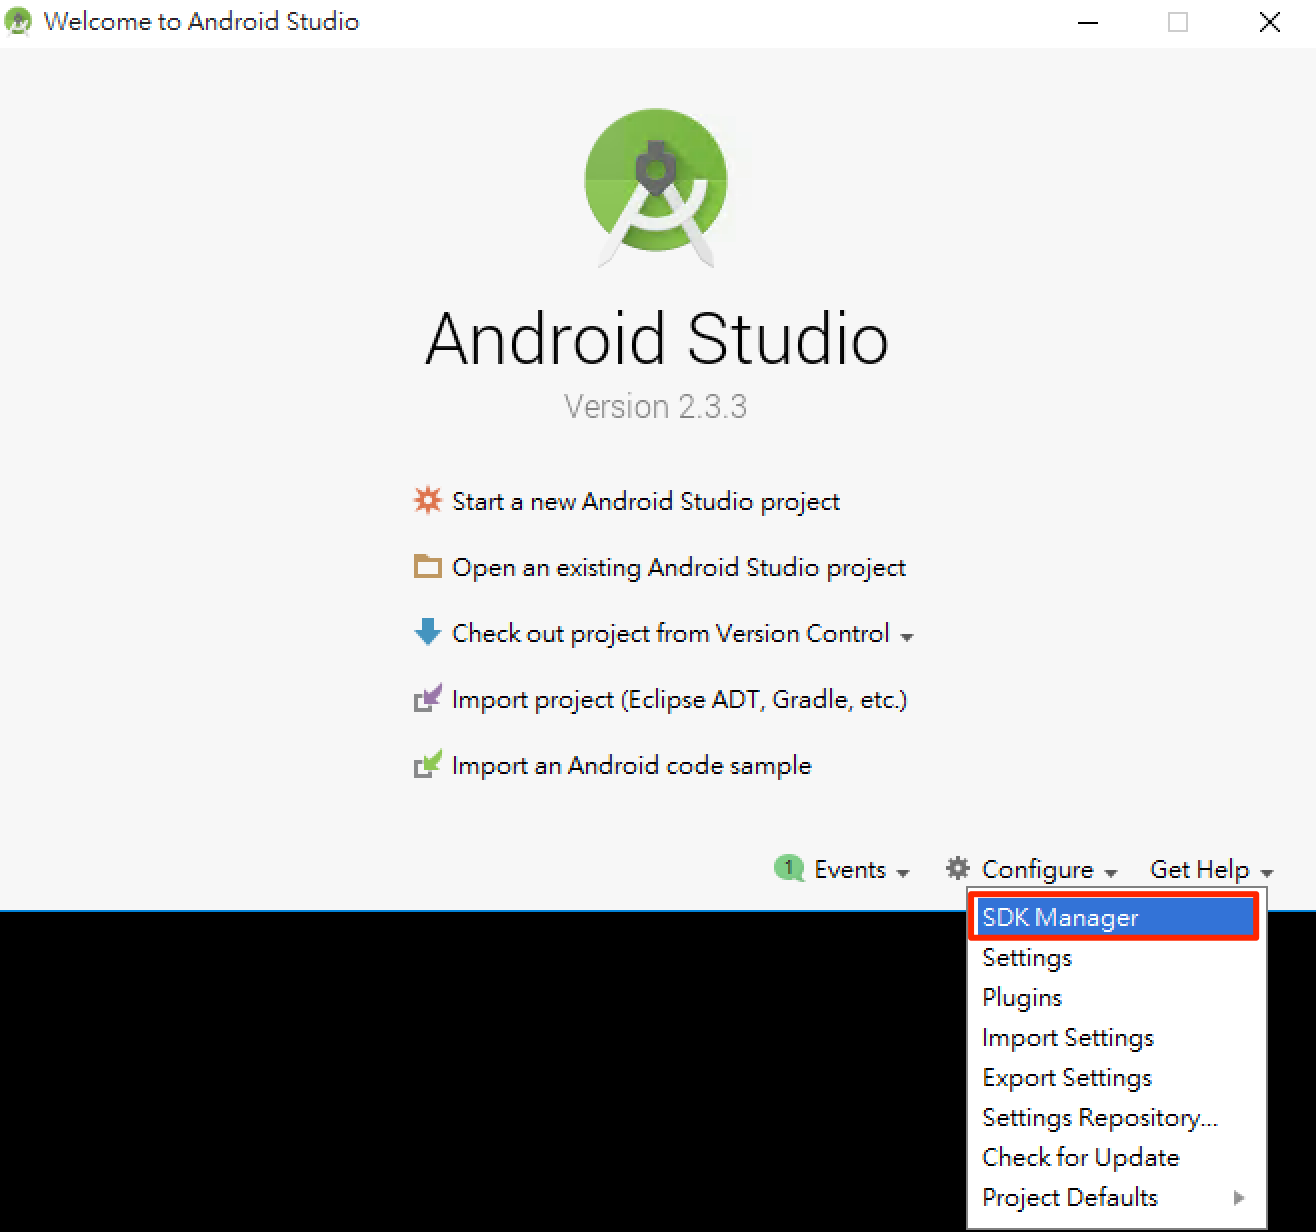
$ adb shell am start -a android.settings.SETTINGSAndroid SDK
React Native 目前需要 Android Studio2.0 或更高版本。
- 下載 Windows Android Studio
- 安裝 Android Studio - 教學影片
- 安裝 SDK
開發環境
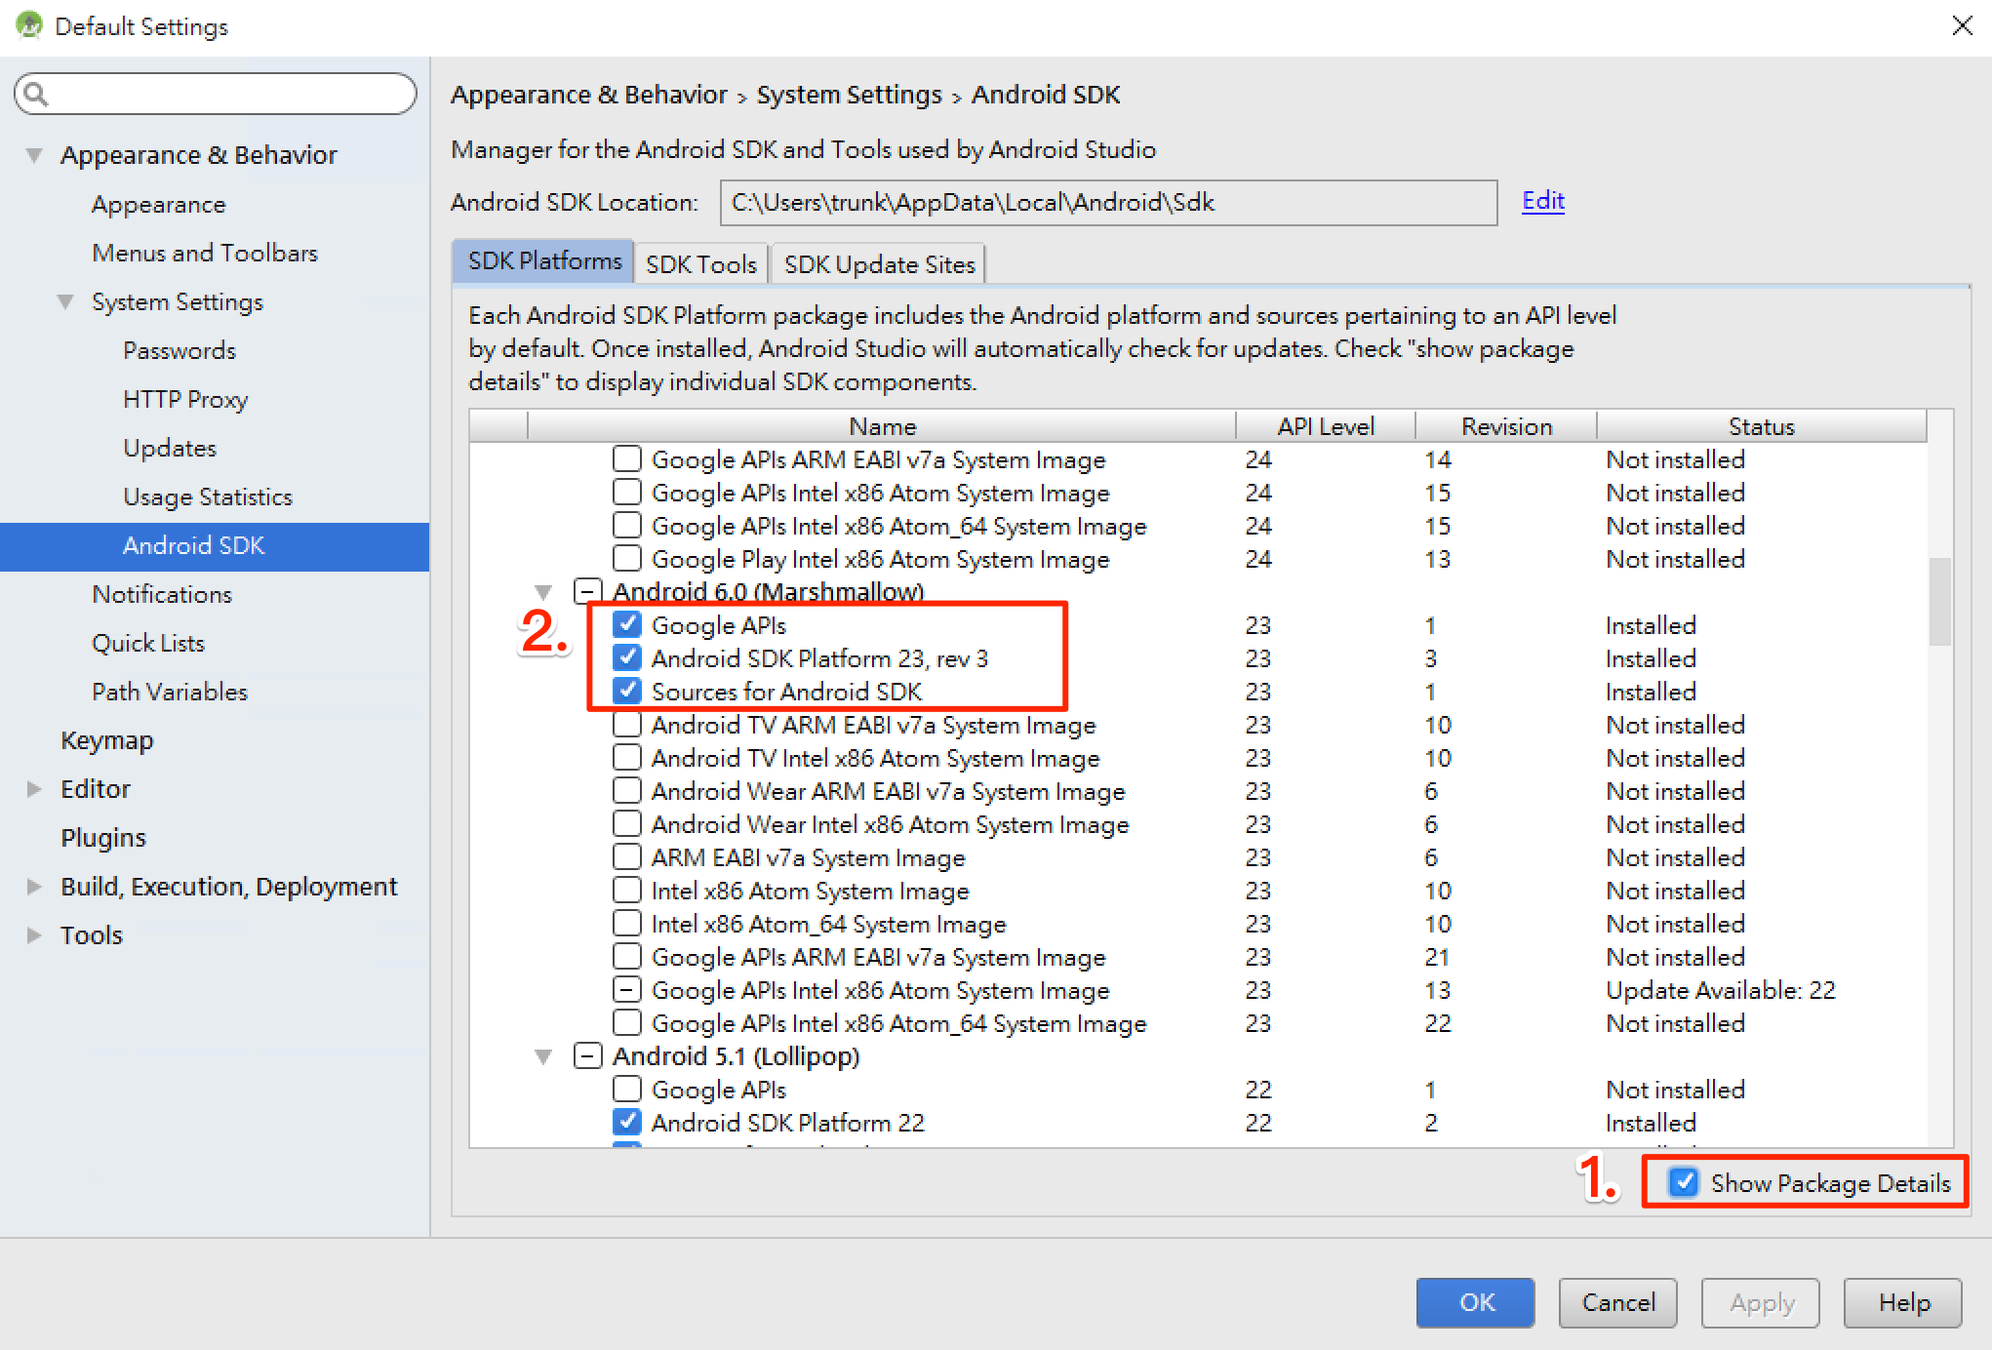
SDK Platforms 選擇 Google APIs 、 Android SDK Platform 23
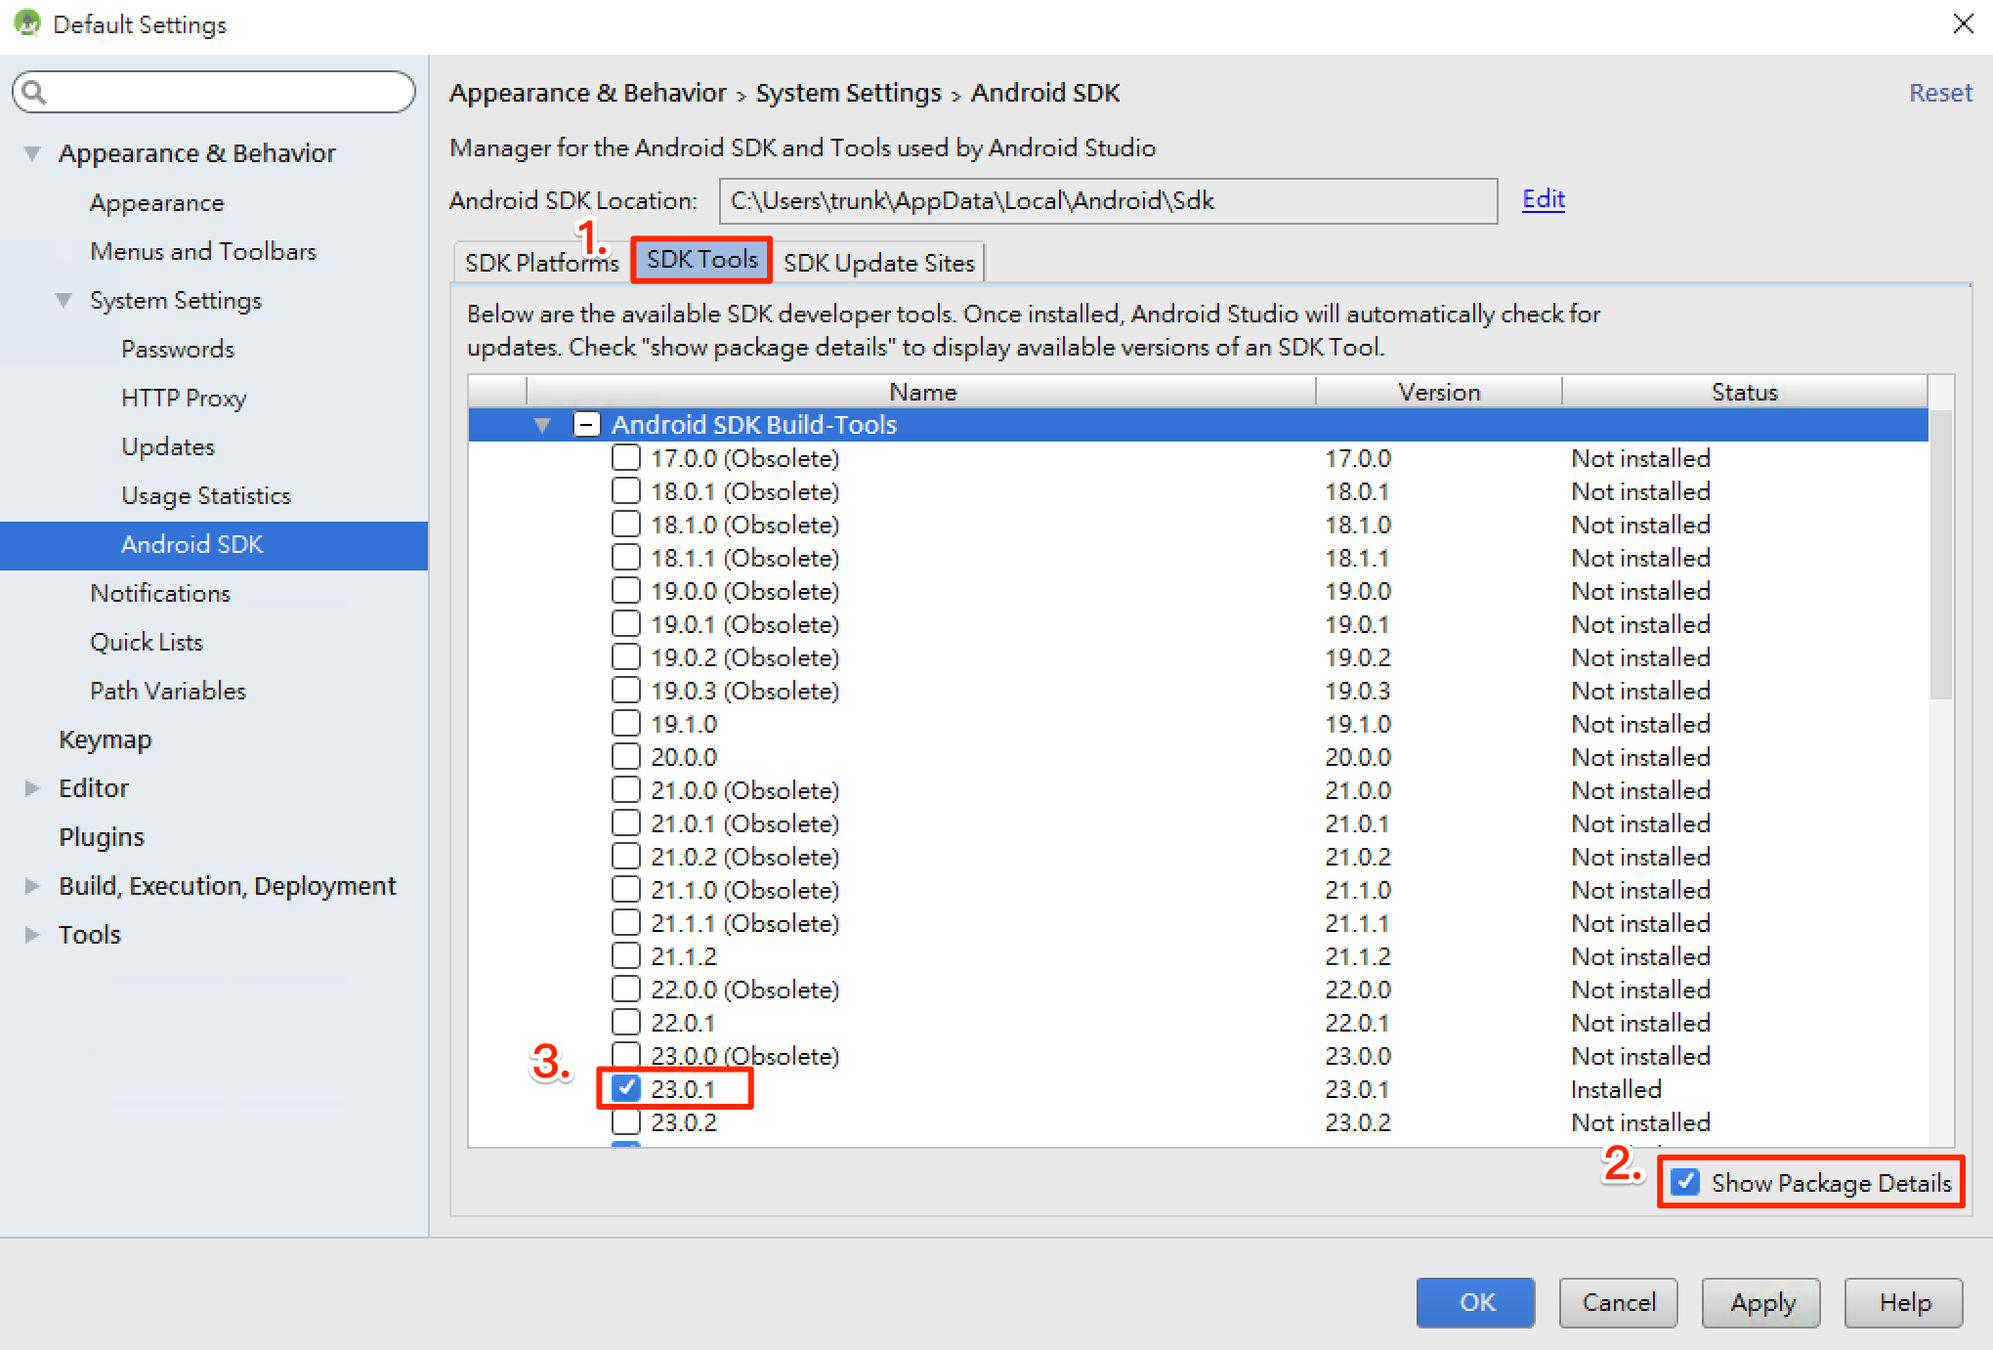
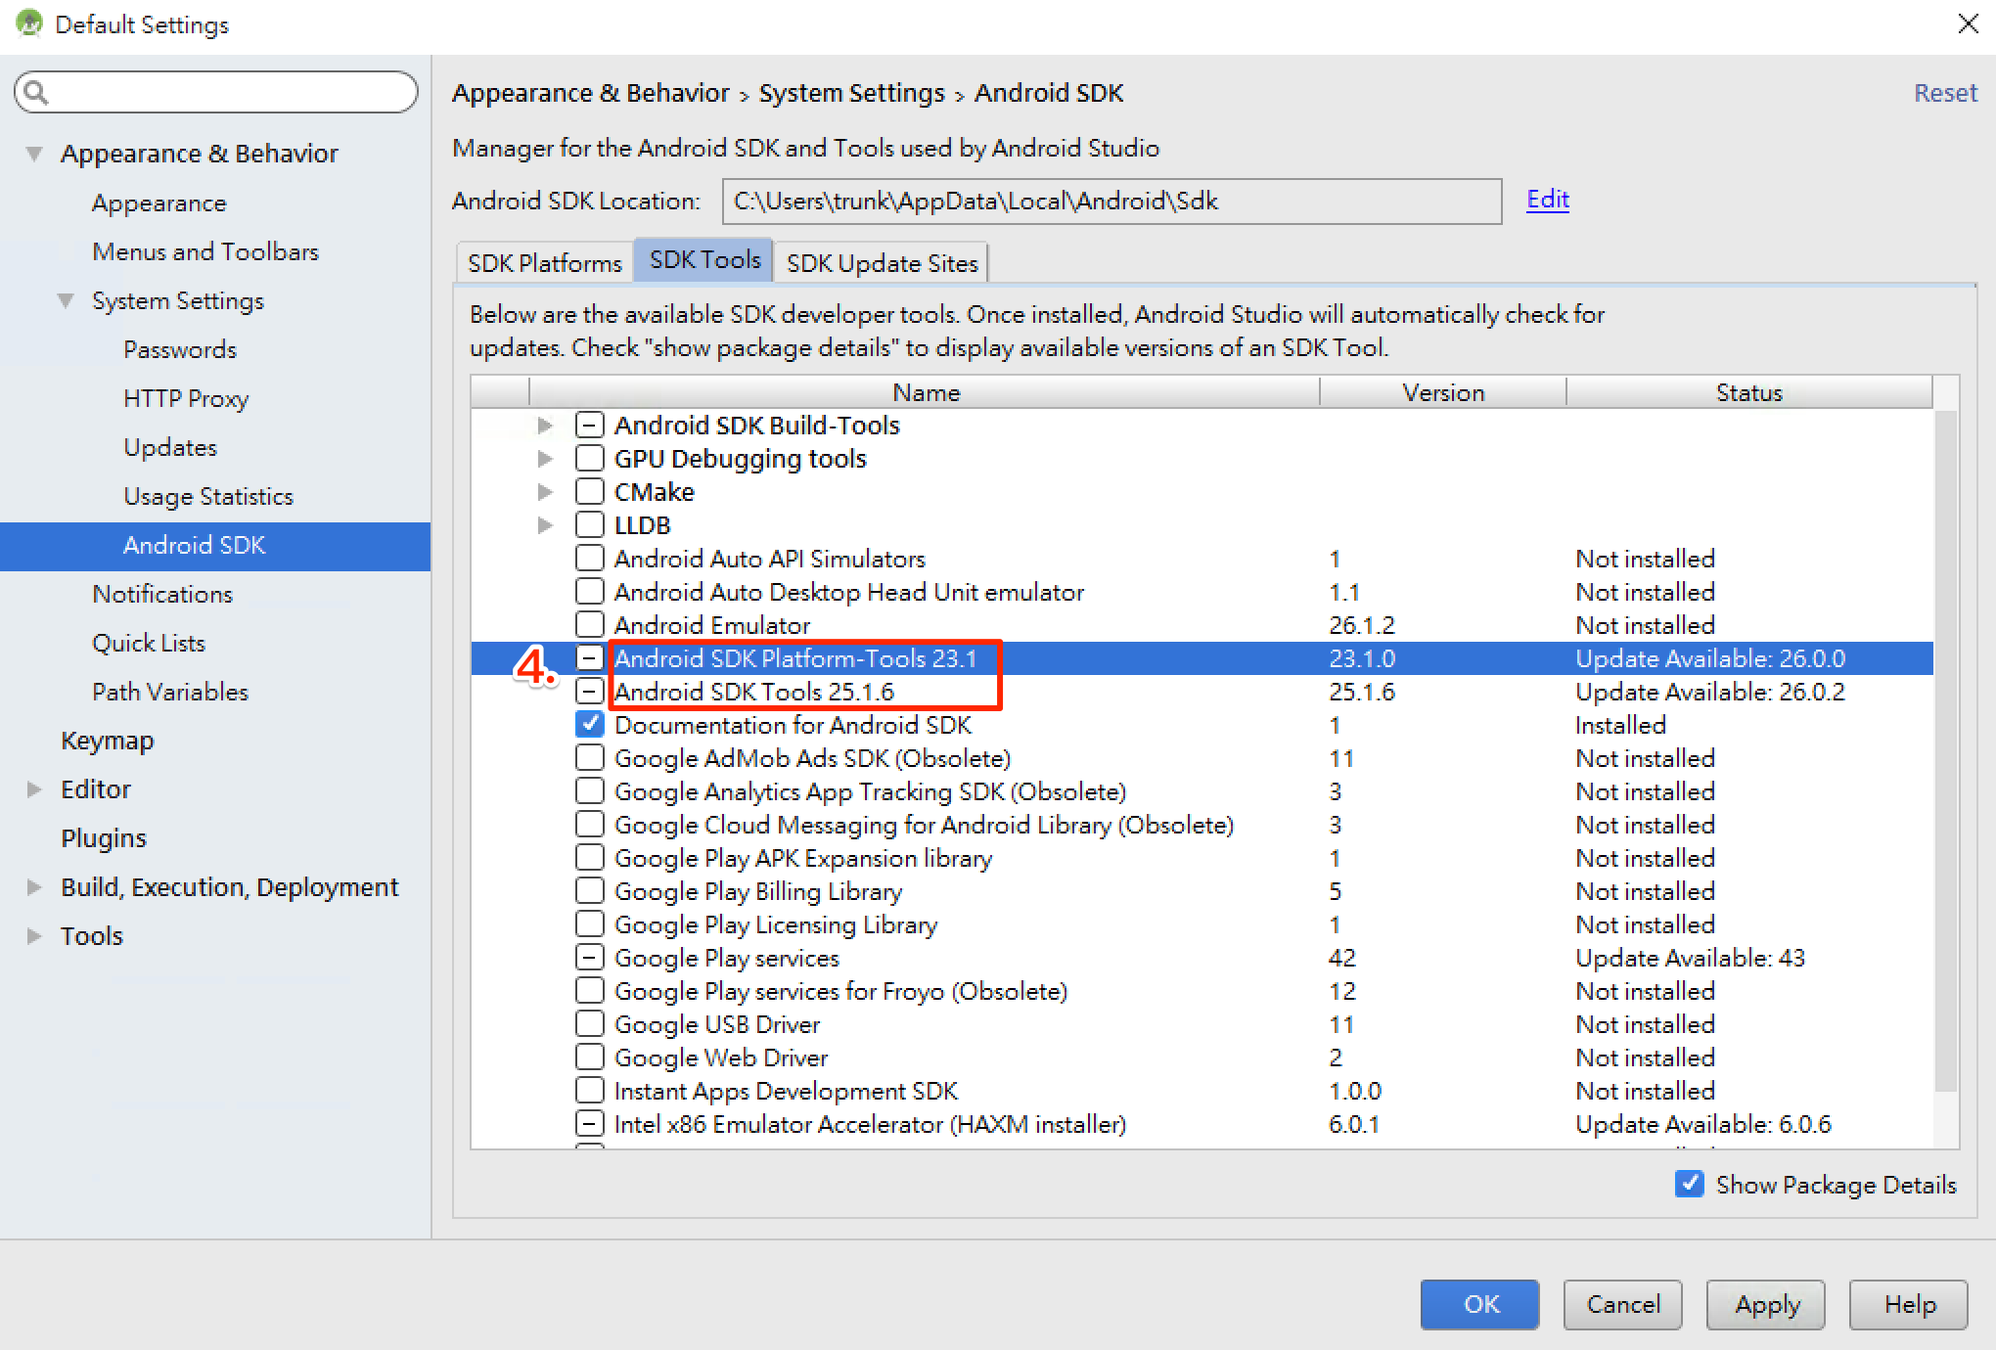
SDK Tools 選擇 Android SDK Build-Tools 23.0.1
Android 環境變數
確保 ANDROID_HOME 環境變數跟 SDK 路徑一致。
Windows
控制台 > 系統及安全性 > 進階系統設定 > 進階 > 環境變數 > 新增

控制台 > 系統及安全性 > 進階系統設定 > 進階 > 環境變數 > 選擇 PATH > 編輯 在後方新增
;C:\Users\使用者名稱\AppData\Local\Android\sdk\platform-tools;C:\Users
\使用者名稱\AppData\Local\Android\sdk\tools
Mac 開起 ~/.bashrc 或 ~/.zshrc 或 ~/.profile 在最後加上
export ANDROID_HOME=${HOME}/Library/Android/sdk
export PATH=${PATH}:${ANDROID_HOME}/tools
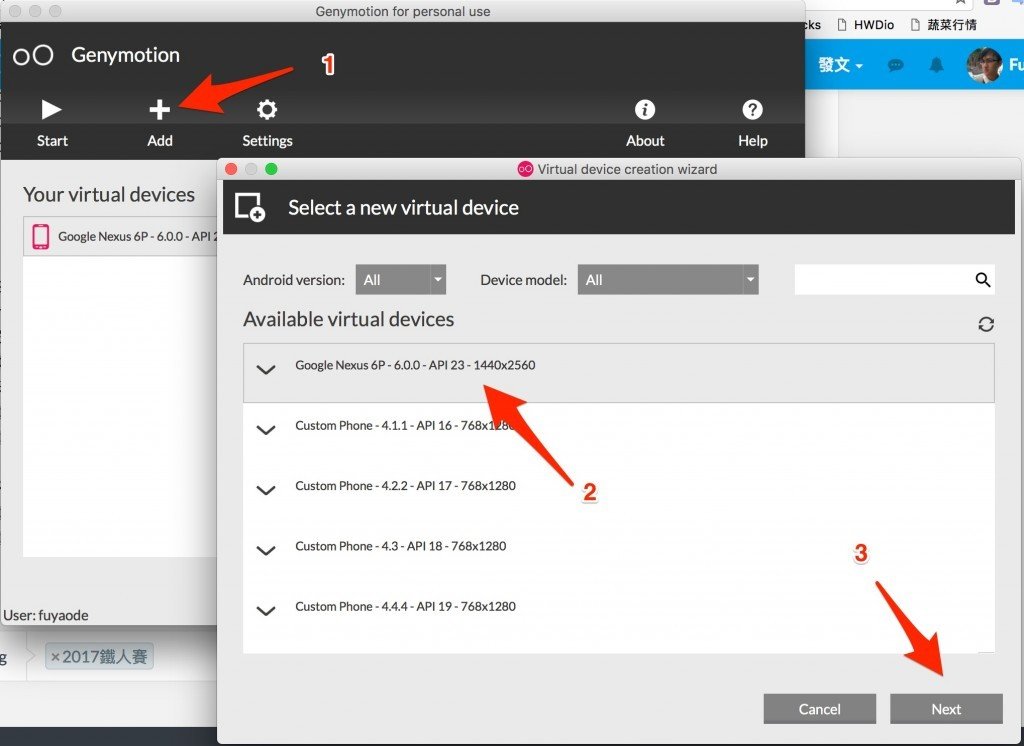
export PATH=${PATH}:${ANDROID_HOME}/platform-toolsAndroid 虛擬機
- 註冊、下載 genymotion
- 新增虛擬機
常見問題
延伸閱讀
React Natvie 初始專案
CLI
$ npm install -g react-native-cli開新專案
$ react-native init HelloJs
$ cd HelloJs
$ npm start
$ react-native run-android
專案環境
專案結構
.
├── __tests__
├── android
├── index.android.js
├── index.ios.js
├── ios
├── node_modules
└── package.json
App 名稱位置 :
./android/app/src/main/res/values/strings.xml
./android/app/src/main/res/mipmap-*
App icon:
進入點
- index
- .ios、.android
- AppRegistry
Debug 按鈕
-
Debug JS Remote
- http://localhost:8081/debugger-ui
- reload
- touchable
- Hot reload
- Live Reload
FlexBox
Flex
Flexbox,就可以在不同屏幕尺寸上提供一致的佈局結構。 雖然跟網頁 CSS 的 flex 很像,但是還是有些為的差異 例如: flexDirection 在網頁中預設是 row,在 RN 裡面預設為 column。
Style
- 遵循 Web 上的 CSS 命名
- 小駝峰
- 可以傳入 style object
- 可以傳入 style array ,會根據 index 給予樣式的優先權
-
StyleSheet.create
- 提高 style 的可讀性
- 驗證 style
- 提高性能
- 把 style 變成一個 id 來引用,這樣不用每次都創一個 style object
<Text style=>A</Text>
<Text style={[{ color: 'red' }, { color: 'blue' }]}>A</Text>
<Text style={styles.red}>red</Text>

const styles = StyleSheet.create({
  red: {
    color: 'red',
  },
});
FLexBox
flexDirection 決定佈局的主軸,可設定子元素是水平排列還是垂直排列
- column 垂直排列 (預設)
- row 水平排列
justifyContent 可以決定其子元素,沿著主軸的排列方式
- flex-start 主軸起始位置
- center 主軸中心
- flex-end 主軸末端
- space-around 根據主軸均勻分布空白
- space-between 根據主軸均勻分布物件
alignItems 可以決定其子元素,沿着次軸的排列方式
- flex-start 次軸起始位置
- center 次軸中心
- flex-end 次軸末端
- space-around 根據次軸均勻分布空白
- space-between 根據次軸均勻分布物件
使用範例
import React, { Component } from 'react';
import {
  StyleSheet,
  View,
  Image,
  Text,
} from 'react-native';

export default class FlexSample extends Component {
  render() {
    return (
      <View style=>
        <View style=>
          <View style=>
            <Text style=>右上</Text>
          </View>
          <View style=>
            <Text style=>置中</Text>
          </View>
        </View>
        <View style=>
          <View style=>
            <Text style=>右上?</Text>
          </View>
          <View style=>
            <Text>1</Text>
            <Text>2</Text>
            <Text>3</Text>
          </View>
        </View>
      </View>
    );
  }
}
Code 太長,無法一頁顯示
練習
flexboxfroggy - 用遊戲學習 CSS 的 flexbox 玩到第 12 關
yoga - Facebook 實作的跨平台 Flex library
View
View
import React, { Component } from 'react';
import {
  View,
} from 'react-native';

export default class ViewSample extends Component {
  render() {
    return (
      <View style=>
       <View style= />
       <View style= />
      </View>
    );
  }
}
文字 Text
Text
用於顯示文本的 React Component,並且它也支持嵌套、樣式,以及觸摸處理。
import React, { Component } from 'react';
import {
  View,
  Text,
  StyleSheet,
  Alert
} from 'react-native';

export default class TextSample extends Component {
  render() {
    return (
      <View style={styles.container}>
        <Text style={styles.text1}>HelloJS</Text>
        <Text style={styles.baseText}>
          <Text style={styles.title}>HelloJS</Text>
          <Text style={styles.desc}> Good</Text>
        </Text>
        <Text
          style=
          numberOfLines={1}
          onPress={() => {
            Alert.alert("阿!!", "你點到我了");
          }}
        >
          測試測試測試測試測試測試測試
        </Text>
      </View>
    );
  }
}

const styles = StyleSheet.create({
  container: {
    flex: 1,
    justifyContent: 'center',
    alignItems: 'center',
    backgroundColor: '#F5FCFF',
    padding: 30,
  },
  text1: {
    fontSize: 30,
  },
  baseText: {
    fontSize: 18,
    color: 'blue'
  },
  title: {
    fontSize: 24,
    fontWeight: 'bold',
  },
  desc: {
    color: 'red',
  }
})
Code 太長,無法一頁顯示
圖片 Image
Image
用於顯示圖片的 React Component
- 本地圖片
- 專案圖片資源 例:
- 網路圖片
/android/app/src/main/res
本地圖片
- 圖片有 @2x、@3x 後輟,React Native 會根據螢幕解析度選擇最適合的大小
- iOS、Android 可以使用相同的路徑
- 只有有用到的圖片會被打包
- 不需要額外設定圖片寬高
使用範例:
assets
├── man@2x.png
├── man@3x.png
└── man.png
<Image source={require('./assets/man.png')} />- Xcode 的 asset、Android 的 drawable
- 需要手動設定圖片寬高
- iOS、Android 用法不同
- 注意此時只使用檔案名稱,不帶路徑、後輟
使用範例:
<Image source= style= />

Android:
<Image source= style= />
App 圖片資源
使用範例:
- 需要手動設定圖片寬高
<Image
  style=
  source=
/>
網路圖片
import React, { Component } from 'react';
import {
  StyleSheet,
  View,
  Image
} from 'react-native';

export default class ImageSample extends Component {
  render() {
    return (
      <View style={styles.container}>
        <Image
          style=
          source=
        />
        <Image
          style=
          source={require('./assets/man.png')}
        />
      </View>
    );
  }
}

const styles = StyleSheet.create({
  container: {
    flex: 1,
    justifyContent: 'center',
    alignItems: 'center',
    backgroundColor: '#F5FCFF',
    padding: 30,
  },
})延伸閱讀
按鈕 Touchableopacity、Button
Button、Touchable
React Natvie 當中拿來當作按鈕的元件
Button
- 0.38 版才開始支援
-
只支援最低限度的客製化
- title
- color
- iOS、Android 樣式不一樣
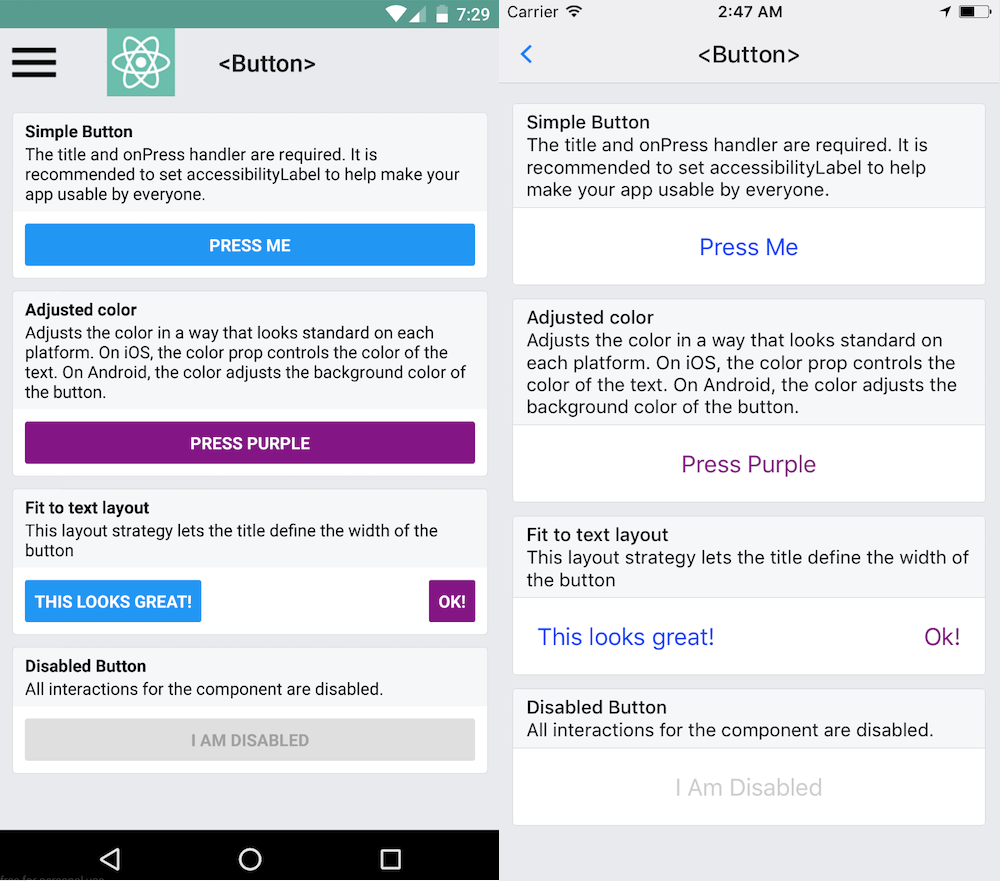
使用範例:
<Button
  onPress={() => {}}
  title="HelloJS"
  color="#841584"
/>
Touchable
-
TouchableHighlight
- 點擊後反黑
-
TouchableNativeFeedback
- Android 會有 Material 效果
-
TouchableOpacity
- 點擊後變透明
-
TouchableWithoutFeedback
- 點擊後沒有反饋, UX 因素不推薦使用
延伸閱讀
View、Text、FlexBox 練習
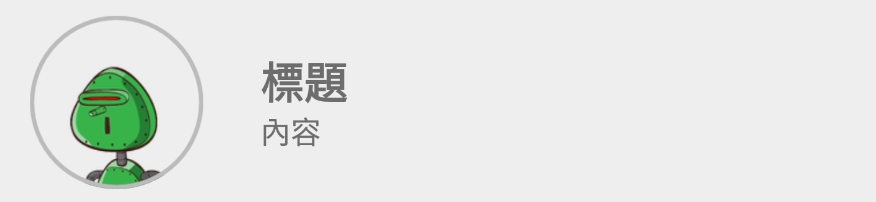
練習ㄧ
使用 ./ListItem.js 做出的樣式
React Native 介紹
By fuyaode


