master
Git and GitHub

Git is a
Version Control System (VCS)
But what the hell does that mean?
The Chaos of
Pre-Version Control Systems
- There are frequent changes on the codebase. It is easy for something to go wrong.
- How do you review the history of the codebase?
- How do you handle changes done by
different people working on the same files? - How do you make sure every server and developer
has the same version across?
Solution Attempts
- Manual Backups: duplicating code files or folders. which is error-prone and inefficient.
- Folder Versioning: maintaining multiple copies of code folders with names like
project_v1,project_v2, etc, which quickly becomes unmanageable and clutters the file system.
History
Many version control systems were created in the 70s, 80s, and 90s, the goal is solve the problems above, but they had their limitations and problems.
Git was created in 2005 by Linus Torvalds, the same legend who created Linux.
So what's git again?
Git is a distributed version control system that solves the problems of pre-existing systems.
Unique Features
-
Decentralized / Distributed: Each developer's local repository is a complete copy of the project history. This allows for offline work and is fault-tolerant.
-
Lightning-Fast: Git is incredibly fast because it doesn't rely on a central server for every operation.
- Powerful Branching.
Installing git
Windows
MacOS
Linux

Using the terminal
You should familiarize yourself with using the command line on your system. Don't worry, it's not that scary.
After this step, you can check that git is successfully installed on your system by writing the following command in the terminal and pressing Enter:
Windows
You can open the command line by pressing + R, then write 'cmd' and Enter.
Or just search 'cmd' or 'powershell' in the applications menu.

In the Finder, open the /Applications/Utilities folder, then double-click Terminal.
Or just search 'terminal'.
MacOS
*This is how we'll use git from now on
git --versionFirst-Time Configuration
Run these commands in the terminal to configure git for the first time:
git config --global user.name "your name"

git config --global user.email "your@email.com"
Terminology
We'll learn new terminologies as we're going
Repository (or repo for short):
The project's folder. It contains all of the project files, each file's revision history, user configuration, and git data.
noun
Gitting started
To initialize a repo, use this command
# to initalize a git repo in current folder
git init

# to initialize it in a new folder
git init <folder-name>
Repo Status
Create a new file in your repo, for example, an empty text file.
git statusThen, run the command
You'll see this output, what does it mean?
On branch main
No commits yet
Untracked files:
(use "git add <file>..." to include in what will be committed)
file.txt
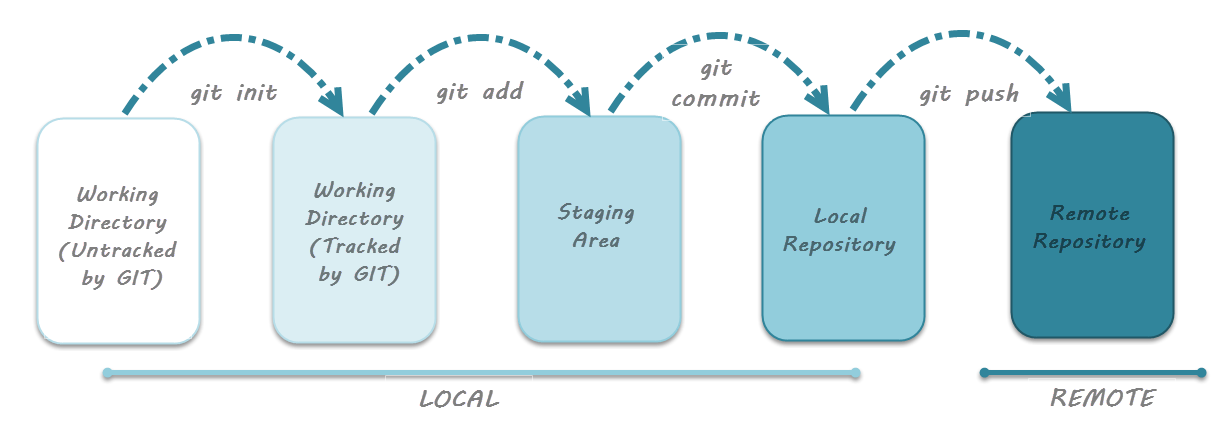
nothing added to commit but untracked files present (use "git add" to track)The lifecycle of a git repo

The lifecycle of a file in a git repo
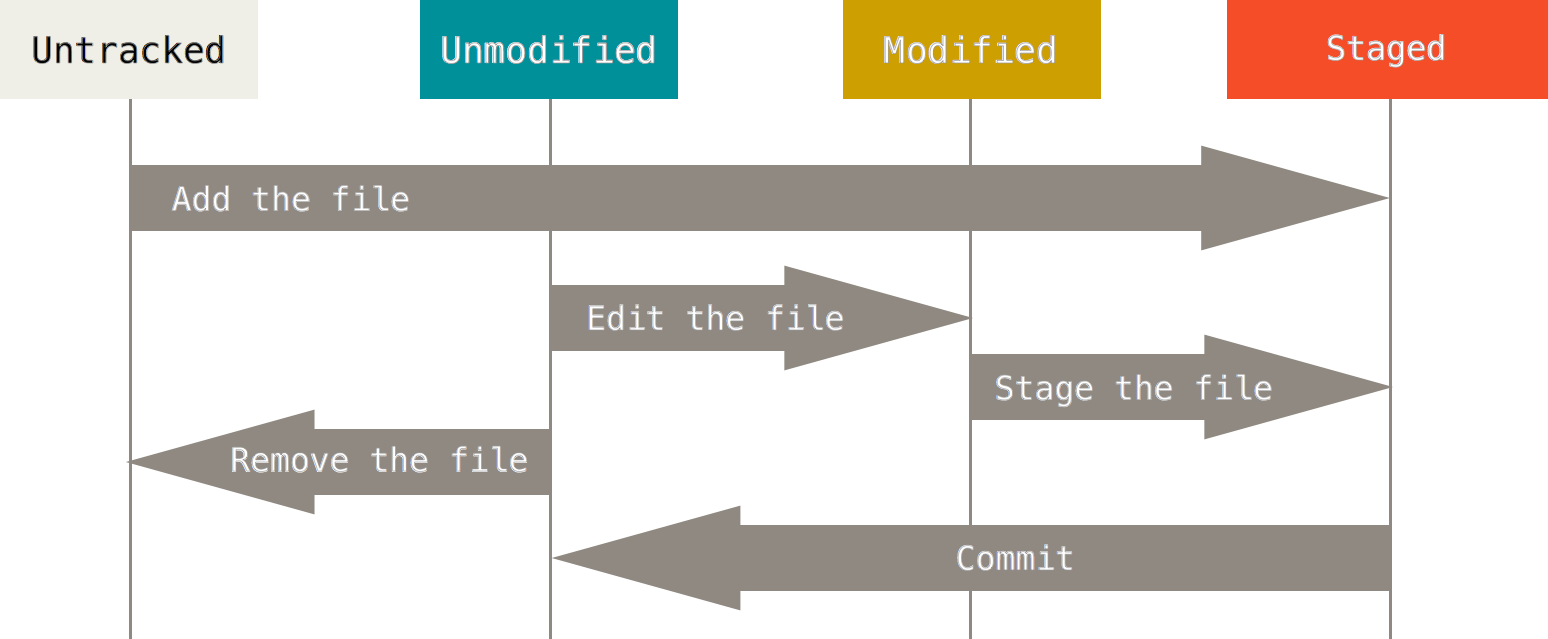
The base state when there's no modifications on the repo. (A clean working directory.)
Terminology
Staged file(s):
a file that has been added to the staging area, where it's being prepared for a commit.
Untracked file(s):
a new file that has not been staged.
Commit:
a snapshot of the project's currently staged changes. It's like a mark on the project history.
Staging area:
This is an intermediate area where we add file to, and commits can be formatted and reviewed before completing the commit.
Modified file(s):
a file that was added to git before but is now modified.
Basic git operations
git add
# to add a single file
git add <file-name>

# to add all files in current folder and subfolders
git add .
Usage
Remember the text file you created earlier? apply this command on the file, and then run git status again and notice the difference in the output.
This command adds a change in the working directory to the staging area. It tells Git that you want to include updates to a particular file in the next commit.
It can be used to add either a tracked file(s) or modified ones.
Basic git operations (cont.)
git commit
This command captures a snapshot of the project's currently staged changes (added files or pieces of files). Committed snapshots can be thought of as “safe” versions of a project — Git will never change them unless you explicitly ask it to.
Think of a commit like a checkpoint in a game, or a mark in history.
Each commit has a unique hash that identifies it to git, as well as a commit message that helps you or anyone working on the project know what changes where made in each specific commit.
Basic git operations (cont.)
git commit
git commit -m "some commit message"Usage
Now add a commit to the file that you created and added earlier to git.
A commit message should be short and meaningful and indicates the changes that were made in the commit.
Commits should involve atomic changes, meaning that one commit should describe just a single change or few changes within the same scope.
Basic git operations (cont.)
git diff
# for unstaged files
git diff

# for staged files that have not been commited
git diff --cached

# difference for a single file
git diff <file-name>
Usage
This command allows you to see changes that has not been staged or commited.
(i.e. the difference between the file(s) before and after the changes).
In the git diff string, a + means added lines or files, and - means removed lines.
Basic git operations (cont.)
git log
# for history with details
git log

# for a less-detailed history
git log --oneline

# for commits history along with difference in each commit (changes)
git log -p
Usage
This command allows you to see the commits history on the project.
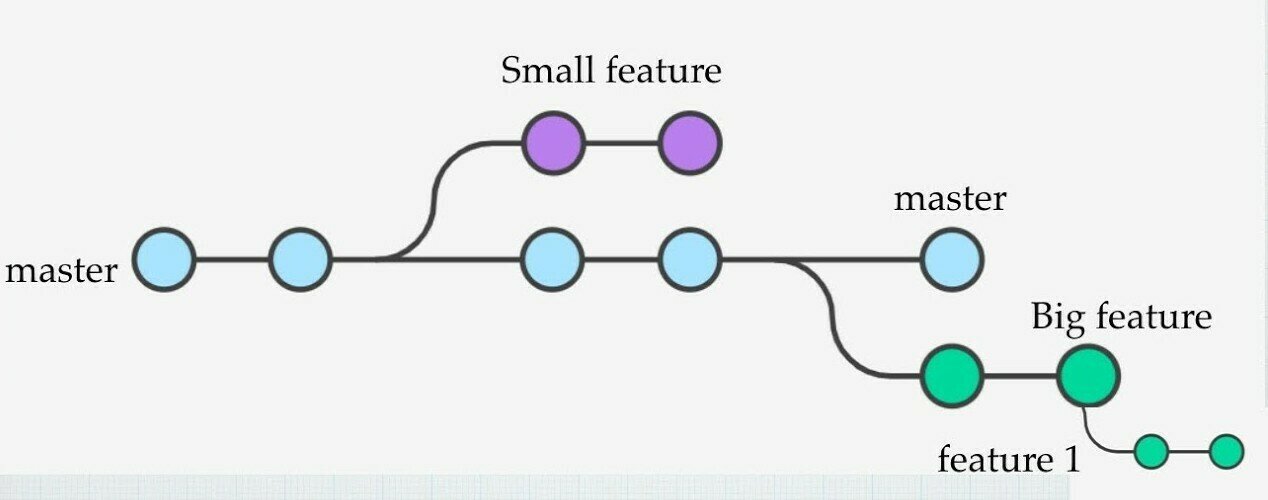
Branches
Branching means you diverge from the main line of development and continue to do work without messing with that main line.
A branch is just a pointer to some commit from another branch or the main one (base / parent branch). Any commit on this branch will be separated from the base branch.
Branches (cont.)
Branching is encouraged in these scenarios:
- you want to work on a big feature and don't want to mess with the main codebase
- you want to test something
- you have a team and want to work on each task separately
And it's a good practice in general.
The default branch in git is main or master branch
Branches (cont.)
# create a new branch based on the current branch
git branch <branch-name>

# view all branches (the current branch will be highlighted)
git branch

# delete a branch (you should be on another branch)
git branch -d <branch-name>

# rename a branch
git branch -m <new-name>
git branch
This command allows you to deal with branches.
Usage
Branches (cont.)
# switch to an existing branch
git checkout <branch-name>
git switch <branch-name> # another way of switching branches

# create a new branch based on the current branch, and switch to it
git checkout -b <branch-name>
git checkout
In git terms, a "checkout" or "checking out" is the act of switching between different versions of a target entity. The git checkout command operates upon three distinct entities: files, commits, and branches.
Usage
Switching between branches
I will only cover the usage related to branches here
Terminology
HEAD:
A special pointer or reference to the latest commit in the currently checked-out branch. It represents your working directory's state and points to the commit that you currently have checked out. It's often used to navigate between different branches and to identify the commit that will be the parent of the next commit you make.
Merging
Merging is Git's way of putting a diverged history back together again. The git merge command lets you take the independent lines of development created by git branch and integrate them into a single branch.
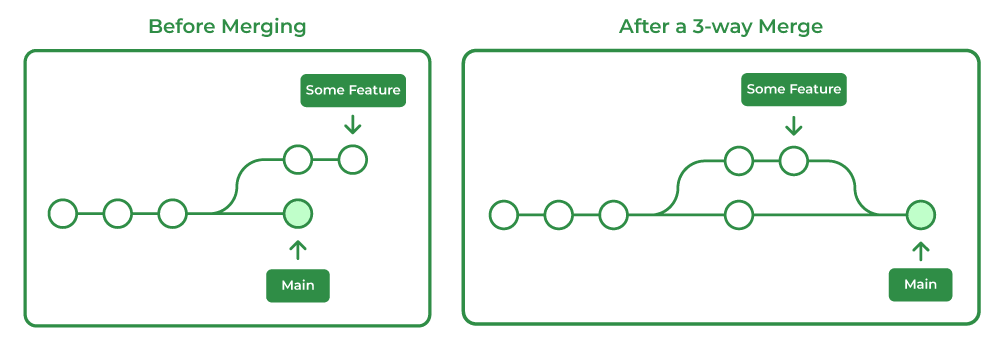
Merging creates a special commit that has 2 unique parents
Merging (cont.)
Merging (cont.)
git merge <source-branch-name>git merge
This command allows you to merge branches together.
Usage
- Switch to the destination branch.
- Merge the commits from the source branch with the following command:
Merging (cont.)
Merge conflicts
When merging 2 branches, a conflict may happen occasionally where git cannot merge the branches automatically.
The reason is that same part of the same file changed differently in the two branches you’re trying to merge.
git merge some-branchYou'll get this message when a conflicts happen
Auto-merging file.txt
CONFLICT (content): Merge conflict in file.txt
Automatic merge failed; fix conflicts and then commit the result.
Merging (cont.)
Resolving merge conflicts
<<<<<<< HEAD
the file content on the destination branch
=======
the file content on the source (upcoming) branch
>>>>>>> some-branch
<<<<<<< is where you're currently at (where you want to merge the changes.
>>>>>>> is the name of the merge source
======= is just a separator
There are many ways to resolve a merge conflict. (all of which are the same way but using different interfaces). We'll cover 2 ways: editing the file directly, and using VS Code
Resolve merge conflicts by editing the conflicted file
If you open the file where the conflict happened in any text editor, you'll notice the file content changed as the following:
You can just edit the file and remove all of this clutter added by git, and either keep the source changes, destination changes, or a combination of both. Then add and commit your changes.
Collaborating with others
You may want to work on a repo with a team, this can be achieved using a repository that is hosted on the internet, this is called a remote git repo.
Remote Git Providers
There are many remote git hosting providers out there, here are the most popular ones:
- GitHub
- GitLab
- BitBucket
- Codeberg
(and you can host a git server yourself too)
Collaborating with others
Benefits of Remote Git Providers
- storing your code in a central safe place outside of your local machine.
- collaborating with teams from all around the world
- exploring open source projects and seeing development happening live
- using other tools that are not in git itself, such as issues, pull requests, wikis, as well as discussions.
GitHub is the most popular Git hosting provider.
Create an account

(preferably using the same email you used in configuring git)
Introduction to GitHub

Working with GitHub
On GitHub, you can:
- create multiple repositories
- fork others' repositories
- clone repositories locally
- open issues
- open pull requests
- and other stuff that you can explore on your own
Working with GitHub (cont.)
Cloning a repo
It's basically copying a remote repo to your local machine.
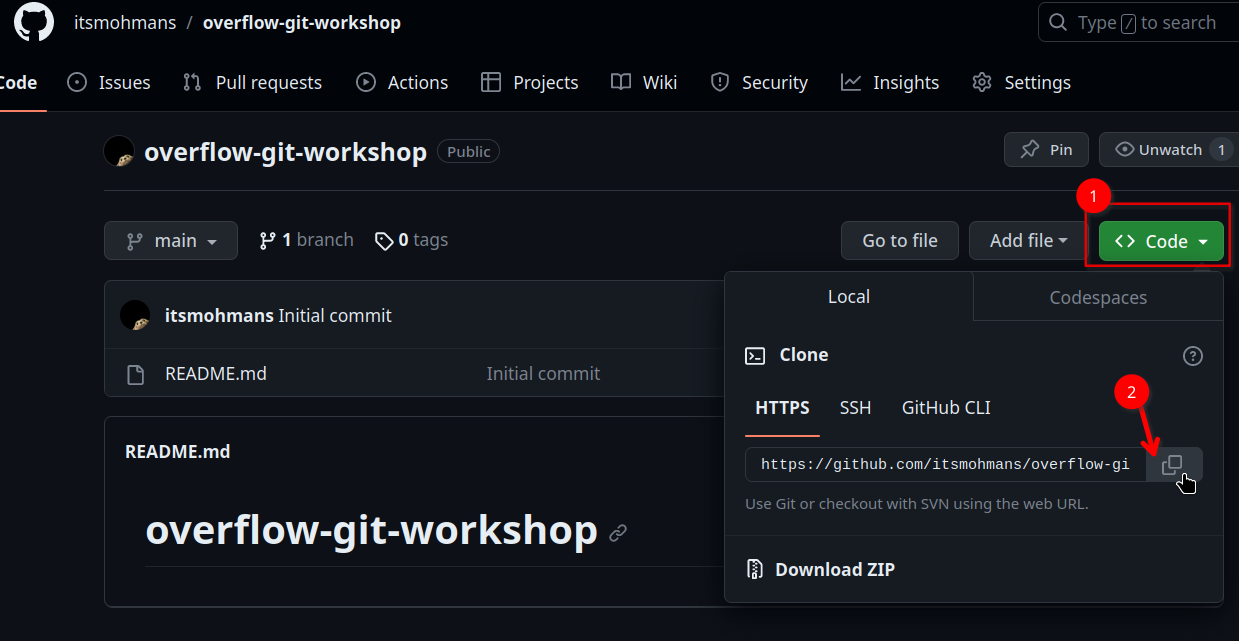
1. copy the repo git URL
Working with GitHub (cont.)
Cloning a repo
git clone
2. Run the following command to clone it to your machine
git clone <repo-url>Working with GitHub (cont.)
What if the repo is on your local machine, but you want to add it to GitHub?
- Create a new repo on GitHub
- Locally, add the new GitHub repo as a remote:
# get the url from github as we did when cloning it
git remote add origin <repository_url>
3. Push your local changes to the GitHub repo:
# main is the default branch name, but it can be any other branch
git push -u origin main
4. Authenticate: You will be prompted to enter your GitHub username and password.
Now go to your repo on GitHub and verify the changes.
Terminology
Remote: a version of a Git repository hosted on a server or a different location. It acts as a centralized place to collaborate with others or to synchronize your work.
Pushing: the action of sending your local commits and changes to a remote repository. This makes your work accessible to others and updates the remote repository with your changes.
Forking: creating a personal copy of someone else's repository on a platform like GitHub. It enables you to make changes independently, which can later be proposed for integration into the original project.
Cloning: the process of creating a local copy of a remote Git repository. It allows you to work on the project on your computer, preserving the entire history and branches.
Pulling: the action of retrieving changes from a remote repository to your local repository. It updates your local copy with changes made by others in the remote repository, ensuring your work is up to date.
Terminology
Origin: a default alias used for the remote repository that your local repository was cloned from. It's the default name given to the remote you clone from, and you often use it as a reference when pushing and pulling changes.
Upstream: a term used to refer to the original repository that a forked repository is based on. It's used when you want to keep your fork synchronized with the changes made in the original repository.
Fetching new changes
git fetch
# fetch from the default origin
git fetch

# fetch from branch <branch> of <remote>
git fetch <remote> <branch>
Working with remote git
Retrieve changes from a remote repository but without merging them into your current branch.
Usage
At this point, the repository has all the commits from the origin repository, but they are not integrated into the cloned repository’s local branches.
Merging pulled changes
git merge origin/<branch>
# fetch from the default origin
git fetch

# merge branch <branch> of <remote>
git merge <remote>/<branch>
Working with remote git
Combines changes from a specific branch in a remote repository (typically the default remote, origin) into the current branch.
Usage
So every time you want to get the latest changes from a remote, you'll have to do git fetch followed by git merge.
b-but, that's too much work!
Fetching and merging changes
git pull
# fetch from the default origin and merge into current branch
git pull

# fetch from <remote> and merge into <branch>
git pull <remote> <branch>
Working with remote git
Fetches the latest changes from the remote repo, and merges them into the current branch.
Usage
You're lazy, I'm lazy, and all developers are lazy, so they came up with one command that combines git fetch and git merge together.
Pushing your local changes to the origin
git push
# push current branch into the default origin/your-current-branch
git push

# push to <remote>/<branch>
git push <remote> <branch>
# if <branch> does not exist on <remote>, you can do this for the first push in order to create <branch> on <remote>
git push -u <remote> <branch>
Working with remote git
Sends your local commits to a remote repository. It updates the remote repository with your changes.
Usage
You pulled changed from the origin repo, you made some changes, now it's time to send your changes back to the repo to keep it in sync.
The lifecycle of a git repo
with a remote repo
git pull
making changes
Forking
Forking is simply creating a personal copy of some remote repo, on GitHub for example, into your own account.

It's similar to cloning a repo, but it copies it as a new remote repo, instead of a local one.
This forked repository becomes your own, and you can freely make changes, experiment, or contribute to the project without affecting the original repository.
Forking
When and why do we fork a repo?
-
Open Source Contributions: Fork, edit, and propose changes via pull requests for projects you lack direct access to.
-
Experimentation: Safely modify code without affecting the main project until you're ready to merge.
-
Personal Use: Customize or maintain private versions of public repositories, respecting licensing terms.
-
Backup: Use forks to safeguard code and history in case the original repository is lost or inaccessible.
Forking
How to?
- Go to any repository on GitHub or most git hosting services, and click on fork.

2. You can then choose a new name for the repo or keep the original name.
3. After forking the repo, you can clone it, make changes as you wish, and pushing to your fork just like pushing to any other remote repo.
Pull Requests
Let's say you forked a repo, and made some changes, and you want to include these changes in the original repo.
A pull request (PR) is a feature in Git-based systems like GitHub or GitLab that allows you to propose changes you've made in your own fork or branch to be integrated into another repository.
It's a formal request for code review and collaboration. Others can review your changes, provide feedback, and, once approved, merge your code into the original project
Pull requests are commonly used for contributing to open source projects and team collaboration.
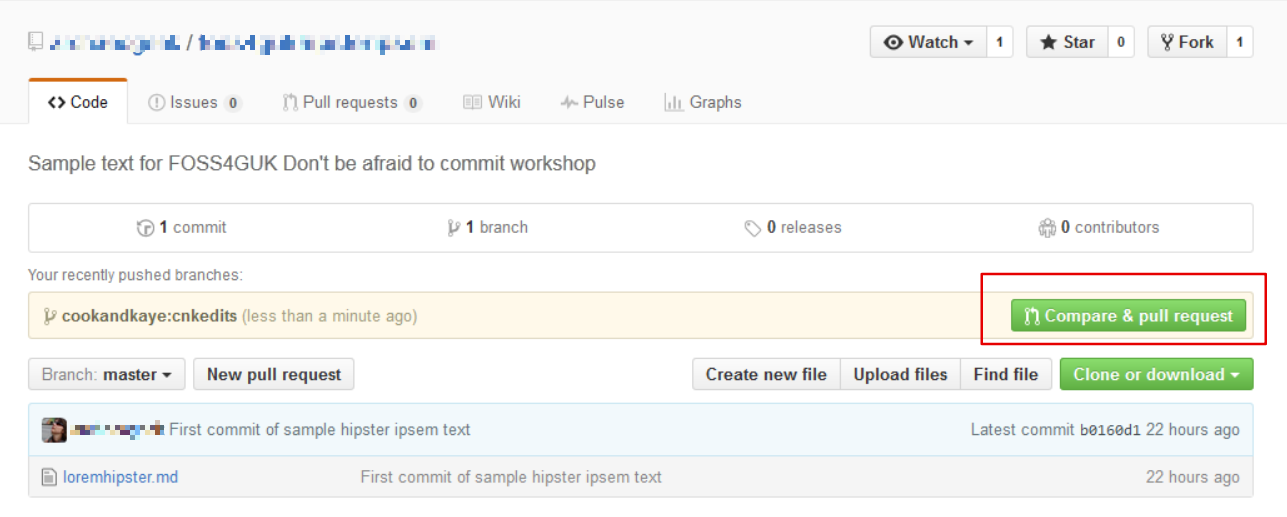
Pull Requests
Opening a PR
1. Fork the repo, clone it, make changes, add and commit
them, and push them to your forked repo.
2. Navigate to your forked repository, and press the New
pull request button on your left-hand side of the page.
Pull Requests
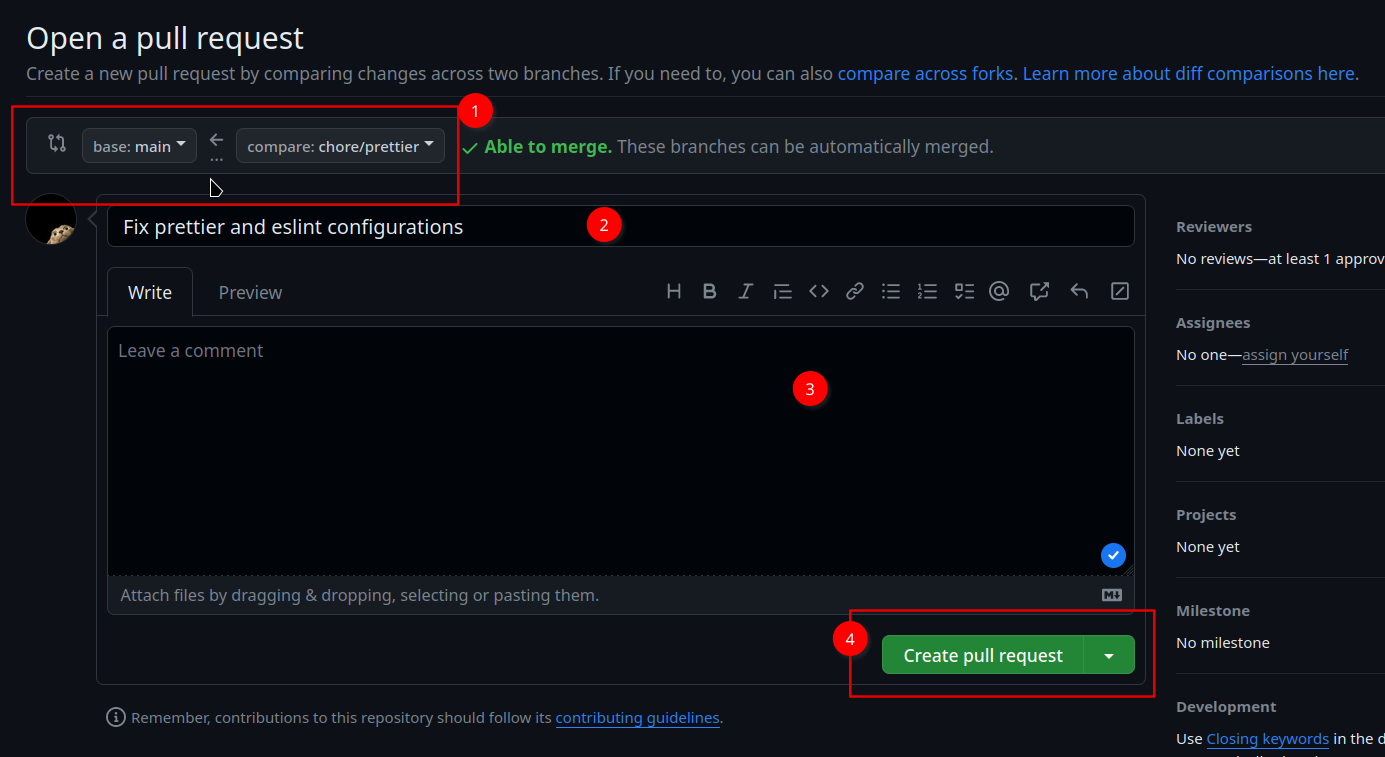
Opening a PR (cont.)
3. You can now modify the correct source and destination
branches, add a title and optional description, and then click
Create pull request.
Pull Requests
Opening a PR (cont.)
You're done. Now you can wait until the repository author or maintainer approve your PR and merge it.
Git interface in VS Code
Explained live.
Additional git features
Stash
If we go back to the analogy of how git commits are like a box with a label, and the main workspace is your staging area, then stashing or git stash is just a shelf where you put files on temporarily until you're done with your current task, and you can get back to it later.
You can research on your own how to use these commands, they're very easy to comprehend.
git stash # stash current unstaged files
git stash save "some title" # stash unstaged files with a title
git stash pop # pop the latest stash
Additional git features
Restore
Restores or discard staged and uncommited changes.
# restore a file
git restore path/to/file.txt

# restore a folder
git restore path/to/folder/
Additional git features
Revert
Reverts a committed change.
The revert changes creates another commit.
# revert a commit using its commit hash
git revert <commit-hash>

# example
git revert 75c2798
Additional git features
Rebase (advanced)
Changes the base of the branch
# rebase your current branch to <branch>
git rebase <branch>
You're ready to go,
but wait...
This is just the tip of the iceberg. The more you use git, the more you discover new features and tricks, and new things that you can do with it.
Additional resources
There are thousands of resources on the internet to learn git and GitHub. I've picked some of the finest ones.
-
Attlassian (BitBucket) Git Tutorial
https://www.atlassian.com/git/tutorials -
Git Immersion
https://gitimmersion.com/index.html -
GitHub's Git Tutorial
https://docs.github.com/en/get-started/getting-started-with-git -
Git's Official Documentation
https://git-scm.com/book/en/v2 -
GitKraken's Videos
https://www.gitkraken.com/learn/git/tutorials - Learn Git Branching Game
https://learngitbranching.js.org/
And remember, googling and StackOverflow are your friends.
And PRACTICE PRACTICE PRACTICE PRACTICE (with Steve Ballmer's voice)
Thank You!

Link to the slides
Git Workshop
By Mo Mansour


