TKC & ICC
A GUIDE


Training Videos
Video explainations available on TEAM
- Trainig Videos for TEAM and Videos for quick reference to FAQ's can be located under the Training Video tab.
- All Videos are less than 2 minutes long and can be used for training and review.
Booking
Creating an Inmate Account
- Fill in the information your facility requires for the New Inmate:
- Name, Gender and DOB are required!
(Other fields are optional and available for your facility use). - When you have filled in the data, click on the "Create Account" Button in the lower right corner.
- Make an initial deposit ...
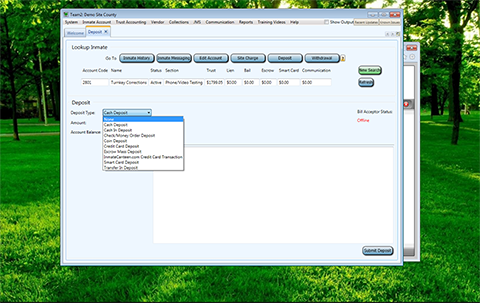
Making an Initial Deposit:
-
After creating a New Inmate account you will be able to process their initial deposit.
- Choose Deposit Type
- Cash In Deposit (Put money into bill acceptor)
- Cash Deposit (Money handled by booking officer)
- Check Deposit
2. Select Submit Deposit
3. Proceed to Site Charge
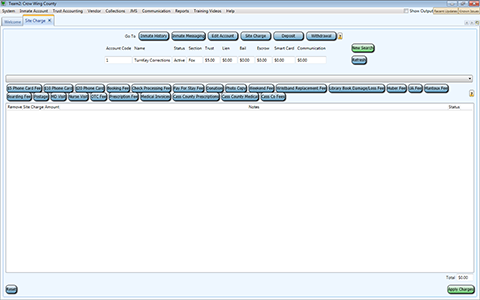
Site Charges
Facility Charges to an Inmate
- Look up an Inmate by Account code or name.
- Choose Site Charges from the quick buttons displayed or the drop down menu.
- Some Site Charges can vary by dollar amount:
-
You are able to edit the amount charged
- Click on the amount.
- Charge Detail Screen will open.
- Input amount and any notes necessary.
- Save.
- When all Site Charges have been added click the "Apply Charges" button in the lower right corner. (Charges will now appear in an Inmate's history for future viewing.)
Making a Deposit
At the Booking Station
- Deposit to an Inmate Account
- Select Inmate by Account Code or Name
- Select your deposit type
- Cash In (Use Bill Acceptor
- Cash
- Check/Money Order
- With different deposit types continue to fill in additional fields.
Inmate History report
Complete financial record of the Inmates Funds and transactions
- Look up an account by Account Code or Name
- Filter by date or date range
- Select Run/Run Details
- You can select specific transaction to view more details
- You can also print or export the report
Messaging
View Inmate Messages
- Select Inmate Messaging
- You will see messages regarding the groups that you are assigned to (ie. Nurse will see medical requests).
- To view individual Inmate requests click on the "Message History" button
- Select your inmate by Account Code or Name
- Click on Search
- You will see all messages sent and received for this inmate.
- Treat this portion of TEAM as an e-mail service. Use the butons to compose, reply and forward messages as needed.
Bank Deposits
Understanding the Cash Handling System
1. Changing the Cash Box
- Open TEAM on the computer the cash box is attached to. (Lobby kiosks you will not need to open anything)
- Remove the cash box from the assembly, and press 'ok' when prompted the cash box has been removed.
- Insert the new cash box, and a pop-up will appear asking if you would like to change the cash box; select 'yes'
-
Choose the cash box you would like to insert
2. Reconciling a Cash Box
- Under "Trust Accounting," then "Cash," click on "Cash Box Reconciliation."
- Once opened, select your cash box from the drop down in the upper left of the screen.
- Enter the number of bills for each denomination in the column of gray boxes.
- Ensure the difference between expected/actual balance on the lower right hand side is $0.00.
- If there is any difference here, submit a ticket or call into TurnKey for assistance.
- If you have any additional cash boxes, repeat steps 1 & 2 until all are reconciled.
3. Bank Deposit
- Under "Trust Accounting," then "bank," click on "bank deposit."
- Click "End Current Session" to pull in all transactions ready to deposit.
- Selcet all funds you will be bringing to the bank with you by checking the box to the left of the transaction.
- Ensure you select all transations under the cash, coin, checks, transfer-in and Misc. tabs that are necessary.
- Any transactions not checked will be available to deposit at a later time.
- Enter any applicable notes in the lower right hand corner.
- Click "save."
4. Printing your deposit slip
- Under "Reports," select "Bank," then "Bank Deposit Report."
- Select the date of deposit from the drop down menu, and click "run" on the upper right hand side.
- Click "print" on the lower right.
- Once deposited in the bank, attach the deposit slip to this report for records.
Close Account
Releasing an Inmate
- When closing an account be careful to select the correct Inmate, because once an Inmate has been selected the status of the account is inactive.
- Continue the process to properly close the account:
(Incorrect selections will need to be reactivated).
- Add any final Site Charges an Inmate has accrued.
- Click the "Continue" button below the dollar amount.
- At this point if an Inmate has a positive balance:
- Select Check Withdrawl
- Add memo if needed
- Select Print (Make sure checks are in printer).
- After the check has been printed you can finalize the closing of the account. Click on the "Close Account" button in the lower right corner.
Inmate Canteen
For Family and Friends
What can Family and Friends do at InmateCanteen.com?
By setting up an account on www.InmateCanteen.com family and friends will have access to the following options: (Features available will differ by facility)
- Deposit Funds to an Inmate
- Purchase Canteen Items for an Inmate
- Buy a Phone Card for an Inmate
- Video Visit an Inmate
- Send an E-mail
InmateCanteen.com - "My Account"
Account features
- Look up Transaction History
- Add or Remove Credit Cards
- Edit Address, Phone Number, E-mail, etc.
- Change Password
Follow us on Facebook and Twitter for the latest information and updates!
www.facebook.com/inmatecanteen
@InmateCanteen
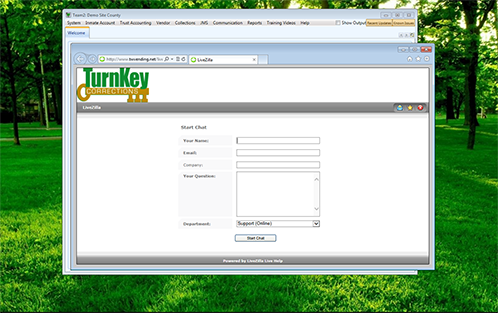
Live Chat
Use Live Chat for quick responses to minor issues or questions.
Emergency or Major Issues can also use live chat but will still require ticket submission.
- Select Live Chat from the main menu
- Fill in all fields (use the company field to place your facility/county name)
- A representative will answer as soon as one is available
- Live Chat works similiar to Instant Messanging where you will type your questions and responses back and forth.
Submit a Ticket
For Troubleshooting Issues
The ticket system is additionally used as a form of documentation, to keep records of issues and resolutions for your facility.
- Select Submit Ticket in the main menu
- Sign into the ticket system using your TEAM login and password
- This will give you a view of ALL tickets by your facility
- Select New Ticket
- Fill in all information. You will need to choose the correct department and your facility (Make sure your e-mail and phone number are correct for prompt responses)
- Detail your message to your best ability. Include dates, times, names, stations, etc. The more information given will result in a more timely and thorough resolution
- You can also attach files or pictures to help with your inquiry.
- Select Submit at the bottom of the screen
- Tickets are handled in a first come first serve system (However priority does play a role in resolution time)
TKC
By katyh


