Sass Essentials

Prerequisites
Getting Started
Understanding Sass
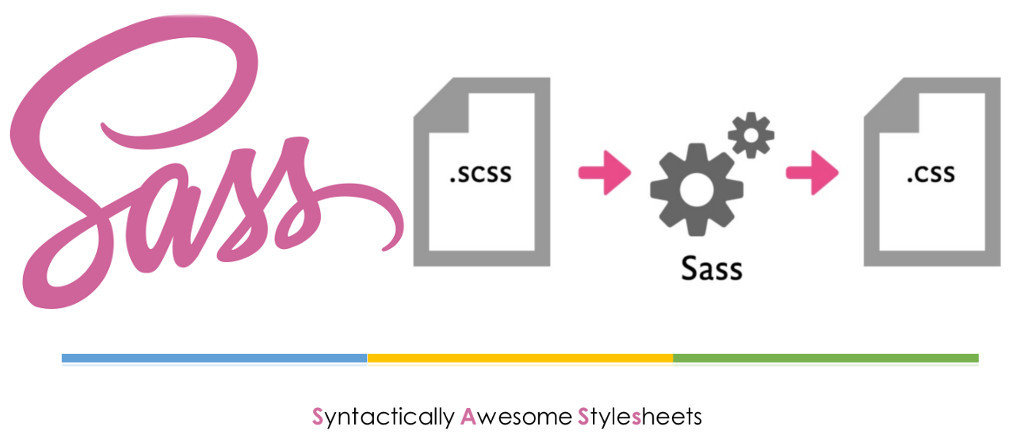
- CSS extension
- Pre-processed
- Extensible
- Written in Ruby
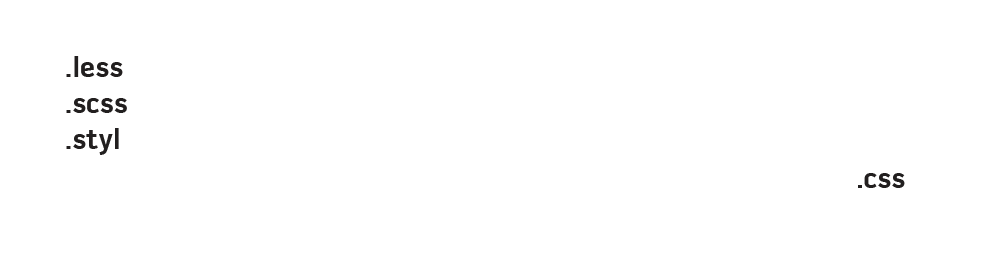
Sass Installation Options

The original Sass you’ve come to love is written in Ruby
JS port of the original Sass engine
libSass is just a library, and need a wrapper (an implementor).
Examples :
- sassC
- node-sass (direct use or wrapped by : gulp-sass, grunt-sass...)


Install Ruby
Install NodeJS
Install node-sass
Install sass

Install Gulp
Install gulp-sass
Sass Sample Project & Workflow
01_03
Sass Fundamentals
Working With Variables
02_01
$main_color : #9E2932;

.navbar {
  background: $main_color;
}

h1, h2, h3 {
  background: darken($main_color, 20);
}
Nesting Styles
02_02
.grid {
  ul {
    margin: 0;
    padding: 0;
    list-style: none;
    li {
      float: left;
      width: 96px;
      height: 96px;
      padding: 0 5px 5px 0;
    }
  }
}
Using Partials
02_03
Creating Basic Mixins
02_04
@mixin clearfix() {
    &:before,
    &:after {
        content: "";
        display: table;
    }
    &:after {
        clear: both;
    }
}

@mixin unordered_list_style() {
  margin: 0;
  padding: 0;
  list-style: none;
}

@mixin square_size($length : 100px) {
  height : $length;
  width : $length;
}

.grid {
  margin: 15px;
  ul {
    @include clearfix();
    @include unordered_list_style;
    li {
      float: left;
      @include square_size(96px);
      margin-right: 5px;
      img {
        border-radius: 15px;
      }
    }
  }
}
Using the @extend Method
02_05
$bouton_background : #ffffff;
$bouton_color: #000000;
$bouton_background_reverse: #000000;
$bouton_color_reverse: #ffffff;
$bouton_border: 1px solid #000000;

.btn {
  margin: 10px;
  padding: 6px 12px;
  line-height: 140%;
  text-align: center;
  vertical-align: middle;
  border: $bouton_border;
  border-radius: 4px;
  background: $bouton_background;
  color: $bouton_color;
}

.btn-reverse {
  @extend .btn;
  background: $bouton_background_reverse;
  color: $bouton_color_reverse;
}
Referencing Parent Selectors With &
02_06

Working With SassScript
Comments and Hidden Comments
/* This comment is
 * several lines long.
 * since it uses the CSS comment syntax,
 * it will appear in the CSS output. */
body { color: black; }

// These comments are only one line long each.
// They won't appear in the CSS output,
// since they use the single-line comment syntax.
a { color: green; }
03_01
Working With Math Operations
@mixin imagegrid($qty, $margin){
  width: ((100% - (($qty - 1) * $margin))/$qty);
  // all elements
  &:nth-child(n){
    margin-right: $margin;
    margin-bottom: $margin;
  }
  // last element
  &:nth-child(#{$qty}n){
    margin-right: 0;
    margin-bottom: 0;
  }
}

.grid{
  @include clearfix;
  margin-top: 15px;
  .item {
    float: left;
    @include imagegrid(6, 1%);
    img{
      display: block;
      border-radius: 10px;
      max-width: 100%;
    }
  }
}

03_02
Modifying Colors
.table {
  font-size: 1rem;
  text-align: left;
  width: 50%;

  caption {
    font-size: 2.5rem;
    text-align: left;
    padding-bottom: 5px;
  }

  > thead,
  > tbody,
  > tfoot {
    > tr {
      &:hover {
        background-color: lighten(orange, 10%);
      }
      &:nth-child(even){
        background-color: lighten(yellow, 10%);
        &:hover {
          background-color: darken(yellow, 10%);
        }
      }
      > th,
      > td {
        padding: 10px;
        border-bottom: 1px dotted blue;
      }
    }
  }

  > thead > tr {
    background-color: magenta;
    color: white;
    &:hover {
      background-color: transparentize(magenta, .8);
    }
    > th {
      border-bottom: 0;
    }
  }
}
03_03
em, rem ?
Creating List Elements
$roundness: 15px 10px 5px;

@mixin imagegrid($qty, $margin){
  width: ((100% - (($qty - 1) * $margin))/$qty);
  // all elements
  &:nth-child(n){
    margin-right: $margin;
    margin-bottom: $margin;
  }
  // last element
  &:nth-child(#{$qty}n){
    margin-right: 0;
    margin-bottom: 0;
  }
}

@mixin clearfix() {
    &:before,
    &:after {
        content: "";
        display: table;
    }
    &:after {
        clear: both;
    }
}

.grid{
  @include clearfix;
  margin-top: 15px;
  .item {
    float: left;
    @include imagegrid(6, 1%);
    img{
      display: block;
      border-radius: nth($roundness, 1);
      max-width: 100%;
    }
  }
}
03_04
Using the @content Container
@mixin break-from($length){
  @media (min-width: $length){
    @content;
  }
}
nav {
    header & {
        background-color: darken($blue, 15%);
    }

    .branding {
        float: left;
        margin-left: 10px;
        display: none;
        @include break-from(720px) {
          display: block;
        };
    }
}
03_05
Conditional @if Statements & Arguments List
@mixin break-from-to($args...) {
  @if length($args) == 1 {
    @media (min-width: nth($args, 1)) {
      @content;
    }
  } @else {
    @media (min-width: nth($args, 1))
      and (max-width: nth($args, 2)) {
      @content;
    }
 }
}
nav {
    header & {
        background-color: darken($blue, 15%);
    }

    .branding {
        float: left;
        margin-left: 10px;
        display: none;
        @include break-from-to(720px, 1024px) {
          display: block;
        };
    }

    .branding h1 {
        font-size: 2.75rem;
        overflow: hidden;
        margin: 0;
        color: $yellow;
    }

    ul {
        list-style: none;
        margin: 0;
        padding: 0;
        @include clearfix;
    }

    ul li {
      @include break-from-to(720px, 1024px) {
        float: right;
        };
        padding: 10px 5px;
    }

    ul li a {
        text-decoration: none;
        padding: 10px 5px;
        color: $color-backgrounds;

        &:hover {
            color: $yellow;
        }

        header &:hover {
            background-color: darken($blue, 20%);
        }

        footer & {
            color: white;
        }
    }
    footer & {
        margin-top:20px;
        min-height: 200px;
        background-color: darken($blue, 15%);
    }
}
03_06
Looping Through List whit @for
$colors: $offwhite, $darkblue, $yellow, $blue,
         $green, $orange, $red, $purple;

@for $item from 1 through length($colors) {
  h#{$item}{
    color: nth($colors, $item);
  }
}
03_07
Going Through List with @each
$colors-values: grey, red, blue;
$colors-names: 'default', 'hot', 'cool';

%btn {
  padding: 6px 12px;
}

@each $name in $colors-names {
  $i : index($colors-names, $name);
  .btn-#{$name} {
    @extend %btn;
    background-color: nth($colors-values, $i);
  }
}
03_08
Working With the Map Data Type
$colors-btn: (
  default : gray,
  hot : red,
  cool : blue
);

%btn {
  padding: 6px 12px;
}

@each $key, $value in $colors-btn {

  .btn-#{$key} {
    @extend %btn;
    background-color: $value;
  }
}
03_09
Next : Responsive Web Design with SASS & Compass

Sass Essentials
By Mohammed Amine EL JIRARI


