AWS for Java Developers Part 3
AWS Relational Database Service (RDS)
- AWS Relational Database Service (RDS) is a fully managed relational database service from Amazon.
- Advantages of using RDS:
-
It's a fully managed service, which automatically manages backups, software and OS patching, automatic failover, and recovery.
-
It also allows taking a manual backup of the database as a snapshot
-
There are limitations in stopping RDS instance
- Only a single AZ RDS instance can be stopped.
-
An RDS instance can be stopped for maximum 7 consecutive days. After 7 days,
the instance is automatically restarted
Amazon RDS components
- DB instances
- Each Amazon RDS engine can create an instance with at least one database in it.
- Each instance can have multiple user-created databases.
- Databases names must be unique to an
AWS account and are called DB instance identifier. - Each DB instance is a building block and
an isolated environment in the cloud.
- Region and AZs
-
AWS hosts its computing resources in data centers, spread across the Globe.
-
Each geographical location where the data centers are located is called a region.
-
Each region comprises multiple distinct locations that are called AZs.
-
Amazon creates AZs in isolated locations such that a failure in one AZ does not impact other AZs in the region.
-
- Security Groups
- Security groups acts like a firewall. They controls access to a RDS DB instance, by specifying the allowed source port, protocol and IPs.
-
DB parameter groups
-
Over a period when a RDS instance is used in enterprise applications, it may be required to tune certain allowed and common parameters to optimize the performance based on the data insertion and retrieval pattern.
-
If not specified then the default DB parameter group with default parameters will be attached.
-
- DB option groups
-
DB options groups are used to configure RDS DB engines.
-
RDS supports DB options group for MariaDB, Microsoft SQL Server, MySQL, and Oracle. Before creating an
RDS instance, it is recommended to create DB option groups.
-
RDS engine types
| Engine Type | Default Port | Protocol |
|---|---|---|
| Aurora DB | 3306 | TCP |
| MariaDB | 3306 | TCP |
| Microsoft SQL | 1433 | TCP |
| Mysql | 3306 | TCP |
| Oracle | 1521 | TCP |
| PostgreSQL | 5432 | TCP |
The Amazon RDS engine for Microsoft SQL server and Oracle supports two licensing models: license included and Bring Your Own License (BYOL).
Aurora DB
-
Amazon Aurora is a MySQL and PostgreSQL-compatible fully managed Relational Database Management System (RDBMS).
-
It provides a rare combination of performance and reliability like commercial databases and the cost effectiveness of open source databases.
-
Amazon RDS also provides push-button migration tools to convert your existing Amazon RDS for MySQL applications to Amazon Aurora.
-
Creating an Amazon Aurora DB instance will create a DB cluster. It may consist of one or more instances along with a cluster volume to manage the data.
-
Primary instance: Performs read, writes, and modifies data to the cluster volume.
Each Aurora DB cluster has one primary instance.
-
Aurora Replica: Performs only read operations. Each Aurora DB cluster supports up to 15 Aurora Replicas plus one primary instance. Amazon RDS Aurora
instance availability can be increased by spreading Aurora
-
It is designed to be a highly durable, fault tolerant, and reliable and provides the following features:
- Storage Auto-repair: It maintains multiple copies of data in three AZs to minimize the risk of disk failure.
-
Survivable cache warming: It warms the buffer pool page cache for known common queries, every time a database starts or is restarted after failure to
provide performance.
-
Crash recovery: Instantly recovers from a crash asynchronously on parallel
threads to make a database open and available immediately after crash.
| Feature | Amazon RDS Aurora | Amazon RDS MySQL |
|---|---|---|
| Read scaling | 15 Read Replica Sets | 5 Read Replica Sets |
| Failover target | Aurora Replicas are automatic failover targets with no data loss. |
Manually Read Replicas promoted as a master DB instance with potential data loss. |
| MySQL version | MySQL version 5.6. | 5.5, 5.6, and 5.7 |
| AWS Region | Not available in some regions. | Available in all regions. |
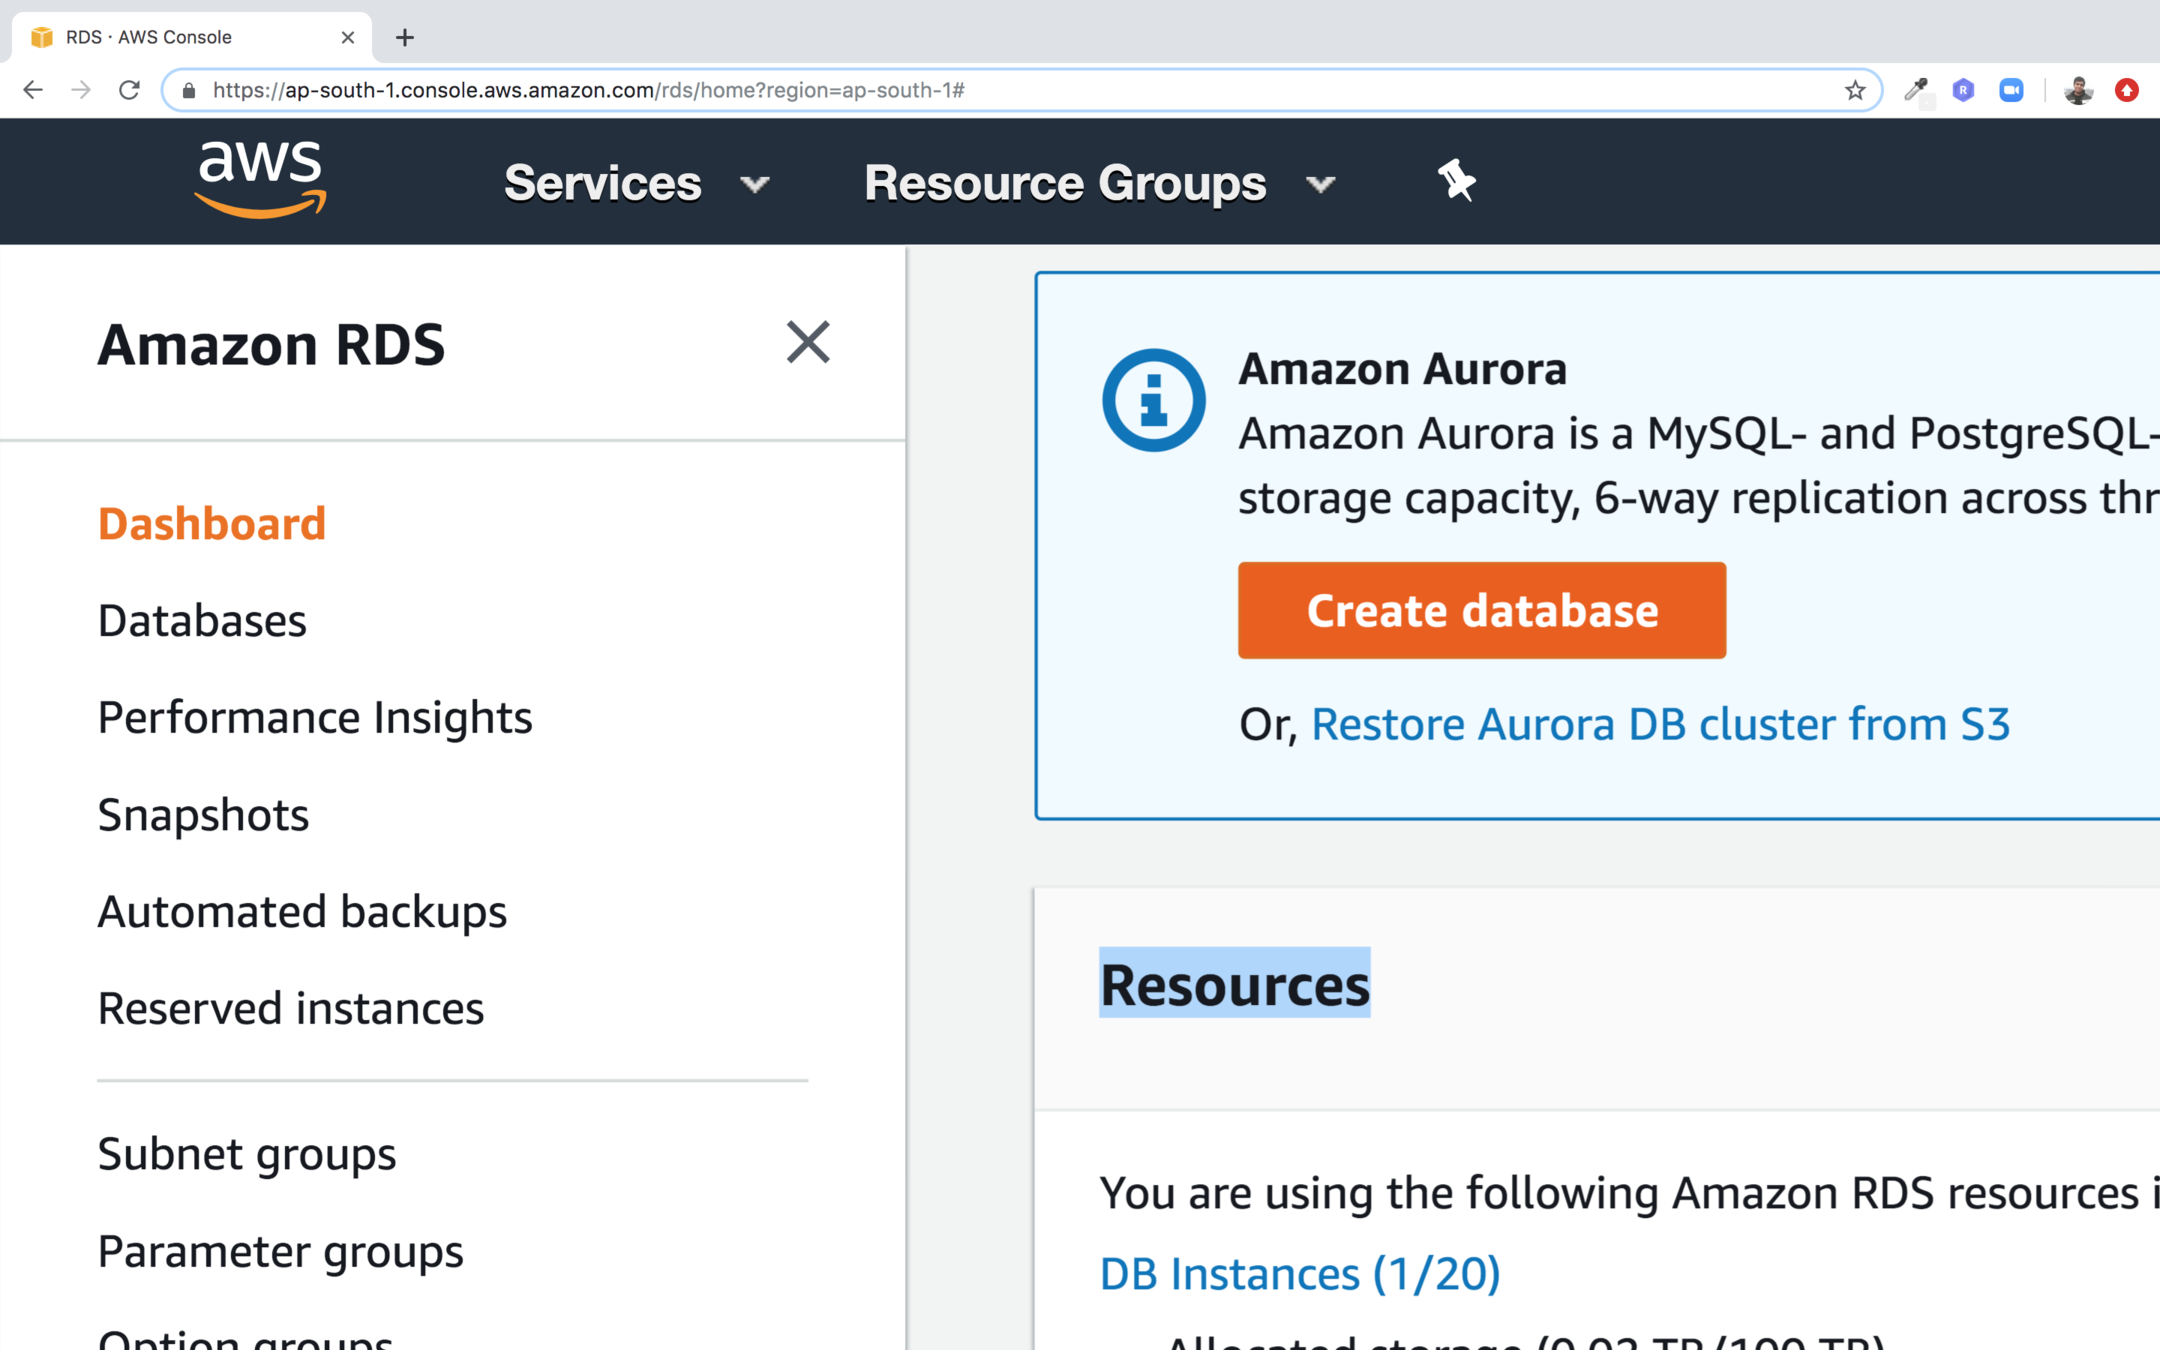
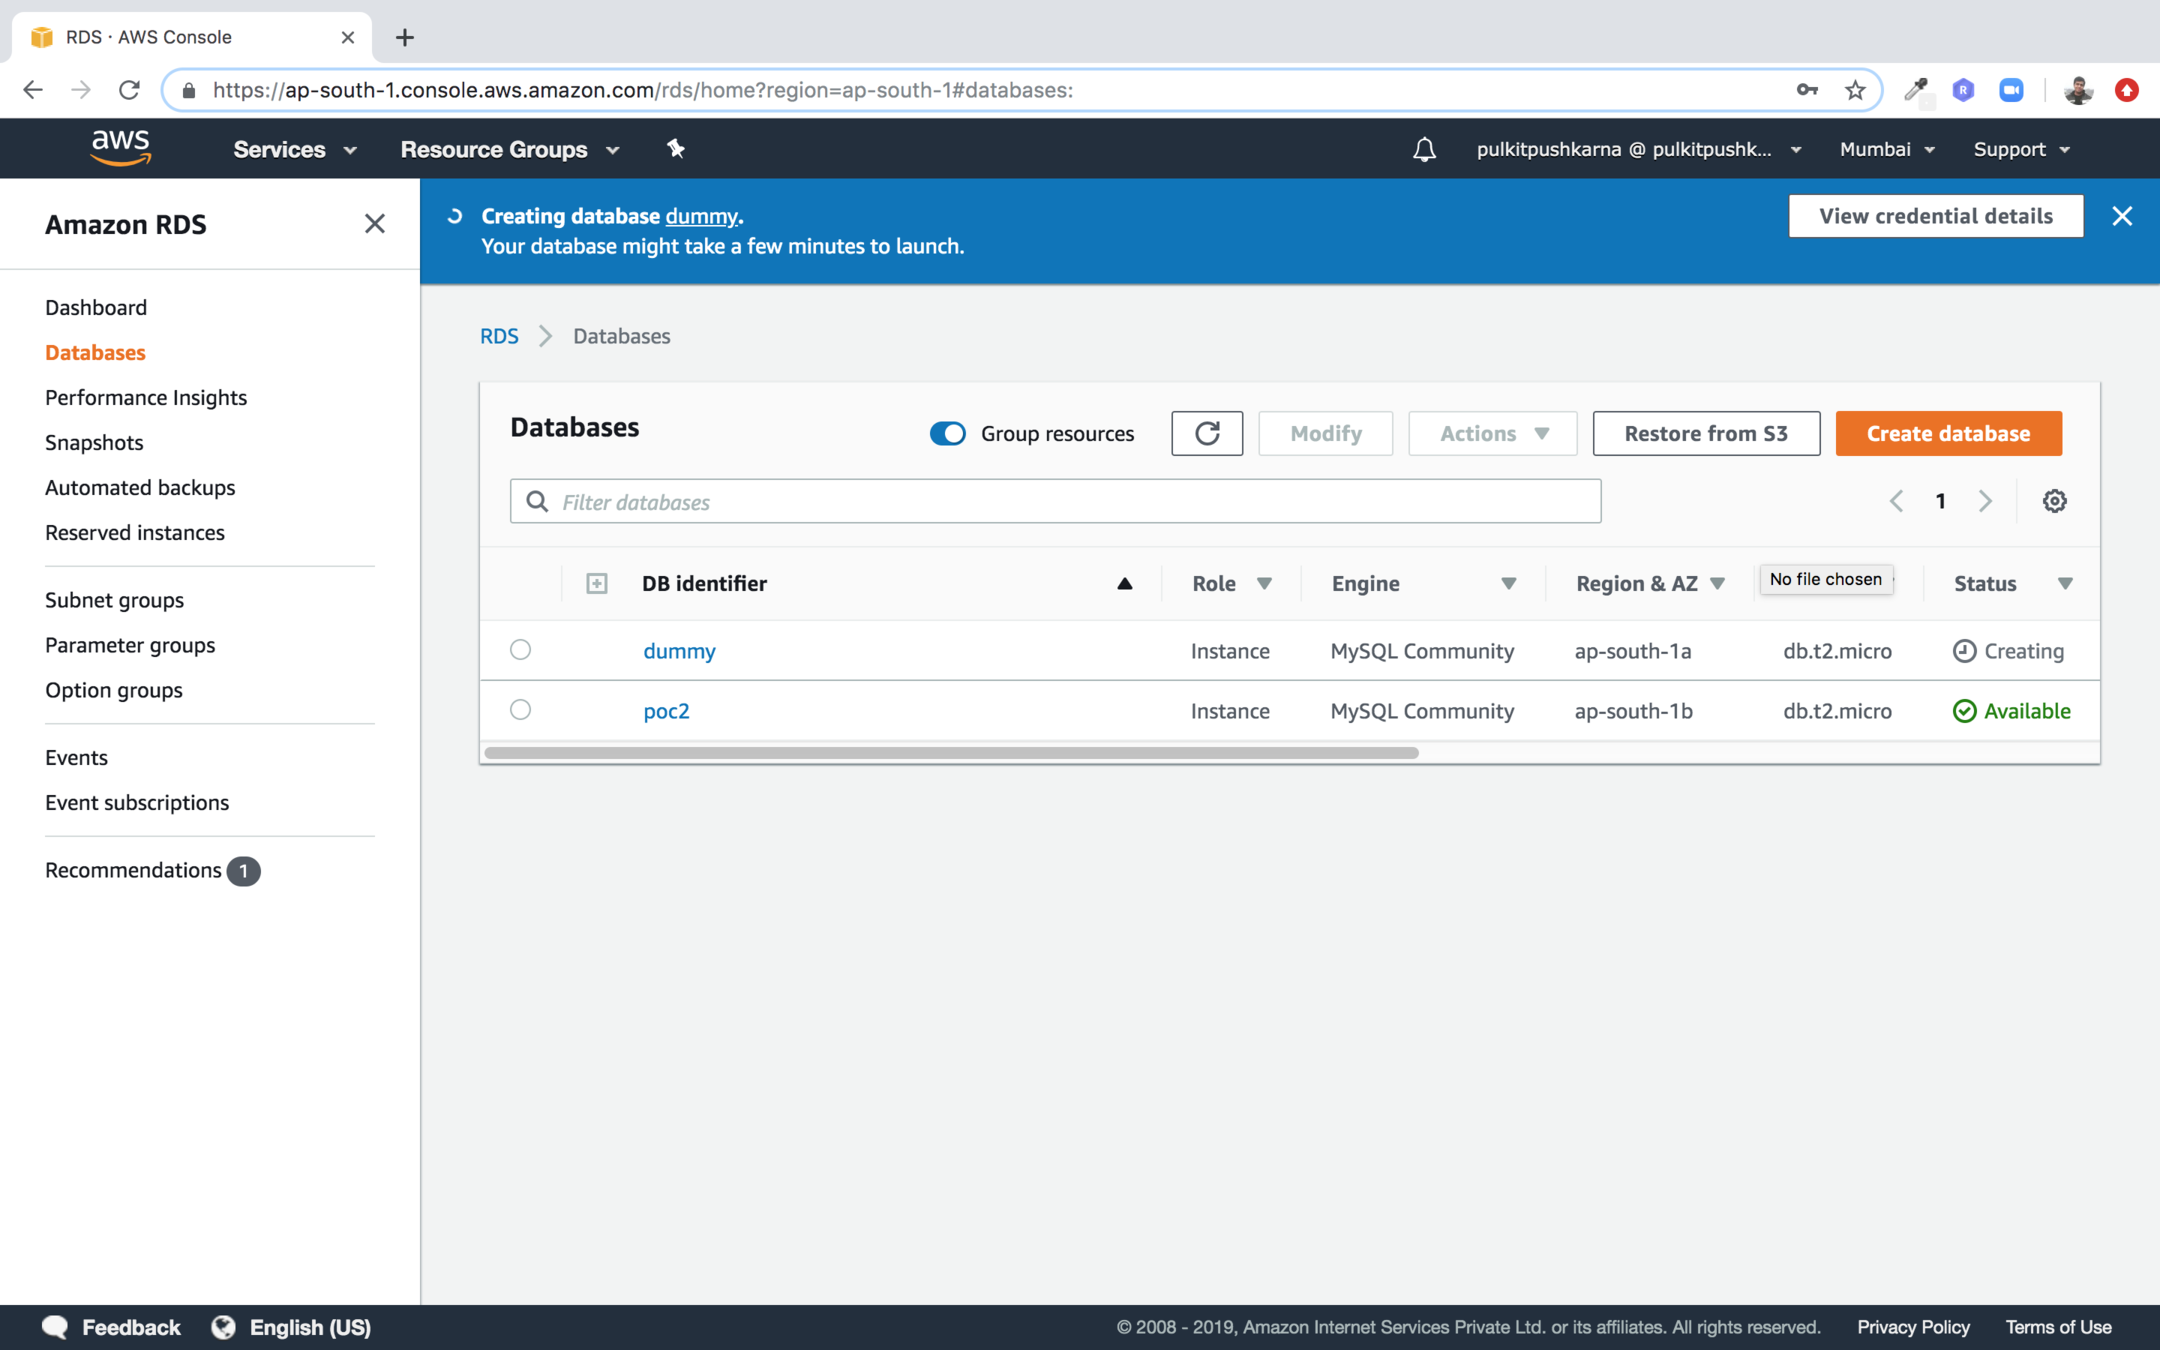
Step 1 : Go to Amazon RDS and click on Create database
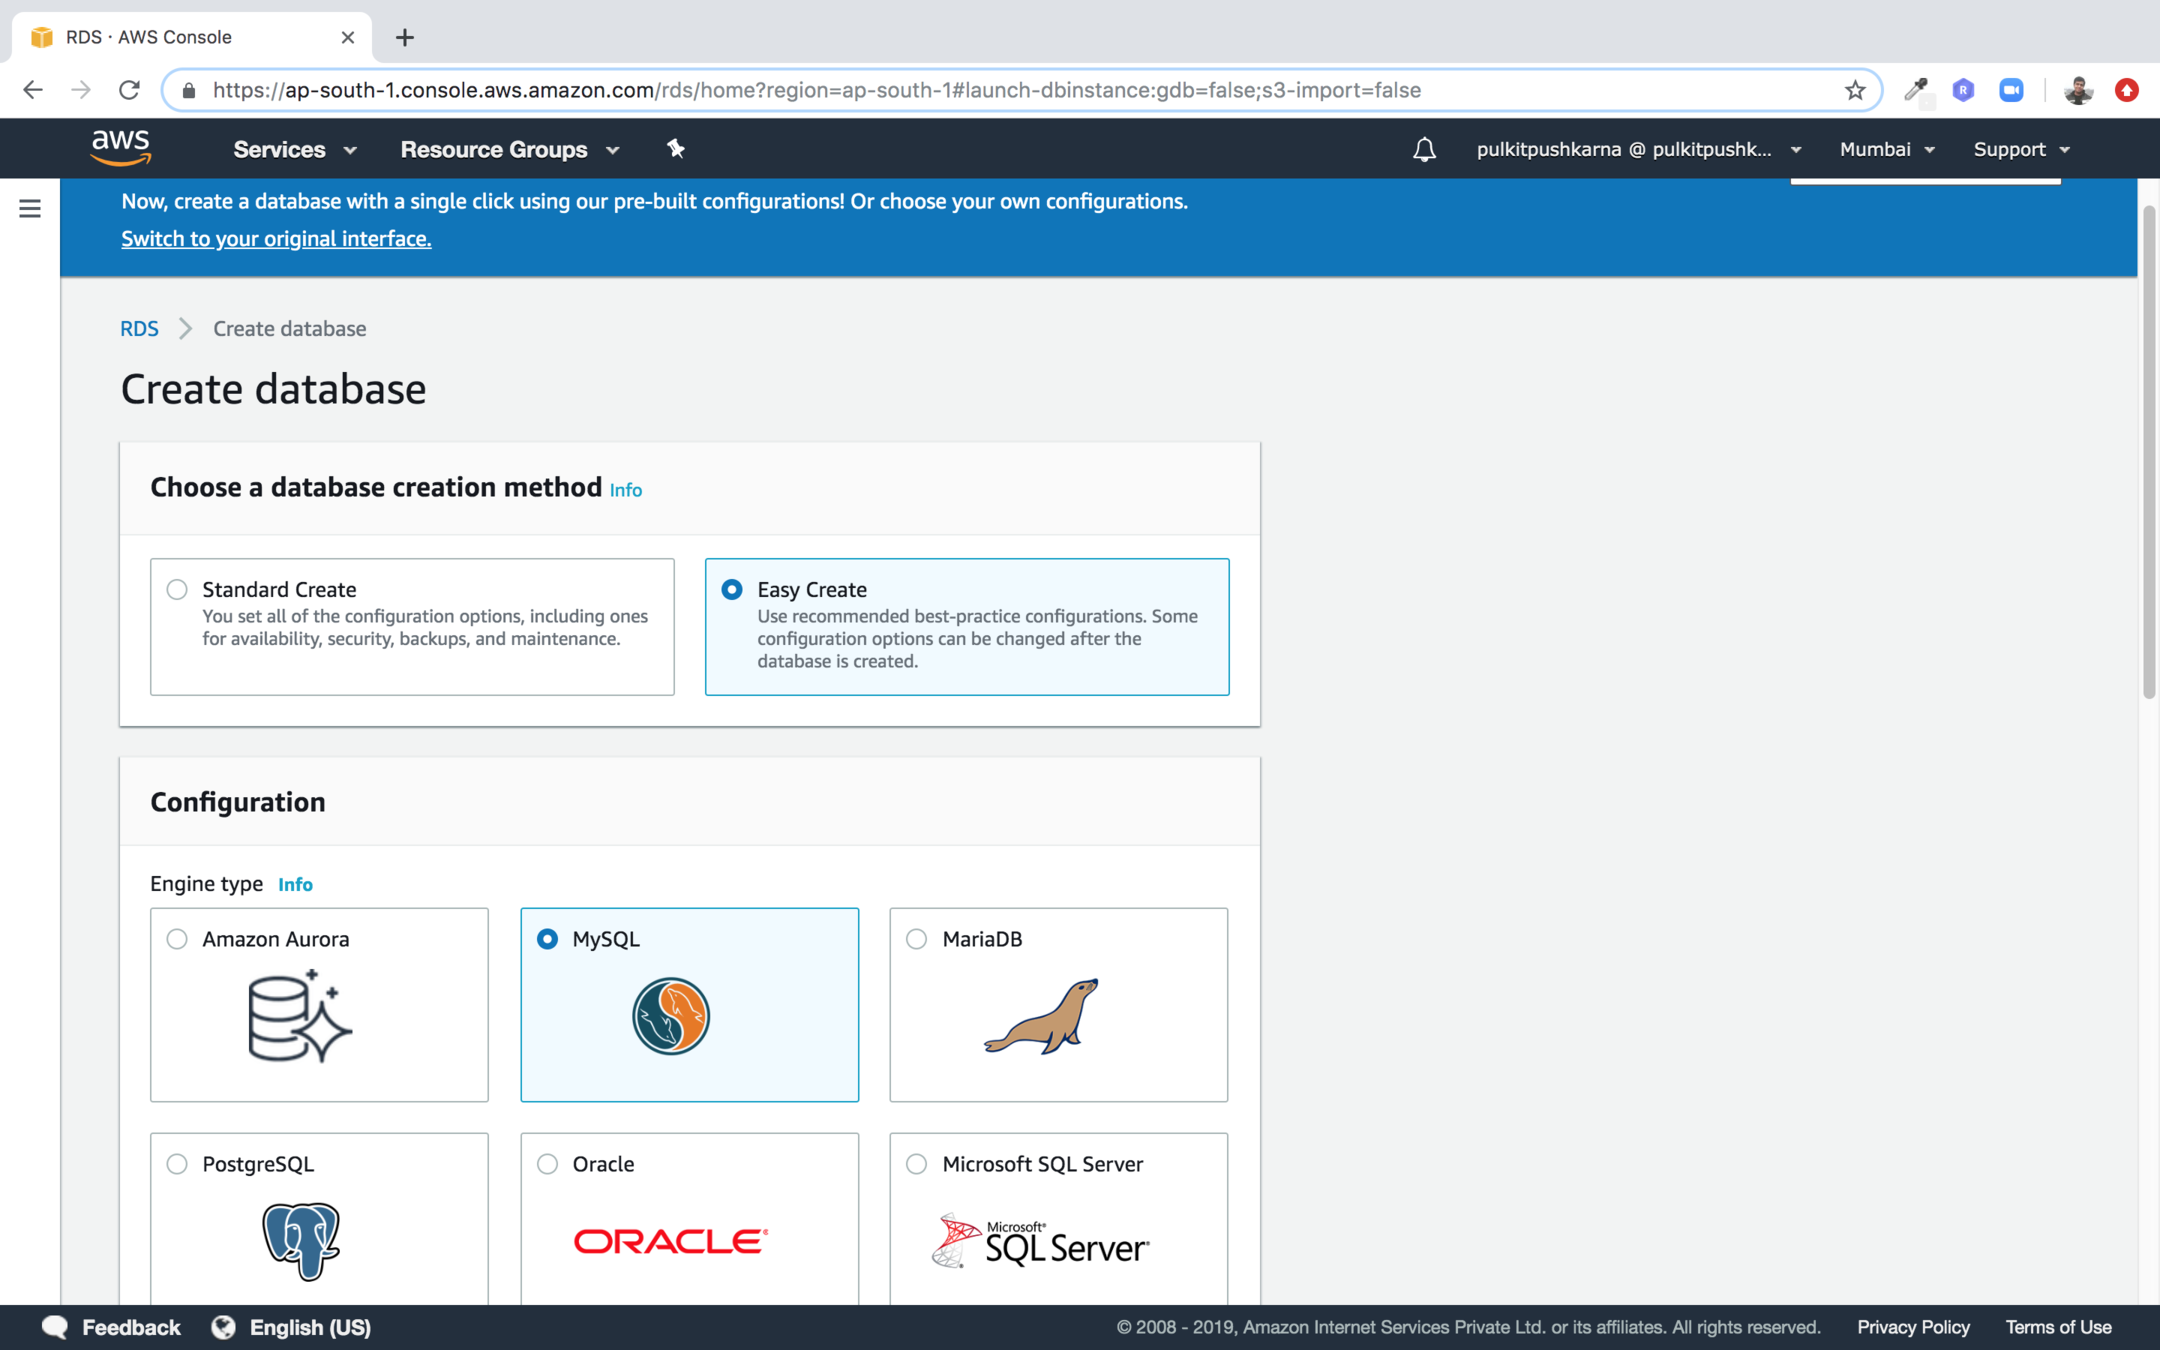
Step 2 : Select Creation method Easy Create and configuration MySQL.
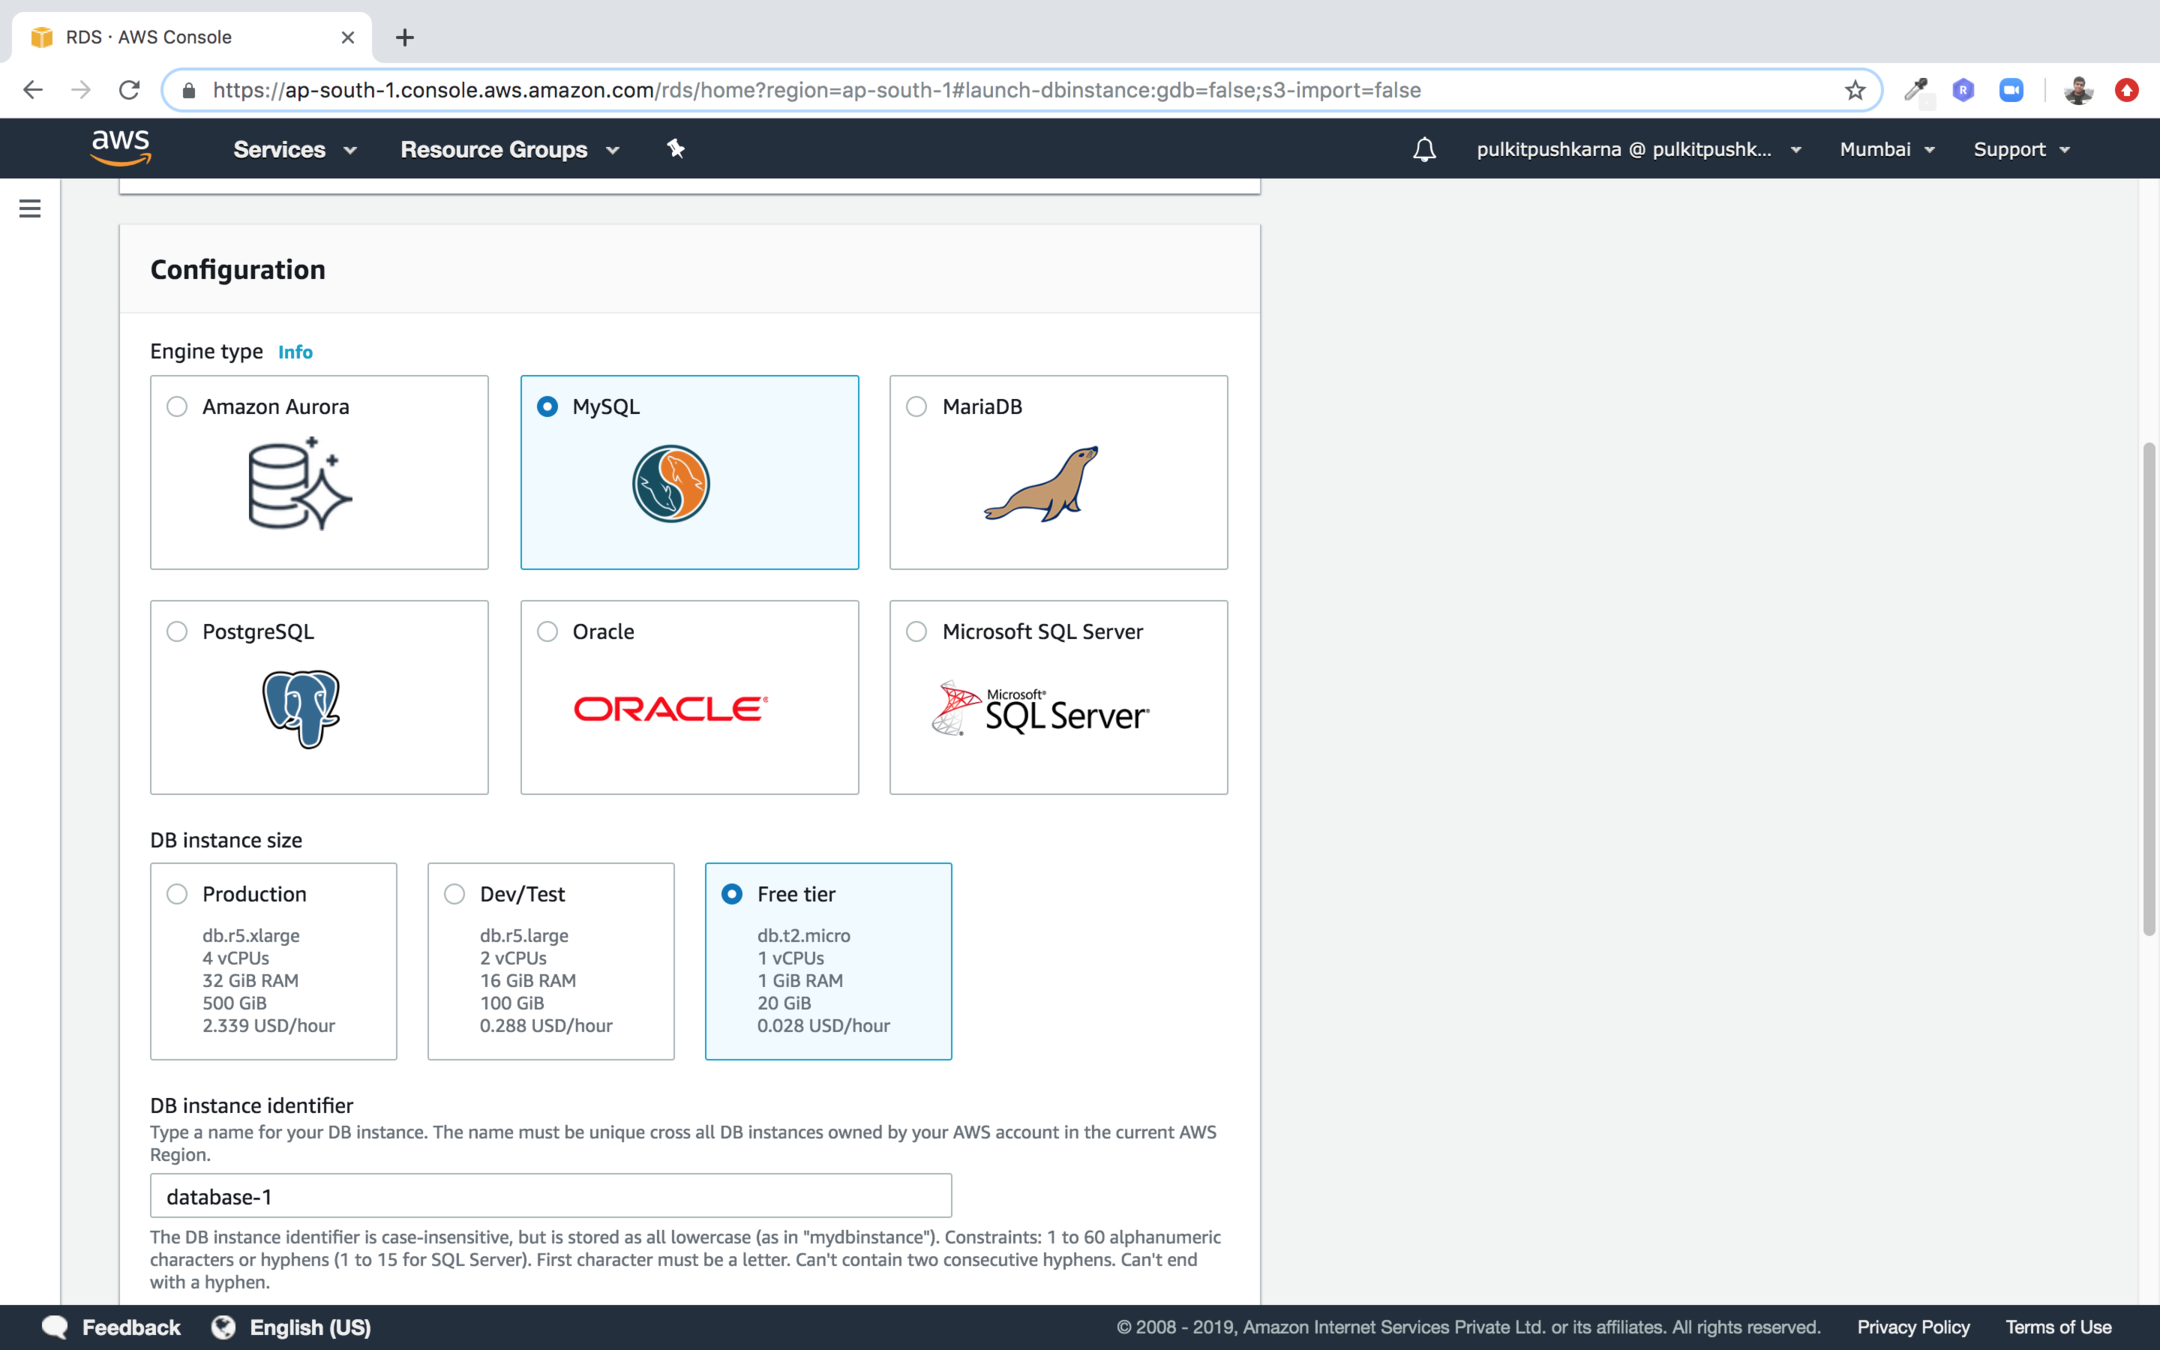
Select the DB instance type Free Tier
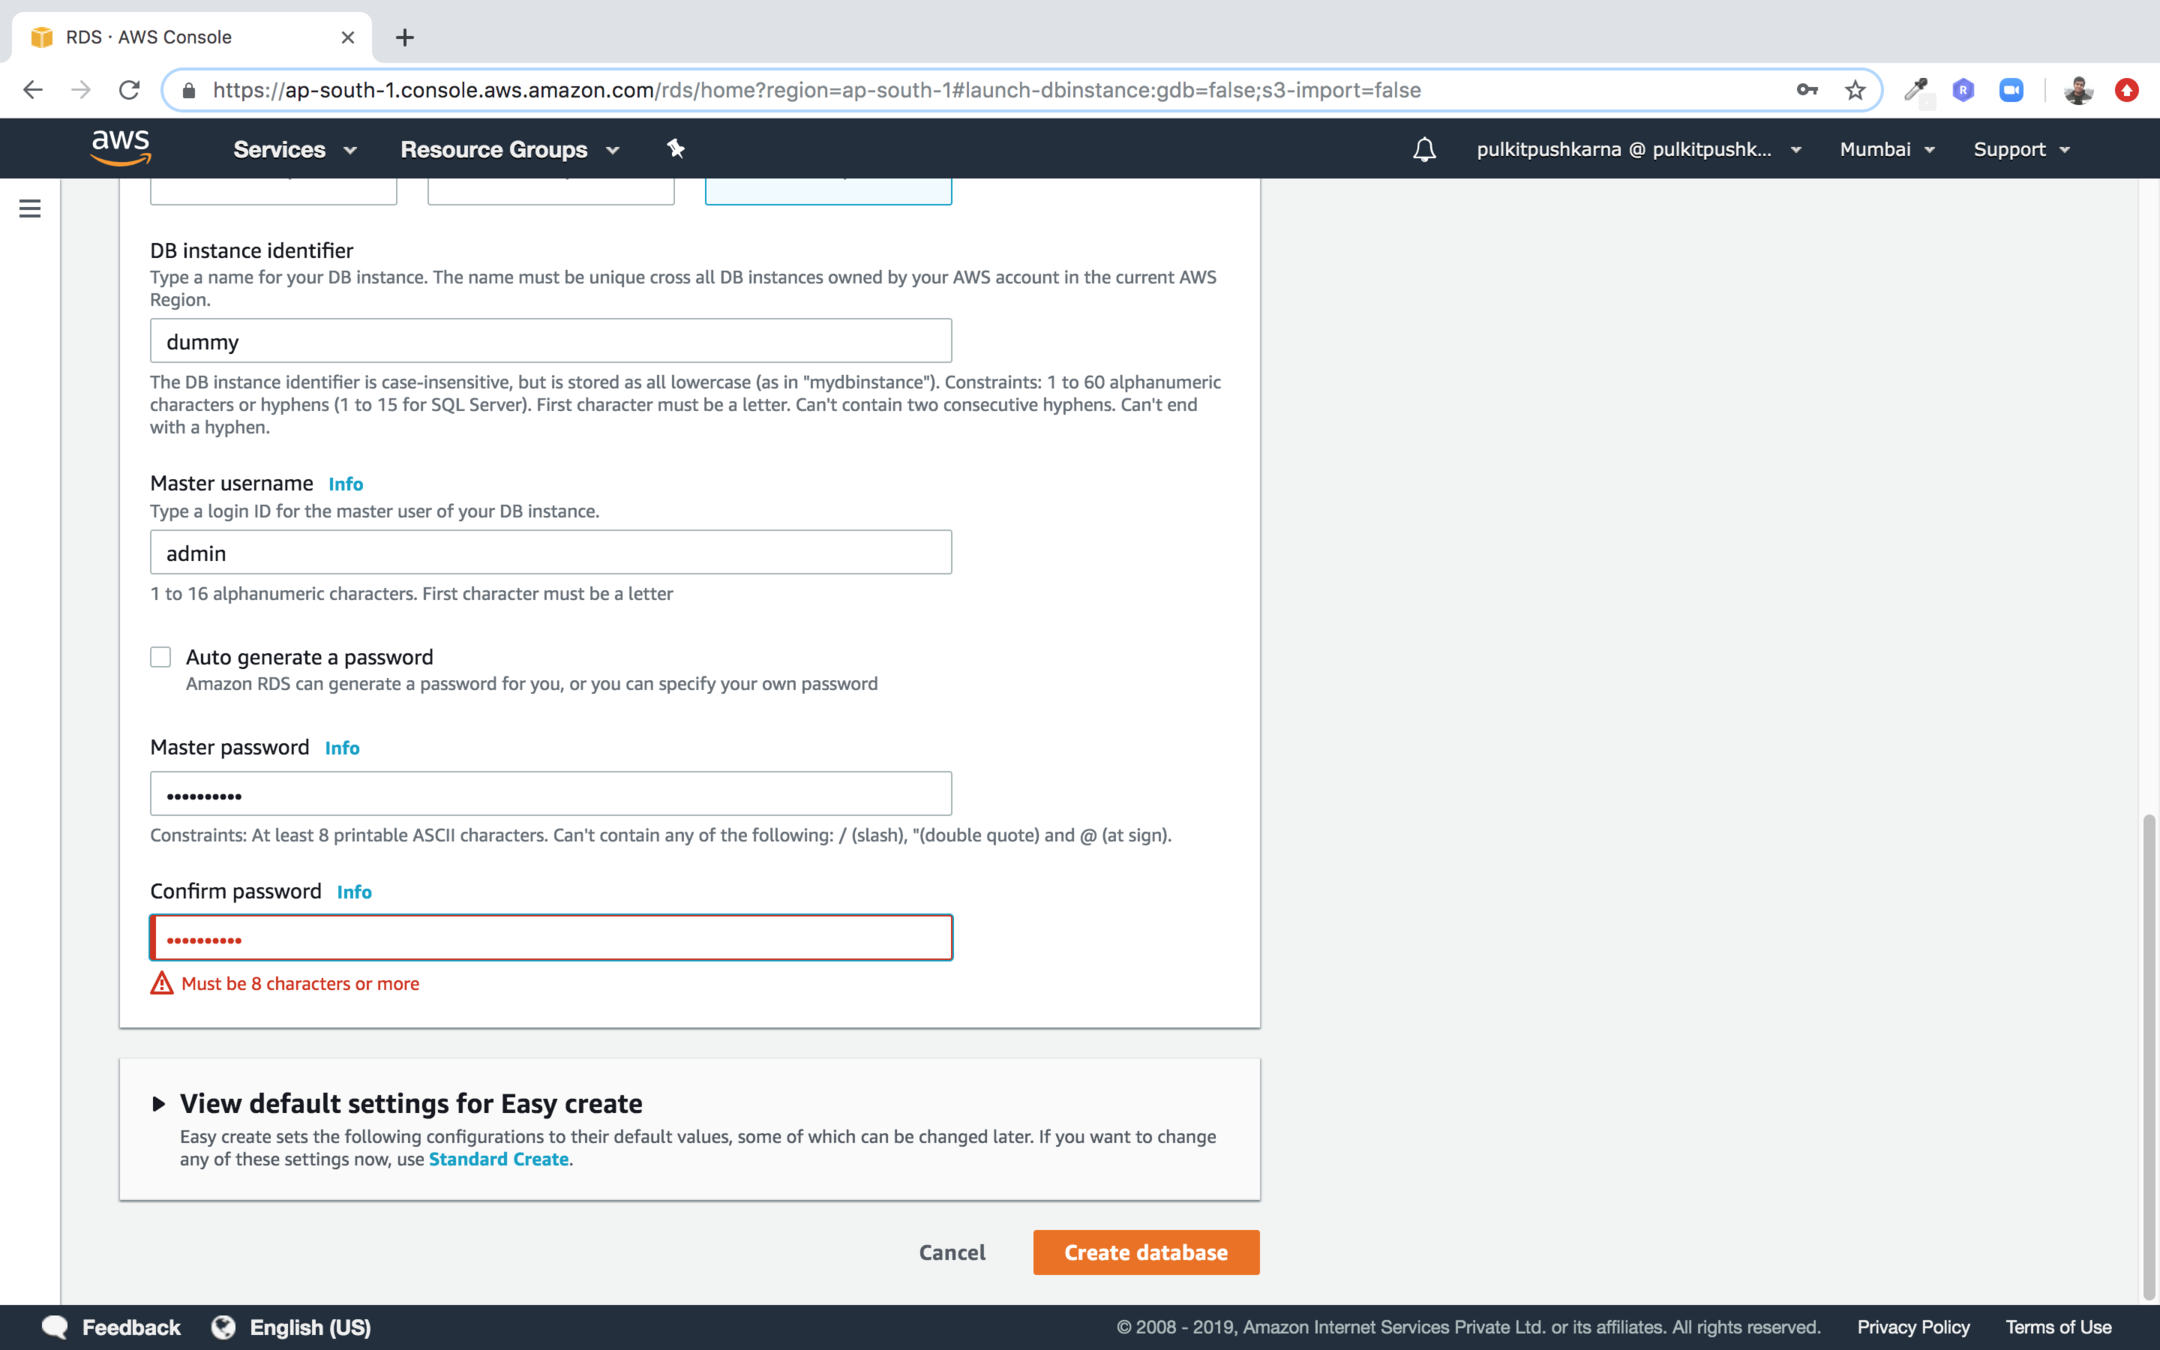
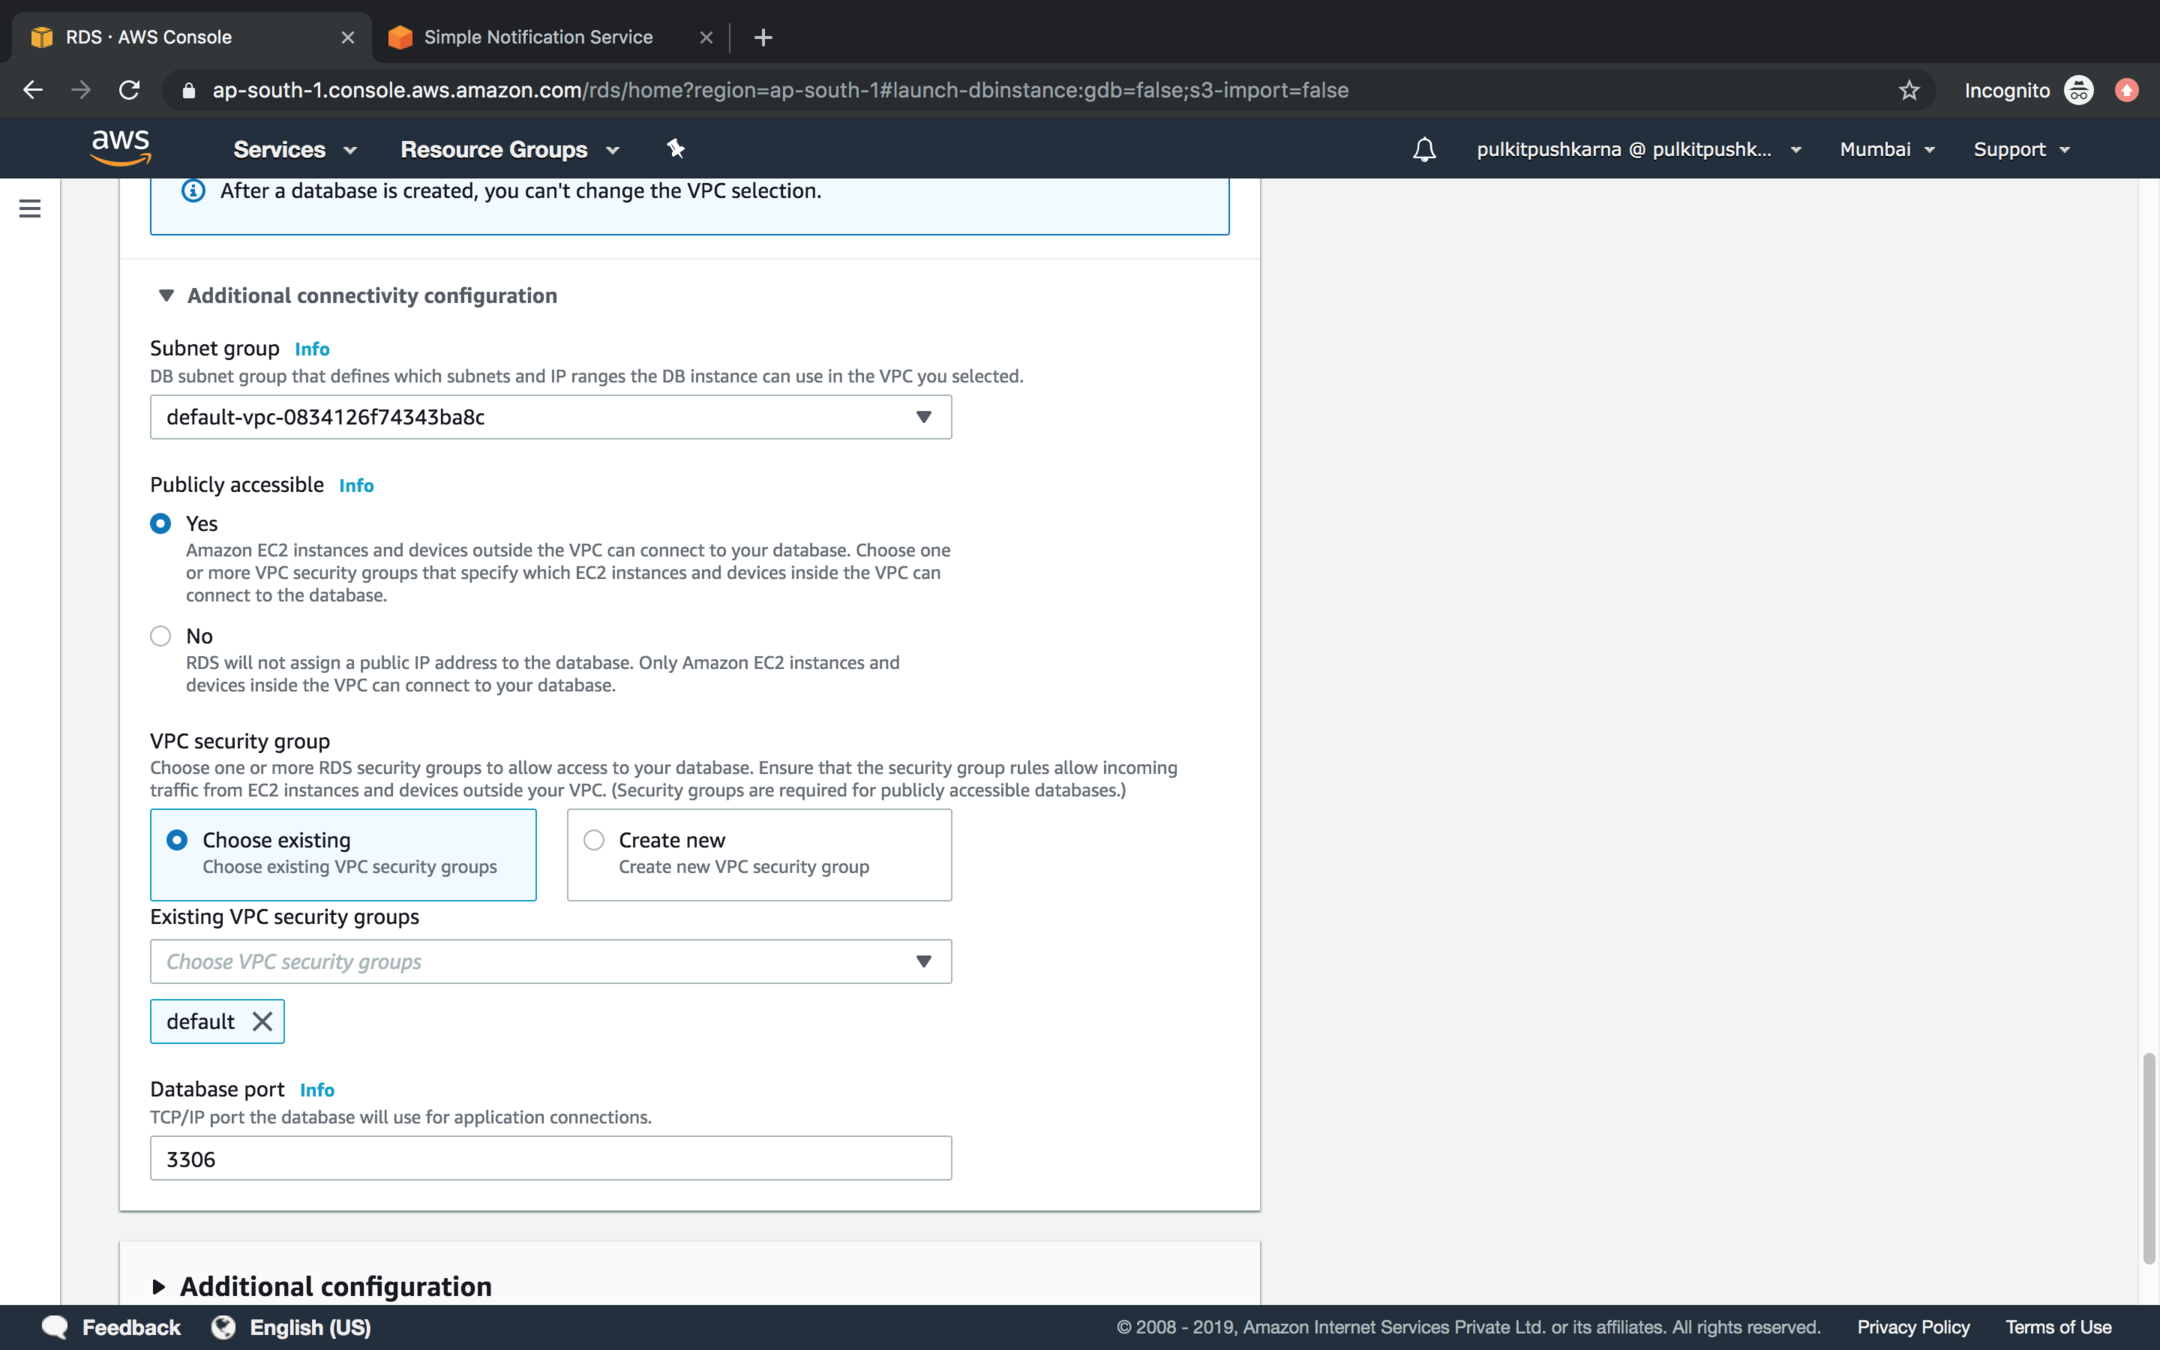
Set public accessible option to yes
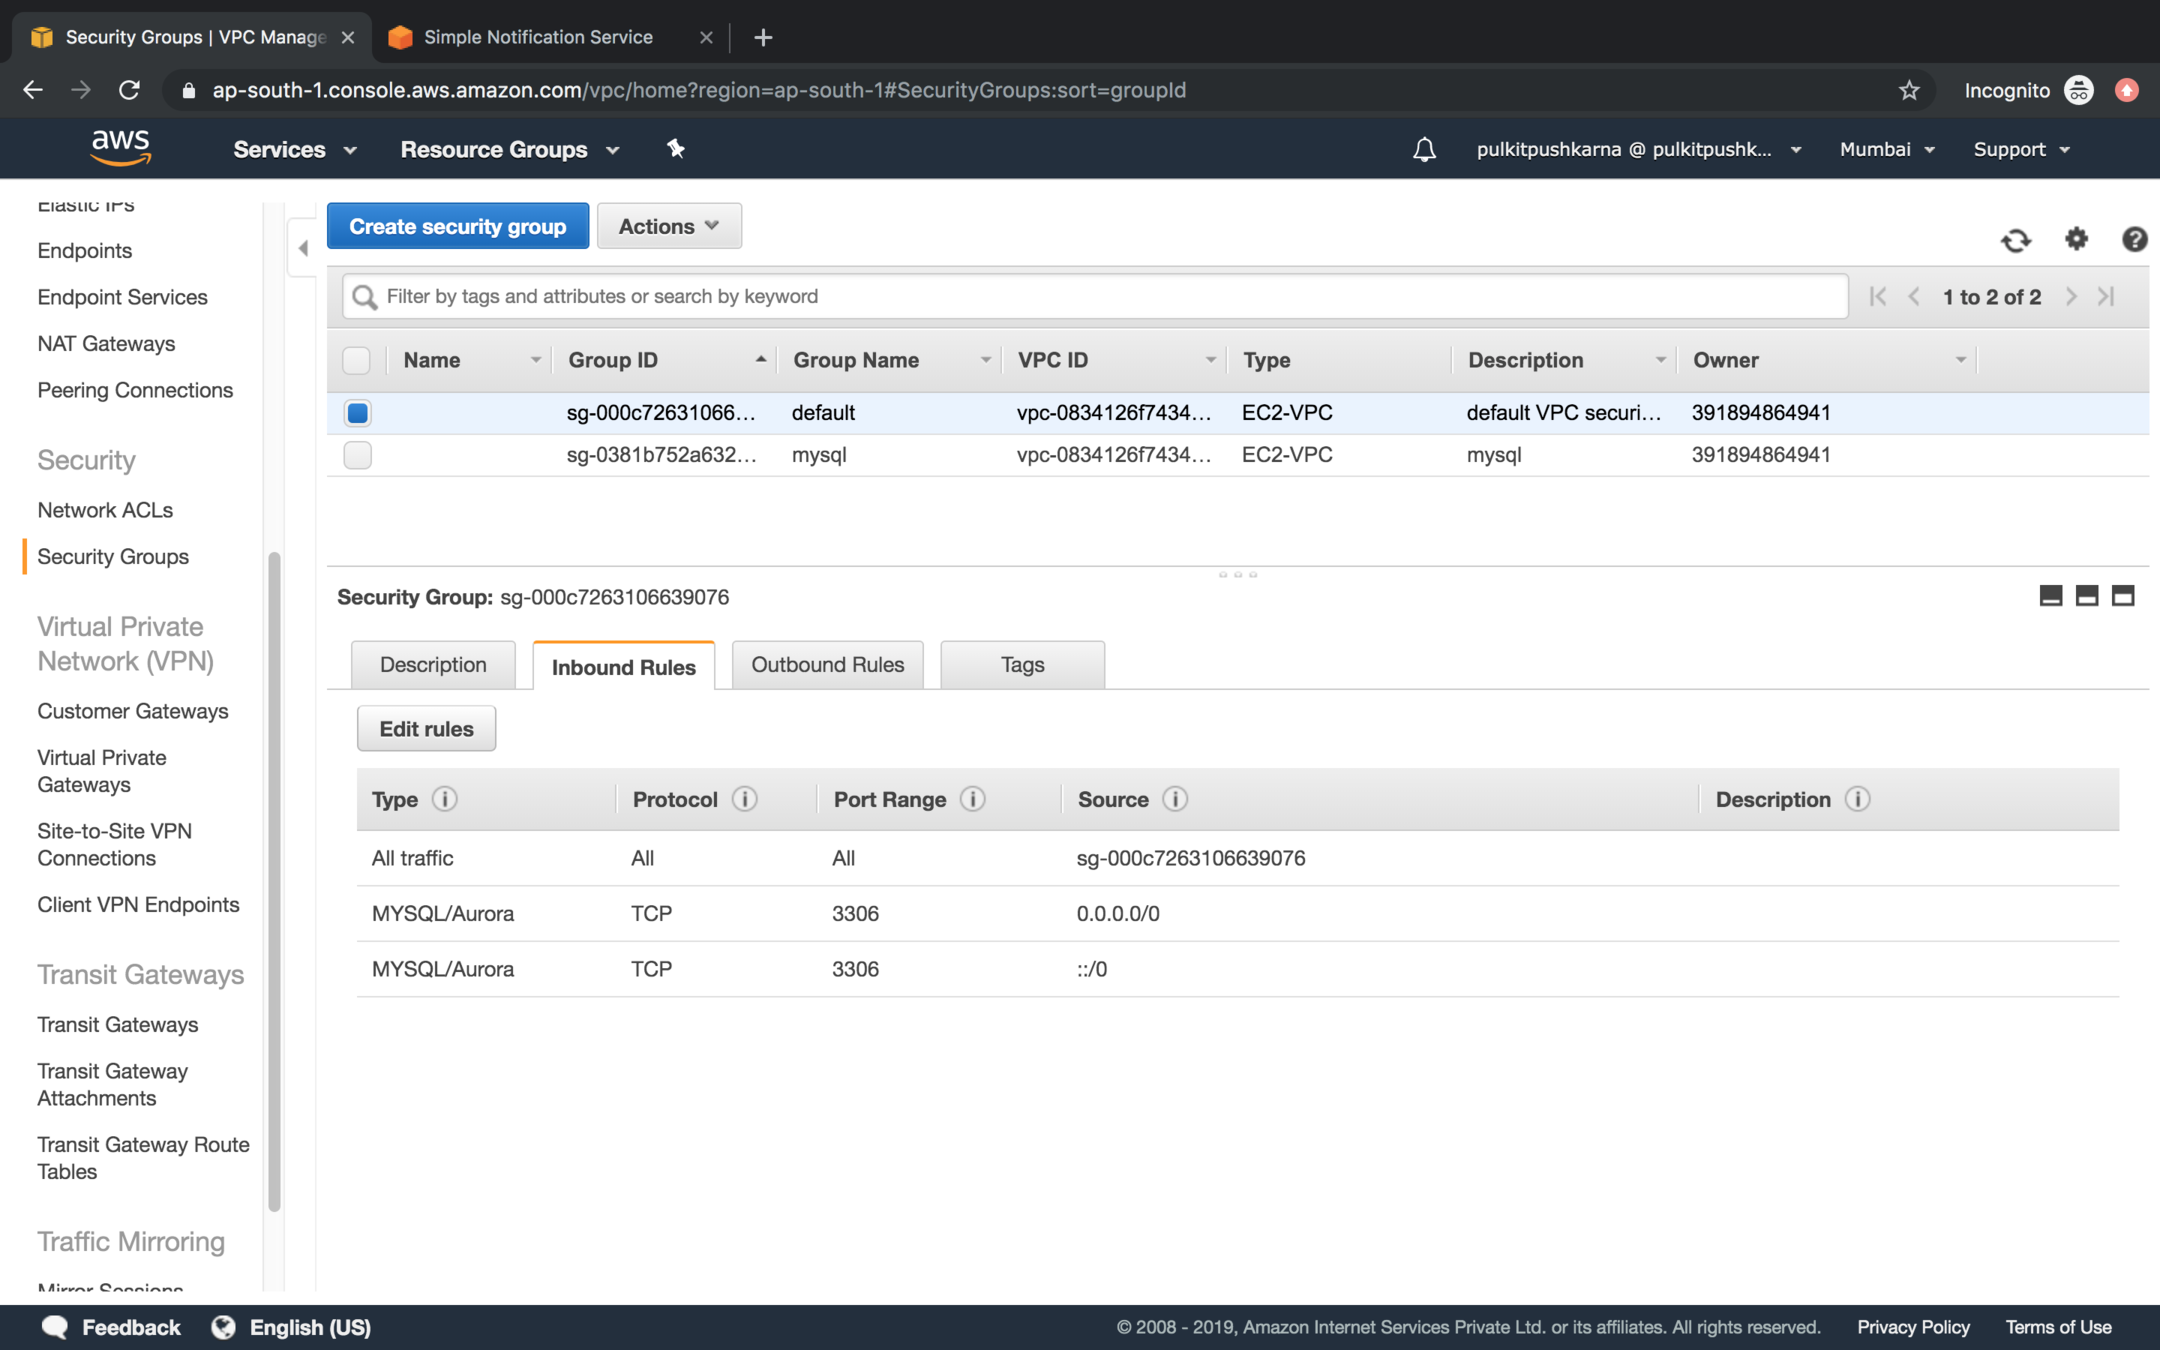
Set inbound rules to Mysql/Aurora for the security group
Spring Boot with RDS
plugins {
	id 'org.springframework.boot' version '2.1.7.RELEASE'
	id 'io.spring.dependency-management' version '1.0.8.RELEASE'
	id 'java'
}

group = 'com.spring-data-jpa.rds'
version = '0.0.1-SNAPSHOT'
sourceCompatibility = '1.8'

repositories {
	mavenCentral()
}

dependencies {
	implementation 'org.springframework.boot:spring-boot-starter-data-jpa'
	runtimeOnly 'mysql:mysql-connector-java'
	testImplementation 'org.springframework.boot:spring-boot-starter-test'
}
build.gradle
application.properties
spring.datasource.url=jdbc:mysql://mydb.cmetoyhg7bms.ap-south-1.rds.amazonaws.com:3306/mydb

spring.datasource.username=admin
spring.datasource.password=password
spring.datasource.driver-class-name=com.mysql.cj.jdbc.Driver
spring.jpa.hibernate.ddl-auto=create
package com.springdatajpa.rds.rdsmysql.entity;
import javax.persistence.Entity;
import javax.persistence.GeneratedValue;
import javax.persistence.GenerationType;
import javax.persistence.Id;
@Entity
public class User {
@Id
@GeneratedValue(strategy = GenerationType.AUTO)
private Integer id;
private String name;
public String getName() {
return name;
}
public void setName(String name) {
this.name = name;
}
public Integer getId() {
return id;
}
public void setId(Integer id) {
this.id = id;
}
@Override
public String toString() {
return "User{" +
"id=" + id +
", name='" + name + '\'' +
'}';
}
}
package com.springdatajpa.rds.rdsmysql.repository;

import com.springdatajpa.rds.rdsmysql.entity.User;
import org.springframework.data.repository.CrudRepository;

public interface UserRepository extends CrudRepository<User, Integer> {
}
package com.springdatajpa.rds.rdsmysql;

import com.springdatajpa.rds.rdsmysql.entity.User;
import com.springdatajpa.rds.rdsmysql.repository.UserRepository;
import org.springframework.boot.SpringApplication;
import org.springframework.boot.autoconfigure.SpringBootApplication;
import org.springframework.boot.autoconfigure.domain.EntityScan;
import org.springframework.context.ApplicationContext;
import org.springframework.data.jpa.repository.config.EnableJpaRepositories;

@SpringBootApplication
@EntityScan(basePackages = {"com.springdatajpa.rds.rdsmysql.entity"})
@EnableJpaRepositories(basePackages = {"com.springdatajpa.rds.rdsmysql.repository"})
public class RdsMysqlApplication {

    public static void main(String[] args) {

        ApplicationContext applicationContext = SpringApplication.run(RdsMysqlApplication.class, args);
        UserRepository userRepository = applicationContext.getBean(UserRepository.class);
        System.out.println(">>>>>>>");
        userRepository.findAll().forEach(System.out::println);
        User user = new User();
        user.setName("Pulkit");
        userRepository.save(user);
        System.out.println("userRepository.count()>>>>>>>>" + userRepository.count());
    }

}
Exercise 1
- Set up an mysql RDS instance of free tier
- Connect RDS with Spring Boot Application and Perform CRUD operation on an Entity Employee(Id, name, age)
Dynamo DB
-
DynamoDB is an easy to use and fully managed NoSQL database service provided by Amazon.
-
It provides fast and consistent performance, highly scalable architecture, flexible
data structure,
DynamoDB Component
Tables : DynamoDB stores data in an entity called a table. A table consists of a set of data.
Item : A table consists of multiple items. An item consists of a group of attributes.
An item is like a record or row in an RDBMS table.
Attributes : An item in a table consists of multiple attributes. An attribute is a basic data element of an item. It is similar to a field or a column in an RDBMS.
Primary key
- It is mandatory to define a primary key in the DynamoDB table. A primary key is a mechanism to uniquely identify each item in a table.
-
There are two types of primary keys:
-
Partition Key :
-
It is a simple primary key that is composed of a single attribute named partition key.
-
DynamoDB partitions the data in sections based on the partition key value.
-
The partition key value is used as an input to an internal hash functions, which determines in which partition the data is stored.
-
This is the reason partition key is also called the hash key.
-
No two items in a table can have the same partition key.
-
-
- Partition key and sort key :
-
Partition key and sort key are composed of two attributes and that's why it is also called as a composite primary key.
-
As the name suggest, the first attribute of the key is the partition key and the second attribute is the sort key.
-
DynamoDB stores all items with the same partition key together.
-
In a partition, items are ordered based on a sort key value. Thus, the partition key determines the first level of sort
order in a table whereas the sort key determines the secondary sort order of the data stored in a partition.
-
A sort key is also called a range key.
-
A table with both partition key and sort key can have more than one item with the same partition key value; however, it must have a different sort key.
-
Secondary indexes
-
DynamoDB allows you to create secondary indexes on a table.
-
It is an alternate way to query table data in addition to querying it using the primary key.
-
DynamoDB allows you to create 5 GSI and 5 LSI on a table. There are two types of secondary indexes:
-
Global Secondary Index (GSI) :
It consists of a partition key and a sort key,
which has to be different from the primary keys defined on the table
-
Local Secondary Index (LSI) :
It uses the same partition key as of the table but
uses a different sort key
-
DynamoDB Streams
-
DynamoDB Streams provides an optional feature that can capture data modification events whenever a DynamoDB table is changed.
-
When you enable a stream on a DynamoDB table, it writes a stream record as and when one of the following events occurs:
-
When a new item is added to a table, the stream captures an image of the entire item including all of the item attributes
-
When an item is updated, the stream captures the before and after values of all the attributes modified during the process
-
When an item is deleted from the table, the stream captures an image of the entire item before it is deleted
-
Naming rules
-
Names are case-sensitive and must be encoded in UTF-8
-
A table name and an index name may range between 3 to 255 characters
-
Names may contain only the following characters:
-
a-z
-
A-Z
-
0-9
- _ (underscore)
-
- (dash)
-
. (dot)
-
Attributes can have a number of characters between 1 to 255.
-
Data Types
-
Scalar types: Scalar data type represents one value. It includes data types such as number, string, binary, boolean, and null.
-
Document types: A document data type contains of a complex structure with nested attributes. Examples of such structures are JSON and XML. DynamoDB
supports list and map document data types.
-
Set types: A set data type contains a group of scalar values. The set types supported by DynamoDb are string set, number set, and binary set.
Step 1: Click on the Create table button in the DynamoDB console
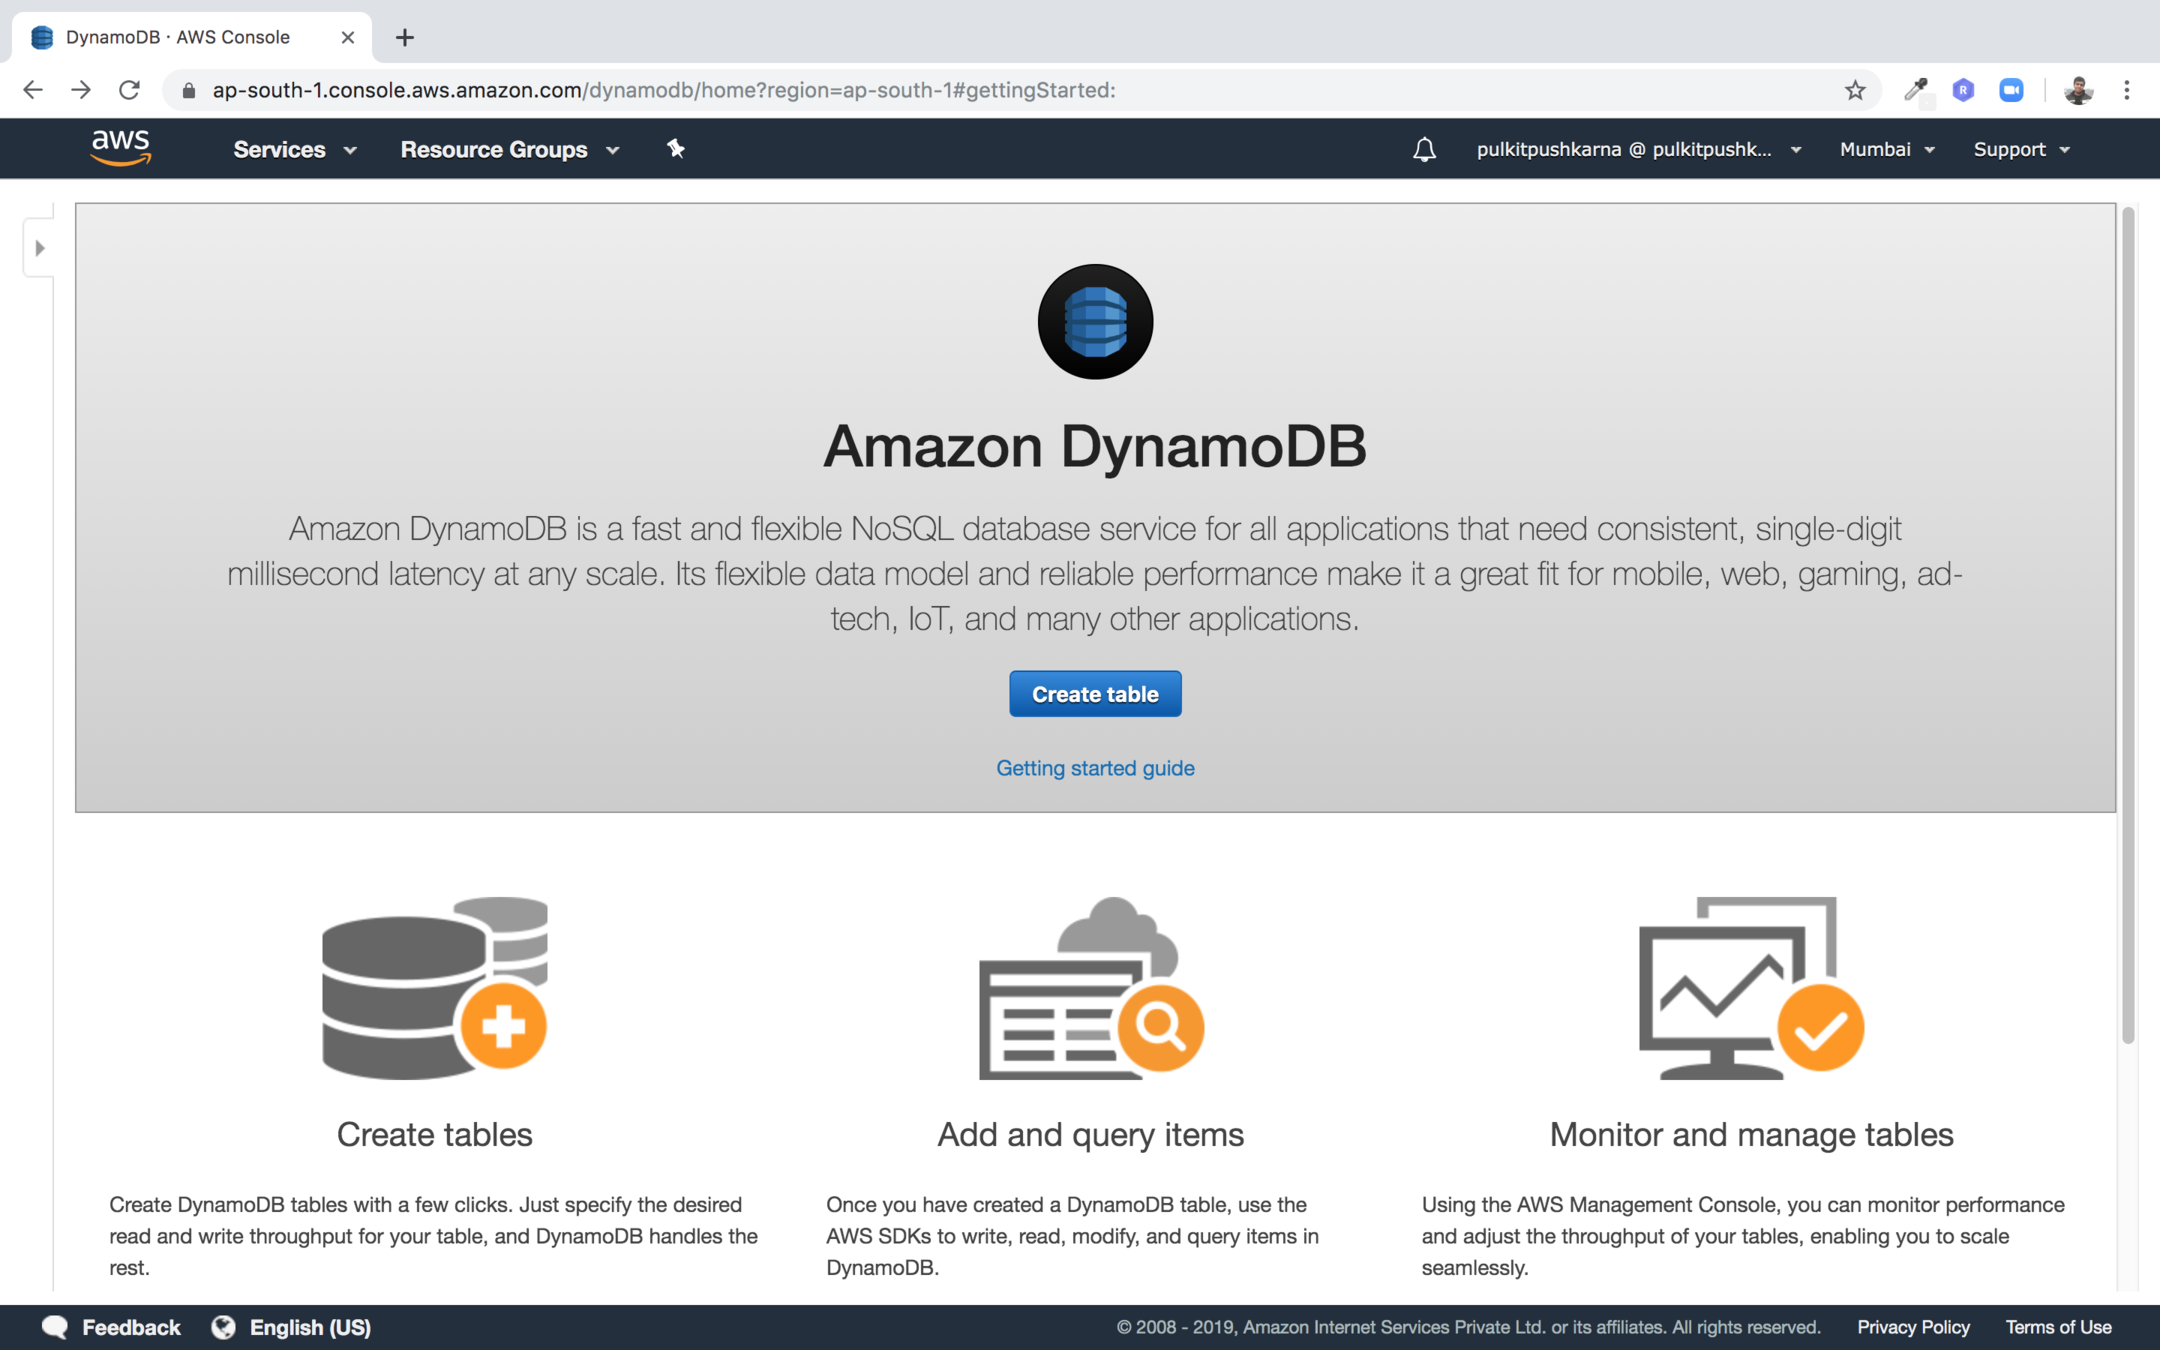
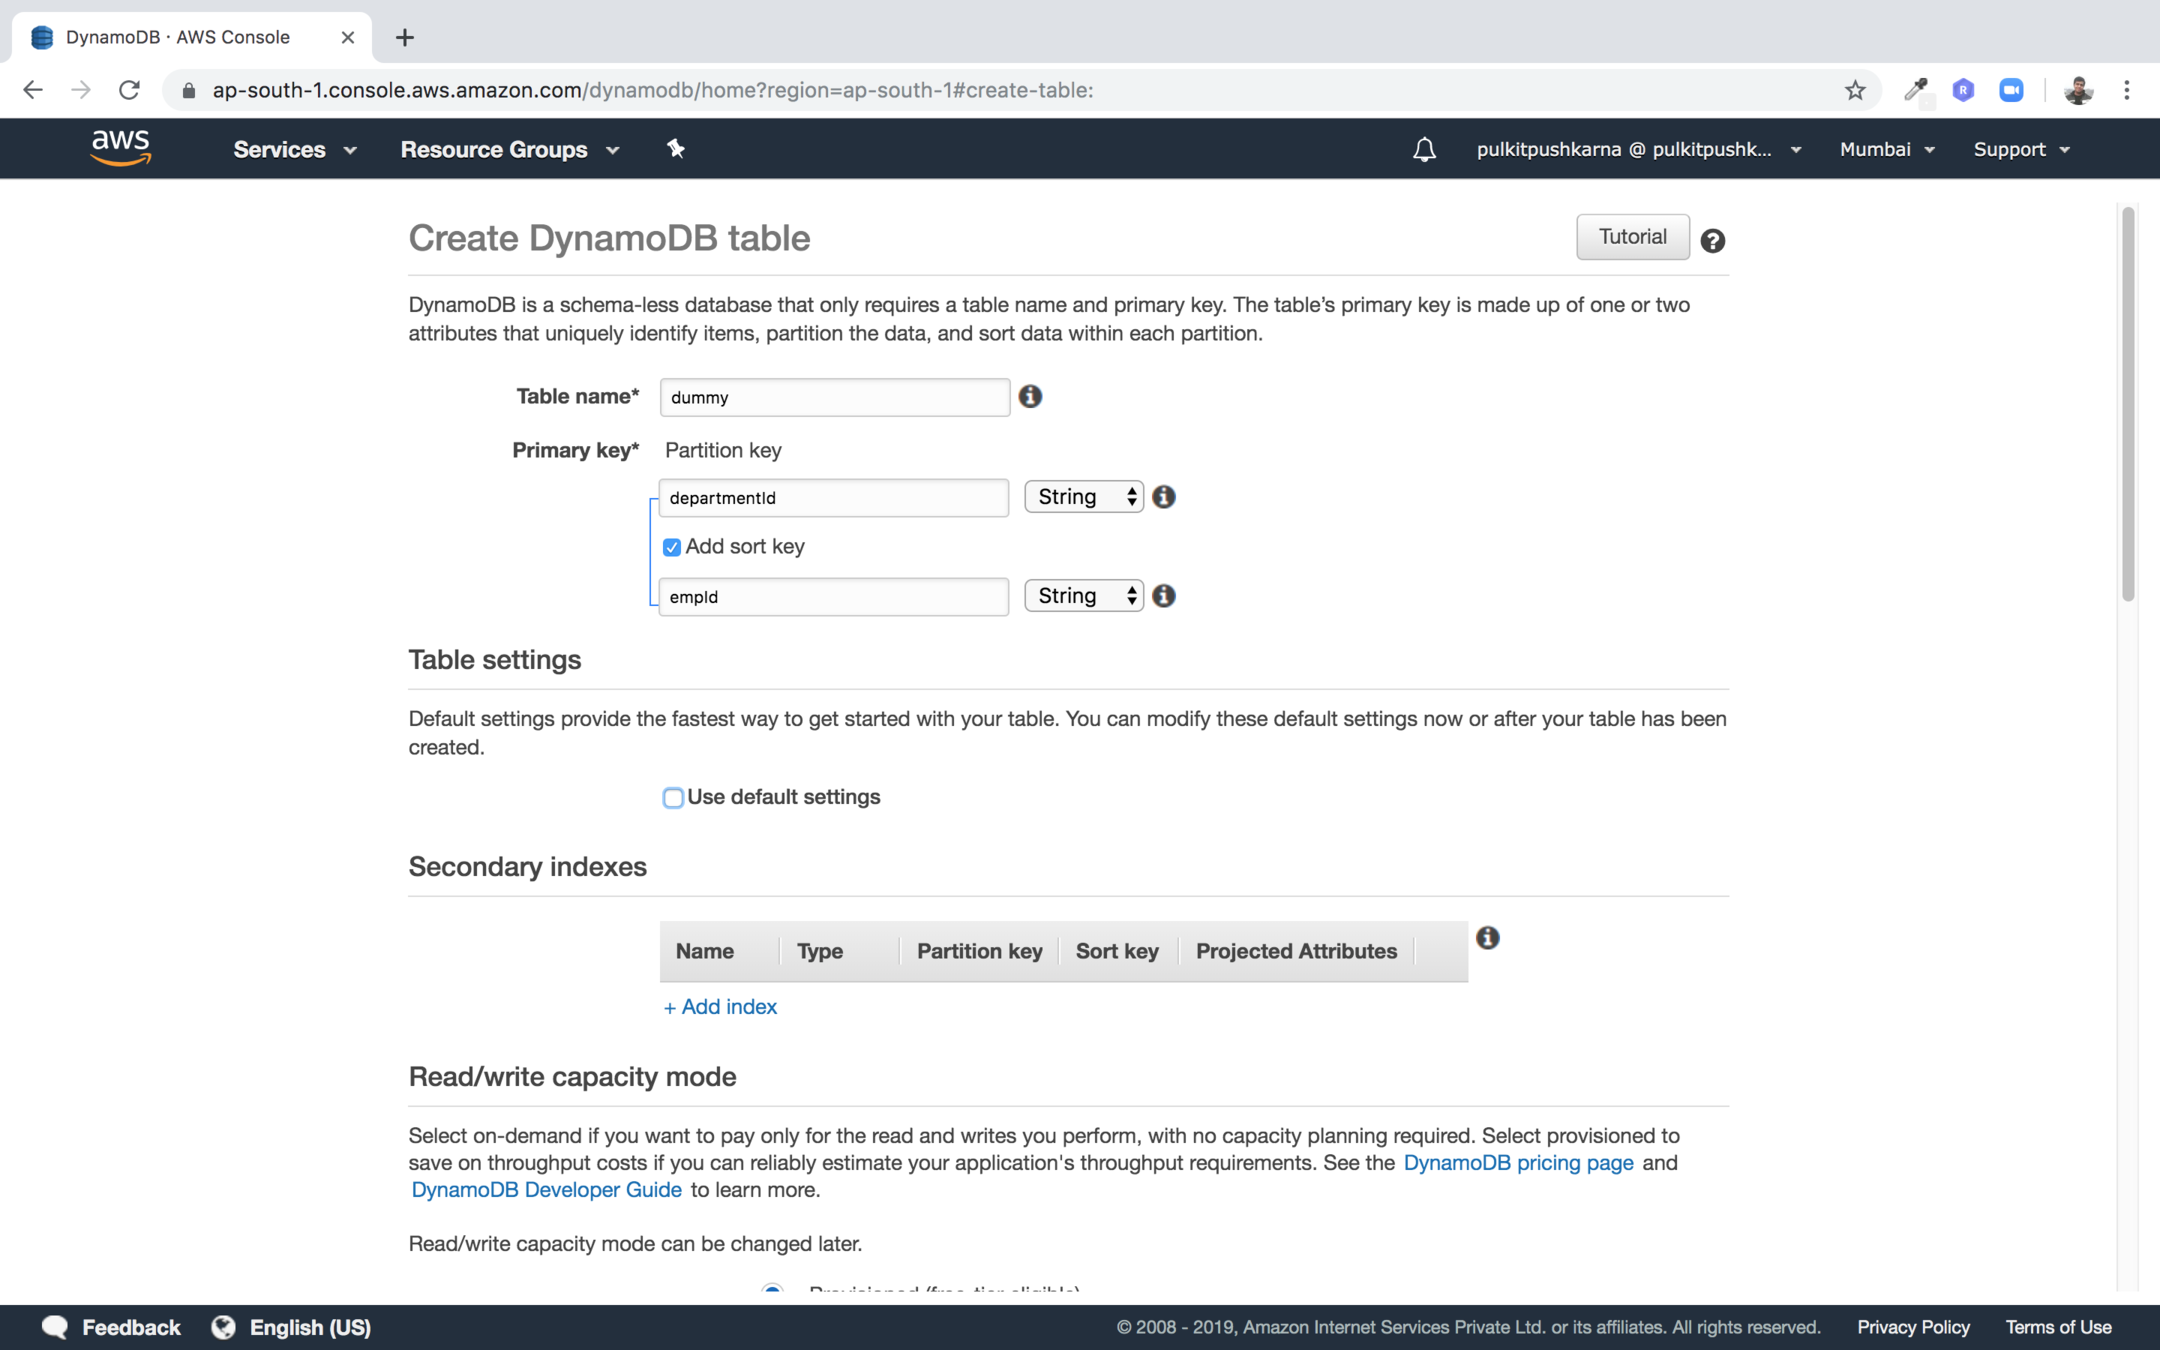
Step 2 : Enter the table name, partition key and sort key for to check the default value you can just uncheck "use default settings"
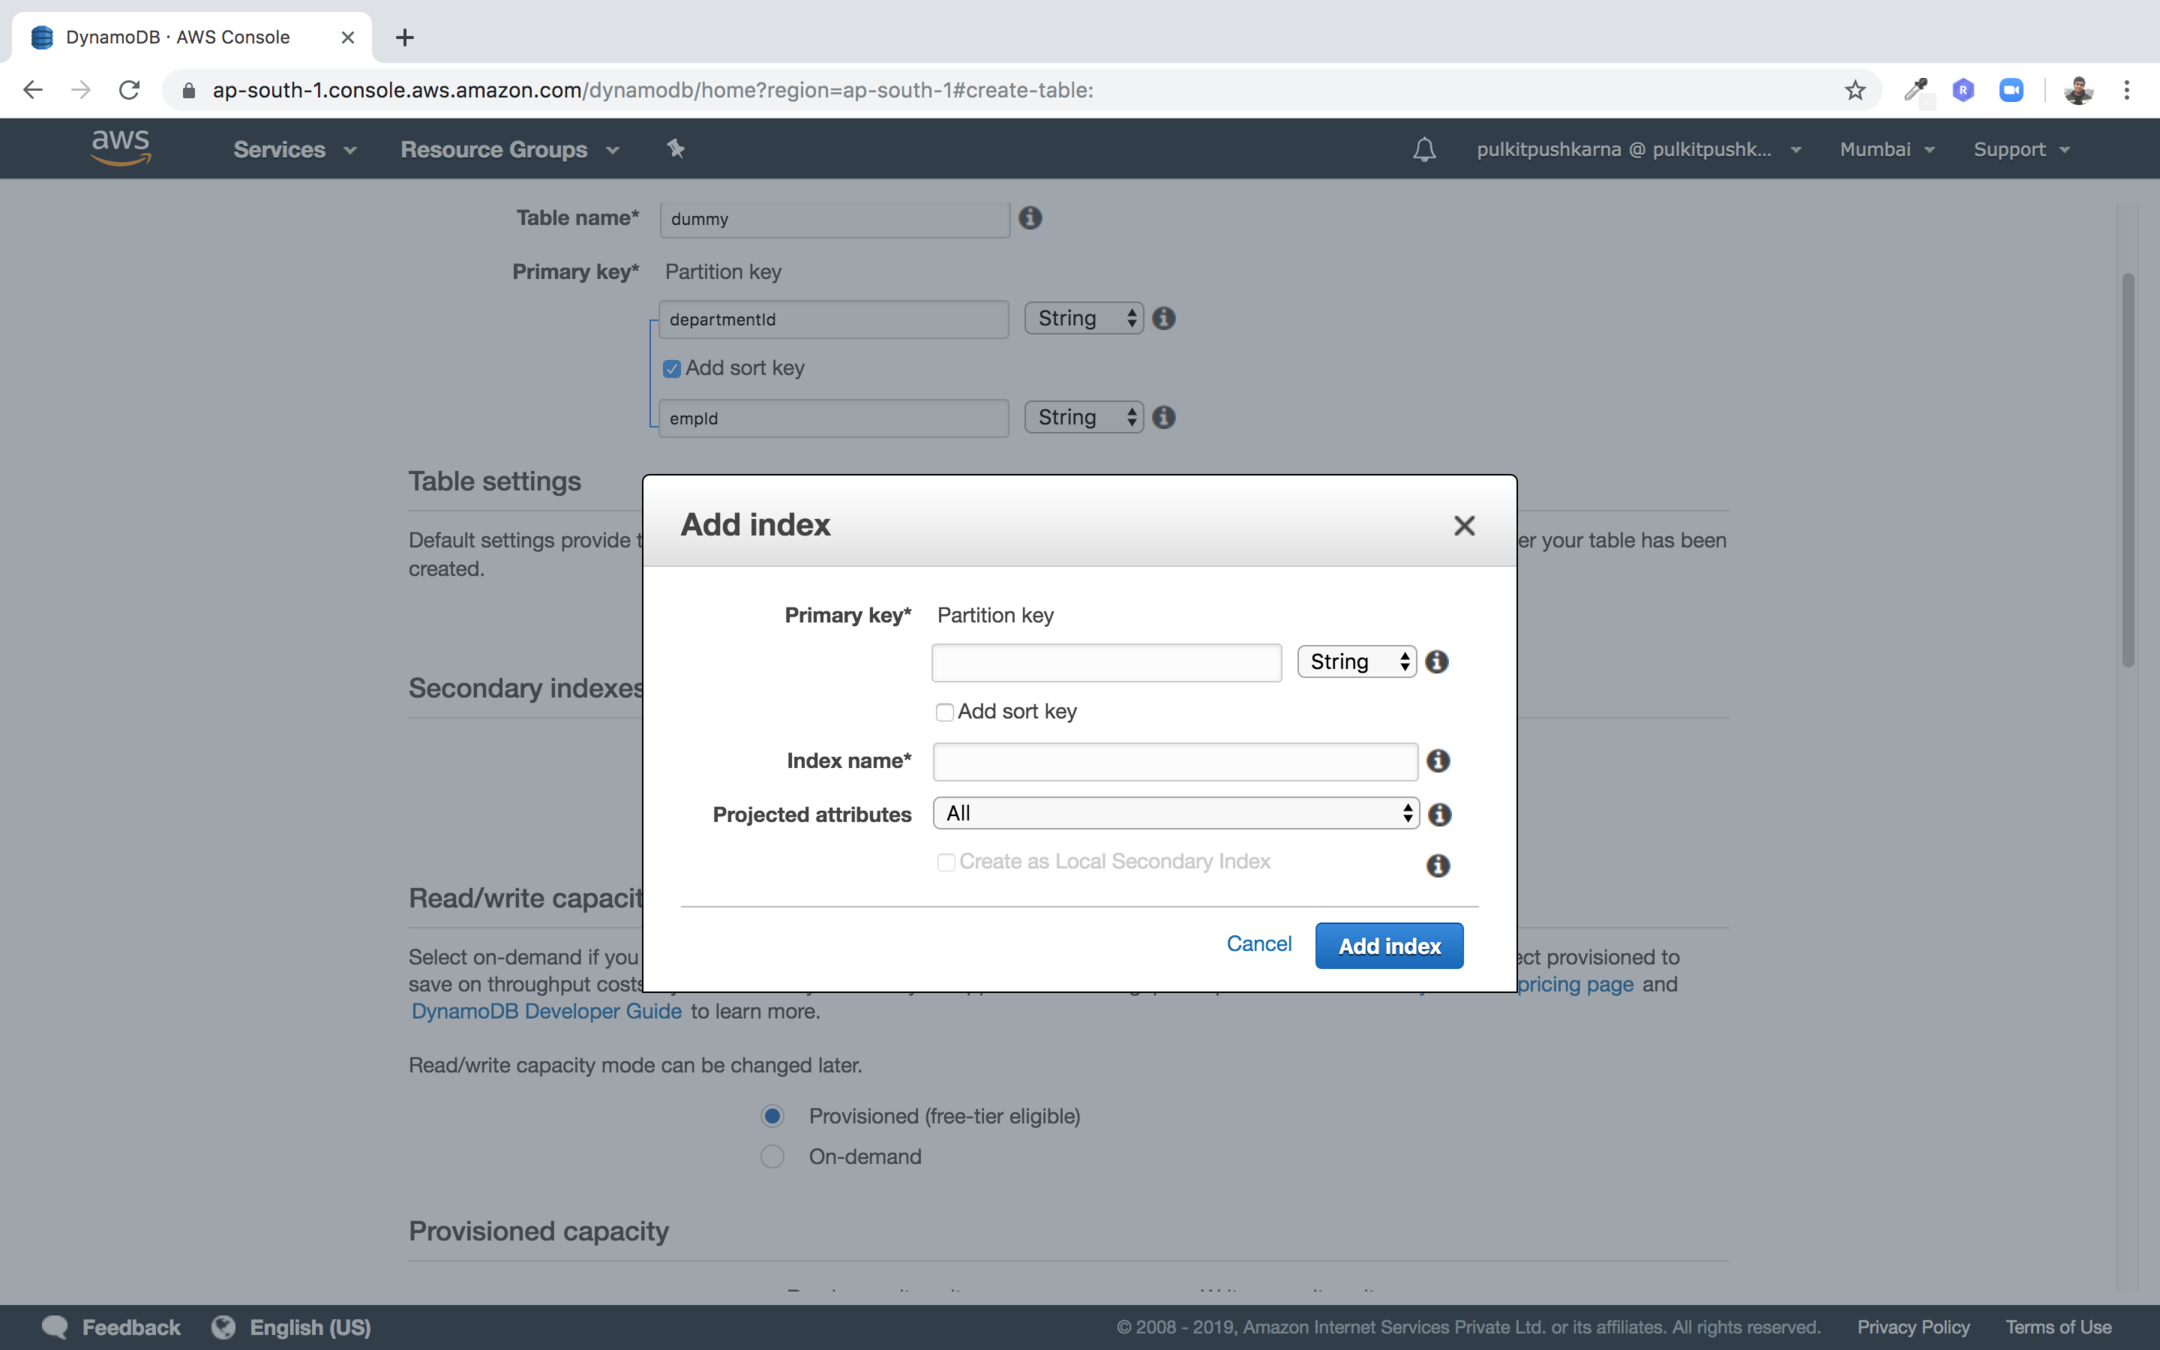
Step 4 : Click on the add index to create secondary index
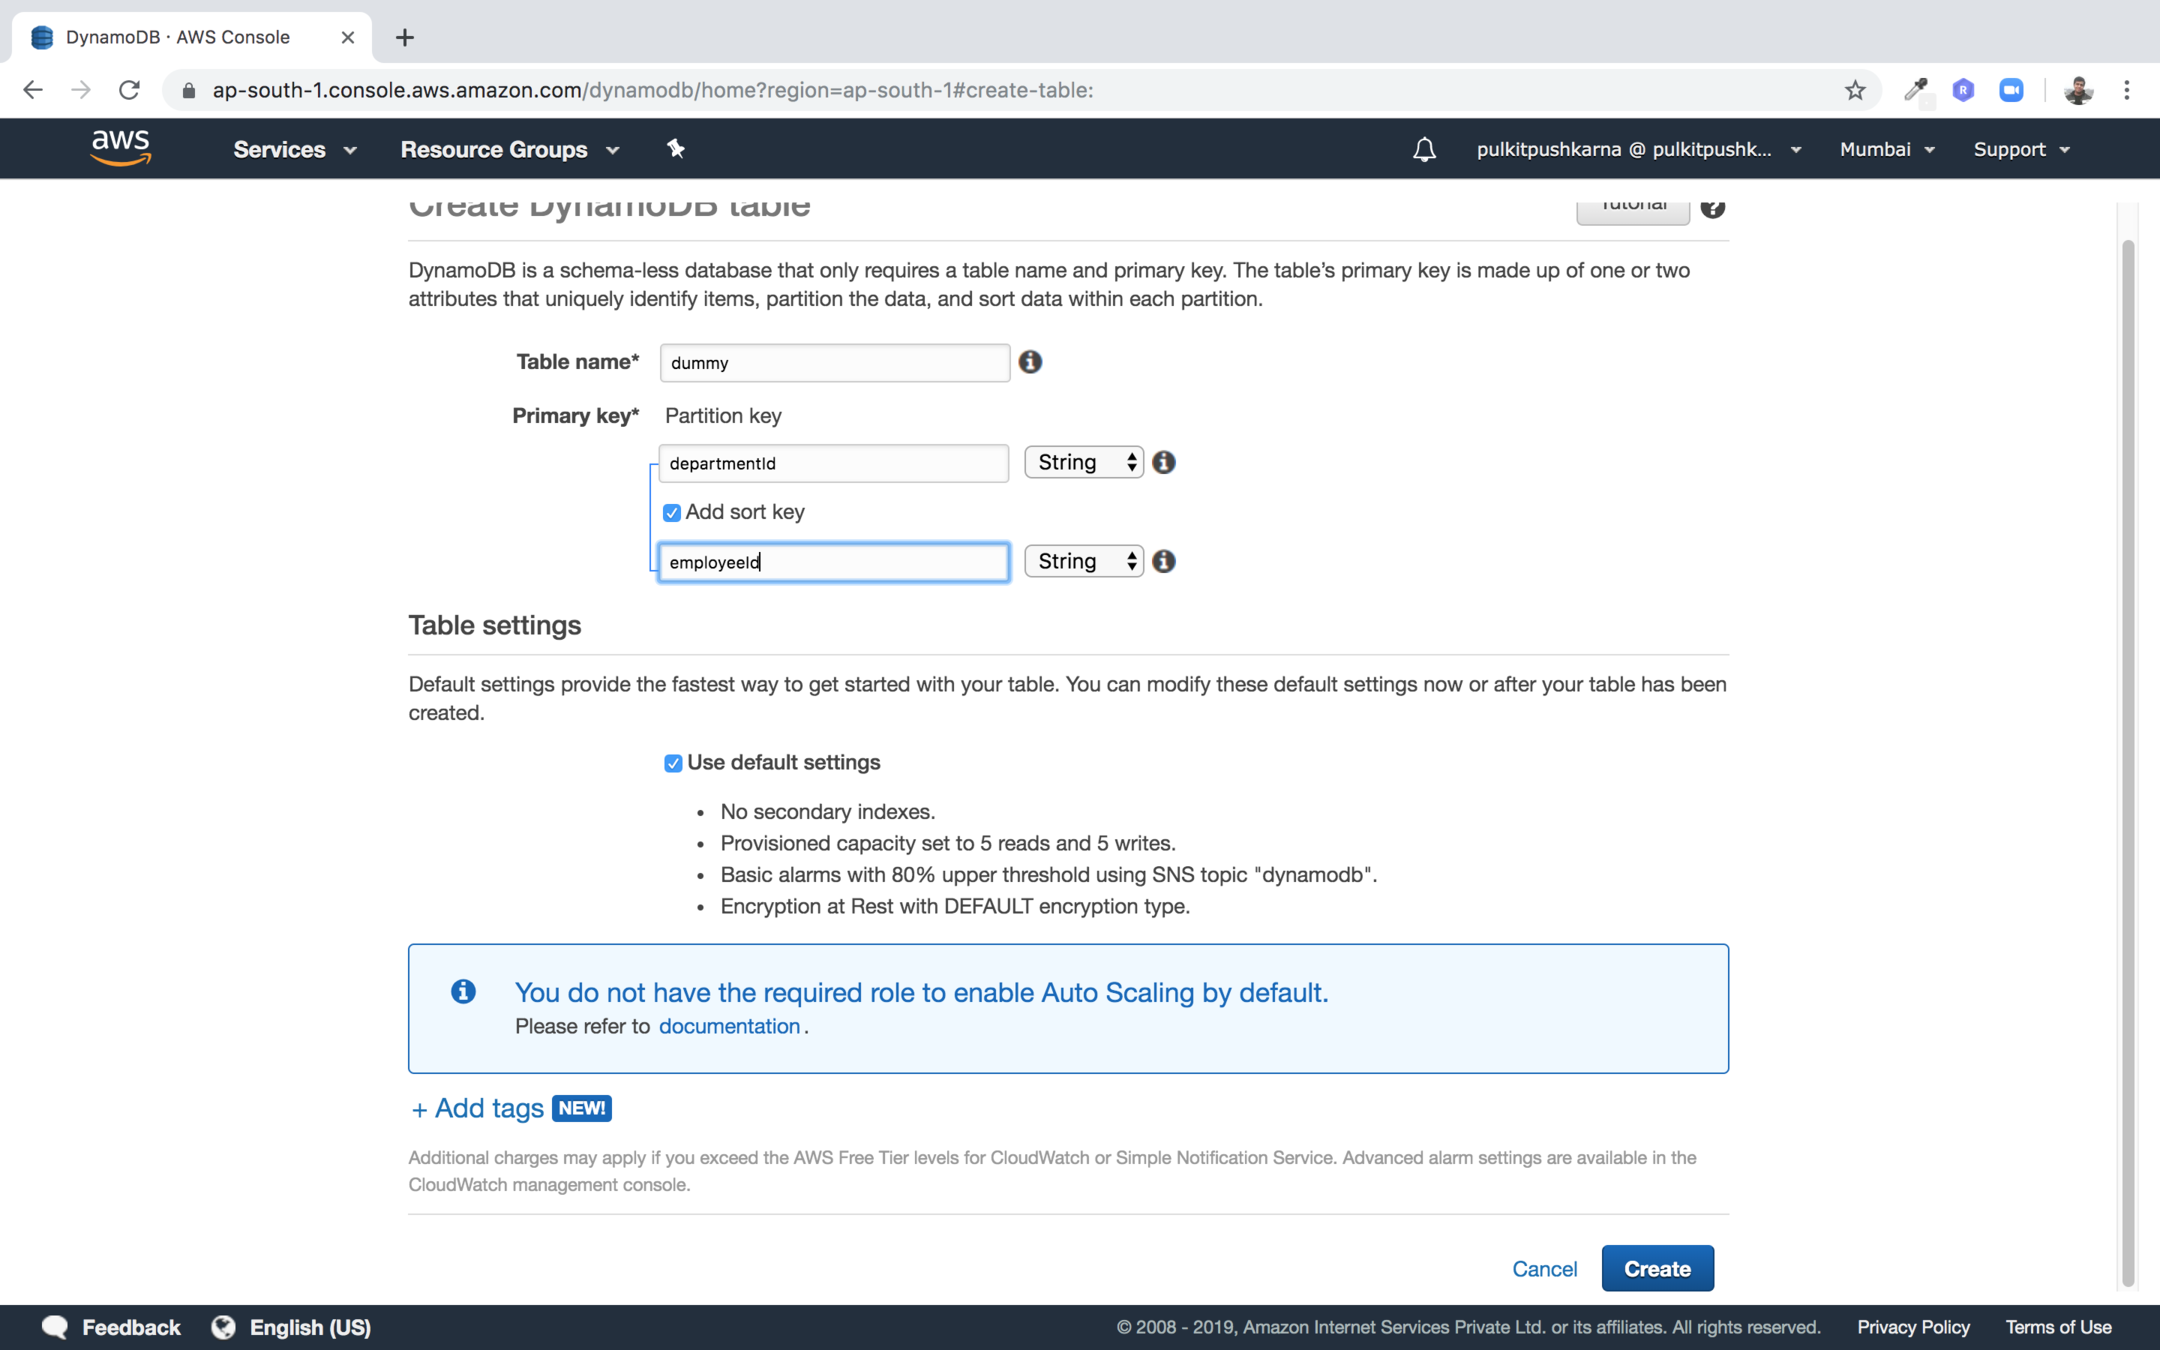
Step 5 : Click on the create button to create the table
Step 7 : You will land to this page
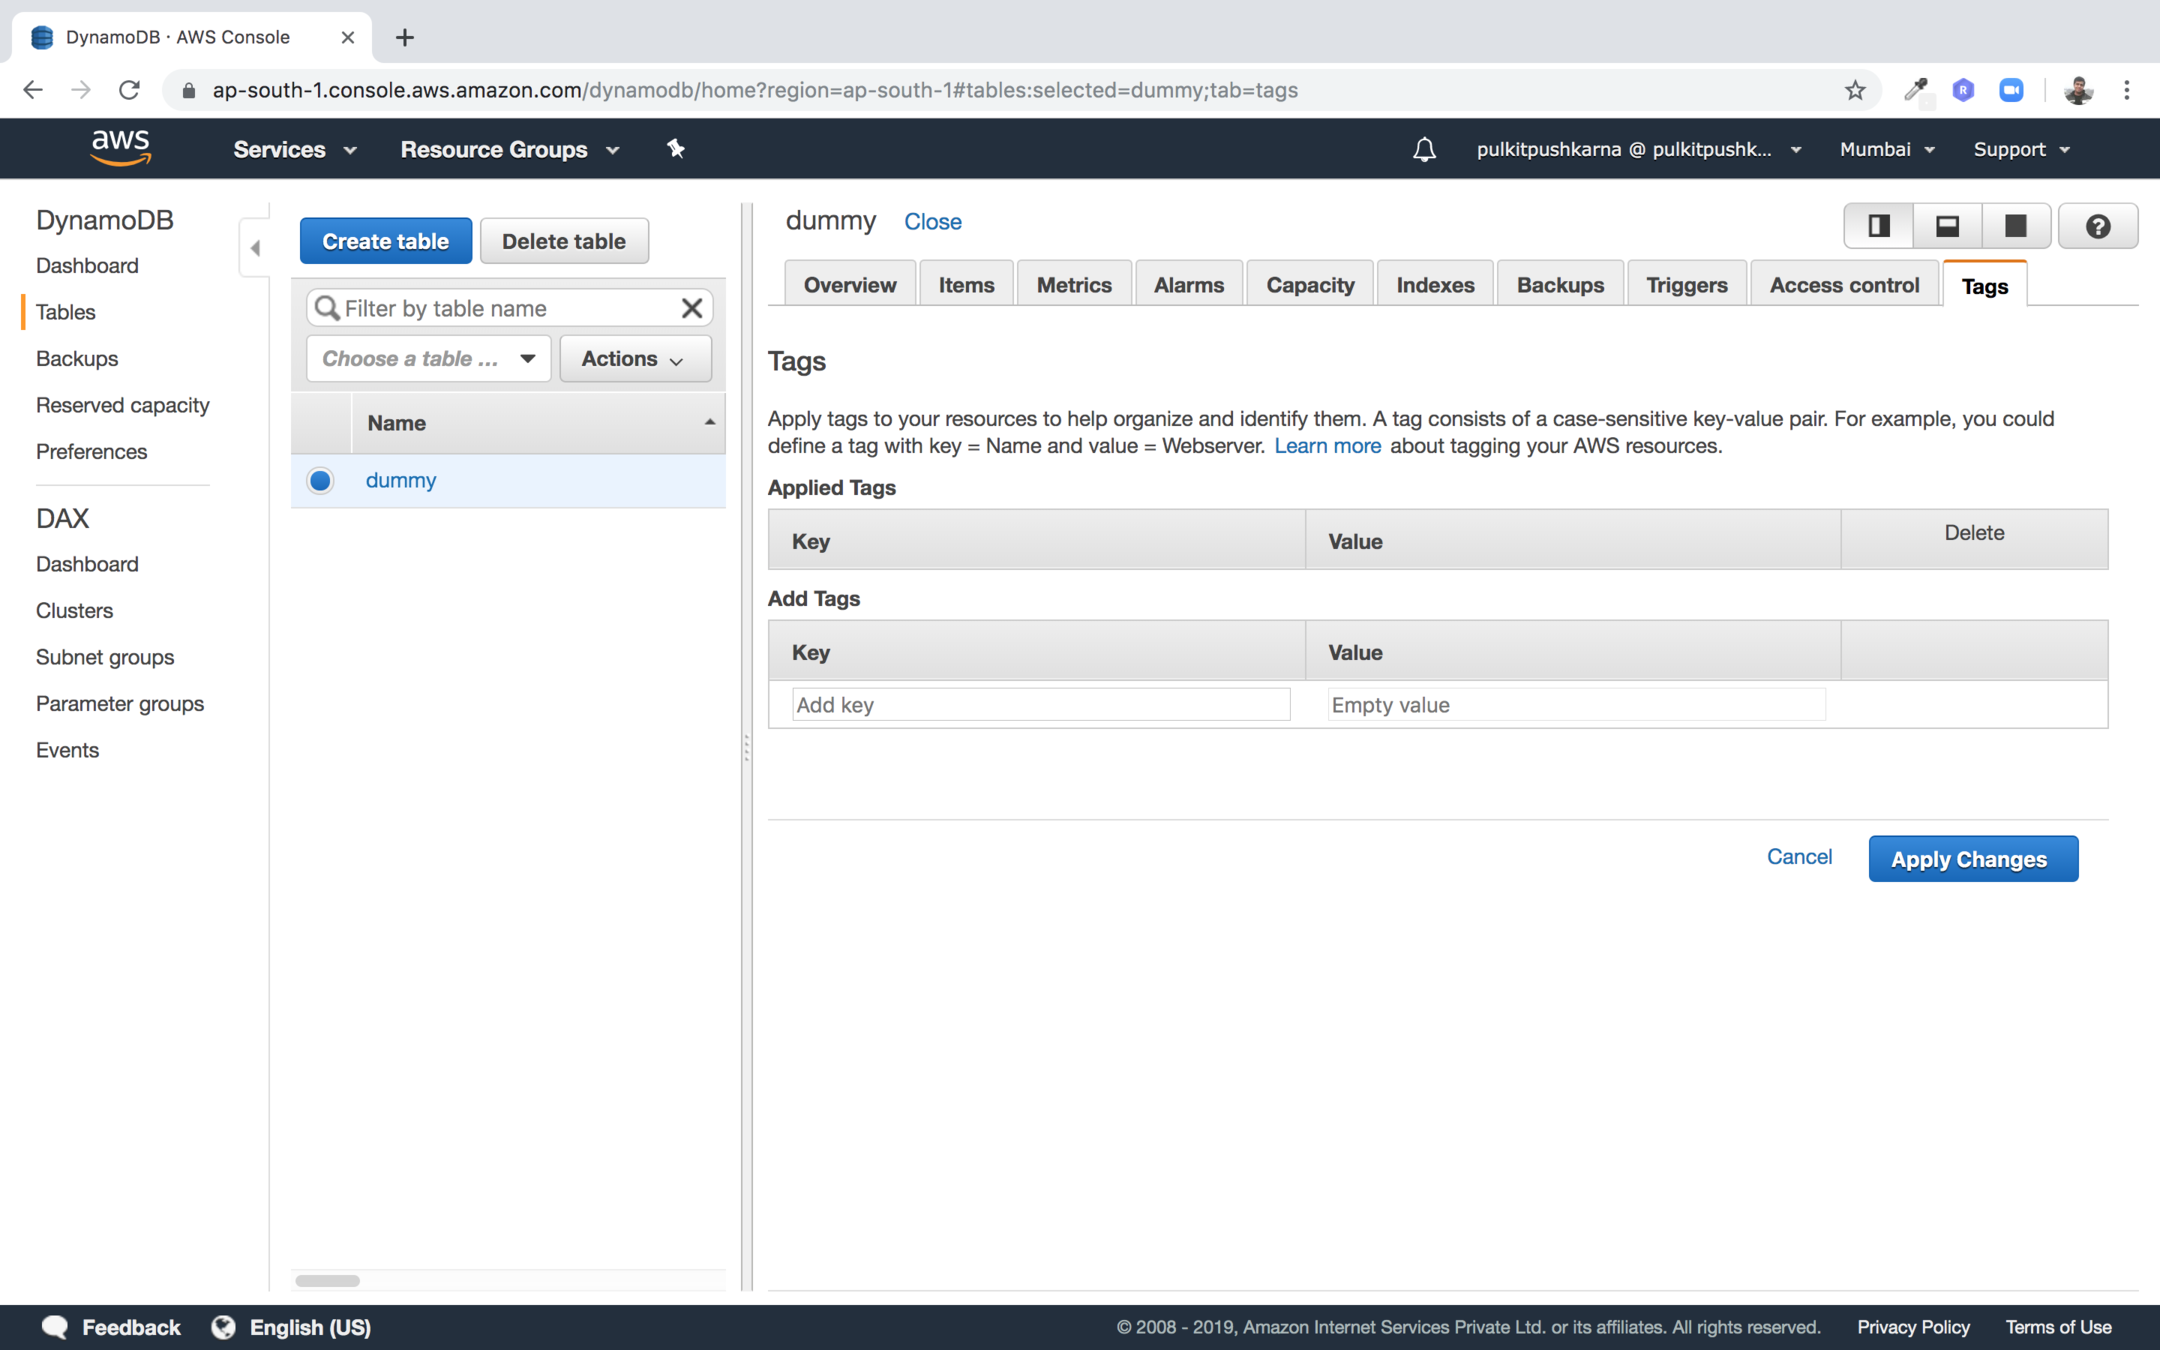
Create Group
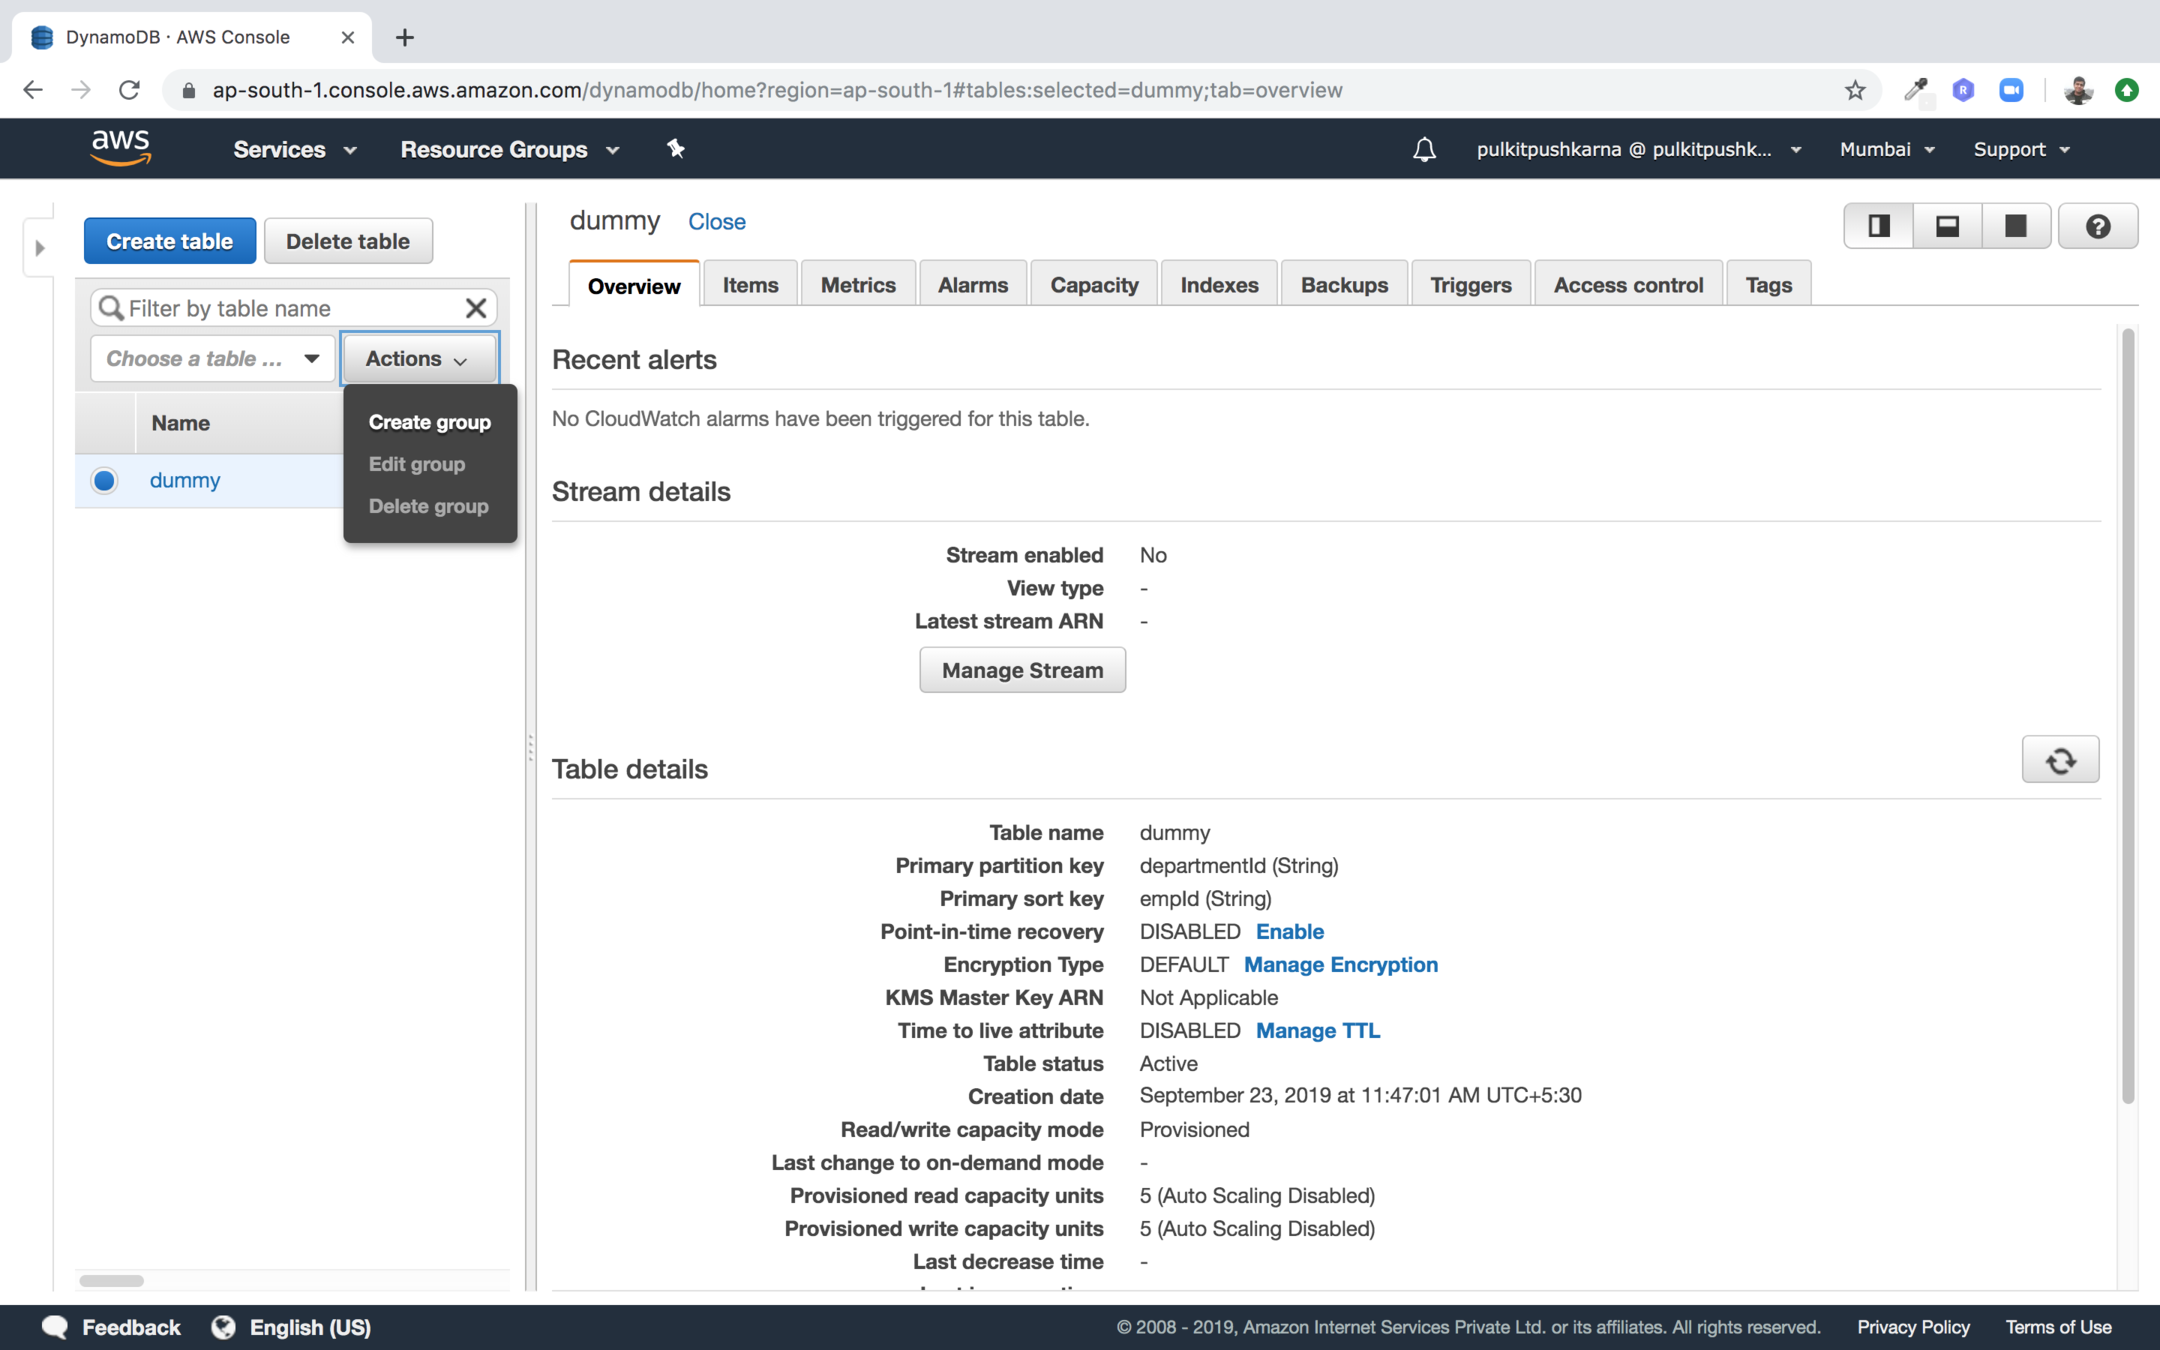
In the Actions drop down select Create group
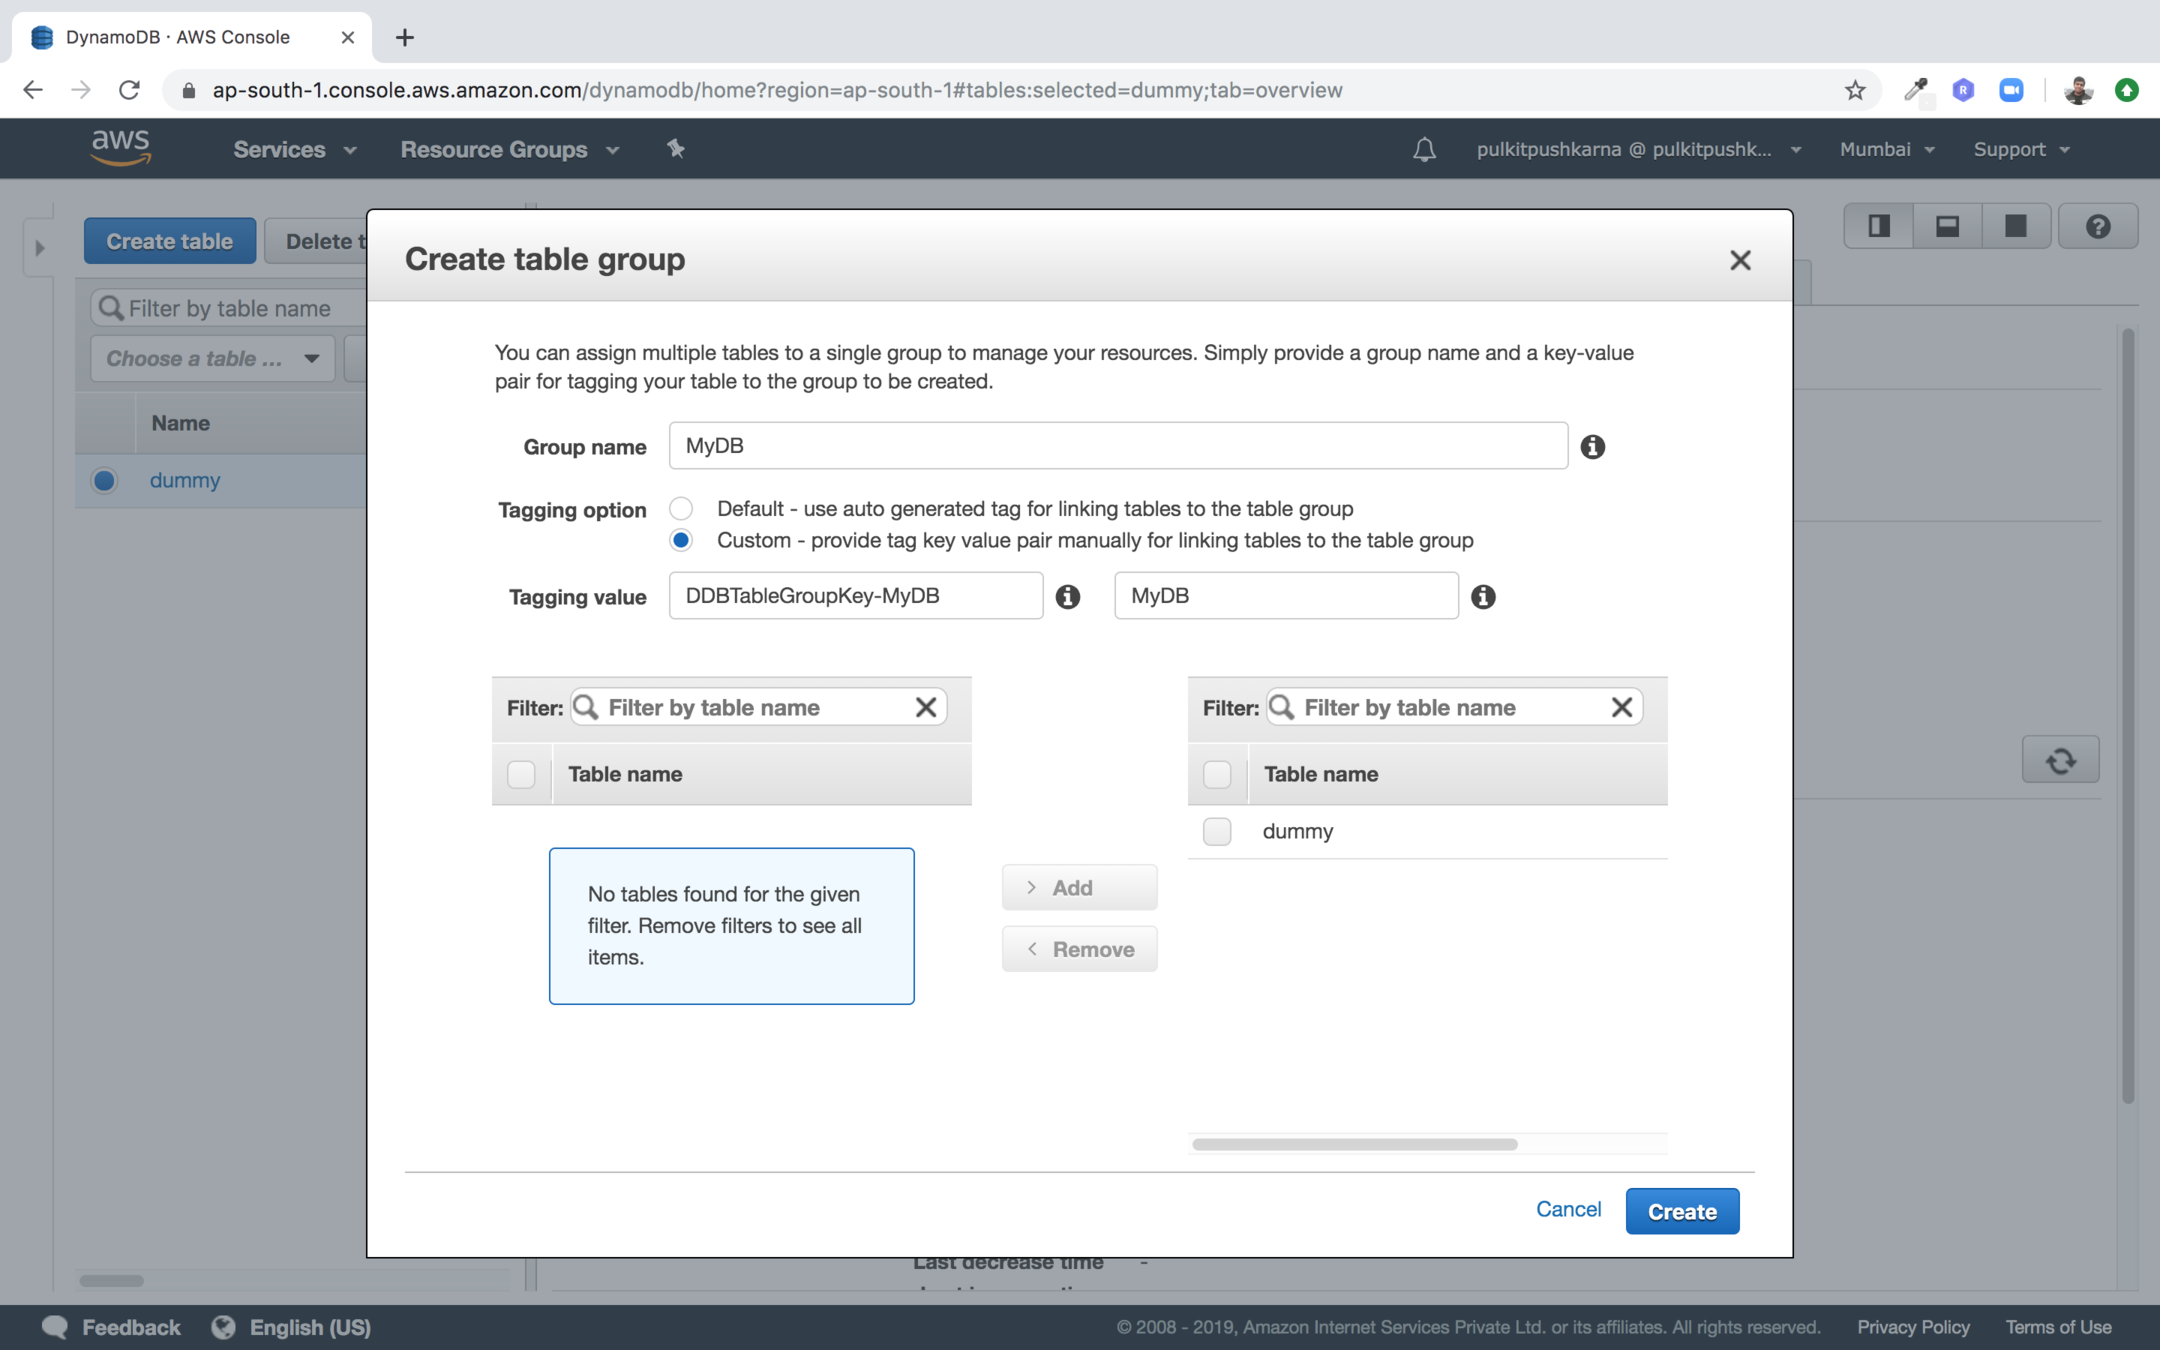
Enter the group name and tag value and add the table to your group
CRUD
Step 1: Click on create item
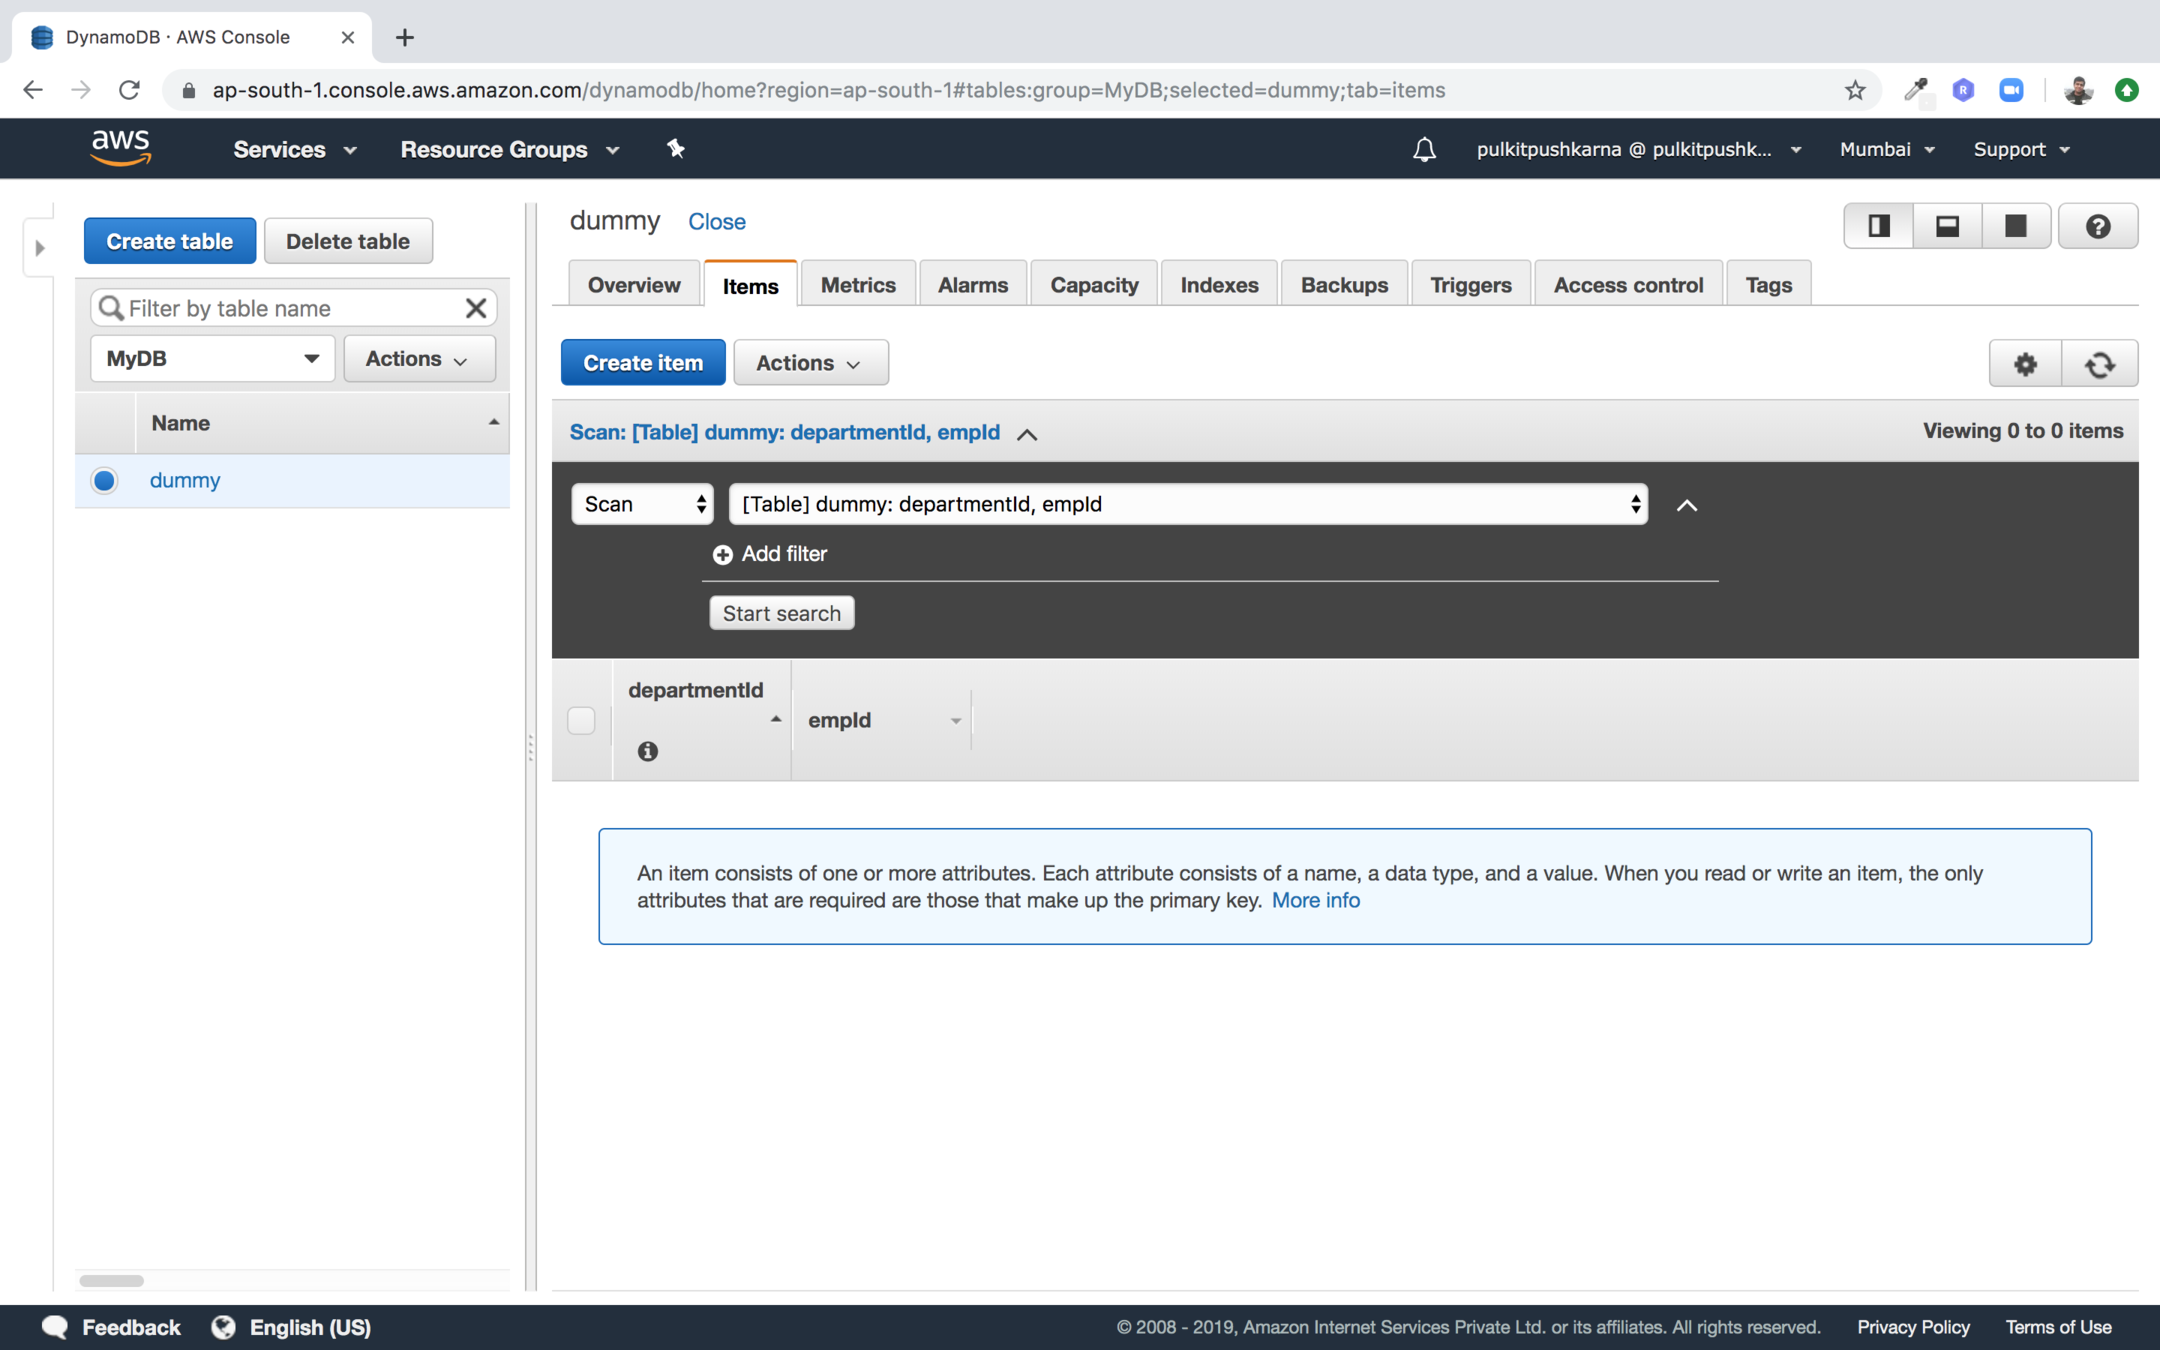

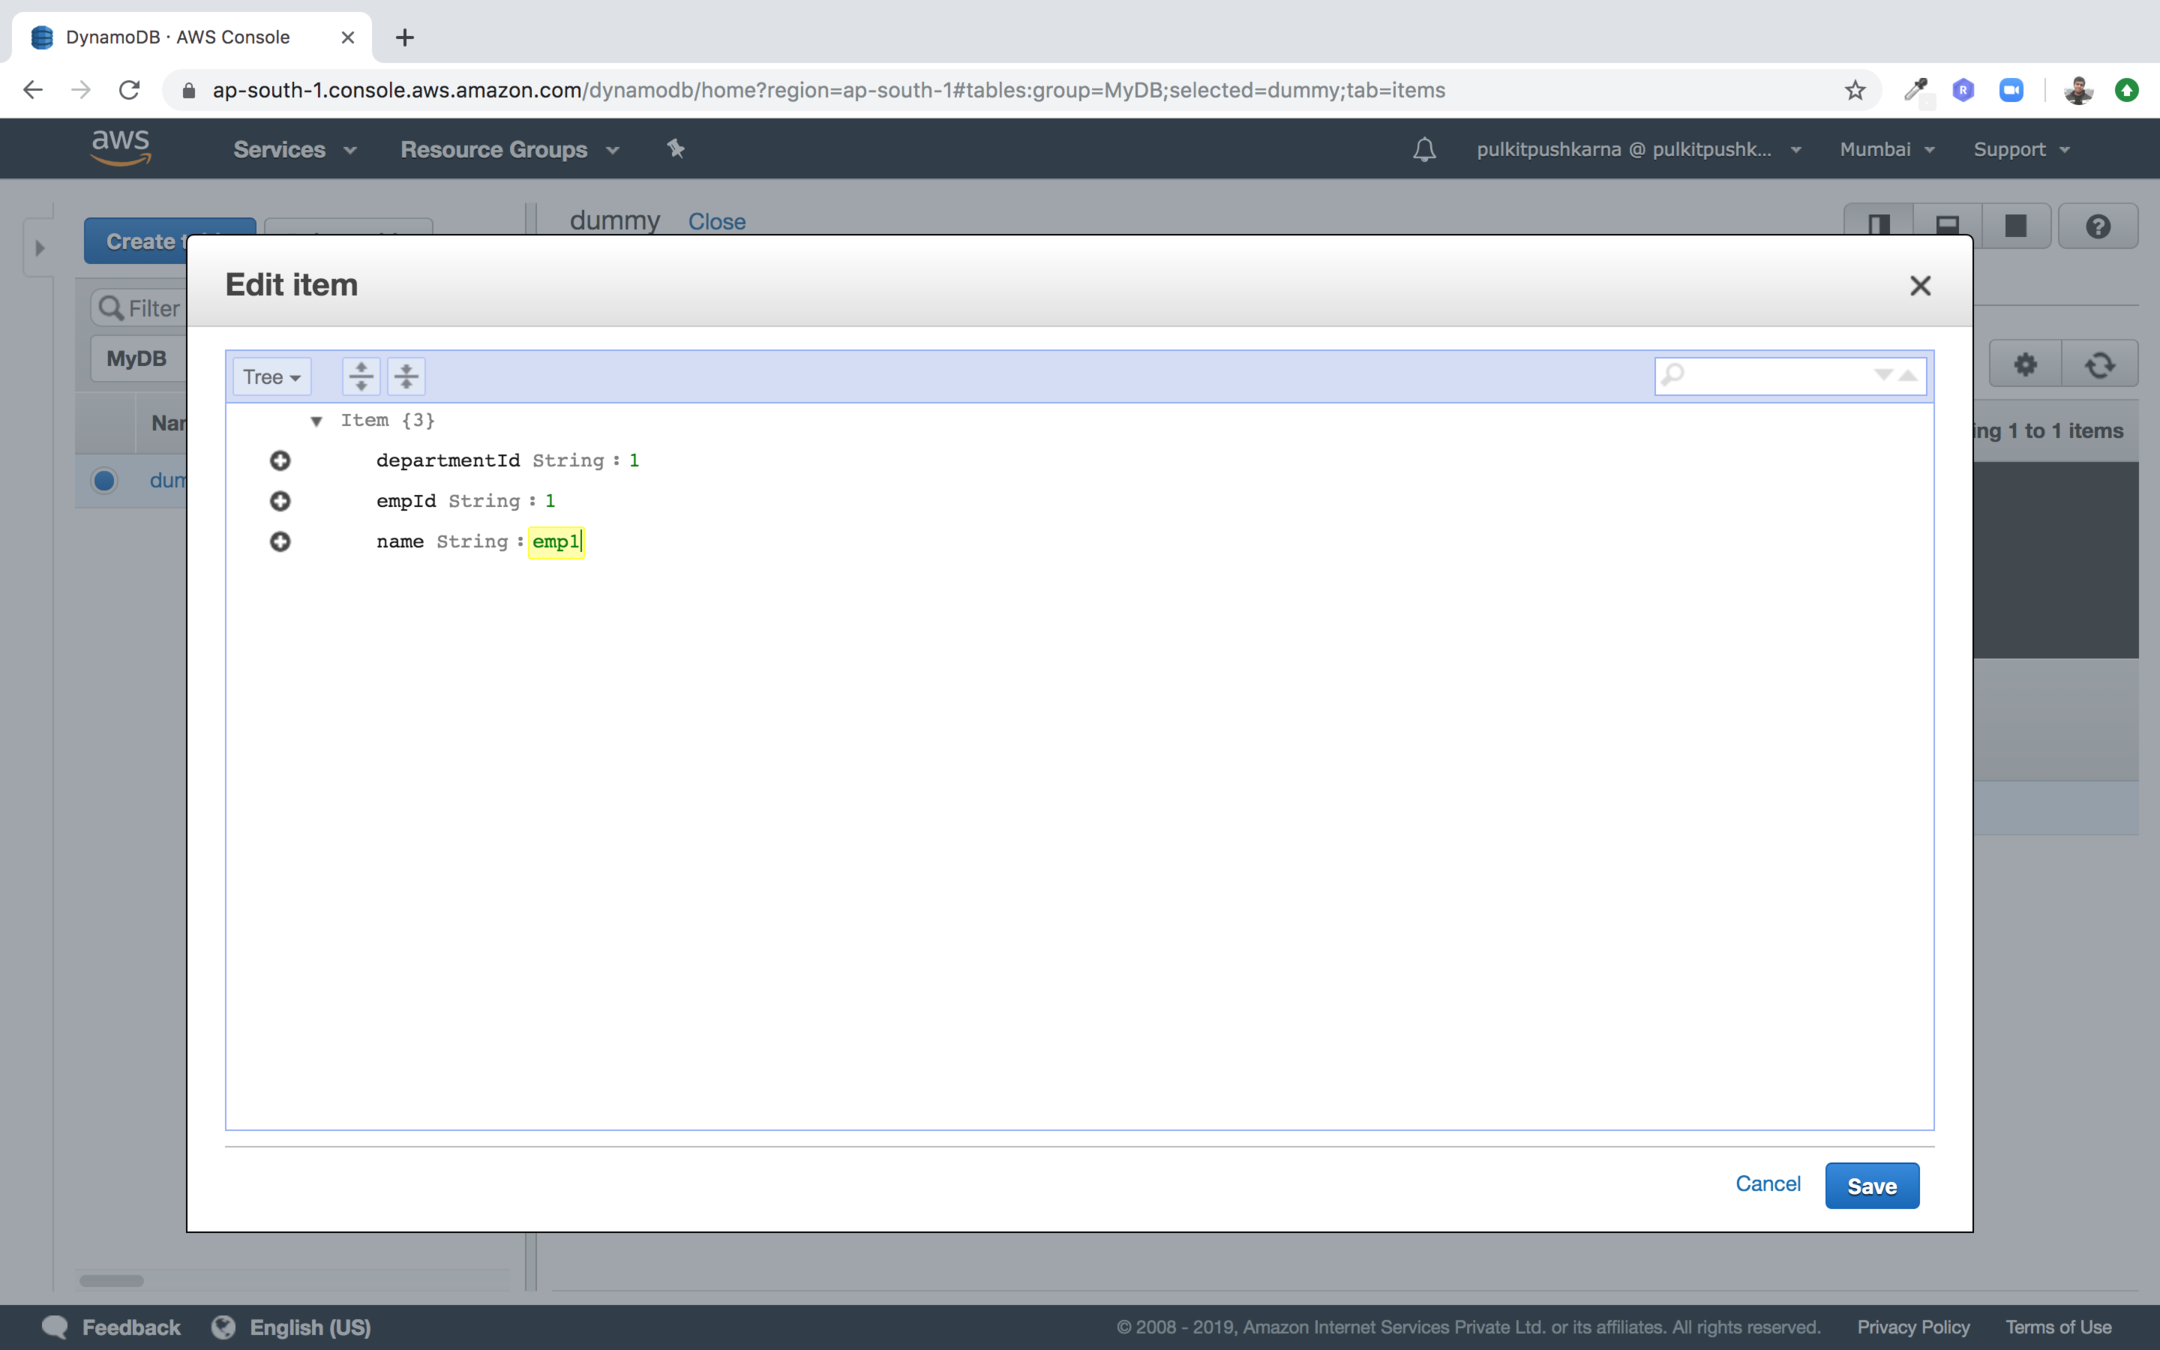
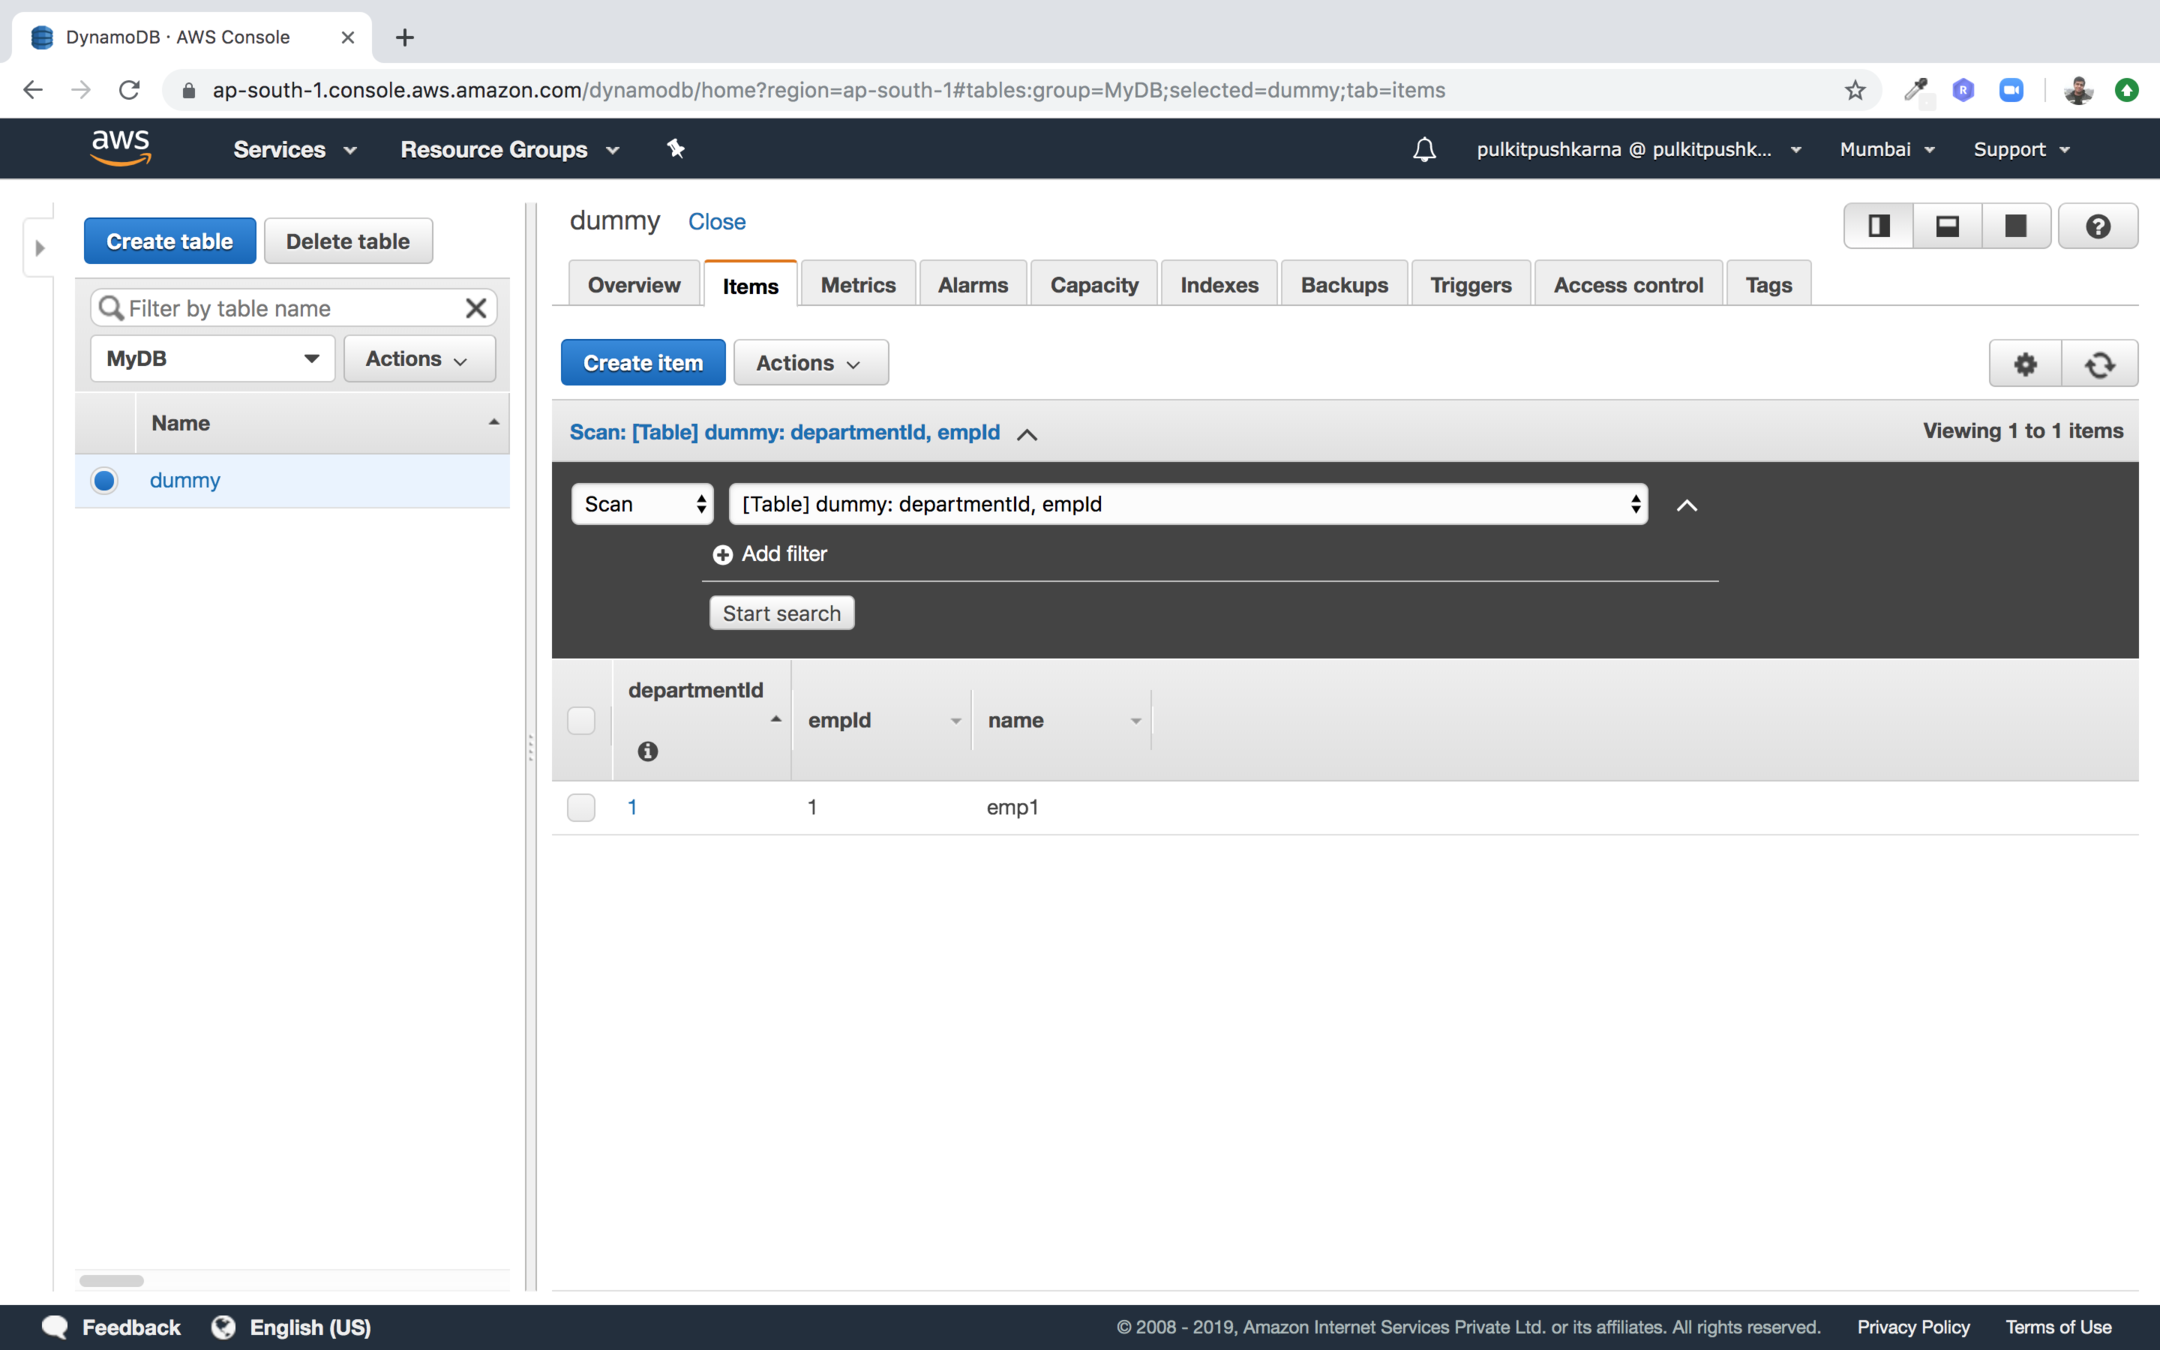
Edit
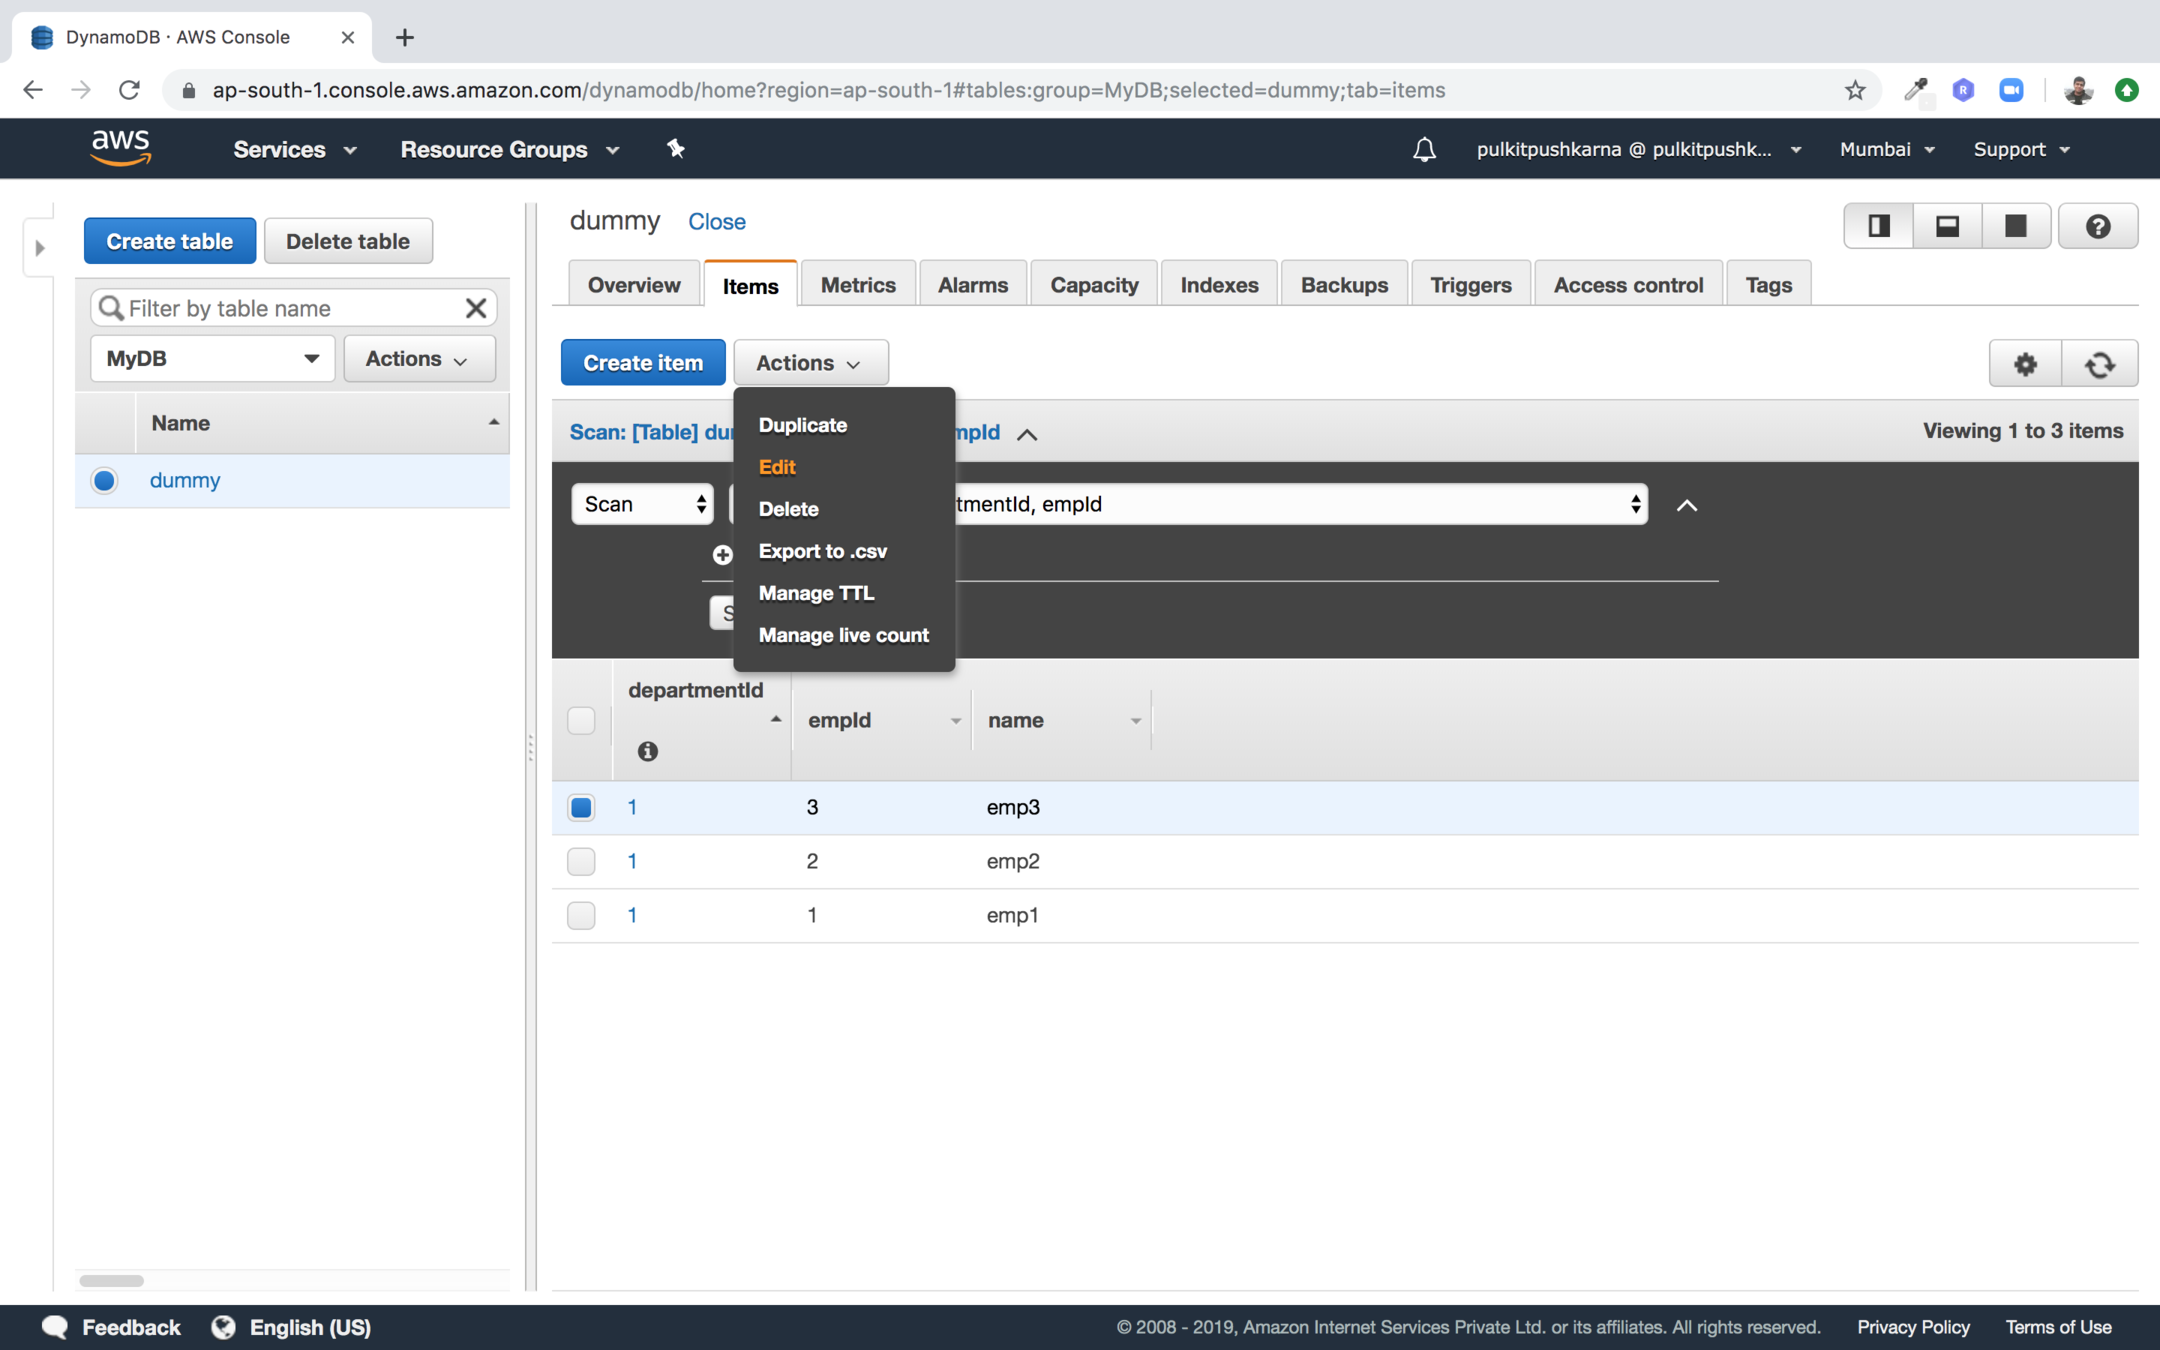
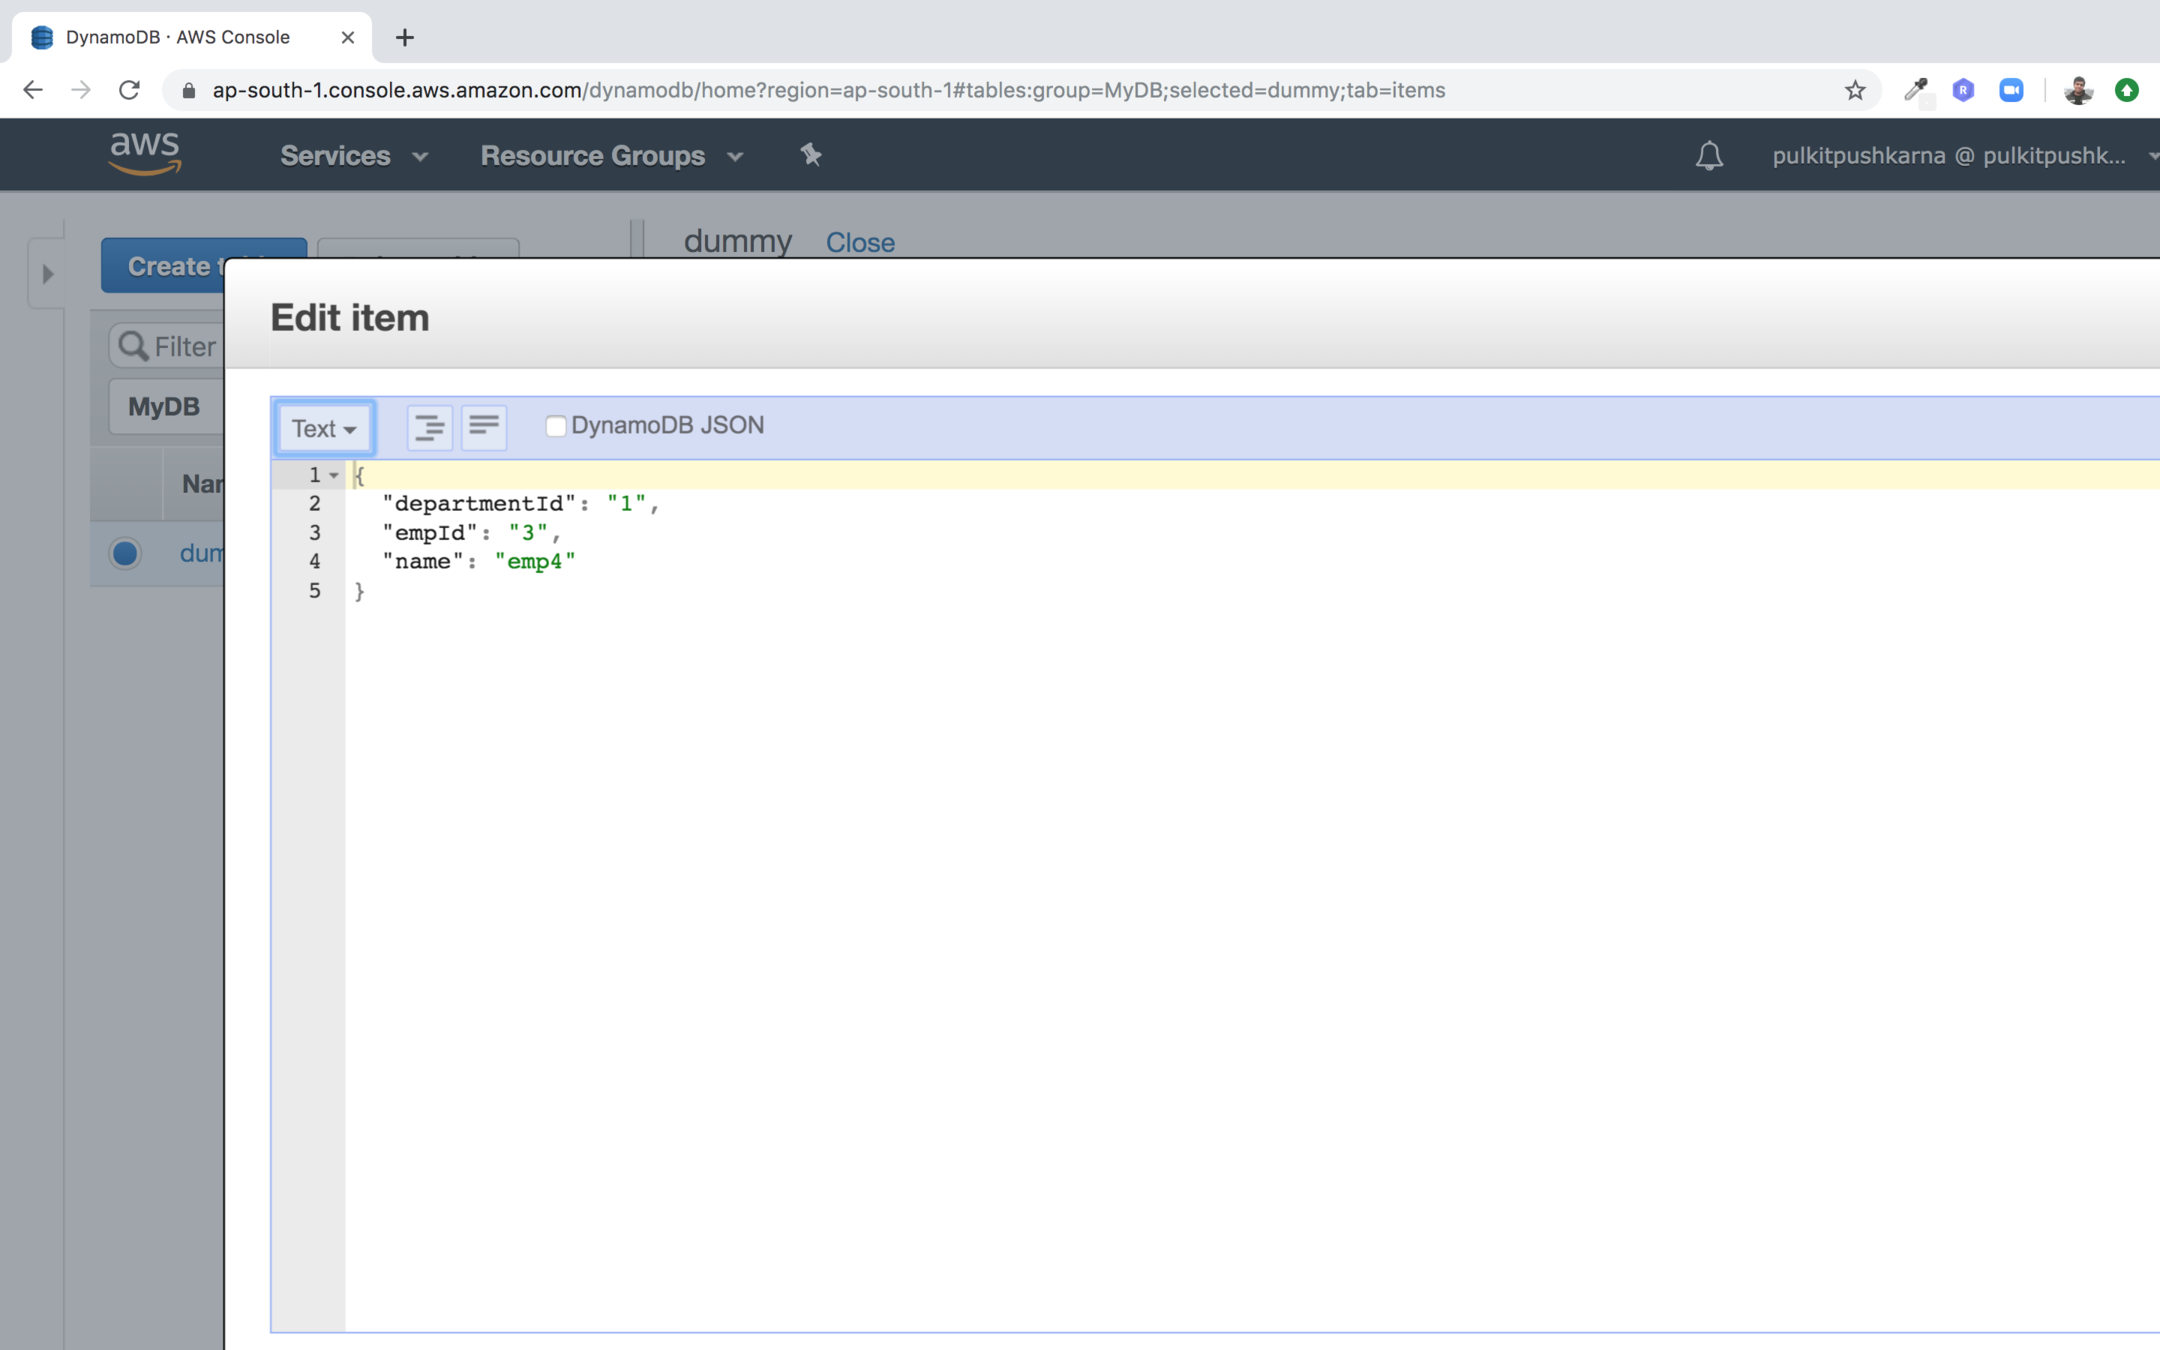
In the drop down on top left select text and edit the name
Delete
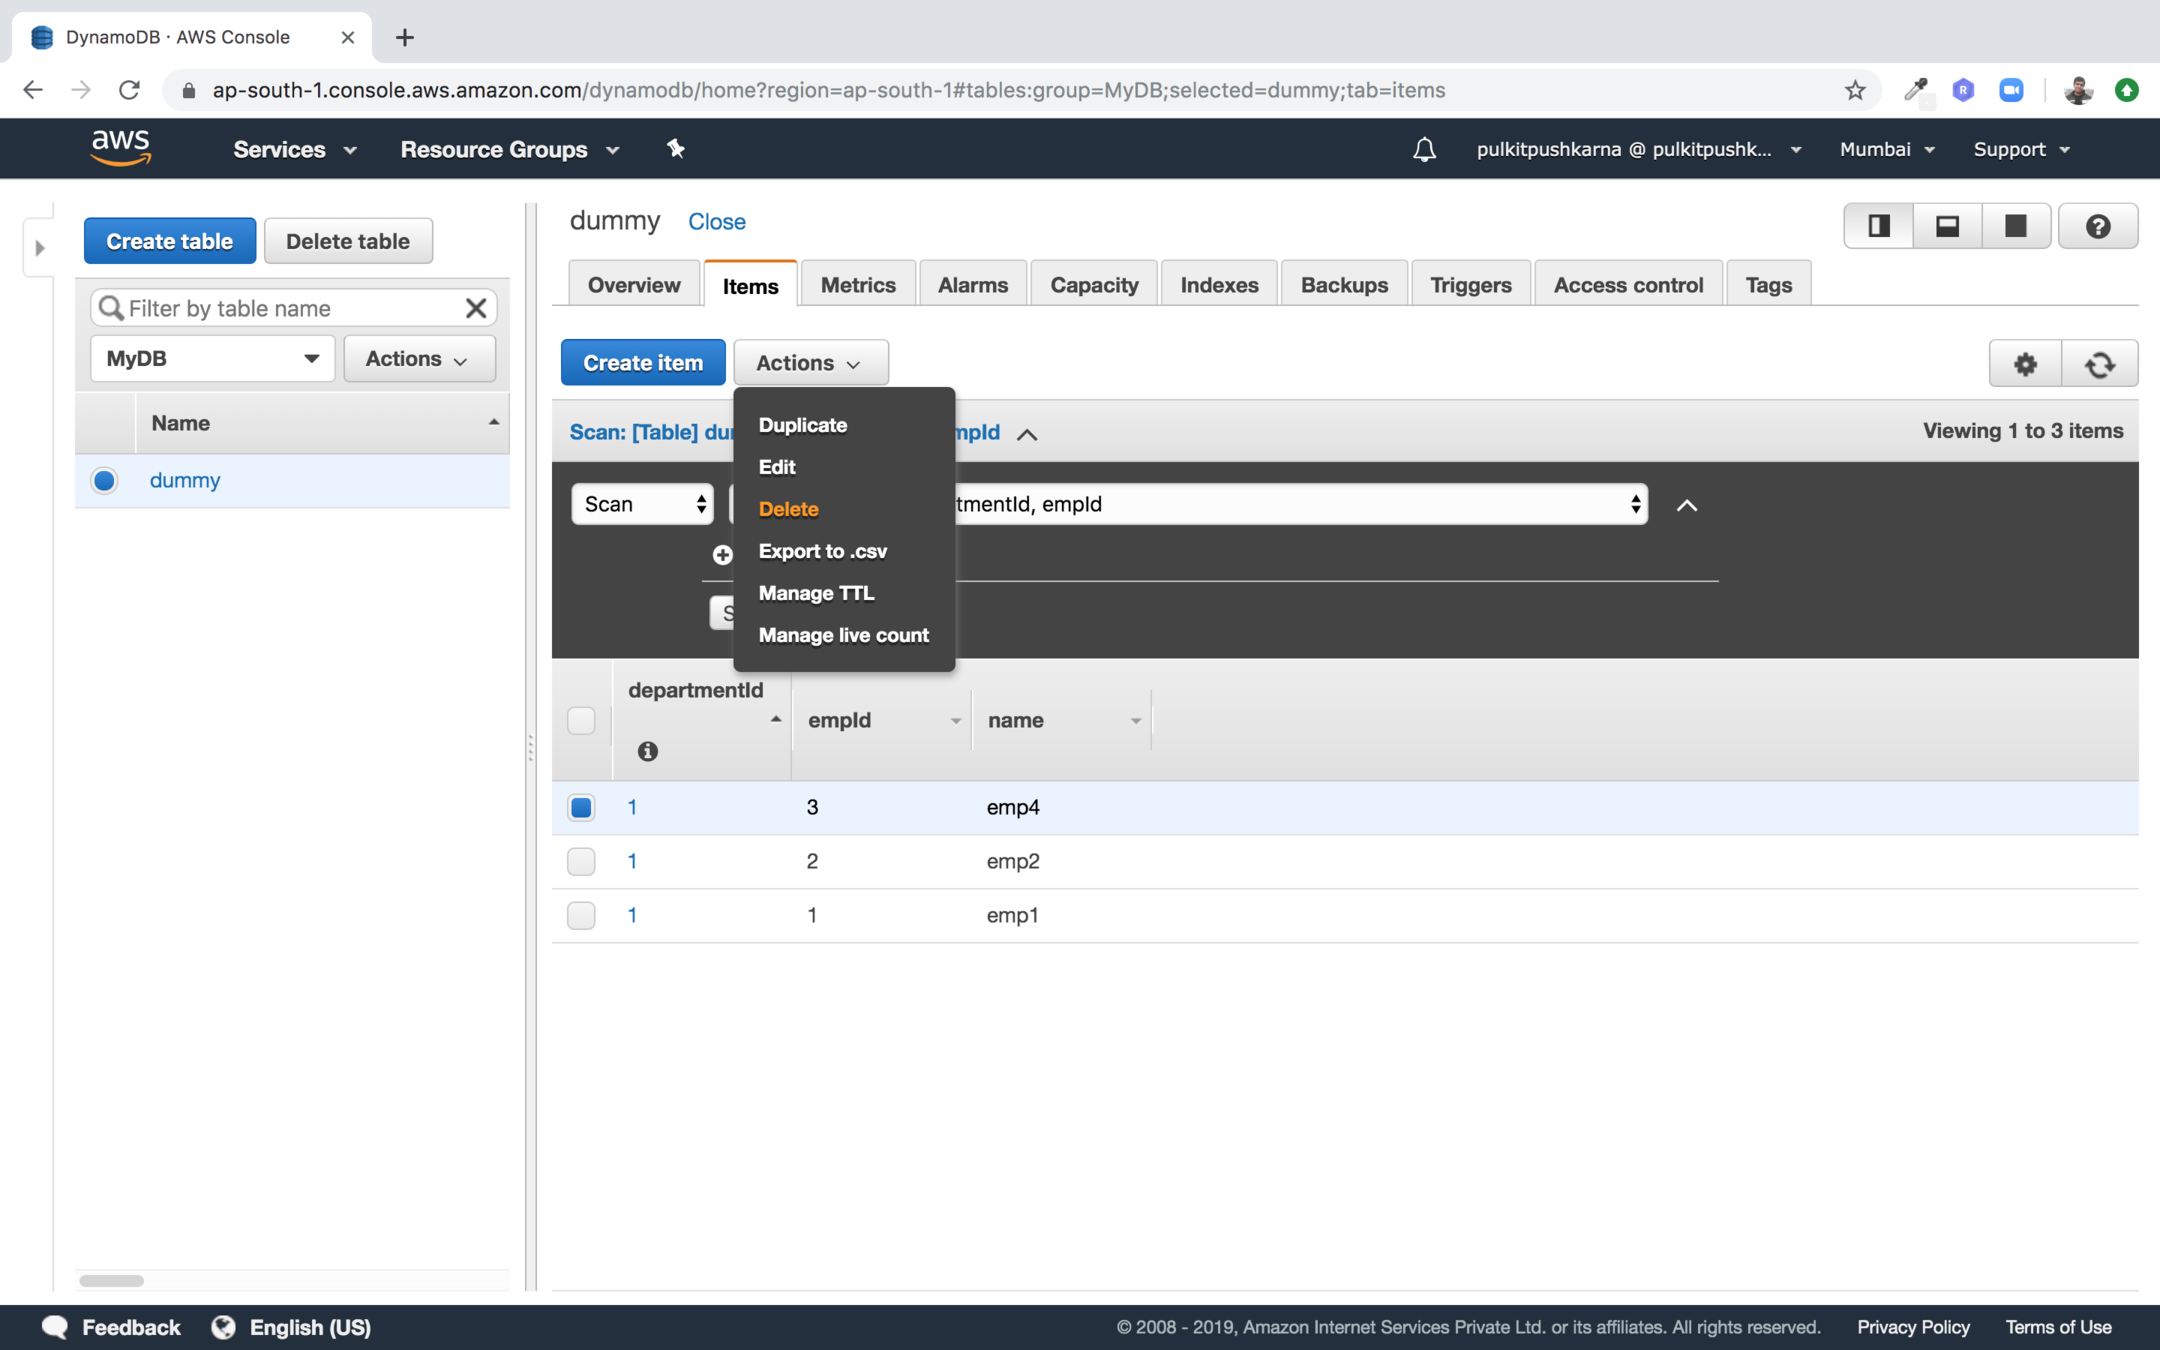
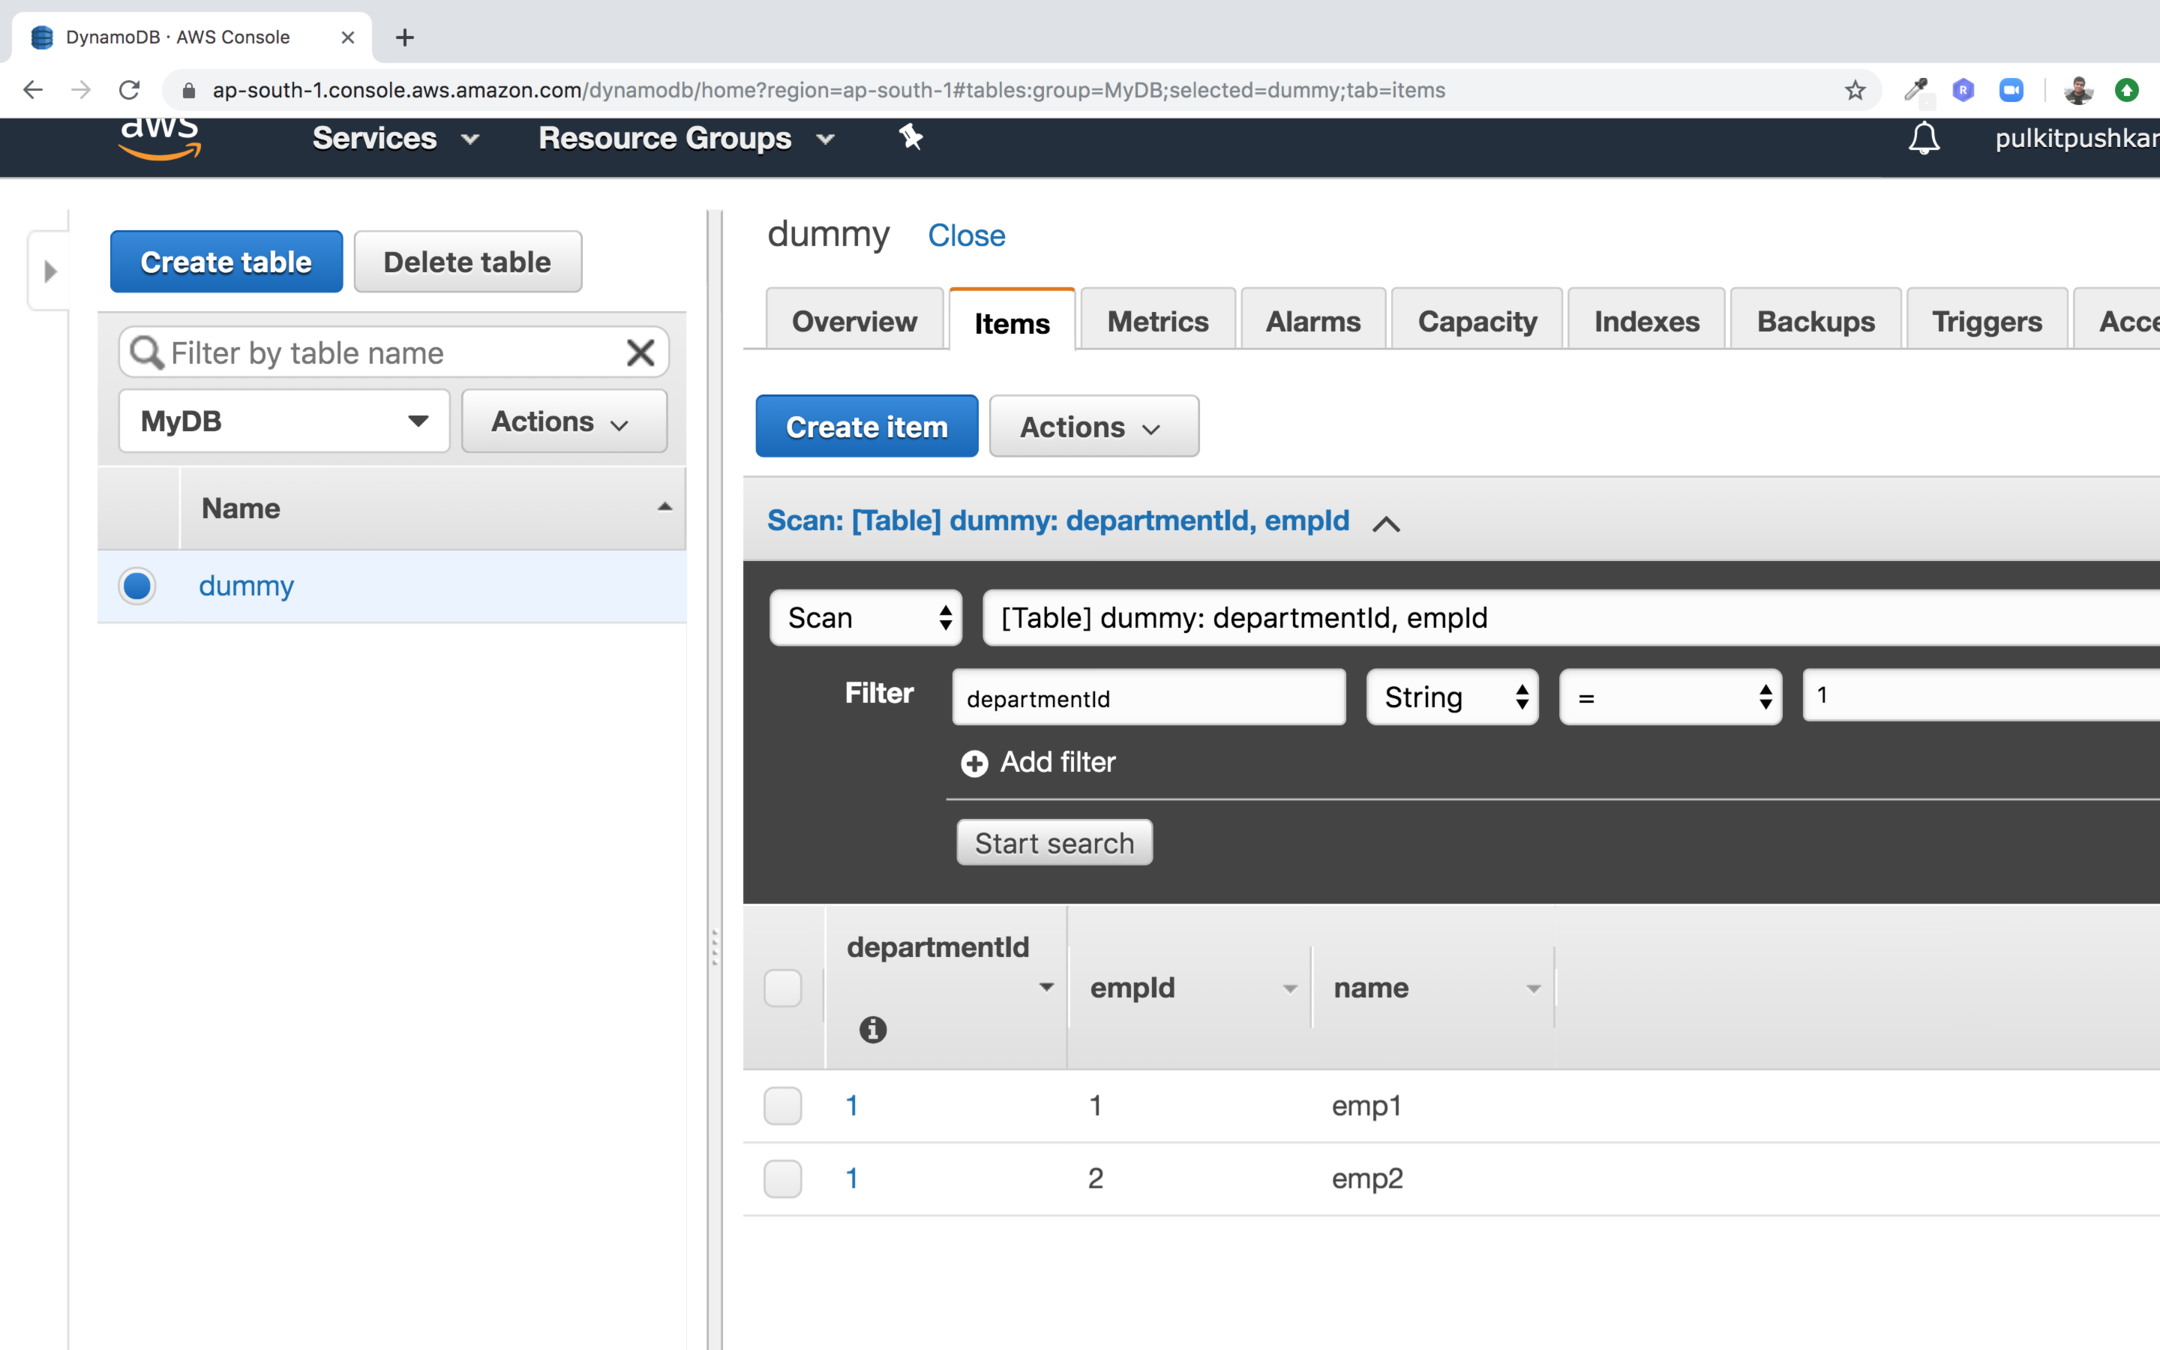
You can filter the records using scan
Dynamo Db using Console
- In order to get started Dynamo DB using command line first install aws cli.
- Now use aws configure command and fill the information
- AWS Access Key ID : <Access key>
- AWS Secret Access Key : <Secret Key>
- Default region name [us-west-2]: ap-south-1
- Default output format [None]: json
- After configuring the credentials enter the command below to get the details of dummy table
-
aws dynamodb describe-table --table-name dummy
-
DynamoDB CLI
-
Get an item on the basis of ID
-
aws dynamodb get-item --table-name dummy --key '{"departmentId":{"S":"1"},"empId":{"S":"1"}}'
-
- Project attributed
-
aws dynamodb get-item --table-name dummy --key '{"departmentId":{"S":"1"},"empId":{"S":"1"}}' --projection-expression "empId"
-
- Attributed using reserved keywords
-
aws dynamodb get-item --table-name dummy --key '{"departmentId":{"S":"1"},"empId":{"S":"1"}}' --projection-expression "empId,#n" --expression-attribute-names '{"#n":"name"}'
-
-
put-item : It is used for writing a new item in the table. If the table already has an item with the same
key, it is replaced with the new item.
-
aws dynamodb put-item --table-name dummy --item '{"departmentId":{"S":"1"},"empId":{"S":"1"},"name":{"S":"sunny"}}'
-
-
update-item : UpdateItem is used for updating an item in a table .
-
aws dynamodb update-item --table-name dummy --key '{"departmentId":{"S":"1"},"empId":{"S":"37"}}' --update-expression "SET #n=:fname" --expression-attribute-values '{":fname":{"S":"Peter Parker"}}' --expression-attribute-names '{"#n":"name"}'
-
Dynamo DB with Spring Data
build.gradle
plugins {
	id 'org.springframework.boot' version '2.0.4.RELEASE'
	id 'io.spring.dependency-management' version '1.0.8.RELEASE'
	id 'java'
}

group = 'com.spring-data-dynamo.demo'
version = '0.0.1-SNAPSHOT'
sourceCompatibility = '1.8'

repositories {
	mavenCentral()
}

dependencies {
	implementation 'org.springframework.data:spring-data-commons'
	compile group: 'com.github.derjust', name: 'spring-data-dynamodb', version: '5.0.3'
	implementation 'org.springframework.boot:spring-boot-starter'
	testImplementation 'org.springframework.boot:spring-boot-starter-test'
}
amazon.dynamodb.endpoint=https://apigateway.ap-south-1.amazonaws.com
amazon.dynamodb.region=ap-south-1
amazon.aws.accesskey=<Access-key>
amazon.aws.secretkey=<Secret-Key>
application.properties
package com.springdynamodb.demo.dynamodbdemo.config;

import com.amazonaws.auth.AWSCredentials;
import com.amazonaws.auth.AWSCredentialsProvider;
import com.amazonaws.auth.AWSStaticCredentialsProvider;
import com.amazonaws.auth.BasicAWSCredentials;
import com.amazonaws.regions.Regions;
import com.amazonaws.services.dynamodbv2.AmazonDynamoDB;
import com.amazonaws.services.dynamodbv2.AmazonDynamoDBClientBuilder;
import com.amazonaws.services.dynamodbv2.datamodeling.DynamoDBMapper;
import com.amazonaws.services.dynamodbv2.datamodeling.DynamoDBMapperConfig;
import org.socialsignin.spring.data.dynamodb.repository.config.EnableDynamoDBRepositories;
import org.springframework.beans.factory.annotation.Value;
import org.springframework.context.annotation.Bean;
import org.springframework.context.annotation.Configuration;

@Configuration
@EnableDynamoDBRepositories(basePackages = {"com.springdynamodb.demo.dynamodbdemo.repositories"})
public class DynamoDBConfigDev {

    @Value("${amazon.aws.accesskey}")
    private String amazonAWSAccessKey;

    @Value("${amazon.aws.secretkey}")
    private String amazonAWSSecretKey;

    public AWSCredentialsProvider amazonAWSCredentialsProvider() {
        return new AWSStaticCredentialsProvider(amazonAWSCredentials());
    }

    @Bean
    public AWSCredentials amazonAWSCredentials() {
        return new BasicAWSCredentials(amazonAWSAccessKey, amazonAWSSecretKey);
    }

    @Bean
    public DynamoDBMapperConfig dynamoDBMapperConfig() {
        return DynamoDBMapperConfig.DEFAULT;
    }

    @Bean
    public DynamoDBMapper dynamoDBMapper(AmazonDynamoDB amazonDynamoDB, DynamoDBMapperConfig config) {
        return new DynamoDBMapper(amazonDynamoDB, config);
    }

    @Bean
    public AmazonDynamoDB amazonDynamoDB() {
        return AmazonDynamoDBClientBuilder.standard().withCredentials(amazonAWSCredentialsProvider())
                .withRegion(Regions.AP_SOUTH_1).build();
    }
}
package com.springdynamodb.demo.dynamodbdemo.entity;

import com.amazonaws.services.dynamodbv2.datamodeling.DynamoDBAttribute;
import com.amazonaws.services.dynamodbv2.datamodeling.DynamoDBAutoGeneratedKey;
import com.amazonaws.services.dynamodbv2.datamodeling.DynamoDBHashKey;
import com.amazonaws.services.dynamodbv2.datamodeling.DynamoDBTable;

@DynamoDBTable(tableName = "User")
public class User {

    private String id;
    private String firstName;
    private String lastName;

    public User() {
        // Default constructor is required by AWS DynamoDB SDK
    }

    public User(String firstName, String lastName) {
        this.firstName = firstName;
        this.lastName = lastName;
    }

    public void setId(String id) {
        this.id = id;
    }

    public void setFirstName(String firstName) {
        this.firstName = firstName;
    }

    public void setLastName(String lastName) {
        this.lastName = lastName;
    }

    @DynamoDBHashKey
    @DynamoDBAutoGeneratedKey
    public String getId() {
        return id;
    }

    @DynamoDBAttribute
    public String getFirstName() {
        return firstName;
    }

    @DynamoDBAttribute
    public String getLastName() {
        return lastName;
    }

}
package com.springdynamodb.demo.dynamodbdemo.repositories;
import com.springdynamodb.demo.dynamodbdemo.entity.User;
import org.socialsignin.spring.data.dynamodb.repository.EnableScan;
import org.springframework.data.repository.CrudRepository;
import java.util.List;
@EnableScan
public interface UserRepository extends CrudRepository<User, String> {
List<User> findByFirstName(String firstName);
}
package com.springdynamodb.demo.dynamodbdemo;

import com.amazonaws.services.dynamodbv2.AmazonDynamoDB;
import com.amazonaws.services.dynamodbv2.datamodeling.DynamoDBMapper;
import com.amazonaws.services.dynamodbv2.model.CreateTableRequest;
import com.amazonaws.services.dynamodbv2.model.ProvisionedThroughput;
import com.amazonaws.services.dynamodbv2.util.TableUtils;
import com.springdynamodb.demo.dynamodbdemo.entity.User;
import com.springdynamodb.demo.dynamodbdemo.repositories.UserRepository;
import org.springframework.boot.SpringApplication;
import org.springframework.boot.autoconfigure.SpringBootApplication;
import org.springframework.context.ApplicationContext;

@SpringBootApplication
public class DynamodbDemoApplication {

	public static void main(String[] args) {
		ApplicationContext applicationContext= SpringApplication.run(DynamodbDemoApplication.class, args);
		init(applicationContext);
		createUser(applicationContext);
		find(applicationContext);
	}

	public static void find(ApplicationContext applicationContext){
		UserRepository userRepository = applicationContext.getBean(UserRepository.class);
		userRepository.findByFirstName("peter").forEach(System.out::println);
	}

	public static void init(ApplicationContext applicationContext){
		UserRepository userRepository = applicationContext.getBean(UserRepository.class);
		userRepository.save(new User("peter","parker"));
		System.out.println(userRepository.count());
	}

	public static void createUser(ApplicationContext applicationContext){
		DynamoDBMapper dynamoDBMapper = applicationContext.getBean(DynamoDBMapper.class);
		CreateTableRequest tableRequest = dynamoDBMapper
				.generateCreateTableRequest(User.class);
		tableRequest.setProvisionedThroughput(
				new ProvisionedThroughput(1L, 1L));
		TableUtils.createTableIfNotExists(applicationContext.getBean(AmazonDynamoDB.class), tableRequest);
	}

}
Exercise 2
- Create a Dynamo DB table (Employee) with Composite Key (dept and id) also introduce name and age field.
- Associate it with a group
- Perform CRUD operation on employee using AWS console
- Perform Scan and Query Operation
- Perform CRUD operation using CLI
- Integrate Dynamo DB with Spring Boot and perform CRUD operations on it
Amazon SQS
- A message queue is a queue of messages exchanged between applications.
- Messages are data objects that are inserted in the queue by sender applications and received
by the receiving applications. - SQS is a highly reliable, scalable, and distributed message queuing service provided by
Amazon
Use cases for SQS
-
Asynchronous data processing : SQS allows you to process the messages asynchronously. That means, you can add a message on the queue but do not need to process it immediately.
-
Building resilience in the system : If some processes in your application environment go down, your entire environment does not go down with it. Since SQS decouples the processes, if a client processing a message goes down, the message is re-added to the queue after a specific duration.
-
Bringing elasticity to application with SQS : Using SQS you can build elasticity into your application. Data publisher and data consumer resources can be scaled up when there is a high
amount of traffic and the resources can be scaled down when the traffic is low.
-
Building redundancy with SQS : Sometimes processes do fail while processing the data. In such scenarios, if the data is not persisted, it is lost forever. SQS takes care of such a data risk by persisting the data till it's completely processed.
How Queue works ?
-
The publishing application pushes message into the queue.
-
The consuming application pulls the message from the queue and processes it.
-
The consuming application confirms to the SQS queue that processing on the message is completed and deletes the message from the SQS queue.
Type of SQS
| Description | Standard queue | FIFO queue |
|---|---|---|
| Availability | It's available in all AWS regions. | Not available in all regions. |
| Throughput | It supports almost all unlimited number of Transaction Per Second (TPS ) |
It supports limited throughput. It can support up to 300 messages per second without any batching |
| Order | In certain occasions the order may change | It ensures that the data is sent in FIFO order. |
| Delivery guarantee |
occasionally a message may be delivered more than once. |
FIFO queue guarantees that amessage will be delivered exactly once. |
| Description | Standard queue | FIFO queue |
|---|---|---|
| Usage | It is used when the throughput is more important than the order in which the data is processed. |
It is used when the order in which the data is processed is more important than the throughput. |
Dead Letter Queue
-
A DLQ is used by other queues for storing failed messages that are not successfully consumed by consumer processes.
-
You can use a DLQ to isolate unconsumed or failed
messages and subsequently troubleshoot these messages to determine the reason for their
failures.
-
SQS uses redrive policy to indicate the source queue, and the scenario in which SQS transfers messages from the source queue to the DLQ.
-
If a queue fails to process a message for a predefined number of times, that message is moved to the DLQ.
Queue Attributes
| Queue Attribute | Description |
|---|---|
| Default visibility Timeout |
The length of time that a message is received from a queue will be invisible to other receiving components. |
| Message Retention Period |
The amount of time that SQS retains a message if it does not get deleted. |
| Maximum Message Size |
Maximum message size accepted by SQS. |
| Delivery Delay | The amount of time to delay the first delivery of all messages added to the queue. |
| Queue attribute |
Description |
|---|---|
| Receive Message Wait Time |
The maximum amount of time that a long polling receive call waits for a message to become available before returning an empty response. |
| Content-Based Deduplication |
FIFO queue uses more than one strategy to prevent duplicate messages in a queue. If you select this checkbox, SQS generates SHA-256 hash of the body of the message to generate the contentbased message deduplication ID. When an application sends a message using SendMessage for FIFO queue with message dedupication ID, it is used for ensuring deduplication of the message. |
Create
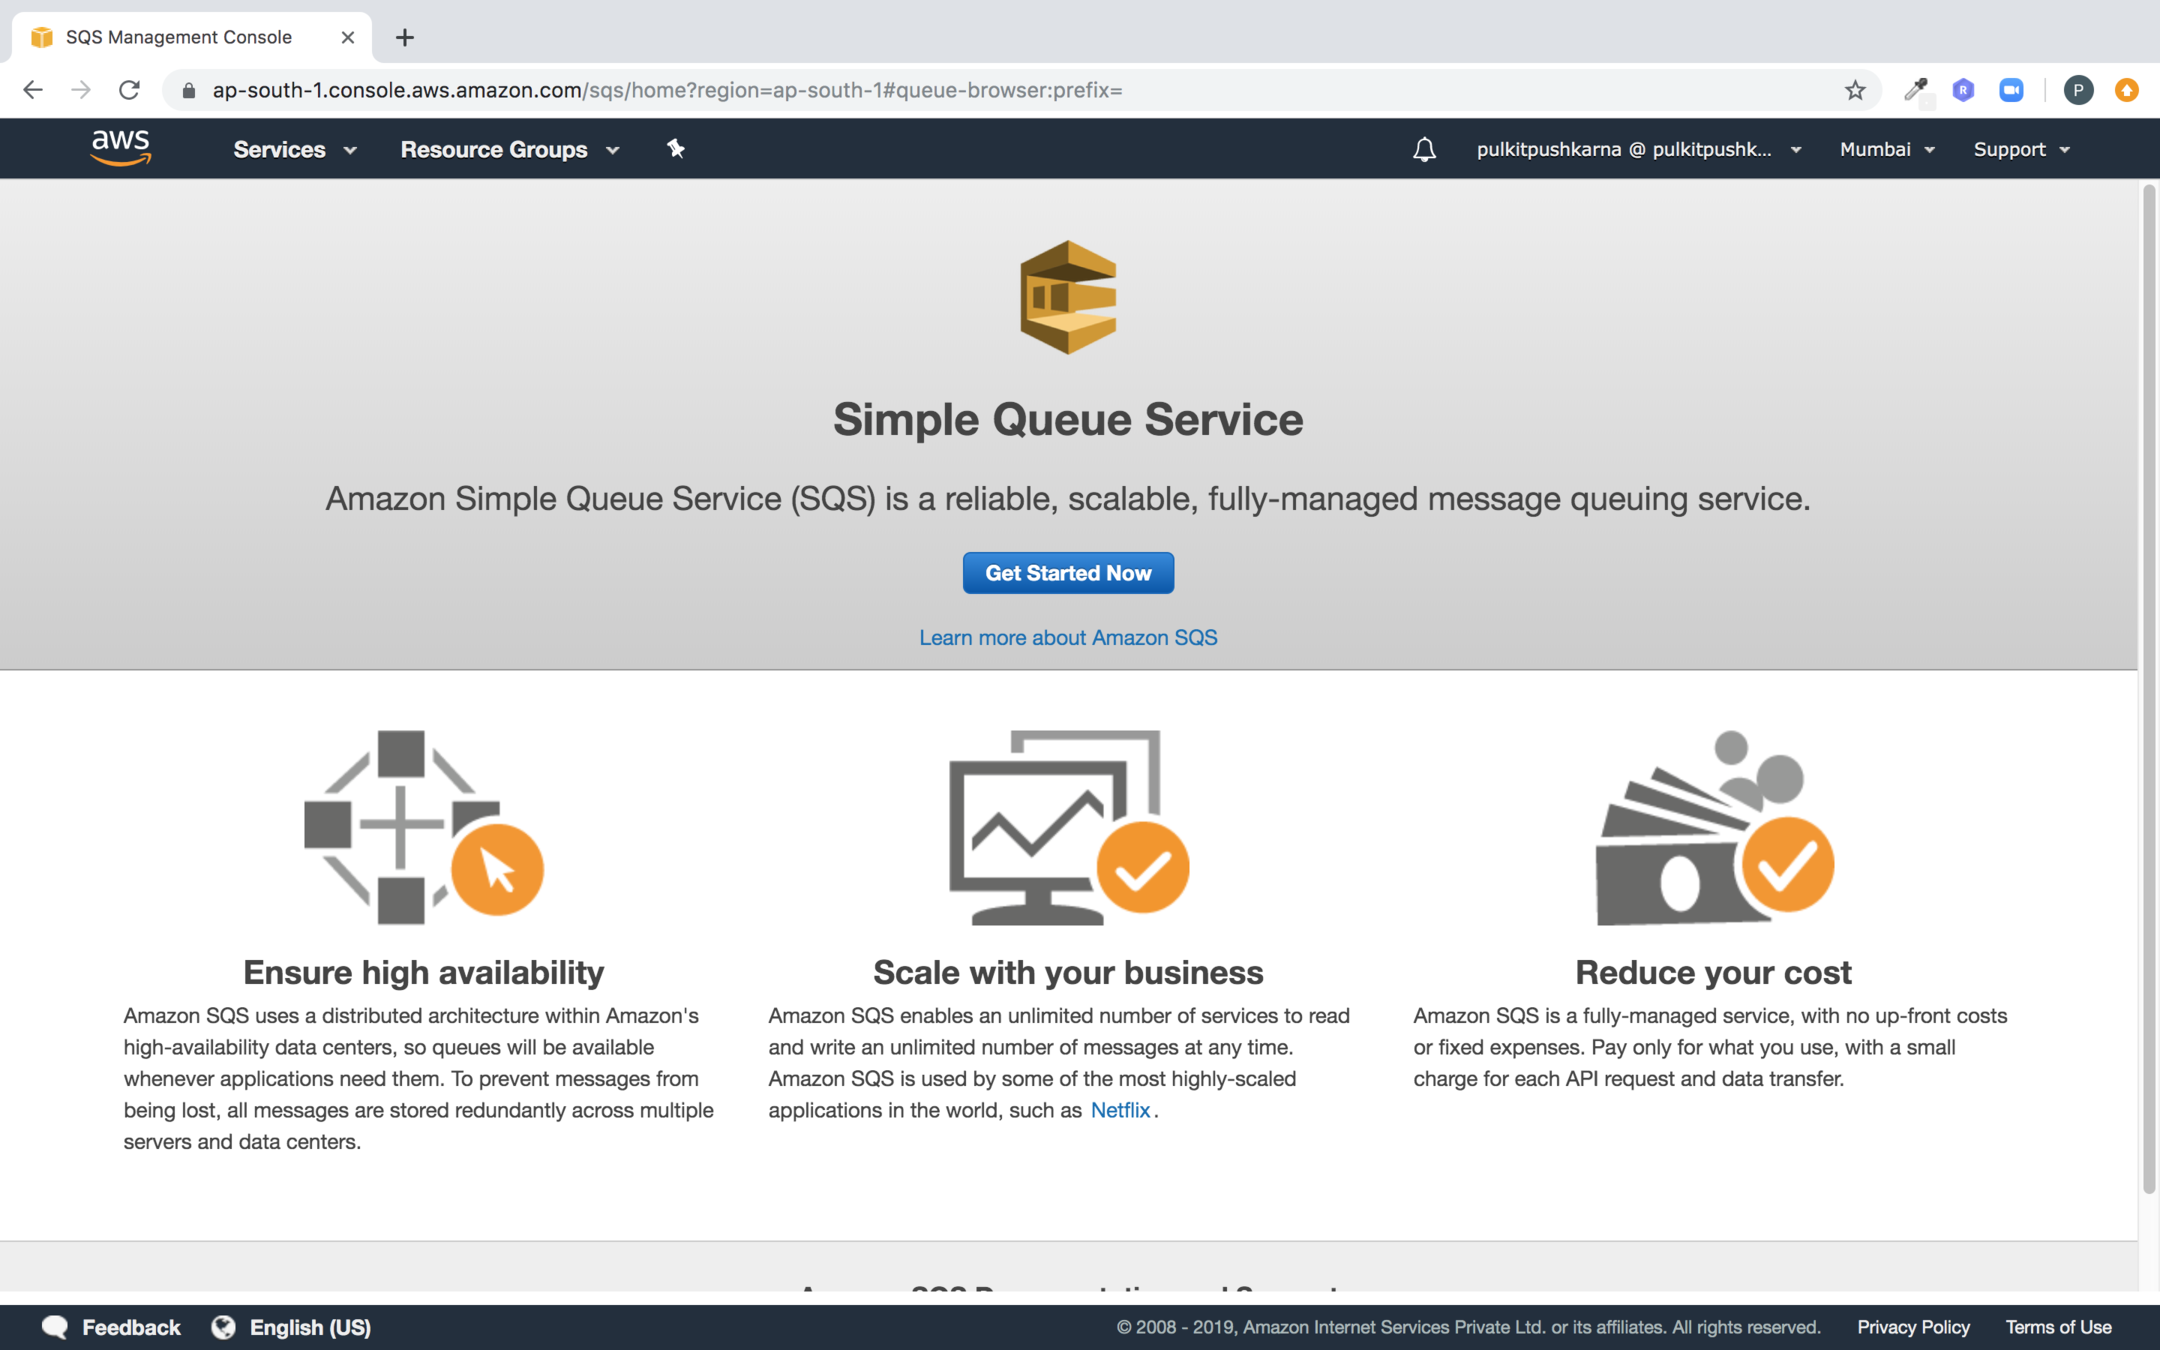
Step 1: Go to SQS service and click Get Started Now
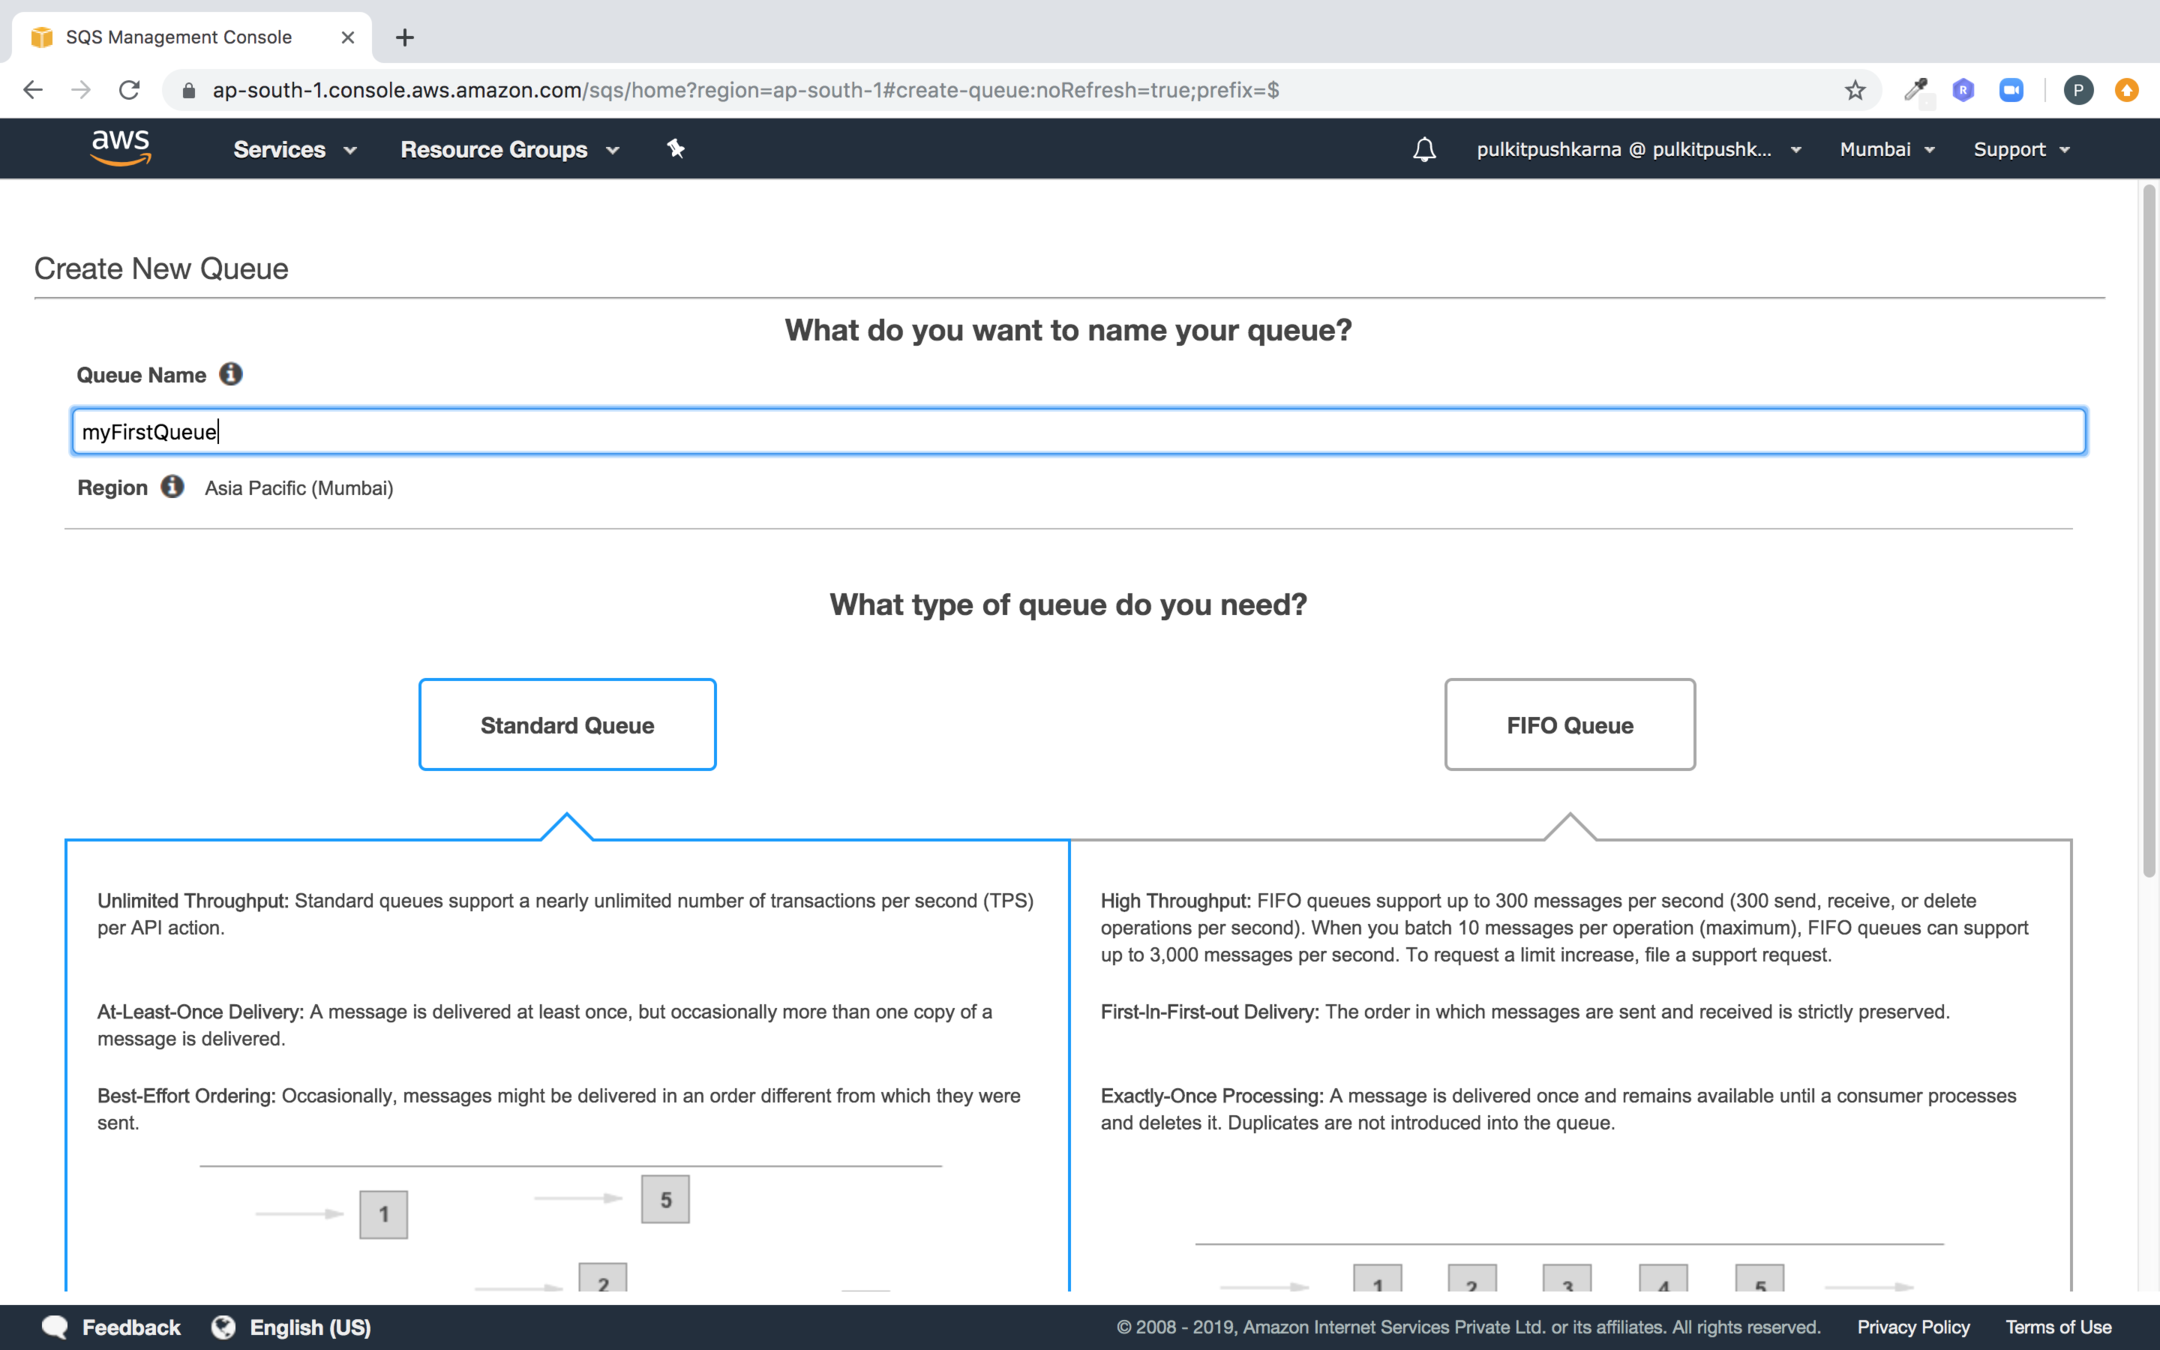
Step 2 : Select the standard queue and Provide the name of the queue
Step 3 : Click on Quick-Create Queue
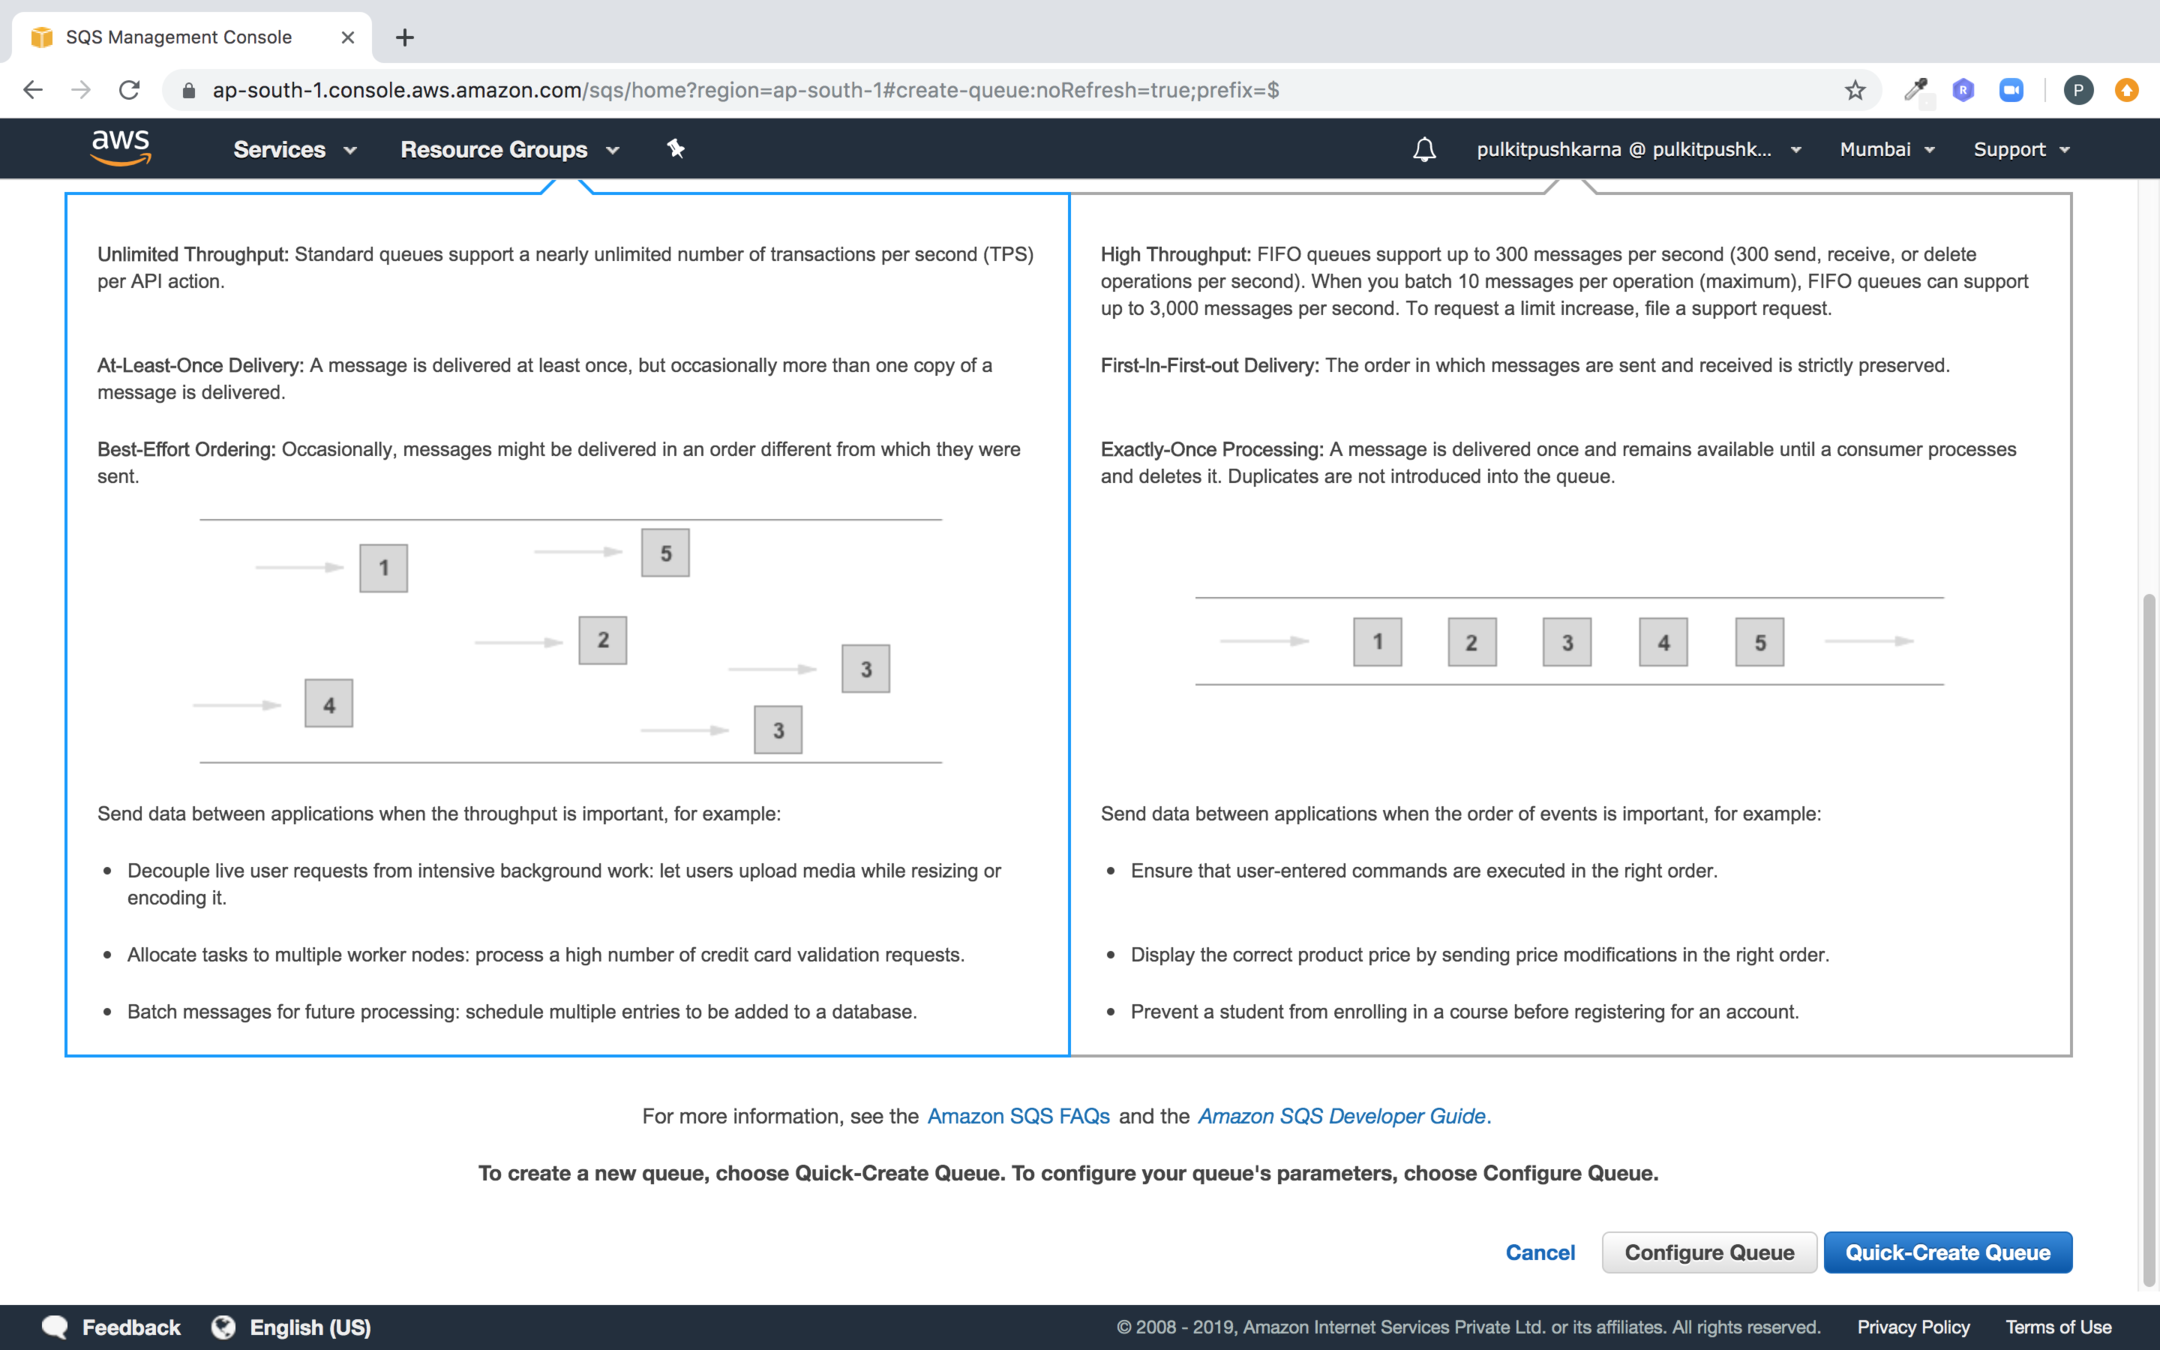
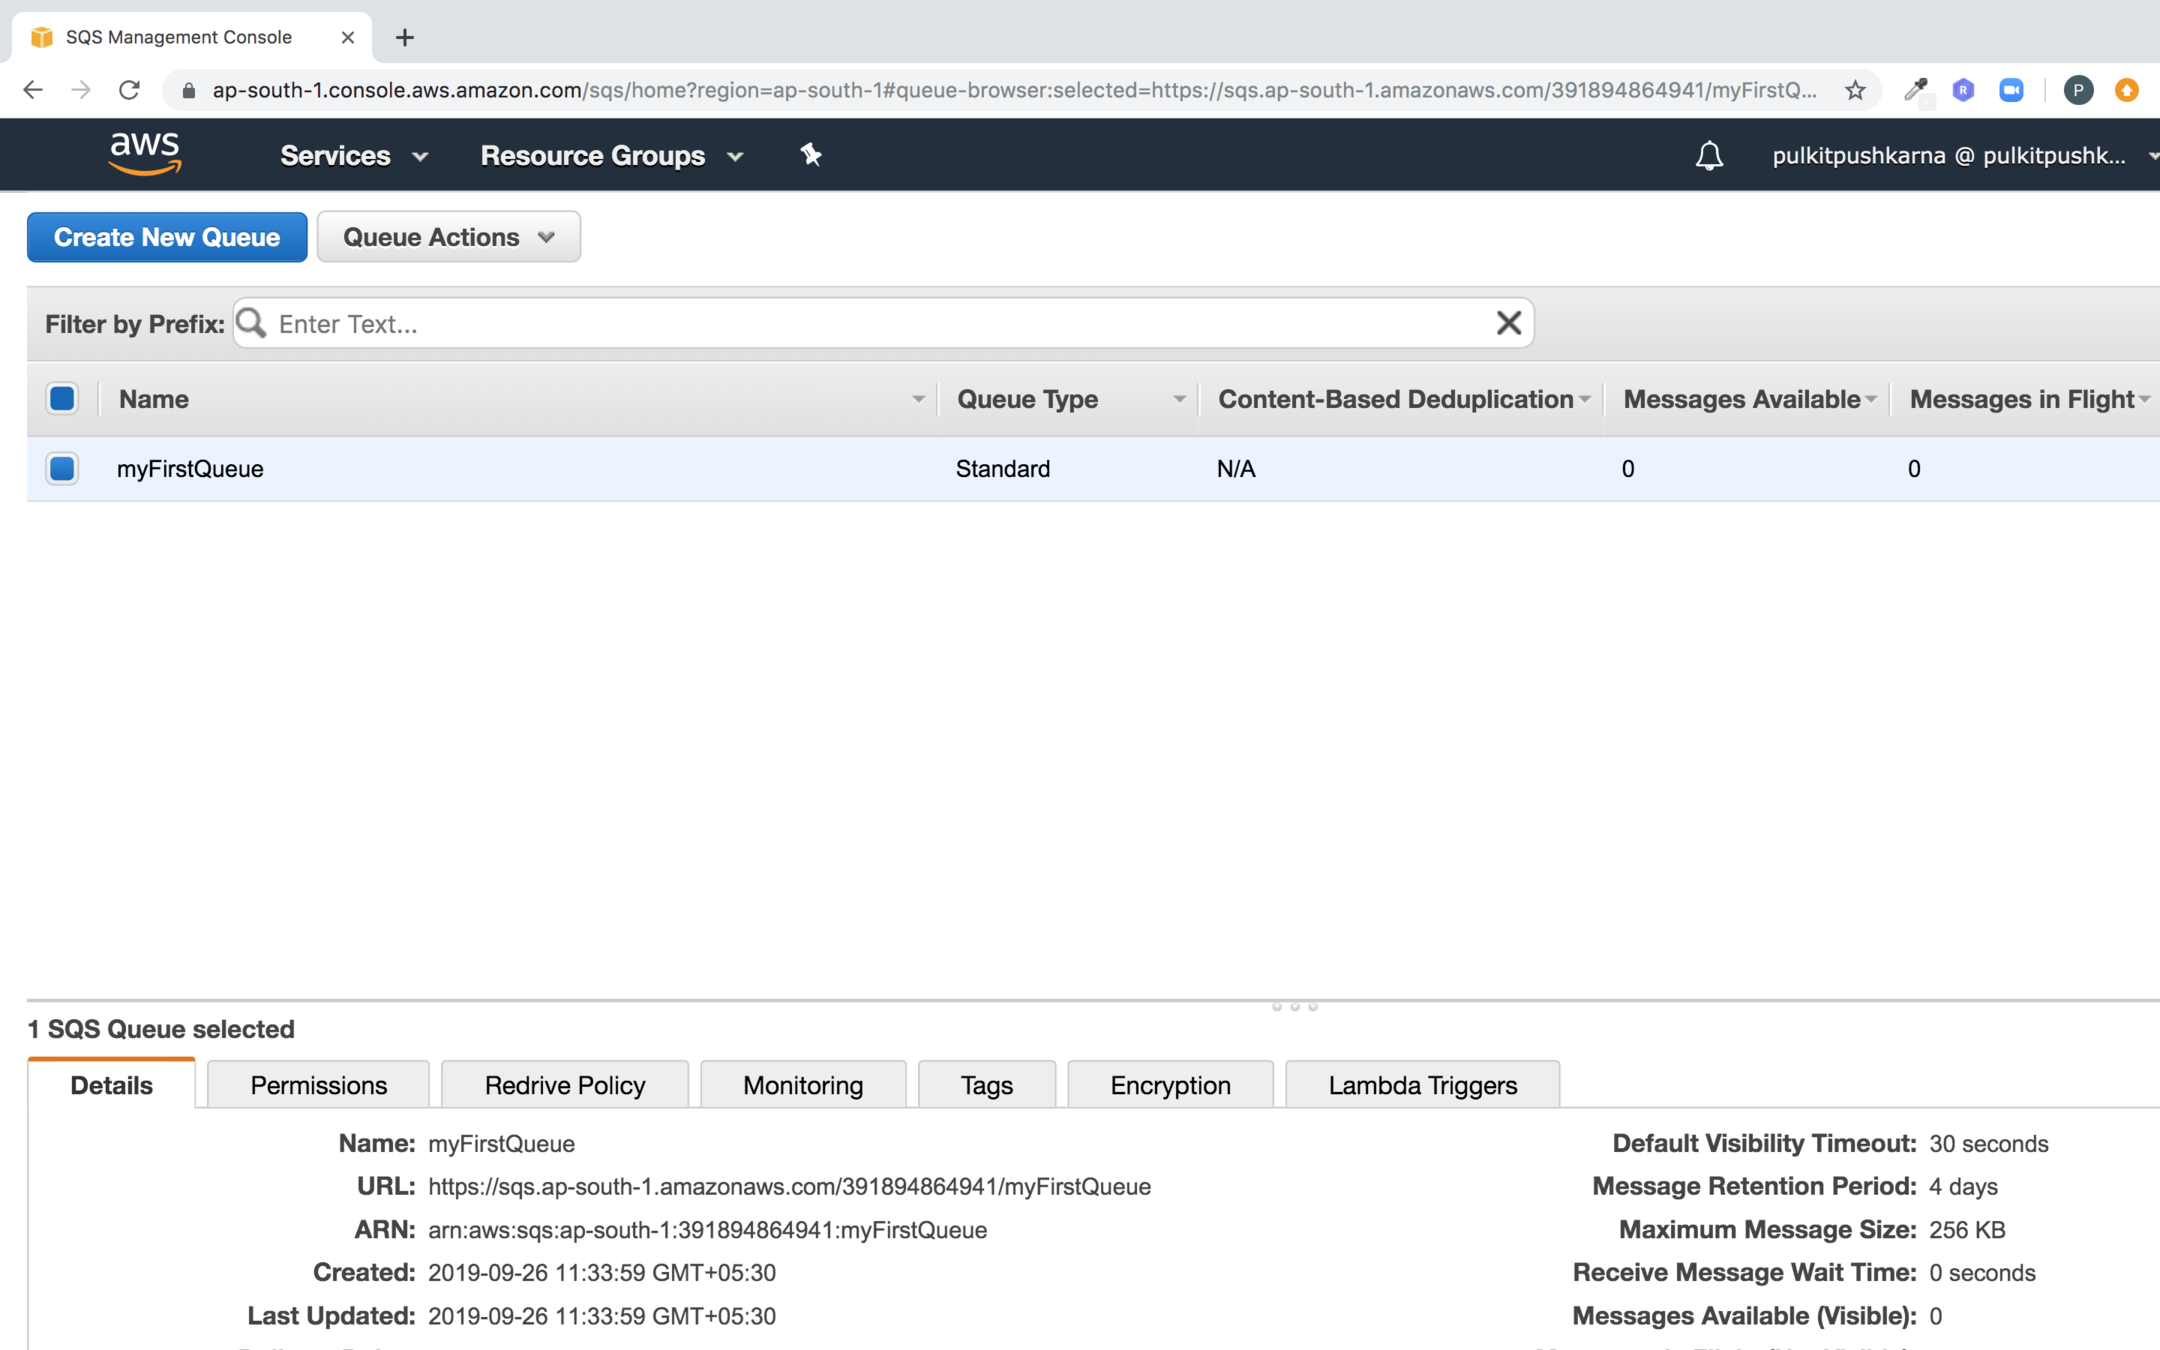
you can see the queue create by queue name
Push elements in the queue
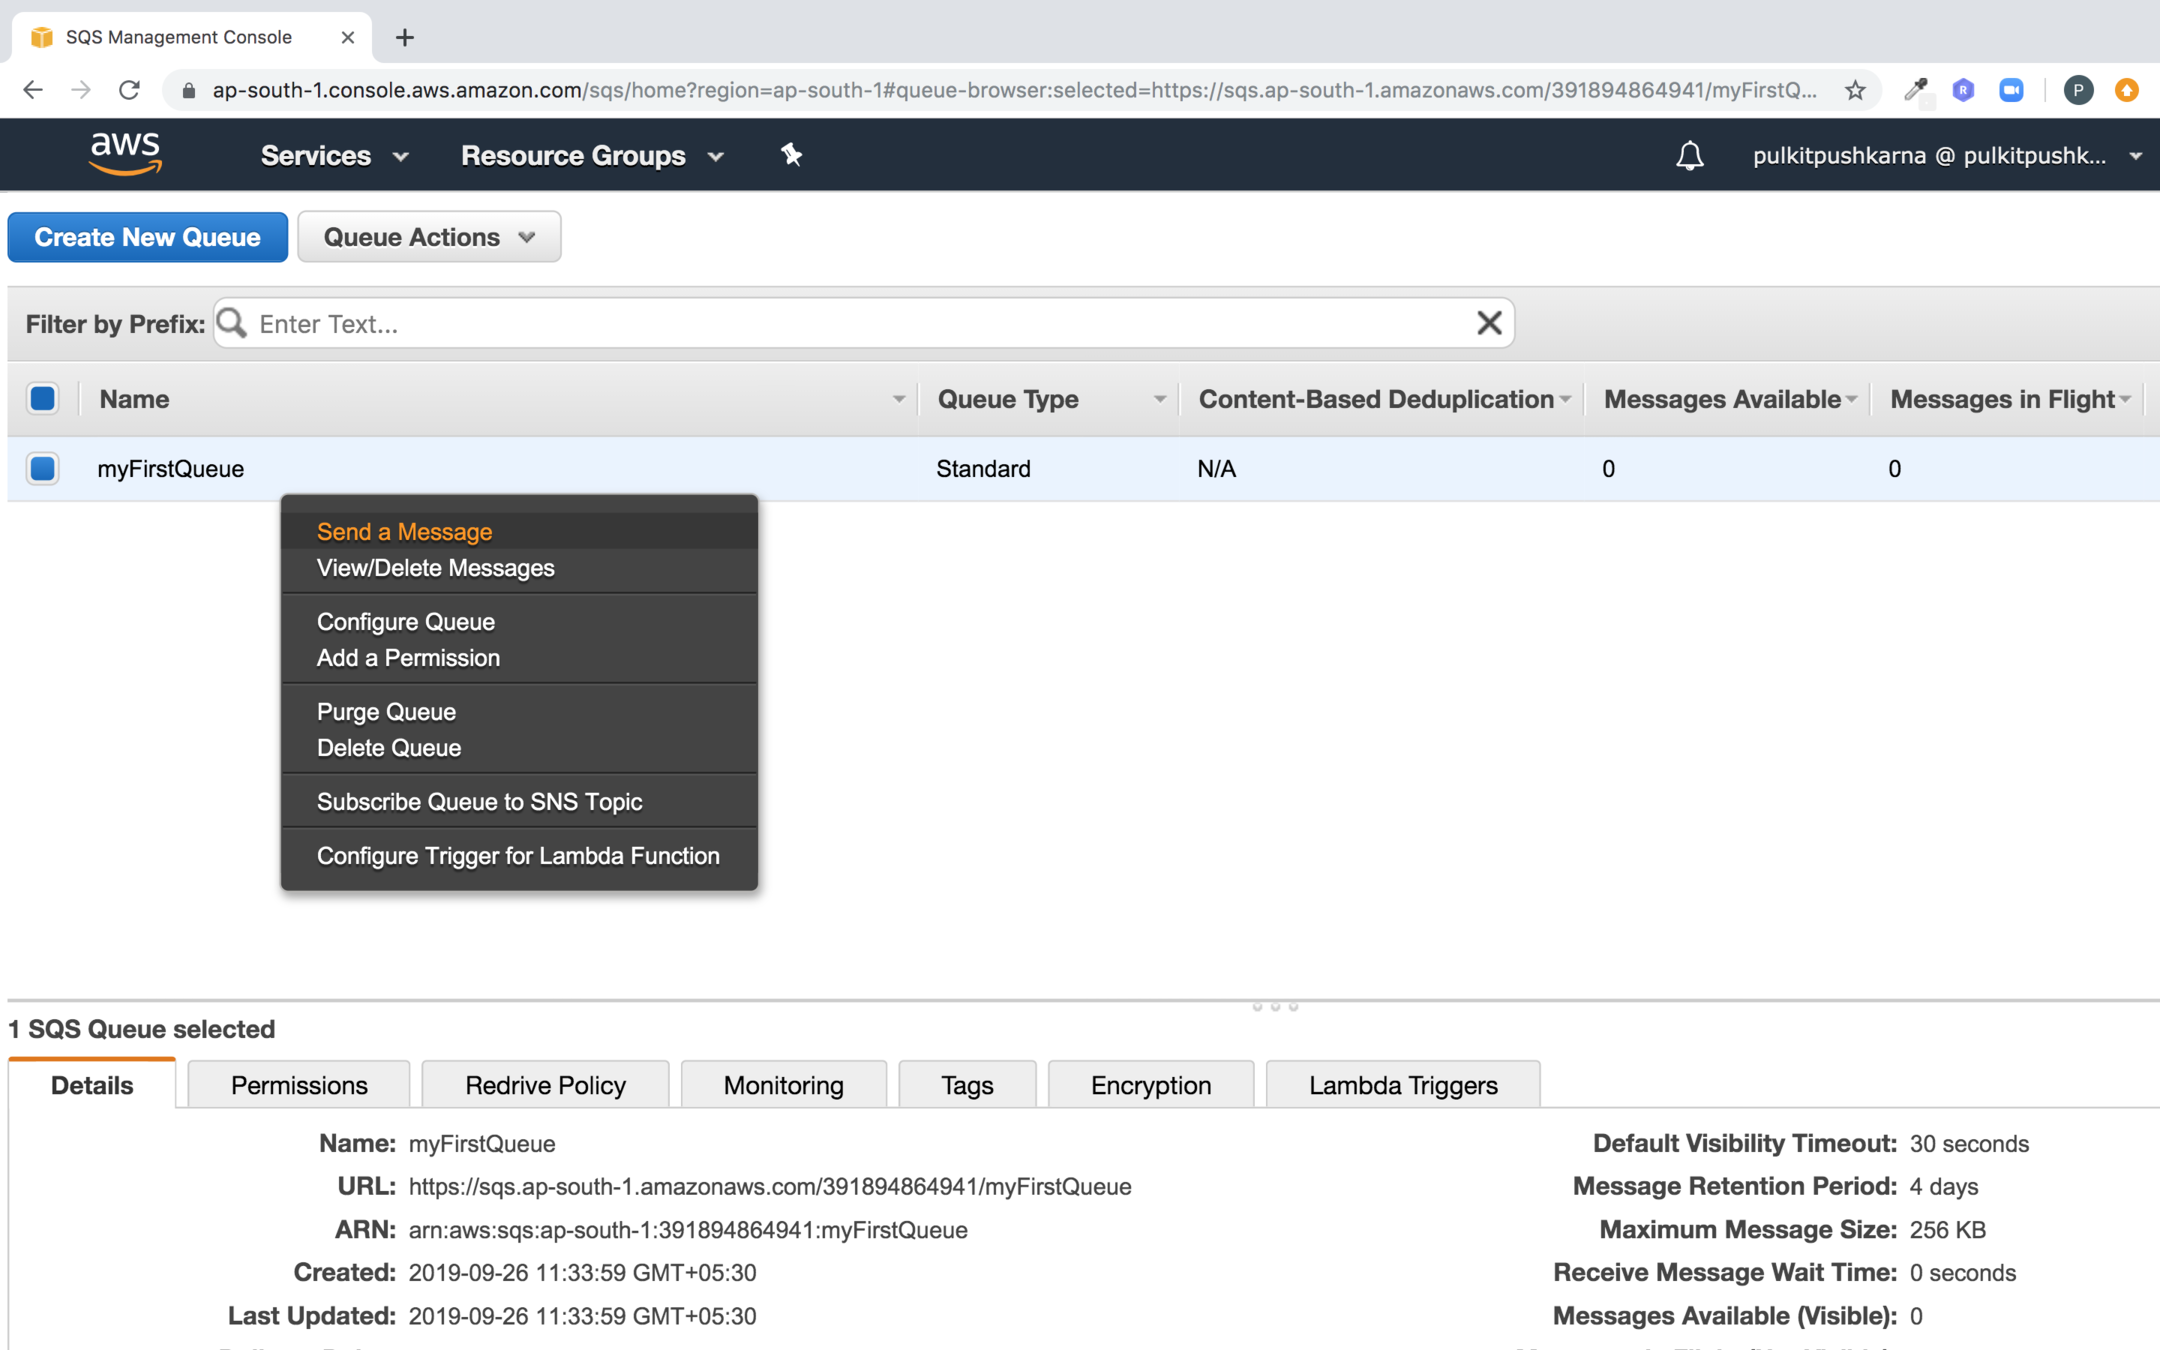
Enter the message body and click on send message
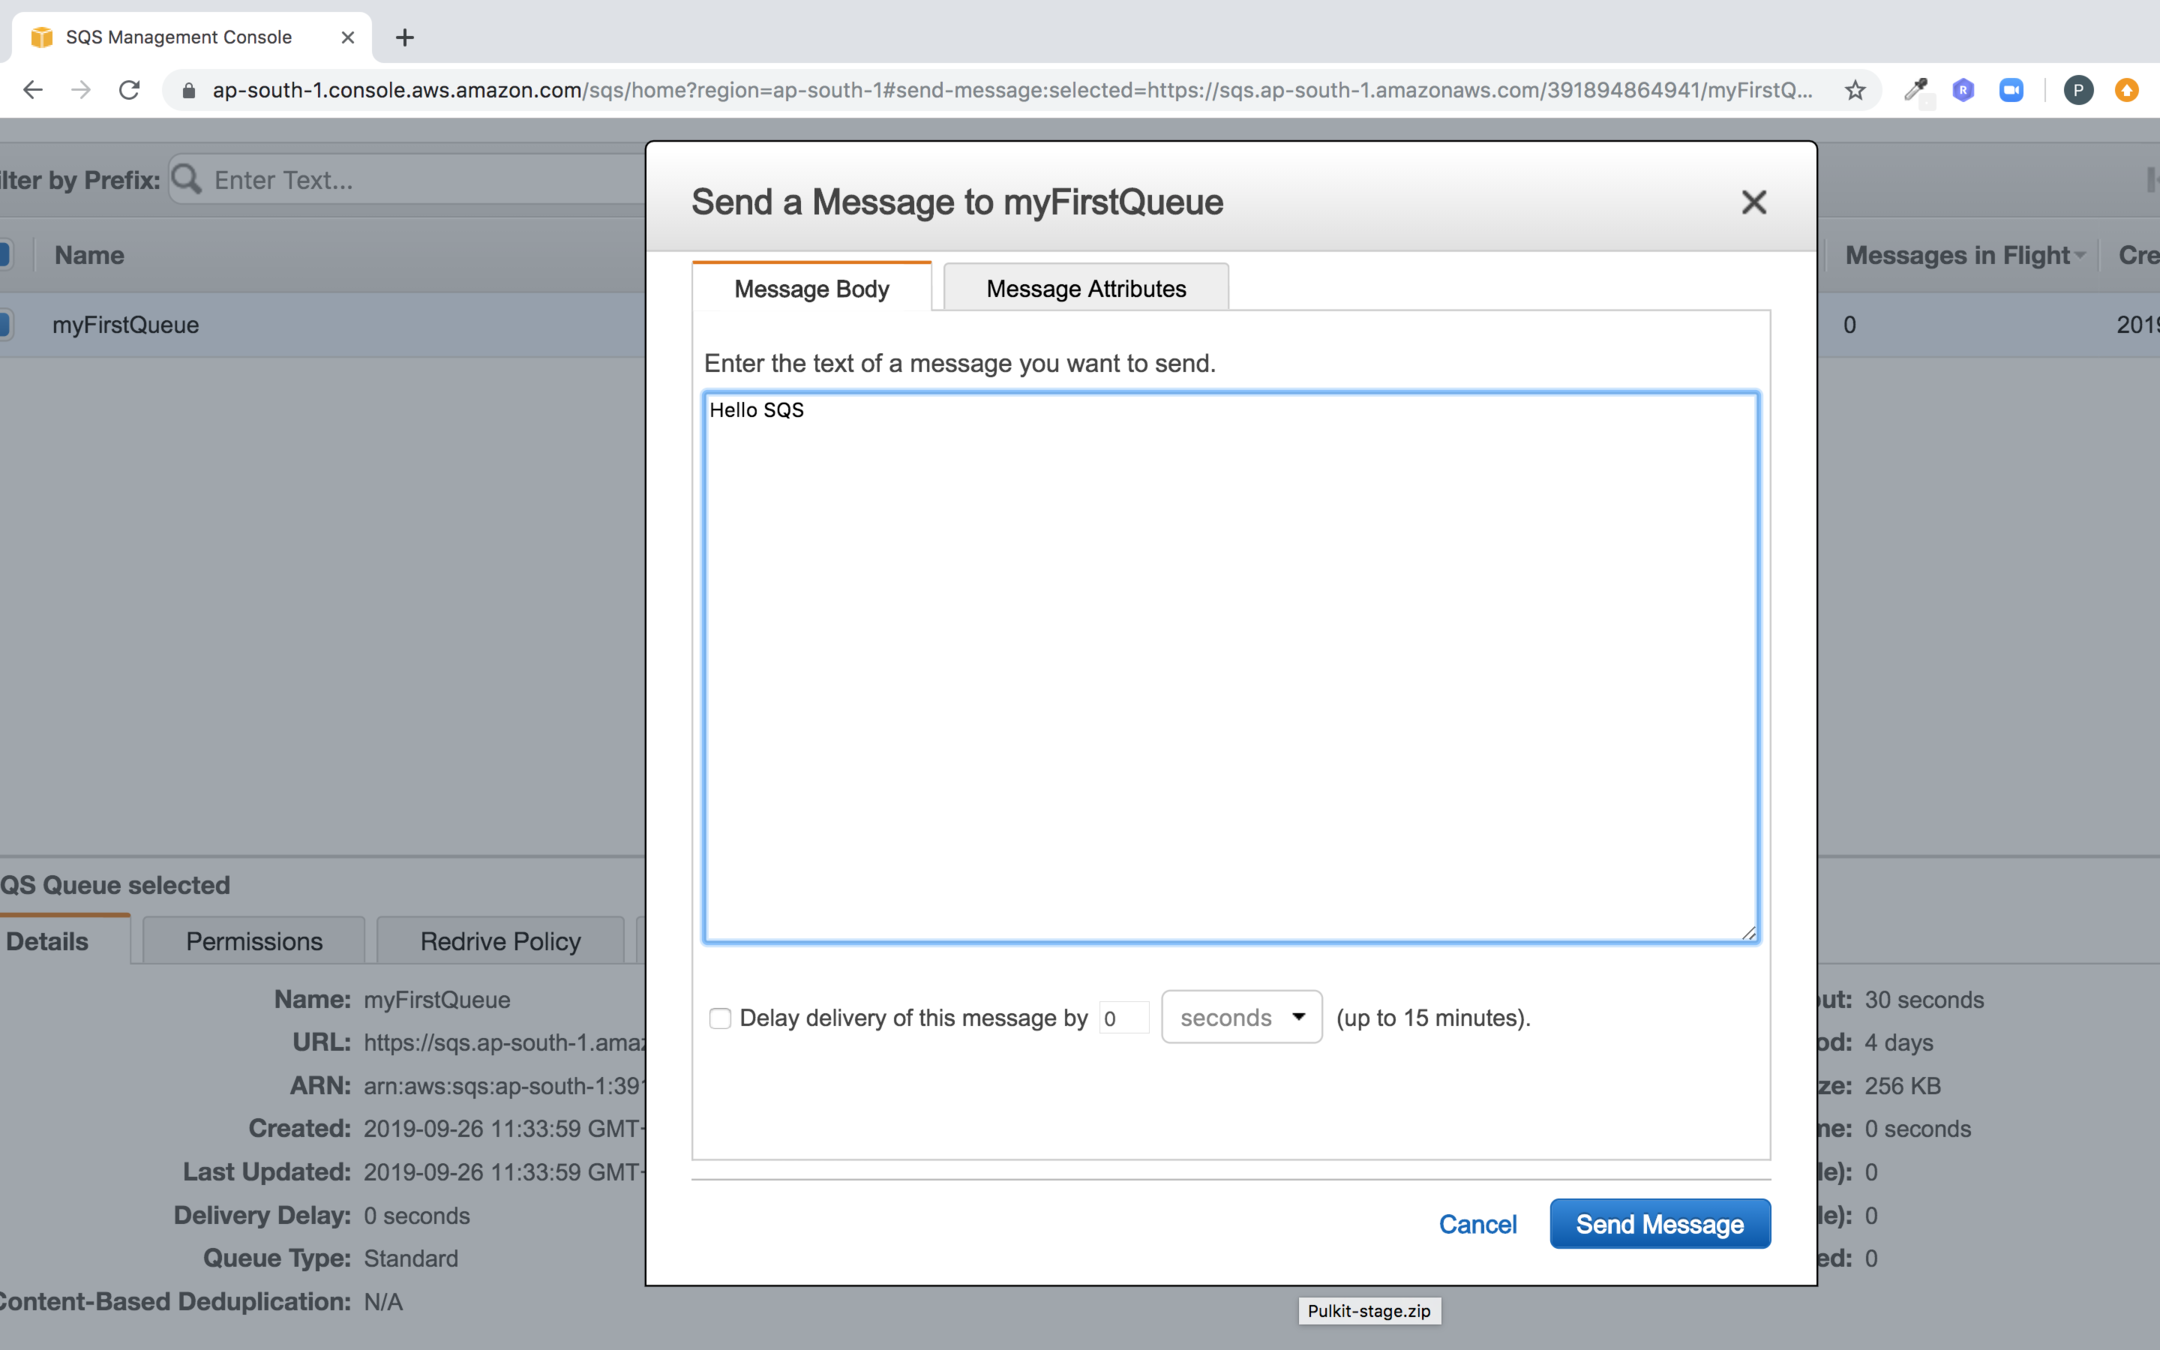
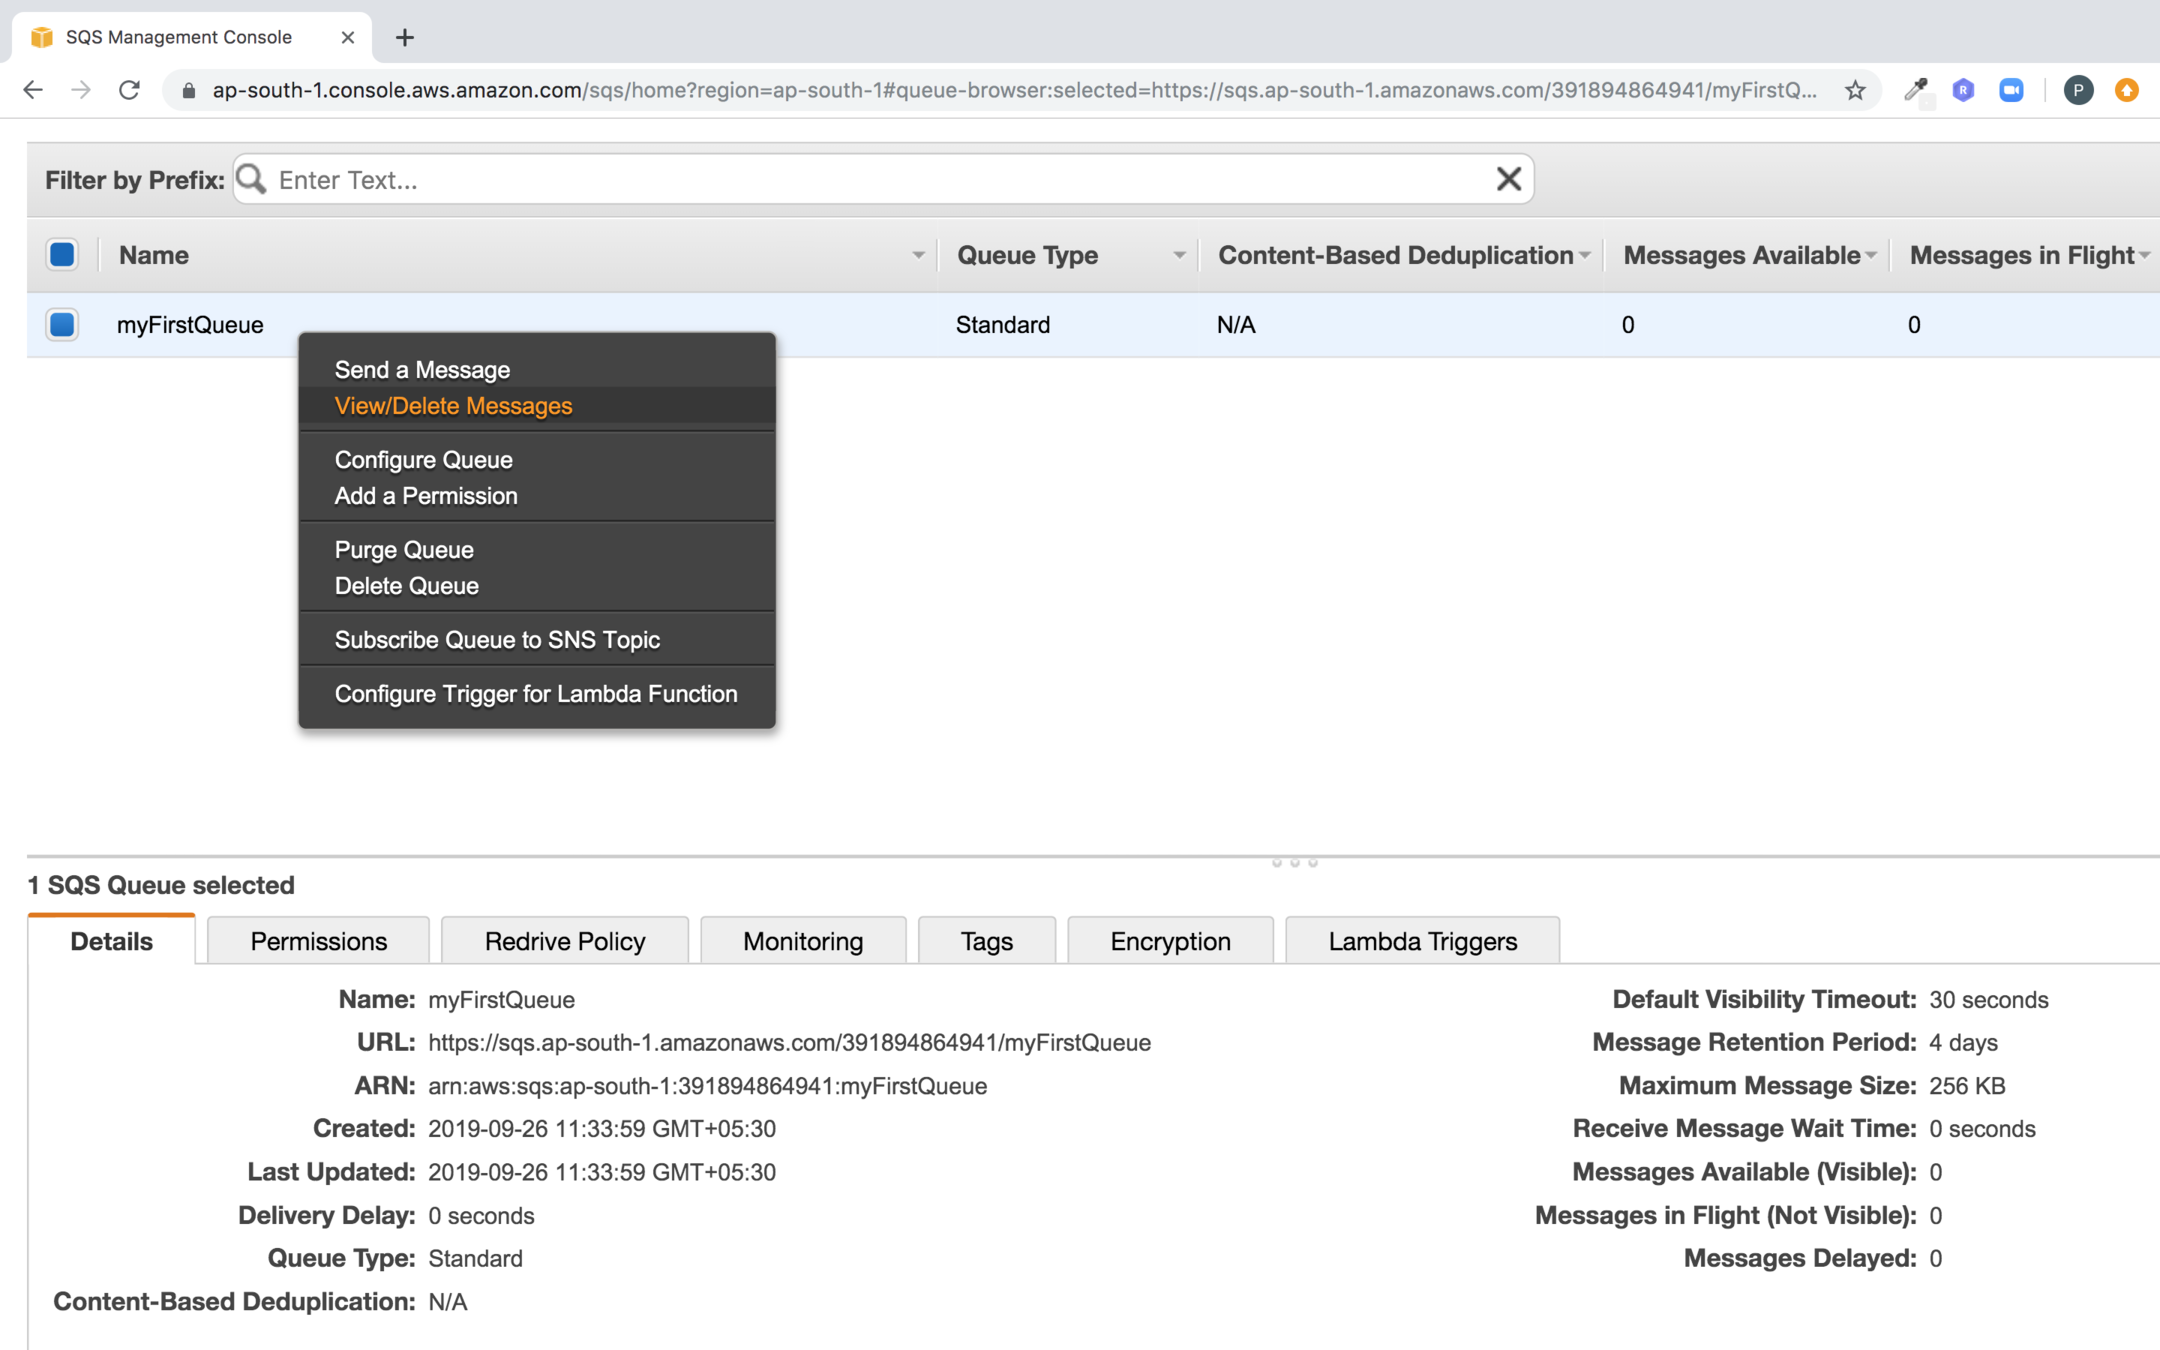
To view the message click on View/Delete Messages
Click on start polling for messages
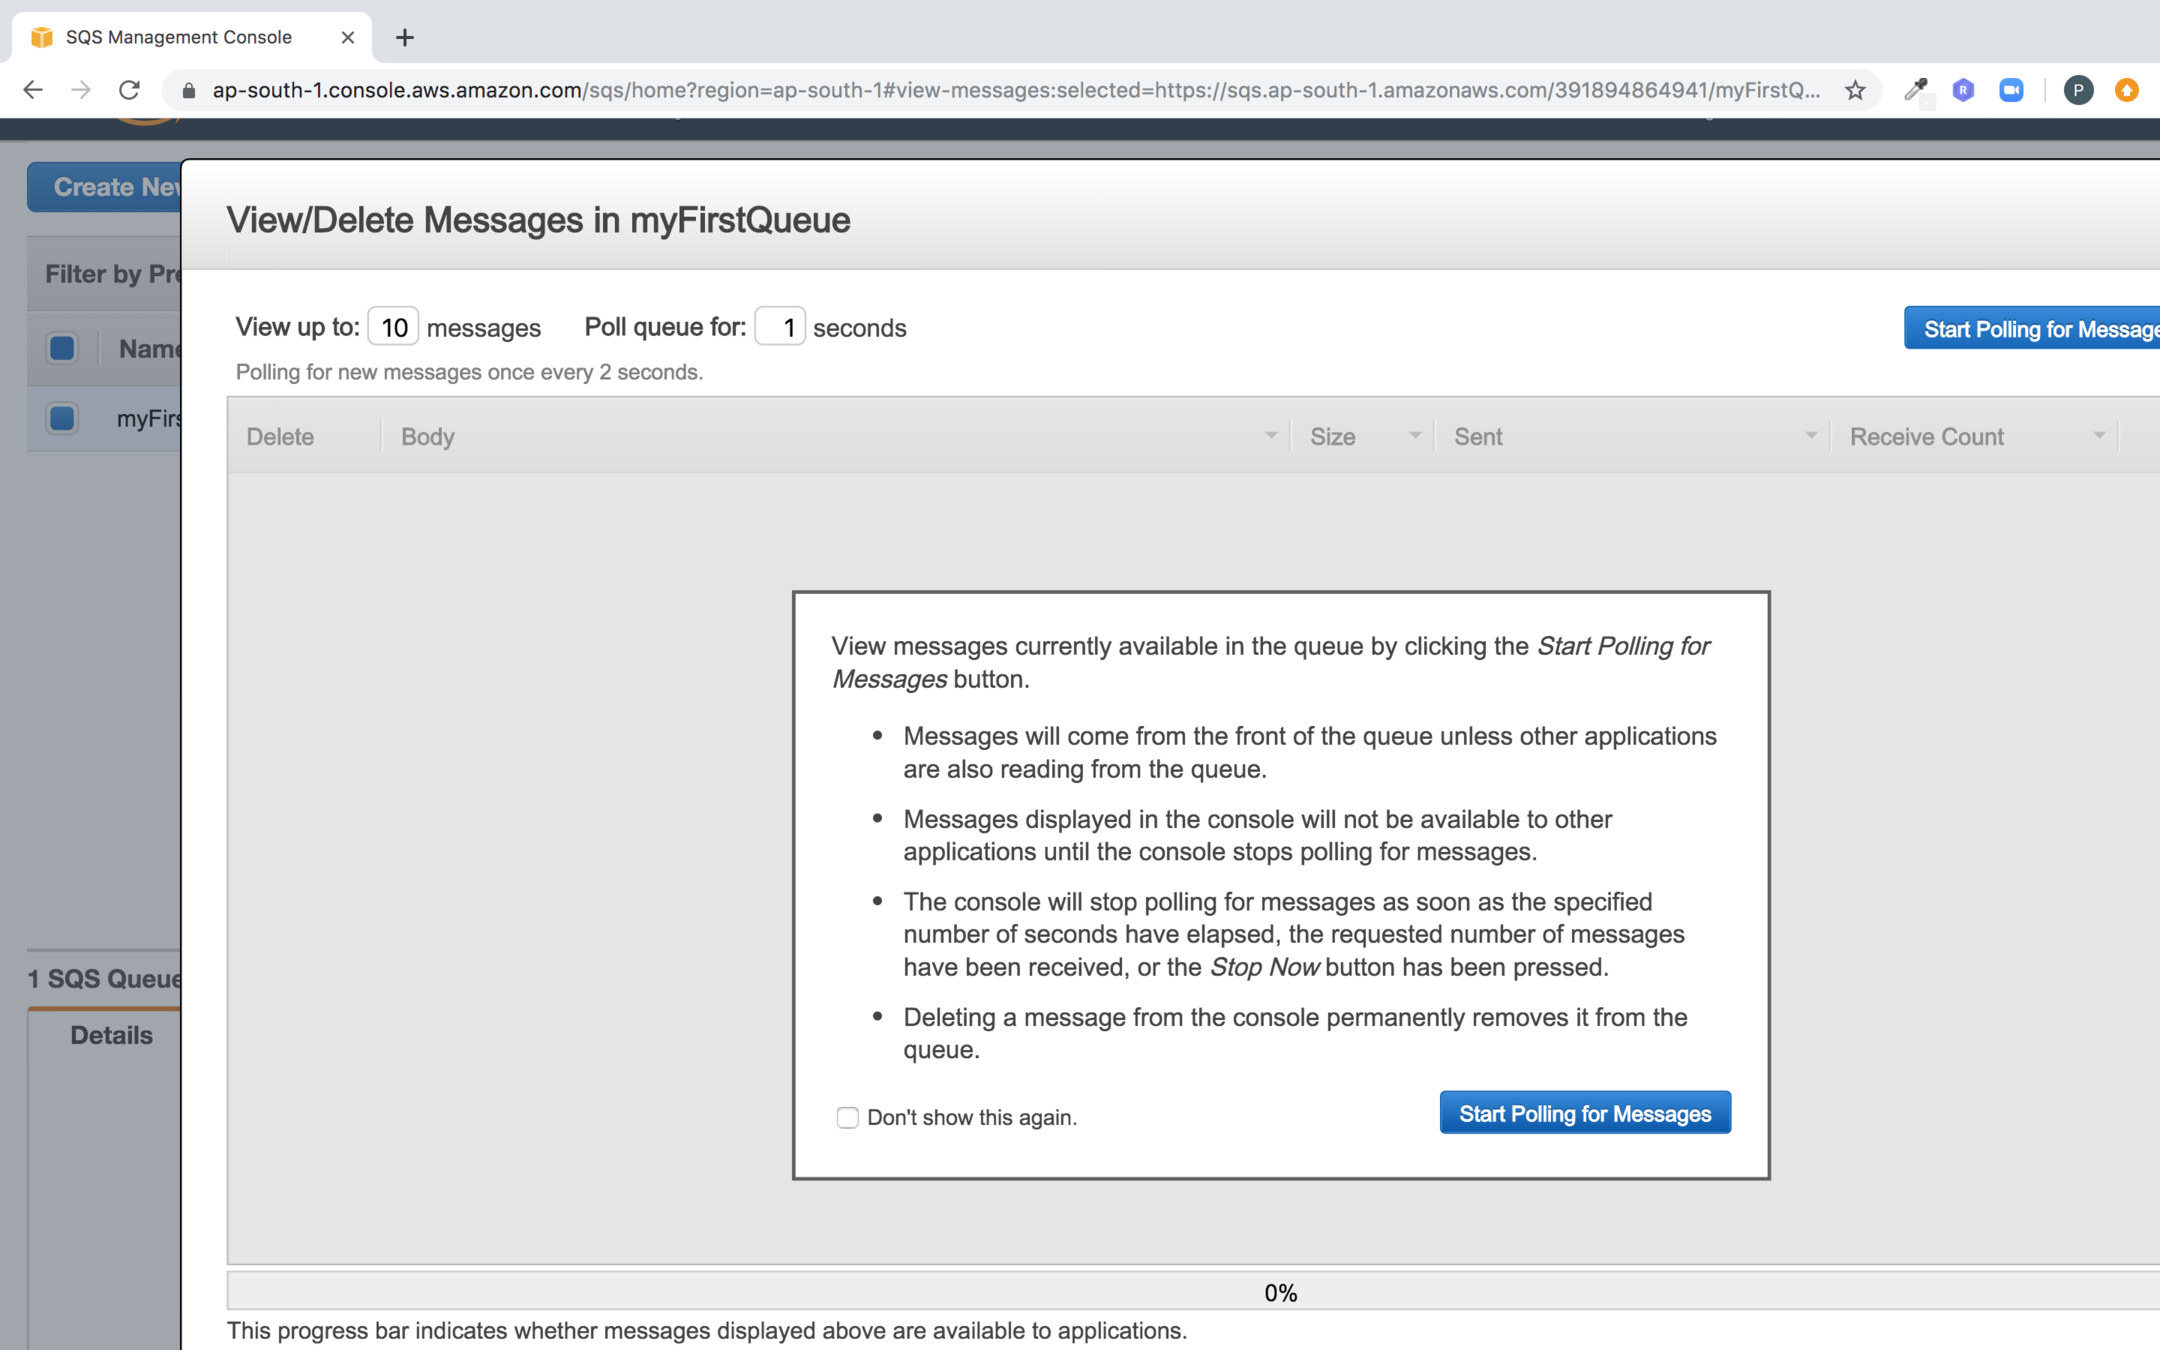
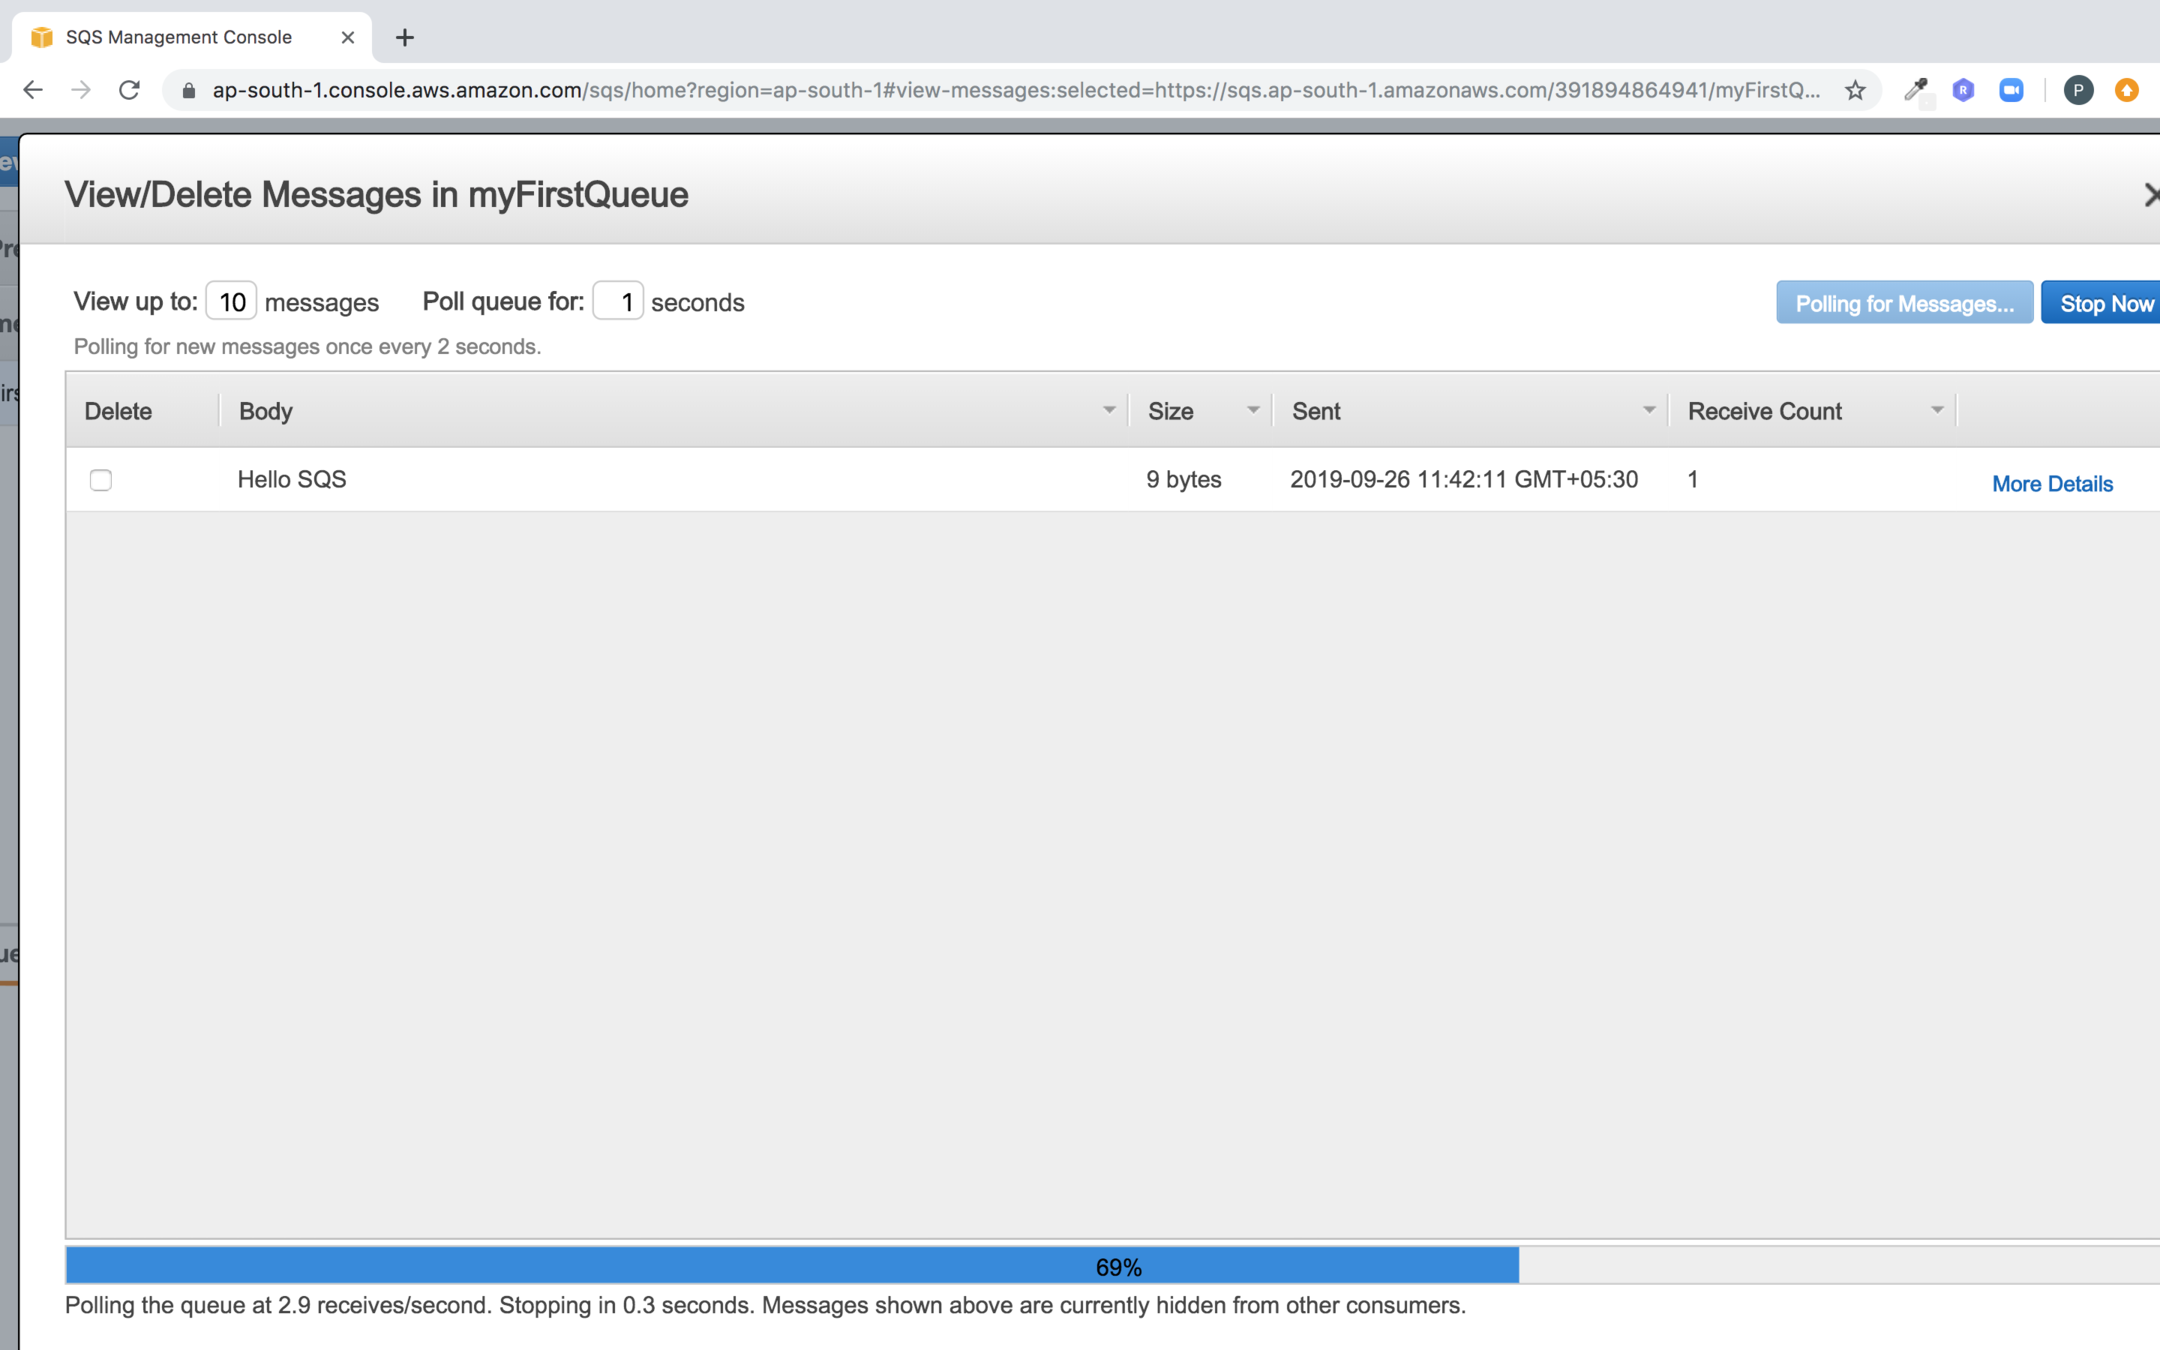
You should see the message you pushed to the queue
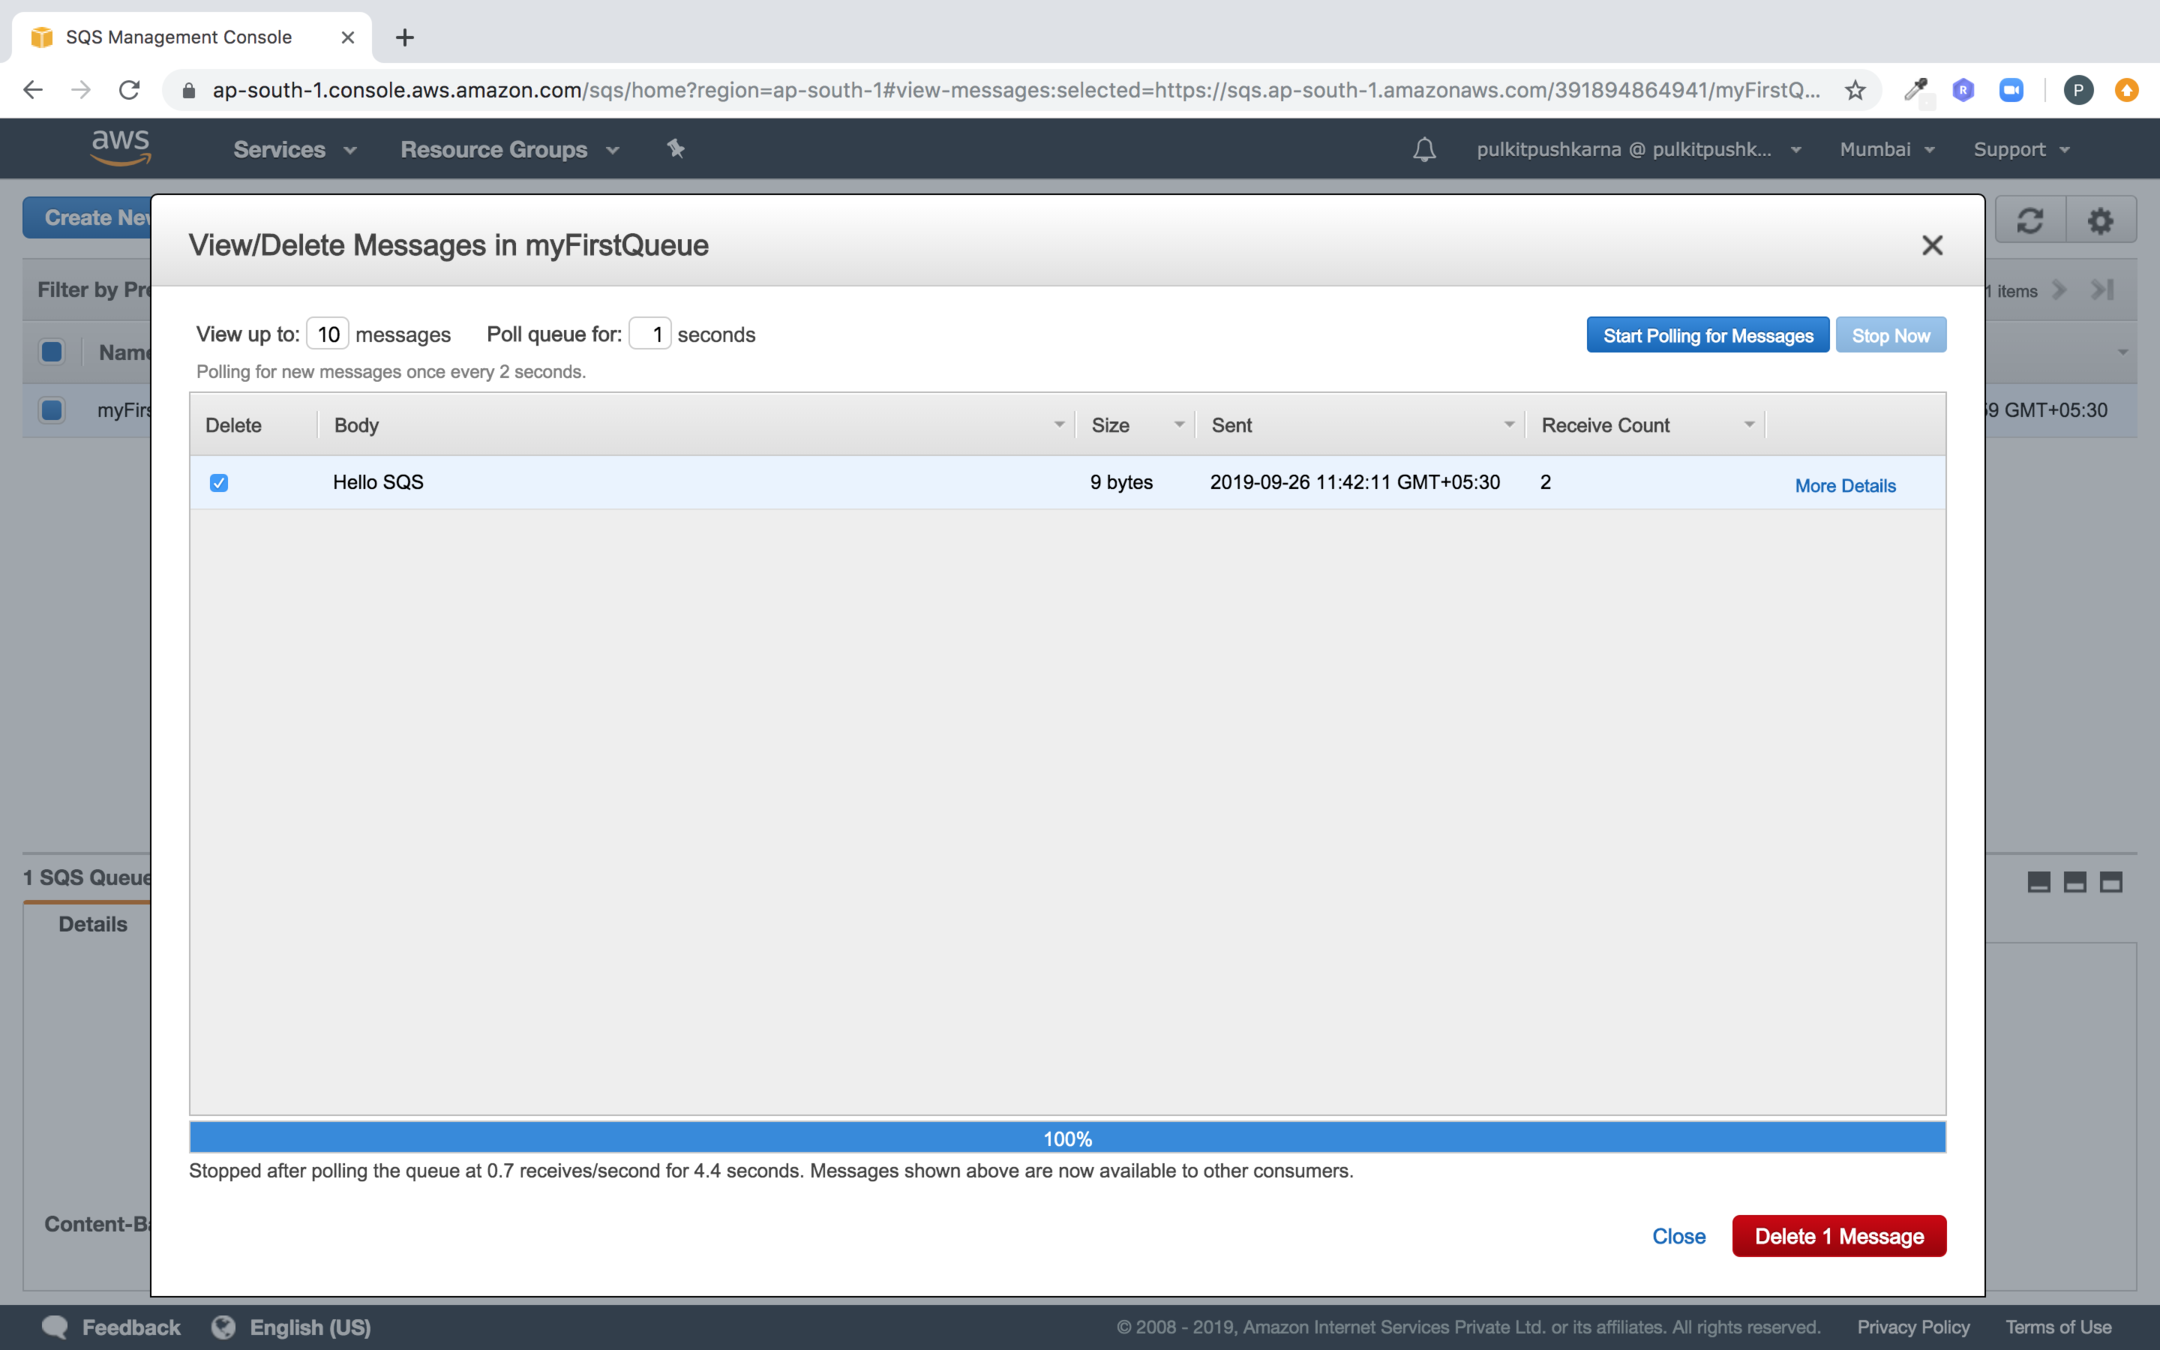
In order to delete the message check the checkbox in front of message and click on delete button
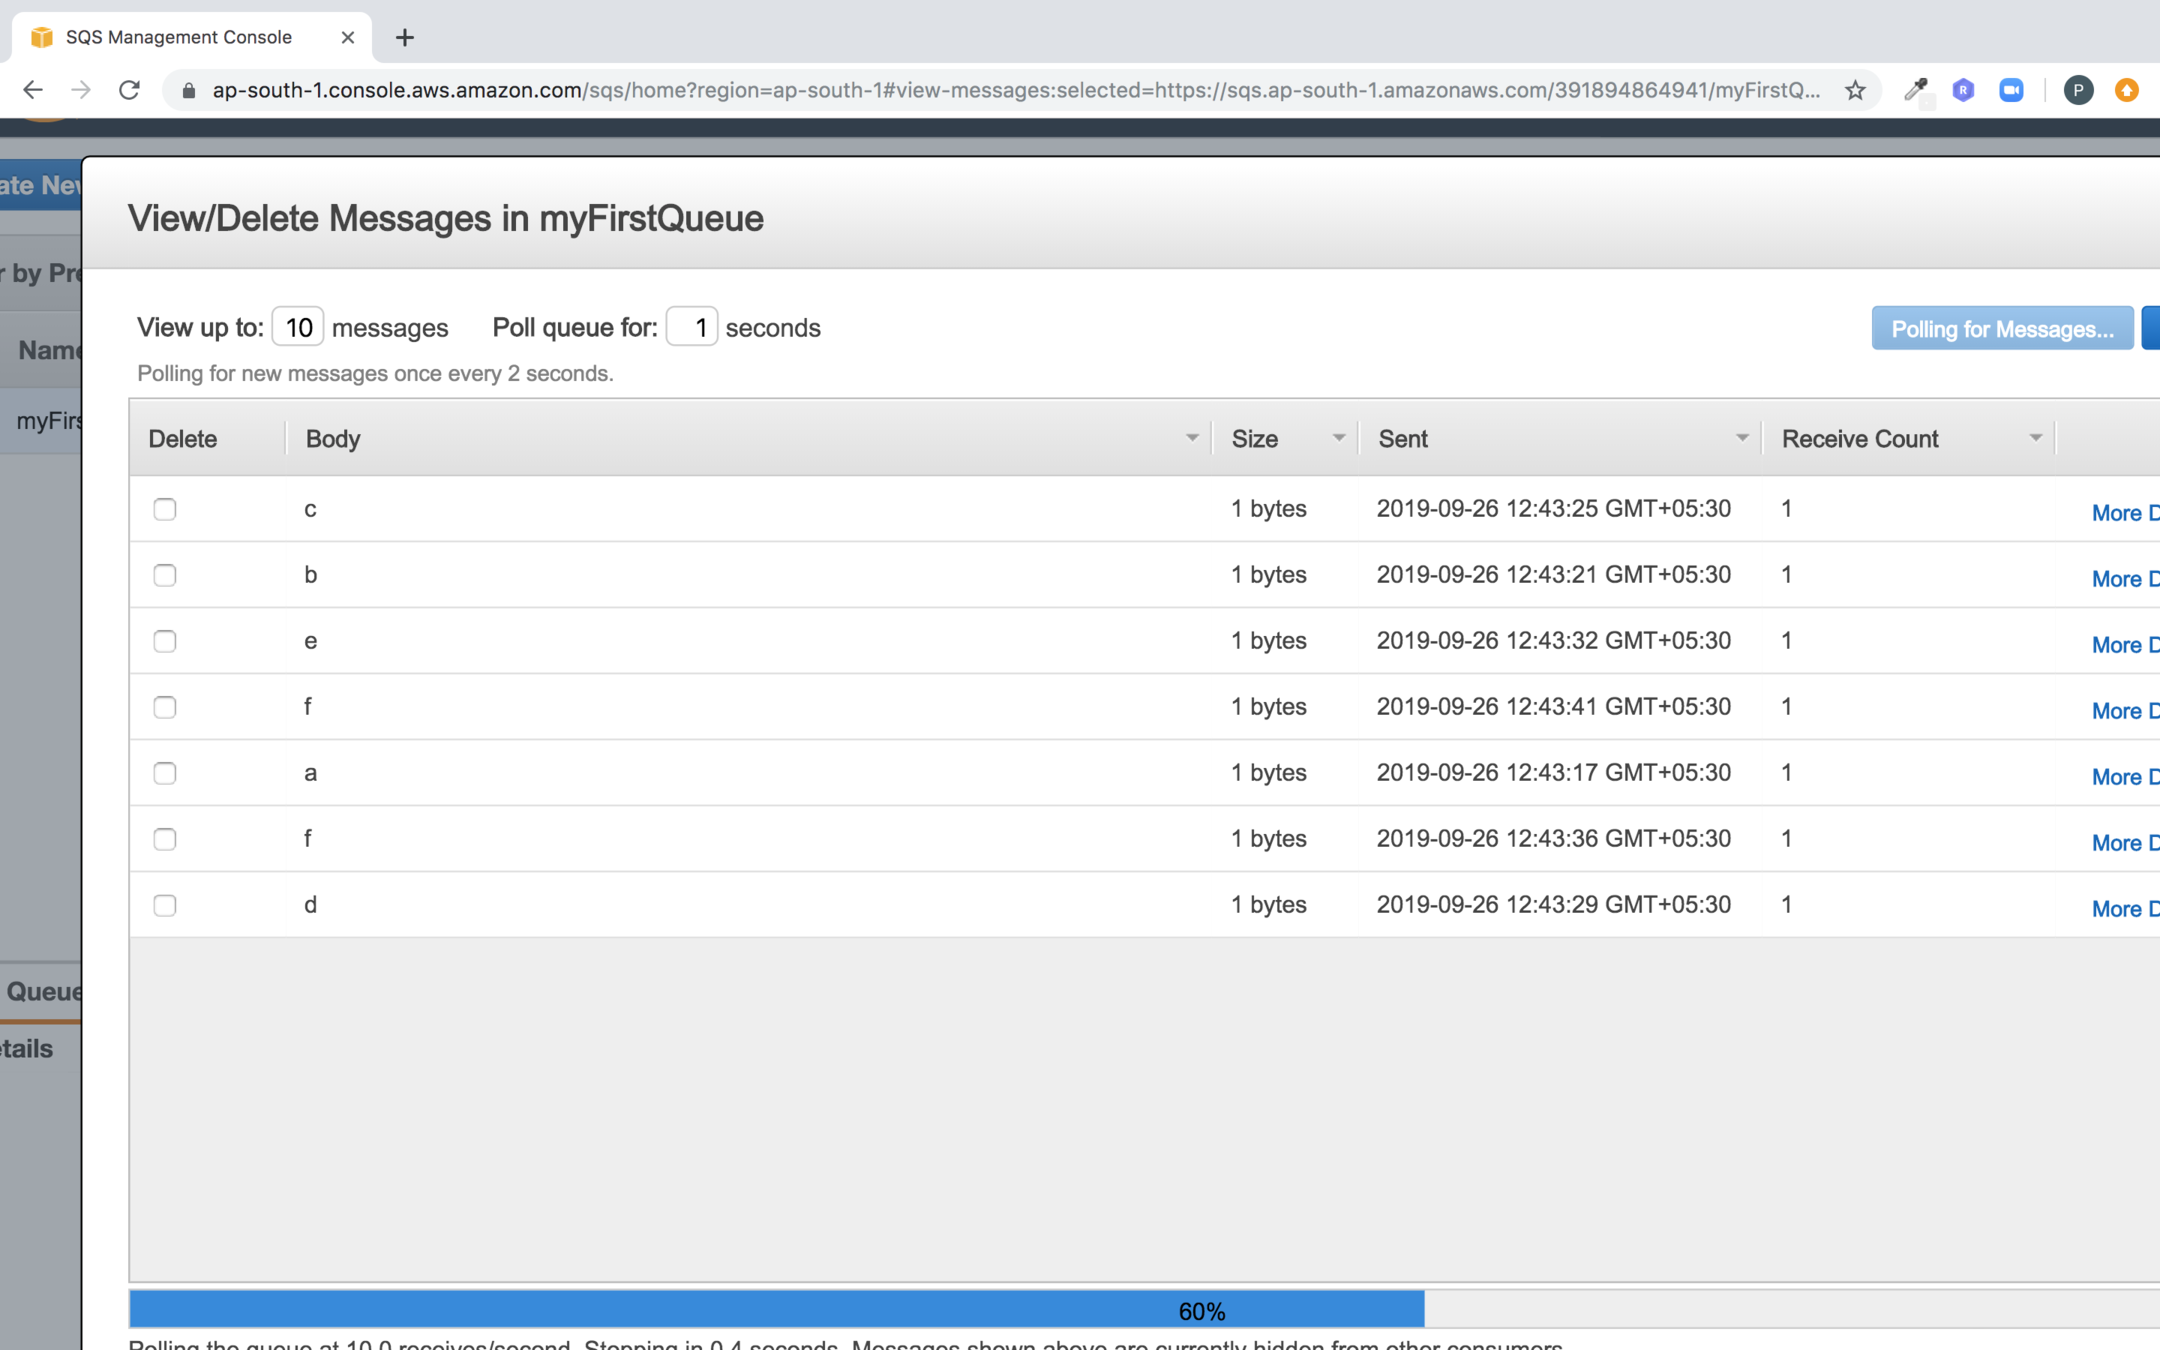
If you enter multiple elements in the queue you will notice that the order is not preserved
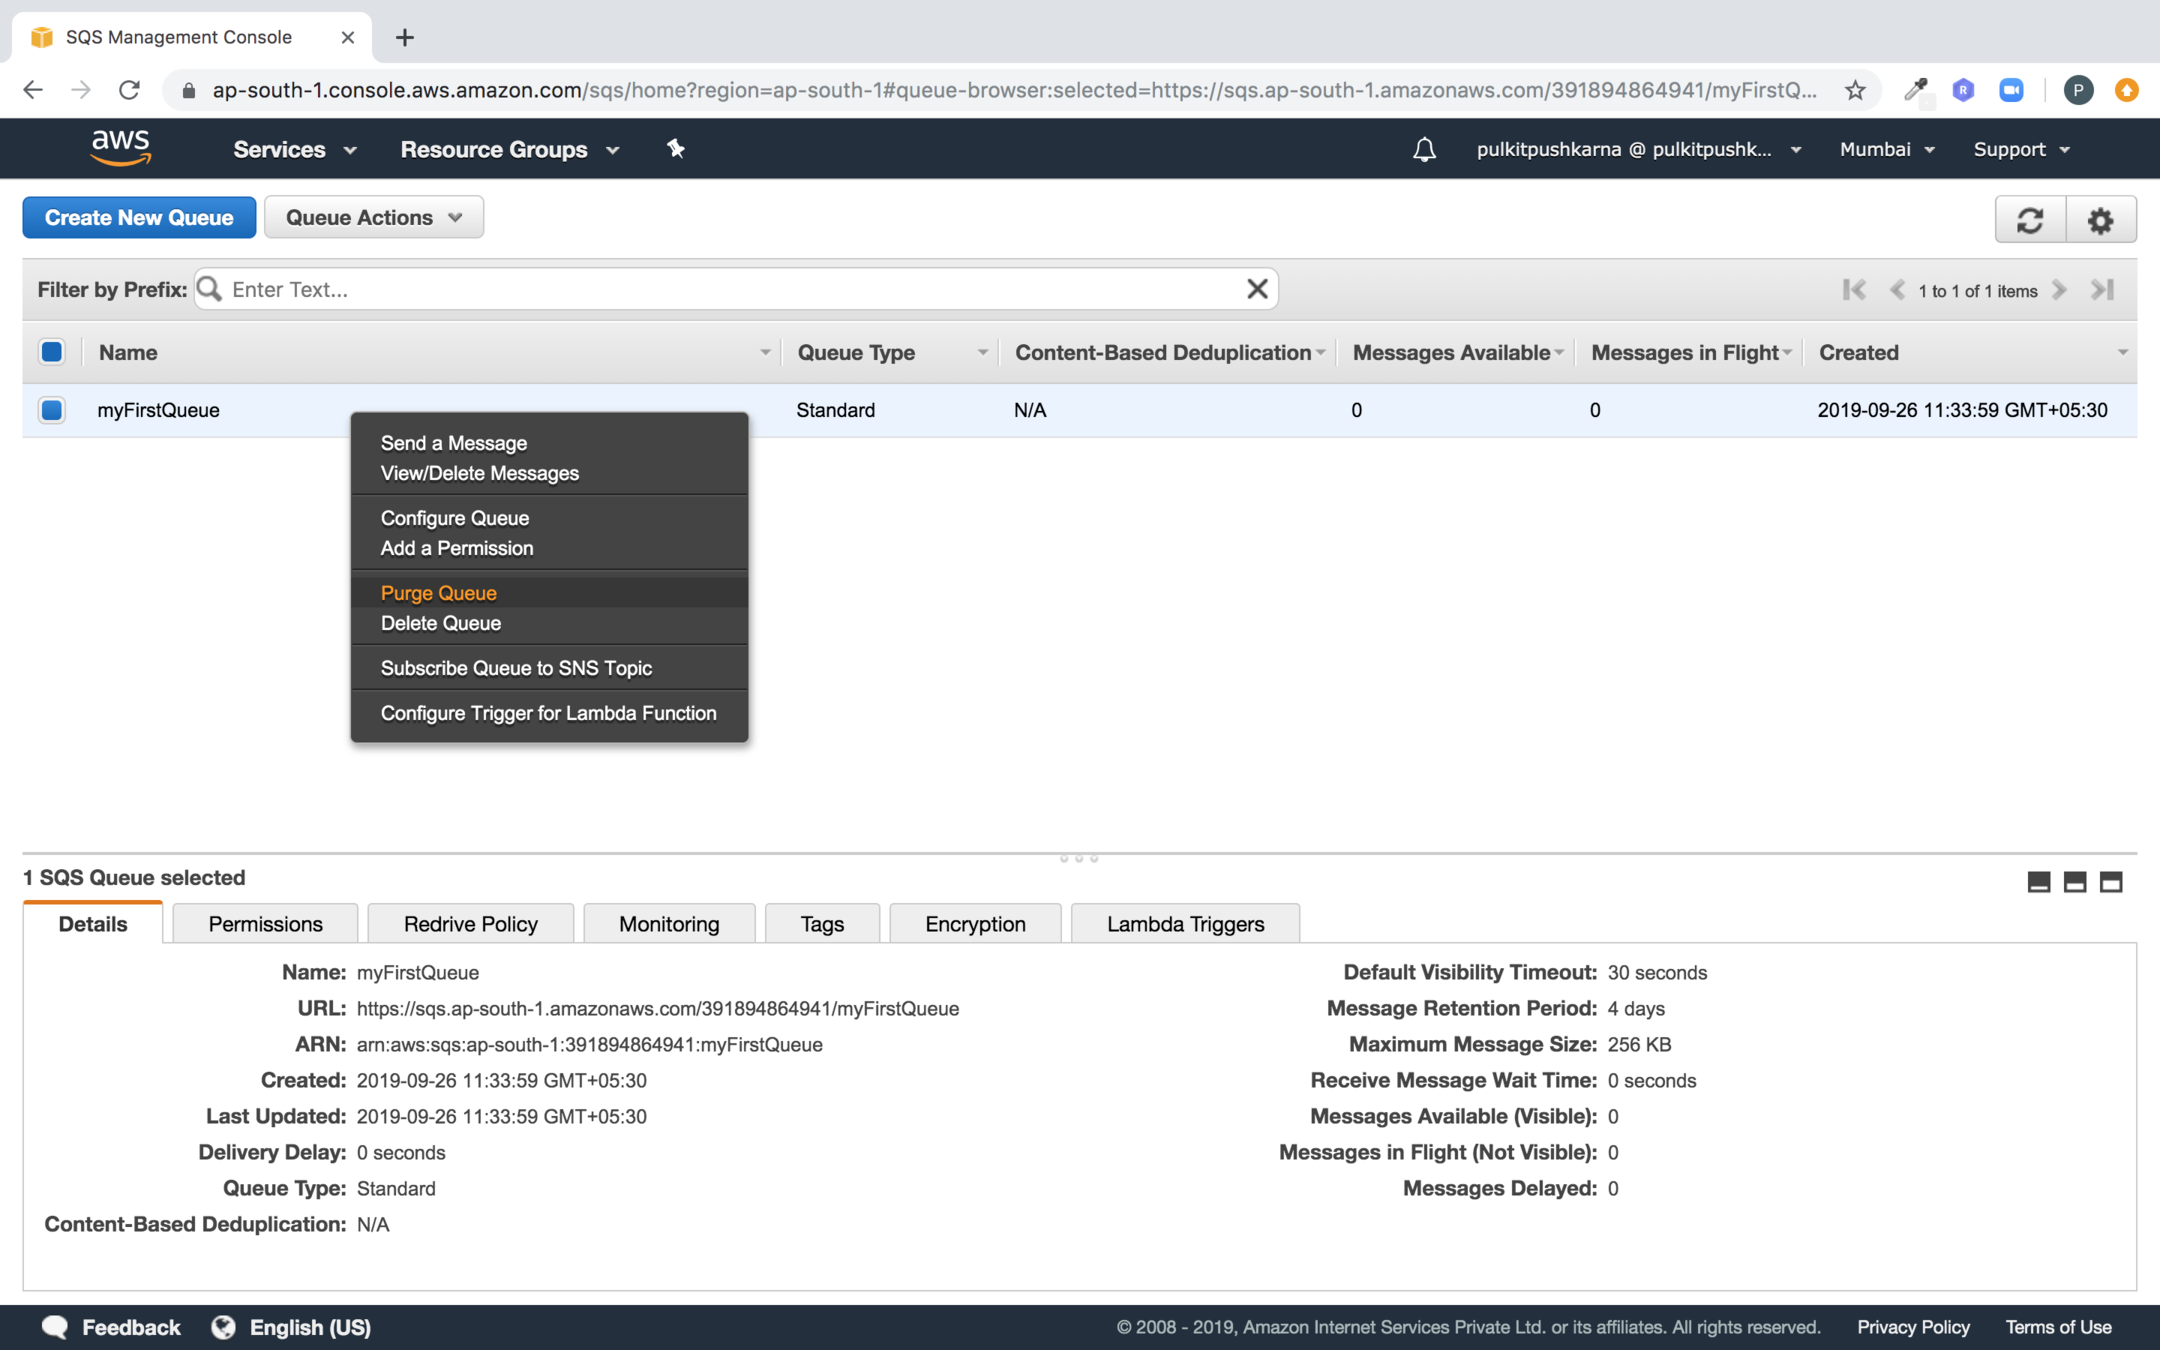
You can Delete and Purge a Queue by selecting the option as shown below
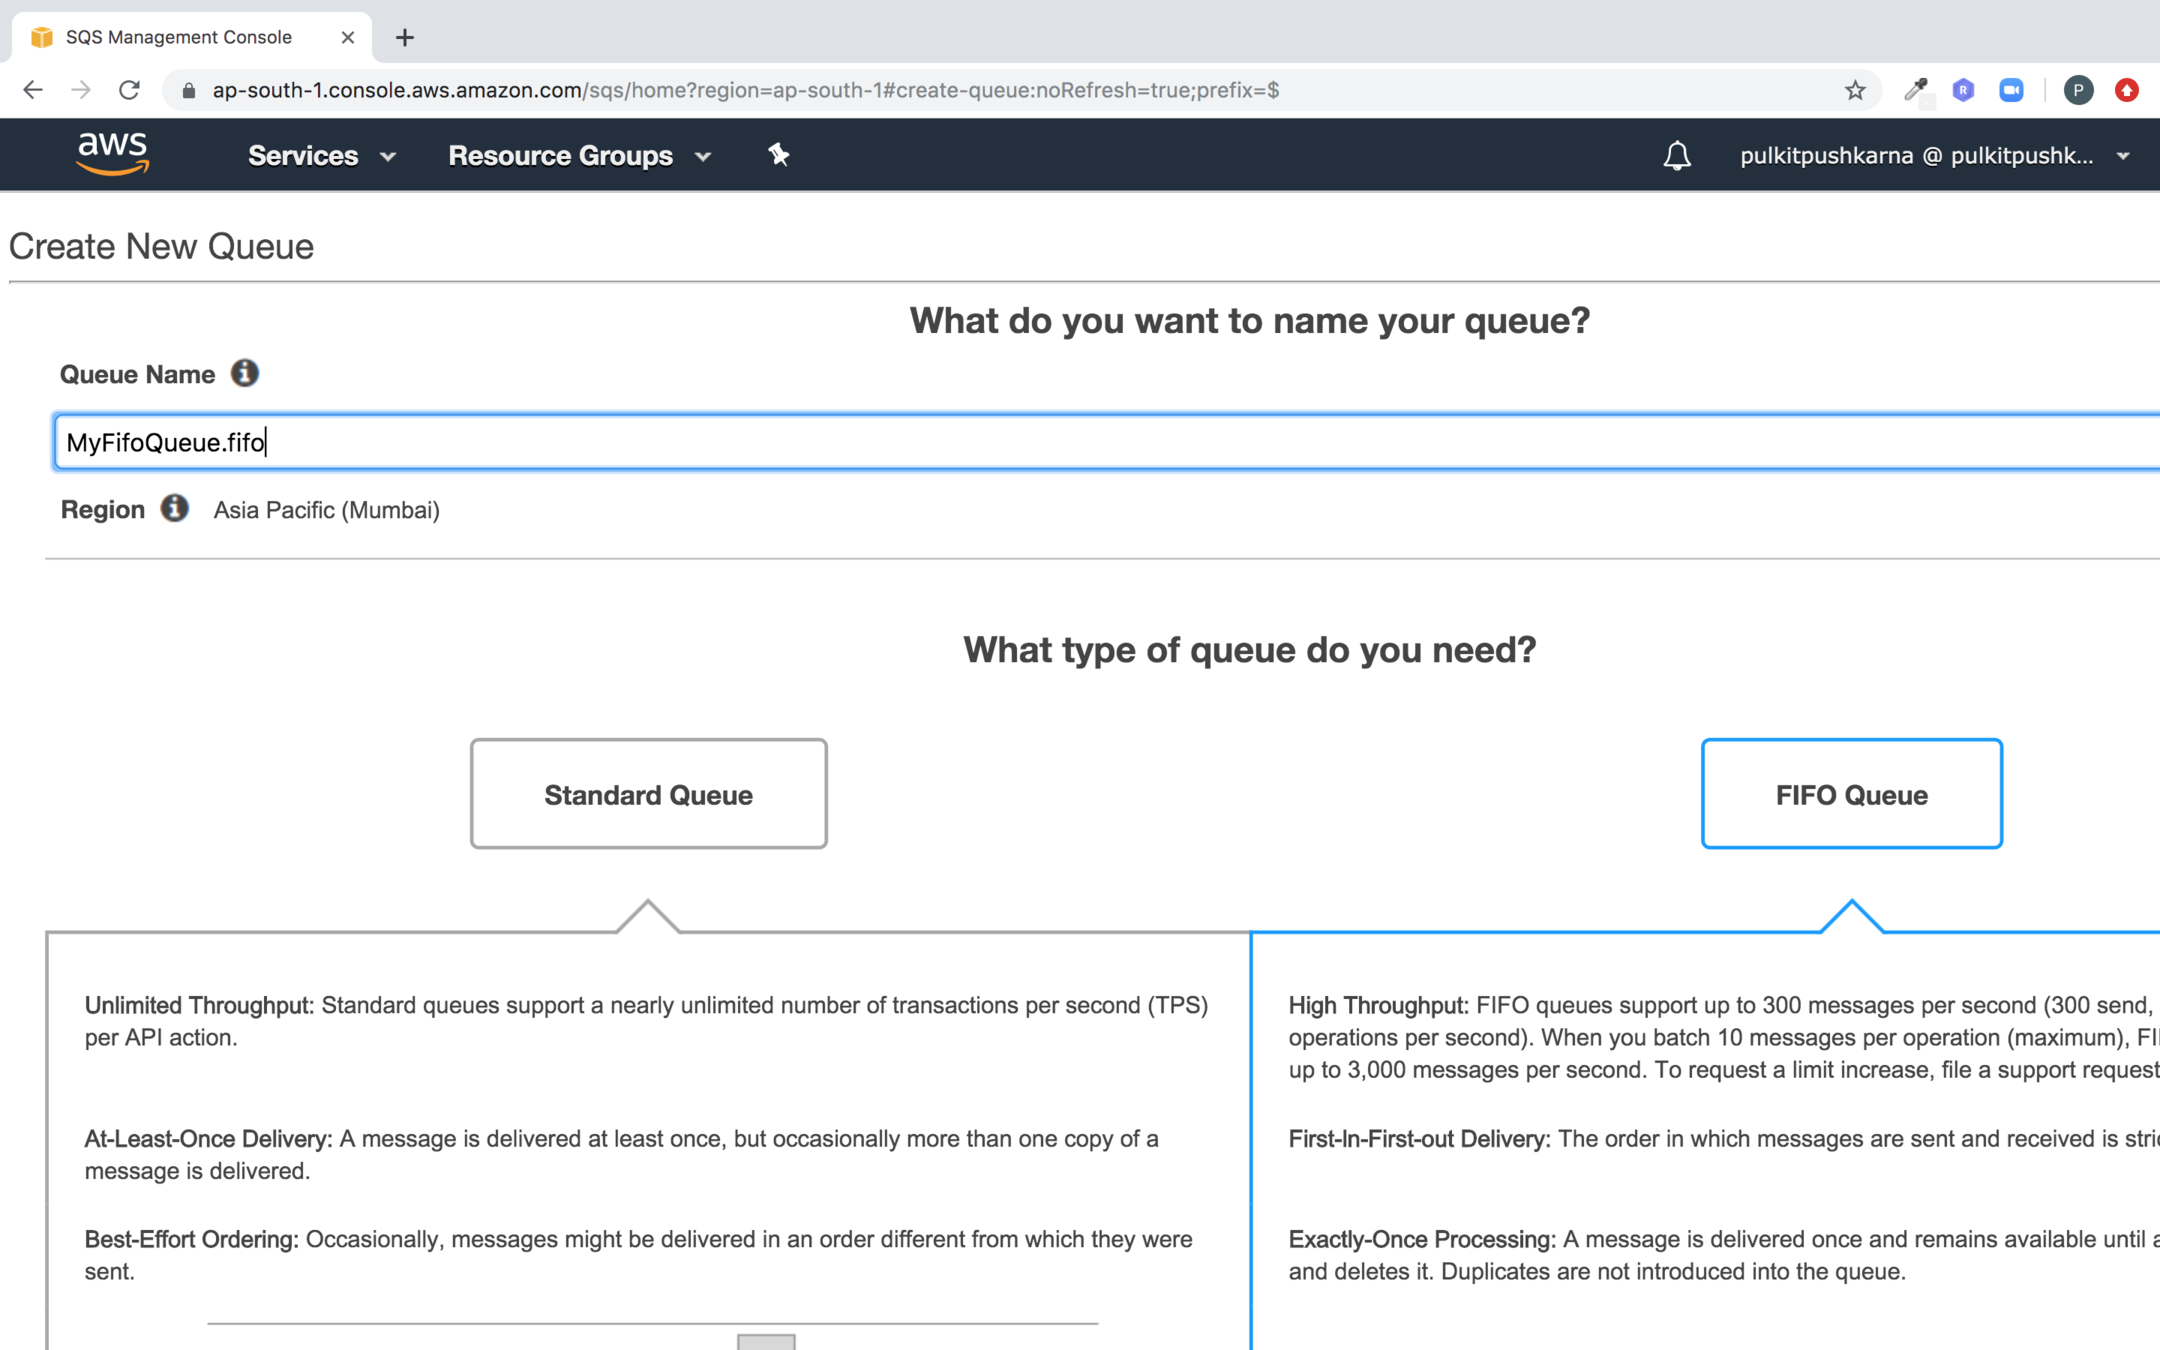
Creating a FIFO queue
In order to create a fifo queue select the FIFO queue and provide a name to the queue postfix it with .fifo
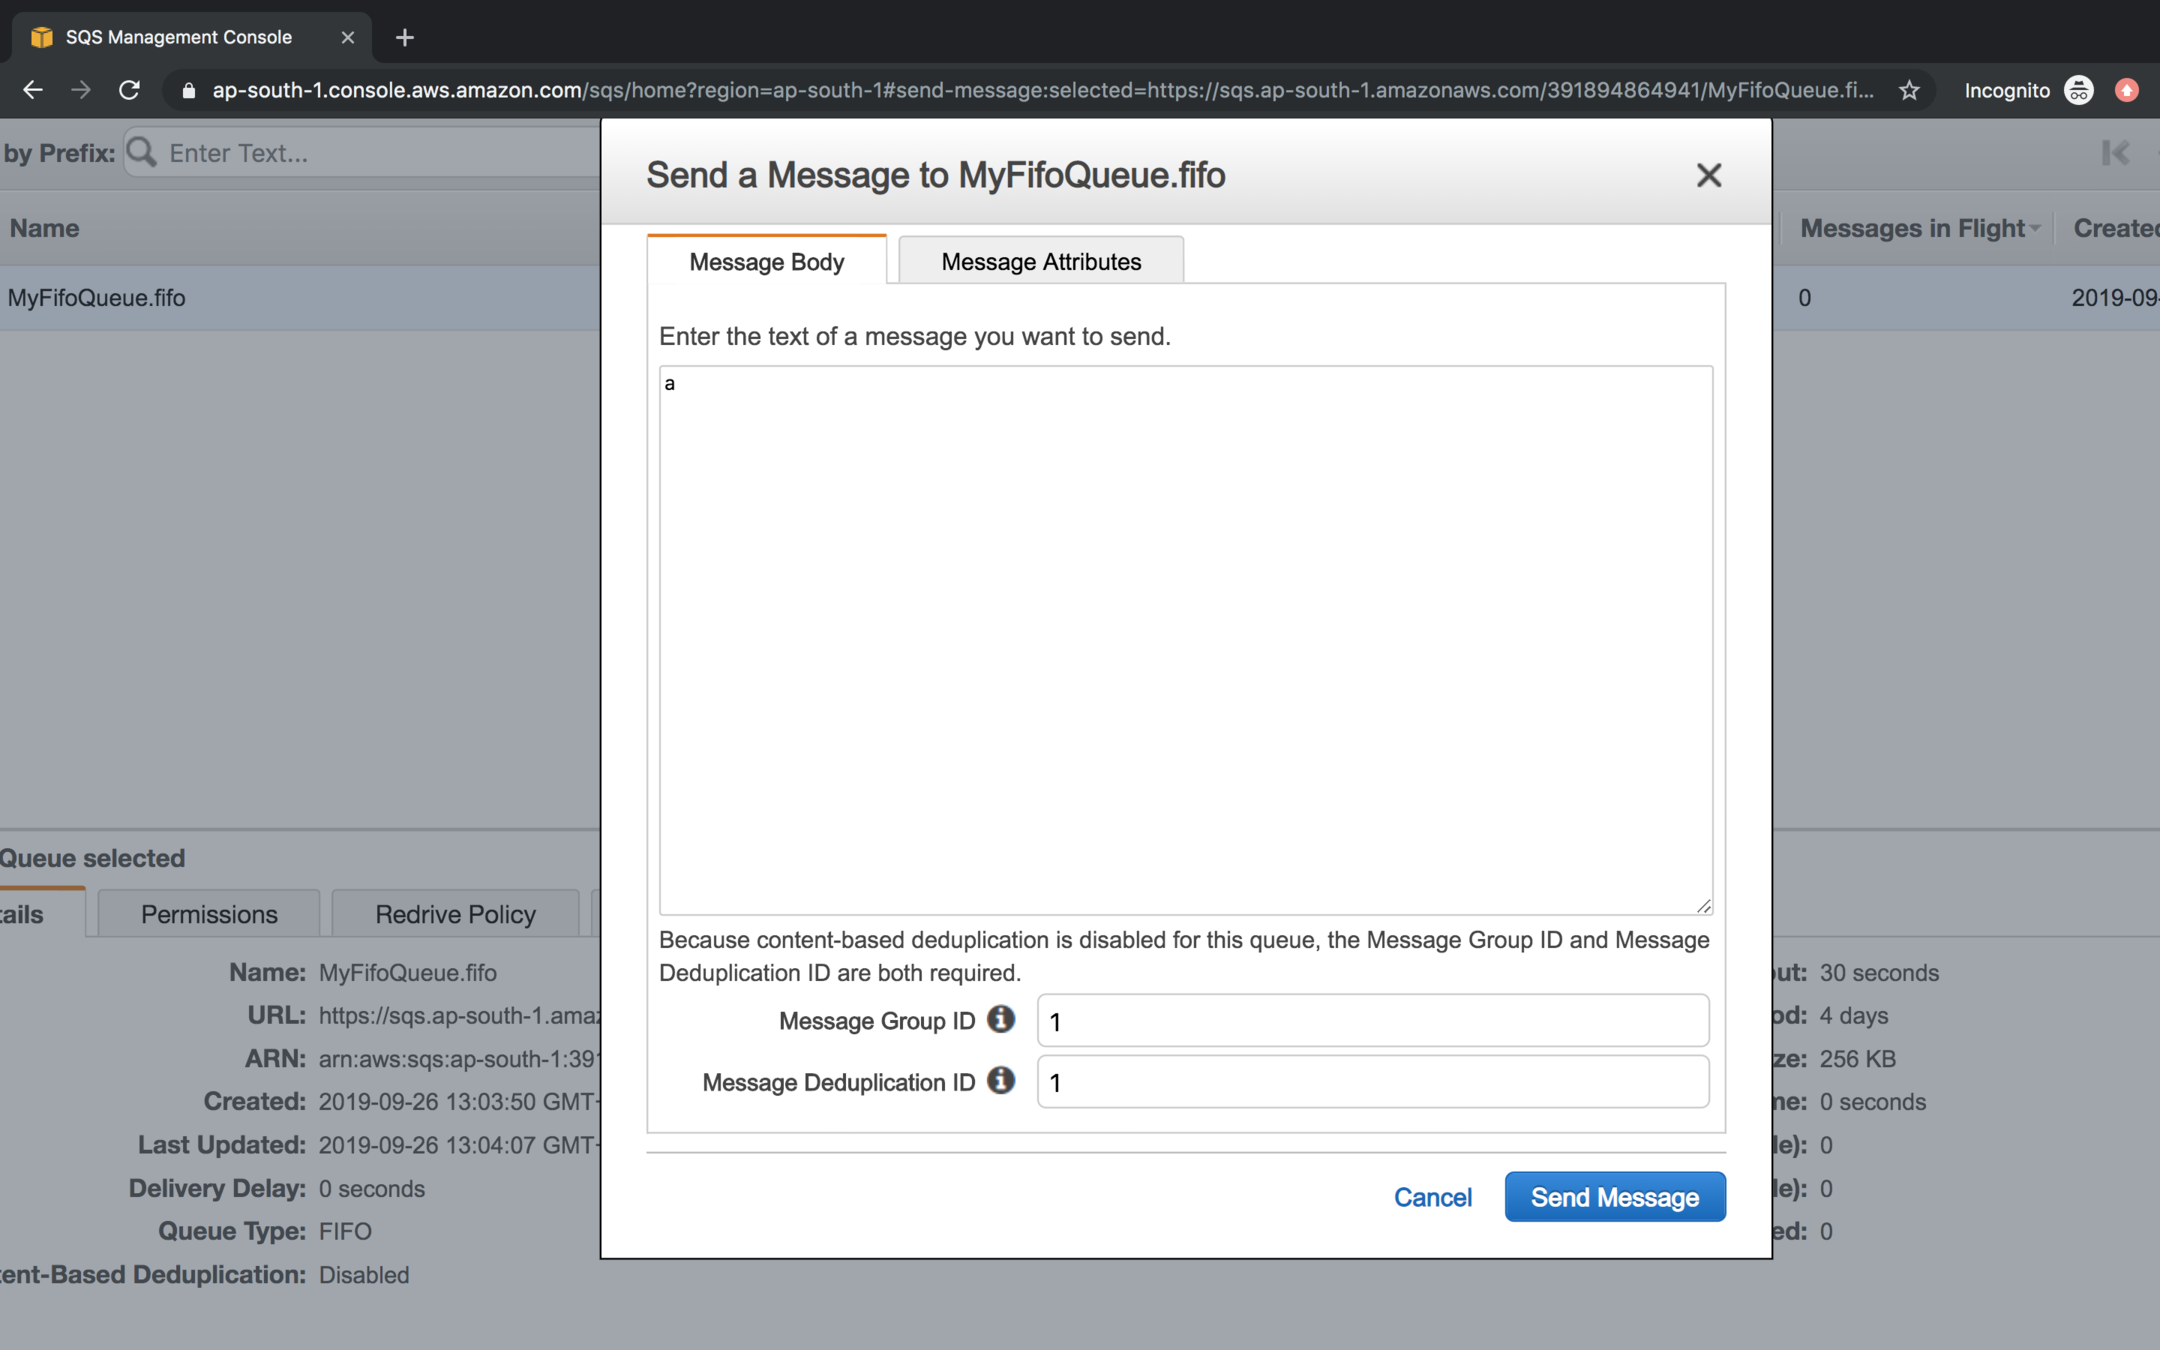
While sending the message to fifo queue you need to specify Message Group Id (It arranges a set of data in order) and Message Deduplication Id (For distinct elements identification)
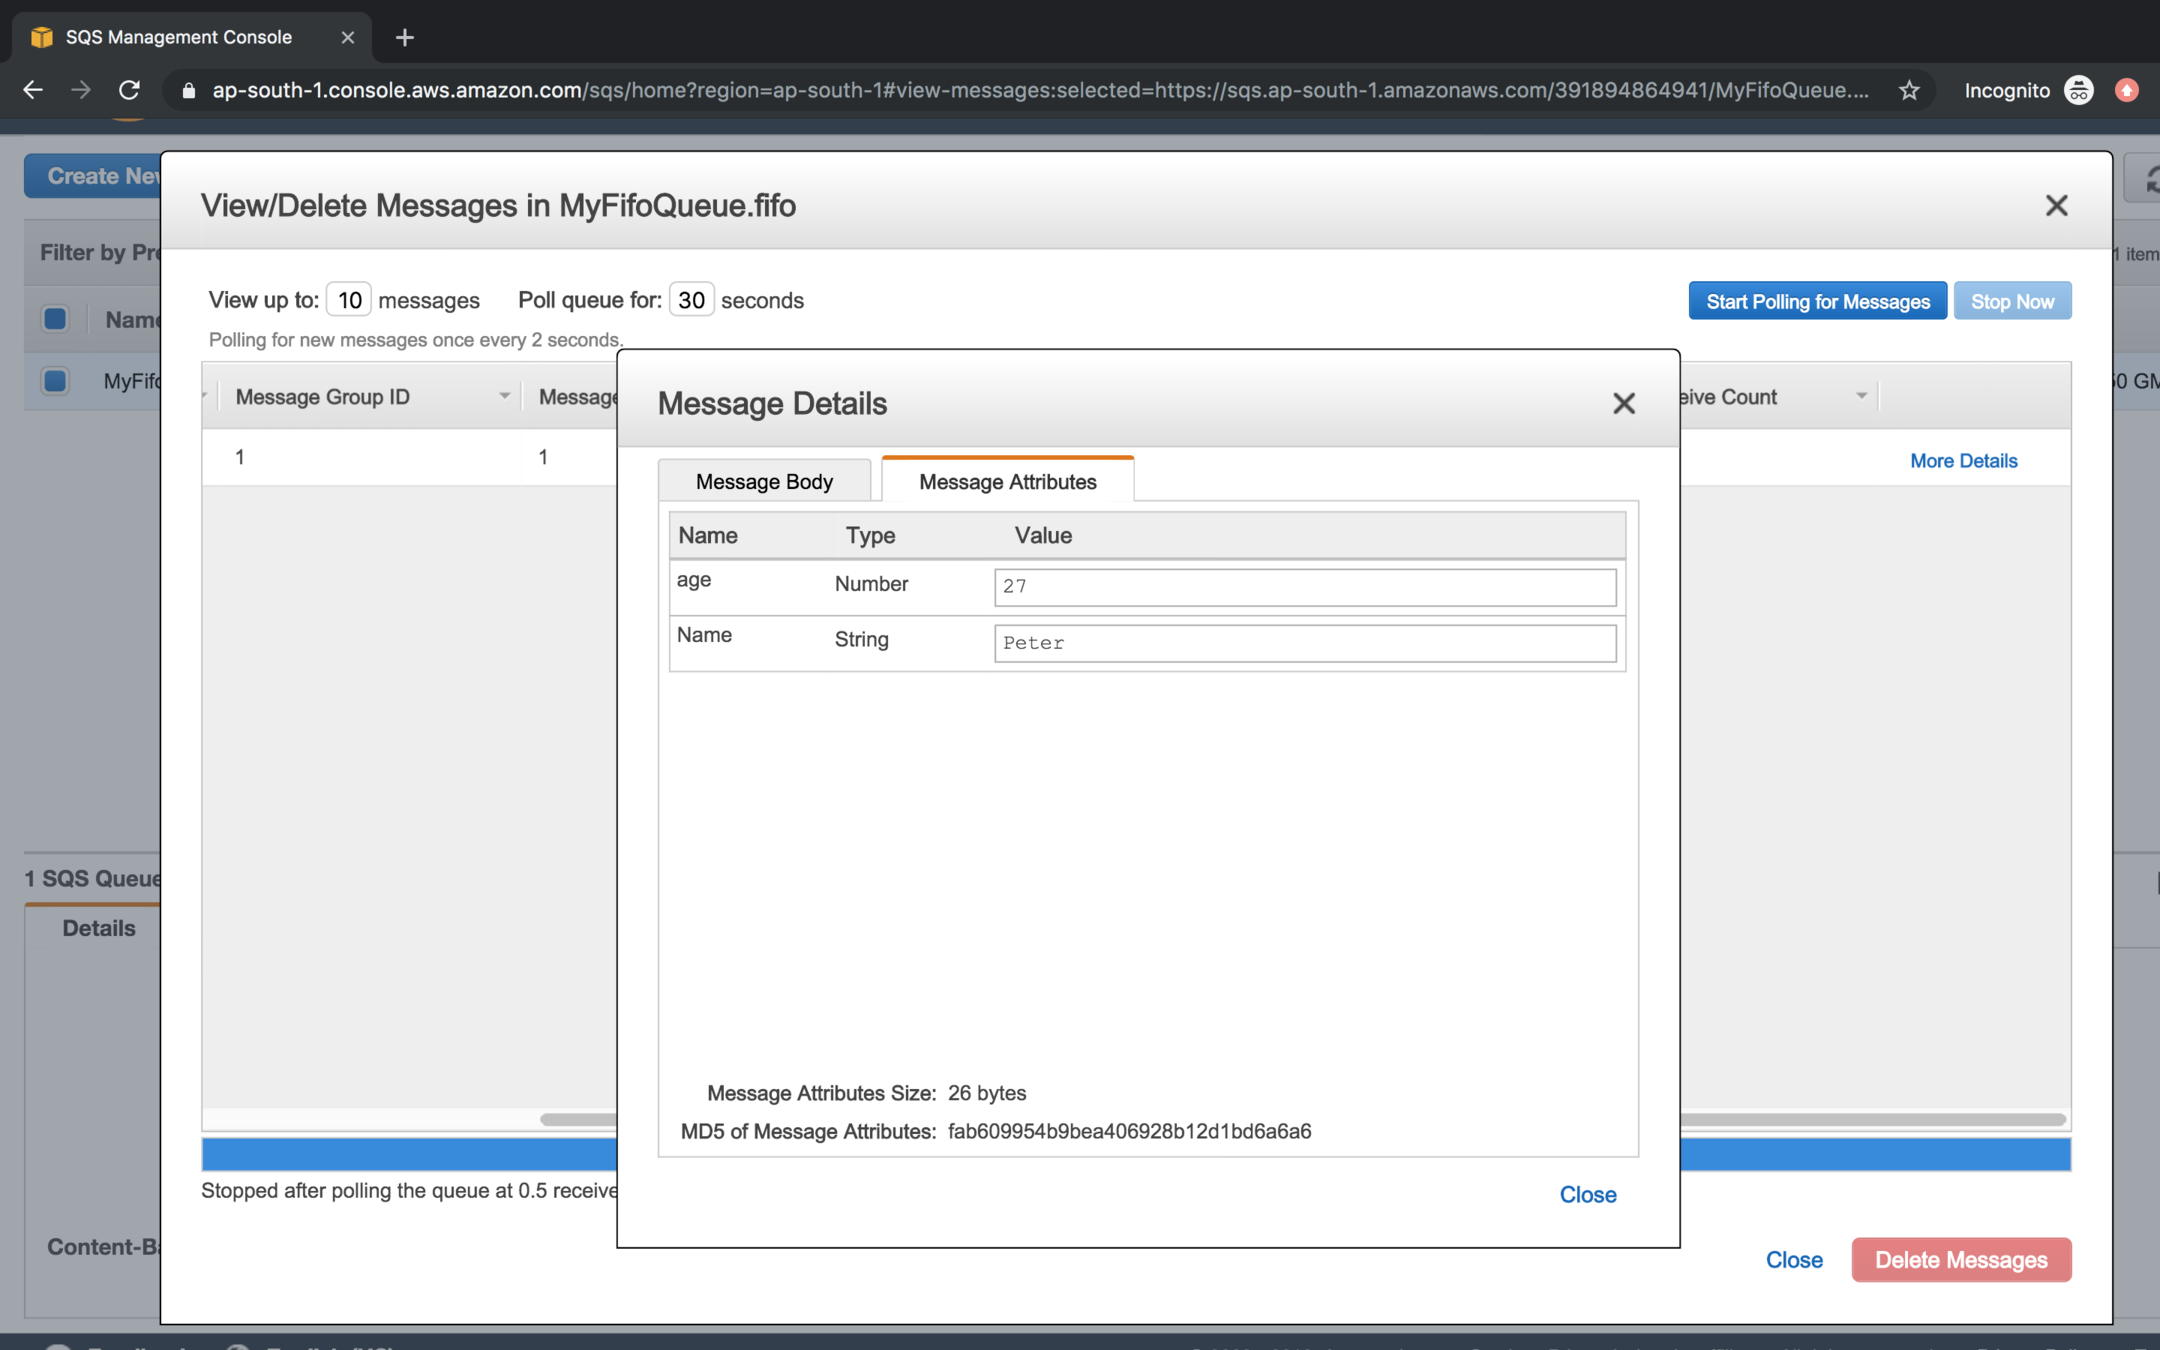
You can specify the attributes with the message

While polling click on the more details link to message attribute information of the message
To understand about group Id and deduplication Id in details let us enter the following values in the fifo
| Message Body | Group ID | Deduplication ID |
|---|---|---|
| a | 1 | 1 |
| b | 1 | 2 |
| c | 2 | 3 |
| d | 2 | 4 |
| e | 1 | 5 |
| f | 1 | 6 |
| g | 2 | 7 |
| h | 2 | 8 |
Now observe the arrangement of messages in the queue
- No new message can have the same Group Id and Deduplication Id which matches to one of the previous messages in the queue
- Messages Available are the new messages not yet received by the consumer
- Messages in flight are the messages received by the consumer but not yet deleted from the queue
Create a dead letter queue
- DeadLetter Queue should be create before Source Queue.
- Create a DeadLetter fifo queue and then create Original Queue.
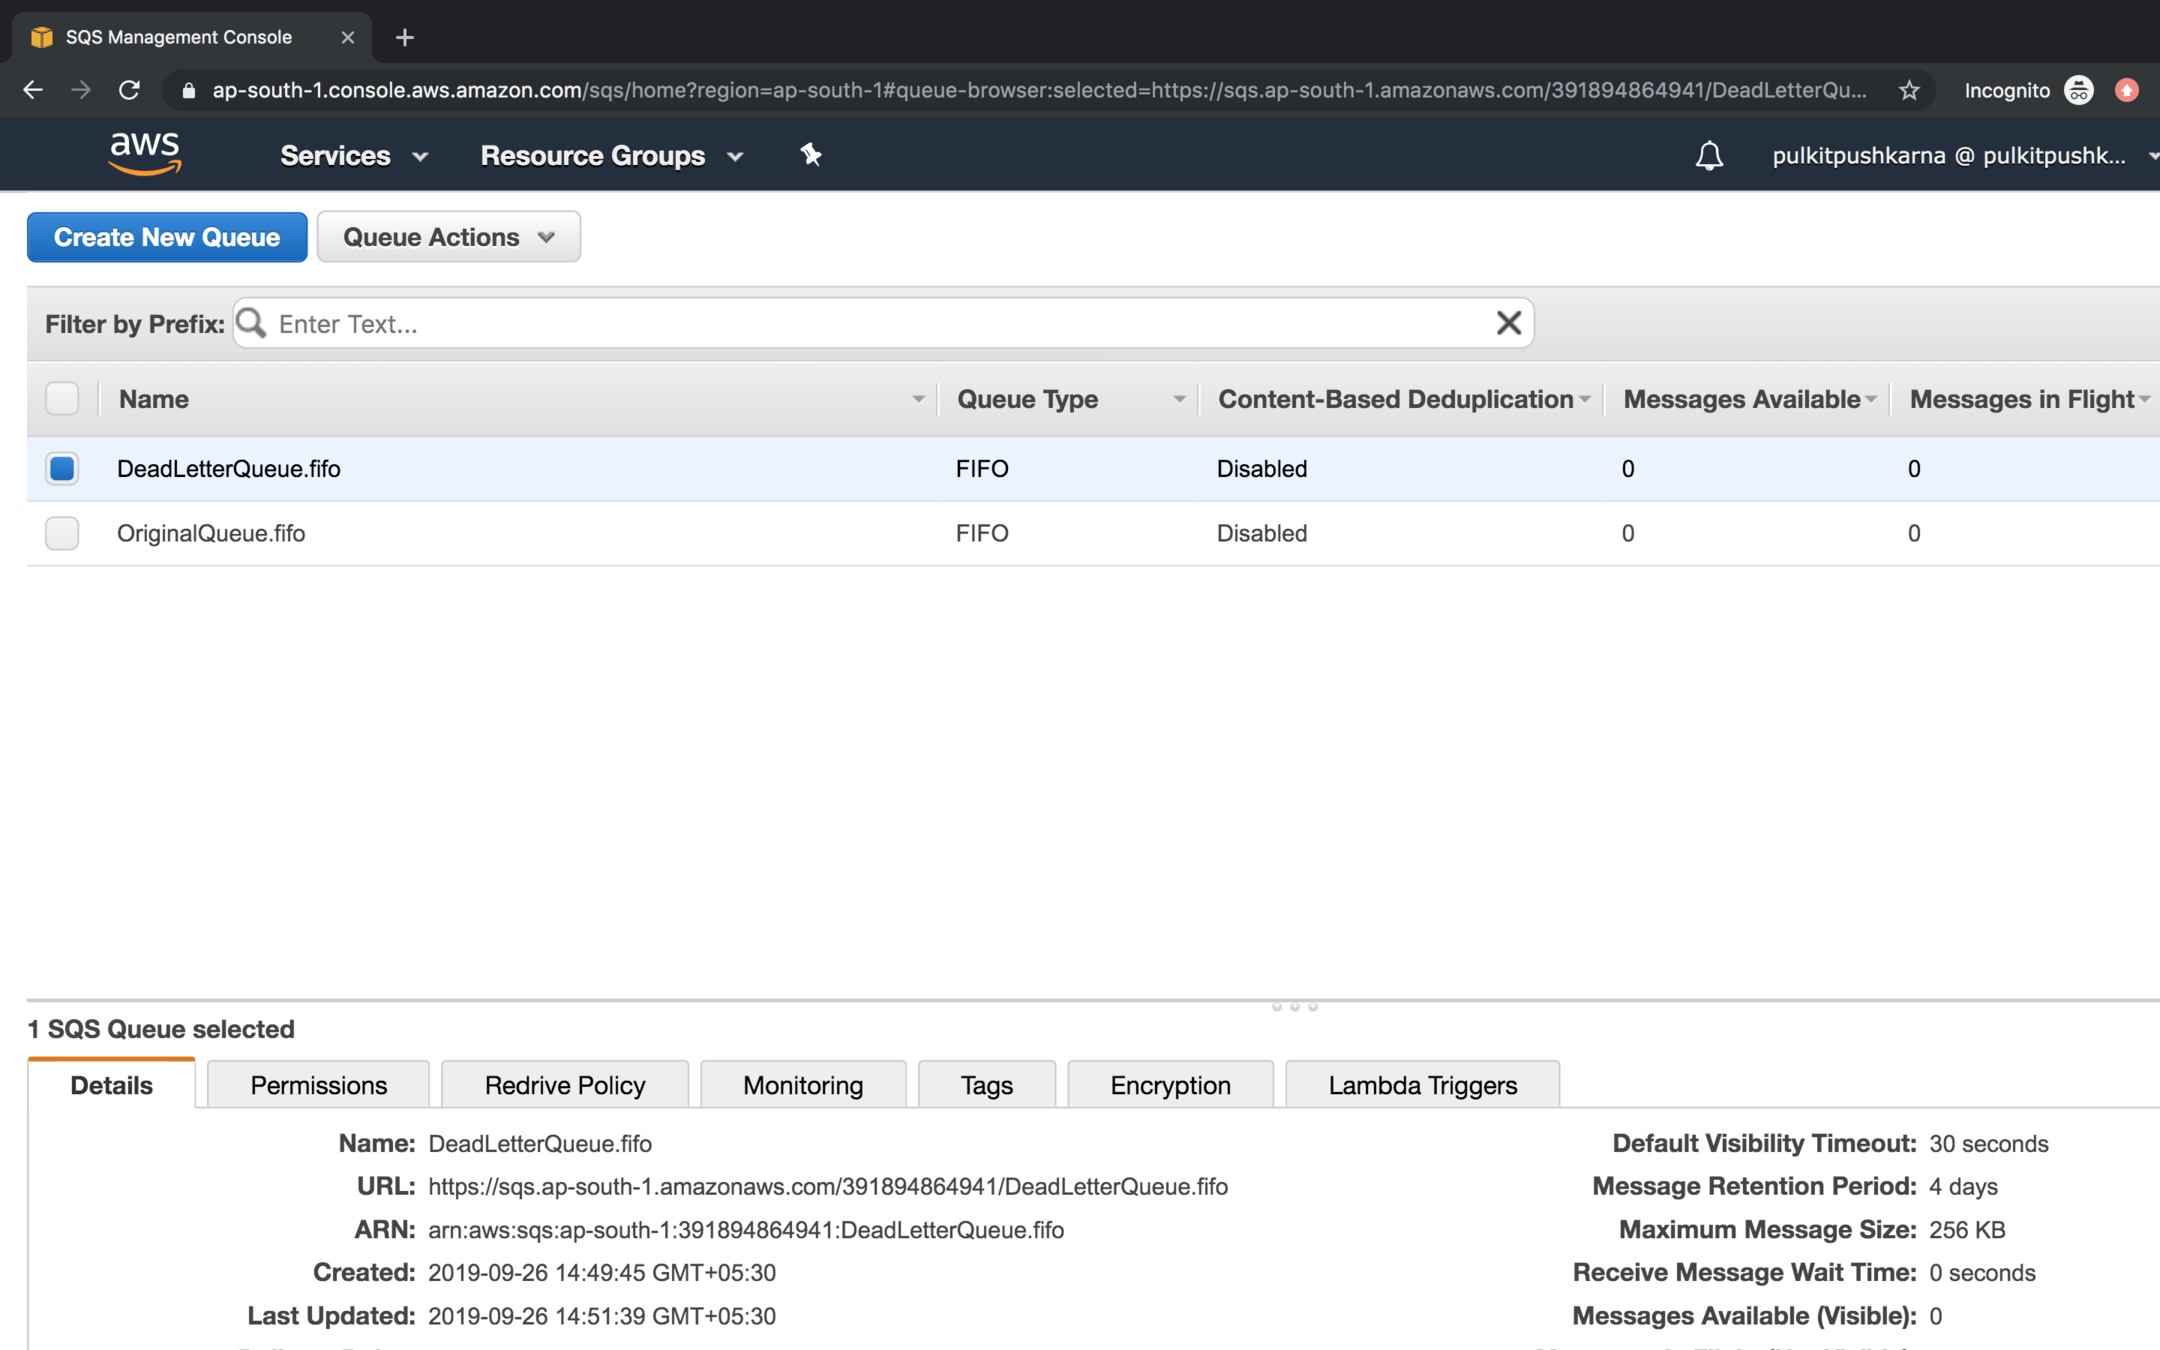
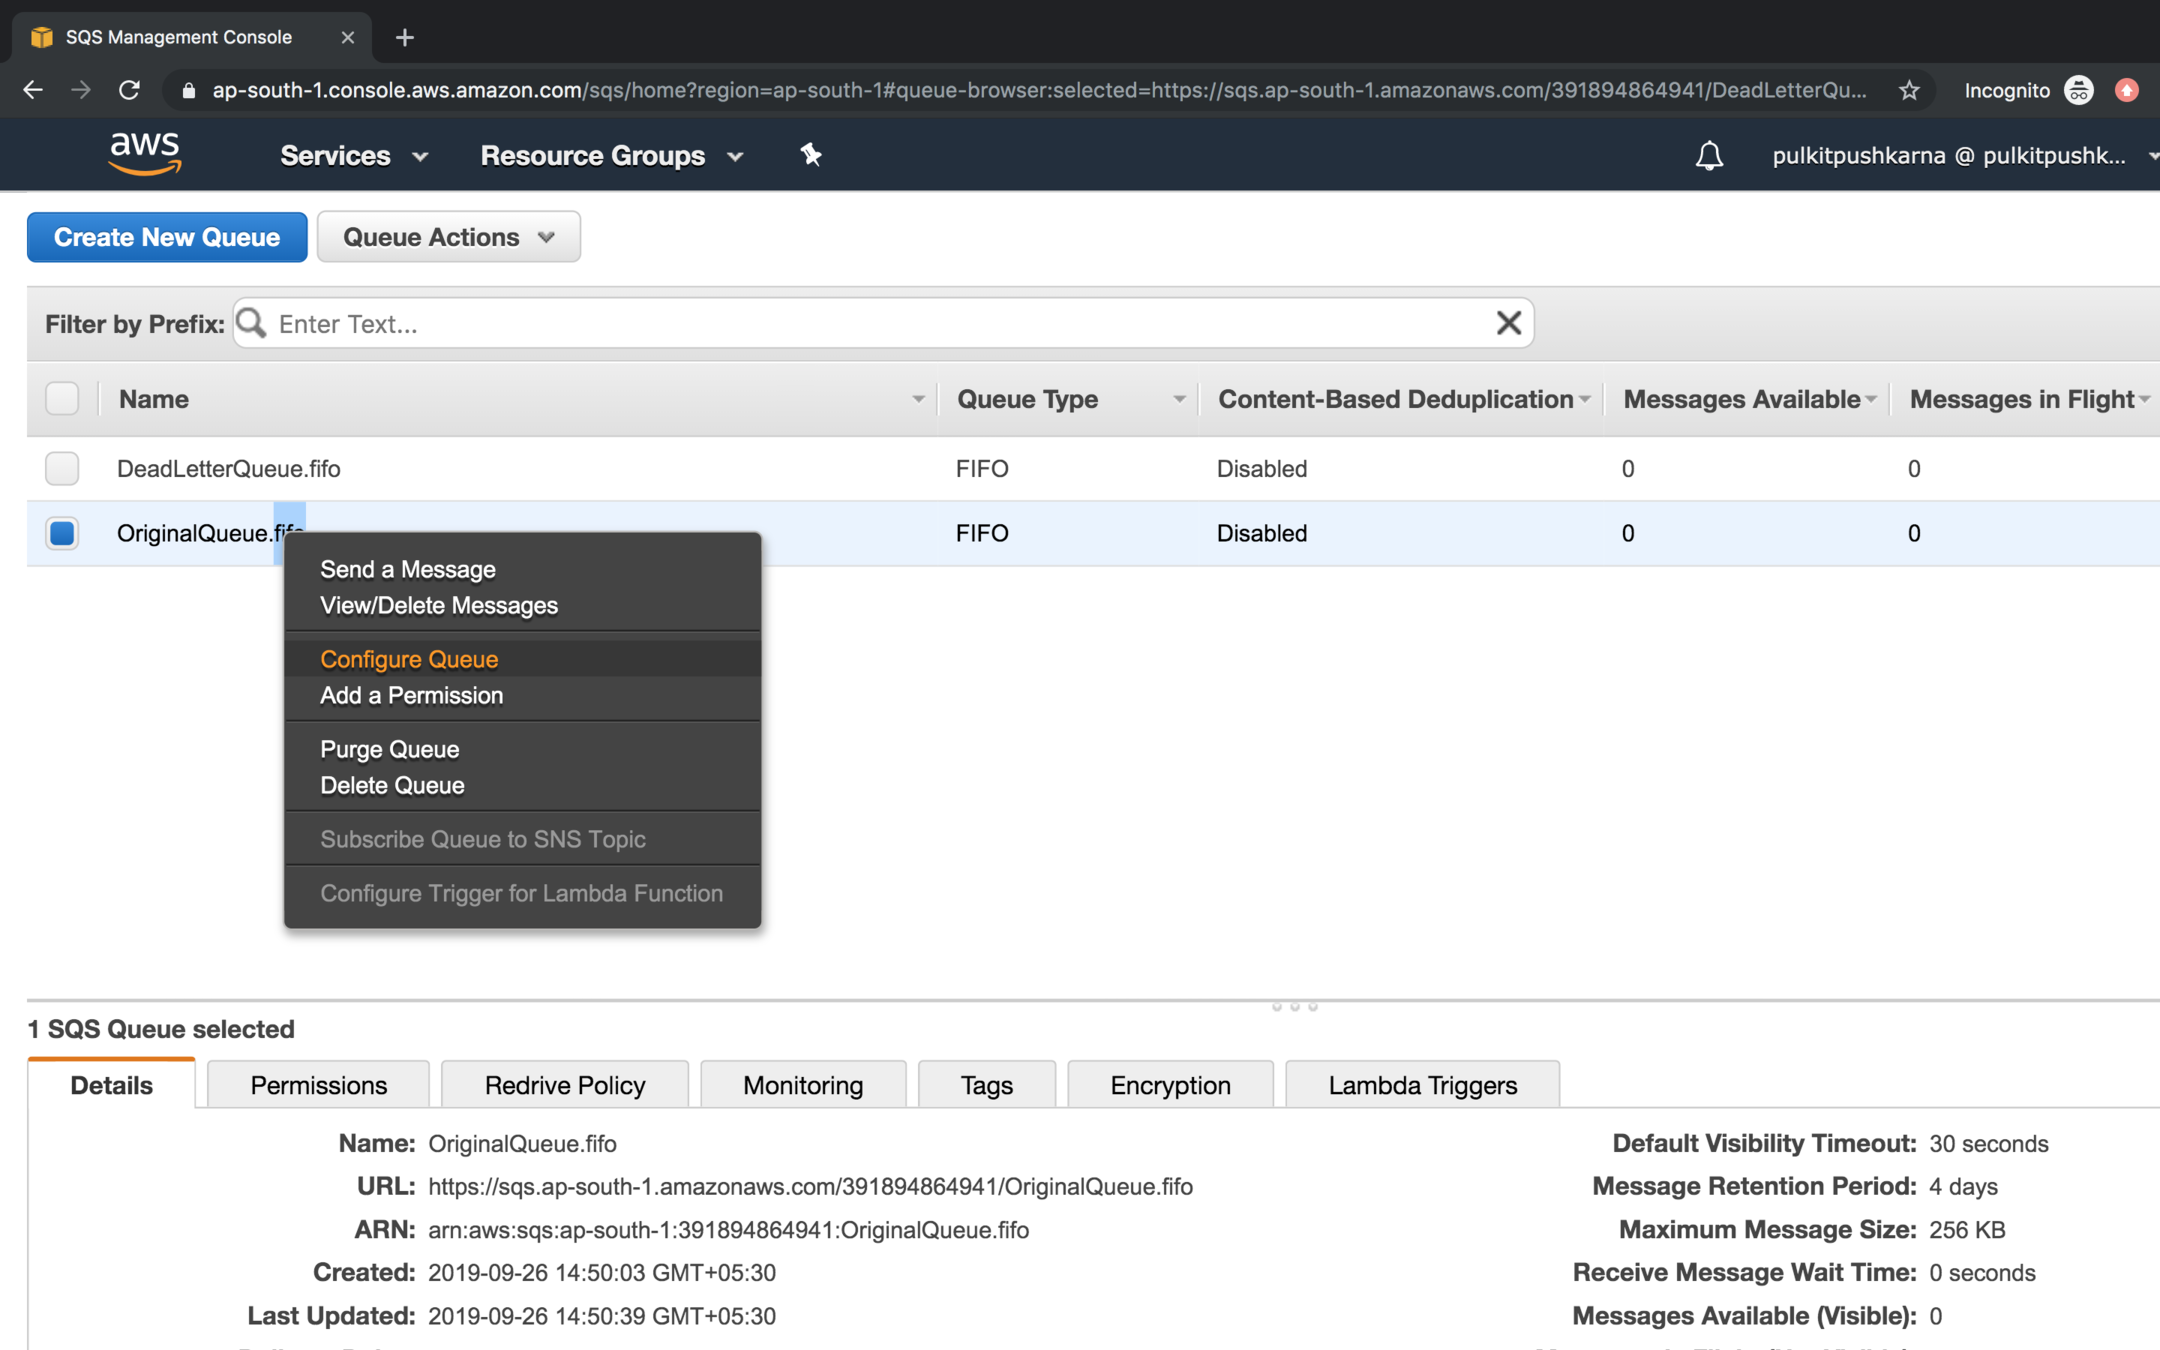
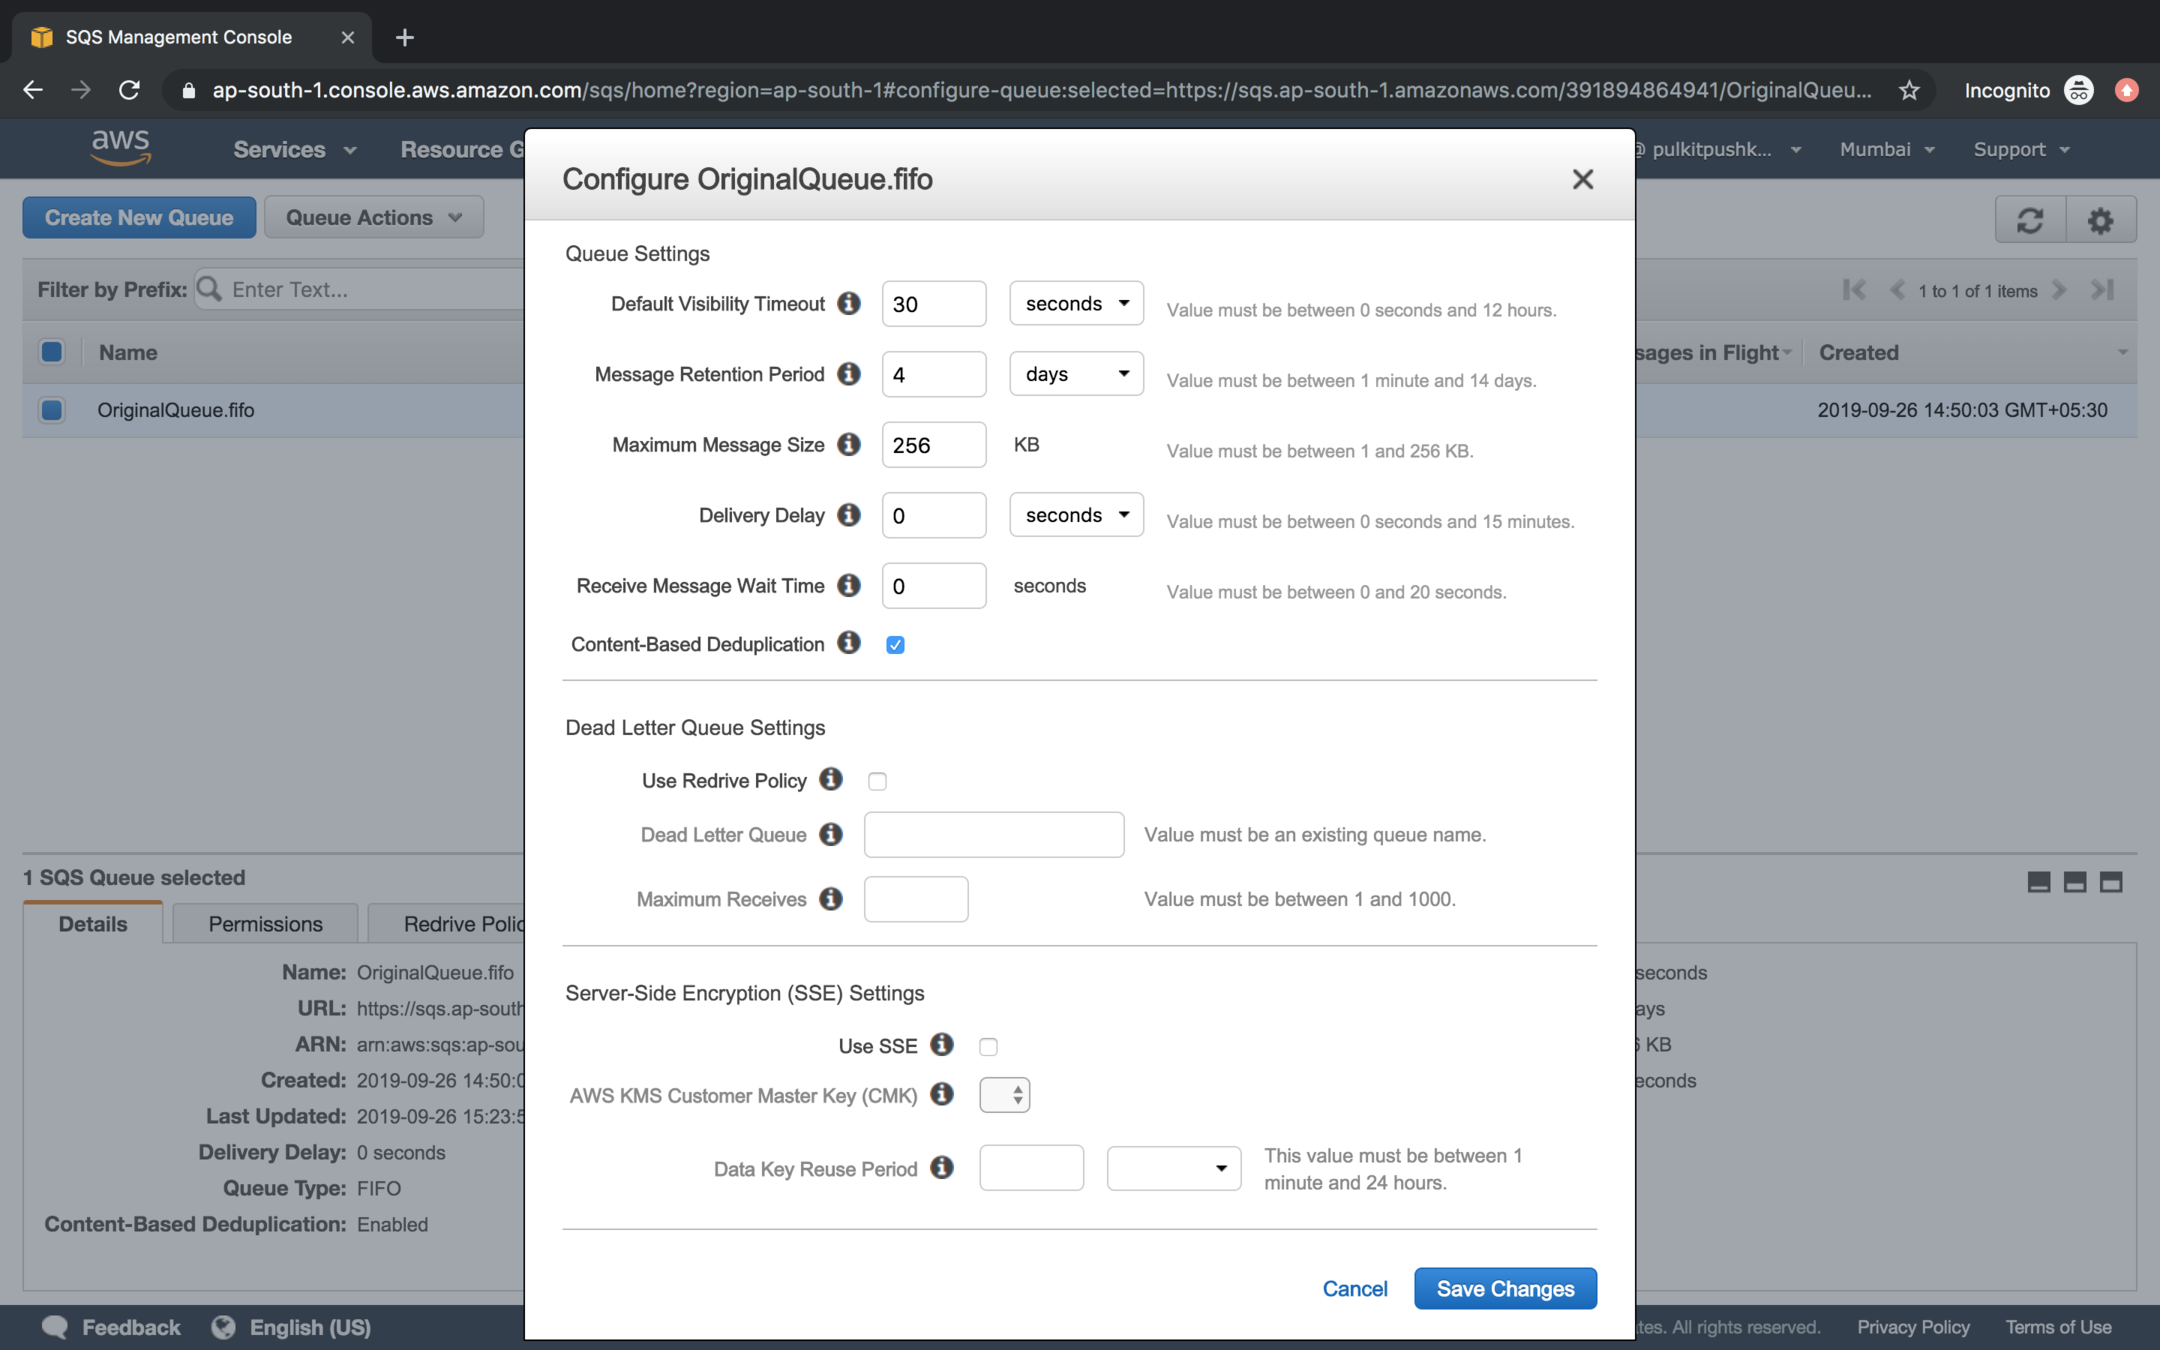
Right click on the original queue and got Configure Queue
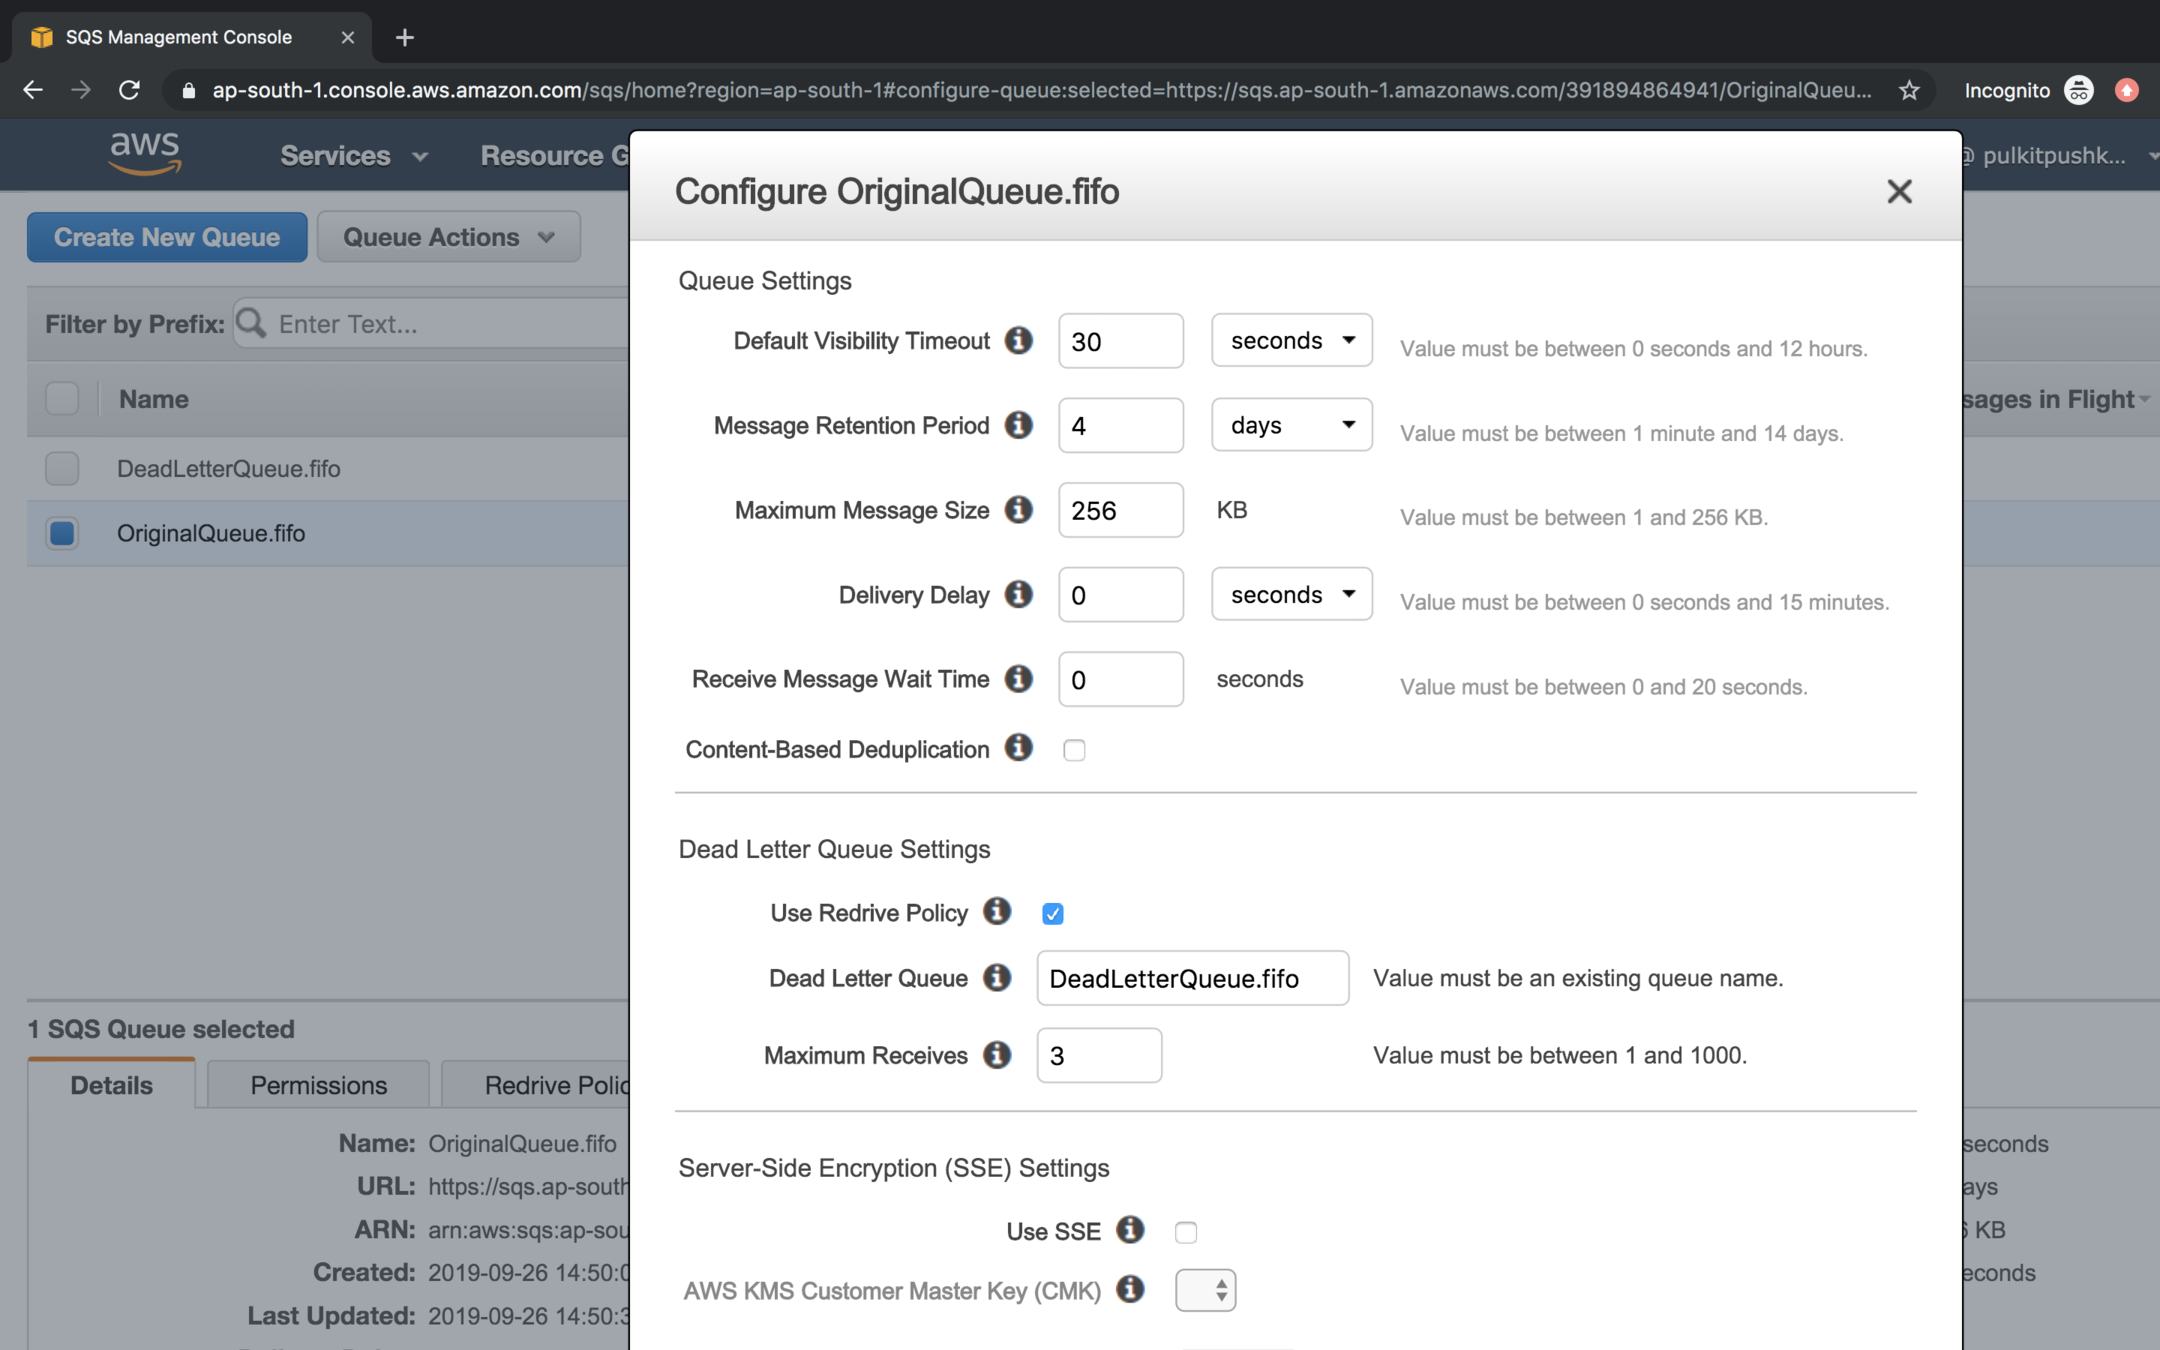
In the Dead Letter Queue Settings click on checkbox Use Redrive Policy, mention the Dead Letter Queue and set Maximum receives value to 3.
Enter a message in original queue and poll again and again till the Receive Count reaches to the value of Dead Letter Queue
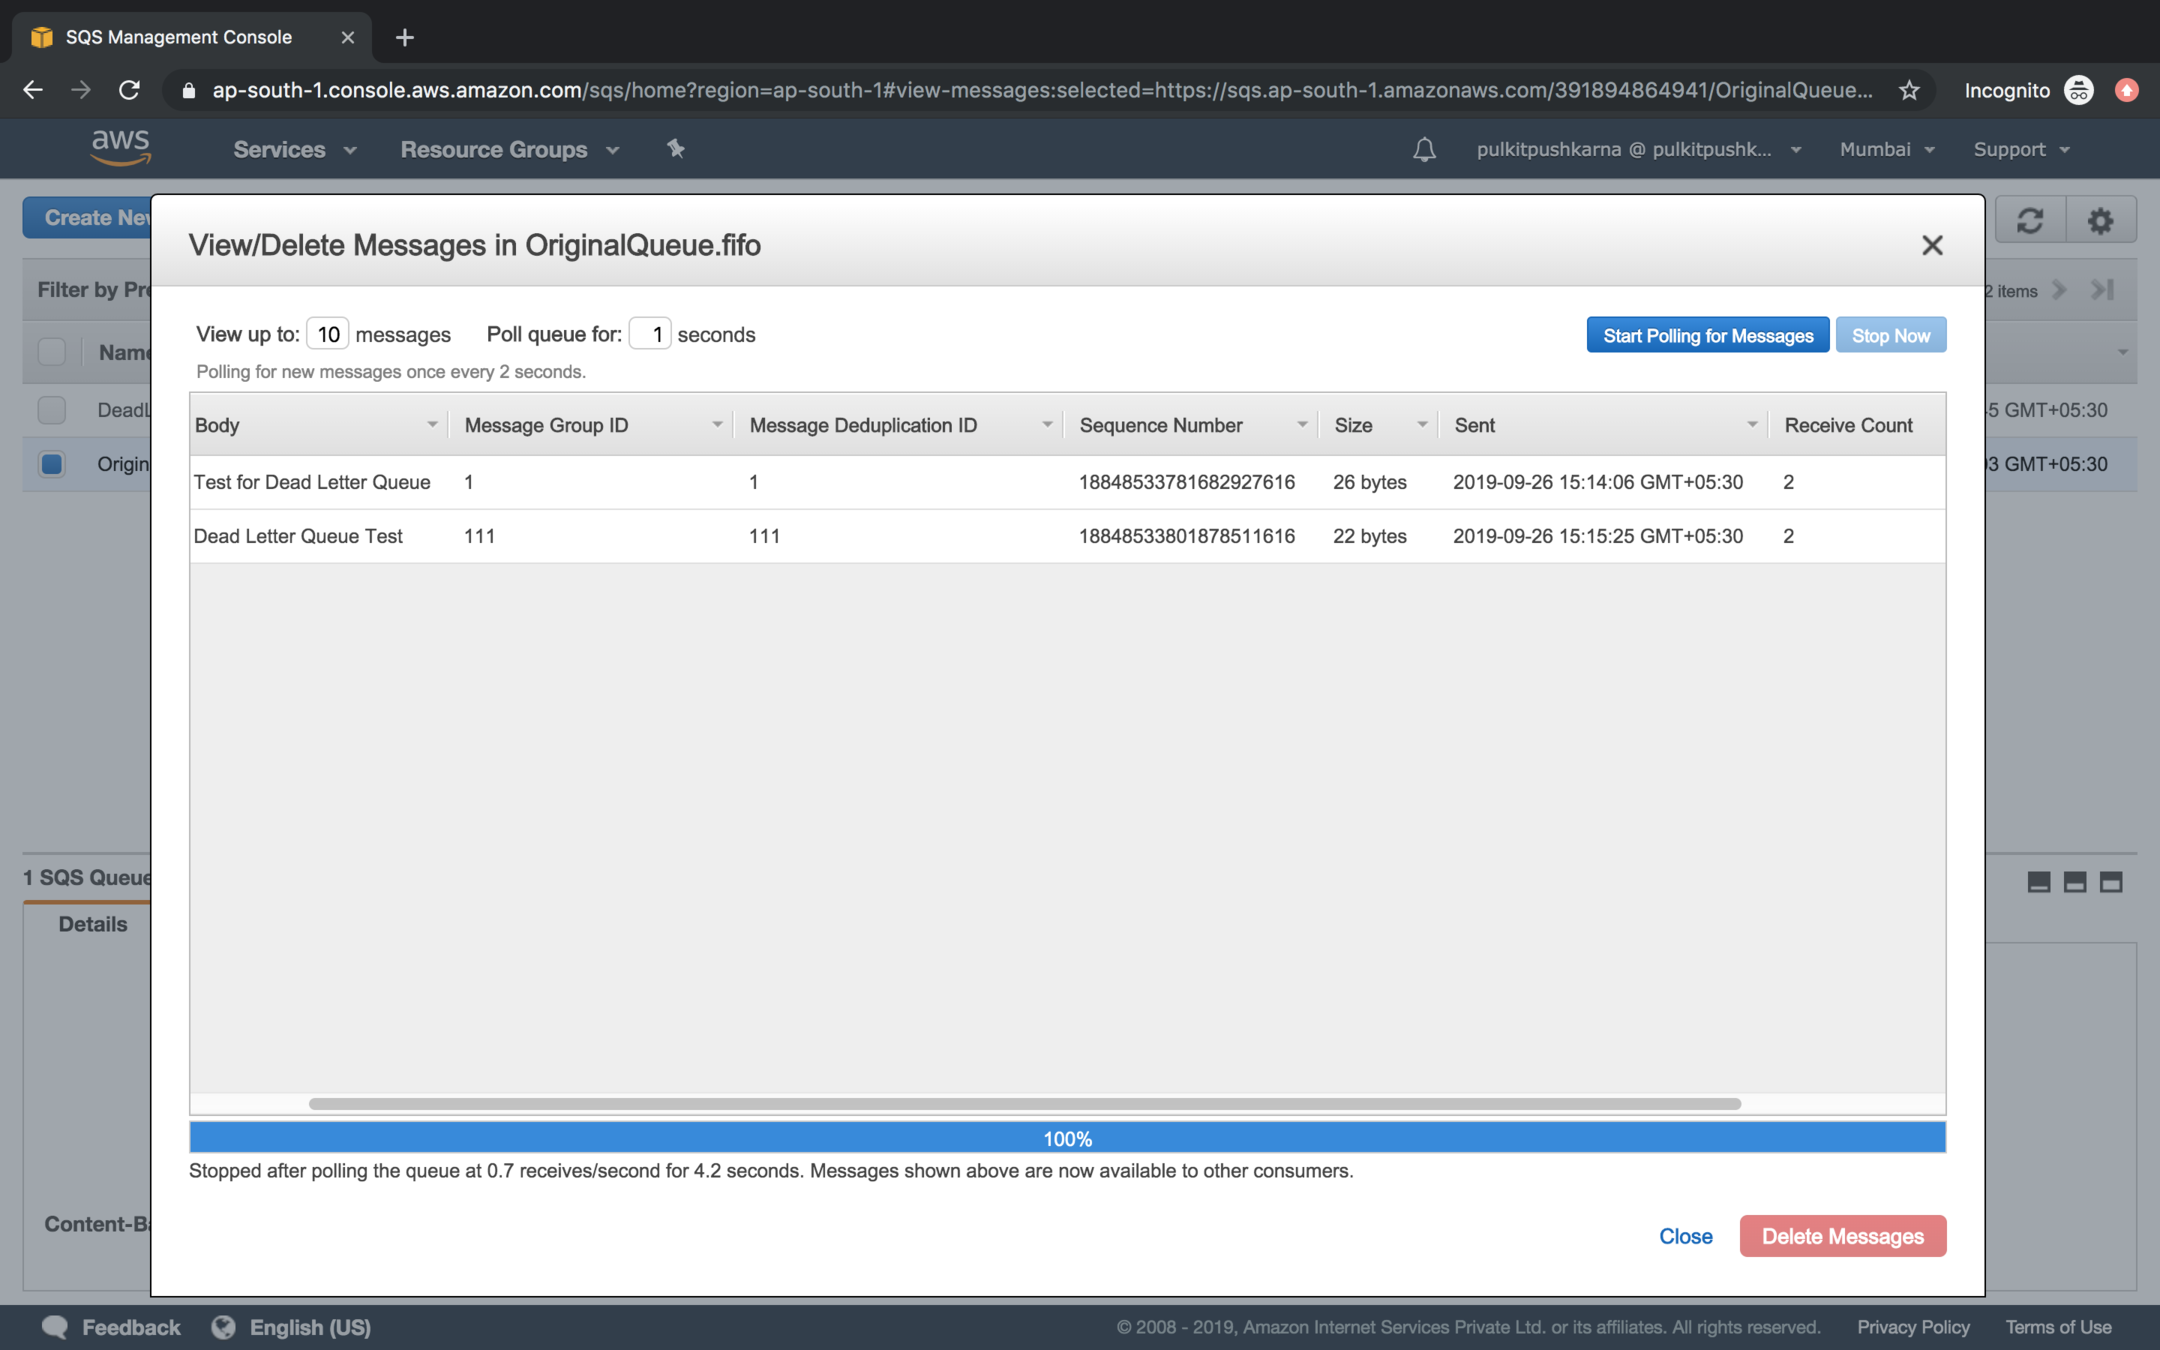
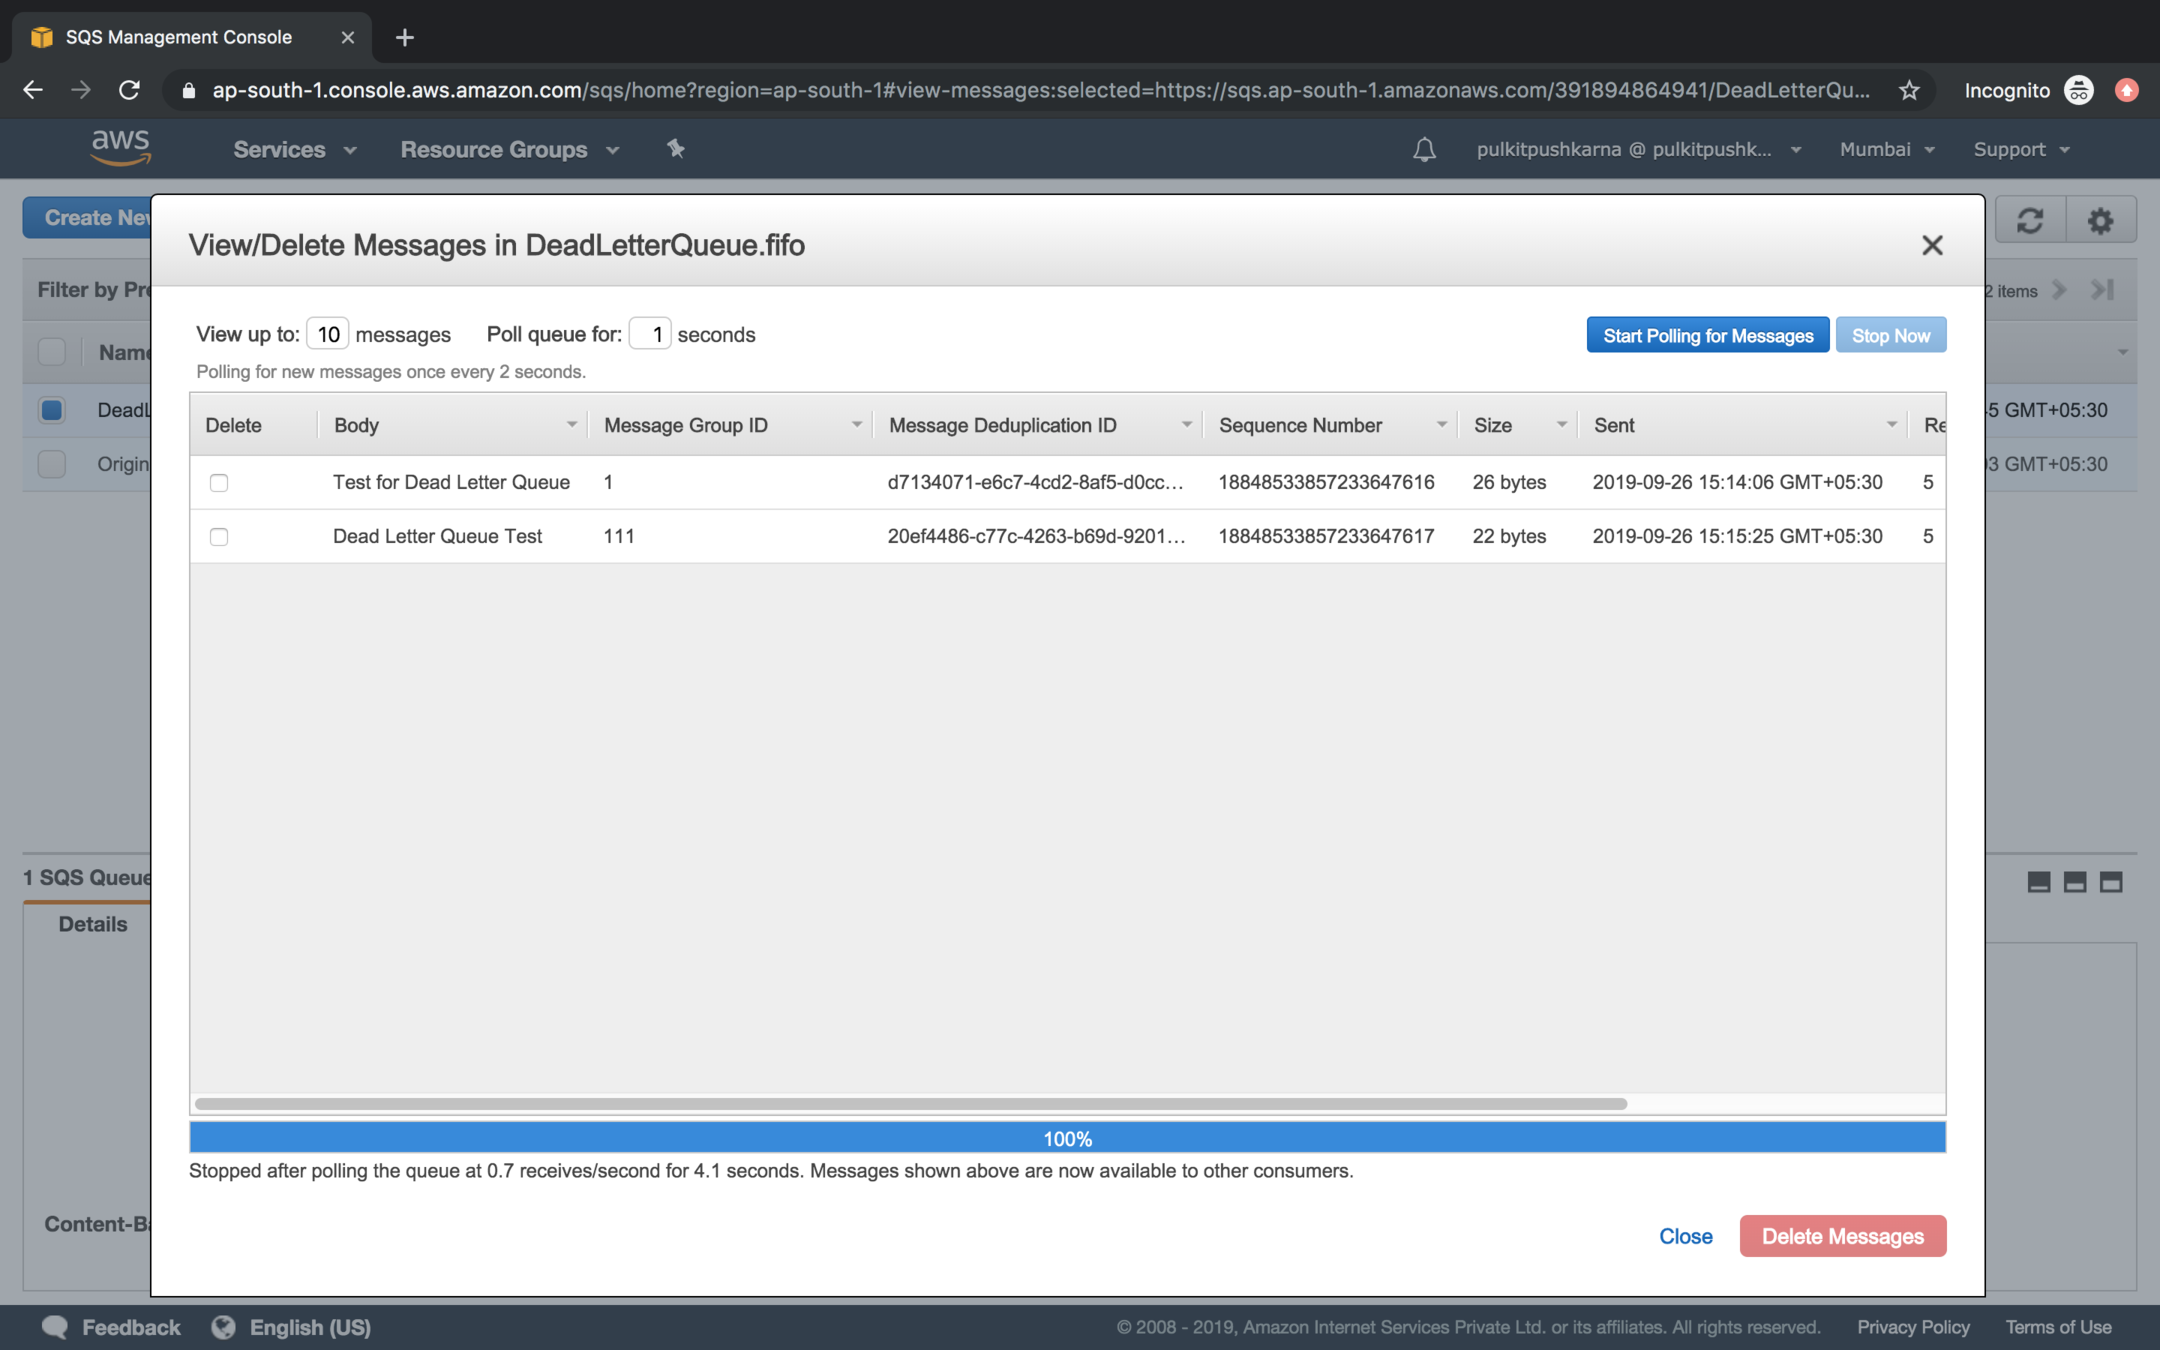
Once the Receive Count passes the value mentioned in Dead Letter Queue it messages will be transferred from Source Queue to Dead Letter Queue
Duplication on the basis of Content can be set for a queue by selecting Content-Based Deduplication option for a Queue
build.gradle
plugins {
    id 'java'
}

group 'aws-demo'
version '1.0-SNAPSHOT'

sourceCompatibility = 1.8

repositories {
    mavenCentral()
}

dependencies {
    compile group: 'com.amazonaws', name: 'aws-java-sdk', version: '1.11.581'

    // https://mvnrepository.com/artifact/io.projectreactor/reactor-core
    compile group: 'io.projectreactor', name: 'reactor-core', version: '3.2.11.RELEASE'
    // https://mvnrepository.com/artifact/io.projectreactor.addons/reactor-extra
    compile group: 'io.projectreactor.addons', name: 'reactor-extra', version: '3.2.3.RELEASE'

}
package com.aws.demo;

import com.amazonaws.auth.AWSStaticCredentialsProvider;
import com.amazonaws.auth.BasicAWSCredentials;
import com.amazonaws.regions.Regions;
import com.amazonaws.services.sqs.AmazonSQS;
import com.amazonaws.services.sqs.AmazonSQSClientBuilder;

public class ClientCredentials {

    public  static BasicAWSCredentials getCloudCredentials() {
        return new BasicAWSCredentials("<Client-Id>", "<Secret-Key>");
    }

    public static AmazonSQS getAmazonSQSClient(){
        return AmazonSQSClientBuilder.standard()
                .withRegion(Regions.AP_SOUTH_1)
                .withCredentials(new AWSStaticCredentialsProvider(getCloudCredentials()))
                .build();
    }
}
SQSUsing Java
Creating AmazonSQS Object
Creating a Queue
	static AmazonSQS amazonSQS = ClientCredentials.getAmazonSQSClient();

    static String queueName = "MyDemoQueue.fifo";

    static void createQueue() {
        CreateQueueRequest create_request = new CreateQueueRequest(queueName)
                .addAttributesEntry("FifoQueue", "true");

        amazonSQS.createQueue(create_request);
    }
List all the Queues
static void listQueue() {
        amazonSQS
                .listQueues()
                .getQueueUrls()
                .forEach(System.out::println);
    }
Get Queue URL
static void getQueueUrl() {
        System.out.println(amazonSQS.getQueueUrl(queueName).getQueueUrl());
    }
Delete Queue URL
static void deleteQueue(){
        amazonSQS.deleteQueue(amazonSQS.getQueueUrl(queueName).getQueueUrl());
    }
Send Message to SQS
static void sendMessages(){
        SendMessageRequest send_msg_request = new SendMessageRequest()
                .withQueueUrl(amazonSQS.getQueueUrl(queueName).getQueueUrl())
                .withMessageBody("Hello Message")
                .withDelaySeconds(0);
        send_msg_request.setMessageGroupId("1");
        send_msg_request.setMessageDeduplicationId("1");
        Map<String, MessageAttributeValue> messageAttributeValueMap = new HashMap<>();
        messageAttributeValueMap.put("Name", new MessageAttributeValue()
                .withDataType("String")
                .withStringValue("Jane"));
        send_msg_request.setMessageAttributes(messageAttributeValueMap);
        amazonSQS.sendMessage(send_msg_request);
    }
static void readAndDeleteMessage(){
String queueUrl = amazonSQS.getQueueUrl(queueName).getQueueUrl();
ReceiveMessageRequest receive_request = new ReceiveMessageRequest()
.withQueueUrl(queueUrl)
.withWaitTimeSeconds(0)
.withMaxNumberOfMessages(4);
List<Message> messages = amazonSQS.receiveMessage(receive_request)
.getMessages();
messages.forEach(m->{
System.out.println(m.getBody());
amazonSQS.deleteMessage(queueUrl,m.getReceiptHandle());
});
}Read and Delete SQS Message
Exercise 3
- Create a standard queue, push and read/delete elements from queue.
- Create a fifo queue push and read/delete elements from the queue.
- Apply content based duplication on fifo queue.
- Create a dead letter queue and associate source queue with it.
- Place the elements from source queue to dead letter queue by applying multiple reads
- Perform the following operations with Java SDK for SQS Create, List, Get, Delete, Send Message, Read and Delete
Simple Notification Service (SNS)
-
AWS Simple Notification Service (SNS) works on a push technology. It is also called a server push.
-
Unlike SNS, AWS SQS works on a pull mechanism.
-
In enterprise architecture, it is often required to send notifications to the subscribers.
-
When an EC2 instance is under or over-utilized for a specific time frame it should
send a notification to system administrators and stack holders.
-
Usually, Installed mobile applications on a smart phone occasionally send push notifications on various offers and discounts based on the user's interaction with
the mobile app.
-
Simple Notification Service (SNS) cont.
- Firstly you need to create an Amazon SNS topic.
-
An SNS topic acts as an access point in between the publisher and subscriber applications.
-
The publisher communicates asynchronously with the subscribers using SNS.
-
Subscribers can be an entity such as a Lambda function, SQS, HTTP or HTTPS endpoint, email, or a mobile device that subscribes to SNS topic for receiving notifications.
-
When a publisher has new information to notify to the subscribers, it publishes a message to the topic. Finally, SNS delivers the message/notification to all subscribers.
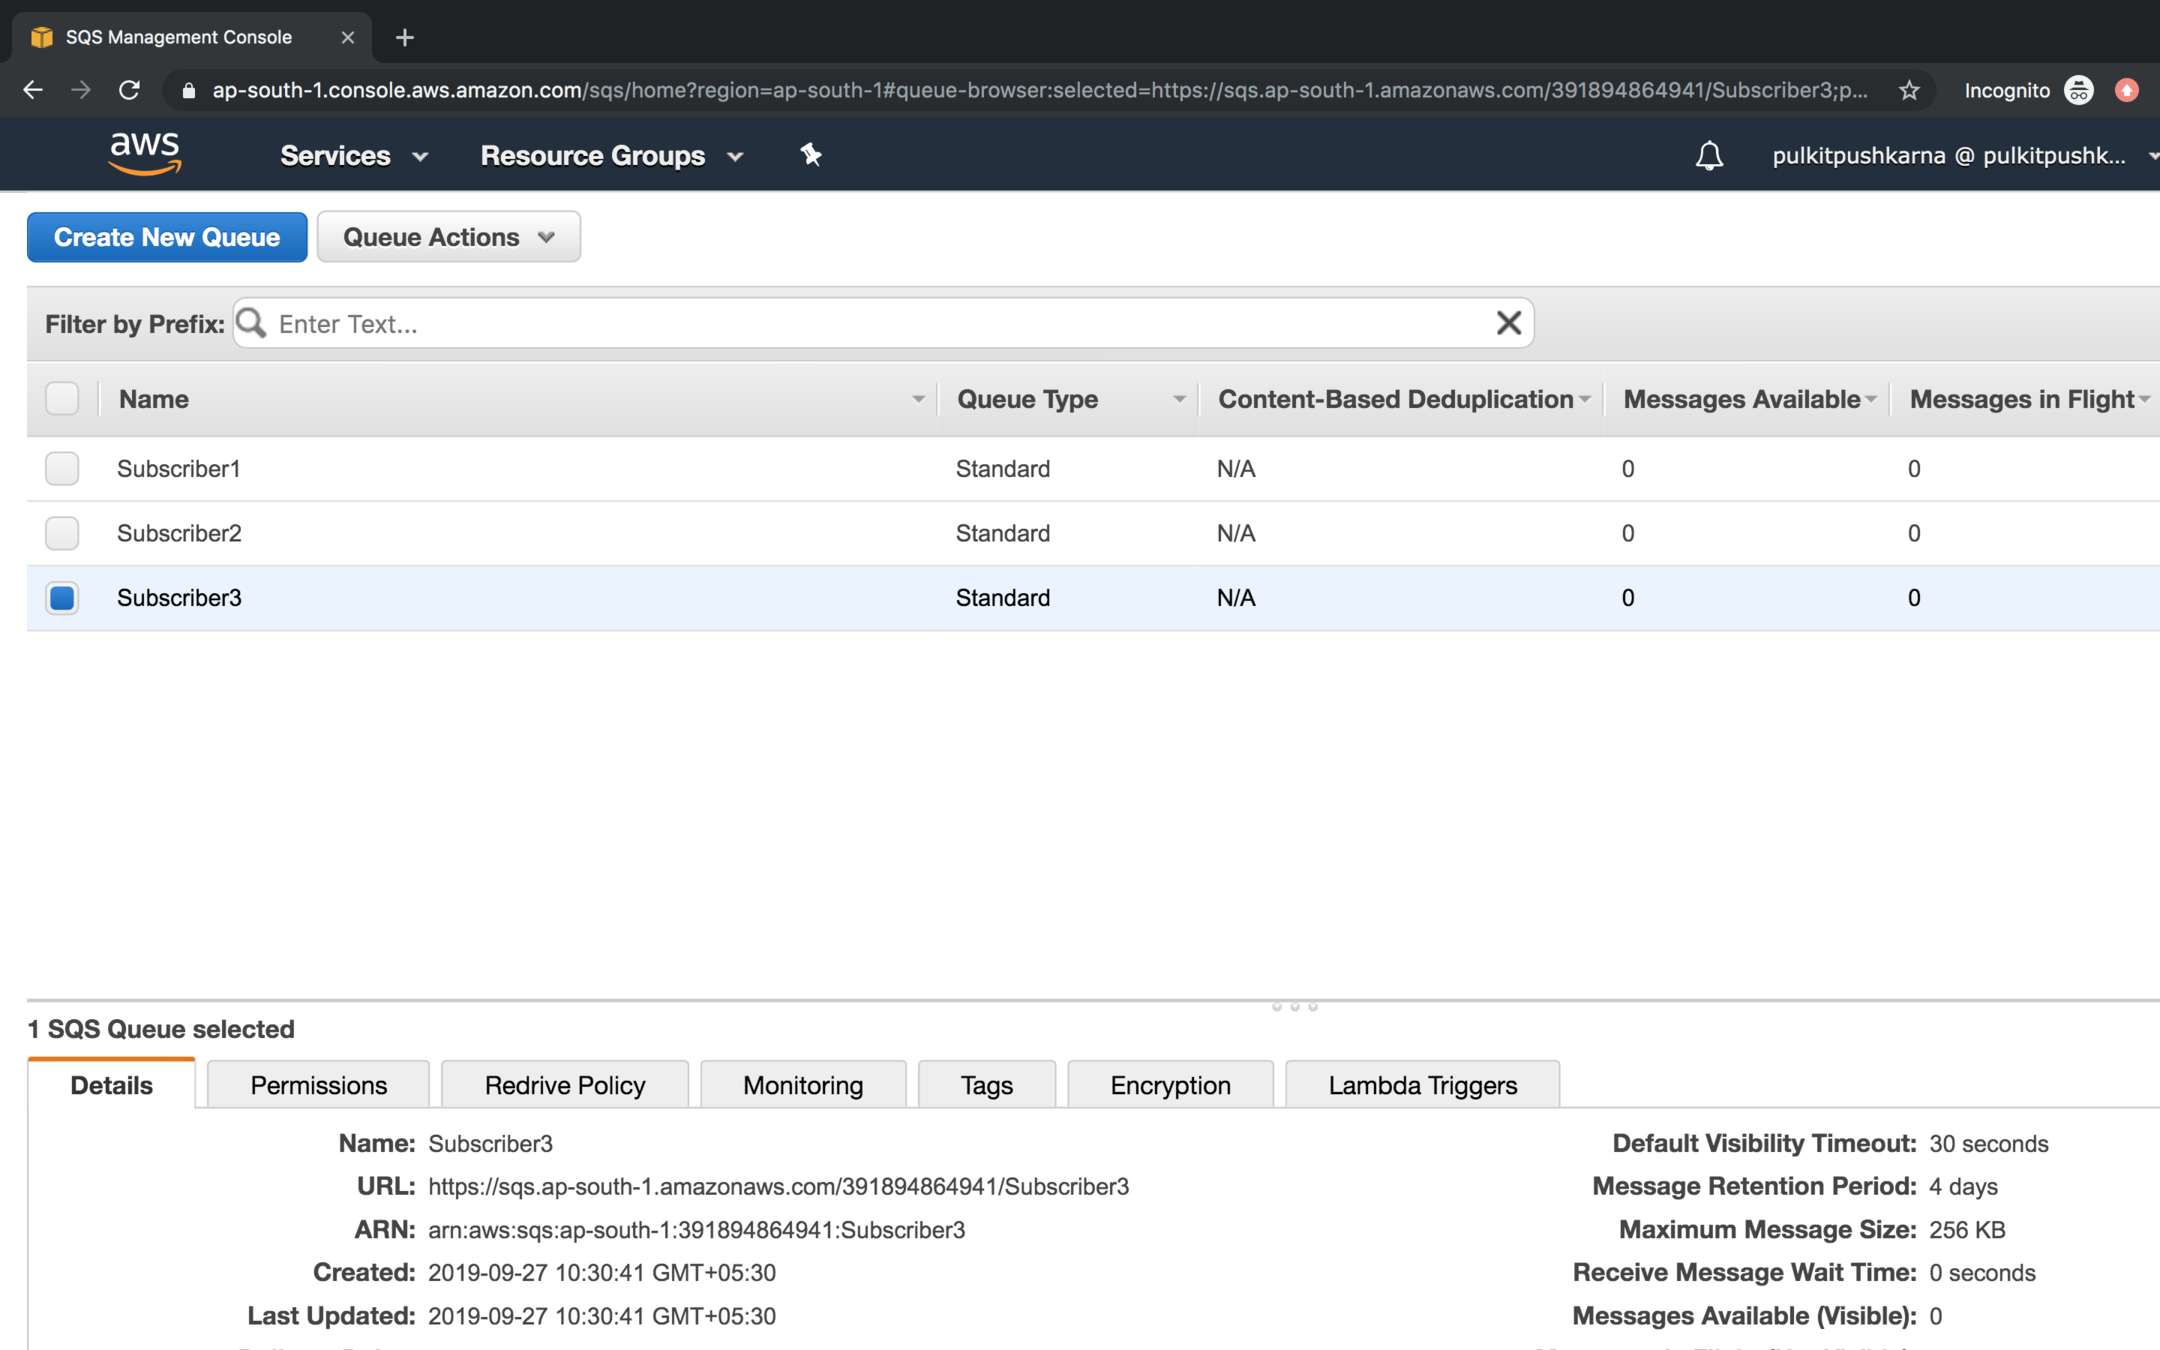
Create 3 Standard Queues
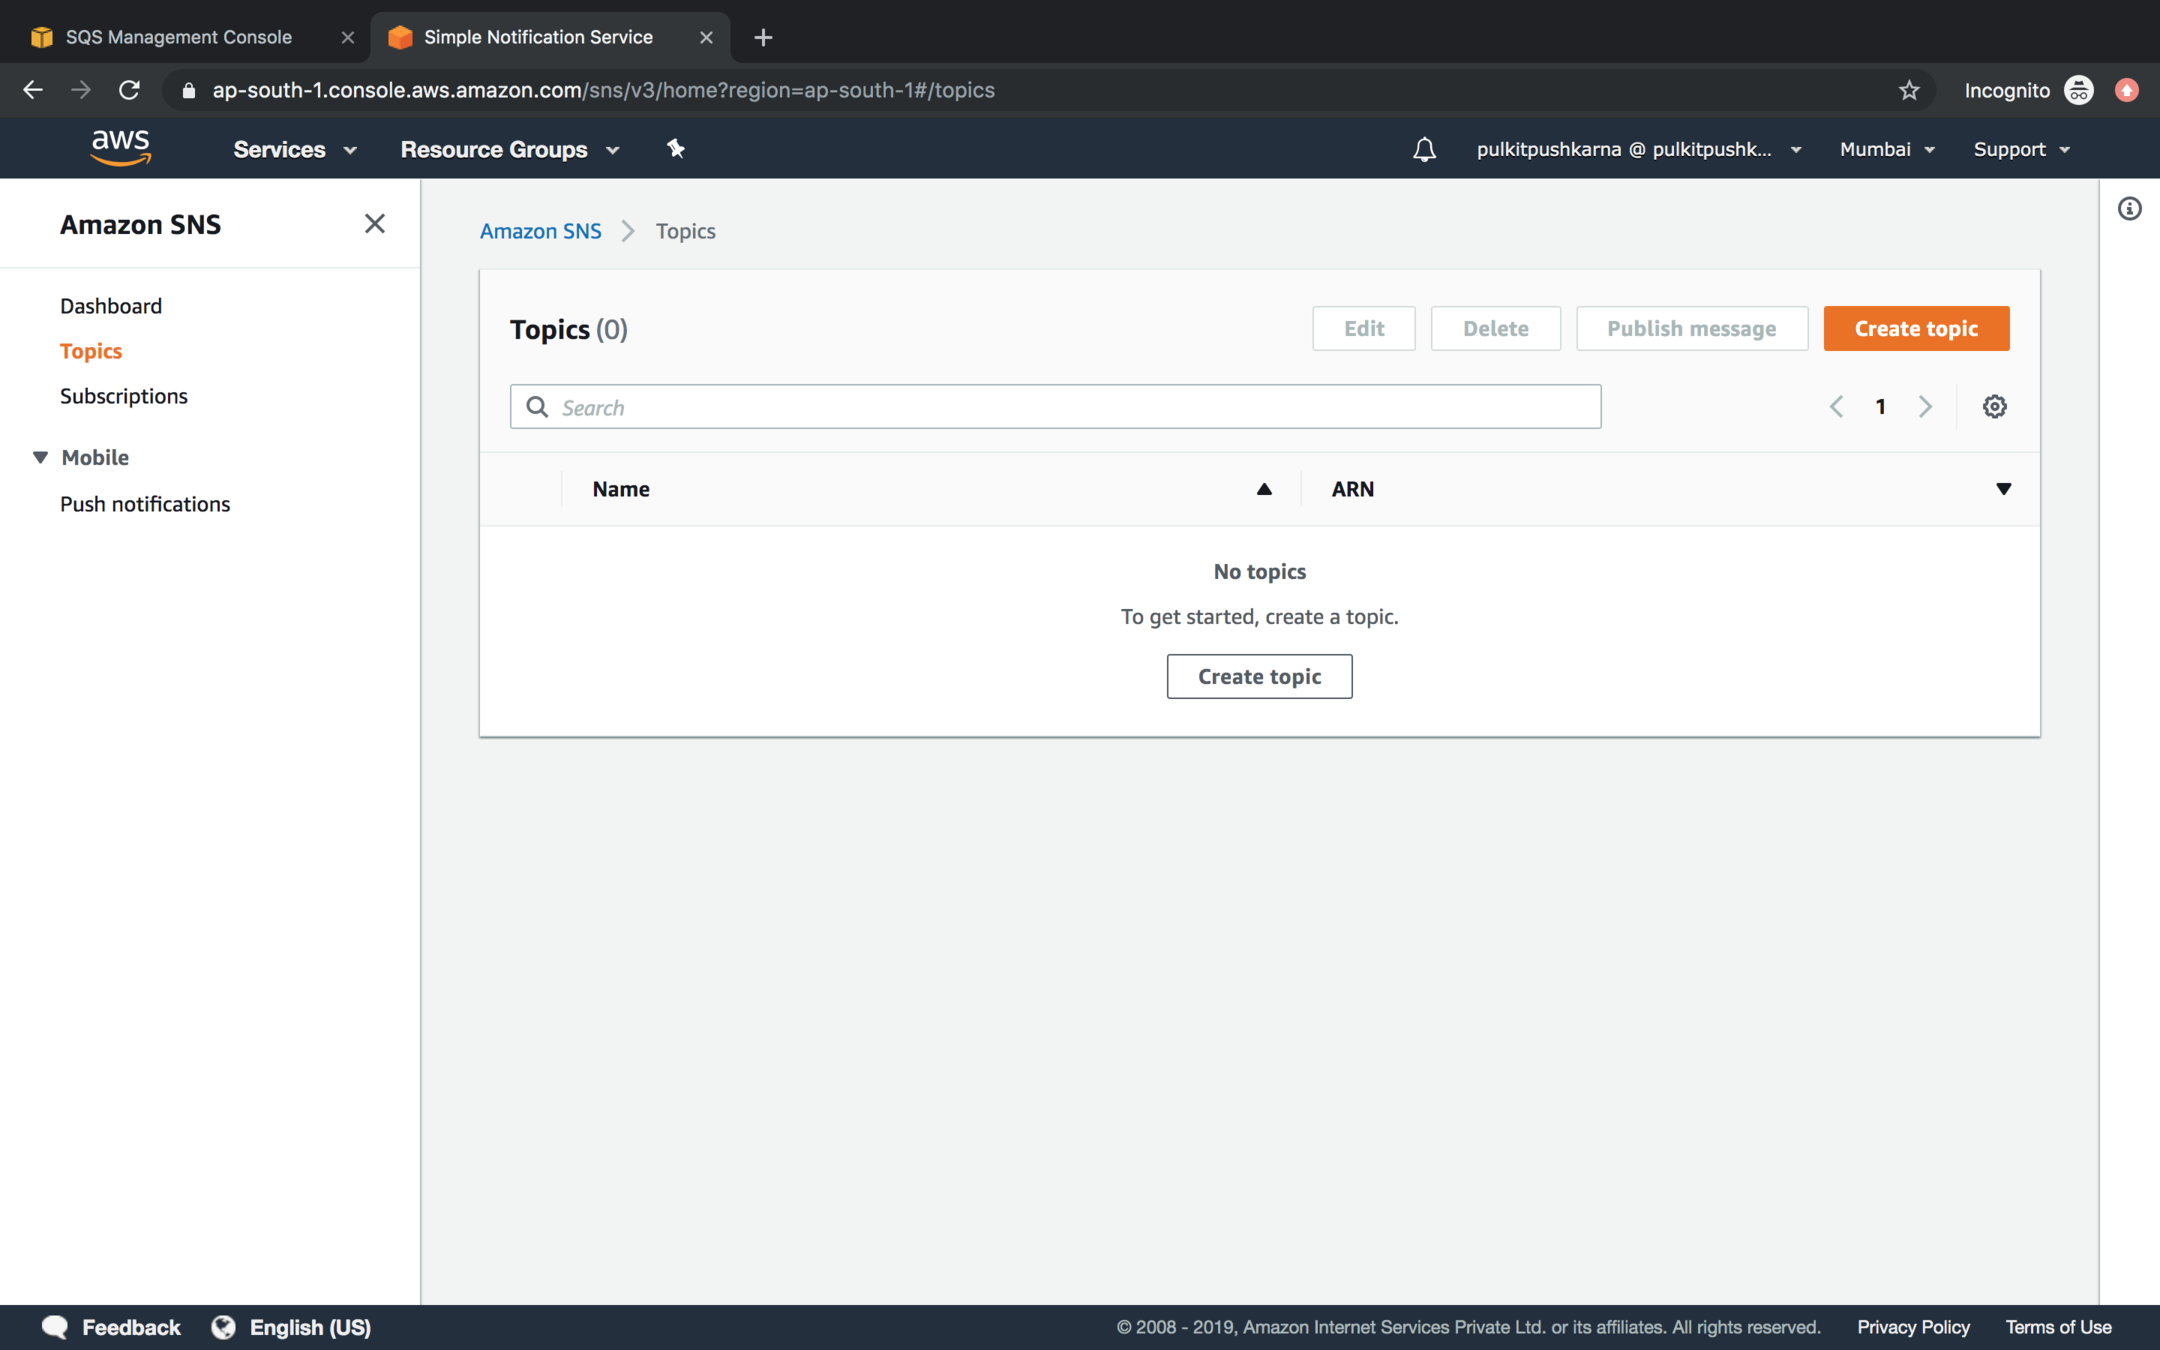
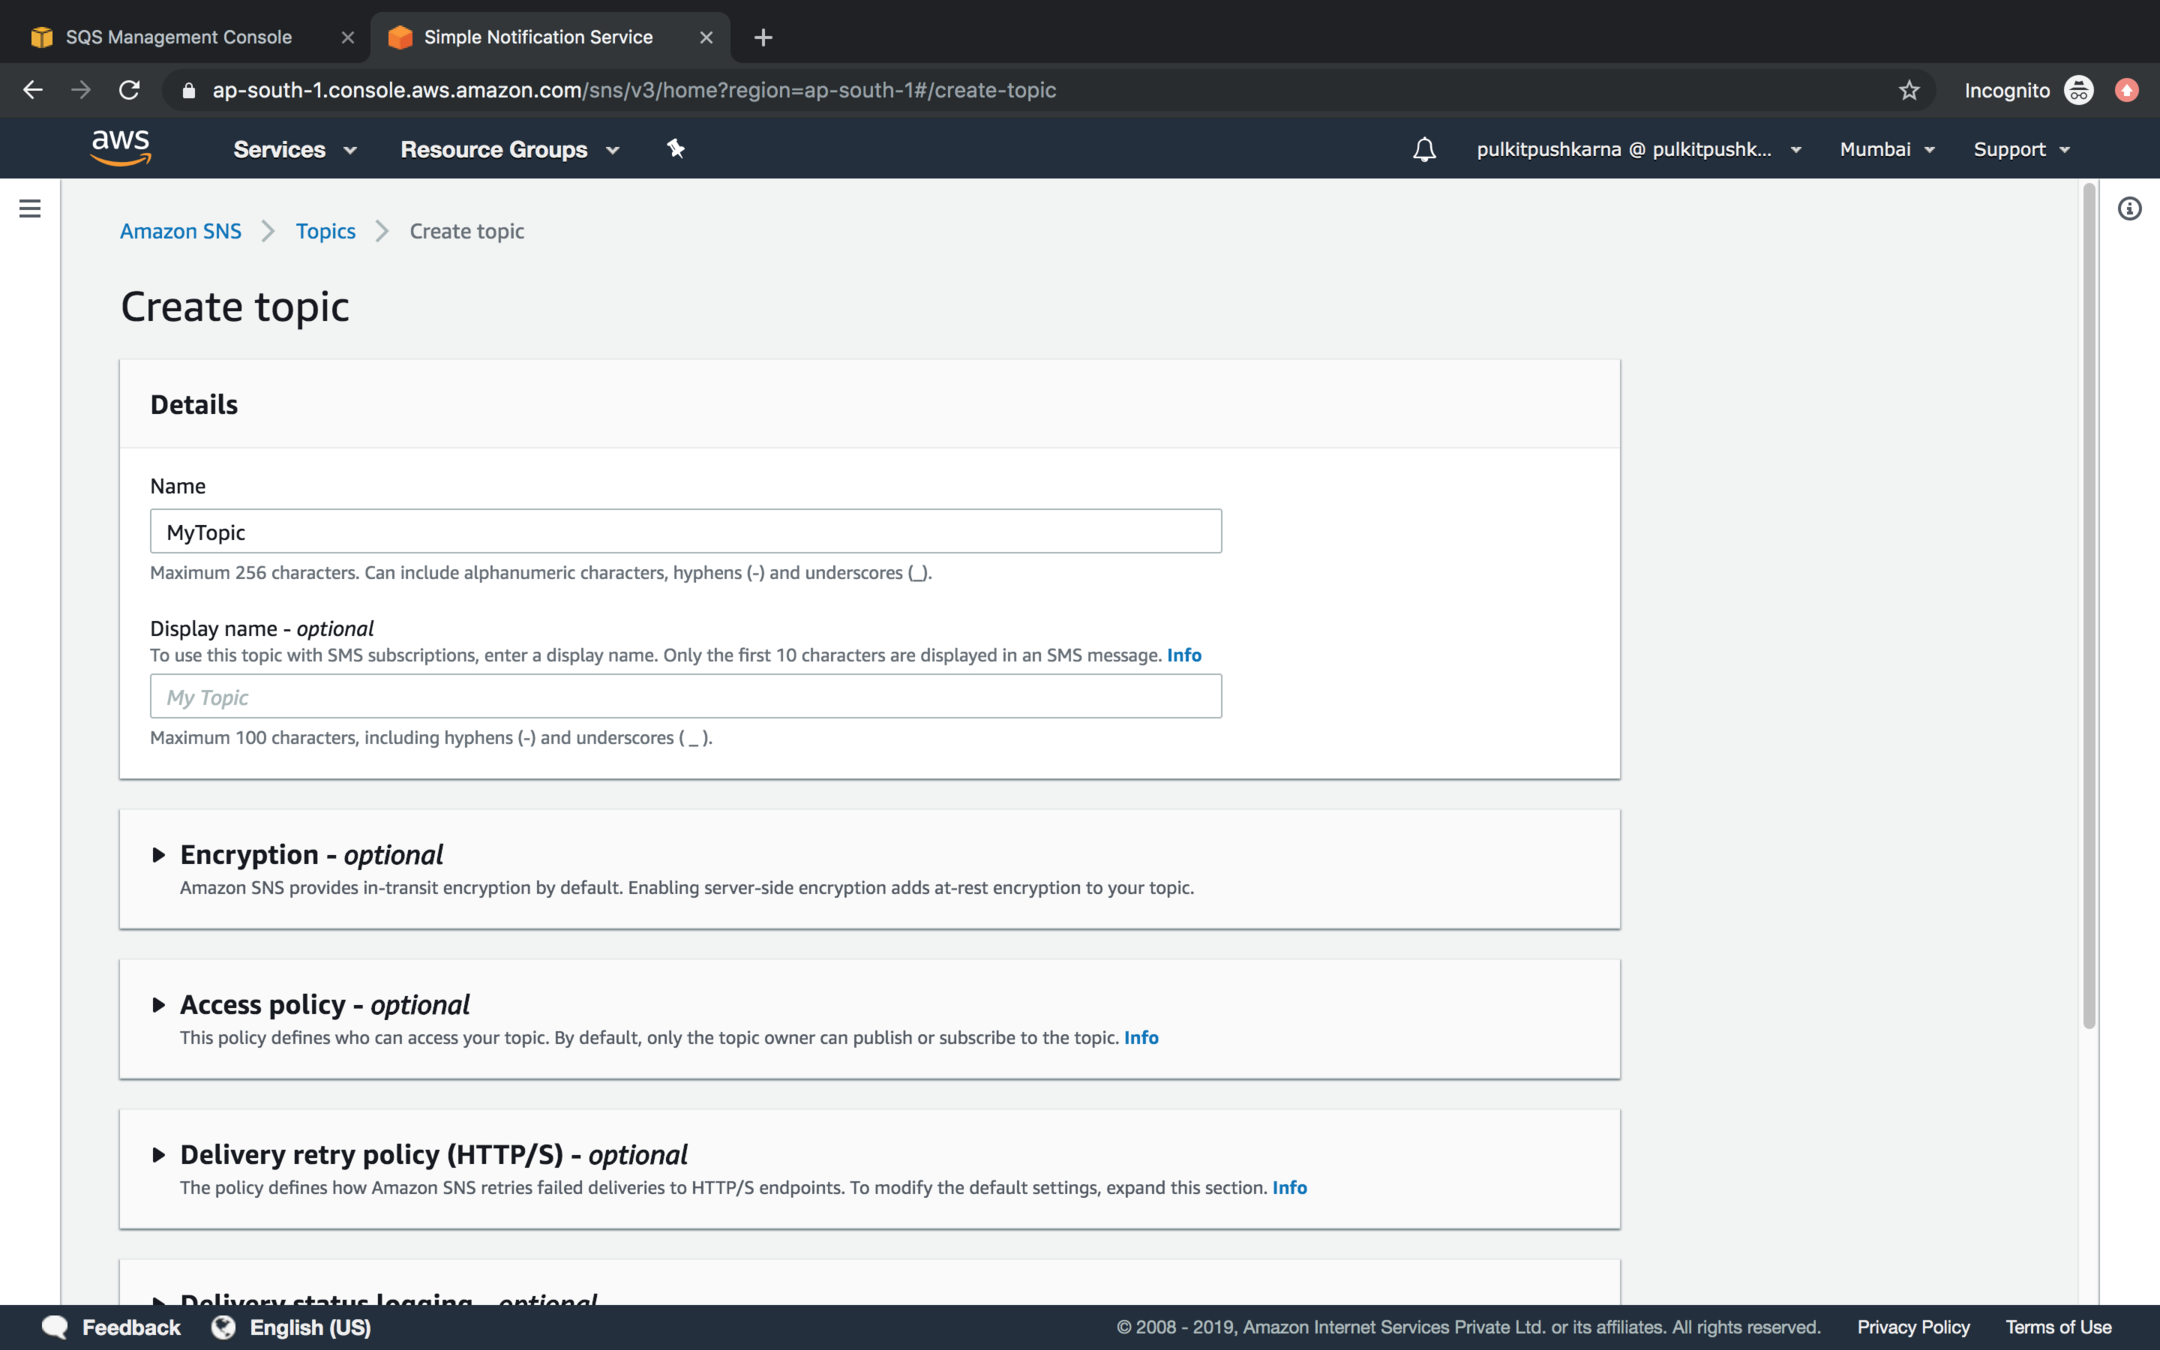
Go to the SNS service and click on Create topic
Enter the name of the topic and Click create Topic
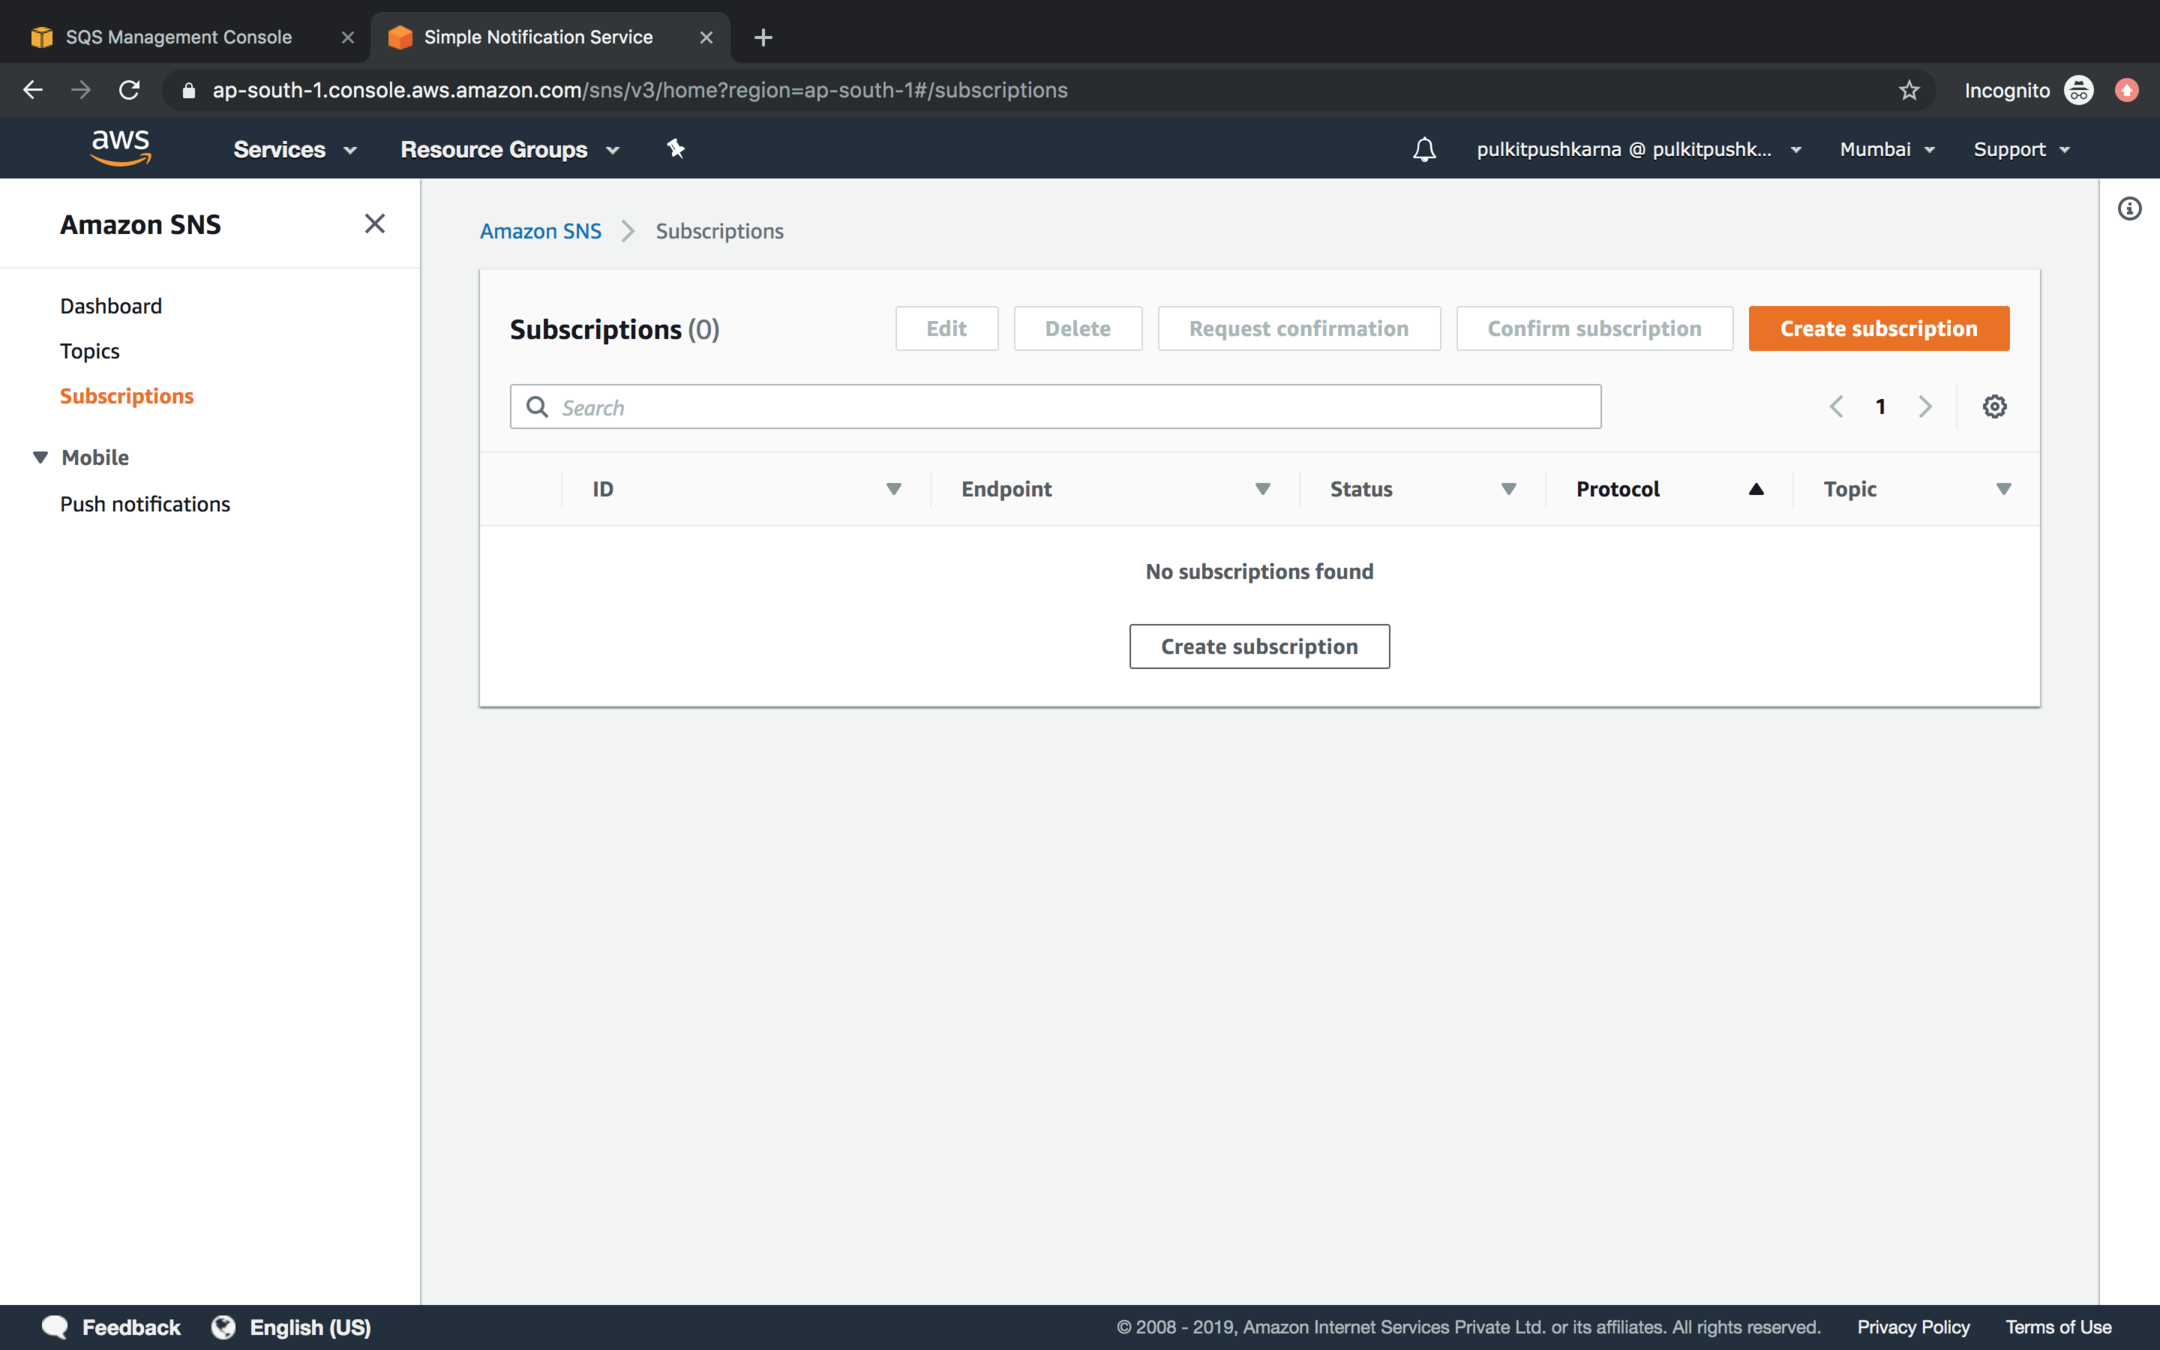
Go to the Subscription Section and click on Create subscription
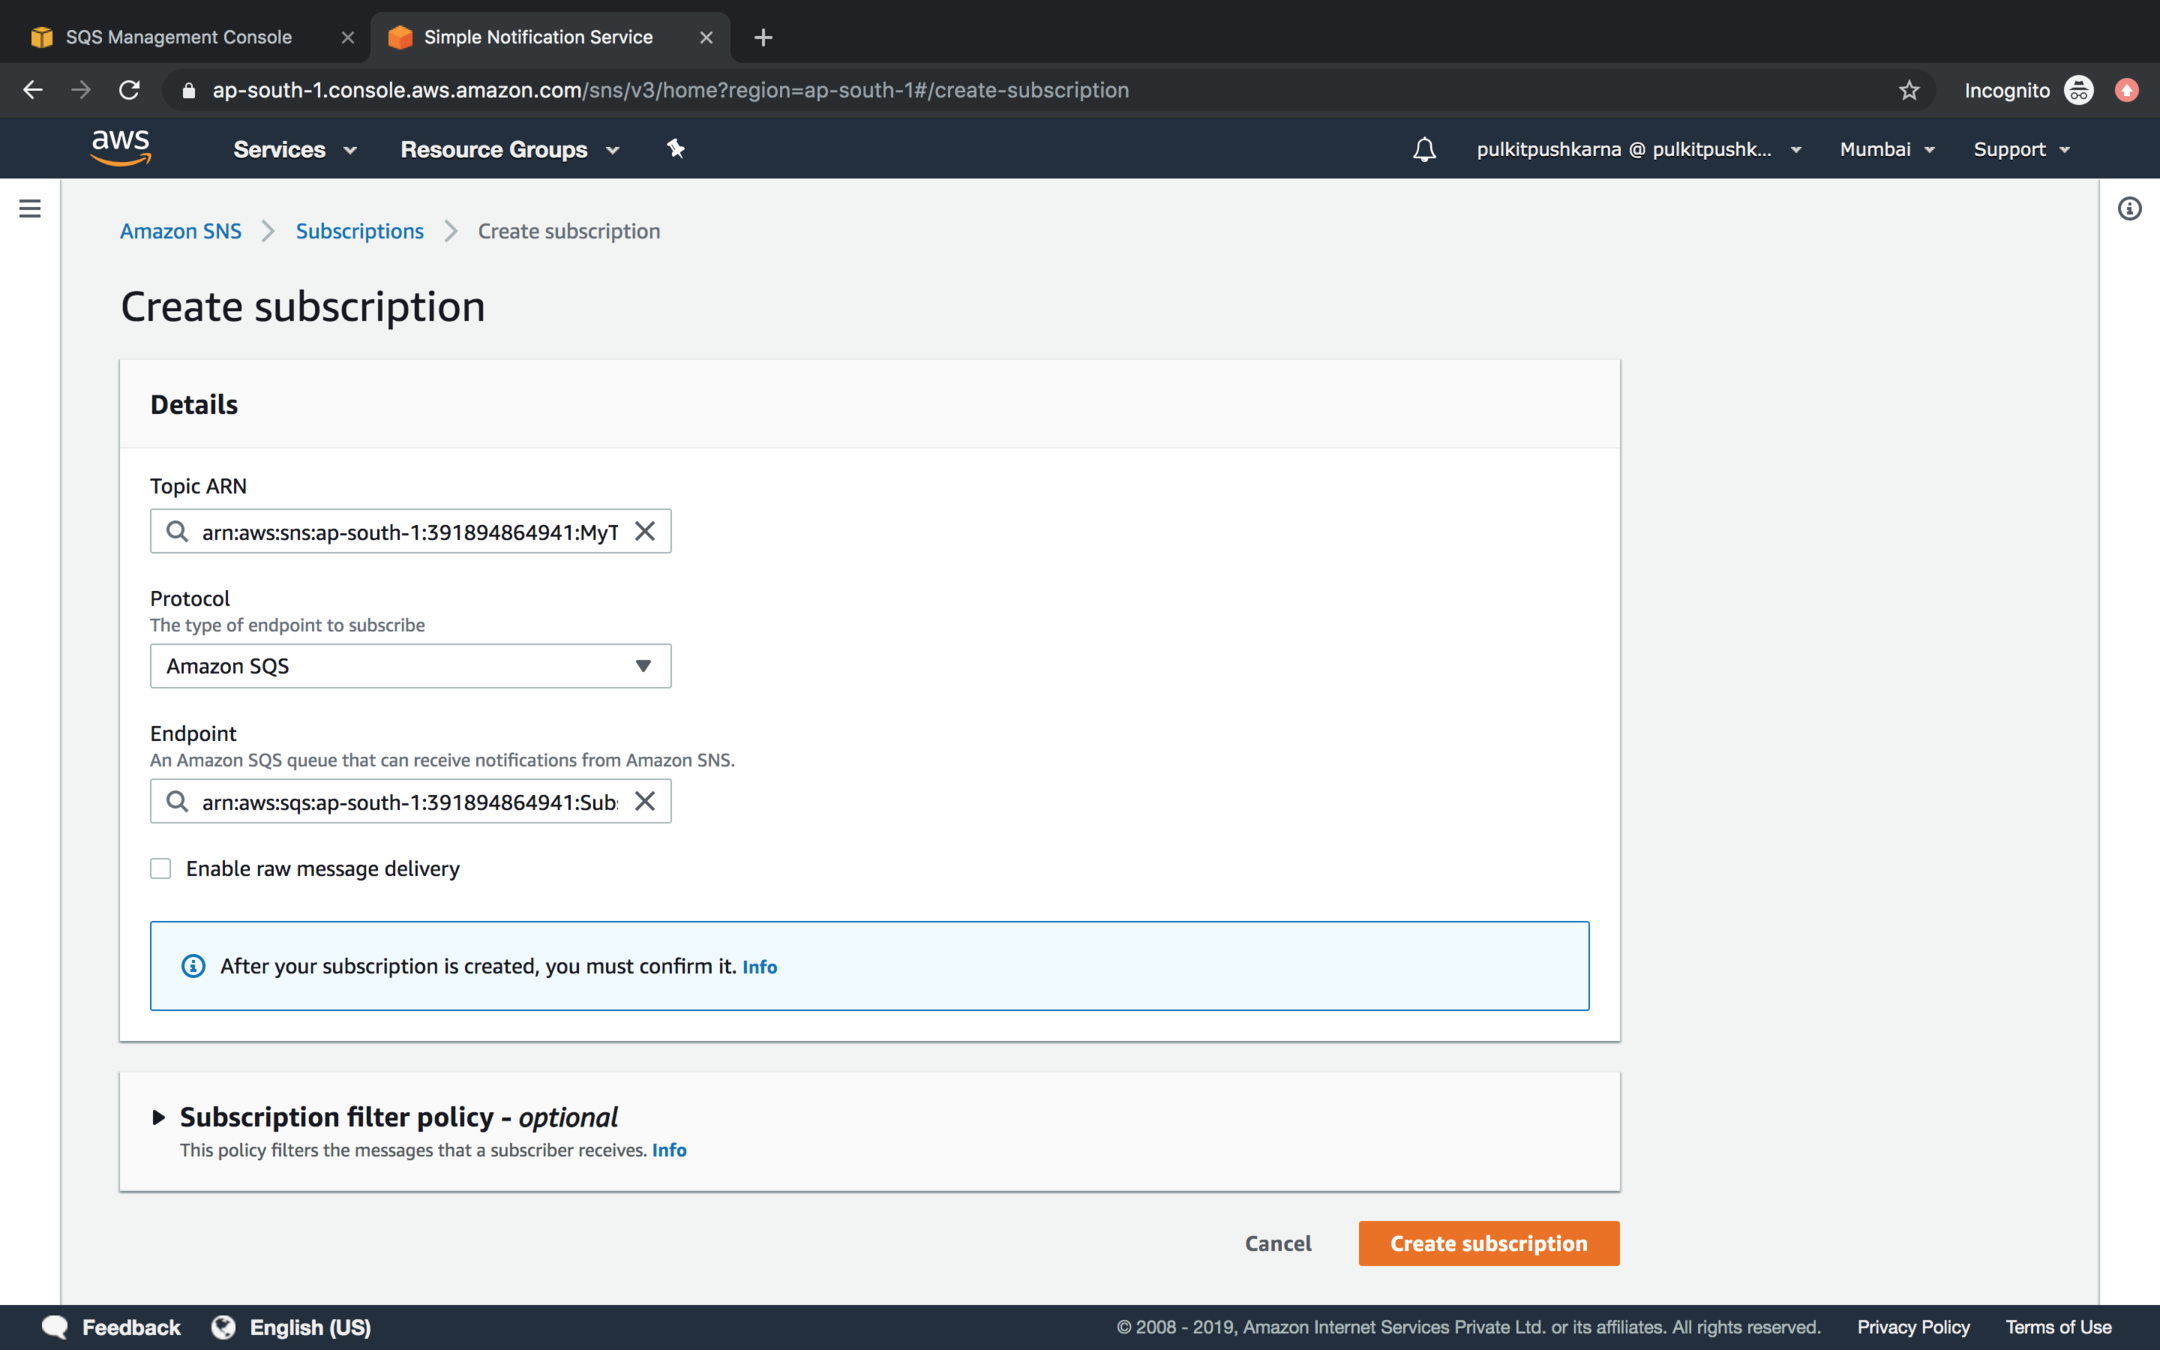
Provide the SNS ARN of the Topic and Select Amazon SQS for Protocol value and in the endpoint enter ARN of SQS and click on Create Subscription
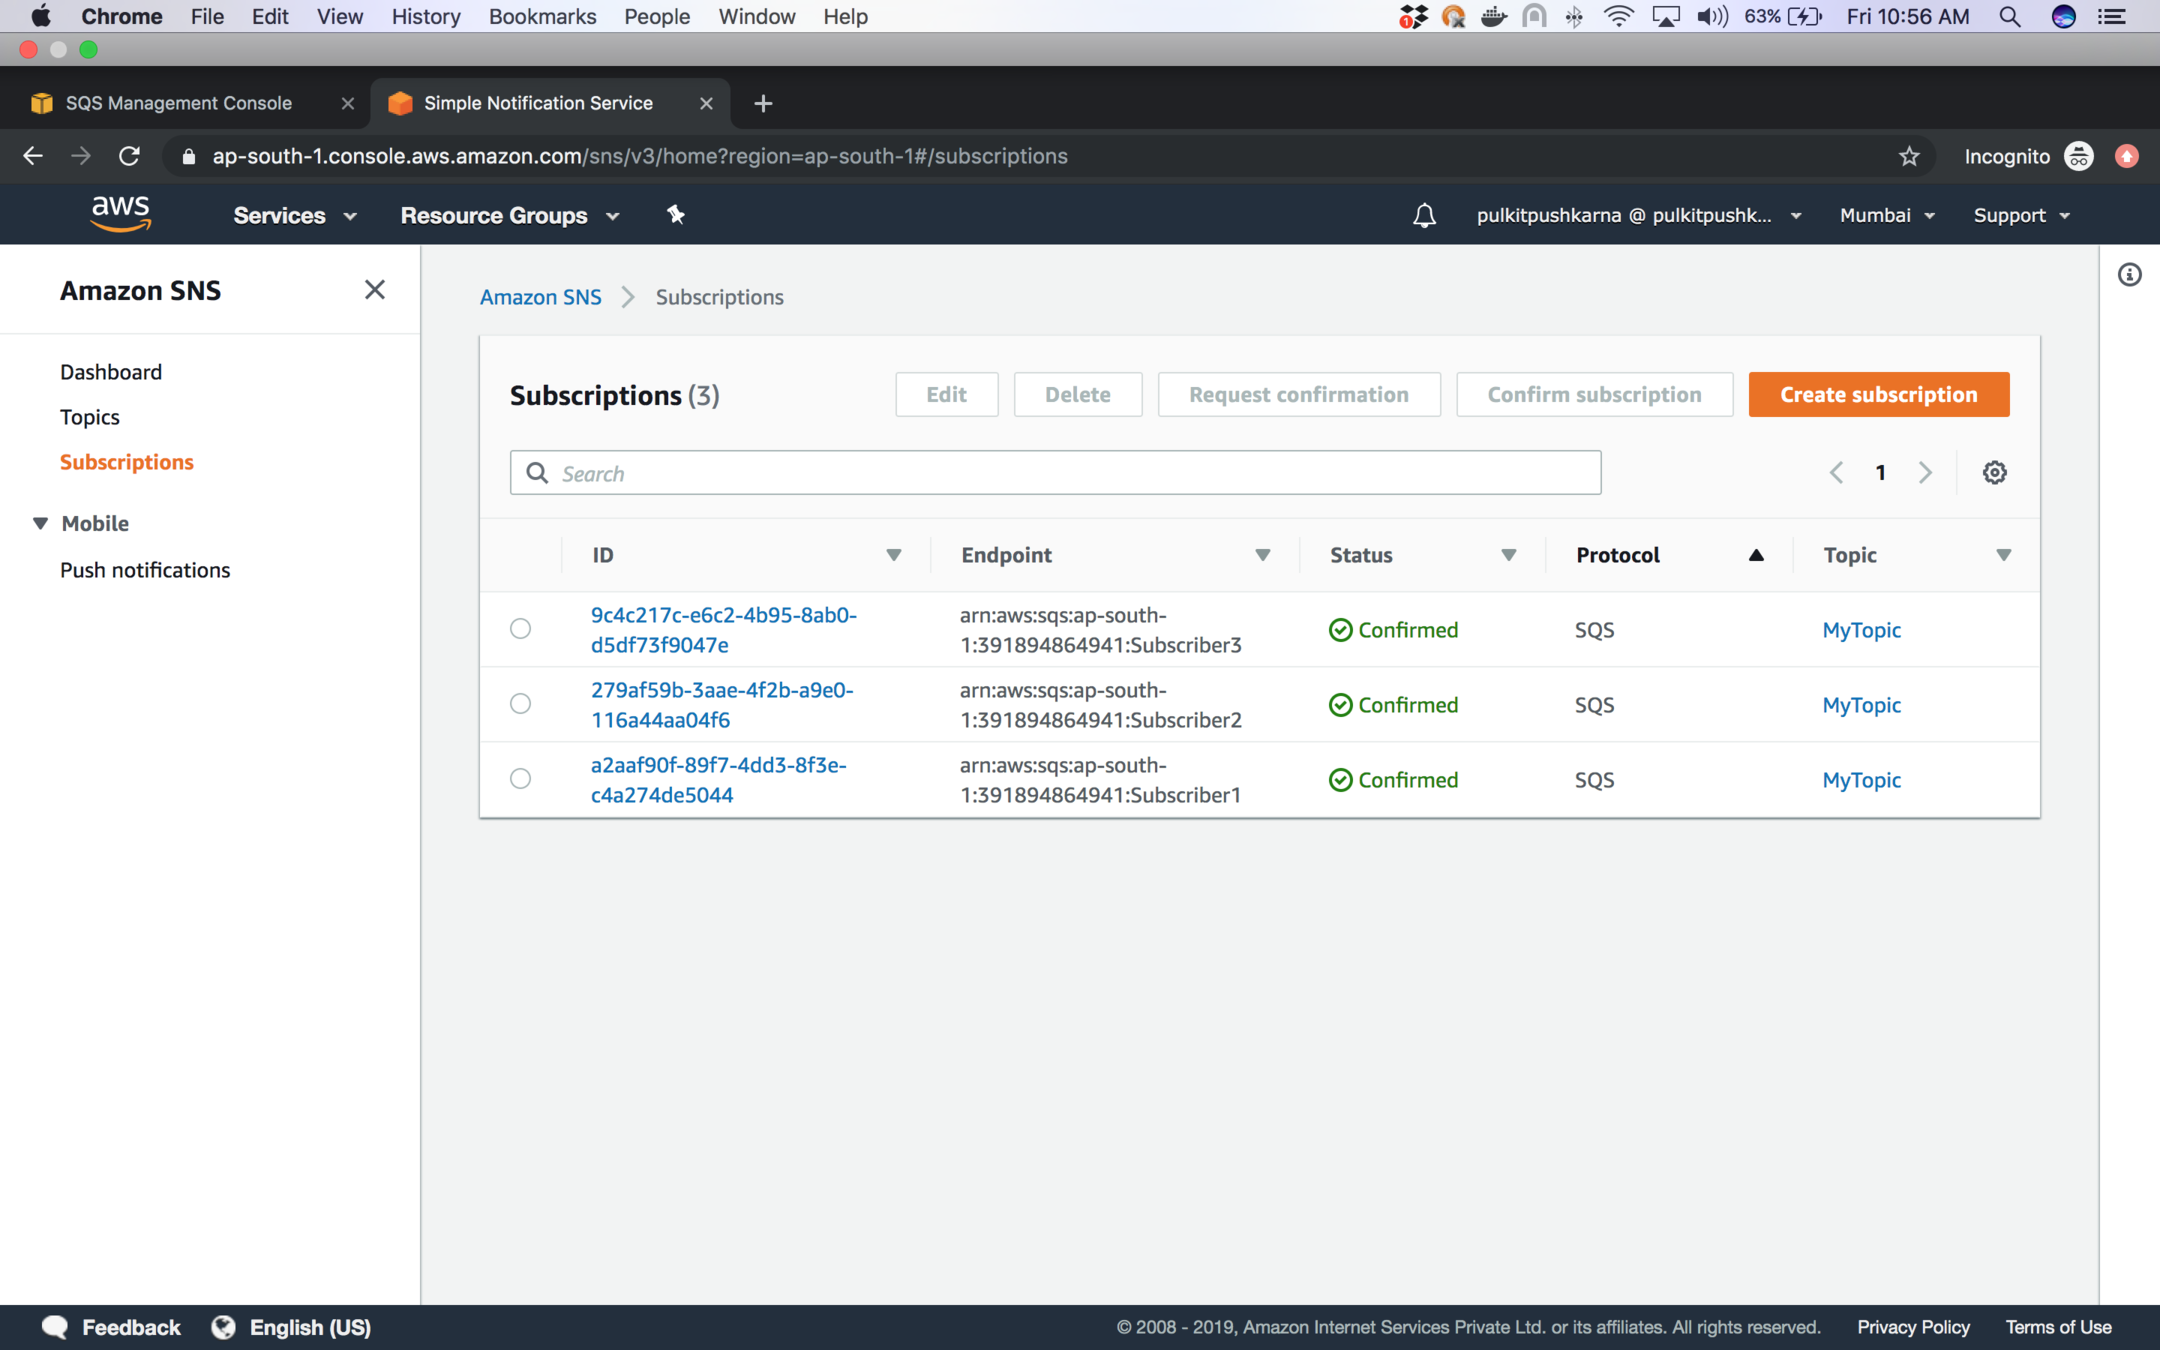
You will see the list below after creating the subscribers
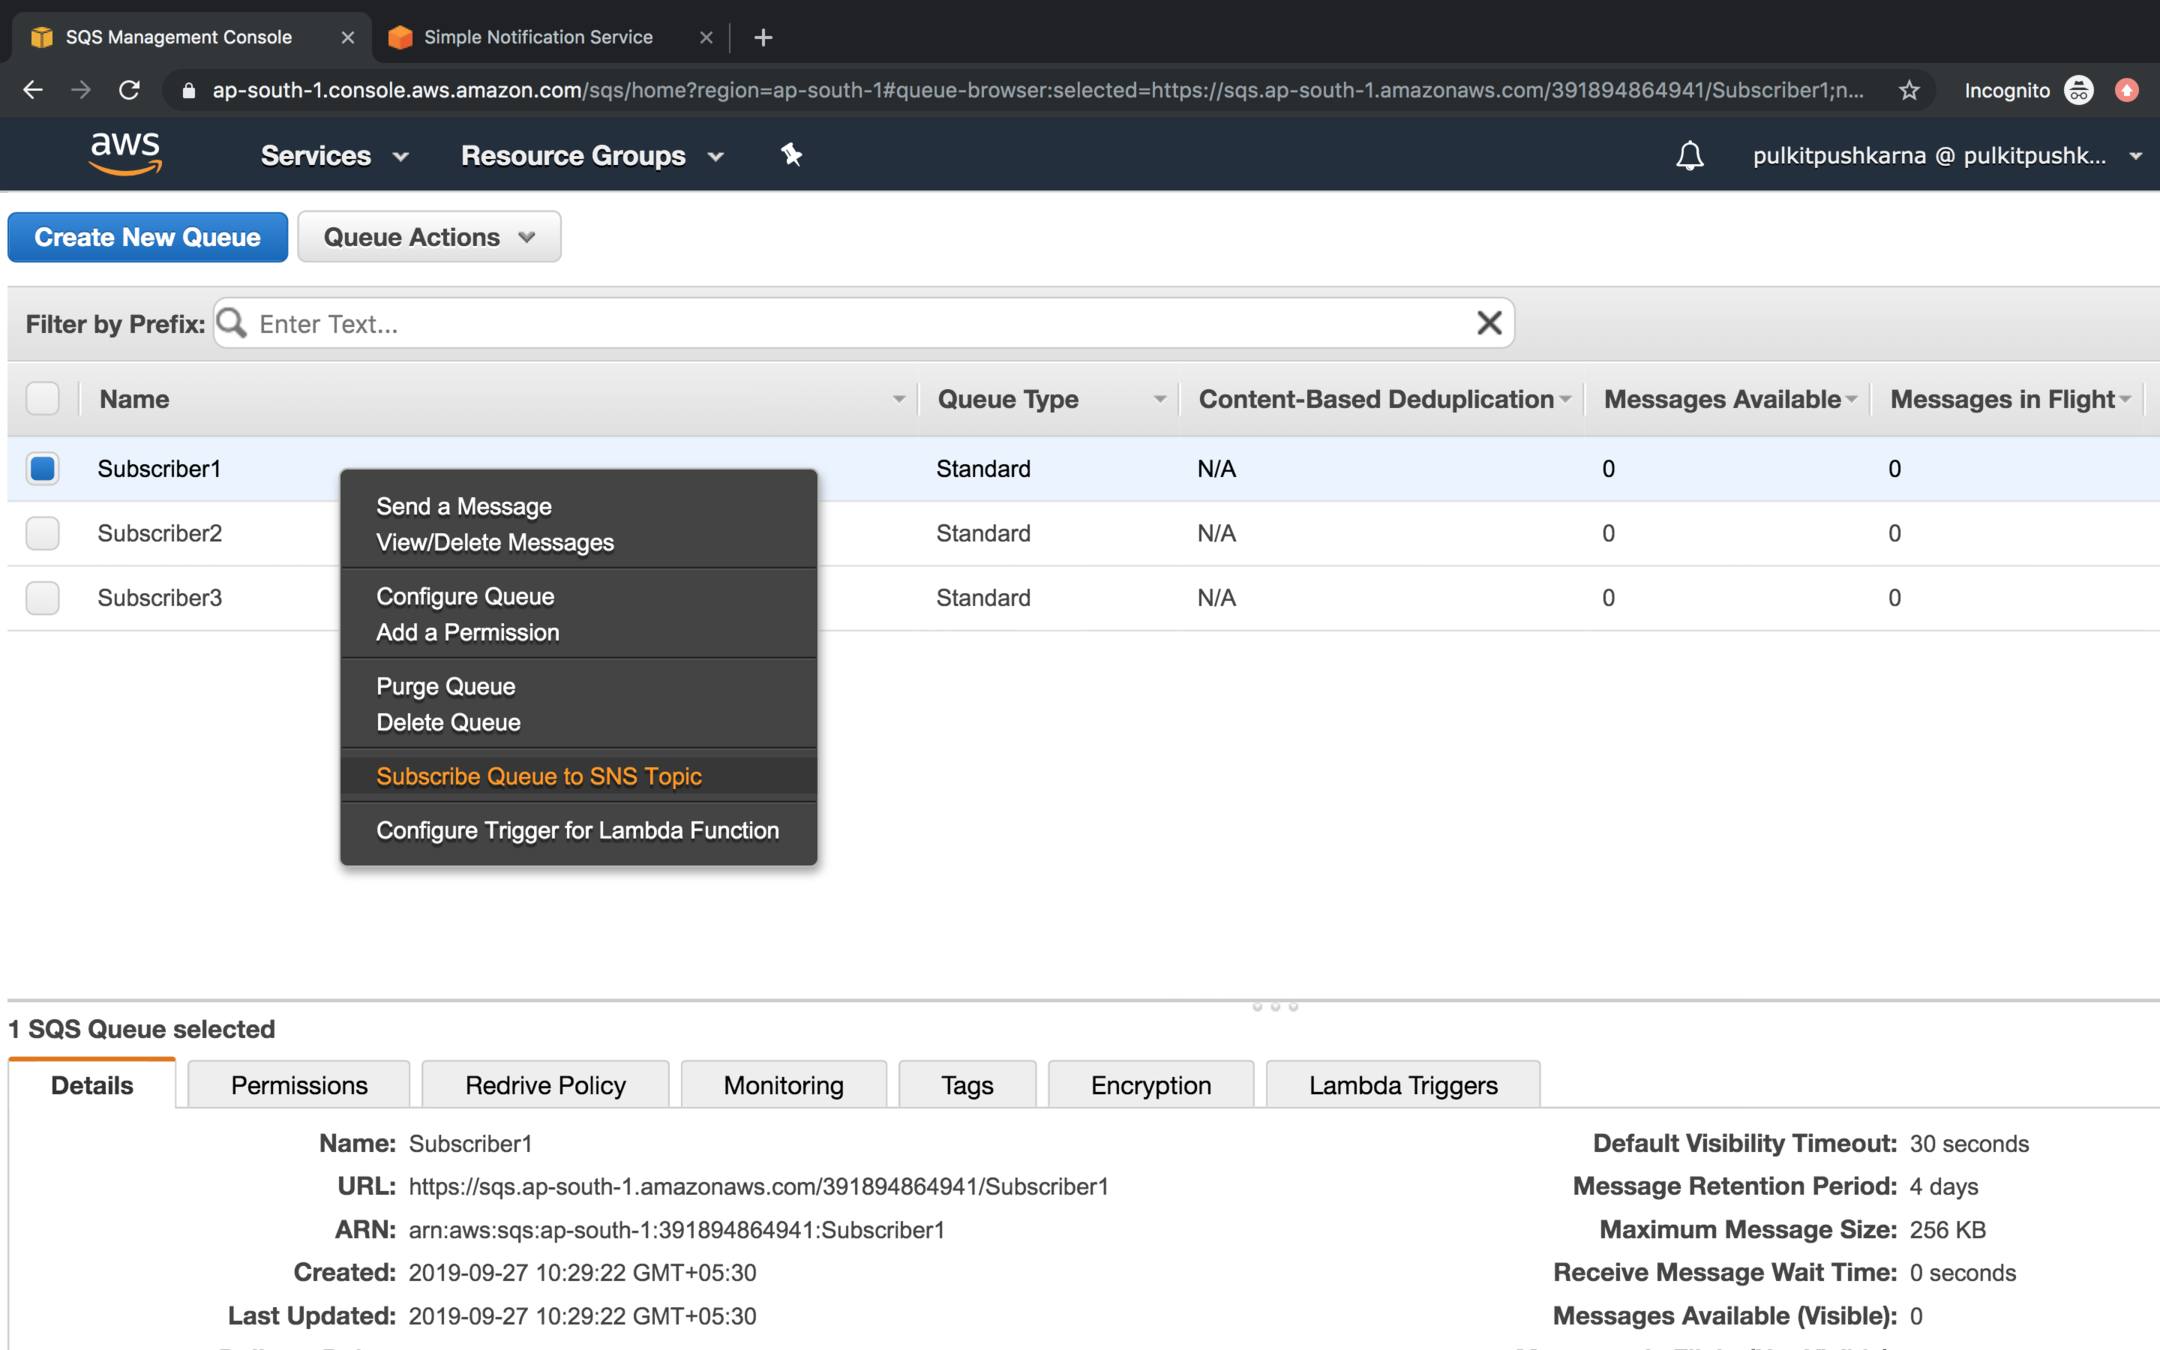
Go to the SQS and Subscribe to SNS topic
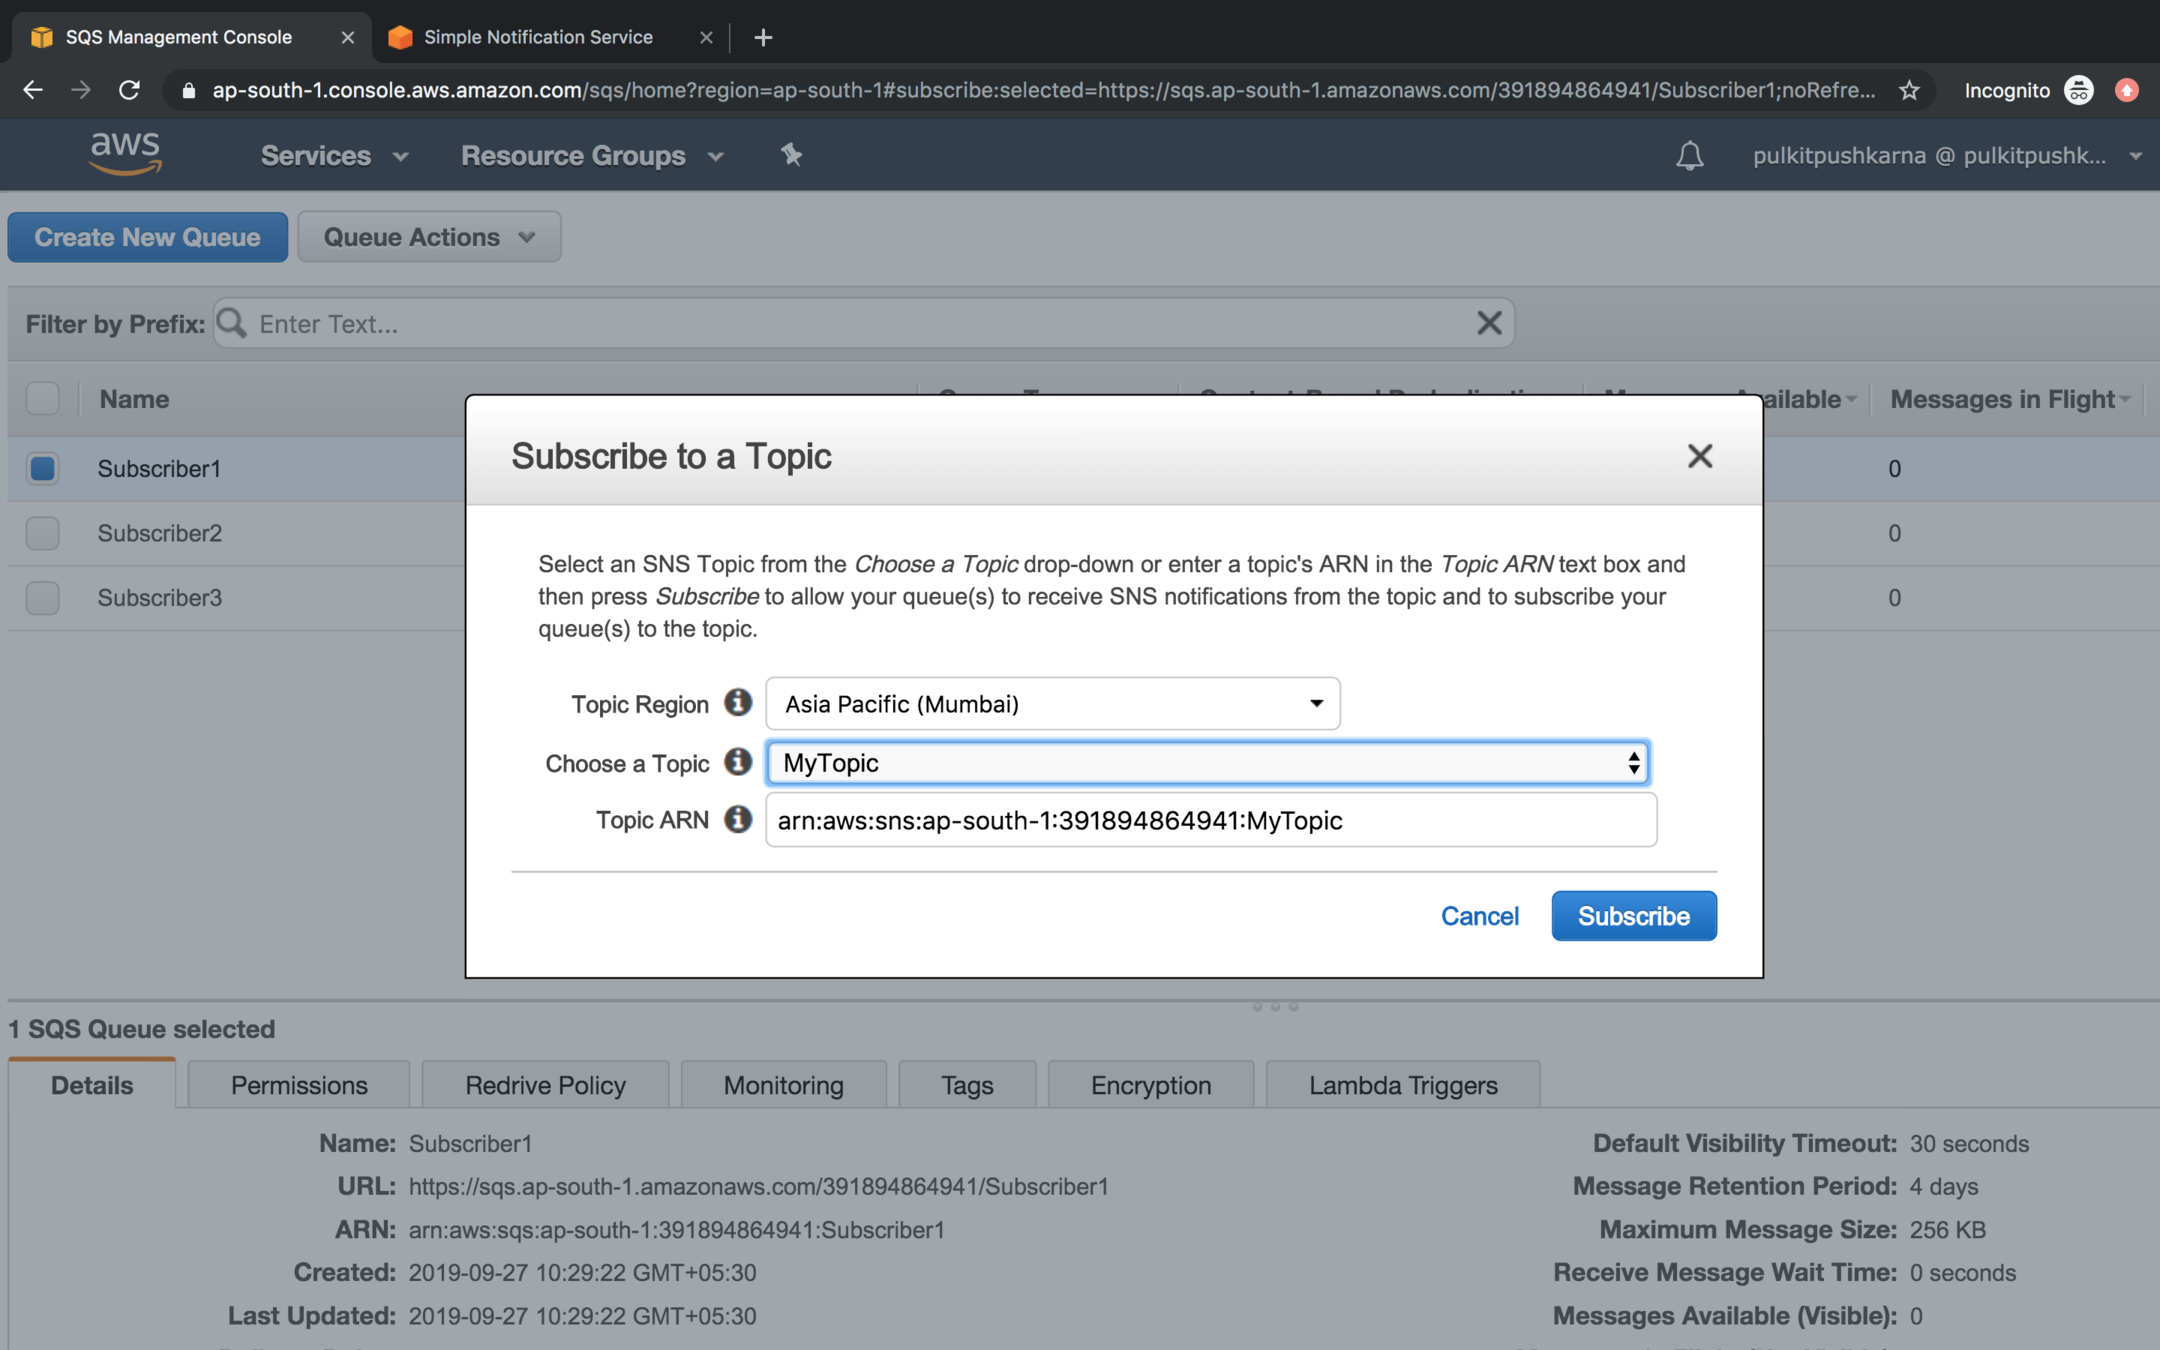
Select the topic to which you want to subscribe and Click on Subscribe button
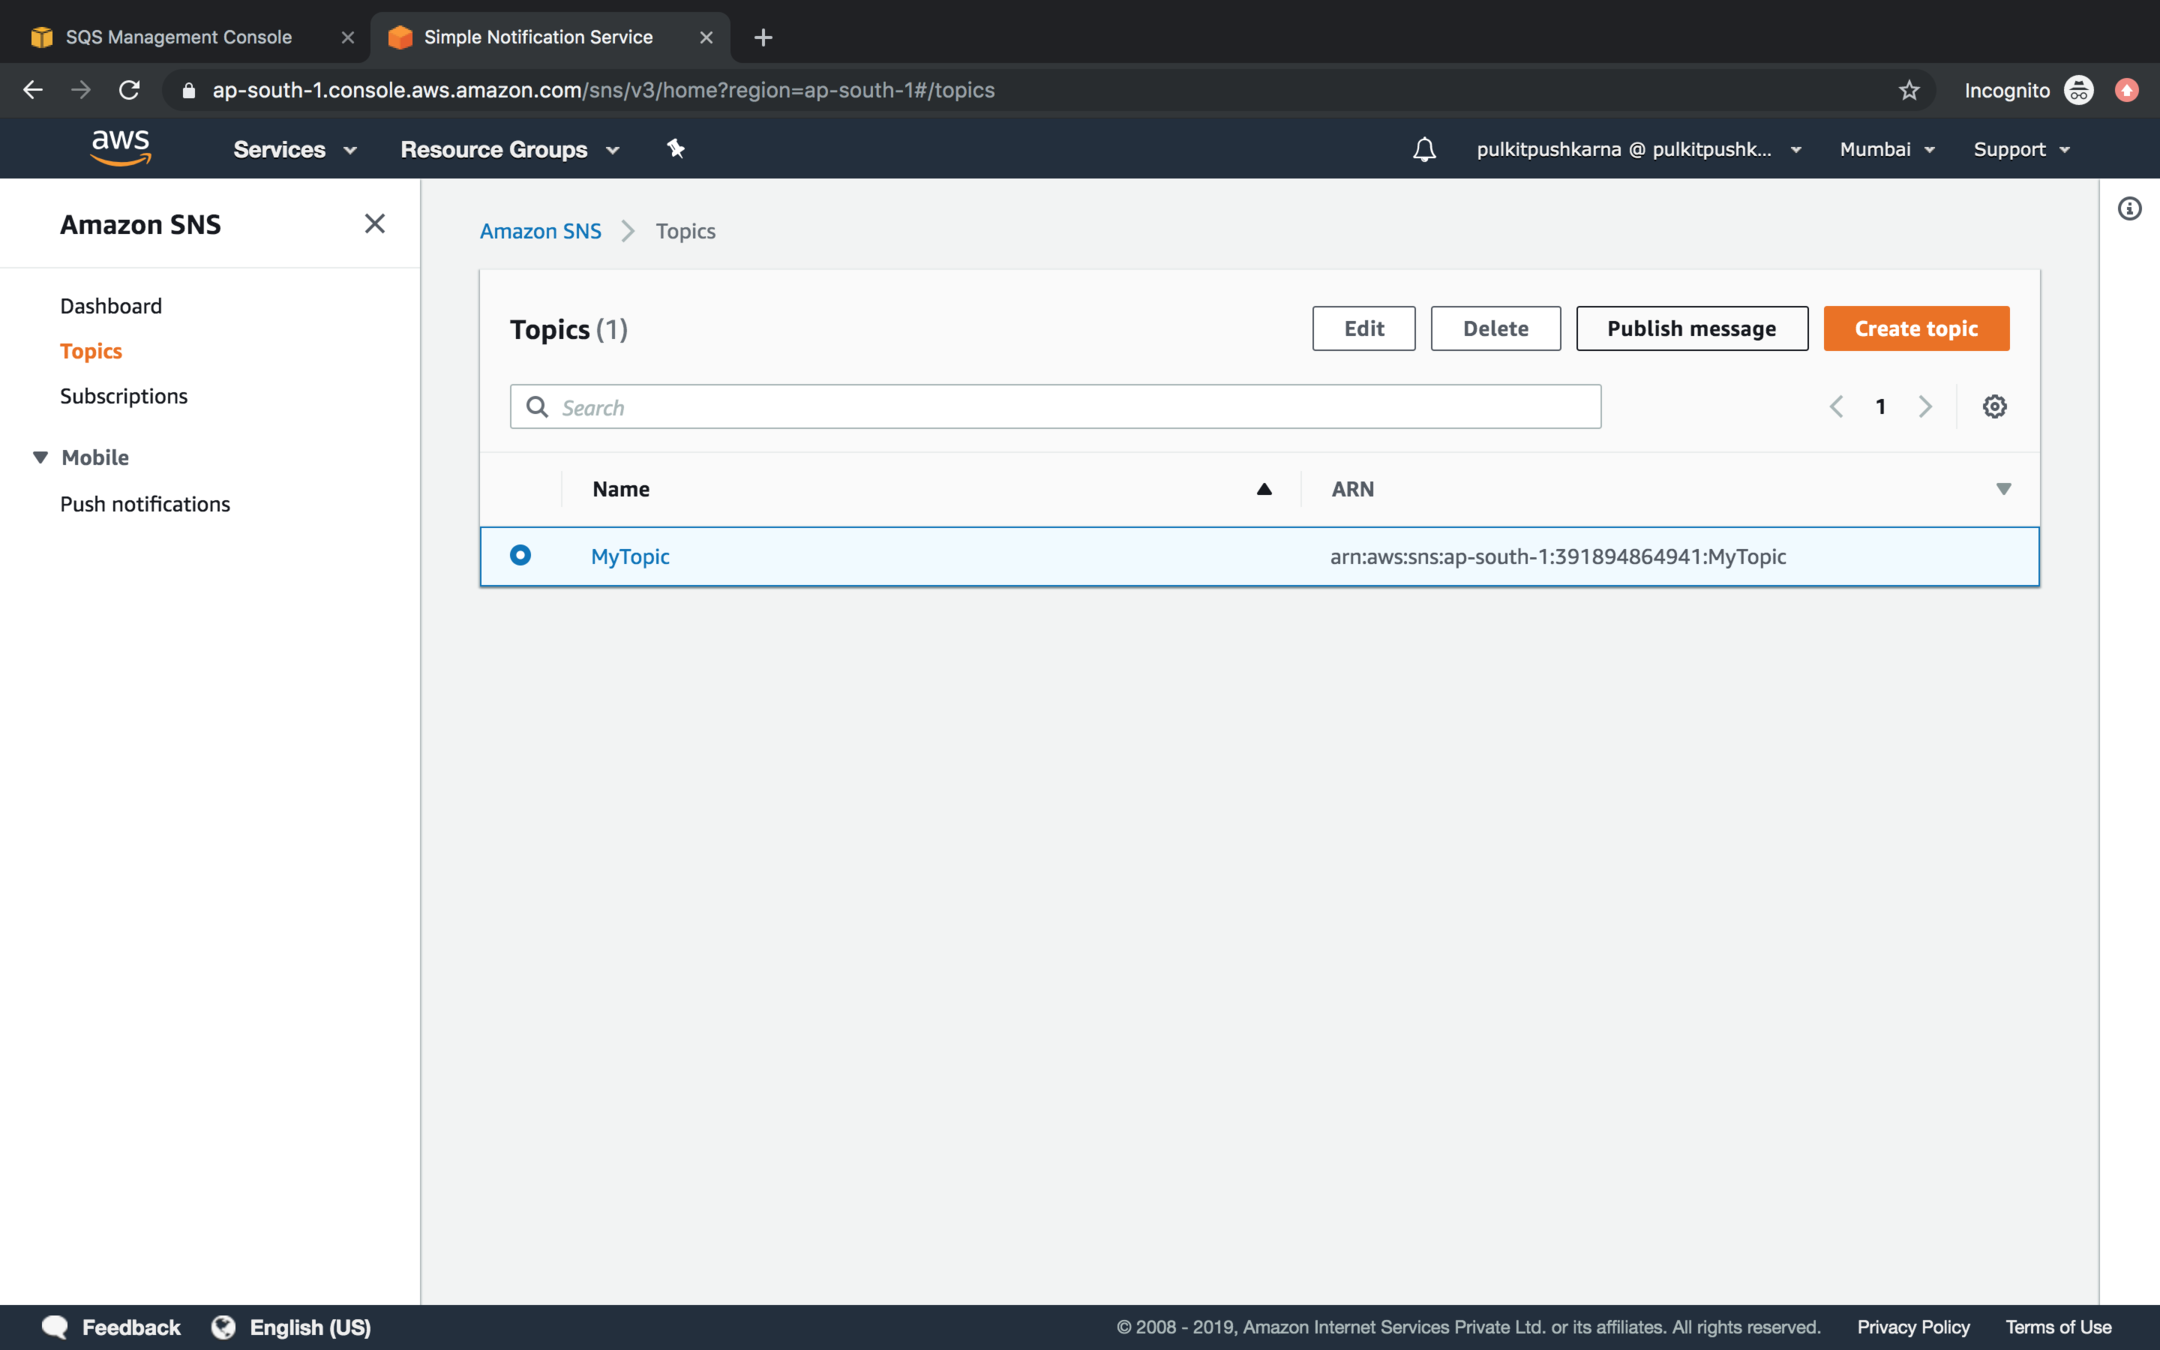
Go to the Amazon SNS Topic section, Select the topic and click on publish message
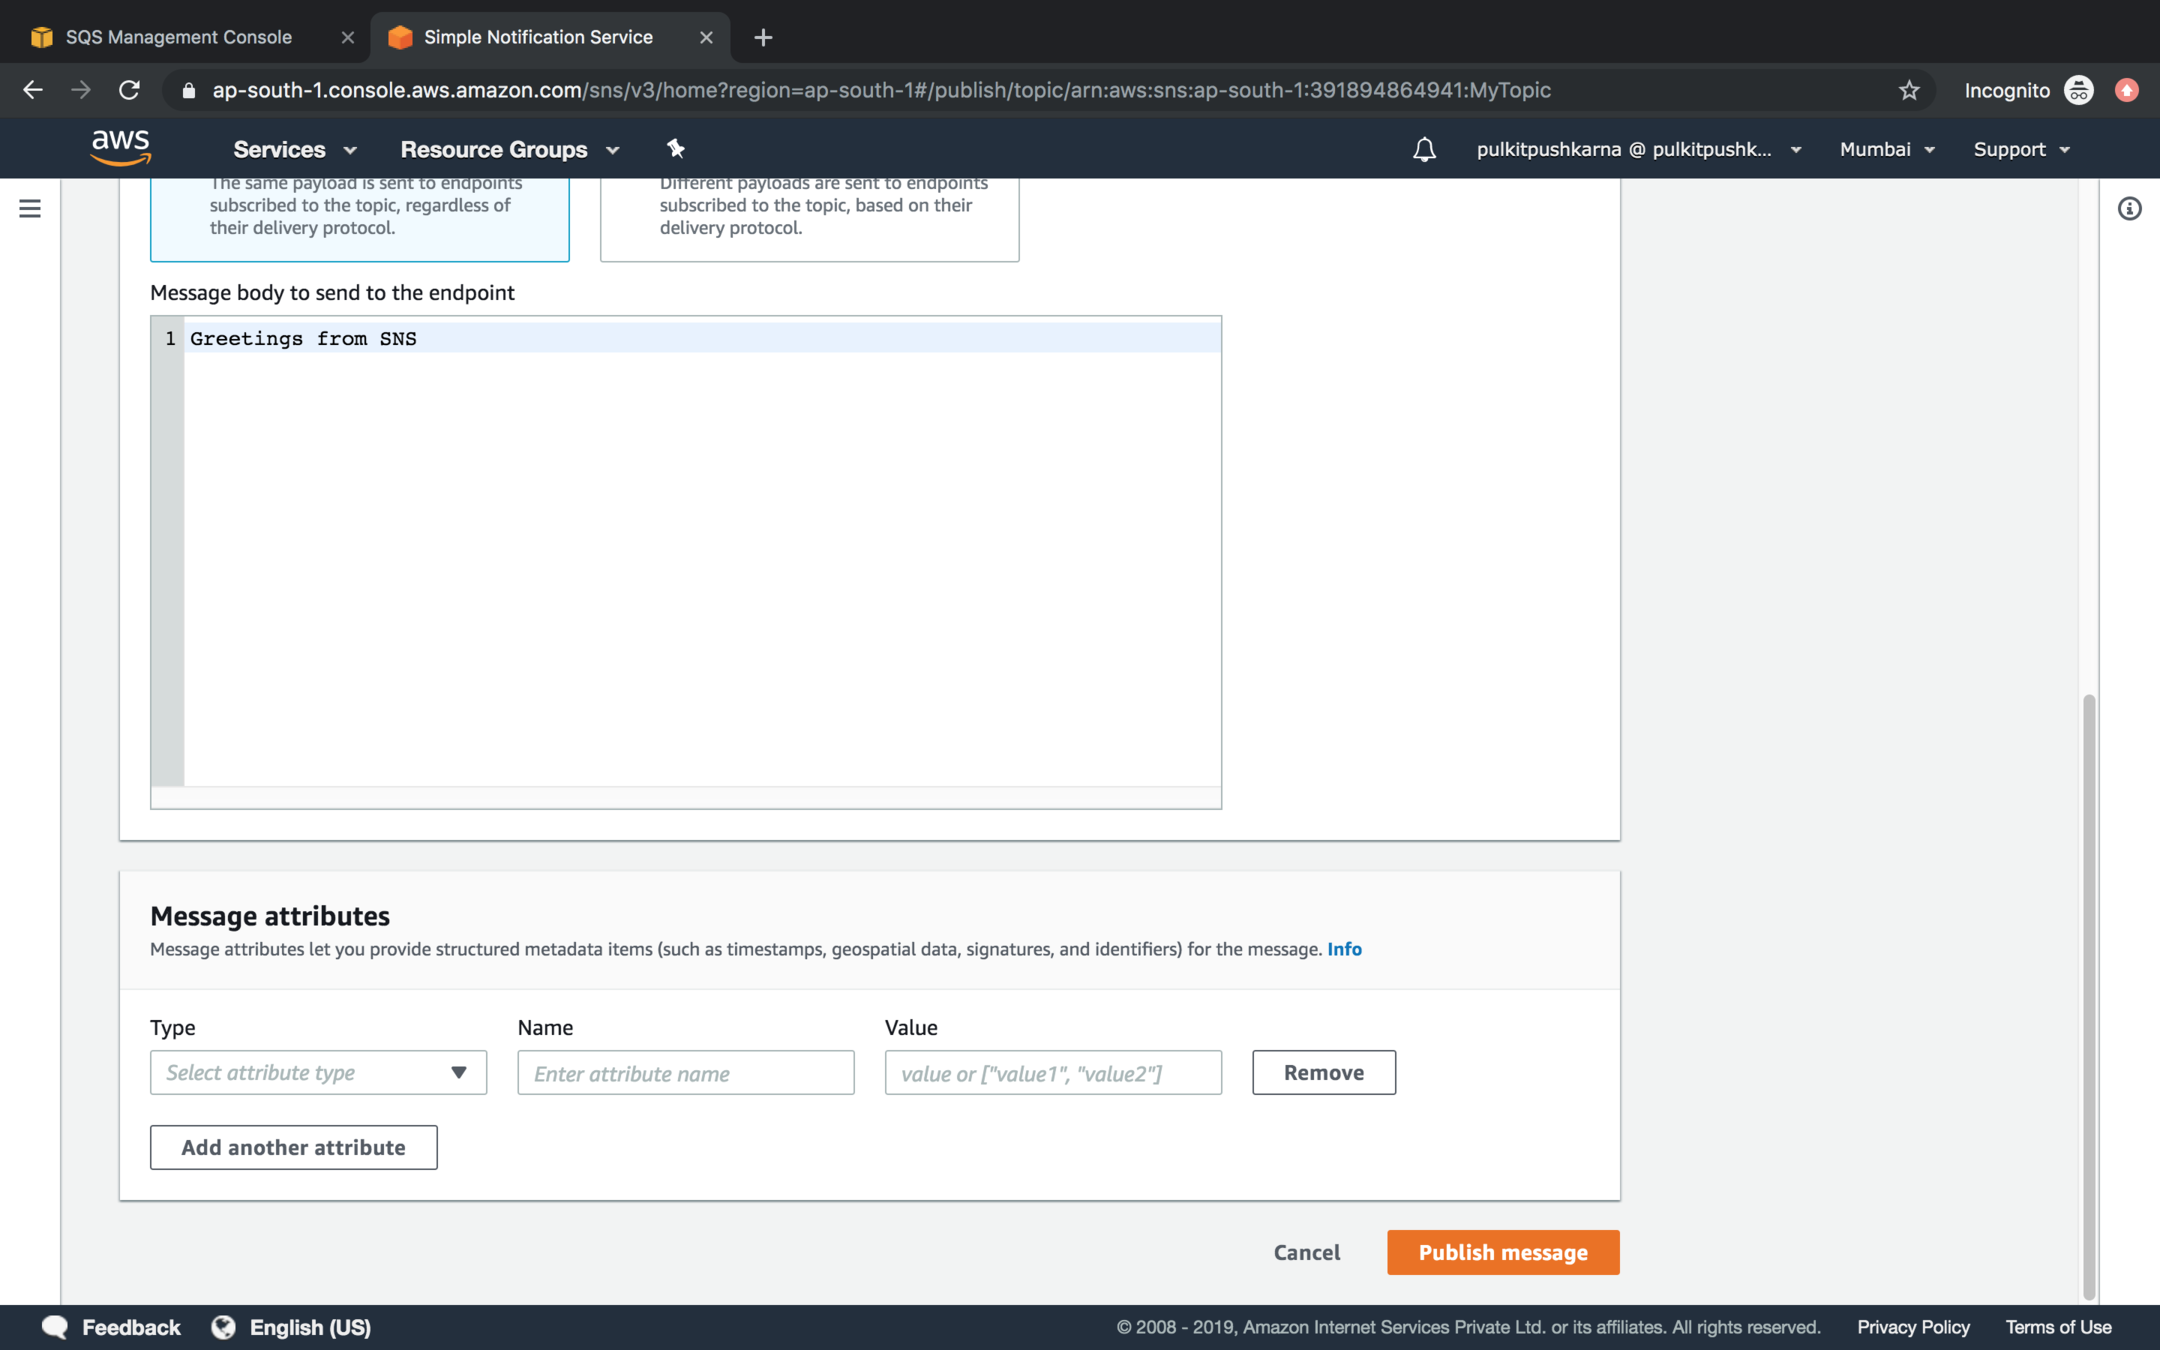
Enter the message in the message body section and click on Publish Message
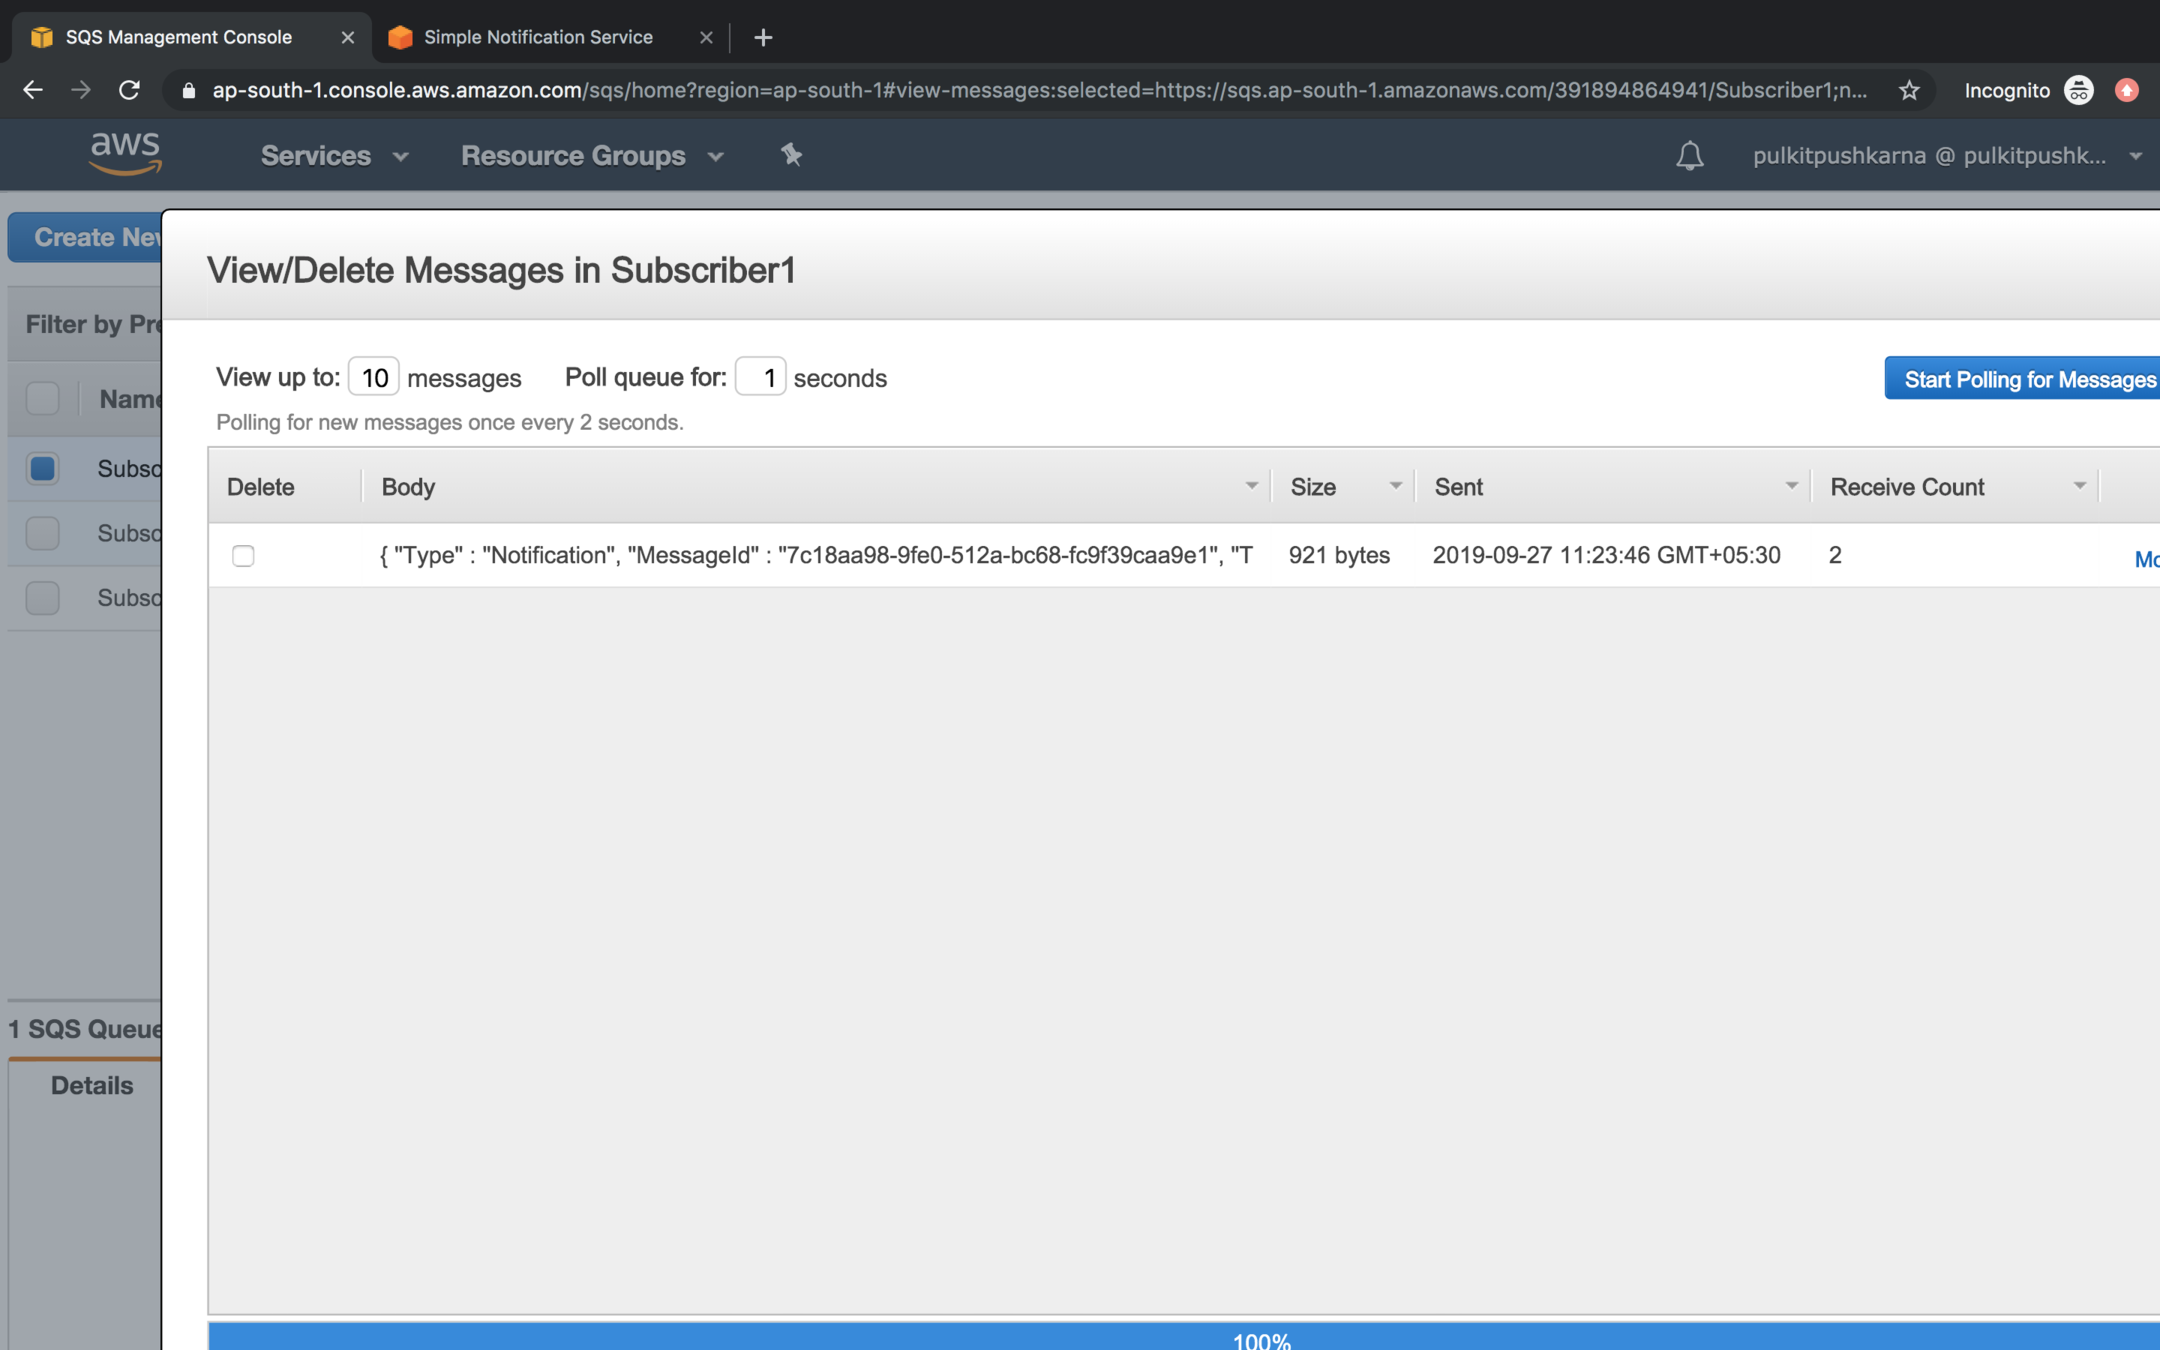
You will see that the message published by SNS is visible in all the queue which have subscribed to the topic
Amazon SNS using Java
Creating Amazon SNS Client
public static AmazonSNS getAmazonSNSClient(){
        return AmazonSNSClientBuilder
                .standard()
                .withRegion(Regions.AP_SOUTH_1)
                .withCredentials(new AWSStaticCredentialsProvider(getCloudCredentials()))
                .build();
Create SNS Topic
static void createAmazonSNSTopic() {
        CreateTopicRequest createTopicRequest = new CreateTopicRequest(SNSTopicName);
        CreateTopicResult createTopicResult = amazonSNS.createTopic(createTopicRequest);
        System.out.println(createTopicResult.getTopicArn());
    }
List Topics
static void listTopics() {
        amazonSNS.listTopics().getTopics().forEach(System.out::println);
    }
Delete Topics
static void deleteTopic() {
        DeleteTopicRequest deleteTopicRequest = new DeleteTopicRequest(topicArn);
        amazonSNS.deleteTopic(topicArn);
    }
Create Subscription
    static void createSubscription() {
        SubscribeRequest subscribeRequest = new SubscribeRequest(topicArn,
                "sqs",
                "arn:aws:sqs:ap-south-1:391894864941:Subscriber1");
        System.out.println(amazonSNS.subscribe(subscribeRequest));
    }
Publish Message
static void publishMessage() {
        PublishRequest publishRequest = new PublishRequest(topicArn,"Hello to All Subscribers");
        System.out.println(amazonSNS.publish(publishRequest));
    }
Exercise 4
- Create an SNS topic.
- Create 3 queues and Subscribe them to the topic created above.
- Push the message from SNS and check weather they are reflected in the queues who have subscribed to the topic.
- Peform the above operation using Java SDK.

AWS for Java Developers Part 3
By Pulkit Pushkarna
AWS for Java Developers Part 3
- 1,487


