Kubernetes for java Developers part-2
Cross cutting of a Microservices Architecture
- Communication Configuration
- Security
- Retry
- Metric
- Tracing
All the cross cutting concerns which we need to add in the each microservices requires lot of time and effort which adds complexity to the services
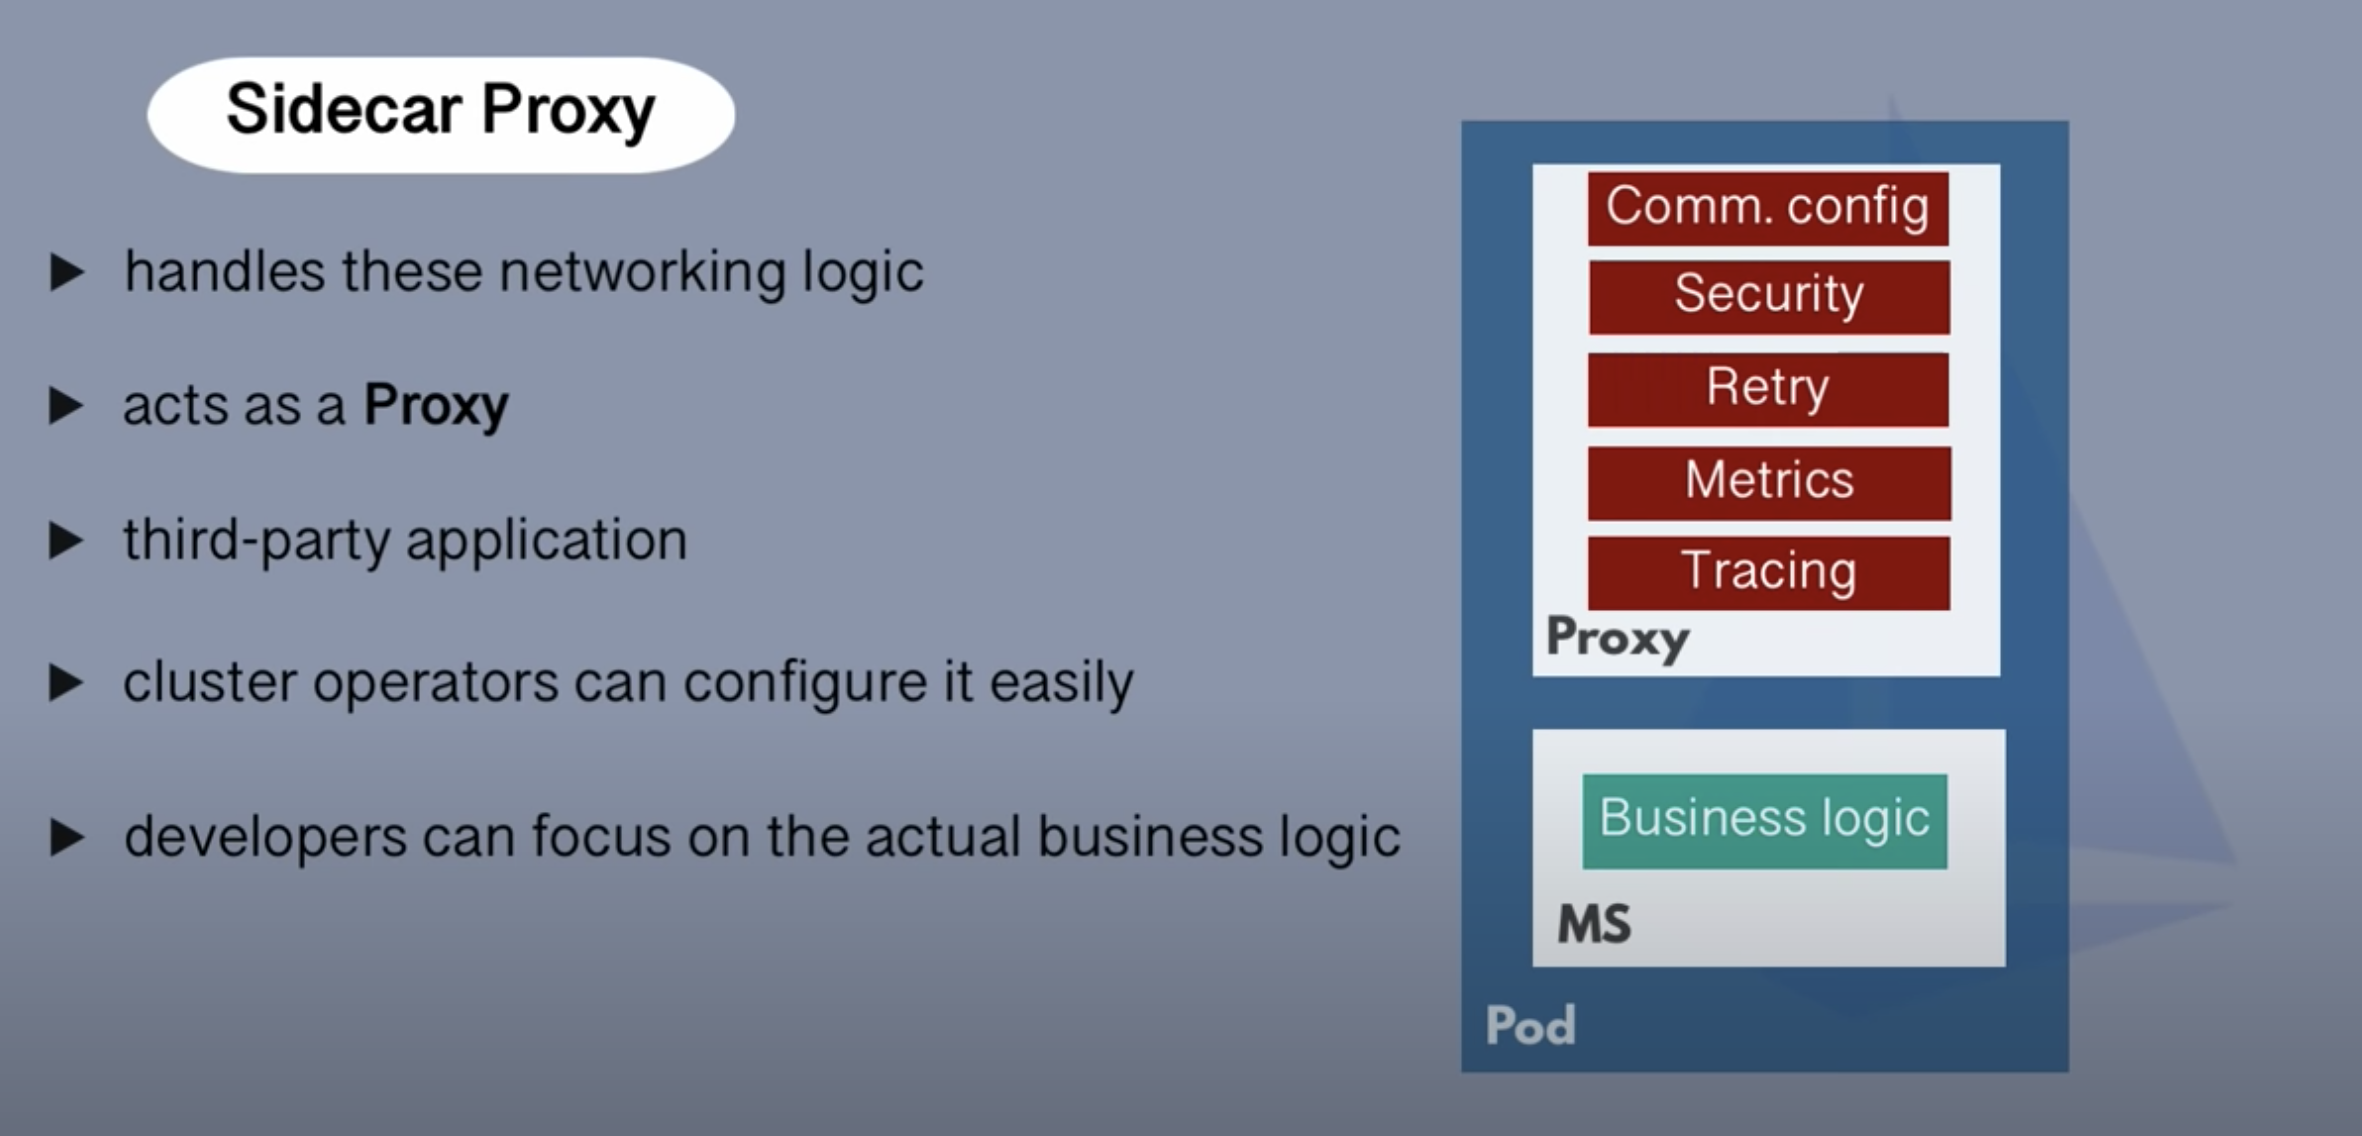
Solution : Service Mesh with SideCar pattern
- We can place all not business logic out of Business logic and place it in a sidecar application
- Acts as a proxy
- Third party application
- Cluster operator can configure it easily
- Developers can focus on the actual business logic
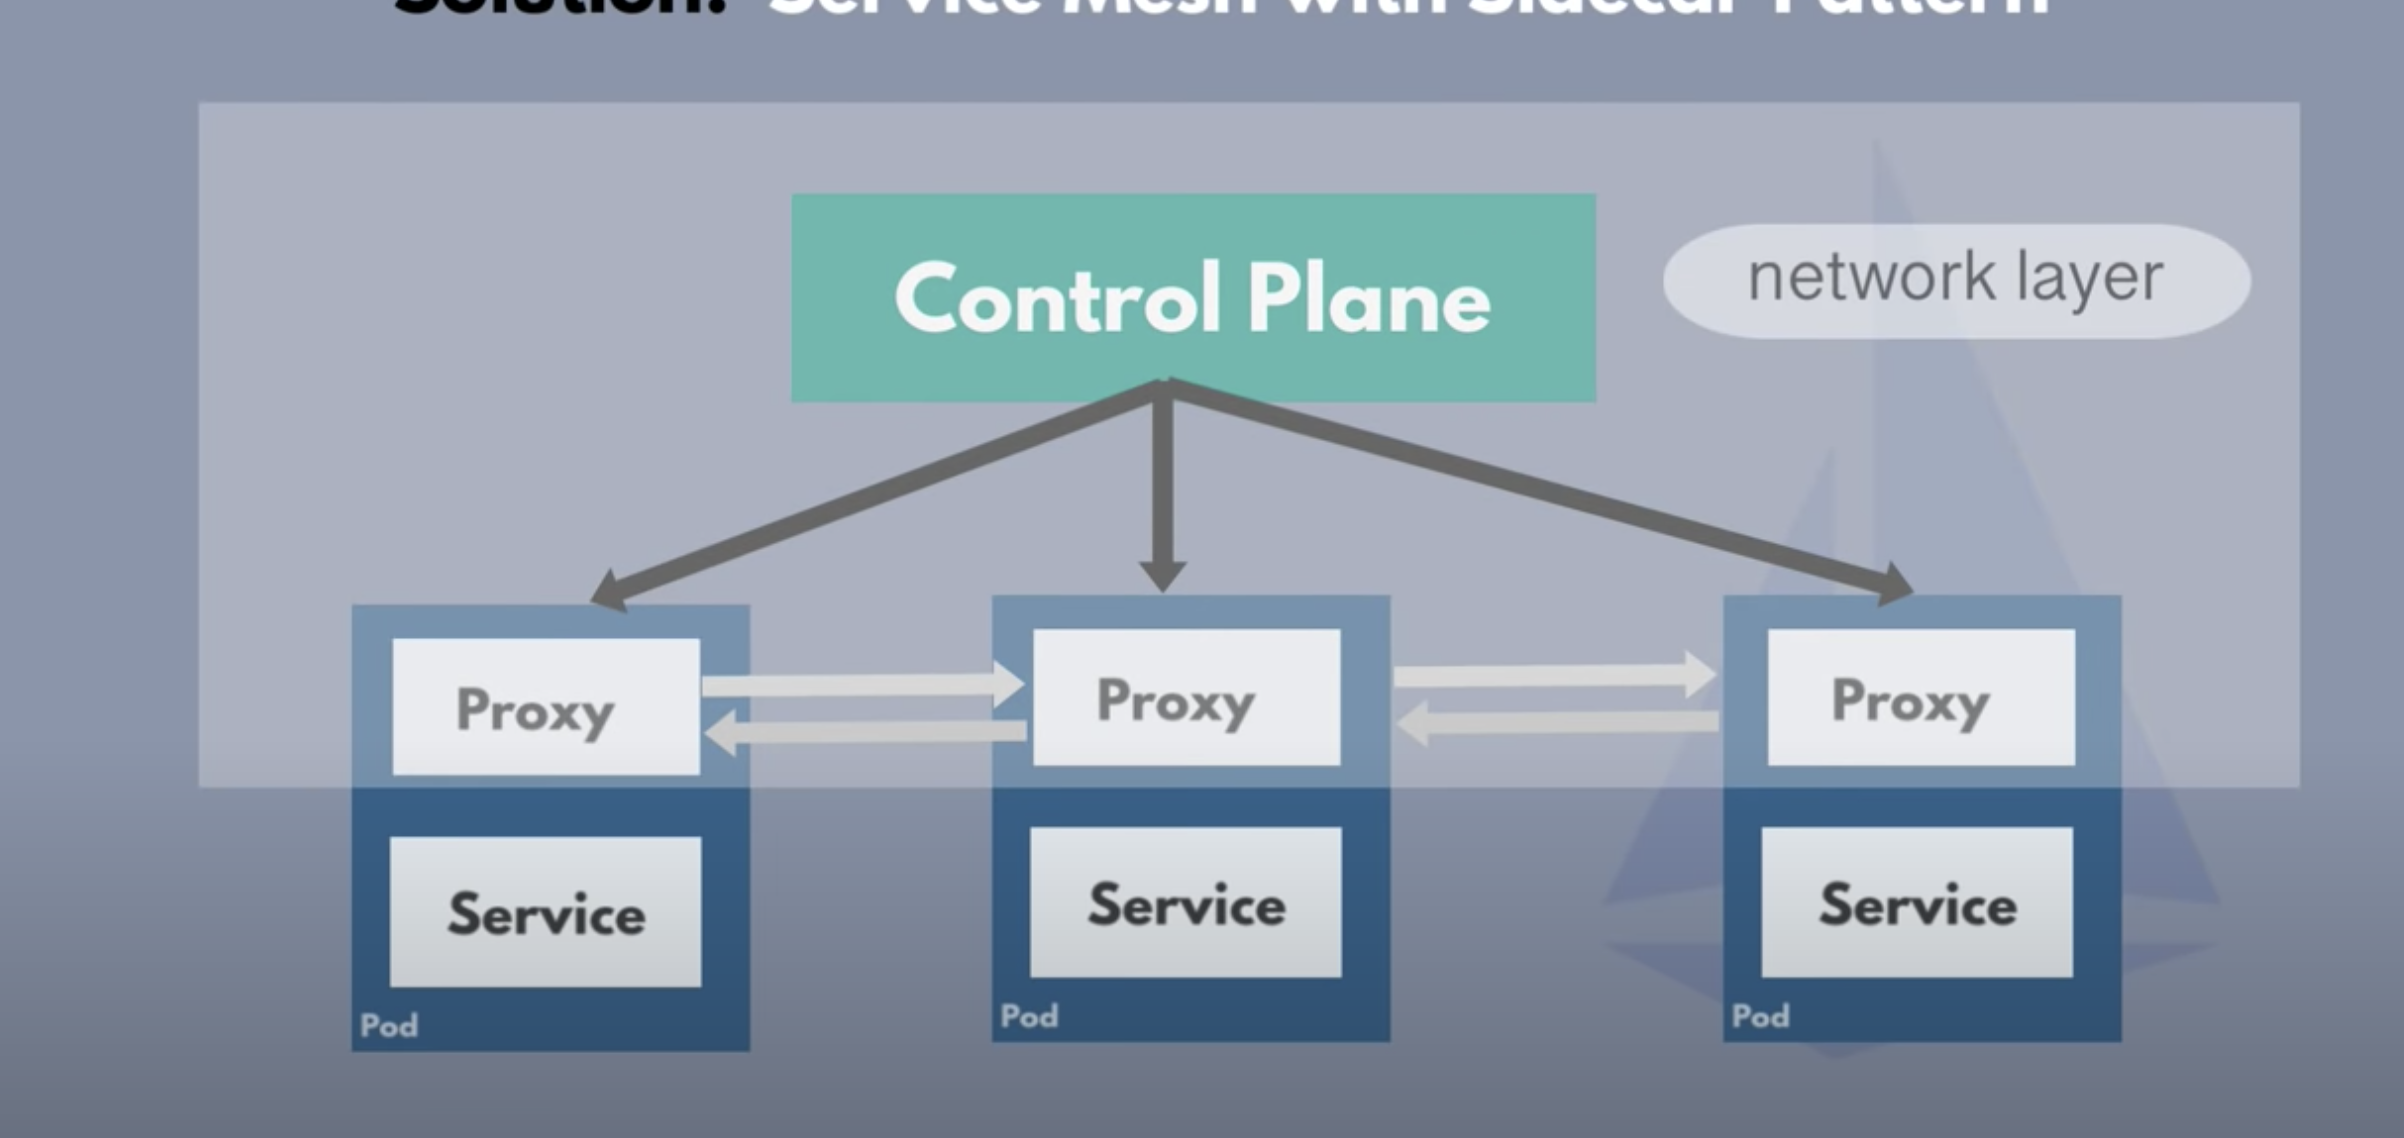
- Service Mesh has a control plane which injects the side car proxy in each microservice
- Istio is the implementation of Service Mesh
Istio and Service Mesh
- Istio is Service Mesh
- Service Mesh manages communication between microservices
Create cluster on EKS
eksctl create cluster --name my-kube-cluster --node-type t2.medium --nodes 2 --nodes-min 2 --nodes-max 3Download istio
curl -L https://istio.io/downloadIstio | sh -Add istio client to your path
export PATH=$PWD/bin:$PATHinstall demo configuration file for istio client
istioctl install --set profile=demo -yGet details of Ingressgateway
kubectl get svc istio-ingressgateway -n istio-systemSet the ingress IP and ports:
export INGRESS_HOST=$(kubectl -n istio-system get service istio-ingressgateway -o jsonpath='{.status.loadBalancer.ingress[0].ip}')
export INGRESS_PORT=$(kubectl -n istio-system get service istio-ingressgateway -o jsonpath='{.spec.ports[?(@.name=="http2")].port}')
export SECURE_INGRESS_PORT=$(kubectl -n istio-system get service istio-ingressgateway -o jsonpath='{.spec.ports[?(@.name=="https")].port}')
Check the set variable
echo $SECURE_INGRESS_PORT
443
echo $INGRESS_HOST

echo $INGRESS_PORT
80
Set ingress host
% kubectl get svc istio-ingressgateway -n istio-system
NAME                   TYPE           CLUSTER-IP       EXTERNAL-IP                                                              PORT(S)                                                                      AGE
istio-ingressgateway   LoadBalancer   10.100.119.196   a2ad7951e826a42b7a54bfe2c998ca53-852284782.us-west-2.elb.amazonaws.com   15021:32206/TCP,80:30954/TCP,443:30130/TCP,31400:30349/TCP,15443:31354/TCP   9m50s
% export INGRESS_HOST=a2ad7951e826a42b7a54bfe2c998ca53-852284782.us-west-2.elb.amazonaws.com
% export GATEWAY_URL=$INGRESS_HOST:$INGRESS_PORT
% echo $GATEWAY_URL
a2ad7951e826a42b7a54bfe2c998ca53-852284782.us-west-2.elb.amazonaws.com:80
Clone the project
git@github.com:pulkitpushkarna/kubernetes-spring-boot.gitCheckout to istio-v1-project-image
git checkout istio-v1-project-imageDeploy pods
kubectl create -f helloworld-deployment.yamlhelloworld-deployment.yaml
apiVersion: apps/v1
kind: Deployment
metadata:
  labels:
    app: hello-world-rest-api
  name: hello-world-rest-api
  namespace: default
spec:
  replicas: 1
  selector:
    matchLabels:
      app: hello-world-rest-api
  template:
    metadata:
      labels:
        app: hello-world-rest-api
    spec:
      containers:
        - image: pulkitpushkarna/kubernetes-with-spring-boot:v1
          imagePullPolicy: IfNotPresent
          name: hello-world-rest-api
          ports:
            - containerPort: 8080
Get pods
kubectl get podYou will observe that one container is there in the pod
Delete the deployment
kubectl delete -f helloworld-deployment.yamlAdd a namespace label to instruct Istio to automatically inject Envoy sidecar proxies when you deploy your application
kubectl label namespace default istio-injection=enabledNow execute the deployment file
kubectl create -f helloworld-deployment.yamlGet pods
kubectl get podsYou will observe that there are 2 containers in the pod. One is istio proxy and other one is app container
Execute service file
kubectl create -f helloworld-service.yamlapiVersion: v1
kind: Service
metadata:
labels:
app: hello-world-rest-api
name: hello-world-rest-api
namespace: default
spec:
#type: LoadBalancer
ports:
- port: 8080
name: http
selector:
app: hello-world-rest-apihelloworld-service.yaml
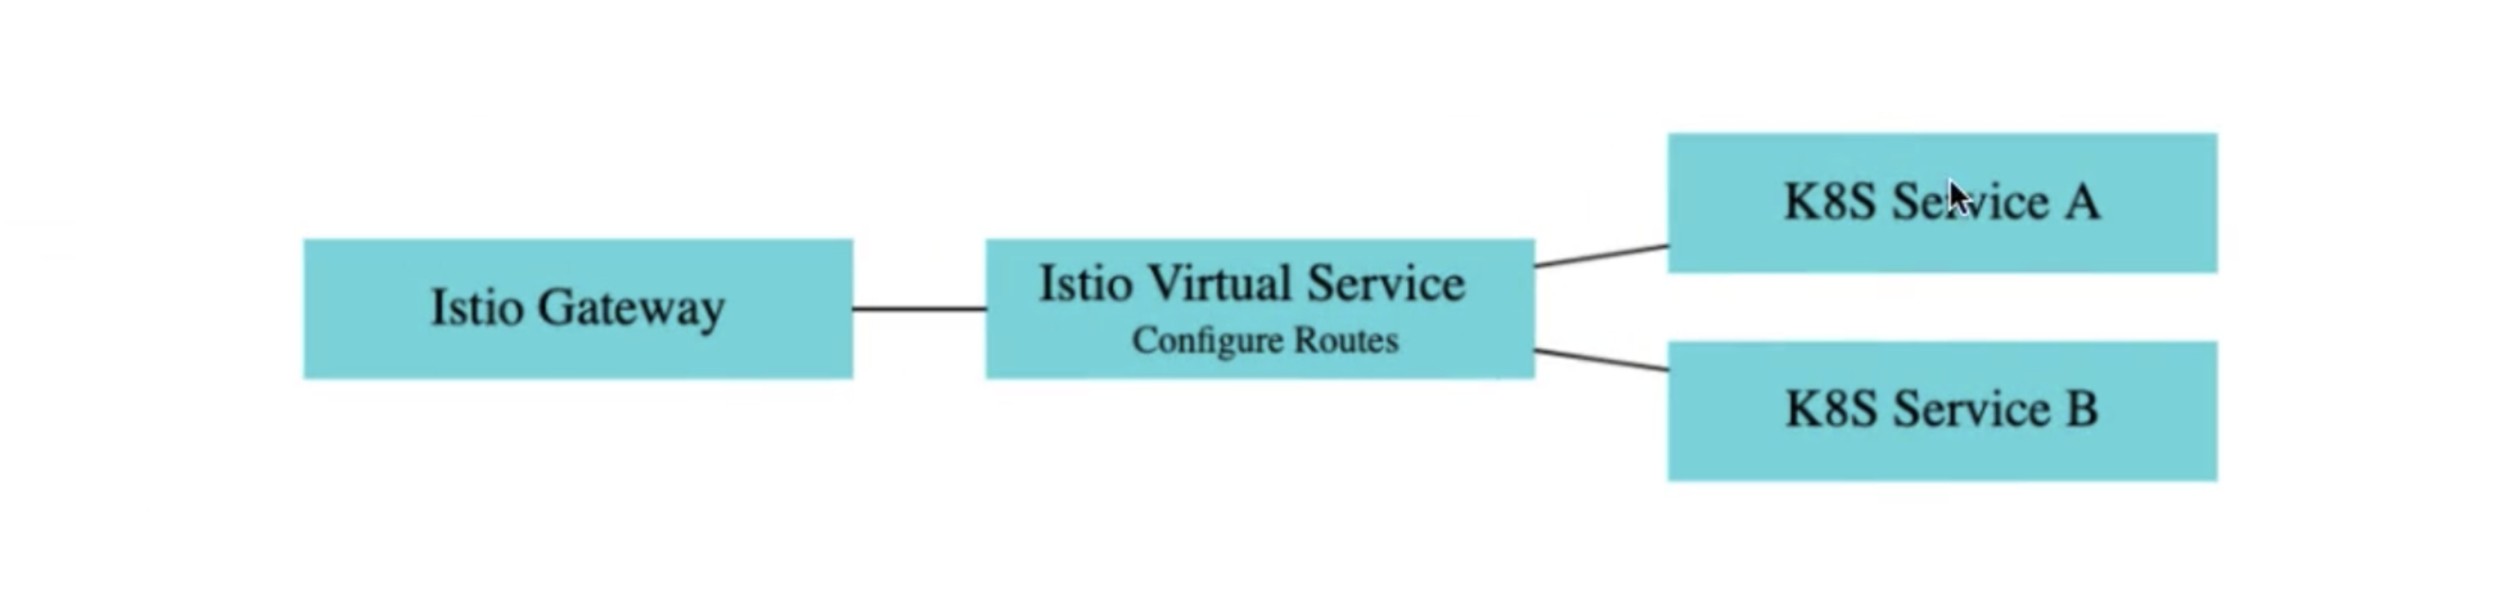
Execute the gateway file
kubectl apply -f creating-http-gateway.yamlcreating-http-gateway.yaml
apiVersion: networking.istio.io/v1alpha3
kind: Gateway
metadata:
  name: http-gateway
spec:
  selector:
    istio: ingressgateway
  servers:
    - port:
        number: 80
        name: http
        protocol: HTTP
      hosts:
        - "*"
Execute the virtual Service file
kubectl apply -f creating-virtualservice-external.yamlcreating-virtualservice-external.yaml
apiVersion: networking.istio.io/v1alpha3
kind: VirtualService
metadata:
  name: helloworld-virtual-services
spec:
  hosts:
    - "*"
  gateways:
    - http-gateway                      # 1
  http:
    - match:
        - uri:
            prefix: /
      route:
        - destination:
            host: hello-world-rest-api             # 2
            port:
              number: 8080
Validate your network
istioctl analyzeNow access deployed application with gateway
pulkitpushkarna@pulkit-pushkarna kubenetes-spring-boot % echo $GATEWAY_URL
a2ad7951e826a42b7a54bfe2c998ca53-852284782.us-west-2.elb.amazonaws.com:80
Enter generated Url on browser now you should be able to access our deployed application
Checkout to branch
git checkout istion-v2-project-imageIn the helloworld-deployment.yaml of thids branch replica is set to 2
kubectl delete -f helloworld-deployment.yamlDelete the existing deployment
Execute the deployment file
kubectl apply -f helloworld-deployment.yaml If you try to access the your pods by gateway url you will observe that load balancing is takin place between 2 deployed apps
Exercise 1
- Set up instio on the your kubernetes cluster
- Make the configurations to access external Ip of load balancer via istioingressgateway.
- Deploy the hello world deployment, service, gateway and virtual service.
- Try to access app endpoint from ELB load balancer external IP
Canary Deployment
- A canary deployment is a deployment strategy that releases an application or service incrementally to a subset of users.
- All infrastructure in a target environment is updated in small phases (e.g: 2%, 25%, 75%, 100%)
- A canary release is the lowest risk-prone, compared to all other deployment strategies, because of this control.

execute deployment file for canary deployment
kubectl apply -f helloworld-v2-deployment.yaml helloworld-v2-deployment.yaml
apiVersion: v1
kind: Service
metadata:
  name: hello-world-rest-api
  labels:
    app: hello-world-rest-api
spec:
  ports:
    - port: 8080
      name: http
  selector:
    app: hello-world-rest-api
---
apiVersion: apps/v1
kind: Deployment
metadata:
  name: hello-world-rest-api-v1
  labels:
    version: v1
spec:
  replicas: 1
  selector:
    matchLabels:
      app: hello-world-rest-api
      version: v1
  template:
    metadata:
      labels:
        app: hello-world-rest-api
        version: v1
    spec:
      containers:
        - name: hello-world-rest-api
          image: pulkitpushkarna/kubernetes-with-spring-boot:v1
          imagePullPolicy: IfNotPresent #Always
          ports:
            - containerPort: 8080
---
apiVersion: apps/v1
kind: Deployment
metadata:
  name: hello-world-rest-api-v2
  labels:
    version: v2
spec:
  replicas: 1
  selector:
    matchLabels:
      app: hello-world-rest-api
      version: v2
  template:
    metadata:
      labels:
        app: hello-world-rest-api
        version: v2
    spec:
      containers:
        - name: hello-world-rest-api
          image: pulkitpushkarna/kubernetes-with-spring-boot:v2
          imagePullPolicy: IfNotPresent #Always
          ports:
            - containerPort: 8080
Deploy virtual service for canary deployment
apiVersion: networking.istio.io/v1alpha3
kind: VirtualService
metadata:
  name: helloworld-virtual-services
spec:
  hosts:
    - "*"
  gateways:
    - http-gateway
  http:
    - match:
        - uri:
            exact: /
      route:
        - destination:
            host: hello-world-rest-api
            subset: v1
          weight: 10
        - destination:
            host: hello-world-rest-api
            subset: v2
          weight: 90
---
apiVersion: networking.istio.io/v1alpha3
kind: DestinationRule
metadata:
  name: hello-world-rest-api
spec:
  host: hello-world-rest-api
  subsets:
    - name: v1
      labels:
        version: v1
    - name: v2
      labels:
        version: v2
kubectl apply -f hello-worldcanary.yamlIf we try to access the loadbalancer we will observe that 90 % traffic goes to v2 and 10 % goes to v1
apiVersion: apps/v1
kind: Deployment
metadata:
  labels:
    app: student-rest-api
  name: student-rest-api
  namespace: default
spec:
  replicas: 1
  selector:
    matchLabels:
      app: student-rest-api
  template:
    metadata:
      labels:
        app: student-rest-api
    spec:
      containers:
        - image: pulkitpushkarna/student-microservice
          imagePullPolicy: IfNotPresent
          name: student-rest-api
          ports:
            - containerPort: 8080
kubectl apply -f student-deployment.yamlSetting up student microservice
apiVersion: v1
kind: Service
metadata:
  labels:
    app: student-rest-api
  name: student-rest-api
  namespace: default
spec:
  #type: LoadBalancer
  ports:
    - port: 8080
      name: http
  selector:
    app: student-rest-api
kubectl apply -f student-service.yamlapiVersion: networking.istio.io/v1alpha3
kind: Gateway
metadata:
name: http-gateway-student
spec:
selector:
istio: ingressgateway
servers:
- port:
number: 80
name: http
protocol: HTTP
hosts:
- "*"kubectl apply -f student-gateway.yamlapiVersion: networking.istio.io/v1alpha3
kind: VirtualService
metadata:
name: helloworld-virtual-services
spec:
hosts:
- "*"
gateways:
- http-gateway-student
http:
- match:
- uri:
exact: /students
route:
- destination:
host: student-rest-api
port:
number: 8080
kubectl apply -f student-virtualsewrvice.yamlAfter executing all student related yaml files you will observe that you can access all students via /students endpoint and Single student via /students/id endpoint
Load-balancer-external-ip/students
Load-balancer-external-ip/students/1
Now inside the student-virtualsewrvice.yaml change keyword prefix to exact you will obeserve that you will only be able to access following API
Load-balancer-external-ip/studentsDifference between exact and Prefix
Data visualisation by Kiali
- Kiali is a management console for an Istio-based service mesh
- It provides dashboards, observability, and lets you operate your mesh with robust configuration and validation capabilities.
- It shows the structure of your service mesh by inferring traffic topology and displays the health of your mesh.
Set up kiali
kubectl get svc -n istio-systemCheck for services in istio-system namespace
Go to /istio-1.11.1/samples/addons folder
Run following command to install kiali
kubectl apply -f kiali.yamlPort forwarding for kiali
kubectl port-forward svc/kiali -n istio-system 20001Execute bookinfo.yaml
kubectl apply -f samples/bookinfo/platform/kube/bookinfo.yamlExecute virtual service for hello-world
kubectl apply -f creating-virtualservice-external.yamlExecute following command to create traffic
watch curl http://aeee8b946ee12489a8f0a36f215a0dfe-153539747.us-west-2.elb.amazonaws.com/Grafana
- Grafana is a multiple platform open source analytics and interactive visualization web application
- It provides charts, graphs, and alerts for the web when connected to supported data sources
- As a visualization tool, Grafana is a popular component in monitoring stacks.
- It can be use to monitor kubernetes cluster.
Setting up prometheus and grafana
kubectl apply -f grafana.yaml
kubectl apply -f prometheus.yaml
Go to /istio-1.11.1/samples/addons folder and execute the command below
Port Forwarding for grafana
kubectl port-forward svc/grafana -n istio-system 3000Some handy commands to interact with clusters
kubectl config viewView cluster configruration
Cluster info
kubectl cluster-infoGet list of clusters
kubectl config get-contextskubectl config current-contextGet Current cluster
kubectl config use-context <context-name>Set context
eksctl delete cluster --name my-kube-clusterDelete cluster
Exercise 2
- Perform Canary deployment for hello-world application.
- Deploy student microservice.
- Test difference between exact and prefix keywords in virtual service for the student microservice.
- Use kiali for data visualisation.
- Use grafana and prometheus for monitoring.
Helm
- helm helps you manage Kubernetes applications
- Helm Charts help you define, install, and upgrade even the most complex Kubernetes application.
-
Following are the features of Helm
- Manage Complexity
- Easy updates
- Simple sharing
- Rollbacks
Instructions to install helm
https://helm.sh/docs/intro/install/Start Minikube
minikube start Make a dir
mkdir my-helm-appInside my-helm-app dir create a file Chart.yaml and templates folder
pulkitpushkarna@pulkit-pushkarna ~ % cd my-helm-app
pulkitpushkarna@pulkit-pushkarna my-helm-app % touch Chart.yaml
pulkitpushkarna@pulkit-pushkarna my-helm-app % mkdir templates
Enter the following configuration in Chart.yaml file
apiVersion: v1
name: my-helm-app # Name should be same as name of the parent folder
version: 0.1.0
appVersion: v1
description: This is a demo chart
In the templates folder place copy the webserver.yaml file from kubernetes-spring-boot project
cp /<path-to-project>/kubenetes-spring-boot/webserver.yaml .Go to the previous folder and run the install command
pulkitpushkarna@pulkit-pushkarna templates % cd ..
pulkitpushkarna@pulkit-pushkarna my-helm-app % helm install my-help-app .
Check your cluster
kubectl get all Run helm list command
pulkitpushkarna@pulkit-pushkarna my-helm-app % helm list
NAME       	NAMESPACE	REVISION	UPDATED                             	STATUS  	CHART            	APP VERSION
my-help-app	default  	1       	2021-08-27 18:22:24.110505 +0530 IST	deployed	my-helm-app-0.1.0	v1
Copy webserver-service.yaml in templates directory
pulkitpushkarna@pulkit-pushkarna my-helm-app % cd templates
pulkitpushkarna@pulkit-pushkarna templates % cp ~/projects/kubenetes-spring-boot/webserver-service.yaml .
pulkitpushkarna@pulkit-pushkarna templates % ls
webserver-service.yaml	webserver.yaml
We have added webserver-service so we will update the version of the chart
pulkitpushkarna@pulkit-pushkarna templates % cd ..
pulkitpushkarna@pulkit-pushkarna my-helm-app % vim Chart.yaml
apiVersion: v1
name: my-helm-app # Name should be same as name of the parent folder
version: 0.2.0 # version changed
appVersion: v1
description: This is a demo chartUpdate the helm chart
pulkitpushkarna@pulkit-pushkarna my-helm-app % helm upgrade my-help-app .
Release "my-help-app" has been upgraded. Happy Helming!
NAME: my-help-app
LAST DEPLOYED: Fri Aug 27 18:38:06 2021
NAMESPACE: default
STATUS: deployed
REVISION: 2
TEST SUITE: None
pulkitpushkarna@pulkit-pushkarna my-helm-app % helm list
NAME       	NAMESPACE	REVISION	UPDATED                             	STATUS  	CHART            	APP VERSION
my-help-app	default  	2       	2021-08-27 18:38:06.122446 +0530 IST	deployed	my-helm-app-0.2.0	v1
Check cluster for the service which we have created
kubectl get allRun the deployed application on browser
minikube service webserver-serviceRollback to previous revision
pulkitpushkarna@pulkit-pushkarna my-helm-app % helm rollback my-help-app 1 You can check your cluster webserver-service is removed from the cluster because it was not there in the first revision
Go back to the revision 2 you will notice that service is back
helm rollback my-help-app 2Uninstall help chart
helm uninstall my-help-appParameterized charts
create values.yaml file
pulkitpushkarna@pulkit-pushkarna my-helm-app % touch values.yaml
pulkitpushkarna@pulkit-pushkarna my-helm-app % vim values.yaml
pulkitpushkarna@pulkit-pushkarna my-helm-app % cat values.yaml
replicaCount: 1
pulkitpushkarna@pulkit-pushkarna my-helm-app % cd templates
pulkitpushkarna@pulkit-pushkarna templates % ls
webserver-service.yaml	webserver.yaml
pulkitpushkarna@pulkit-pushkarna templates % vim webserver.yaml

apiVersion: apps/v1
kind: Deployment
metadata:
  name: mywebserver
  labels:
    app: spring-boot-app
spec:
  replicas: {{ .Values.replicaCount}}
  strategy:
    type: RollingUpdate
    rollingUpdate:
      maxSurge: 1
      maxUnavailable: 1
  selector:
    matchLabels:
      app: spring-boot-app
  template:
    metadata:
      labels:
        app: spring-boot-app
    spec:
      containers:
        - name: my-spring-boot-app
          image: pulkitpushkarna/kubernetes-with-spring-boot:v1
          ports:
            - containerPort: 8080
Introduce expression for replicaCount in webserver.yaml
Change the yaml chart version
pulkitpushkarna@pulkit-pushkarna templates % cd ..
pulkitpushkarna@pulkit-pushkarna my-helm-app % vim Chart.yaml

apiVersion: v1
name: my-helm-app # Name should be same as name of the parent folder
version: 0.3.0
appVersion: v1
description: This is a demo chart
Install helm chart you will observer that only one replica is created for webserver
pulkitpushkarna@pulkit-pushkarna my-helm-app % helm install my-helm-app .
NAME: my-helm-app
LAST DEPLOYED: Fri Aug 27 19:16:20 2021
NAMESPACE: default
STATUS: deployed
REVISION: 1
TEST SUITE: None
pulkitpushkarna@pulkit-pushkarna my-helm-app % kubectl get all
Uninstall app
helm uninstall my-helm-appInstall app by providing replicaCount
helm install my-helm-app . --set replicaCount=3Change replica count without uninstalling the helm chart
helm upgrade my-helm-app . --set replicaCount=2Parametized app version
pulkitpushkarna@pulkit-pushkarna my-helm-app % helm uninstall my-helm-app
release "my-helm-app" uninstalled
pulkitpushkarna@pulkit-pushkarna my-helm-app % vim values.yaml

replicaCount: 1
myAppVersion: pulkitpushkarna/kubernetes-with-spring-boot:v1
pulkitpushkarna@pulkit-pushkarna my-helm-app % cd templates
pulkitpushkarna@pulkit-pushkarna templates % vim webserver.yaml
apiVersion: apps/v1
kind: Deployment
metadata:
name: mywebserver
labels:
app: spring-boot-app
spec:
replicas: {{ .Values.replicaCount}}
strategy:
type: RollingUpdate
rollingUpdate:
maxSurge: 1
maxUnavailable: 1
selector:
matchLabels:
app: spring-boot-app
template:
metadata:
labels:
app: spring-boot-app
spec:
containers:
- name: my-spring-boot-app
image: {{ .Values.myAppVersion}}
ports:
- containerPort: 8080pulkitpushkarna@pulkit-pushkarna my-helm-app % helm uninstall my-helm-app
release "my-helm-app" uninstalled
pulkitpushkarna@pulkit-pushkarna my-helm-app % helm install my-helm-app . --set myAppVersion=pulkitpushkarna/kubernetes-with-spring-boot:v2
NAME: my-helm-app
LAST DEPLOYED: Fri Aug 27 19:58:33 2021
NAMESPACE: default
STATUS: deployed
REVISION: 1
TEST SUITE: NoneExercise 3
- Start minikube
- Create helm chart for the deployment and webserver.yaml and webserver-service.yaml.
- Try to access deployed webservice from minkube service command.
- Parameterise replicas parameter of the yaml file webserver.yaml file in your template folder.

Kubernetes for java Developers part-2
By Pulkit Pushkarna


