Rest with Spring Part-3 (Microservices)
What is microservice ?
- It is an architectural style
- Structures an application as a collection of loosely coupled Services
- REST
- Services are well choosen deployable unit
- Cloud Enabled

How an Microservices Architecture looks like ?
Advantages of Using Microservices Architecture
- New Technology and Process Adaption
- Dynamic Scaling
- Faster Release Cycle
Challenges with Microservices
- Bonded Context
- Configuration Management
- Dynamic Scale up and Scale Down (Load Balancing)
- Visibility (Common logging and monitoring)
- Pack of cards (Fault Taulerant)
Spring Cloud
-
Spring Cloud provides tools for developers to quickly build some of the common patterns in distributed systems.
- Coordination of distributed systems leads to boiler plate patterns, and using Spring Cloud developers can quickly stand up services and applications that implement those patterns.
- They will work well in any distributed environment, including the developer's own laptop
For more details click https://projects.spring.io/spring-cloud/
Solutions in Spring Cloud for Microservices challenges
| Problems | Solution |
|---|---|
| Configuration Management | Spring cloud config server |
| Dynamic Scale Up and Down | Naming Server (Eureka) Ribbon (Client Side Load Balancing) Feign (Easier Rest Client) |
| Visibility and Monitoring | Zipkin Distributed Tracing Netflix API Gateway |
| Fault Talerance | Hystrix |
Microservices we will gonna create
| CurrencyCalculationService |
|---|
| CurrencyExchangeService |
|---|
| LimitsService |
|---|
Spring Cloud Config Server
| CurrencyCalculationService |
|---|
| CurrencyExchangeService |
|---|
| LimitsService |
|---|
| Spring Cloud Config Server |
|---|
| Git |
|---|
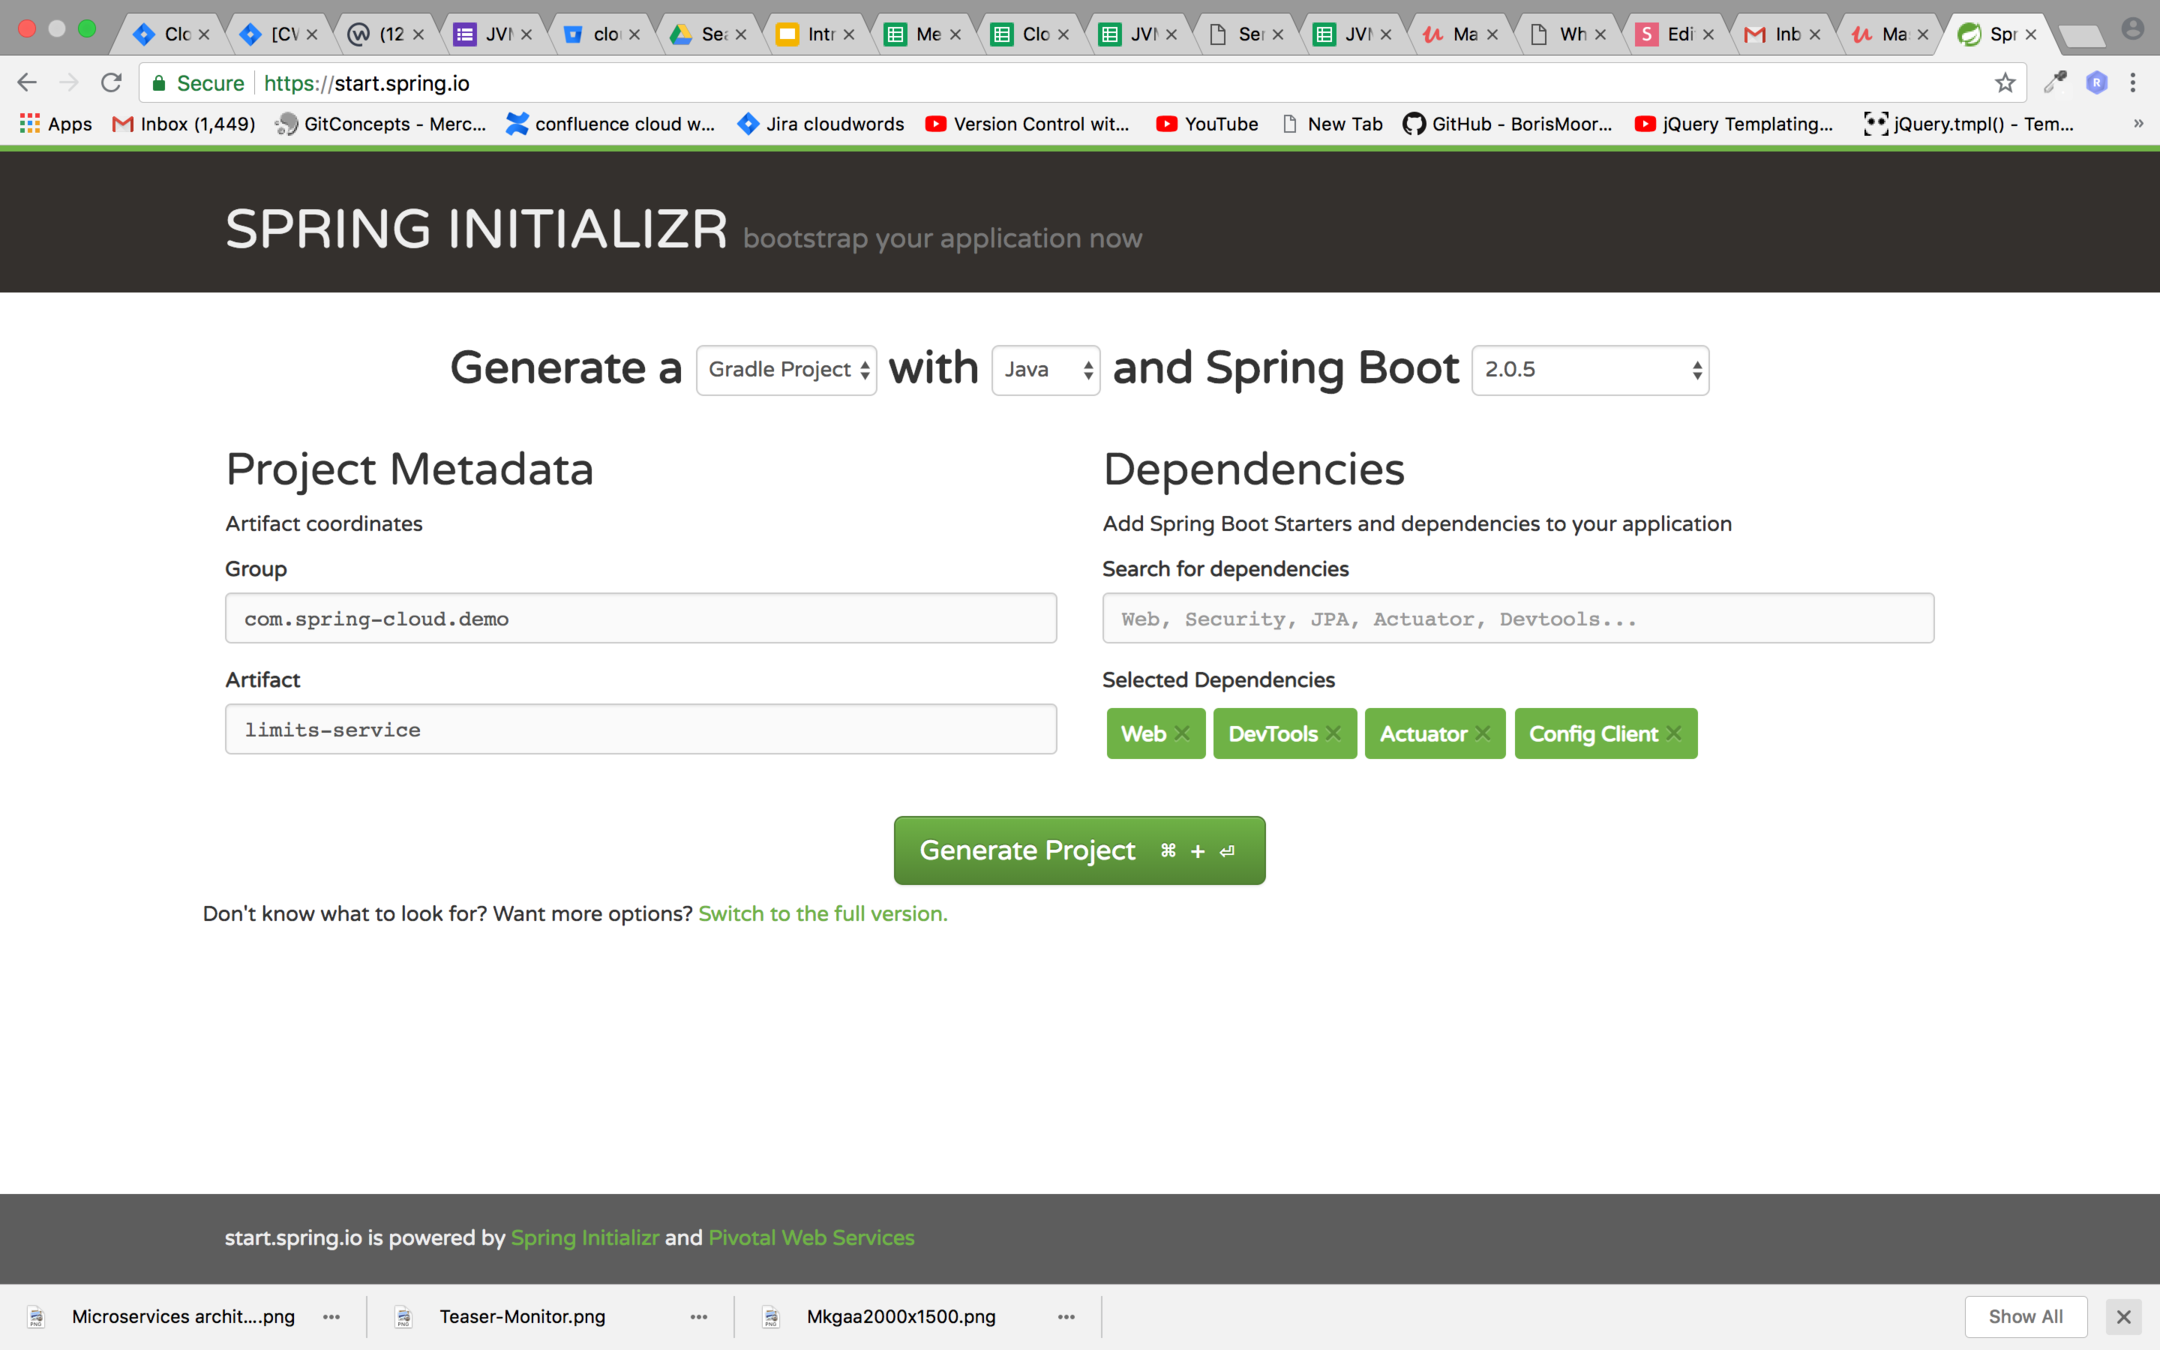
Setting up limits service
Step 1: Go to https://start.spring.io/ and generate a spring boot project with gradle with the below mention dependencies
Step 2:
- Download the project from start.spring.io and extract the zip
- Create an empty project in intellij Idea and import limits-service gradle project as module
Step 3:
Introduce following properties in application.properties
spring.application.name=limits-service

limits-service.minimum=9
limits-service.maximum=999
Step 4:
Create the following files in your project
- Configuration
- LimitsConfigurationController
- LimitsConfiguration
Note : code for the files above is in the further slides
package com.springcloud.demo.limitsservice;

public class LimitsConfiguration {
    private int maximum;
    private int minimum;

    public int getMaximum() {
        return maximum;
    }

    public void setMaximum(int maximum) {
        this.maximum = maximum;
    }

    public int getMinimum() {
        return minimum;
    }

    public void setMinimum(int minimum) {
        this.minimum = minimum;
    }

    public LimitsConfiguration(int maximum, int minimum) {
        this.maximum = maximum;
        this.minimum = minimum;
    }
}
package com.springcloud.demo.limitsservice;

import org.springframework.boot.context.properties.ConfigurationProperties;
import org.springframework.stereotype.Component;

@Component
@ConfigurationProperties("limits-service")
public class Configuration {
    private int minimum;
    private int maximum;

    public int getMinimum() {
        return minimum;
    }

    public void setMinimum(int minimum) {
        this.minimum = minimum;
    }

    public int getMaximum() {
        return maximum;
    }

    public void setMaximum(int maximum) {
        this.maximum = maximum;
    }
}
package com.springcloud.demo.limitsservice;

import org.springframework.beans.factory.annotation.Autowired;
import org.springframework.web.bind.annotation.GetMapping;
import org.springframework.web.bind.annotation.RestController;

@RestController
public class LimitsConfigurationController {

    @Autowired
    Configuration configuration;

    @GetMapping("/limits")
    LimitsConfiguration helloWorld(){
        return new LimitsConfiguration(configuration.getMinimum(),configuration.getMaximum());

    }
}
Exercise 1
- Implement the limits service as shown in slide
Setting up Spring Cloud Config Server
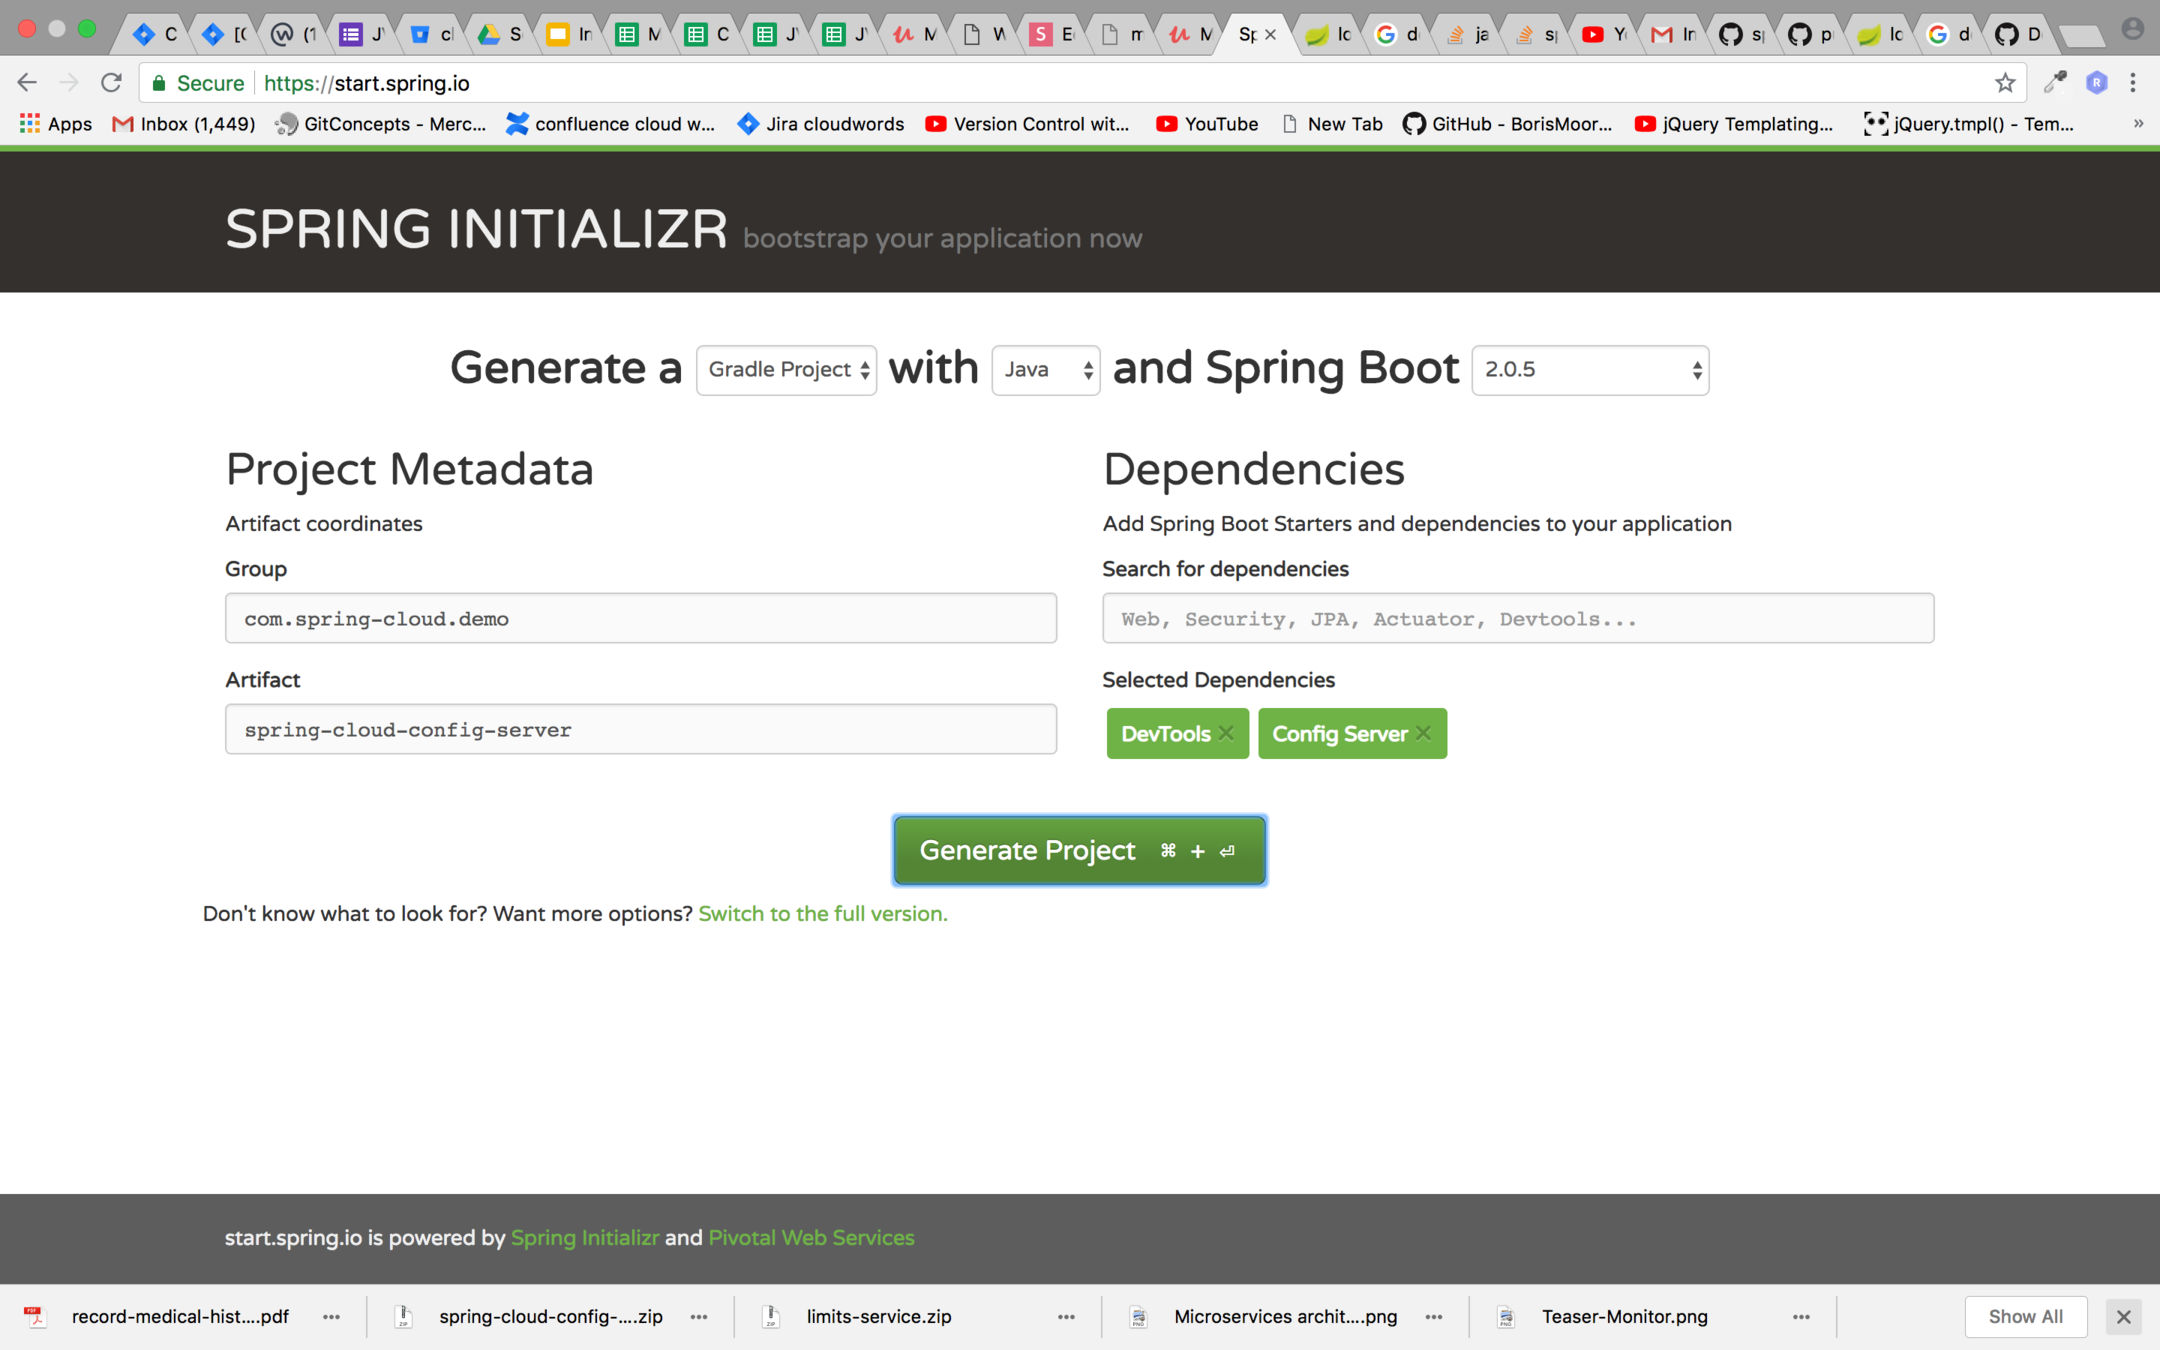
Step 1 : Create the spring boot project with gradle with the dependencies shown below on start.spring.io
Step 2 :
Download and extract the project on your local system. Once you have extracted project then add it as module in your existing project
Step 3 :
Set the following values in application.properties file of spring-cloud-config-server
spring.application.name=spring-cloud-config-server
server.port=8888

spring.cloud.config.server.git.uri=<git-url-containing-properties-file>
Note : Enable Config server by placing @EnableConfigServer at the top of SpringCloudConfigServerApplication.java
In the git repo which you have added limits-service.properties file with the following value
Setting up git for spring cloud config server
limits-service.minimum=9
limits-service.maximum=999
Now hit http://localhost:8888/limits-service/default
You must get the properties which you have configured in the above git repo
Note: url name is related to properties filename
Environment specific configuration
For environment specific configuration you just need to add hyphen with Environment Name i.e limits-service-qa.properties and the properties available in this file will be available on the following url:
Connecting limits-service to spring-cloud-config-server
Rename application.properties file in limits-service to bootstrap.properties and add the following properties to it
spring.application.name=limits-service

spring.cloud.config.uri=http://localhost:8888/
Run both applications i.e limits-service and spring-cloud-config-server and hit
You will see the default values from spring cloud config server
Note : The file is picked on the bases of spring.application.name whose value in this case is limits-service so limits-service.properties will be picked
Configure profiles for Limits service
In order to configure the profile for limits service add the line below in boostrap.properties
spring.profiles.active=qaNote : if the value is not set in the specified profile's properties file then default value will be picked
Exercise 2
- Implement the Spring cloud config server as shown in slides
Setting up currency exchange service
Step 1:
Create a Spring boot project gradle project with the dependencies shown below
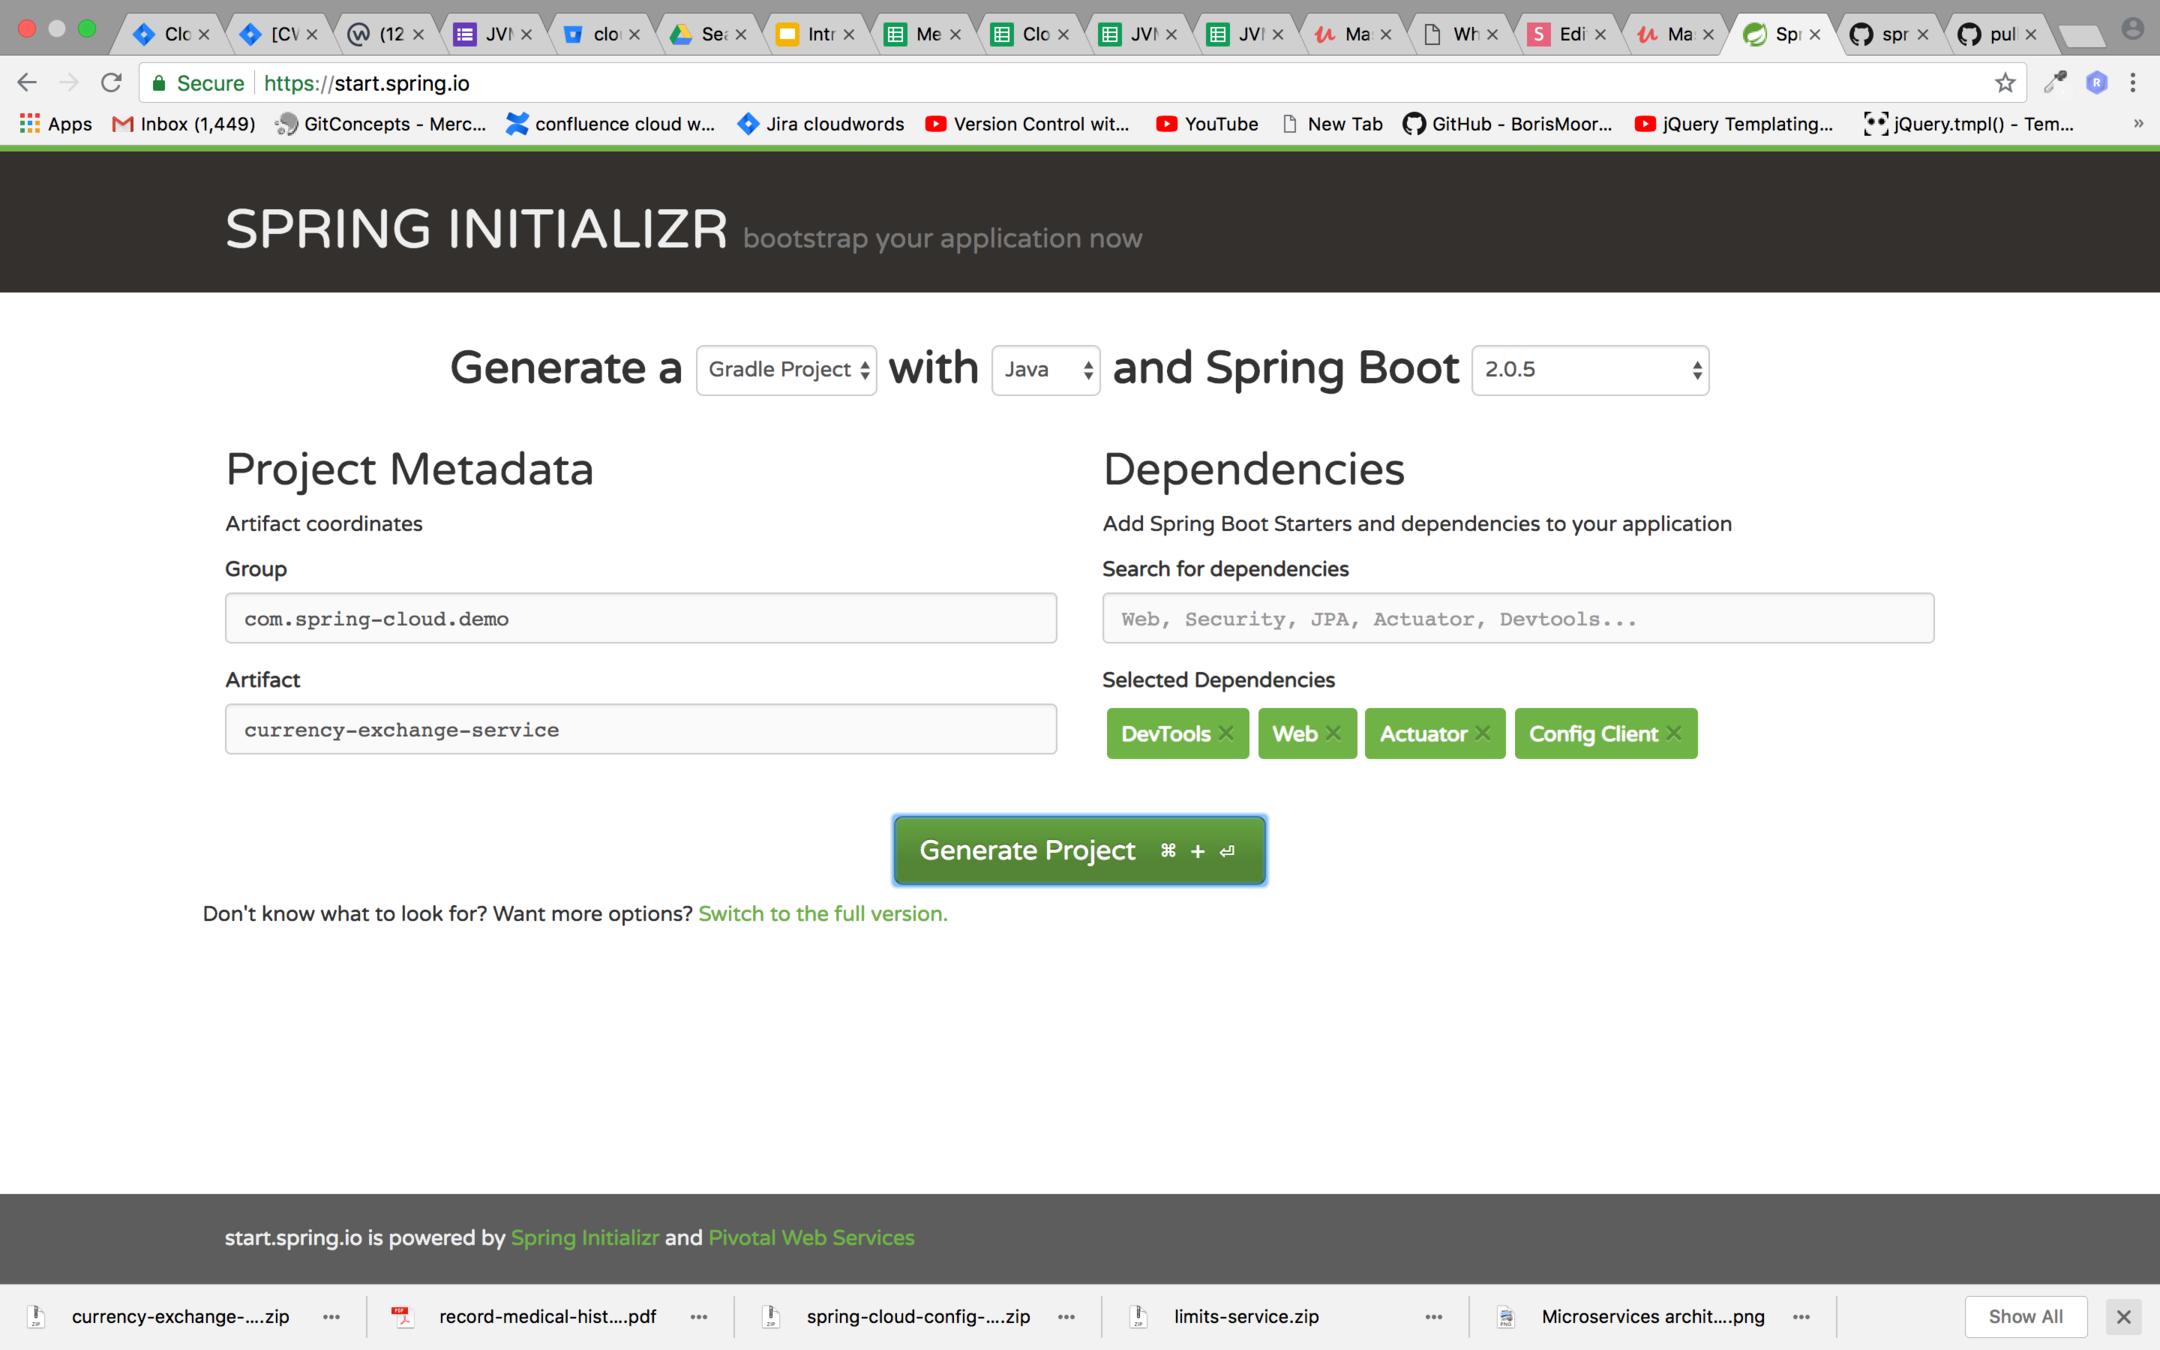
Step 2 :
After downloading and extracting the currency exchange service import it in Intellij idea with other microservices and set the following values in application.properties
spring.application.name=currency-exchange-service
server.port=8000
Step 3 :
Include the following files in the currency-exchange-service
- CurrencyExchangeController.java
- ExchangeValue.java
Code for the files is in the next 2 slides
package com.springcloud.demo.currencyexchangeservice;

import java.math.BigDecimal;

public class ExchangeValue {

    private Long id;
    private String from;
    private String to;
    private BigDecimal conversionMultiple;

    public ExchangeValue() {
    }

    public ExchangeValue(Long id, String from, String to, BigDecimal conversionMultiple) {
        this.id = id;
        this.from = from;
        this.to = to;
        this.conversionMultiple = conversionMultiple;
    }

    public Long getId() {
        return id;
    }

    public void setId(Long id) {
        this.id = id;
    }

    public String getFrom() {
        return from;
    }

    public void setFrom(String from) {
        this.from = from;
    }

    public String getTo() {
        return to;
    }

    public void setTo(String to) {
        this.to = to;
    }

    public BigDecimal getConversionMultiple() {
        return conversionMultiple;
    }

    public void setConversionMultiple(BigDecimal conversionMultiple) {
        this.conversionMultiple = conversionMultiple;
    }
}
package com.springcloud.demo.currencyexchangeservice;

import org.springframework.web.bind.annotation.GetMapping;
import org.springframework.web.bind.annotation.PathVariable;
import org.springframework.web.bind.annotation.RestController;

import java.math.BigDecimal;

@RestController
public class CurrencyExchangeController {

    @GetMapping("/currency-exchange/from/{from}/to/{to}")
    public ExchangeValue retrieveExchangeValue(@PathVariable String from,@PathVariable String to){
        return new ExchangeValue(1000L,from,to, BigDecimal.valueOf(20));
    }

}
Run Mulitple instances of Currency Exchange service
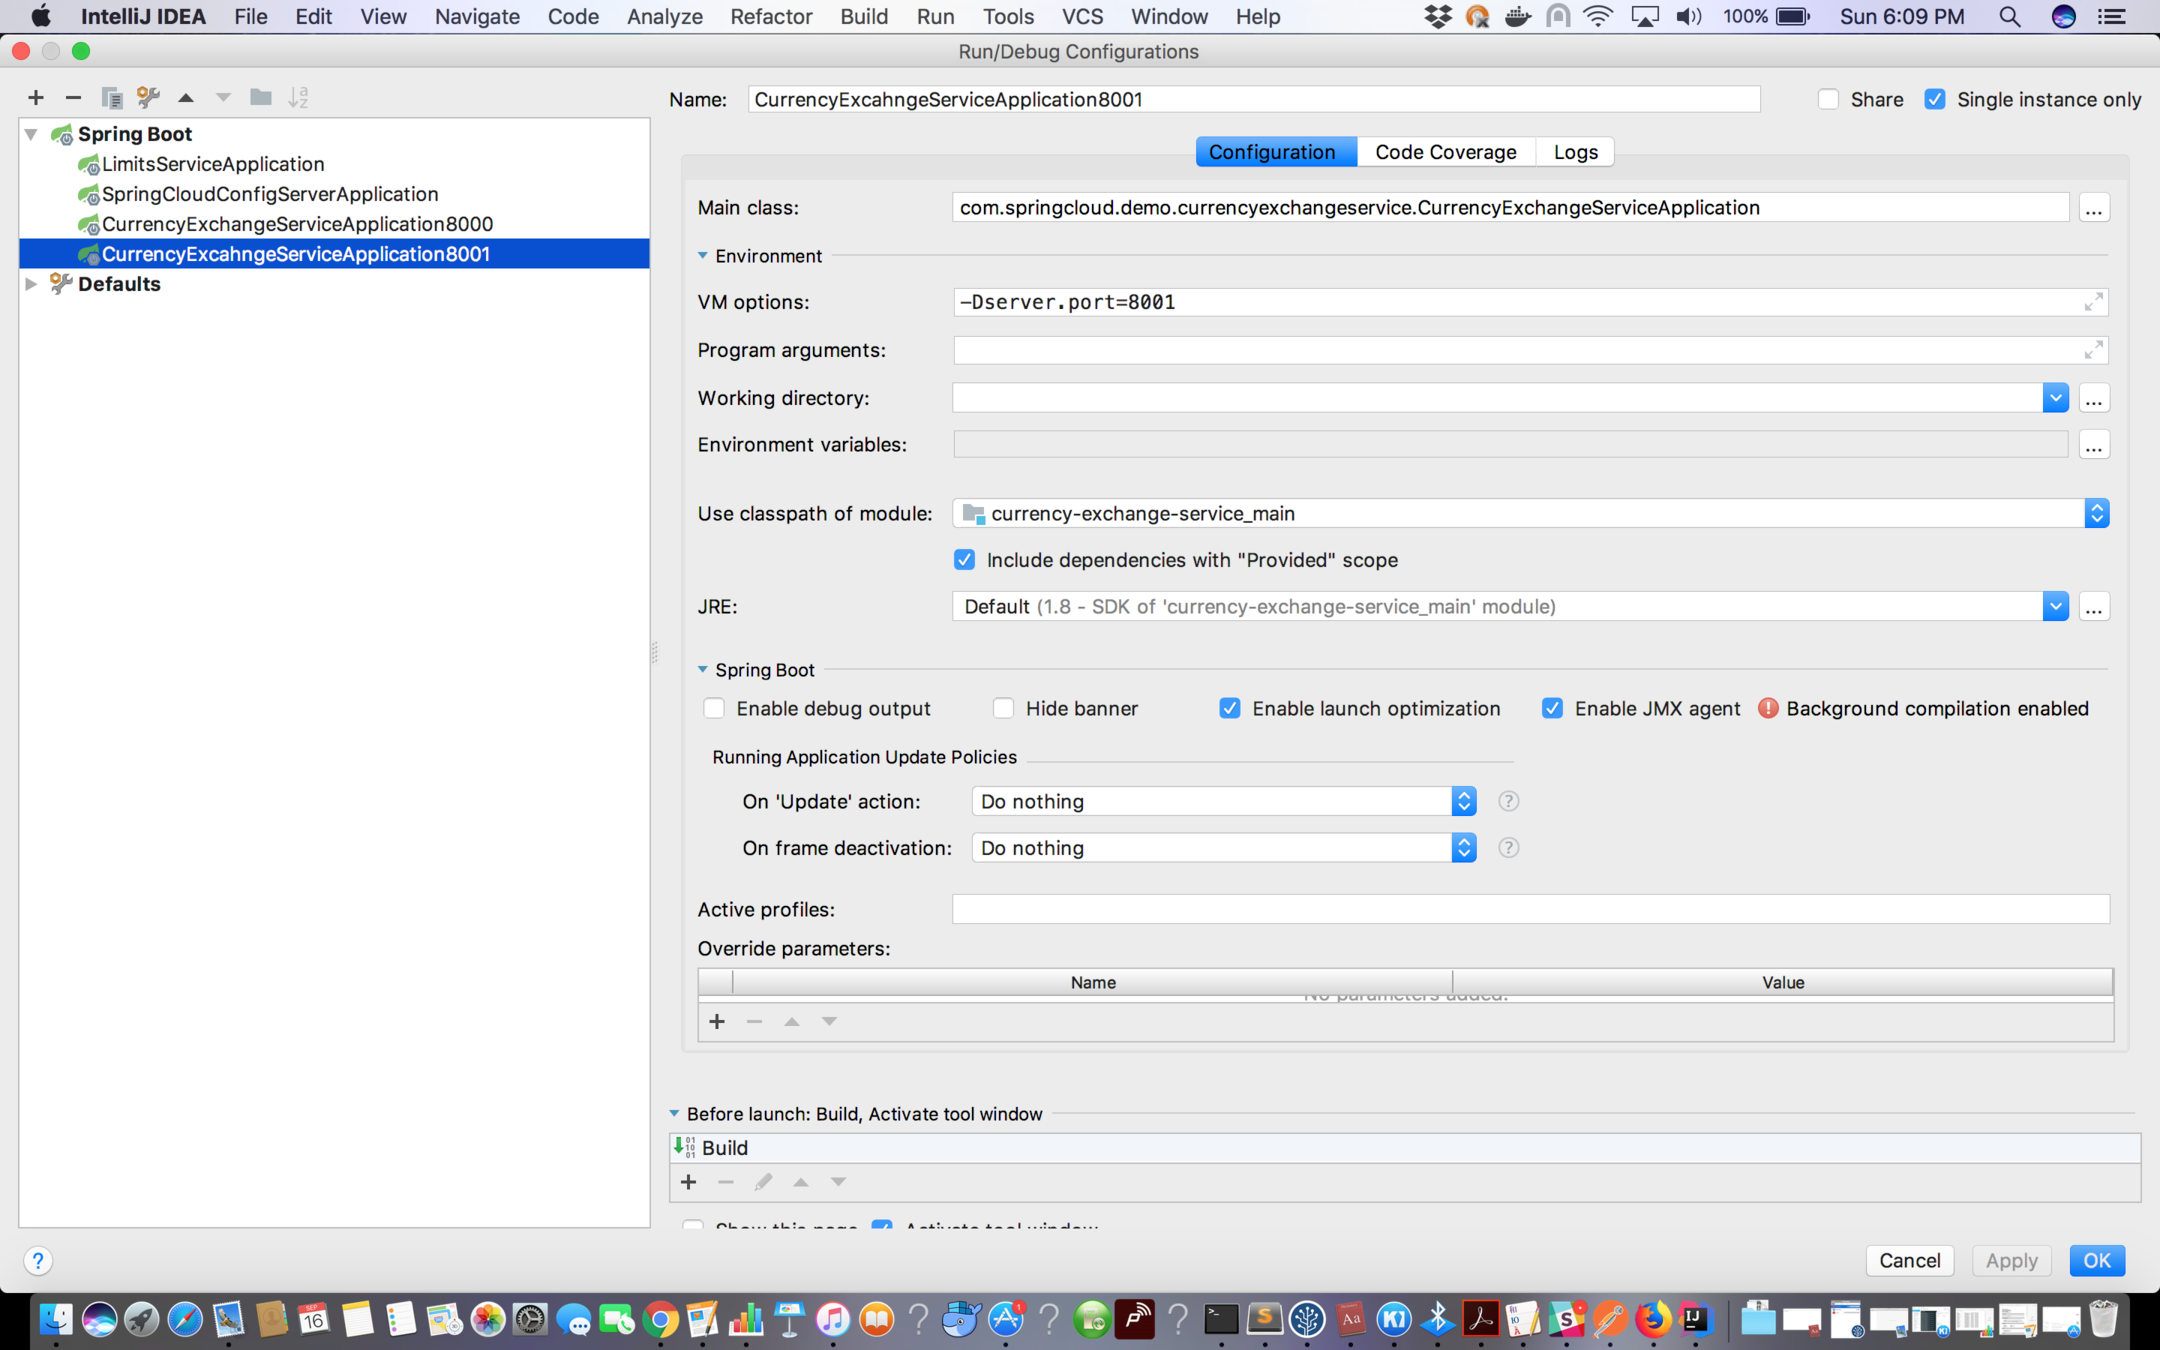
Create a copy of existing configuration and set VM options for it to -Dserver.port=8001
Introduce port int type instance variable in ExchangeValue and set the port value in CurrencyExchangeController in the following way:
exchangeValue.setPort(Integer.parseInt(environment.getProperty("local.server.port")));Exercise 3
- Implement currency-exchange-service as shown in slides and run multiple instances of it.
Setting up currency conversion
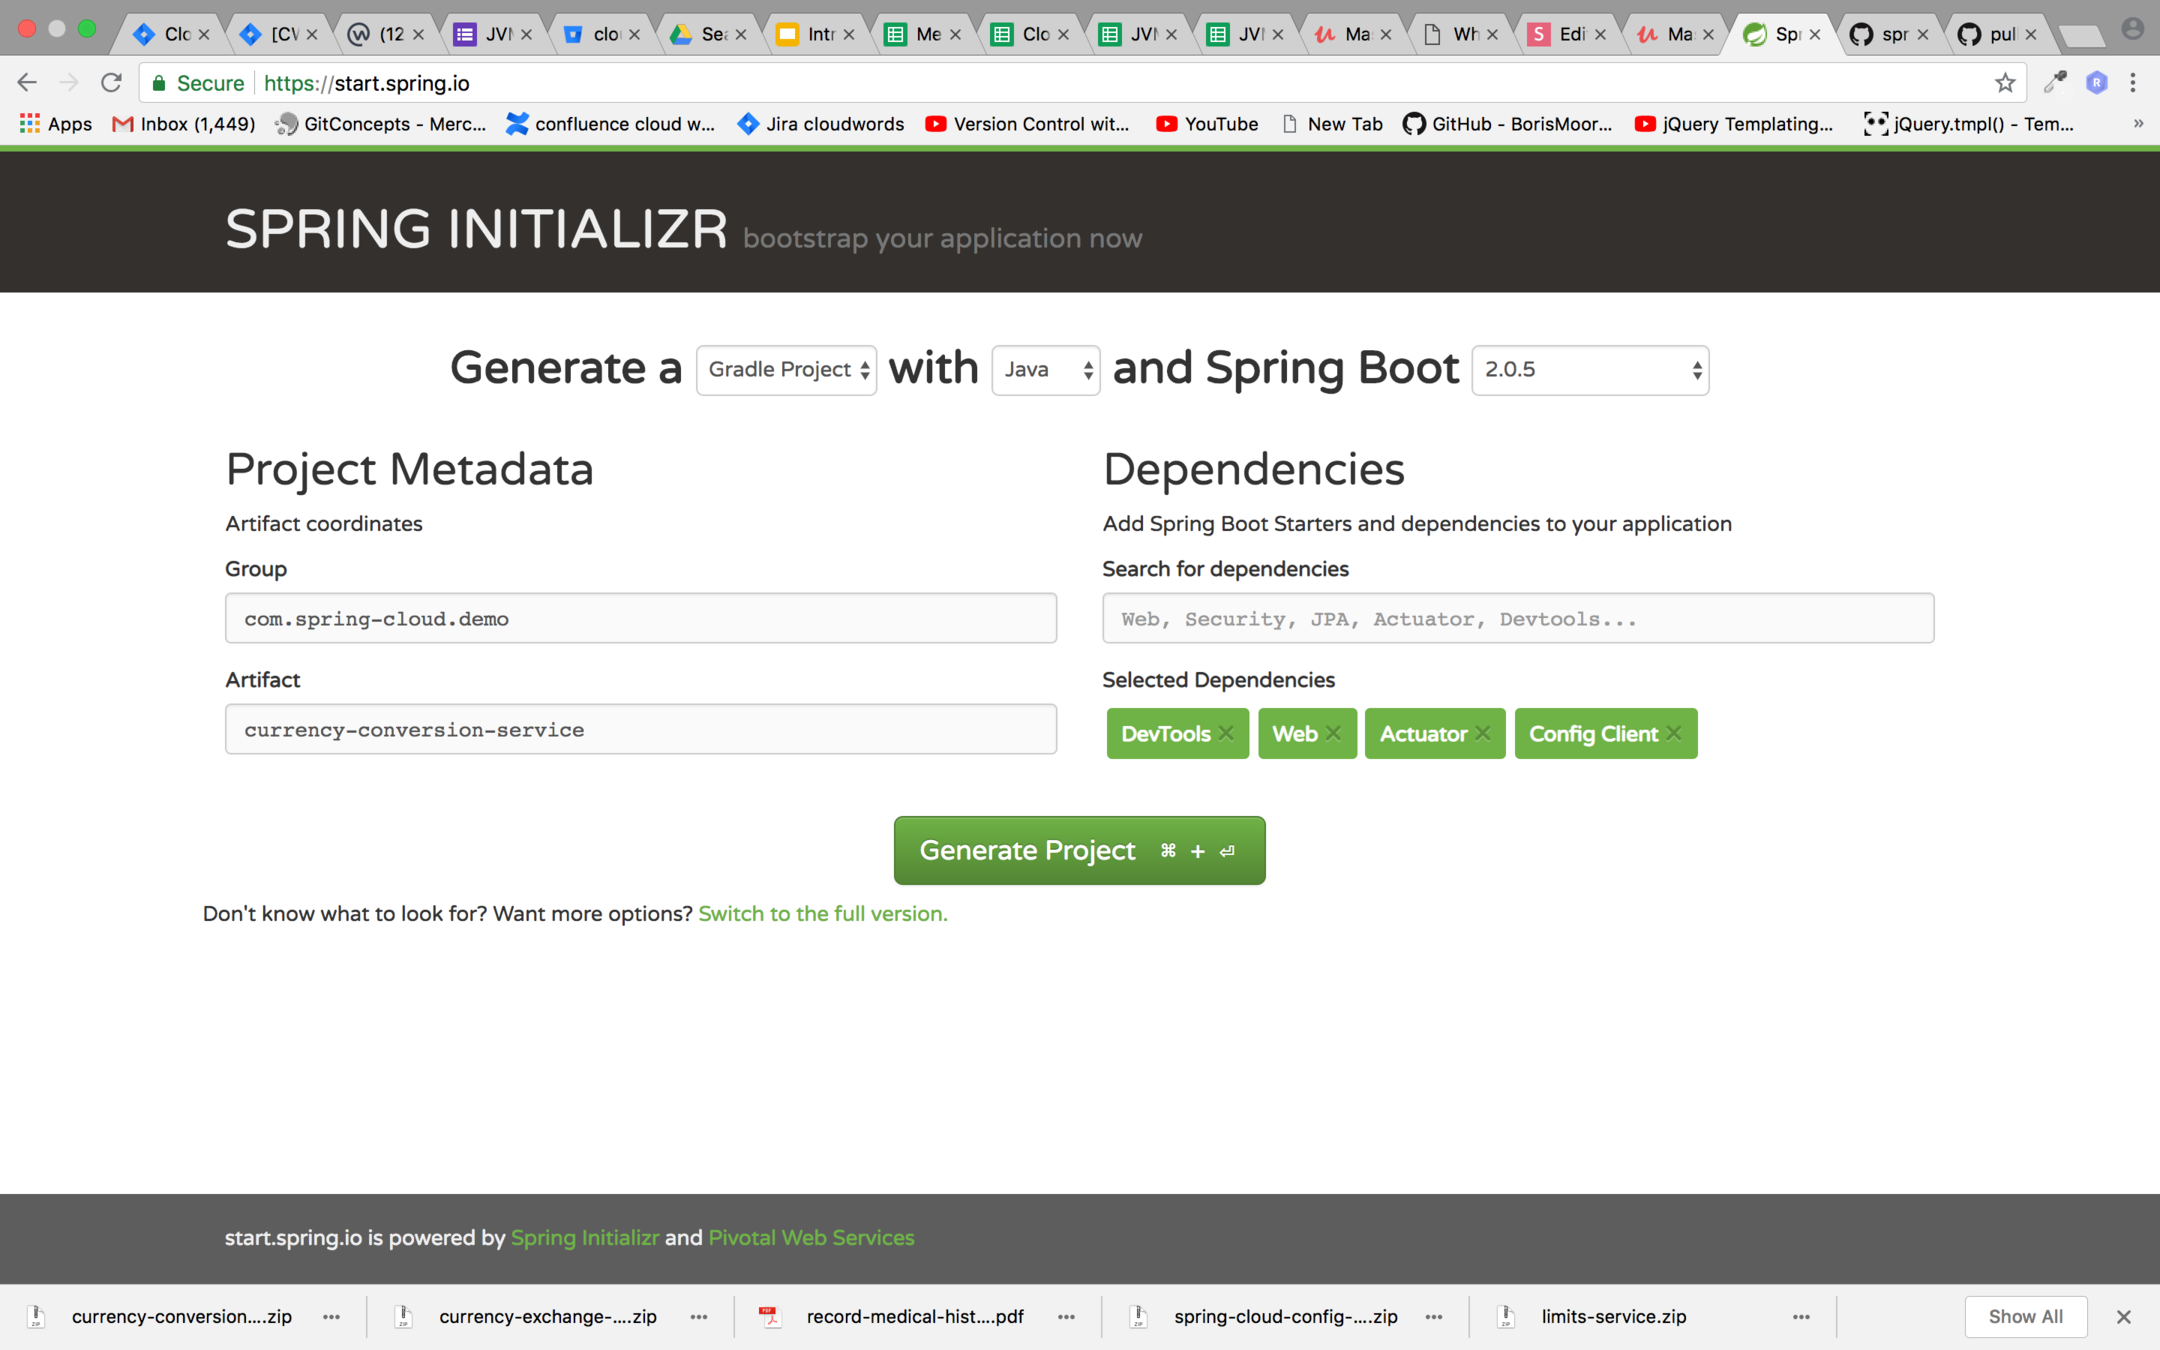
Create a spring boot project with gradle which contains the dependency shown in the image below from https://start.spring.io/
Step 2:
In application.properties of currency exchange service add the following lines
spring.application.name=currency-conversion-service
server.port=8100
Step 3:
Include the following files in currency convert module:
- CurrencyConversionController.java
- CurrencyConversion.java
Code for the files is in the next to slides
package com.springcloud.demo.currencyconversionservice;

import java.math.BigDecimal;

public class CurrencyConversion {

    private Long id;
    private String from;
    private String to;
    private BigDecimal conversionMultiple;
    private int port;
    private BigDecimal totalCalculatedAmount;

    public CurrencyConversion() {
    }

    public CurrencyConversion(Long id, String from, String to, BigDecimal conversionMultiple) {
        this.id = id;
        this.from = from;
        this.to = to;
        this.conversionMultiple = conversionMultiple;
    }

    public Long getId() {
        return id;
    }

    public void setId(Long id) {
        this.id = id;
    }

    public String getFrom() {
        return from;
    }

    public void setFrom(String from) {
        this.from = from;
    }

    public String getTo() {
        return to;
    }

    public void setTo(String to) {
        this.to = to;
    }

    public BigDecimal getConversionMultiple() {
        return conversionMultiple;
    }

    public void setConversionMultiple(BigDecimal conversionMultiple) {
        this.conversionMultiple = conversionMultiple;
    }

    public int getPort() {
        return port;
    }

    public void setPort(int port) {
        this.port = port;
    }

    public BigDecimal getTotalCalculatedAmount() {
        return totalCalculatedAmount;
    }

    public void setTotalCalculatedAmount(BigDecimal totalCalculatedAmount) {
        this.totalCalculatedAmount = totalCalculatedAmount;
    }
}
package com.springcloud.demo.currencyconversionservice;


import org.springframework.beans.factory.annotation.Autowired;

import org.springframework.core.env.Environment;
import org.springframework.http.ResponseEntity;
import org.springframework.web.bind.annotation.GetMapping;
import org.springframework.web.bind.annotation.PathVariable;
import org.springframework.web.bind.annotation.RestController;
import org.springframework.web.client.RestTemplate;

import java.math.BigDecimal;
import java.util.HashMap;
import java.util.Map;

@RestController
public class CurrencyConversionController {

    @Autowired
    Environment environment;

    @GetMapping("/currency-converter/from/{from}/to/{to}/quantity/{quantity}")
    public CurrencyConversion covertCurrency(@PathVariable String from,
                                             @PathVariable String to,
                                             @PathVariable BigDecimal quantity){
        Map<String,String> pathVariables = new HashMap<>();
        pathVariables.put("from",from);
        pathVariables.put("to",to);
        ResponseEntity<CurrencyConversion>  responseEntity=new RestTemplate()
                .getForEntity("http://localhost:8000/currency-exchange/from/{from}/to/{to}",
                        CurrencyConversion.class,pathVariables);
        CurrencyConversion currencyConversion= responseEntity.getBody();
        currencyConversion.setPort(Integer.parseInt(environment.getProperty("local.server.port")));
        currencyConversion.setTotalCalculatedAmount(quantity.multiply(currencyConversion.getConversionMultiple()));
        return currencyConversion;
    }
}
Exercise 4
- Implement currency-conversion-service which will use currency exchange service as shown in slides
Using feign Rest Client for Service invocation
- Feign is a declarative Rest Service client.
- It makes writing rest service client easier.
- Feign provides integration with ribbon which is client side load balancer
Include the following dependency in build.gradle of currency-conversion-service
compile('org.springframework.cloud:spring-cloud-starter-openfeign')Enable feign in Spring Boot application by Marking the application class of currency conversion service with
@EnableFeignClients("<package name to scan>")
i.e
@EnableFeignClients("com.springcloud.demo.currencyconversionservice")
Now we need to create a proxy interface class for currency exchange service
package com.springcloud.demo.currencyconversionservice;

import org.springframework.cloud.openfeign.FeignClient;
import org.springframework.web.bind.annotation.GetMapping;
import org.springframework.web.bind.annotation.PathVariable;

@FeignClient(name = "currency-exchange-service" ,url = "localhost:8000")
public interface CurrencyExchangeServiceProxy {

    @GetMapping("/currency-exchange/from/{from}/to/{to}")
    CurrencyConversion retrieveExchangeValue(@PathVariable("from") String from,
        @PathVariable("to") String to);
}
Now add one more action ConvertCurrencyFeign to CurrencyConversionController as shown below:
package com.springcloud.demo.currencyconversionservice;


import org.springframework.beans.factory.annotation.Autowired;

import org.springframework.core.env.Environment;
import org.springframework.http.ResponseEntity;
import org.springframework.web.bind.annotation.GetMapping;
import org.springframework.web.bind.annotation.PathVariable;
import org.springframework.web.bind.annotation.RestController;
import org.springframework.web.client.RestTemplate;

import java.math.BigDecimal;
import java.util.HashMap;
import java.util.Map;

@RestController
public class CurrencyConversionController {

    @Autowired
    Environment environment;

    @Autowired
    CurrencyExchangeServiceProxy proxy;

    @GetMapping("/currency-converter/from/{from}/to/{to}/quantity/{quantity}")
    public CurrencyConversion covertCurrency(@PathVariable String from,
                                             @PathVariable String to,
                                             @PathVariable BigDecimal quantity){
        Map<String,String> pathVariables = new HashMap<>();
        pathVariables.put("from",from);
        pathVariables.put("to",to);
        ResponseEntity<CurrencyConversion>  responseEntity=new RestTemplate()
                .getForEntity("http://localhost:8000/currency-exchange/from/{from}/to/{to}",
                        CurrencyConversion.class,pathVariables);
        CurrencyConversion currencyConversion= responseEntity.getBody();
        currencyConversion.setPort(Integer.parseInt(environment.getProperty("local.server.port")));
        currencyConversion.setTotalCalculatedAmount(quantity.multiply(currencyConversion.getConversionMultiple()));
        return currencyConversion;
    }

    @GetMapping("/currency-converter-feign/from/{from}/to/{to}/quantity/{quantity}")
    public CurrencyConversion covertCurrencyFeign(@PathVariable String from,
                                             @PathVariable String to,
                                             @PathVariable BigDecimal quantity){
        CurrencyConversion currencyConversion= proxy.retrieveExchangeValue(from,to);
        currencyConversion.setPort(Integer.parseInt(environment.getProperty("local.server.port")));
        currencyConversion.setTotalCalculatedAmount(quantity.multiply(currencyConversion.getConversionMultiple()));
        return currencyConversion;
    }
}
Exercise 5
- Use feign client to consume endpoint of currency-exchange-service from currency-conversion-service
Setting up client side load balancing with Ribbon
- Existing problem is that one instance of CurrencyConversionService can talk to one instance of CurrencyExchangeService.
- Ribbon comes to rescue here. It distributes the load to different instances.
| CurrencyCalculationService |
|---|
| NamingServer |
|---|
| CurrencyExchangeService1 |
|---|
| Ribbon |
|---|
| CurrencyExchangeService2 |
|---|
| CurrencyExchangeService3 |
|---|
In order to get started with ribbon first you need to import the dependency of ribbon in build.gradle of currency-conversion-service as follows:
compile('org.springframework.cloud:spring-cloud-starter-netflix-ribbon')Mark CurrencyExchangeServiceProxy with RibbonClient annotation as shown below
package com.springcloud.demo.currencyconversionservice;

import org.springframework.cloud.netflix.ribbon.RibbonClient;
import org.springframework.cloud.openfeign.FeignClient;
import org.springframework.web.bind.annotation.GetMapping;
import org.springframework.web.bind.annotation.PathVariable;

@FeignClient(name = "currency-exchange-service" )
@RibbonClient(name = "currency-exchange-service")
public interface CurrencyExchangeServiceProxy {

    @GetMapping("/currency-exchange/from/{from}/to/{to}")
    CurrencyConversion retrieveExchangeValue(@PathVariable("from") String from, @PathVariable("to") String to);
}
Now we need to add following property in the application.properties of currency-conversion-service
spring.application.name=currency-conversion-service
server.port=8100
currency-exchange-service.ribbon.listOfServers=http://localhost:8000,http://localhost:8001
Need of a naming server
In the previous example we have hardcoded the names of the 2 instances of currency-exchange-service into application.properties of currency-conversion service.
Now if we need to add another instance of currency-exchange-service to ribbon then we need to add the url of that instance in application.properties file of currency-conversion-service.
In order to avoid making hardcoded changes application.properties file we will use Eureka naming server.
Setting up the eureka server
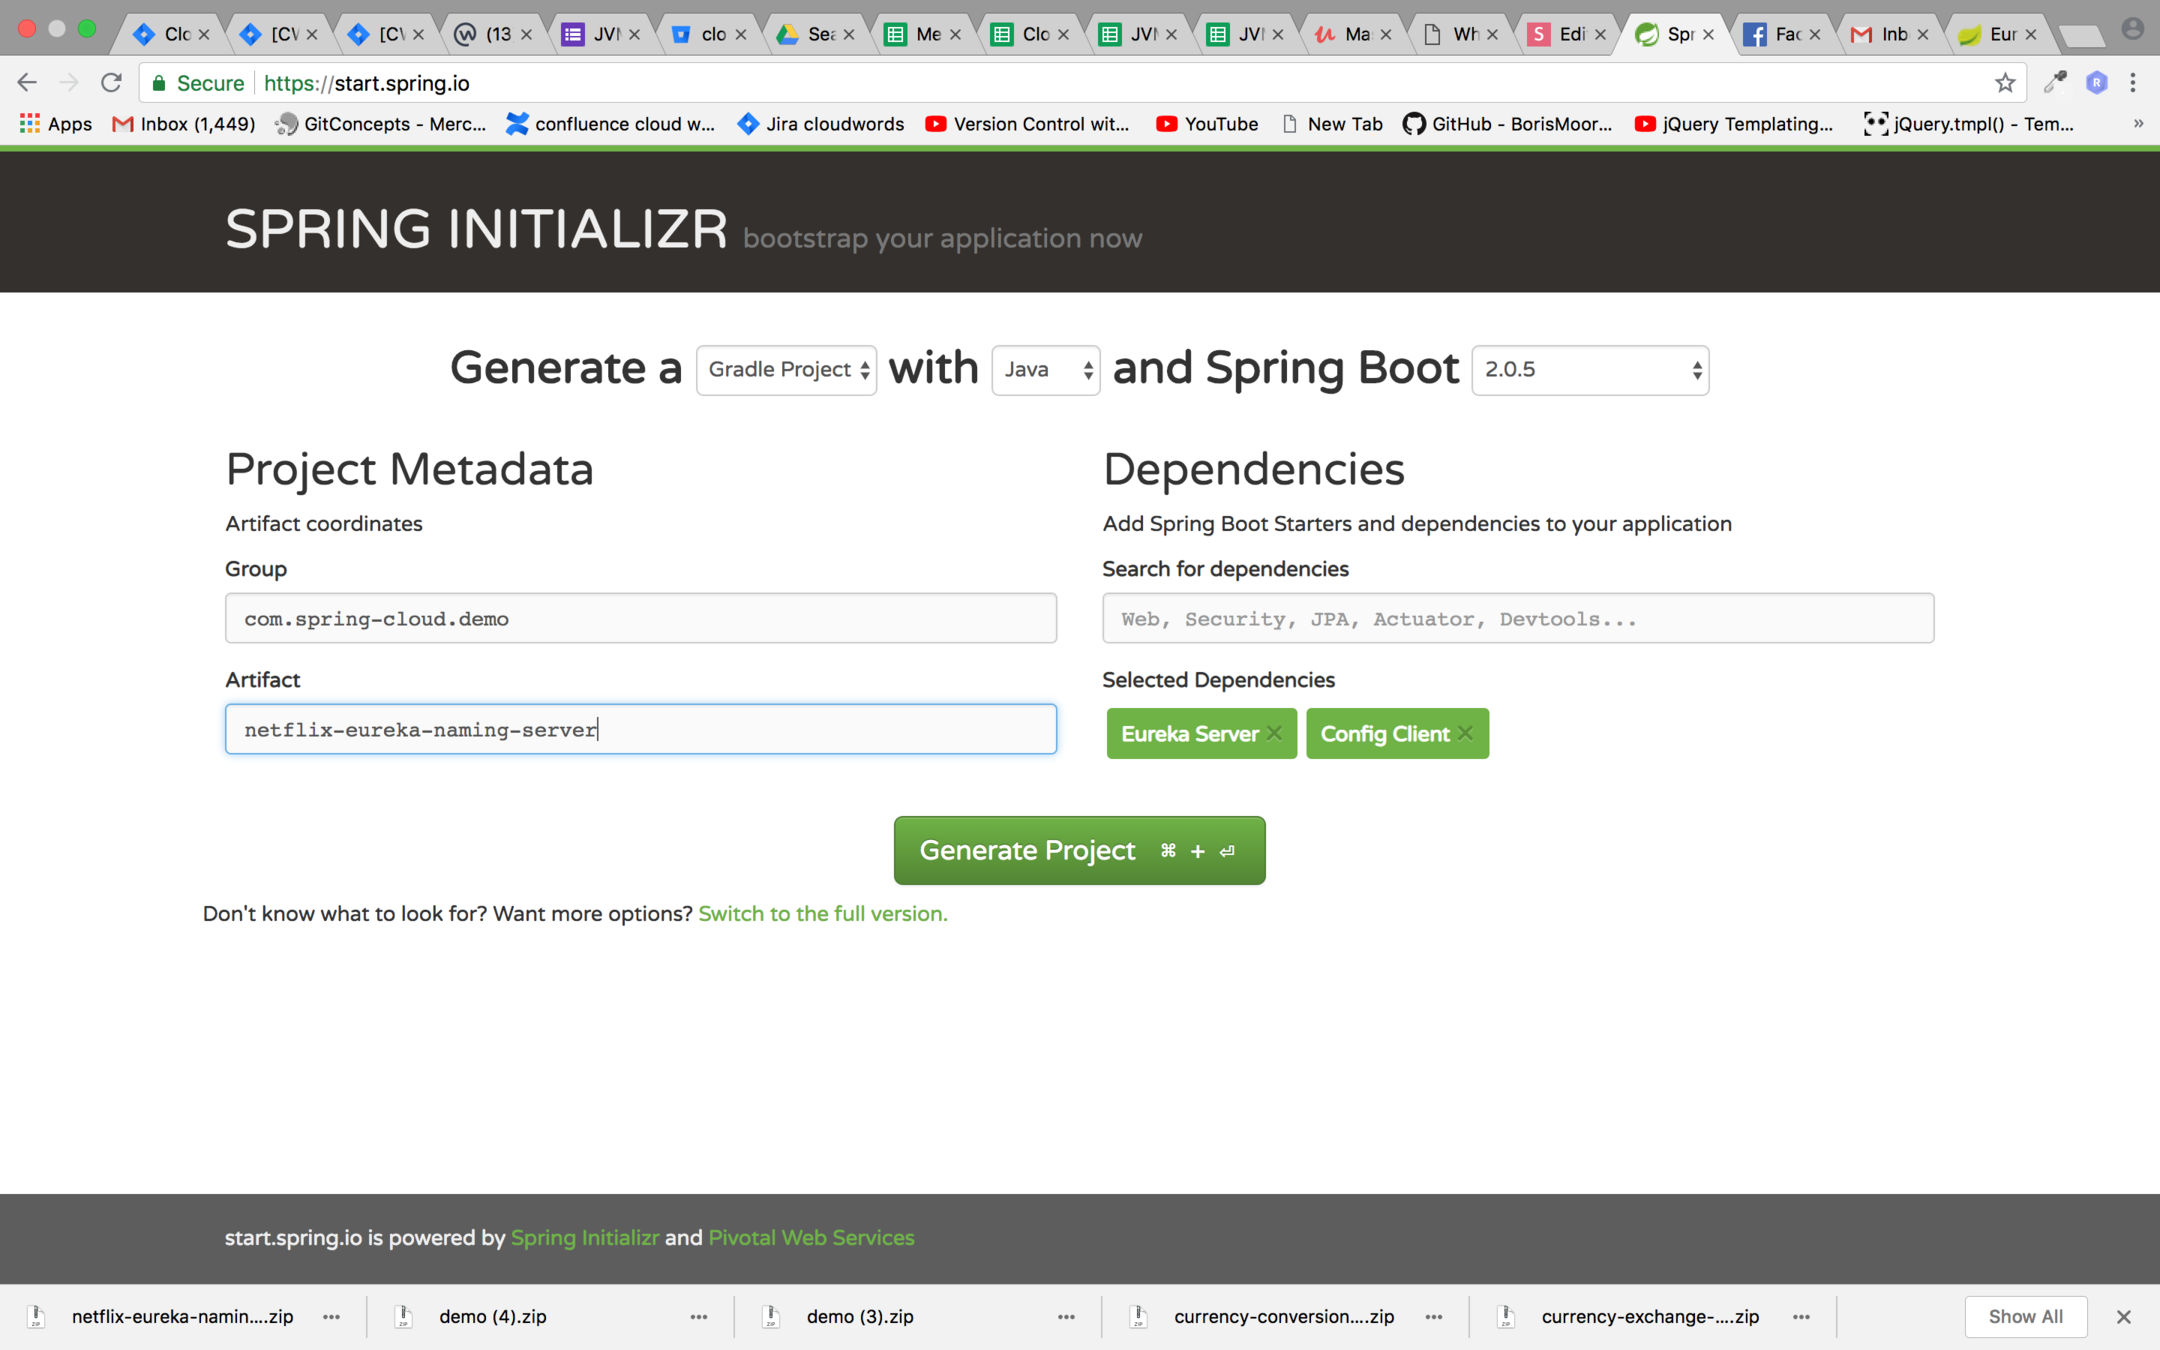
Step 1 : Create Spring boot Gradle project with the dependencies mentioned the image below
Step 2 : Enable the Eureka Server
package com.springcloud.demo.netflixeurekanamingserver;

import org.springframework.boot.SpringApplication;
import org.springframework.boot.autoconfigure.SpringBootApplication;
import org.springframework.cloud.netflix.eureka.server.EnableEurekaServer;

@SpringBootApplication
@EnableEurekaServer
public class NetflixEurekaNamingServerApplication {

	public static void main(String[] args) {
		SpringApplication.run(NetflixEurekaNamingServerApplication.class, args);
	}
}
Step 3 : Set the following properties value in application properties file for eureka naming server
spring.application.name=netflix-eureka-naming-server
server.port=8761

eureka.client.register-with-eureka=false
eureka.client.fetch-registry=false
Run the application and hit http://localhost:8761/
You should be able to see UI of Eureka naming server
Connecting currency-conversion-service to eureka naming server
Step 1: Add the following dependency in currency-conversion-service
compile('org.springframework.cloud:spring-cloud-starter-netflix-eureka-client')Step 2: Enable Client discovery through annotaion @EnableClientDiscovery
package com.springcloud.demo.currencyconversionservice;

import org.springframework.boot.SpringApplication;
import org.springframework.boot.autoconfigure.SpringBootApplication;
import org.springframework.cloud.client.discovery.EnableDiscoveryClient;
import org.springframework.cloud.openfeign.EnableFeignClients;

@SpringBootApplication
@EnableFeignClients(basePackages ={"com.springcloud.demo.currencyconversionservice"} )
@EnableDiscoveryClient
public class CurrencyConversionServiceApplication {

	public static void main(String[] args) {
		SpringApplication.run(CurrencyConversionServiceApplication.class, args);
	}
}
Step 3: Add the eureka server url in application.properties file of currency-conversion-service
spring.application.name=currency-conversion-service
server.port=8100
eureka.client.service-url.default-zone=http://localhost:8761/eureka
currency-exchange-service.ribbon.listOfServers=http://localhost:8000,http://localhost:8001
Now first run the eureka server and then currency-conversion-service. Now hit http://localhost:8761/ you should be able to see that currency-coversion-service is registered as instance in eureka naming server
Connecting currency-exchange-service to Eureka naming server
Step 1: Add the following dependency in currency-exchange-service
compile('org.springframework.cloud:spring-cloud-starter-netflix-eureka-client')Step 2: Enable Client discovery through annotaion @EnableClientDiscovery
package com.springcloud.demo.currencyexchangeservice;

import org.springframework.boot.SpringApplication;
import org.springframework.boot.autoconfigure.SpringBootApplication;
import org.springframework.cloud.client.discovery.EnableDiscoveryClient;

@SpringBootApplication
@EnableDiscoveryClient
public class CurrencyExchangeServiceApplication {

	public static void main(String[] args) {
		SpringApplication.run(CurrencyExchangeServiceApplication.class, args);
	}
}
Step 3: Add the eureka server url in application.properties file of currency-exchange-service
spring.application.name=currency-exchange-service
server.port=8000
eureka.client.service-url.default-zone=http://localhost:8761/eureka
Now run the 2 instances of currency- exchange-service and both the instances should be registered in Eureka naming server
Distributing calls using Eureka and Ribbon
comment line currency-exchange-service.ribbon.listOfServers
in application.properties and now try to run currency-conversion-service to observe the ports form currency-exchange-service
spring.application.name=currency-conversion-service
server.port=8100
eureka.client.service-url.default-zone=http://localhost:8761/eureka

#currency-exchange-service.ribbon.listOfServers=http://localhost:8000,http://localhost:8001

API Gateways
API Gateways are required to intercept calls between microservices
Common Functionality of API Gateways
- Authentication, Authorization and Security
- Rate Limits
- Fault Tolerance
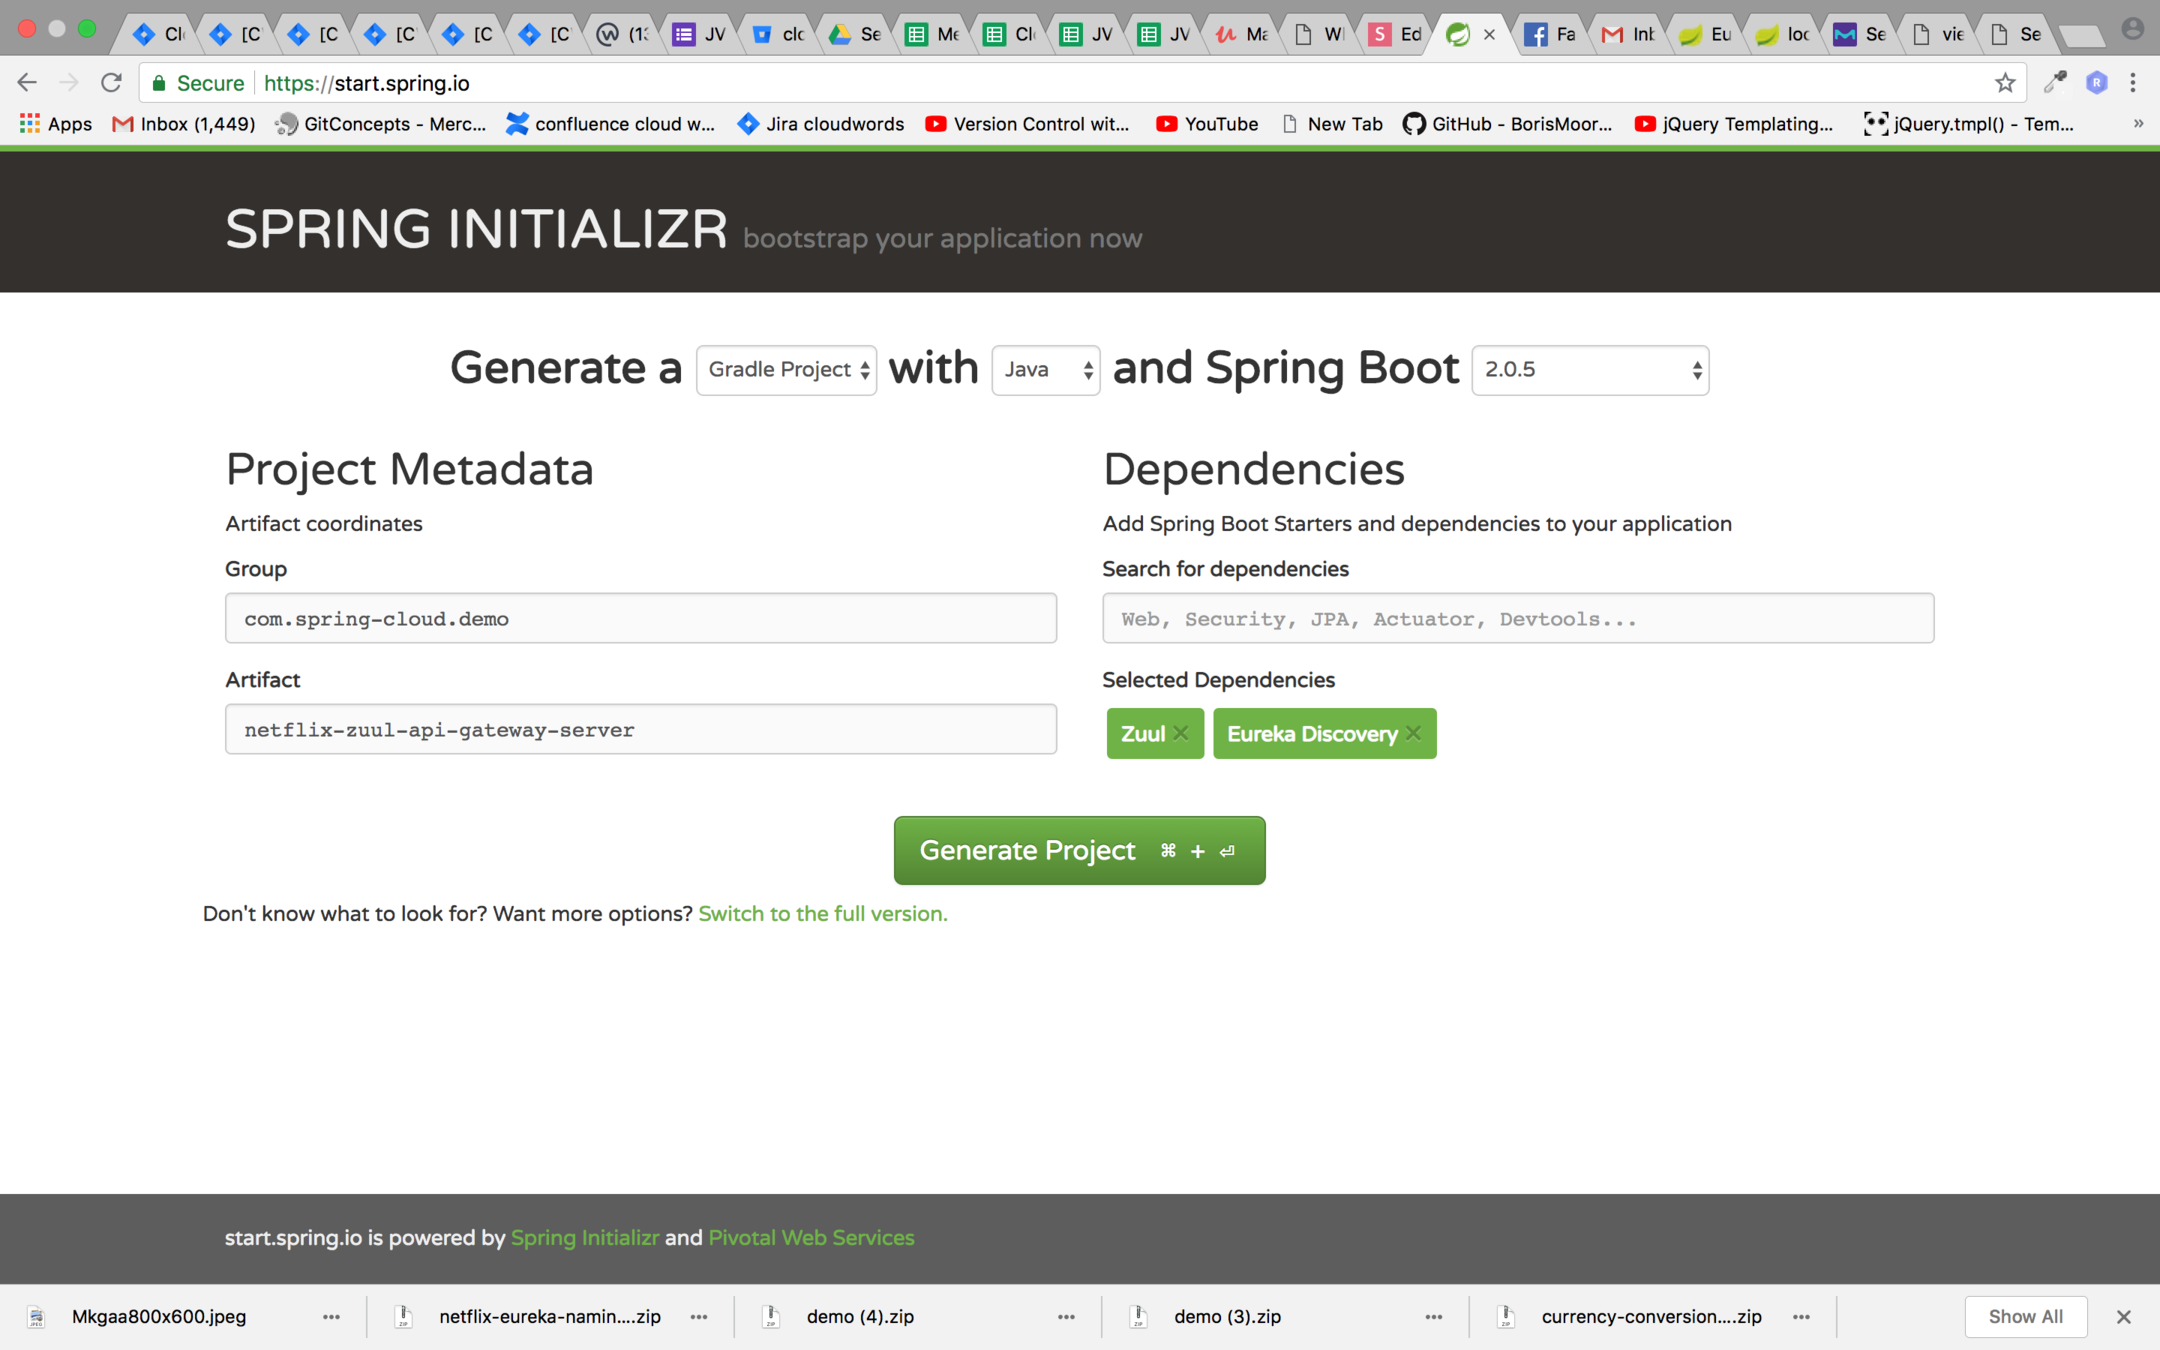
Setting up Zuul API Gateway
Enable Zuul proxy and Discover Clients
package com.springcloud.demo.netflixzuulapigatewayserver;

import org.springframework.boot.SpringApplication;
import org.springframework.boot.autoconfigure.SpringBootApplication;
import org.springframework.cloud.client.discovery.EnableDiscoveryClient;
import org.springframework.cloud.netflix.zuul.EnableZuulProxy;
import org.springframework.cloud.netflix.zuul.EnableZuulServer;

@EnableZuulProxy
@EnableDiscoveryClient
@SpringBootApplication
public class NetflixZuulApiGatewayServerApplication {

	public static void main(String[] args) {
		SpringApplication.run(NetflixZuulApiGatewayServerApplication.class, args);
	}
}
Values in application.properties for Zuul API Gateway
spring.application.name=netflix-zuul-api-gateway-server
server.port=8765
eureka.client.service-url.default-zone=http://localhost:8761/eureka
Create the following Bean of Zuul Filter as follows :
package com.springcloud.demo.netflixzuulapigatewayserver;

import com.netflix.zuul.ZuulFilter;
import com.netflix.zuul.context.RequestContext;
import com.netflix.zuul.exception.ZuulException;
import org.springframework.stereotype.Component;

import javax.servlet.http.HttpServletRequest;
import java.util.logging.Logger;

@Component
public class ZuulLoggingFilter extends ZuulFilter {
    private  Logger logger= Logger.getLogger(this.getClass().toString());
    @Override
    public String filterType() {
        return "pre";
    }

    @Override
    public int filterOrder() {
        return 1;
    }

    @Override
    public boolean shouldFilter() {
        //business logic goes here
        return true;
    }

    @Override
    public Object run() throws ZuulException {
        HttpServletRequest httpServletRequest =
                RequestContext.getCurrentContext().getRequest();
        logger.info("httpServletRequest>>>"+httpServletRequest);
        logger.info("request uri"+httpServletRequest.getRequestURI());
        return null;
    }
}
Endpoint to hit in order to execute endpoint through API gateway
API-Gateway-App-URL/Application-name/Application-URL
Following is the example where we are hitting endpoint of currency-conversion-service with the help of API Gateway
localhost:8765/currency-conversion-service/currency-converter-feign/from/USD/to/INR/quantity/22000
Setting up Zuul between microservices invocation
In our case we are hitting currency-exchange-service with currency-conversion-service and we want to invoke the API call via API gateway. We need to do the following changes in CurrencyExchangeServiceProxy.java
package com.springcloud.demo.currencyconversionservice;

import org.springframework.cloud.netflix.ribbon.RibbonClient;
import org.springframework.cloud.openfeign.FeignClient;
import org.springframework.web.bind.annotation.GetMapping;
import org.springframework.web.bind.annotation.PathVariable;

//@FeignClient(name = "currency-exchange-service" )
@FeignClient(name = "netflix-zuul-api-gateway-server" )
@RibbonClient(name = "currency-exchange-service")
public interface CurrencyExchangeServiceProxy {

//    @GetMapping("/currency-exchange/from/{from}/to/{to}")
    @GetMapping("/currency-exchange-service/currency-exchange/from/{from}/to/{to}")
    CurrencyConversion retrieveExchangeValue(@PathVariable("from") String from, @PathVariable("to") String to);
}
Sequency in which applications should be run
- netflix-eureka-naming-server
- netflix-zuul-api-gateway-server
- currency-exchange-service
- currency-conversion-service
Now if you hit localhost:8765/currency-conversion-service/currency-converter-feign/from/USD/to/INR/quantity/22000
you will be able to see logs for both currency-conversion-service and currency-exchange service
Understanding the need of Spring Cloud Bus
- Include following configuration in application.properties file of limits-service.
- Create One more instance of limits-service with port 8081.
- Run both the instances of limits service and hit the /limits endpoint to get the minimum and maximum value.
- Now change the value of maximum and minimum in git repository.
- In order to reflect the update value in limits service we need to hit the following endpoint POST for both the instances
<hostname:port>/actuator/refresh
- For every instance we need to hit this endpoint
management.endpoints.web.exposure.include=*Rest with Spring Part-3 (Microservices)
By Pulkit Pushkarna
Rest with Spring Part-3 (Microservices)
- 1,447


