Importing
Quick Start Guide
This guide is no longer monitored or updated - please visit the help tab of your StaffConnect login for more up to date support
Getting Started
Importing multiple shifts to your StaffConnect system is an easy task.
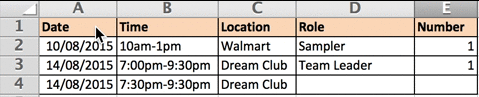
To get started, these are the essential columns that StaffConnect requires in order to upload them to your calendar:
If a row has the same date, time, location, campaign, region etc. as the preceding one - it will be assumed to be a different role within the same shift.
Additional Columns

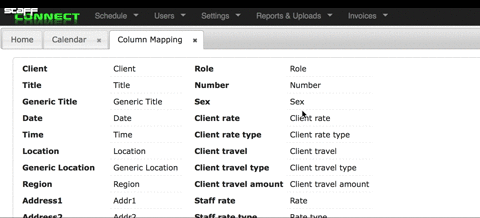
You can add in additional information to your shifts by using the categories that appear in the Column Map.
If you choose not to enter anything for a particular column, that area will simply appear blank.
Column Map

The Column Map can be found under the Schedule tab.
It is important that your headings exactly match those in your column map - ie: Time not Times.
You are able to locate and change the title of these columns by altering the Column Map.
Edit Column Map
Change a title by clicking on the word you would like to change, entering a new word and clicking the tick to save.
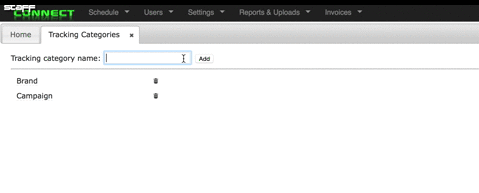
Tracking Category
Need a category that is not listed in the Column Map?
No problem! Simply add a Tracking Category!
Tracking Categories can be found under the Settings tab.
Add Tracking Categories
1. Add a Tracking Category name.
This will act as your column heading.
2. Add your options.
When importing, any tracking option not already in the system will be automatically added and assigned to the category.
3. Tailor your individual options by clicking on them.
From here you can add files to all shifts attached to this
option & manage your staff, supervisor or client access.
Import
Once you are ready, importing your excel spreadsheet is easy!
3. Import.
Select Import to import the schedule to your calendar.
1. Add File.
Click Choose File and select your excel spreadsheet to import
2. Review your import.
If the system doesn’t recognise something, Invalid will appear next to the column to alert you.
Delete Import

If you need to delete your import, follow these simple steps:
1. Import History is located under the Schedule Tab
2. Select the Trash Can icon beside the import you wish to delete.
3. Select Yes to delete the imported shifts.
Sometimes this is a quicker method then deleting each imported shift individually.
Import Shifts Guide
By staffconnect


