
Cường Trần
Cường Trần on slides.com
By Cường Trần / cuongtran3001@gmail.com
Using Codepen Hello World example
http://codepen.io/gaearon/pen/rrpgNB?editors=0010
Using html file:
https://facebook.github.io/react/downloads/single-file-example.html
Using Plunker template:
Embed react & react-dom script:
Embed babel script to compile:
Import and code
<script src="https://unpkg.com/react@15/dist/react.js"></script>
<script src="https://unpkg.com/react-dom@15/dist/react-dom.js"></script>
<script src="https://unpkg.com/babel-standalone@6.15.0/babel.min.js"></script>import React from 'react';
import ReactDOM from 'react-dom';
ReactDOM.render(
<h1>Hello, world!</h1>,
document.getElementById('root')
);A syntax extension to Javascript
const element = <h1>Hello, world!</h1>;Embed Expressions in JSX
JSX is an Expression Too
function getGreeting(user) {
  if (user) {
    return <h1>Hello, {formatName(user.name)}!</h1>;
  } else {
    return <h1>Hello, Stranger.</h1>;
  }
}Using attributes with JSX
const element = <div tabIndex="0"></div>;

const element = <img src={user.avatarUrl}></img>;Specifying Children with JSX
const element = (
  <div>
    <h1>Hello!</h1>
    <h2>Good to see you here.</h2>
  </div>
);
JSX Prevents Injection Attacks
const title = response.potentiallyMaliciousInput;

// This is safe:
const element = <h1>{title}</h1>;
JSX Represents Objects
const element = (
  <h1 className="greeting">
    Hello, world!
  </h1>
);
is identical:
const element = React.createElement(
  'h1',
  {className: 'greeting'},
  'Hello, world!'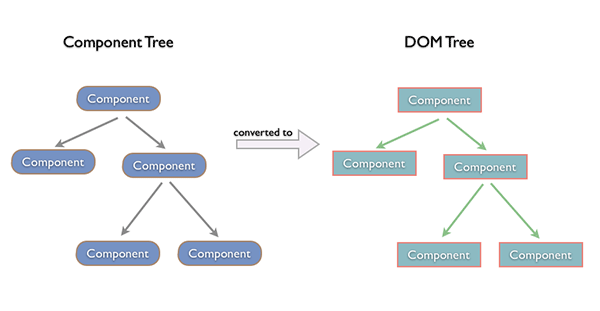
);Unlike browser DOM elements, React elements are plain objects, and are cheap to create.
React DOM takes care of updating the DOM to match the React elements.
Using ReactDOM.render method:
//html
<div id="root"></div>

//js
const element = <h1>Hello, world</h1>;

ReactDOM.render(
  element,
  document.getElementById('root')
);Updating the rendered element
React elements are immutable. Once you create an element, you can't change its children or attributes
In practice, most React apps only call ReactDOM.render() once
React only updates what's necessary
Components let you split the UI into independent, reusable pieces, and think about each piece in isolation.
Conceptually, components are like JavaScript functions. They accept arbitrary inputs (called "props") and return React elements describing what should appear on the screen.
Create component
class Welcome extends React.Component {
  render() {
    return <h1>Hello, {this.props.name}</h1>;
  }
}Render component
const element = <Welcome name="Sara" />;

ReactDOM.render(
  element,
  document.getElementById('root')
);Example:
Composing components
Extracting components
Extracting components
Update the content problem:
Adding state:
Adding lifecyle:
DO NOT modify state directly:
// Wrong
this.state.date = new Date();


// Correct
this.setState({date: new Date()});
State updates may be Asynchronous:
// Wrong
this.setState({
  counter: this.state.counter + this.props.increment,
});

// Correct
this.setState(function(prevState, props) {
  return {
    counter: prevState.counter + props.increment
  };
});
State updates are merged:
constructor(props) {
    super(props);
    this.state = {
      posts: [],
      comments: []
    };
  }
componentDidMount() {
fetchPosts().then(response => {
this.setState({
posts: response.posts
});
});
fetchComments().then(response => {
this.setState({
comments: response.comments
});
});
}Handling events with React elements is very similar to handling events on DOM elements. There are some syntactic differences:
//HTML
<button onclick="activateLasers()">
  CLICK ME
</button>


//React
<button onClick={activateLasers}>
  CLICK ME
</button>Toogle example
List
Key: Key should be specified inside the array.
Key: Key must only be unique among siblings
Key: map() in JSX
Two types of form components:
Controlled components
- Provide a value prop
- Don't maitain its own internal stag e
- Render purely based on props
Controlled components
Controlled components
- Change value to update user input
Controlled components
Controlled components
Uncontrolled components
Uncontrolled components
Default value
For input, select: defaultValue
For checkbox: defaultChecked
render() {
    return <input type="text" defaultValue="Hello!" />;
}Interactive Props
onChange
onInput
onClick
...
Interactive Props
onChange
onInput
onClick
...
Checking the props of component
For development only
https://facebook.github.io/react/docs/react-api.html#typechecking-with-proptypes
React.PropTypes.array
React.PropTypes.bool
React.PropTypes.func
React.PropTypes.number
React.PropTypes.object
React.PropTypes.string
React.PropTypes.symbol
React.PropTypes.node
React.PropTypes.element
...
Requiring single chilren
class MyComponent extends React.Component {
  render() {
    // This must be exactly one element or it will warn.
    const children = this.props.children;
    return (
      <div>
        {children}
      </div>
    );
  }
}

MyComponent.propTypes = {
  children: React.PropTypes.element.isRequired
};Default Prop values: using defaultProps
class Greeting extends React.Component {
  render() {
    return (
      <h1>Hello, {this.props.name}</h1>
    );
  }
}

// Specifies the default values for props:
Greeting.defaultProps = {
  name: 'Stranger'
};

// Renders "Hello, Stranger":
ReactDOM.render(
  <Greeting />,
  document.getElementById('example')
);Modify a child outside of the typical dataflow and can not use props for rendering new props.
Containment
- Components don't know their childrend
- Using children prop to pass children element directly
Containment
Containment
Specialization: configure props and add children elements
Step 1: Install react-router
npm install react-routerStep 2: Create components
ABOUT
HOME
CONTACT
PAGESStep 2: Create components
class Home extends React.Component {
   render() {
      return (
         <div>
            <h1>Home...</h1>
         </div>
      )
   }
}
Home.js
Step 2: Create components
class About extends React.Component {
   render() {
      return (
         <div>
            <h1>About...</h1>
         </div>
      )
   }
}
About.js
Step 2: Create components
class Contact extends React.Component {
   render() {
      return (
         <div>
            <h1>Contact...</h1>
         </div>
      )
   }
}
Contact.js
Step 2: Create components
class App extends React.Component {
   render() {
      return (
         <div>
            <ul>
               <li><Link to="/">Home</Link></li>
               <li><Link to="/about">About</Link></li>
               <li><Link to="/contact">Contact</Link></li>
            </ul>

           {this.props.children}
         </div>
      )
   }
}
App.js
Step 2: Create components
Use <Link> not <a>
Can be added className and activeClassname
//declare
<Link to="/about" className="item">About</Link>

//will become to
<a href="/about" class="item">About</a>Step 3: Add Router
ReactDOM.render((
   <Router history = {browserHistory}>
      <Route path = "/" component = {App}>
         <IndexRoute component = {Home} />
         <Route path = "home" component = {Home} />
         <Route path = "about" component = {About} />
         <Route path = "contact" component = {Contact} />
      </Route>
   </Router>

), document.getElementById('root'))
script.js
Step 3: Add Router
<Router>
    <Route path="/" component={Home} />
</Router>
<Router>
<Route path="user/:userId" component={UserDetail} />
</Router>
==> /users/1
/users/2
==> this.props.params.userId in UserDetail Step 3: Add Router
IndexRoute
<Router>
    <IndexRoute component={Home} />
</Router>Step 3: Add Router
Multiple routers:
<Router>
    <Route path="/" component={Home} />
    <Route path="/about" component={About} />
    <Route path="/contact" component={Contact} />
</Router>Step 3: Add Router
Nested routers:
<Router>
    <Route path="/" component={Home} />
    <Route component={About} />
        <Route path="/info" component={Info} />
        <Route path="/bod" component={BoardOfDirector} />
        <Route path="/team" component={Team} />
    </Route>
</Router>Step 3: Add Router
Optional Route Attributes
<Router>
    <Route path="/" component={Home} />
    <Route component={About} />
        <Route path="about/info" component={Info} />
        <Route path="about/bod" component={BoardOfDirector} />
        <Route path="about/team" component={Team} />
    </Route>
 </Router>
<Router>
<Route path="/" component={Home} />
<Route path="about" component={About} />
<Route path="info" component={Info} />
<Route path="bod" component={BoardOfDirector} />
<Route path="team" component={Team} />
</Route>
</Router>Step 3: Add Router
BrowserHistory and HashHistory
ReactDOM.render((
  <Router history={browserHistory}>
    ...
  </Router>
), document.getElementById('root'));

==> example.com/about
ReactDOM.render((
<Router history={hashHistory}>
...
</Router>
), document.getElementById('root'));
==> example.com/#aboutStep 3: Add Router
Redirect with BrowserHistory
browserHistory.push('/some/path');Step 3: Add Router
Install
npm install --save-dev react-addons-css-transition-groupImport
// ES6
import ReactCSSTransitionGroup from 'react-addons-css-transition-group';


// ES5 with npm
var ReactCSSTransitionGroup = require('react-addons-css-transition-group');


// ES5 with react-with-addons.js
var ReactCSSTransitionGroup = React.addons.CSSTransitionGroup; Add ReactCSSTransitionGroup to wrap elements or components:
<ReactCSSTransitionGroup
    transitionName = "example"
    transitionAppear = {false}
    transitionEnter = {true}
    transitionLeave = {true}
    transitionEnterTimeout = {1000}>

    //YOUR ELEMENTS OR COMPONENTS HERE

</ReactCSSTransitionGroup>ReactCSSTransitionGroup attributes:
Transition name:
transitionName
Transition style:
transitionAppear, transitionEnter, transitionLeave
Transition time:
transitionAppearTimeout, transitionEnterTimeout, transitionLeaveTimeout,
CSS:
1/Define transitionName-type:
.example-appear, example-enter, example-leave
2/Define transitionName-type-active:
.example-appear.example-appear-active
.example-enter.example-enter-active
.example-leave.example-leave-active
NOTE
Animation durations need to be specified in both the CSS and the render method.
Animation group must be mouted to work(See detail)
IT IS TIME FOR DEMO
ReactTransitionGroup
Using javascript instead of CSS for animation
Callback should be called when animation run completly:
componentWillAppear() - componentDidAppear() - componentWillEnter() - componentDidEnter() - componentWillLeave() - componentDidLeave()
See more: @medium
https://facebook.github.io/react/docs/two-way-binding-helpers.html
http://exploringjs.com/es6/ch_modules.html
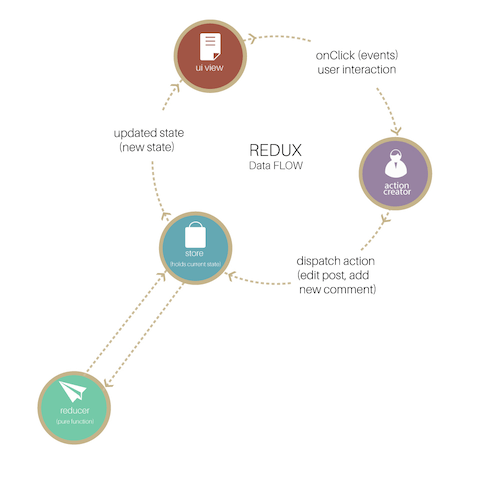
Redux is a predictable state container for JavaScript apps.
Redux is a predictable state container for JavaScript apps.
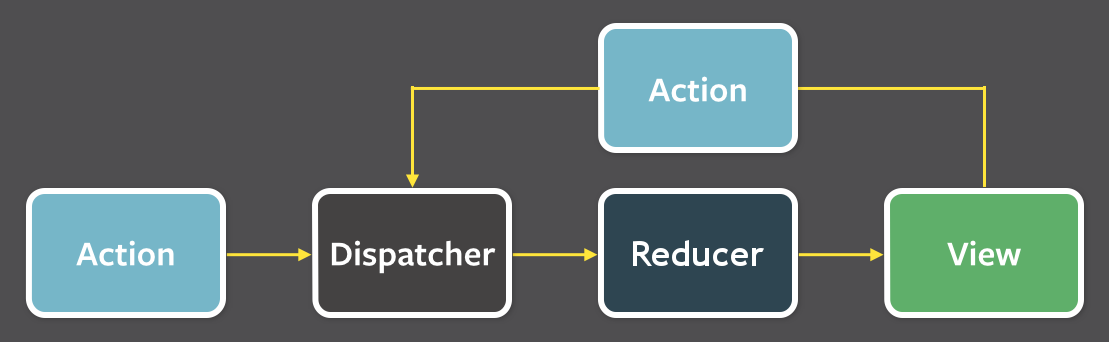
Actions
Actions are payloads of information that send data from your application to your store. They are the onlysource of information for the store
const LOGIN = 'LOGIN';

{
  type: LOGIN ,
  payloads: {username: '', password: ''}
}Action Creators
Action creators are exactly that—functions that create actions. It's easy to conflate the terms “action” and “action creator,” so do your best to use the proper term
function authLogin(formData) {
  return {
    type: LOGIN,
    formData
  }
}


store.dispatch(authLogin({username: '', password: ''});
Reducers
Decides how to change a state after receiving an action, and thus can be considered the entrance of a state change.
A reducer is comprised of functions, and it changes states by taking an action as an argument, in which it then returns a new state
Reducers
It does not make outside network or database calls.
Its return value depends solely on the values of its parameters.
Its arguments should be considered "immutable", meaning they should not be changed.
Calling a pure function with the same set of arguments will always return the same value
Reducers
// reducer

function authenticate(state, action) {
  switch(action.type) {
    case 'LOGIN':
      // handle action and return new state here

  }
}Reducers
Handle more actions:
// reducer

function authenticate(state, action) {
  switch(action.type) {
    case 'LOGIN':
      // handle login and return new state here

    case 'LOGOUT':
      // handle logout and return new state here

  }

}Reducers
Splitting reducers:
function todos(state = [], action) {
  switch (action.type) {
    case ADD_TODO:
      return [...]

    case TOGGLE_TODO:
      return [...]
      })
    default:
      return state
  }
}
Reducers
Splitting reducers:
function todoApp(state = initialState, action) {
  switch (action.type) {
    case SET_VISIBILITY_FILTER:
      return [...];

    case ADD_TODO:
    case TOGGLE_TODO:
      return todos(state.todos, action);

    default:
      return state
  }
}Reducers
Combine reducers:
import { combineReducers } from 'redux'

function visibilityFilter(state = SHOW_ALL, action) {
    //TODO
}

function todos(state = [], action) {
    //TODO
}

const todoApp = combineReducers({
  visibilityFilter,
  todos
})

export default todoApp;Store
Store is the object that holds the application state and provides a few helper methods to access the state, dispatch actions and register listeners.
The entire state is represented by a single store. Any action returns a new state via reducer.
Store
Import Store:
import { createStore } from 'redux';

import todoApp from './reducers';

let store = createStore(todoApp);Store
Dispatch actions:
store.dispatch(addTodo('The first thing todo'));Store
getState():
store.dispatch(addTodo('The first thing todo'));


store.getState();   // => [{text: 'The first thing todo'}]
Store
Add a change listener:
function select(state) {
  return state.some.deep.property;
}


function handleChange() {

  var currentValue = select(store.getState());

  //TODO: do somthing with currentValue

}

store.subscribe(handleChange);DEMO
By Cường Trần
React