Electron.js

跨平台app框架
how it works?
把網頁用app的形式呈現
利用chrome在背後渲染
後端用node.js執行
優點
- 由於是基於chrome,所以只要chrome(跟nodejs)可以跑得地方electron就可以跑
- 對於寫過網頁的很容易放手

缺點
- 要把一整個chromium包進去,執行檔很肥
- chrome很吃效能,electron也承襲這個問題

實際應用
vscode, spotify, discord,...etc


先備知識

html, css, javascript
前置作業
安裝node.js (本機javascript執行環境)
選長期維護版
cd Desktop

mkdir tmp-electron

cd tmp-electron

npm init
打開cmd(命令提示字元)輸入以下
(一行一行輸入)
npm init之後會有一串資料要輸入,以下
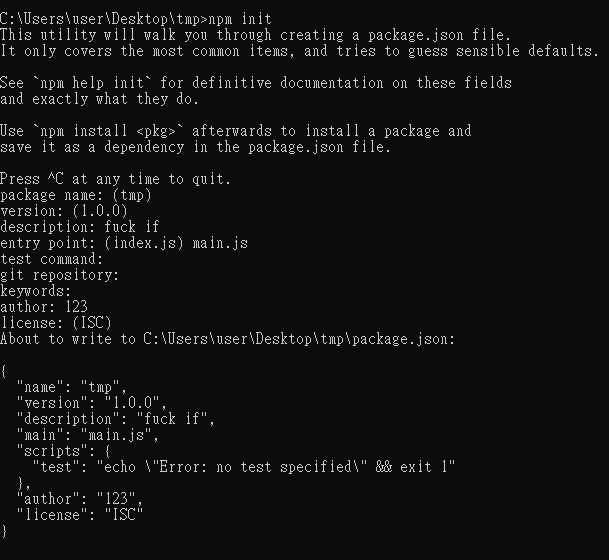
author跟description要輸入
entry point輸入main.js
其他直接按enter
npm install --save-dev electronnext:
"scripts": {
  "start": "electron ."
}
到package.json中把scripts那段修改成:
安裝自動refresh頁面的外掛
npm install --save-dev electron-reload架構
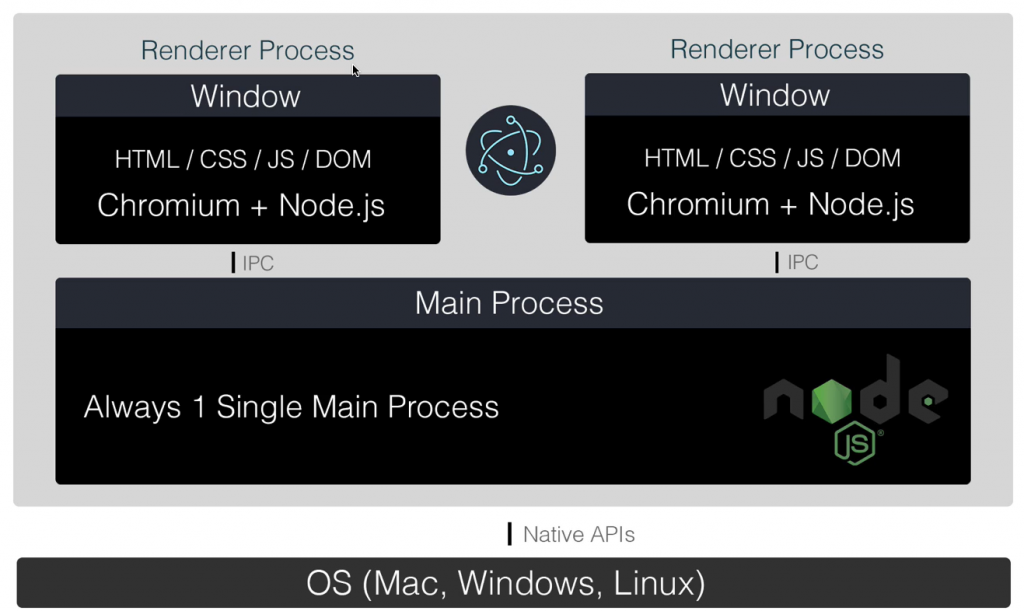
main process:用node.js跟系統層面互動,有如網頁後端,是主要的組織
renderer process:chromium的部分,顯示頁面,只有部分api功能
ipc(inter process communication):main跟renderer溝通的橋樑
基本頁面
再專案的根目錄新增以下的檔案
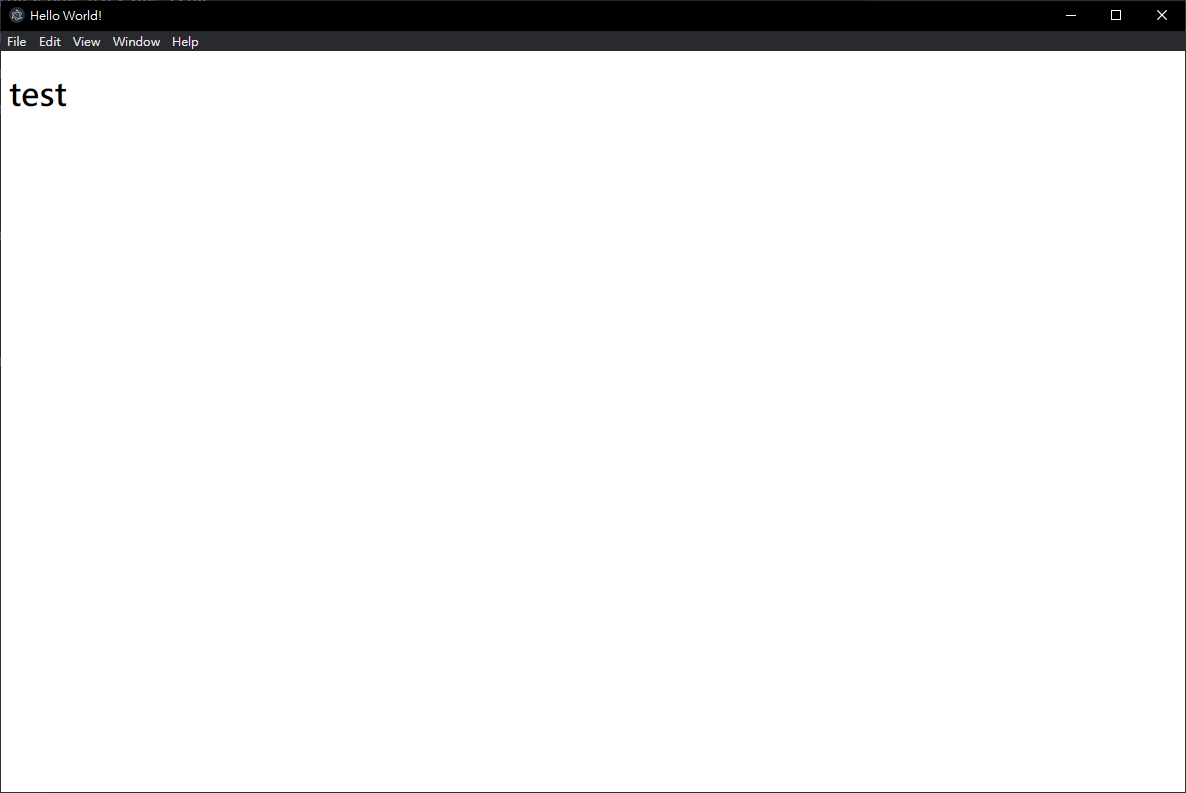
主頁 index.html
<!DOCTYPE html>
<html>
  <head>
    <meta charset="UTF-8">
    <title>Hello World!</title>
  </head>
  <body>
    <h1>test</h1>
  </body>
  <script src="renderer.js"></script>
</html>
屬於renderer process
renderer.js
index.html呼叫得js, 之後會用到
屬於renderer process
主程式 main.js
// 引入electron函式庫
const { app, BrowserWindow } = require('electron')
require('electron-reload')(__dirname) // 自動refresh

// 視窗的設定
const createWindow = () => {
    const win = new BrowserWindow({
        width: 1200,
        height: 800
    })

    //這個視窗要渲染index.html的頁面
    win.loadFile('index.html')
}

app.whenReady().then(() => {
    createWindow()
})
新增在專案資料夾最上層
屬於main process
這時候就可以在cmd打
npm run start應該會出現
視窗常用設定
開發人員工具
const mainWindow = () => {
    const win = new BrowserWindow({
        width: 800,
        height: 600,
    });
    win.webContents.openDevTools()
    win.loadFile("index.html")
}
關掉選項列
const mainWindow = () => {
    const win = new BrowserWindow({
        width: 800,
        height: 600,
        autoHideMenuBar: true,
    });
    win.loadFile("index.html")
}
app圖示
const mainWindow = () => {
    const win = new BrowserWindow({
        width: 800,
        height: 600,
        icon: "ckcsc.jpg" //filename
    });
    win.loadFile("index.html")
}
把檔案放專案根目錄
最大化
const createWindow = () => {
    const win = new BrowserWindow({
        width: 1200,
        height: 800,
        show: false
    })

    win.loadFile('index.html')
    win.maximize()
    win.show()
}
要先show: false再maximize()然後再show(),否則會glitch
等html完全讀取再顯示視窗
const createWindow = () => {
    const win = new BrowserWindow({
        width: 1200,
        height: 800,
        show: false
    })

    win.loadFile('index.html')
    win.once('ready-to-show', () => {
        win.maximize()
        win.show()
    })
}
避免像很多瀏覽器出現讀一半就顯示的情況,在app裡看起來就很怪
推薦的設定
做一個介面吧
利用其他網頁課所學的

preload.js
視窗的js要取用系統api有兩個方法:preload script和IPC
Preload Script是在頁面顯示前執行的js程式,能同時存取部分nodejs功能和DOM(aka. 把一些東西丟給renderer.js取用)
在根目錄新增preload.js
const { app, BrowserWindow } = require('electron')
require('electron-reload')(__dirname)
const path = require("path")

const createWindow = () => {
    const win = new BrowserWindow({
        width: 1200,
        height: 800,
        webPreferences: {
          	nodeIntegration: true,
        	preload: path.join(__dirname, 'preload.js'),
    	},
    })

    win.loadFile('index.html')
}

app.whenReady().then(() => {
    createWindow()
})
編輯main.js
nodeIntegration可以讓preload script取得node的功能。根據electron官方,特定情況會造成資安疑慮,不過現階段我們都是用自己的code跑,更重要的是沒有nodeintegration preload.js就沒什麼用
編輯preload.js
const { contextBridge } = require('electron')

contextBridge.exposeInMainWorld('info', {
})
透過preload script把node.js裡的一些數值和函式expose到renderer process
編輯preload.js
const { contextBridge } = require('electron')

contextBridge.exposeInMainWorld('info', {
  path: () => __dirname
})
現在要把cpu用量expose到renderer process
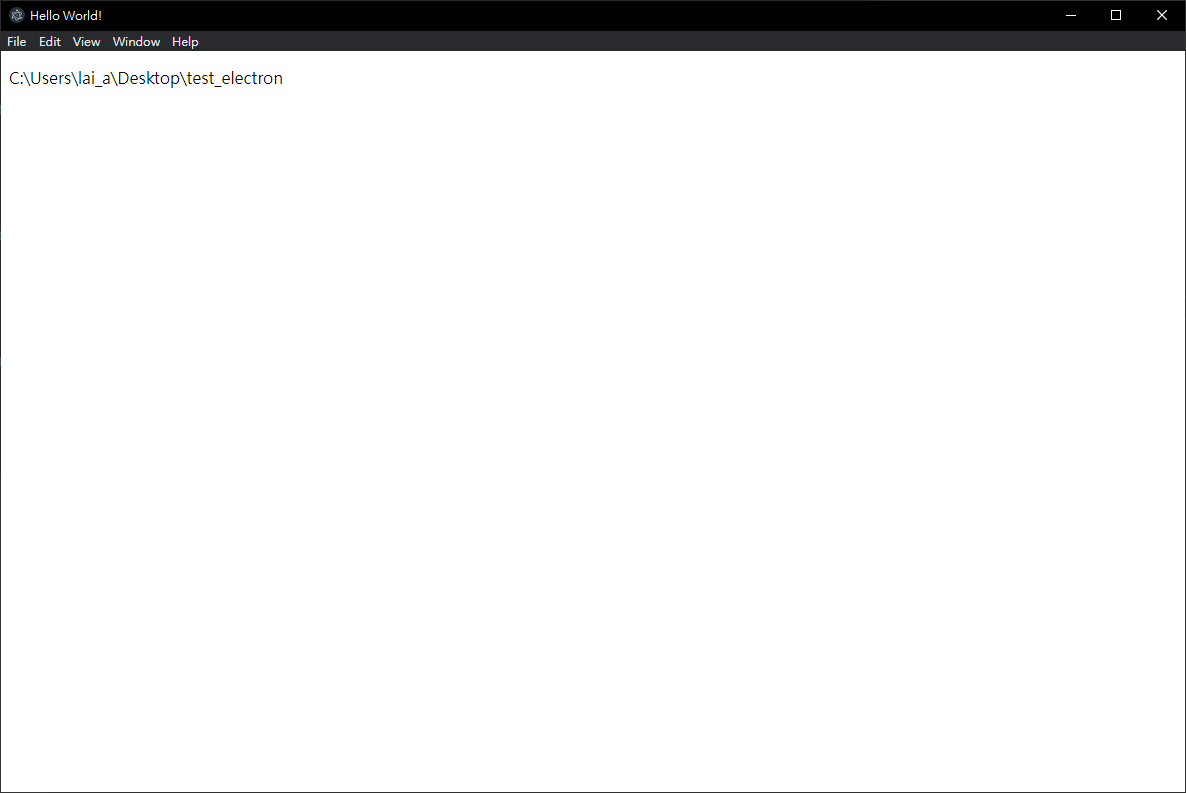
編輯index.html
<!DOCTYPE html>
<html>
  <head>
    <meta charset="UTF-8">
    <title>Hello World!</title>
  </head>
  <body>
    <p id='showpath'></p>
  </body>
</html>
編輯renderer.js
const information = document.getElementById('showpath')
information.innerText = info.path()
取得expose出的變數放到html裡
result:
IPC
如果要在網頁渲染後才呼叫electron的程式和變數,就要用ipc呼叫跟接受訊息
ipc需要在前端和後端分別有發送端跟接收端
const { contextBridge, ipcRenderer } = require('electron')

contextBridge.exposeInMainWorld('info', {
  call: (method, arg) => ipcRenderer.sendSync(method, arg)
})
編輯preload.js:expose 發送ipc的function
編輯index.html
略-------------------
  <body>
    <button onclick="sayhi()">hihi</button>
  </body>
略-------------------
編輯renderer.js
function sayhi(){
    alert(info.call('sup', 123))
}
編輯main.js
const { app, BrowserWindow, ipcMain } = require('electron')
const path = require("path")
require('electron-reload')(__dirname)

ipcMain.on('sup', (event, arg) => {
    event.returnValue = 'hi back'
})
略-----------------------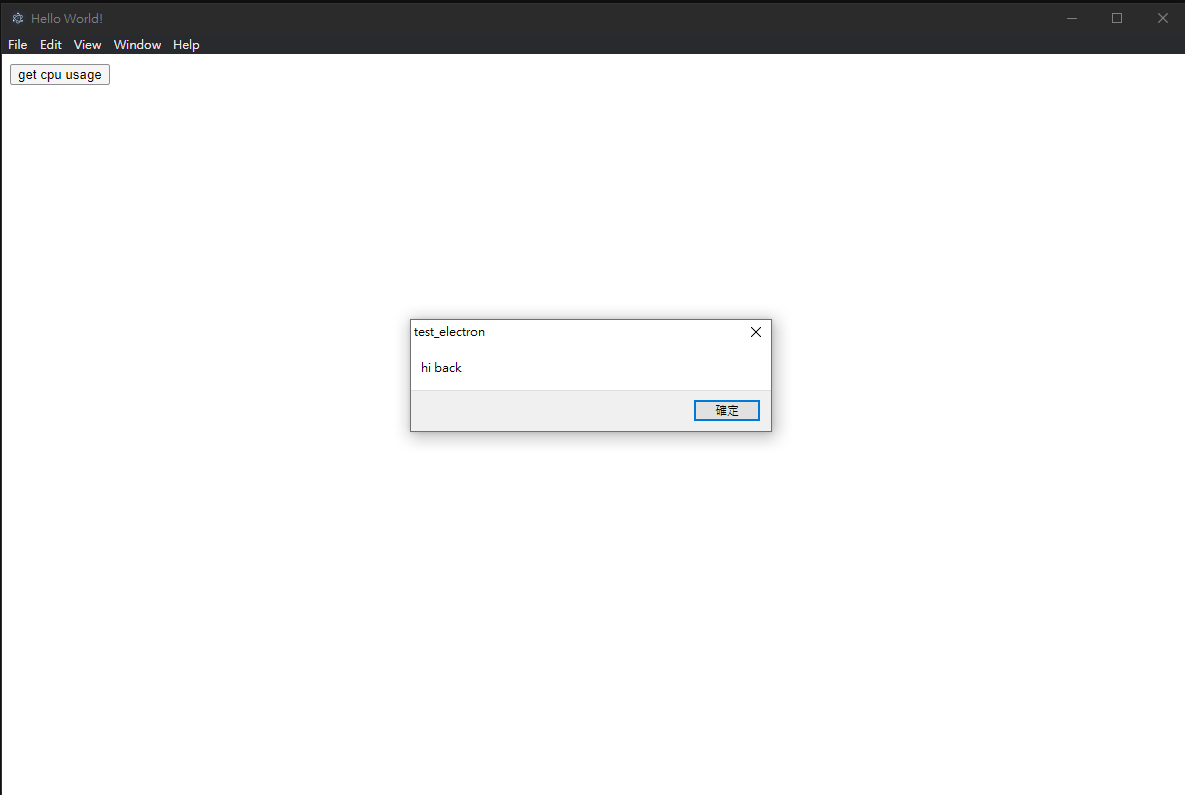
如果發送但不須要回傳值,那在preload.js的sendSync改成send就好
const { contextBridge, ipcRenderer } = require('electron')

contextBridge.exposeInMainWorld('info', {
  call: (method, arg) => ipcRenderer.sendSync(method, arg)
})
打包成執行檔
npm install --save-dev electron-builder安裝打包工具
{
  "name": "test_electron",
  "version": "1.0.0",
  "description": "hihi",
  "main": "main.js",
  "scripts": {
    "start": "electron .",
    "pack": "electron-builder --dir"
  },
  "build": {
    "appId": "alanlai.app",
    "win": {
      "icon": "ckcsc.jpg"
    }
  },
  "author": "me",
  "license": "ISC",
  "devDependencies": {
    "electron": "^22.0.0",
    "electron-builder": "^23.6.0",
    "electron-reload": "^2.0.0-alpha.1"
  }
}
編輯package.json
build部分可有可無
npm run pack跑完後執行檔就會出現在dist資料節裡
deck
By alan lai


