Vijay
A product developer at Anand Software and involved in Learning and Assessment System development. Check it out at Learning and Assessment System
1. What is Return Loss:
Return loss is a measure of VSWR (Voltage Standing Wave Ratio), expressed in decibels (db). The return-loss is caused due to impedance mismatch between two or more circuits. For a simple cable assembly, there will be a mismatch where the connector is mated with the cable. There may be an impedance mismatch caused by nick or cuts in a cable. At microwave frequencies, the material properties as well as the dimensions of the cable or connector plays important role in determining the impedance match or mismatch.
A co-axial cable is chosen to measure the return-loss for study purpose. Typically, for a device or a system, return-loss is measured at the input or at the output. The following equipment are used to measure the return loss of a co-axial cable at microwave frequencies:
Frequency source
Network Analyzer (either a scalar network analyzer or a vector network analyzer)
Detector with calibration source.
Reflection bridge
Co-axial Short
Cable under test (this could be any device under test)
A 10dB attenuator (optional, but recommended).
3.The Measurement of Co-axial cable losses:
The measurement process consists of calibrating the test set-up for insertion and return-loss. If you have dual channel network analyzer, both insertion and return losses can be measured simultaneously. You can also measure insertion and return losses separately as is done here.
3.a Insertion loss Measurement:
Step 1. Set the sweep source to the required frequency range. Make sure that the output of the sweep source is within the desired amplitude limits, otherwise, it may saturate the detector head and any measurements taken would not be accurate. You may use an attenuator at the output of the sweep source to mitigate any problem that may arise due to mismatch between the cable under test and the sweep source.
It is recommended to use a 10 dB attenuator for this purpose. For example, you can set the values as below:
Sweep frequency (measurement frequency):
100MHz - 2.3 GHz; Sweep power: 12 dBm
Note: Also, make sure that you are measuring same impedance. For example, if the cable is 50Ohm, and the Sweep generator output is 75 Ohm, you need to use a 50 to 75 Ohm impedance matching device.
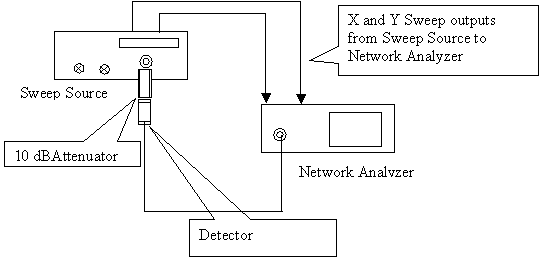
Step 2: Calibrate the test system by connecting as shown in the figure 1, bypassing the cable under test. Calibration is nothing but setting a reference line taking all stray measurement errors into consideration.
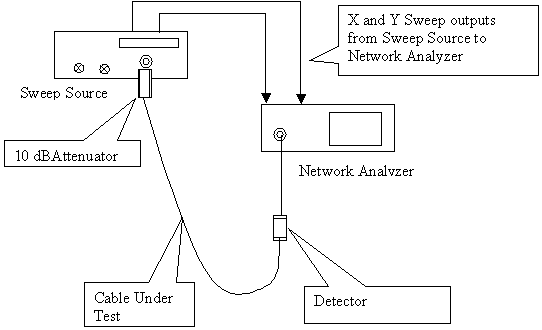
Step 3: Now you have done the equipment calibration, connect the cable as shown in the figure 2, without disturbing any other parameters such as sweep power output or the attenuator value. The trace in the network analyzer display now shows the Insertion loss of the cable against the frequency.
Courtesy: RFCables.org
Checkout full article at Tutorialsweb.com Coax Cable Measurements
By Vijay
The presentation is about measurement of coaxial (Coax) cable measurements, such as insertion loss and return loss.


