ECSE 321 - Tutorial 5
Dominic Charley-Roy
https://github.com/dominiccharleyroy
dominic.charley-roy @ mail.mcgill
Swing
What's Swing???
Time to upgrade that boring command line application to a full-fledged GUI application.
Basics of Swing
- Library for developing Java GUI applications
- Part of the standard Java library
- Swing code lives in the javax.swing package
- Code for this tutorial will be at: https://github.com/dominiccharleyroy/swingtutorial
JComponent
GUI components are implemented as Java classes. These almost all extend JComponent, whcih is a basic GUI component class.

JFrame
A JFrame represents a basic GUI window.
import javax.swing.JFrame;

public class BasicWindow {
	public static void main(String[] args) {
		JFrame window = new JFrame("Window Title");
		window.setSize(640, 480); // 1
		window.setDefaultCloseOperation(JFrame.EXIT_ON_CLOSE); // 2
		window.setVisible(true); // 3
	}
}
Things to note:
- JFrames have a size of 0x0 initially.
- By default JFrames do not exit the application when closed, causing memory leaks - we have to specify that clicking the X should exit the application.
- JFrame objects need to be made visible - they are hidden by default.
But our frame is empty... :(
- A JFrame has a content pane.
- This means that it has a child component.
- The content pane is what gets rendered!
- The frame accepts any Component as a content pane!
- To set the component:
window.add(component);JLabel
- This component creates a simple text label.
- We can set the text in the constructor of the label.
- The label text can be changed via setText() and fetched via getText().
import javax.swing.*;

public class BasicWindow {
	public static void main(String[] args) {
		// Create the window.
		JFrame window = new JFrame("Window Title");
		window.setDefaultCloseOperation(JFrame.EXIT_ON_CLOSE);
		window.setSize(640, 480);

		// Create our label.
		JLabel label = new JLabel("Hello, ");
		label.setText(label.getText() + "world!");

		// Set it as the window's content pane and show the window.
		window.add(label);
		window.setVisible(true);
	}
}
JPanel
The JPanel is a JComponent which acts as a container and can hold as many components as you like - even other JPanels!
This lets us have more than one GUI element in our frame!
Note: By default, Java tries to layout panel components in a natural flow in the order they are added. We'll cover how to change this later!
We can add and remove components from a JPanel using .add(component) and .remove(component)
JPanel Example!
import javax.swing.*;

public class JPanelExample {
	public static void main(String[] args) {
		// Create the window.
		JFrame window = new JFrame("Window Title");
		window.setDefaultCloseOperation(JFrame.EXIT_ON_CLOSE);
		window.setSize(640, 480);

		// Create our JPanel.
		JPanel panel = new JPanel();

		// Create 5 labels and add them to our panel.
		for (int i = 0; i < 5; i++) {
			panel.add(new JLabel("Label " + i));
		}

		// Set it as the window's content pane and show the window.
		window.add(panel);
		window.setVisible(true);
	}
}
Buttons!
We want an interactive application! This is accomplished with buttons! Buttons are implemented using the JButton class!
We pass the button text in the constructor!
JButton button = new JButton("Press Me!");
My button doesn't do anything...
We want to run code when a button is pressed!
To do this, Java provides an interface called ActionListener with one method:
void actionPerformed(ActionEvent e)We can then register ActionListener objects on the button! The actionPerformed method is called when the button is pressed or the user presses space while the button is highlighted.
button.addActionListener(actionListener);ExcitingButton.java
This test application has a label and a button. When you press the button, the label text is updated!
MUCH EXCITE!
Alerts!
Swing provides us with some helper methods for showing an alert message and collecting user input.
public class AlertExample {

	public static void main(String[] args) {
		// Show a regular alert with an OK button.
		JOptionPane.showMessageDialog(null, "This is an alert!");

		// Show a dialog with a text field to get input.
		String name = JOptionPane.showInputDialog(null, "What is your name?");
		JOptionPane.showMessageDialog(null, "Hi " + name + "!");

		// Show the user a Yes/No dialog. Note that we have to specify what
		// buttons we want as the last argument.
		int result = JOptionPane.showConfirmDialog(null, "Are you awesome?",
				"Dialog Title", JOptionPane.YES_NO_OPTION);
		if (result == JOptionPane.YES_OPTION) {
			JOptionPane.showMessageDialog(null, "You pressed Yes!");
		} else {
			JOptionPane.showMessageDialog(null, "You pressed No!");
		}
	}

}
Text Fields
Swing provides JTextField for single-line text input fields and JTextArea for larger inputs.
Both have a getText and a setText method!
new JTextField(int cols)
new JTextArea(int rows, int cols)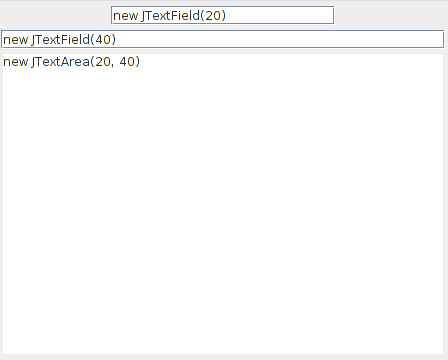
Let's Build Something!
- As practice, let's build an application together which will have a text field, a button and a label.
- When you press the button, the label's text should be updated to reflect the text field text.
- How do we get started? What will we need?
- Solution: NameInFieldSolution.java
But black and white is so boring...
Most JComponents expose methods for controlling the style of the component.
- setForeground(color) sets the foreground color, eg. the text color of a label.
-
setBackground(color) sets the background color.
Note: that for JLabels, you have to do setOpaque(true);
The java.awt.Color class has a number of commonly used colors, eg. Color.BLUE or Color.PINK. You can also make your own:
new Color(int r, int g, int b);
Color goldenrod = new Color(135, 206, 250);
component.setForeground(goldenrod);
Borders on Borders on Borders
Components have a setBorder(border) method.
How do we create borders?
// Create a red line border with 1px thickness.
Border redLine = BorderFactory.createLineBorder(Color.red, 1);
// Add 5px of padding as a border.
Border padding = BorderFactory.createEmptyBorder(5, 5, 5, 5);
// Add the red line border outside of the padding.
// BorderFactor.createCompoundBorder(outside, inside)
// You can nest a compound border within another!
Border paddedRedLine = BorderFactory.createCompoundBorder(redLine, padding);

Enabling and Disabling
- Sometimes we want to disable components!
- eg. a text field should be disabled until a button is pressed.
- Components have a setEnabled(boolean) method for this!
Controlling Layout
- Every JPanel has a layout manager which dictates how the components added to the panel will be arranged.
- The default layout manager is called FlowLayout - it adds the elements back to back, going to the next line if necessary, similar to how text is written (eg. if a word is too big, it goes to the next line).
- JPanel's have a setLayout(layoutManager) method!
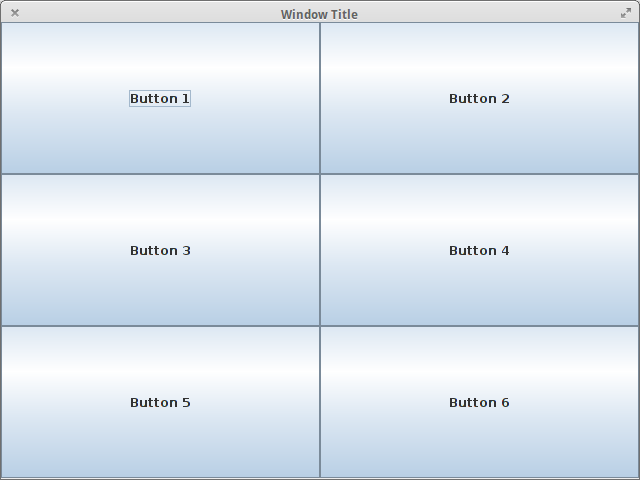
GridLayout
- The GridLayout layout manager arranges components in a grid (think of Excel)!
- Every grid cell is the same size - if one component is really big, it stretches out all grid cells!
-
new GridLayout(int rows, int cols)
- If you leave rows as 0, then there are unlimited rows.
- If you leave columns as 0, then there are unlimited columns.
- Components are added in a left-to-right fashion.
GridLayoutExample.java
BorderLayout
- This layout manager separates a JPanel into 5 segments: NORTH, EAST, WEST, SOUTH and CENTER.
- The CENTER section stretches as much as possible.
- Each segment can have 0-1 component.
- When adding a component, if you don't specify which segment to add into, it is added to CENTER.
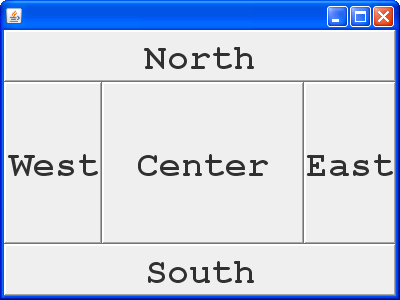
BorderLayoutExample.java

// Create our JPanel.
JPanel panel = new JPanel();
panel.setLayout(new BorderLayout());

// Add a button to each section.
panel.add(new JButton("EAST"), BorderLayout.EAST);
panel.add(new JButton("NORTH"), BorderLayout.NORTH);
panel.add(new JButton("WEST"), BorderLayout.WEST);
panel.add(new JButton("SOUTH"), BorderLayout.SOUTH);
panel.add(new JButton("CENTER"));
Combining JPanels!
Now that we've seen layout managers, you might see why we want to nest JPanels!
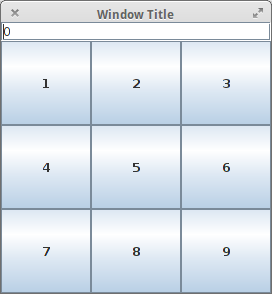
Suppose we were making a calculator - we want a grid of buttons in the center of the screen and a text field at the top!
This entire application is stored in a JPanel using BorderLayout. In the CENTER, we have a JPanel using GridLayout with all the buttons. In the NORTH, we have a text field.
Calculator.java
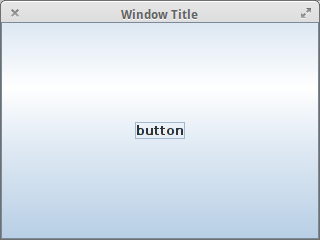
Packing!
A quick note about the size of the JFrame. Recall we had used setSize(width, height) to set the initial size of the frame. We can also use pack() instead to size the frame to the size of it's contents. This needs to be done after making the frame visible.

vs.
Swing Standard
So far we've been creating all of our applications in the main function. This isn't great! :(
The Swing best practice is to create our own JFrame class, like so:
class MyFrame extends JFrame {}Swing isn't thread-safe. Don't worry about what that means, all you need to know is that your main should look like this:
public static void main(String[] args) {
	SwingUtilities.invokeLater(new Runnable() {
		@Override
		public void run() {
			JFrame frame = new MyFrame();
			frame.setVisible(true);
		}
	});
}
Moar?
- Swing offers all the standard components, such check boxes, menus, list boxes, password fields, color pickers, etc.
- Swing also offers all sorts of event handling, such as key presses, events when you resize a screen, etc.
- Useful resources:
- http://bit.ly/1q0NHwU - Oracle Java Swing tutorial
- http://bit.ly/1COaO6G - YouTube playlist containing Swing tutorials.
It's
WindowBuilder
Time!

What's that?!
- WindowBuilder is an Eclipse plugin which lets you build GUIs by dragging and dropping!
- To install WindowBuilder:
http://www.eclipse.org/windowbuilder/download.php - We'll want the SwingDesigner.
Demo Time!
Copy of Copy of ECSE 321 - Tutorial 3
By dominiccharleyroy