ECSE 321 - Tutorial 9
Dominic Charley-Roy
https://github.com/dominiccharleyroy
dominic.charley-roy @ mail.mcgill
Jars, Ant, and Javadocs

A Motivating Problem
- Suppose you want to show a friend your game - how do you send your Java project to them? Do you zip it?
- What if they don't know how to use Eclipe?
- What if they don't know how to unzip?
- What if they don't know what Java is?
- Ideally, we want to package our project into one file that your friend can just double click to run!
Enter Jar Files
- A Jar file lets you bundle up your entire Java project in one executable file!
- This is kind of like an .exe file on Windows!
- Internally, it's basically like a zip file... except that you can run it!
Easy as 1, ...
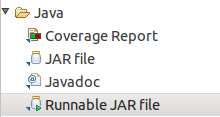
Step 1. From Eclipse: go to the File menu and hit Export. Select Runnable Jar File
..., 2, ...
- Select the Run configuration for your project (should be the name of the class with your main)
- Select the destination where the Jar file will go.

..., 3!
Hit the Finish button!

You might get a message about repacking referenced libraries... don't worry about that for now!
Unfortunately...
- There is one extra step! :(
- When a Jar file is built, it may do some re-organizing.
- If you have project resources (eg. game images), you have to do some things differently...
- First, create a source folder called res in Eclipse at the same level as src and put your resources there:
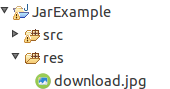
Accessing our Resources
- Now, whenever you want to refer to a resource, instead of just passing the file name you need to build a URL object like this:
- Note that we have to give a class as the first value!
- Also note that we start our path by a slash! This means it is at the root of the classpath. You need to put / and not /res.
MyClassName.class.getResource("/download.jpg")Note about libraries
- Ideally your libraries should be in a folder called lib.
- Most libraries come in a Jar file as well - remember that a Jar is basically like a zip file!
- Try to leave "Extract required libraries into generated Jar" as checked - this will make sure you don't have any class path issues when running a Jar file.
Stop - Demo Time!

What is Ant?
- Ant is a command line tool which lets you do all sorts of magical things with your project!
- Kind of like Makefiles
- We can create a bunch of tasks associated with our project, such as building (creating a Jar), cleaning, uploading to a remote server, pushing to git, all sorts of things!
Installing Ant
sudo apt-get install antAnt Basics
- To use Ant, your project should have a build.xml file which will describe all the available tasks.
- To run a specific task, you do:
- If you don't specify a task name, it will use the default task specified by the project.
ant taskNameHello, world!
Here we will create a build.xml file with one task (hello-world) which is the default task. When invoke, it simply prints out "Hello, world!"
<project name="MyProject" default="hello-world" basedir=".">
	<target name="hello-world">
		<echo>Hello, world!</echo>
	</target>
</project>
$ ant hello-world
Buildfile: /home/dom/Coding/Workspace/AntJarExample/build.xml
hello-world:
[echo] Hello, world!
BUILD SUCCESSFUL
Total time: 0 secondsAnt Targets
- A target in Ant is essentially a task!
- It has a name! It can also have dependencies, which are tasks that will be run before this one is run.
- For example, if you have a build task that has clean and init as a dependency, running build will cause clean and init to run first!
- A target has a list of steps! A step can be removing a file, executing a command, printing to the screen... all sorts of things!
- For a list of built-in tasks: http://ant.apache.org/manual/tasklist.html
Ant Variables
- Ant lets you create variables which you can then use in your tasks!
- This can be useful for the name of folders! If you put them in a variable, then you can change bin to build or src to source and you only need to change the variable!
<property name="src" location="src"/>
<property name="build" location="bin"/>
<property name="dist"  location="dist"/>
Example Project
- We're going to be making a build file for a project:
https://github.com/dominiccharleyroy/antjarexample - We want the following tasks:
- One for cleaning up!
- One for compiling our Java files to .class files
- One for building a Jar file
Our project structure
- Our project will have the following folders:
- src/ for holding source code.
- res/ for resources
- lib/ for external libraries
- bin/ for compiled Java files (.class files)
- dist/ for our final Jar file
Our Clean task
Our clean task should simply delete the bin and dist folders.
<project name="MyProject" default="compile" basedir=".">
	<property name="src" location="src"/>
	<property name="lib" location="lib"/>
	<property name="res" location="res"/>
	<property name="build" location="bin"/>
	<property name="dist"  location="dist"/>

	<target name="clean">
		<!--
			Delete our directories.
		-->
		<delete dir="${build}"/>
		<delete dir="${dist}"/>
	</target>
	...
</project>
Our Compile Task
This compiles all of our files in the source folder and puts them as .class files in the bin folder. Note that it cleans first!
<target name="compile" depends="clean">
	<!-- Create the build directory. -->
	<mkdir dir="${build}"/>
	<!--
        	Compile all of the source files.
		Make sure to include libraries.
	-->
	<javac srcdir="${src}" destdir="${build}">
		<classpath>
			<fileset dir="${lib}">
				<include name="**/*.jar"/>
			</fileset>
		</classpath>
	</javac>
	<!-- Copy our resources. -->
	<copy todir="${build}">
	    <fileset dir="${res}"/>
	</copy>
</target>
Our Jar Task
This creates the Jar file and puts it in the dist folder!
Note: This can be automatically generated from Eclipse in the Export to Runnable Jar screen.
<target name="jar" depends="compile">
	<!-- Create our dist folder. -->
	<mkdir dir="${dist}"/>
	<!-- Create the jar file as build.jar -->
	<jar destfile="${dist}/build.jar" filesetmanifest="mergewithoutmain">
		<!-- Specify the class which has the main method. -->
		<manifest>
			<attribute name="Main-Class" value="TestApp"/>
			<attribute name="Class-Path" value="."/>
		</manifest>
		<!-- Add in our compiled files. -->
		<fileset dir="${build}"/>
		<!-- Add in our libraries. -->
		<zipgroupfileset dir="${lib}" includes="**/*.jar"/>
	</jar>
</target>
Example Run
$ ant jar

Buildfile: /home/dom/Coding/Workspace/AntJarExample/build.xml

clean:
   [delete] Deleting directory /home/dom/Coding/Workspace/AntJarExample/bin
   [delete] Deleting directory /home/dom/Coding/Workspace/AntJarExample/dist

compile:
    [mkdir] Created dir: /home/dom/Coding/Workspace/AntJarExample/bin
    [javac] Compiling 2 source files to /home/dom/Coding/Workspace/AntJarExample/bin
     [copy] Copying 1 file to /home/dom/Coding/Workspace/AntJarExample/bin

jar:
    [mkdir] Created dir: /home/dom/Coding/Workspace/AntJarExample/dist
      [jar] Building jar: /home/dom/Coding/Workspace/AntJarExample/dist/build.jar

BUILD SUCCESSFUL
Total time: 1 second
Eclipse and Ant
- You can run Ant targets from within Eclipse!
- Right click your build.xml and select Run As > Ant Build to run the default task.
- Right click your build.xml and select Run As > Ant Build... to select a different task to run.
Javadoc
- Javadoc is a documentation feature of Java!
- You can run certain tools to generate a nice, human-readable form of the Javadocs of a project.
- Example:
https://docs.oracle.com/javase/7/docs/api/overview-summary.html
Generating Javadoc with Ant
We can create an Ant target to generate the HTML version of our Javadoc! This will put our HTML files in the doc folder.
Just make sure to add the right line to clean.
<property name="doc"  location="doc"/>
...
<target name="doc" depends="clean">
	<!-- Create the doc directory. -->
	<mkdir dir="${doc}"/>
	<!-- Generate the Javadoc. -->
	<javadoc sourcepath="${src}" destdir="${doc}"/>
</target>
Want More?
- Apache Ant Manual:
http://ant.apache.org/manual/ - Rami's ECSE 321 Ant tutorial:
https://github.com/sayar/talks
(under ECSE321/Tutorial 9) - Ant and Eclipse:
http://help.eclipse.org/luna/index.jsp?topic=%2Forg.eclipse.platform.doc.user%2F
gettingStarted%2Fqs-93_project_builder.htm
Tutorial 9 - Ant, Jars, and Javadocs
By dominiccharleyroy