ECSE 321 - Tutorial 8
Dominic Charley-Roy
https://github.com/dominiccharleyroy
dominic.charley-roy @ mail.mcgill
Multi-User Git
Git Recap
git init
git clone
git add/rm
git status
git commit
git log
git diff
git tag
Time
to
Branch Out
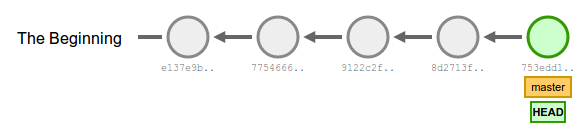
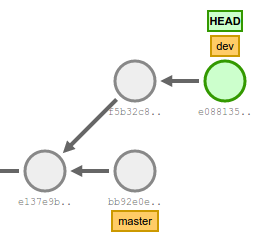
The State of a Git Repo
- Up to now, we've seen our git repository as a chain of commits.
- The HEAD is a reference to whatever is the current active commit and allows us to see what our repository looked like for a past commit.
- This is what our repository looks like after a few commits:
If we work this way, our history will be simple and linear.
Branching!
- Git has the concept of branches.
- A branch can be thought of like "Save As..." - it allows deviating from the main history of a git project.
- Save as lets you create a copy of a project to work on it without modifying the original.
What makes up a branch?
- A branch has a name.
- As we are deviating from history, a branch has a starting point which is the last commit it had in common with the branch it was based off of.
- Master is a special branch!
Branching History
- A branch has its own history starting after the starting point! This means you can commit to a particular branch and the commit will not appear in the branch it was based off of.
- Git also lets you re-integrate (merge) any changes made in a branch to the branch it was based off of!
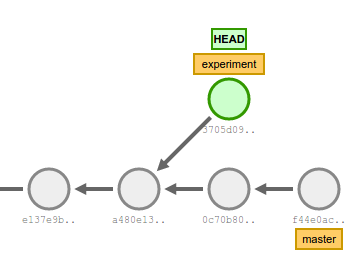
Branch Example
- Suppose after a few commits, we want to try something out without dirtying our main repository.
- We create a branch called experiment. Its starting point will be a480e13.
- We can commit to experiment.
- Note that anyone can still commit to master as well, so it may get its own new commits that are not in experiment!
HEAD and Branches
- Remember that HEAD keeps track of the current commit (e.g. what commit is currently visible on our local repository).
- HEAD also keeps track of the current branch!
- The current branch is used to determine where a commit will go!

Creating a Branch
- To create a branch:
- The current commit and branch pointed to by HEAD will be used as the starting point!
- Note that when you create the branch, you are not automatically switched to the branch! If you create a branch and HEAD points to master, you will still be in master afterwards!
git branch BRANCHNAMESwitching Branches
- To switch branches, we can use our trusty git checkout command!
- Recall that git checkout simply changes our HEAD!
git checkout devgit checkout BRANCHNAME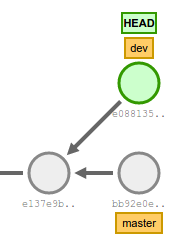
Pushing Branches
- Recall our git push command:
- When you create a branch, it is part of your local repository. If you want it to be on the remote repository, you must push it!
- Note that -u is only required the first time we push for every branch. It sets up the branch information on the remote repository.
git push -u origin mastergit push -u origin BRANCHNAMERe-Integrating Changes
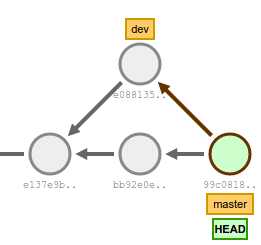
- Once we've done our commits to our branch, if we decide that we want to re-integrate these commits into the starting point branch, we need to merge.
- If we created a branch dev which deviated from master, then we can merge our changes like so:
- This will create a new commit in master which is the changes of dev!
- Note: You can get merge conflicts if both master and dev worked on the same files! These can get really ugly!
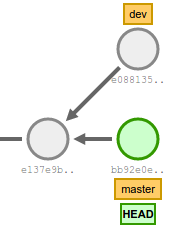
git checkout master
git merge dev
Visualizing Merging

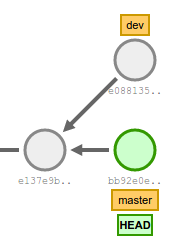
git checkout master # Step 1
git merge dev # Step 2
Step 1
Step 2
Initial State
Keeping Branches Local
- Suppose you wanted to try something out locally without sending anything over to the server.
- You can keep a local branch by simply never pushing it!
- If you want your branch changes to appear remotely, merge them in to the starting point and then push the starting branch!
I'm done with my experiment...
When you're done with a branch, you can delete it:
- You can't delete the current branch! If you want to delete a branch, you need to checkout a different branch. Or else we'd have no way of fixing our HEAD!
- If a branch has some unmmerged commits and you try to delete it, git will warn you that you are about to lose commits. Change -d to -D if you really want to do this.
git branch -d BRANCHNAMEIdeal Workflow
- The master branch should always be working! In other words, you should always be able to compile master (even if there is functionality missing).
- Create a dev branch (starting from master) which will contain code that compiles but needs to be tested before being merged to master.
- Create a feature branch (starting from dev) for each new feature. This lets you work on 1 feature in isolation. It is expected that these feature branches can be broken/unstable. When the feature is complete, merge it into dev.
Interactive Demo
Collaboration Approaches
Branches introduce two different ways of collaborating on a project with multiple users.
- Merging
- Rebasing
Merging
- Merging is what we saw earlier with git merge.
-
Pros:
- Simple to use!
- Does not alter the history, i.e. commits stay in the branch they were comitted and then we have a commit which merges them.
-
Cons:
- It can be really confusing where commits come from since our history can be a huge tree.
- Does not always work the same way. We have special types of merges called fast-forward merge which appear different in history.
- We have an extra commit almost every time we merge!
Rebasing
- Rebasing works differently from merging in the sense that history is re-written.
- Rebasing lets you keep your branch up to date with master so that you have no merge conflicts when you merge your branch back into the starting branch!
- When you rebase, it takes the commit history of the branch you are rebasing with (e.g. the starting branch) and puts a copy of each commit in the branch in front, regardless of when you actually committed!
Rebasing Example
Suppose we rebase dev onto master to make sure we are up to date. Notice how the commits get copied and we now have linear history (except dev and master are at different points)
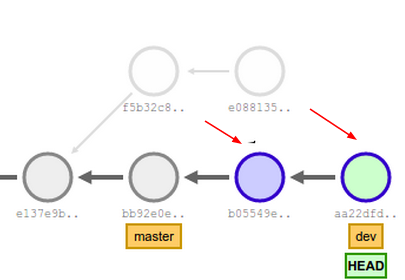
Before rebase
After rebase
Note that the red arrows are not history, I just added them to make it clear that the commits were copied.
Simple Rebase Workflow
Suppose you have changes in dev and want to cleanly rebase them into master.
git checkout dev # Switch to dev branch
git rebase master # Perform the rebase
git checkout master # Switch to master
git merge dev # Bring master HEAD up to date with rebased commits
Interactive Rebasing
- By default, rebase acts kind of like a black box and doesn't give you much control.
- You can use rebase -i to do all sorts of things, including:
- Edit a commit message before rebasing it.
- Only rebase some commits (this can lead to you losing commits!!!)
- Squash two commits together before copying them over.
- Note: this uses your system editor by default, which may be vi/vim/nano if you are on Linux or OSX.
git rebase -i BRANCH-TO-REBASE-INTOExample
Rebase -i essentially lets you build the rebasing script. The list of commits to rebase are presented in reverse order.
pick f7f3f6d changed my name a bit
pick 310154e updated README formatting and added blame
pick a5f4a0d added cat-file

# Rebase 710f0f8..a5f4a0d onto 710f0f8
#
# Commands:
#  p, pick = use commit
#  r, reword = use commit, but edit the commit message
#  e, edit = use commit, but stop for amending
#  s, squash = use commit, but meld into previous commit
#  f, fixup = like "squash", but discard this commit's log message
#  x, exec = run command (the rest of the line) using shell
#
# These lines can be re-ordered; they are executed from top to bottom.
#
# If you remove a line here THAT COMMIT WILL BE LOST.
#
# However, if you remove everything, the rebase will be aborted.
#
# Note that empty commits are commented out
Why interactive?
- It's called interactive because it will stop for user input as rebasing goes on!
- Recall that rebasing essentially creates a copy of each commit!
Example: Changing commit message on rebase.
- If you mark a line as r/reword, the rebase will pause at some point and open up an editor to let you change commit message.
- If you mark a line as e/edit, the rebase will pause at some point. Enter this to change the commit/commit message:
Once that is done, we need to tell rebase to continue:
git commit --amendgit rebase --continueExample: Dealing with a conflict
Suppose you rebase and both master and dev have changed the file hello.txt. When you rebase, you will get this error:
If you run git status, you will see what file had a conflict:
error: could not apply ...

When you have resolved this problem, run "git rebase --continue".
If you prefer to skip this patch, run "git rebase --skip" instead.
To check out the original branch and stop rebasing, run "git rebase --abort".
Unmerged paths:
  (use "git reset HEAD <file>..." to unstage)
  (use "git add <file>..." to mark resolution)

	both added:      hello.txt
Example Cont'd: Dealing with a conflict
If you open hello.txt, you can see the conflict:
Once you have fixed the conflict (e.g. by only keeping the "Hello from test!" line), we need to stage our fix
And finally, we tell rebase to continue!
<<<<<<< HEAD
Hello, from master!
=======
Hello from test!
>>>>>>> 1f028f3... Updated hello.txt (test)
git add hello.txt git rebase --continueMore rebase tips
- You can abort a rebase by typing:
- You can ignore a commit in a rebase (note that this can lose result in you losing your commit, so be careful!!!) by typing:
git rebase --abortgit rebase --skipRebasing summary
- Pros:
- The history is a lot more clear. You can collaborate, make uses of branches, and still end up with linear history in master!
- It is easier to revert a rebased (copied) commit instead of a merge!
- Cons:
- Rebasing loses some context since the commits re copied - you don't know the branch in which they were developped!
- If you are working on a branch with another person, rebasing is dangerous and should not be done since you may lose their work. Remember, you are creating a copy of all commits.
Workflows
- There are best practices for both the merging approach and the rebasing approach.
- Ultimately, it depends on what you want: do you want clear history or do you want to keep branch context information on merges?
- http://blogs.atlassian.com/2013/10/git-team-workflows-merge-or-rebase/ for a sample workflow of each approach.
- If rebasing seems confusing it is better to only stick to merging. Note that you may have to deal with more merge conflicts this way though.
Protip: Git stash!
- Suppose you are working on the next biggest feature, and you need to switch back to a different branch for something. You don't want to lose your work on the feature and you also aren't ready to commit yet.
- You can use the git stash to save your changes temporarily without committing!
To stash your working directory, simply do:
When you're ready to work on your changes again:
git stashgit stash applyMultiple Stashes
You can have more than one stash! To view all of them:
By default, apply uses the most recent stash. To apply a particular stash:
$ git stash list
stash@{0}: WIP on master: 049d078 added the index file
stash@{1}: WIP on master: c264051 Revert "added file_size"
stash@{2}: WIP on master: 21d80a5 added number to log
git stash apply stash@{2}Play around with this demo! It's super useful!
Copy of Copy of Copy of Copy of Copy of ECSE 321 - Tutorial 3
By dominiccharleyroy